Jump to content


Photo

Snap-41a Bullpup

One-Piece Springless Trigger/Catch

13 replies to this topic

#1 taerKitty

taerKitty

    Member

  • Members
  • 883 posts

Posted 05 June 2010 - 12:52 AM

Firstly, before the detractors leap in to say "That's not original!", here's the pre-emptive link to Carbon's Snap-4bp, including davidbowie's 3-D mockup of a bullpup longarm.

Secondly, it's a WIP. I got it to the firing stage and wanted to show a fellow NHer who tried to follow my emailed description during the build.

Lastly, it doesn't use the SNAP line's trigger or plunger assembly, but it's still a Snap in spirit, especially given the Snap-4bp, above.

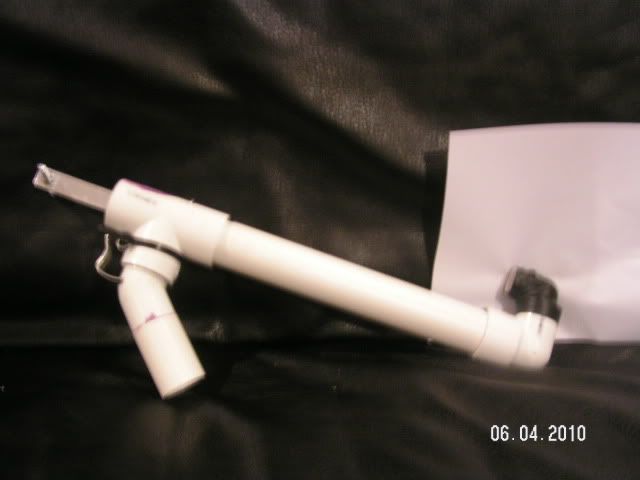
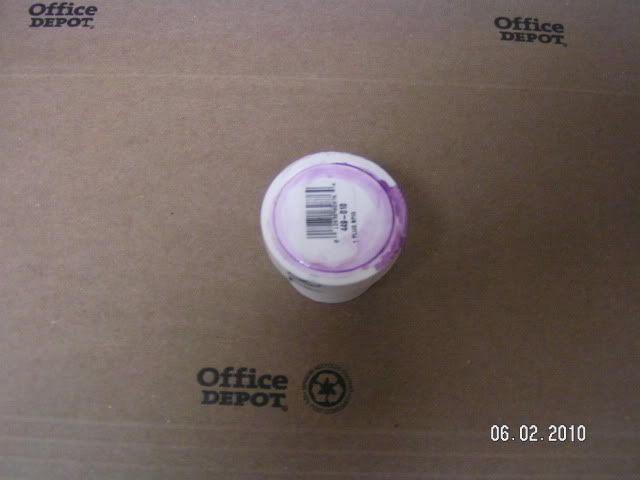
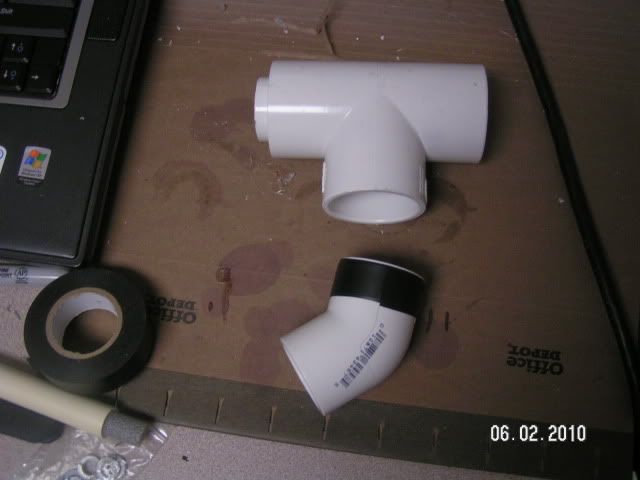
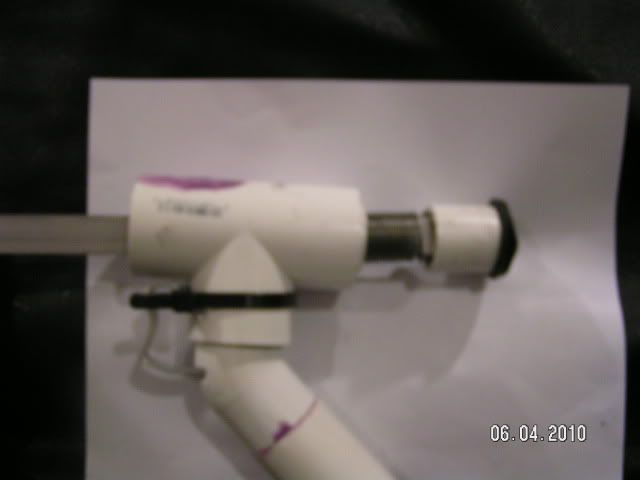
Let's jump to the chase. Here's what it looks like currently:

Posted Image


It ends in a 1/2" PVC elbow, ready to take whatever breech or magazine you want to throw at it.

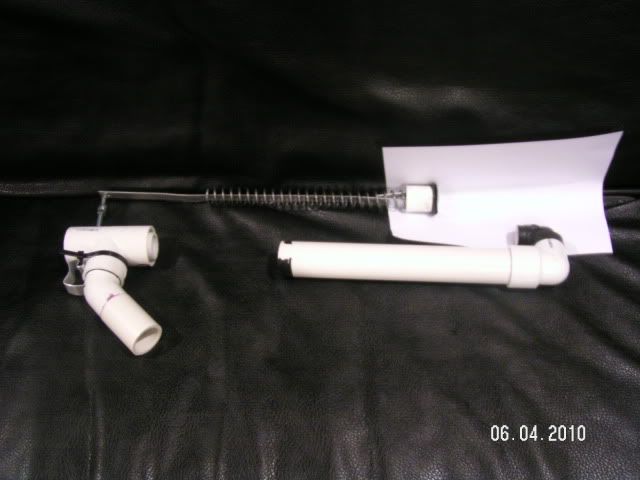
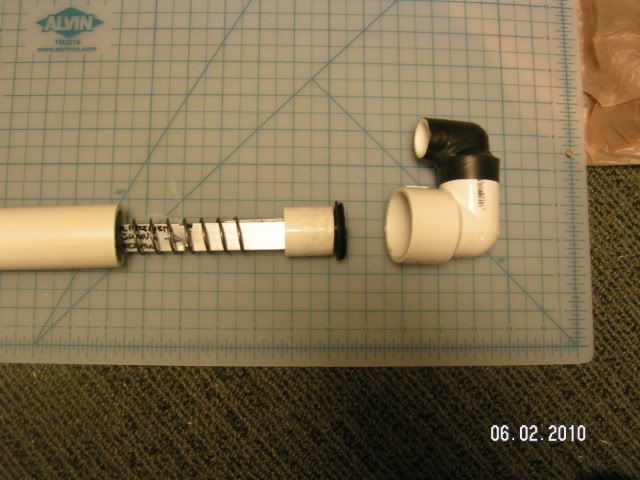
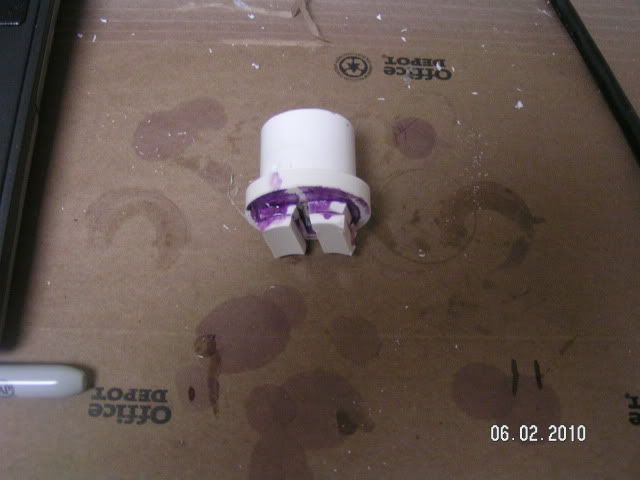
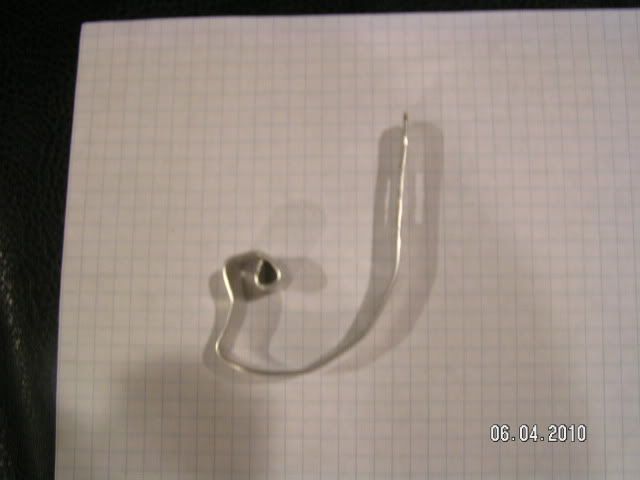
Here's the 'field stripped' image (field stripping consists of taking the cocking bolt at the front of the plunger rod off):

Posted Image


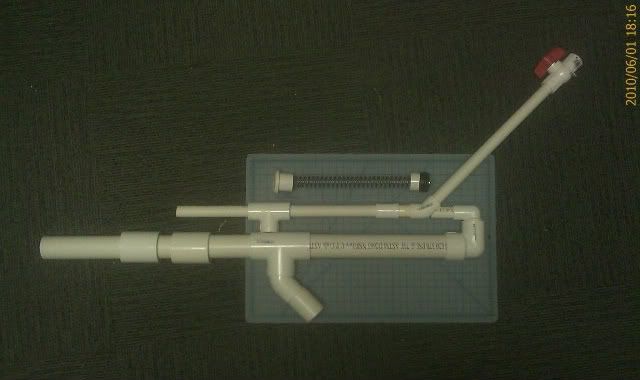
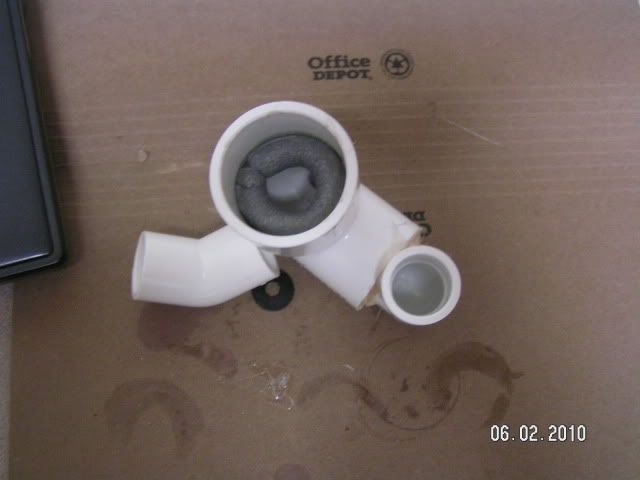
This shows the intended end product, with a pump-action fore-end to protect the rather vulnerable plunger rod:

Posted Image


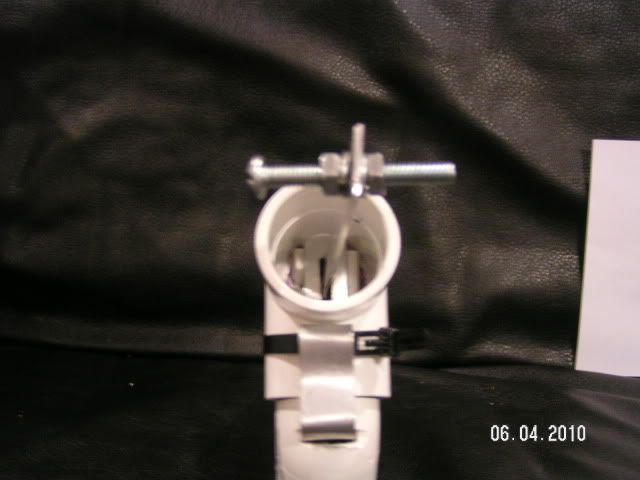
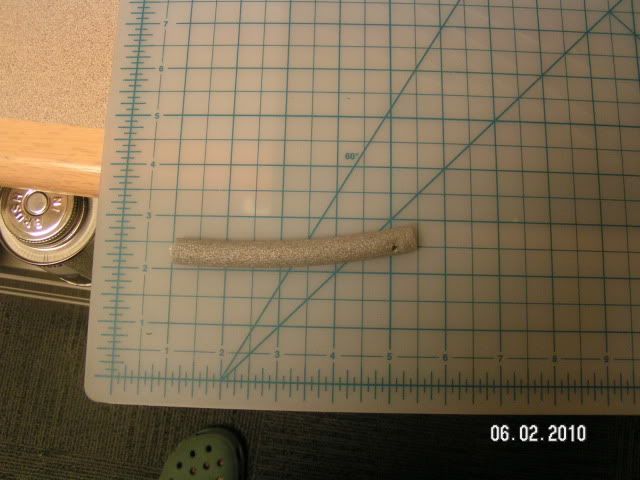
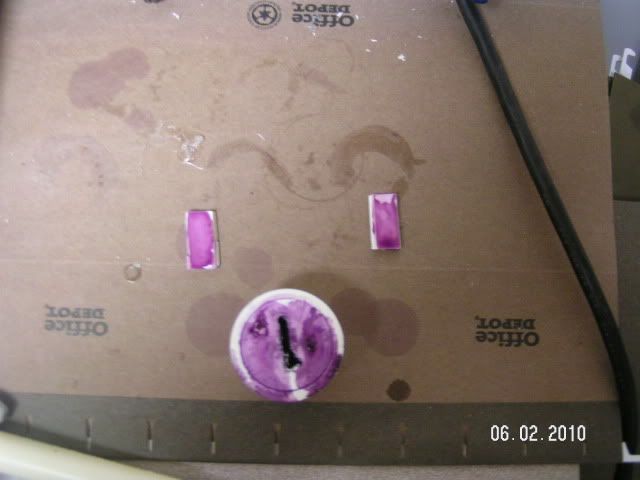
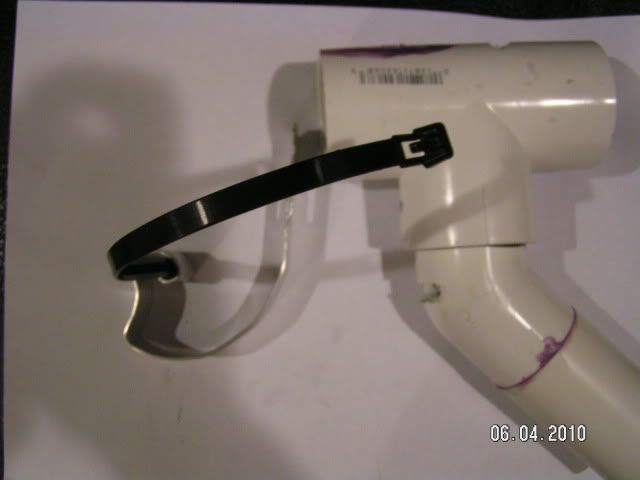
Here's the 'business end', showing the catch system.

Posted Image


===

Alright, let's start with the build. This will only cover the core unit, not the fore-end or hopper clip.

Tools and supplies:
  • Assorted files, large and small
  • Ratcheting plastic pipe shears
  • PVC primer and cement (Hot glue alone won't do)
  • Power drill with 3/16" and 1/4" bits
  • Hot glue gun
  • Electrical Tape
  • Tongue-and-groove pliers (two, preferably)
  • Plunger lubricant - I used silicone grease
  • Ruler
  • Calipers
  • Boltcutters
Parts:
1 Ace Hardware 1/4" ID Cone Washer TBD TBD
1 Ace Hardware 36" x 1/2" x 1/16" Aluminum Bar TBD $4.87
2 HomeDepot 1" PVC Schedule 40 Plug Spigot 449-010HC (745274) $0.96
2 HomeDepot Crown Bolt 3/16" x 1-1/2" Washer Neoprene 89378 (597960) $0.80
3 HomeDepot 3/8" Lock Washer, Medium, Galvanized 12806.0 (252898) $0.21
1 HomeDepot 1/4" x 2" Machine Screw, Round Head, Stainless Steel 10-pack 33272.0 (442276) $4.97
3 HomeDepot 1/4" Hex Nut, Coarse, Zinc 08426 (655414) $0.06
1 HomeDepot 3/8" Flat Washer, Zinc 25-Pack Bag 08054 (328154) $2.81
1 HomeDepot 1-1/4" x 1" PVC 90 Degree Elbow 406-168HC (743637) $1.38
1 HomeDepot 3/4" x 1/2" PVC Schedule 40 90 Degree Reducing Elbow Slip x Slip 406-101HC (610801) $0.63
1 HomeDepot 1-1/4" x 10 Ft PVC Schedule 40 Plain End Solidcore Pipe PVC 07100 0600 (312940) $3.46
1 HomeDepot 1-1/4" PVC Tee 401-012HC (294144) $1.27
1 HomeDepot 1" PVC 45 Degree Elbow 417-010HC (188034) $0.87
1 McMaster-Carr Continuous-Length Compression Spring Spring-Tempered Steel, 11" L, .844" OD, .08" Wire 9637K26 $10.49

HomeDepot.com part numbers are followed by the SKU in parentheses, which will also be used in the brick-and-mortar stores.

Total parts cost: just over $35 (not including tax for local purchases, and S&H for the springs from McMaster-Carr) However, the springs come 5 to a package, so the actual cost per blaster will be more like $17.50 when factoring in the number of blasters you can make with the multi-packs. Put another way, the $35 will buy you a lot of PVC and springs to make other Snaps.

Note: 1/2" PVC is shown in the 'end product' image, but barrelling material is up to you. In playing with it, I also had good results with OMC PETG shoved into a 1/2" CPVC coupler, and a foot of 1/2" CPVC crammed into a short length of 1/2" PVC. Dart fit and barrel material will vary based on your darts, hence the core unit only ends with the 1/2" elbow.

===

Handle

Let's start with the simplest part. Cut a 2" length of 1-1/4" PVC. This is where the ratcheting plastic pipe shears comes in handy. 30 seconds of grunting beats two minutes of cussing with a hacksaw. Of course, if you have a table or bandsaw, props to you.

Use the PVC primer and cement to attach it to the end of the 1" 45-degree elbow. Use some tape to keep in aligned, then leave it alone for however long the PVC cement can says.

===

Plunger

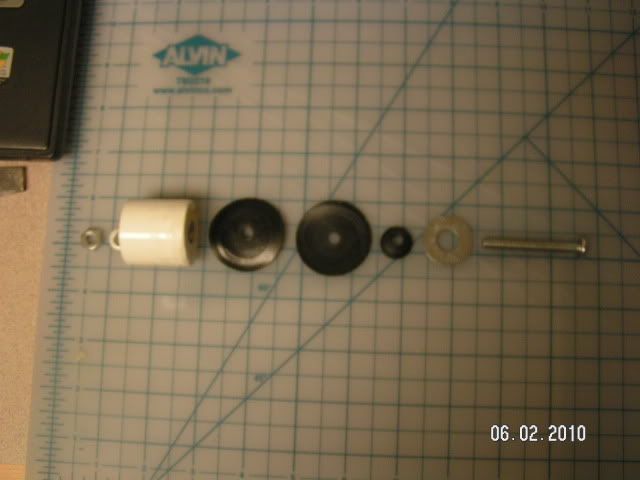
Take one of the 1" spigot plugs and sand it down so the slight lip around the end is gone. You should now have a giant PVC thimble. Drill a 1/4" hole in the center. Assemble the washer sandwich as follows:

Posted Image


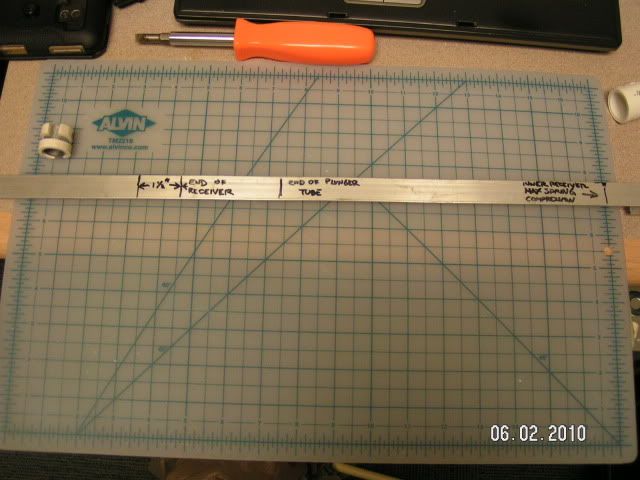
Take the aluminum bar and measure out a 1/2" interval 2-1/2" from the end. Ignore the 1-1/2" + 1" mark, that was for some bending that ended up not being needed.

Posted Image


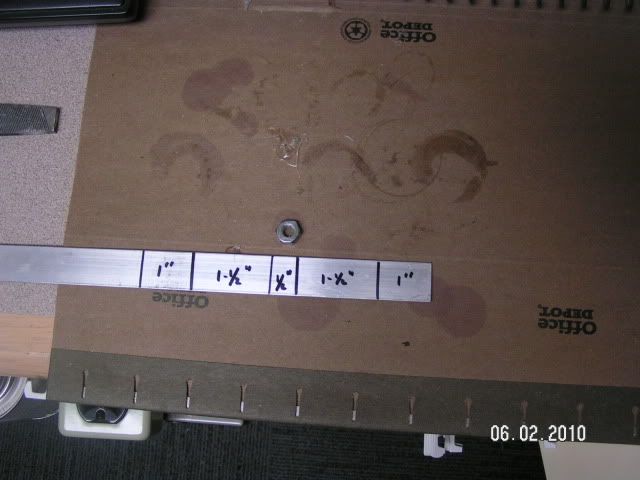
Bend it 90 degrees at the start of the 1/2" interval. Then drill a 1/4" hole in the middle of the interval, and finally bend it 90 dgrees at the end of the 1/2" interval.

Posted Image


Attach the plunger head to it by working the bolt through the hole in the bar, then thead on a lock washer and nut.

Posted Image


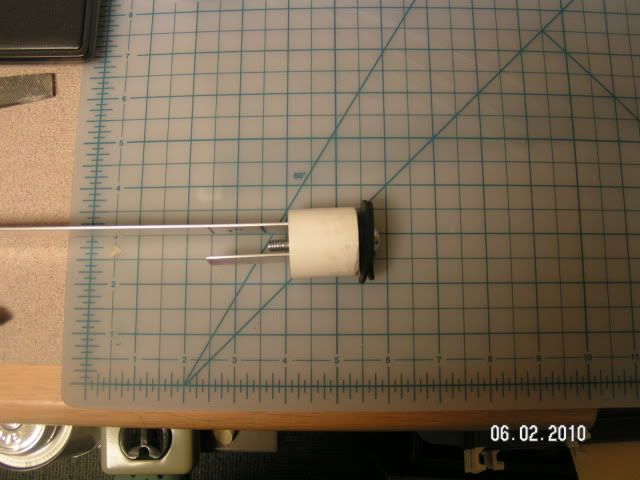
Insert plunger rod through the spring. It is a very snug fit, and should 'lock' under the 1" spigot plug so it doesn't rattle when un-primed.

===

(to be continued due to image count limit.)

Edited by taerKitty, 07 June 2010 - 09:05 AM.

  • 0
Fugly is a feature.

#2 taerKitty

taerKitty

    Member

  • Members
  • 883 posts

Posted 05 June 2010 - 12:58 AM

Plunger tube (rear)

The plunger tube itself is 12" of 1-1/4" PVC. The rear end of the plunger tube is formed by the two mismatched elbows. However, the larger one is reversed in the picture - apologies.

Posted Image


The OD for a 3/4" coupler or elbow approximates the OD for 1" PVC, so the two will nest nicely, but not airtight. What I should have done was wrap a collar around the 3/4" reducing elbow with some electrical tape, then PVC cement it into the 1-1/4" reducing elbow. What I ended up doing was mummifying the whole thing with e-tape after realizing the cement didn't form an airtight seal.

Next, cut a 4-1/2" long length of FBR:

Posted Image


Hot glue it into the 1-1/4" end of the elbow assembly:

Posted Image


Thread the plunger assembly tail-first through the plunger tube and cap it with the elbow assembly. You should find that it will not insert head-first into the plunger tube without you carefully forming the neoprene into a cup.

Posted Image


===

Plunger tube (front)

Take the 1" spigot plug and measure the height of the lip. Then insert it head-first into a length of 1-1/4" PVC until the underside of the lip is flush with the end of the pipe. Take the pipe shears and cut a ring of 1-1/4" PVC that is as long as the 1" spigot plug head is high.

Posted Image


Apply the PVC primer and cement, effectively expanding the lip for the 1" plug to the same OD as 1-1/4" pipe.

Posted Image


Take the 3/16" bit to the power drill and drill a series of holes across the diameter of the 1" spigot plug, then use the smaller flies to smooth out the cuts, creating a slit 1" wide, enough for the 3/4" aluminum bar to pass through smoothly. Then, cut out four 1" x 1/2" pieces of PVC. I cut a 1" ring of 1-1/4" pipe, then snipped them into 1/2" wide slugs. Scrape off the label. Apply PVC primer and cement to the face of the 1" spigot plug and the top & bottom of one pair of PVC slugs

Posted Image


Glue the PVC slugs to either side of the slit, then apply PVC primer and cement to the underside of the next set.

Posted Image


Place the 1" spigot plug on the end of the pluger and pull the spring to its maximum compression, then mark where that is relative to the top of the PVC slugs cemented to the front of the spigot plug.

Use the boltcutters to cut a 1/4" x 1/4" notch 1/4" beyond the point of maximum compression. If it is to be a beveled notch, make sure the flat side is furthest from the plunger head, and the sloping side is closer to the plunger head.

Posted Image


===

(to be continued due to image count limit.)

Edited by taerKitty, 06 June 2010 - 10:25 PM.

  • 0
Fugly is a feature.

#3 taerKitty

taerKitty

    Member

  • Members
  • 883 posts

Posted 05 June 2010 - 01:00 AM

Receiver and Trigger

Hm. I don't have a good picture of how the 1" spigot plug goes into the 1-1/4" PVC tee. This one shows it in place, and the 1" elbow about to be inserted. (No, this doesn't have the 2" of 1-1/4" PVC handle attached yet.)

When inserting the 1" spigot plug, make sure the slit is vertical relative to the bottom of the PVC tee.

Posted Image


Assemble the plunger and receiver. Lubricate the plunger and test it. The aluminum rod should slide freely. With the spring at full extension, measure 1-1/2" beyond the end of the receiver, and cut the bar there. Round the edges with the file. Drill a 1/4" hole 1/4" from the end and sides of the bar for the cocking handle.

Remove the plunger tube and plunger and set them aside. The 1" spigot plug should be trapped in the back of the receiver. Leave it here.

The trigger is a bit tricky. It will be mounted to the outside of the receiver, and with the calipers, we can subtract the wall thickness of the 1-1/4" tee and 1" 45-degree elbow. Given that we're Flintstoning it with the trigger anyhow, 1-1/2" radius seems about right for the lower-right quadrant of the trigger.

Posted Image


Start with the pivot - using the pliers, wrap the aluminum bar around one of the 1/4" bolts to form the loop. then shape it into an overly large trigger that ends appx 1-1/2" below the pivot, form the rounded lower-right quadrant, then leave the end long.

Lay the receiver on a sheet of graph paper, trace its outline, place the pivot where the trigger goes, and measure the height to the top of the receiver. Cut it and round it off.

Use the edge of a file to cut slits for the trigger, one where it will enter the handle and one where it will exit the top of the receiver. Use the caliper to determine how deep the front end of the plunger tube (and PVC slugs) rests from the front of the receiver and cut a slot there.

Posted Image


Insert the trigger through the lower slot. It should scrape against the inside back of the handle. When in place, it should be springy from the aluminum flexing. With this prototype, it is normally level with the outside top of the receiver, and extends beyond it when the trigger is squeezed.

Posted Image


Use a wire tie to affix the trigger at the pivot. Use a second one to simulate pulling the trigger. Use the pointed tip of a small file to scratch into the back of the trigger the position of the slot in the 1" spigot plug. Remove the wire ties and remove the trigger from the receiver. Use the 3/16" bit to drill a series of holes corresponding to the 1" spigot plug's slot when the trigger is depressed. Use the smaller files to smooth down the holes into a 1" x 3/16" slot.

To clarify, here is a picture of the trigger when the blaster is primed. Notice the small black gap at the bottom of the trigger's slot. This means the notch in the trigger is lower than the notch in the spigot plug, so the top of the trigger slot will catch on the notch in the plunger rod.

Posted Image


Here is a picture of the trigger depressed. Notice that the slots are congruent. This means the notch in the plunger bar is free of the trigger, so the plunger bar will slide home.

Posted Image


Here is a picture of the receiver only with the spring compressed.

Posted Image


===

Putting it all together

Insert the plunger and tube into the receiver, taking care that the notch in the plunger rod is on the top. Once in, spin one of the 1/4" nuts to slightly past the middle of the 1/4" x 2" bolt, drop a lock washer on top, then insert through the 1/4" hole at the end of the plunger rod. Complete the plunger rod sandwich with another lock washer, topped off by a second 1/4" nut. Use the pliers to tighten the nuts until they are rigid.

At current time, the core unit is not sealed up with PVC cement. This means that priming the blaster can be a little tricky. Holding onto the plunger tube will result in the receiver and plunger gliding out of the plunger tube with a little 'plop.' And, remember, the plunger head won't go back into the tube head-first without a lot of fiddling.

For test firing, I've found it best to place my hand against the front of the receiver with the plunger bar protruding between two fingers, then using the other hand to haul at the cocking bolt until I hear that soft latching sound.

===

Deviations from the standard Snap design
  • Overall

    Pros:
    - Lighter plunger mass.
    - Requires a good deal less work.

    Cons:
    - Not compatible with standard Snaps.
    - Extremely expensive - costs approximately $9 per blaster. That's over half of the blaster's per-unit cost, which factors for the portion of the consumables actually being used vs. the purchase cost.
    - Looks and feels different than a 'real' blaster handle and trigger.

  • Plunger head
    Pros:
    - Requires no sanding.

  • Plunger rod
    Cons:
    - Aluminum bar costs $5.
    - A boltcutter (the tool I used) is not commonly part of the Nerfer's toolbox.

  • Catch / trigger
    Pros:
    - Single piece.
    - No spring.

    Cons:
    - 3/4" wide trigger feels 'fat'.

  • Receiver / handle
    Pros:
    - Does not require sawing PVC lengthwise.

    Cons:
    - Cylindrical cross section feels very 'fat' in the hand.
    - 1" plug, 1-1/4" tee, and 1" 45-degree elbow total to $4 and change.
===

Author's notes

I am surprised by the simplicity of this blaster. The trigger-and-catch system is a single strip of metal and a zip-tie. There is no spring, no sliding block, no separate catch. Trigger release is very clean, and the pull is light, steady and straight.

Performance varies. This is my first homebrew, so I'm sure I'm missing some critical considerations. I'm getting 50+' with 15" of CPVC, but I've not played with dart weight, barrel length, etc yet. I just wanted to see if it worked.

The plunger head works very well. When I place a cap over the end of plunger tube, the plunger slowly descends. It's not airtight, but, given the internal imperfections of PVC piping, it's still pretty good that it can retard a [k26] spring.

I just reviewed the original Snap-1's writeup more carefully. I need to try 3/4" endcaps next time!

Edited by taerKitty, 07 June 2010 - 08:51 AM.

  • 0
Fugly is a feature.

#4 TantumBull

TantumBull

    Member

  • Moderators
  • 1,929 posts

Posted 05 June 2010 - 01:25 AM

Excellent build, Tim. I love how different and alternative this homemade is, and am really glad to see it all come together after the back and forth emailing. Also, the trigger is awesome.

As for performance, I noticed that the spring rest only has that small slot for the aluminum bar. I'd guess that flow isn't optimal with the bar inserted and you may be getting somewhat of a vacuum building behind the plunger upon firing. Try drilling some portings into back of the plunger tube that will just hold the compressed spring and that the plunger head won't ever reach.
  • 0

#5 polycarb

polycarb

    Member

  • Members
  • 41 posts

Posted 05 June 2010 - 07:25 AM

In the writeup, when talking about making a slit for the plunger rod to pass through, you say to drill a series of 3/8 holes. The slit in the picture doesn't look 3/8 in wide. If the plunger rod is 1/16in thick, you shouldn't need 3/8in for it to pass through. Maybe 1/8 inch would be appropriate.

But otherwise, very nice. I fear that the plunger cushioning on the 1+1/4 to 1 elbow might fall off. Is there a lip on the elbow that prevents this?

I really like your catch design. It's so simple. However, I would be afraid of it bending out of shape and not catching.
  • 0

#6 taerKitty

taerKitty

    Member

  • Members
  • 883 posts

Posted 05 June 2010 - 09:56 AM

As for performance, I noticed that the spring rest only has that small slot for the aluminum bar. I'd guess that flow isn't optimal with the bar inserted and you may be getting somewhat of a vacuum building behind the plunger upon firing. Try drilling some portings into back of the plunger tube that will just hold the compressed spring and that the plunger head won't ever reach.

Good point! I'll give it a try in a day or two and let you know.

In the writeup, when talking about making a slit for the plunger rod to pass through, you say to drill a series of 3/8 holes. The slit in the picture doesn't look 3/8 in wide. If the plunger rod is 1/16in thick, you shouldn't need 3/8in for it to pass through. Maybe 1/8 inch would be appropriate.

If I had a scroll saw, it'd probably be a 1/8". (Then again, if I had a scroll saw, I'd be playing with a plusBow!) However, trying to get a bunch of holes in a row without a drill press probably would've resulted in a 3/8" slot regardless of the starting bit size. :P

Edit: You're right. I meant to say 3/16". Thanks!

I fear that the plunger cushioning on the 1+1/4 to 1 elbow might fall off. Is there a lip on the elbow that prevents this?

Nope. The hot glue keeps it in place until the plunger tube pinches it when the tube is seated in the elbow.

I would be afraid of (the aluminum) bending out of shape and not catching.

It's indeed a risk. The aluminum could be deformed, say, if the user were to take a digger. I may take some 2" PVC and form a trigger guard.

As for the catch, it has only 1/4" of travel, so there shouldn't be much risk to it from ordinary use.

===

Next steps
  • Dart stop in the elbow. Done. Drilled a hole across the elbow just beyond the stop, secured a wire across it, sealed the holes with hot glue and e-tape.

  • Pump-action fore-end. Protect the plunger rod and make the priming action more natural.

  • Various breeches/magazines. Right now, it's a singled blaster.

  • Forward barrel guide. PVC is inherently flexible, so putting a 3/4" tee at the top of the receiver should keep it from waving too wildly. Does anyone know where I can buy a 1-1/4" PVC saddle?

  • Drill out some vents as per TantumBull's suggestion to see if that helps.

  • Try some different lube - Tri-flo seems to need repeated application. Any recommendation for something that's rubber- and PVC-recommended? Done. I'll be using Silicone Grease from now on.

  • Add some latches to keep the plunger tube attached to the receiver.

Edited by taerKitty, 06 June 2010 - 11:02 PM.

  • 0
Fugly is a feature.

#7 CA13

CA13

    Nude Nerfer

  • Members
  • 234 posts

Posted 05 June 2010 - 05:40 PM

Posted Image


CROCS, ARRGHH.... MY EYES!

Well, fashion aside, you got a pretty potent homemade going on here. You could probably simplify this with a non-rigid plunger tube and a catch made with a keyhole like notch where a bead could enter and rest in the notch. Off to my workshop, I guess.
  • 0
Doing this as I speak. I have no idea when I got it...my DAD got it some 15 years ago, but that doesn't matter. Anyways, it keeps jerking around all over the place. I try to hold it with a rag...It doesn't look like...much.

#8 taerKitty

taerKitty

    Member

  • Members
  • 883 posts

Posted 05 June 2010 - 11:00 PM

CROCS, ARRGHH.... MY EYES!

Well, fashion aside, you got a pretty potent homemade going on here. You could probably simplify this with a non-rigid plunger tube and a catch made with a keyhole like notch where a bead could enter and rest in the notch. Off to my workshop, I guess.

Whoops! I try to keep 'me' out of the pictures, just for that reason. Normally I wear sneakers, but was just feeling like Crocs that day.

Unsure what you mean by a 'non-rigid plunger tube', would love to see the results of your workshop jaunt. I'd love to see the keyhole/bead catch, too.

The one-piece catch was a surprise to me. I was expecting to have to add a spring behind the trigger to cause it to latch, but the inherent springiness of the aluminum and the fact it was measured to abut against the inner wall of the handle caused that happy coincidence.

I'm still looking for a good lube. While Tri-flo is rubber-safe, it seems to just evaporate, forcing me to constantly re-apply. And, with the rear elbows now semi-permanently affixed to the plunger tube, re-applying the lube means popping out the plunger, then slowly nudging the neoprene back in.

Edit: Thanks to jwasko, TantumBull & JSB for the recommendation to upgrade to rubber-safe grease.

Edited by taerKitty, 06 June 2010 - 11:03 PM.

  • 0
Fugly is a feature.

#9 jwasko

jwasko

    PowerBeard

  • Moderators
  • 1,021 posts

Posted 06 June 2010 - 01:28 AM

Try to find silicone grease. Make sure that it advertises as "rubber safe" and/or "petroleate free" (that may not be how you spell petroleate).

It usually comes in a small white container. I think I've seen it Lowe's...check hardware stores, too.
  • 0

-Jwasko, STILL Sole Surviving member of Steel City Nerf and Sober Sister of the Sex Dwarves
We NERF ON all day, and FUCK OFF all night


#10 TantumBull

TantumBull

    Member

  • Moderators
  • 1,929 posts

Posted 06 June 2010 - 01:35 AM

Yep, silicone grease is the way to go. As for the lube you've been trying, it may be spray-on dry lube (a paradox, I know). Basically it just dries up real fast.
  • 0

#11 taerKitty

taerKitty

    Member

  • Members
  • 883 posts

Posted 06 June 2010 - 03:09 AM

Yep, the local Ace was out of the grease, but I found a spray silicon lube that, if anything, performed even worse than the Tri-flo.

I'll try to find some at Fred Meyer's (a Target-like superstore that's local to Seattle).
  • 0
Fugly is a feature.

#12 ModSquad

ModSquad

    Member

  • Members
  • 102 posts

Posted 06 June 2010 - 08:14 AM

Wow, just wow. Looks great, gets good ranges, and is simple. Very nice work.
  • 0
QUOTE
"Roger Ten Niner, we got a rainbow four klicks out. I'm casting the rod."
"Roger Squad Leader. Sending in back up."
"Roger Ten Niner. We have a confirmed bite. I repeat, a confirmed bite"
"Good job boys, lets real it in and go home"

#13 Carbon

Carbon

    Contriberator

  • Moderators
  • 1,894 posts

Posted 06 June 2010 - 09:55 PM

I like your take on the backwards plunger system! The reversed design tends to be a bit fussier, but it's a whole lot of fun to use....it's my favorite blaster after the SNAP-1 (and that's just because the 1 is more reliable). I'm looking forward to seeing the finished blaster, and if you're able to get a true pump action to work, with just a sleeve and not an actual handle. The future hopper is also a nice addition....gotta try that.

I know it's a WIP, but have you tried a shorter barrel? I'd guess that 15" is way long for a reverse design, what with the dead space. With an inline, my current barrel is only 4" long for 50-80' ranges. The [k26] should be able to double both of those numbers....and also be a real bitch to prime with a reverse plunger.

Unrelated side note: I initially said that the BP in SNAP-4bp was for BullPup. In retrospect, it makes a lot more sense (and is more accurate!) for it to just stand for Backwards Plunger.
  • 0
Hello. I am Indigo of the Rainbow Clan. You Nerfed my father. Prepare to die.

#14 taerKitty

taerKitty

    Member

  • Members
  • 883 posts

Posted 06 June 2010 - 10:55 PM

Wow, just wow. Looks great, gets good ranges, and is simple. Very nice work.

Much thanks. Ranges aren't set in stone yet. Carbon gave some good suggestions on barrel length, and I'm still playing with dart-barrel fit. Oh, and that hopper will probably decrease ranges somewhat, too.

Stop looking at spray anything. No matter what's inside -even if the label says it's safe for plastics- the propellant probably is not.

Roger wilco. Purchased some Faucet & Valve Grease (Master Plumber brand at True Value Hardware, UPC 78864 40368, appx $3 for 1 oz.) and Silicone Grease (same brand and location, UPC 78864 50095, appx $6 for 0.5 oz.). I'm using the former and it's working very well, but what's the difference between the two (aside from 4x the price per unit volume?)

I like your take on the backwards plunger system! The reversed design tends to be a bit fussier, but it's a whole lot of fun to use....it's my favorite blaster after the SNAP-1 (and that's just because the 1 is more reliable).

Much thanks - it looked pretty interesting. My next one will be a traditional 'hockey stick' form factor. I have the plunger tube already formed, etc.

What reliability issues have you encountered with the backward plungers / bullpups?

I know it's a WIP, but have you tried a shorter barrel? I'd guess that 15" is way long for a reverse design, what with the dead space. With an inline, my current barrel is only 4" long for 50-80' ranges.

That makes sense. Performance varied wildly when I was using the Tri-flo, by the way. One time, 15" of CPVC lodged a Tagger Stefan in a side of a cardboard box, but I was never able to repeat that. I know I'm doing something wrong, given my anemic ranges compared to other [k26] homebrews. (As verified by what you say next.)

The [k26] should be able to double both of those numbers....and also be a real bitch to prime with a reverse plunger.

It is. I think I'll switch to a 1-1/2" reducing tee instead, so I can work a vertical fore-grip into the design. I've found that CPVC fits nicely over 1/4" hex nuts and bolts, so my priming handle isn't raping my fingers when I pull it anymore, but I can't see myself having any easier time with a horizontal tube alone (which was what the 2 x 1-1/2" couplers were going to be.

Unrelated side note: I initially said that the BP in SNAP-4bp was for BullPup. In retrospect, it makes a lot more sense (and is more accurate!) for it to just stand for Backwards Plunger.

It could, but in this case, I think I'll keep the bullpup designation, as the plunger tube assembly approximates a buttstock. It's a trifle long - the stock throw (distance from front of handle to rear of stock) is over 15", which is at least 2" too long for my comfort. Moreover, it lays out the blaster like a real bullpup does - breech, action, and magazine are set in the fixed stock, and barrel starts behind the handle.
  • 0
Fugly is a feature.


0 user(s) are reading this topic

0 members, 0 guests, 0 anonymous users