Jump to content


Photo

Deluge Tanks Doubleshot Mod

Picture heavy warning!

16 replies to this topic

#1 Phree Agent

Phree Agent

    Member

  • Members
  • 402 posts

Posted 09 June 2010 - 04:28 PM

Phree's Doubleshot Mod: Make your doubleshot not suck....as bad

Main Objectives:
1. Functional break action loading system
2. Keep ability to fire both barrels independently
3. Ranges of at least 50 feet
4. Be cheap

Secondary Objectives:

1. Look as close to stock as possible
2. Be aesthetically pleasing

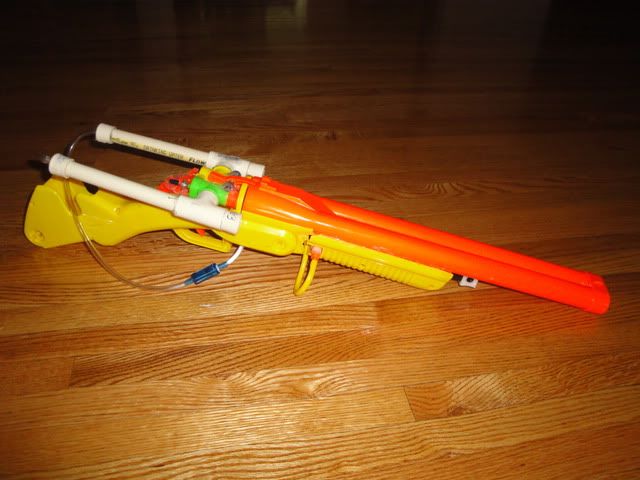
All objectives were met, minus the subjective opinions that it is not aesthetically pleasing.

Business:

1. Get air tanks

I chose the Super Soaker Deluge tanks because they were small enough to not require a total shell overhaul for the DS and were cheap. Any other tank could be used I guess, you would just break the "Cheap" objective and it would require some extra structural steps.

Posted Image

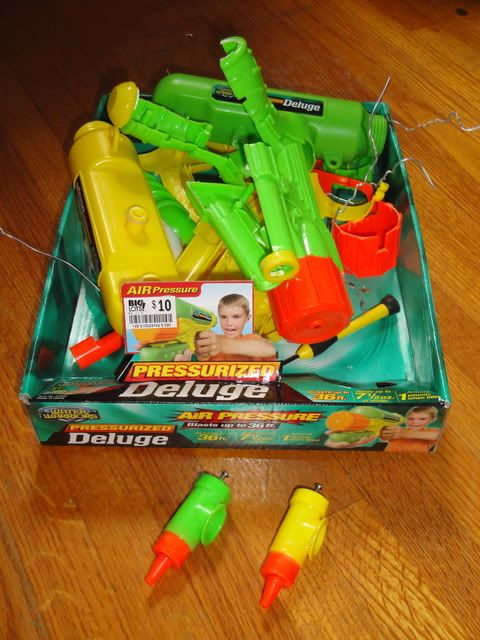
First disassemble the pair of Deluge blasters and salvage the tanks. Also save the triggers, we will need those later. The rest is unneeded for this mod.

2. Assemble tank expansions


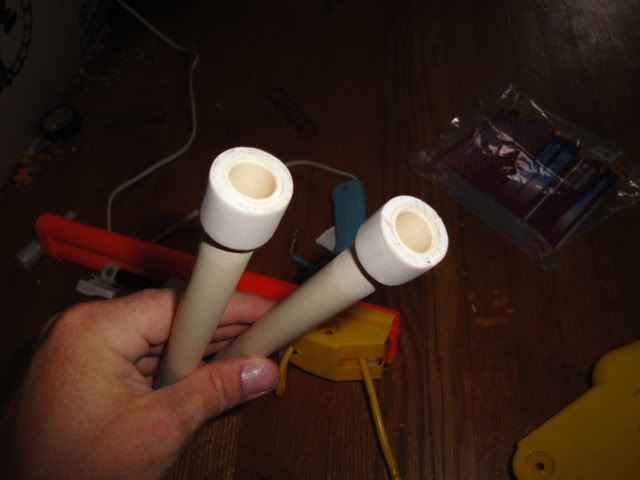
I did not test these tanks without expansions, but based on size I figured they were worthless without the extra volume. I used cpvc and various cpvc fittings to create my tank expansions.

Posted Image

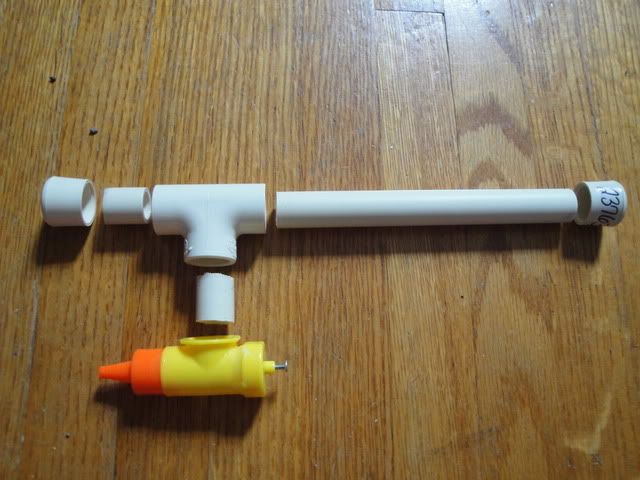
This picture shows the expanded view of my tank expansion. The length of the expansion could be changed if you wish.

Posted Image

Drill 1/4 holes in 2 of the endcaps for the air input. These endcaps could be used as the front of the tank expansion, or the back depending on how you want to run your tubing. I chose to do mine from the back because originally I was going to run my tubing internally.

Posted Image

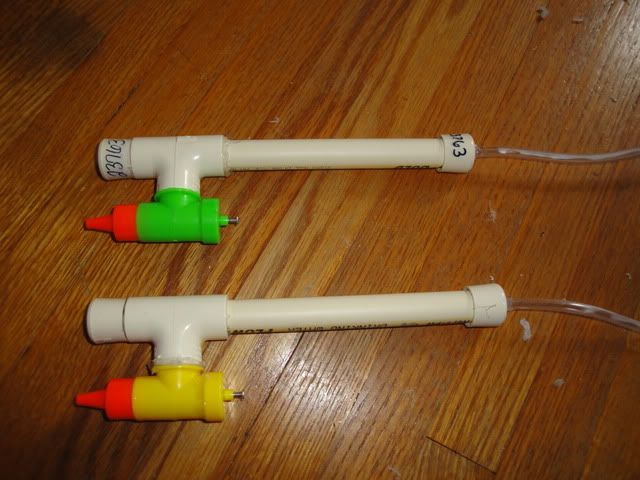
Glue your tank expansions together and attach your 1/4 tubing to the end using whatever glue/attaching process you like the best. I used superglue for the joints, then sealed over those with hotglue.

Posted Image

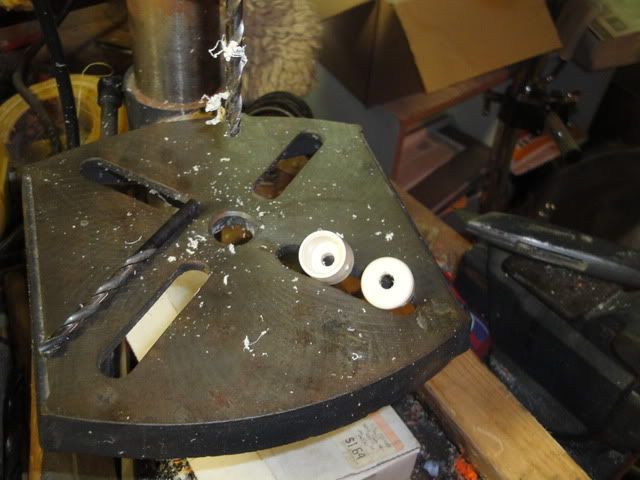
Next cut off the nubs on the end of the original tanks. Leave a little more than 1/8 inch of the nub so that it fits nicely into the double shot plate. (This will become clearer in the next picture)

Posted Image

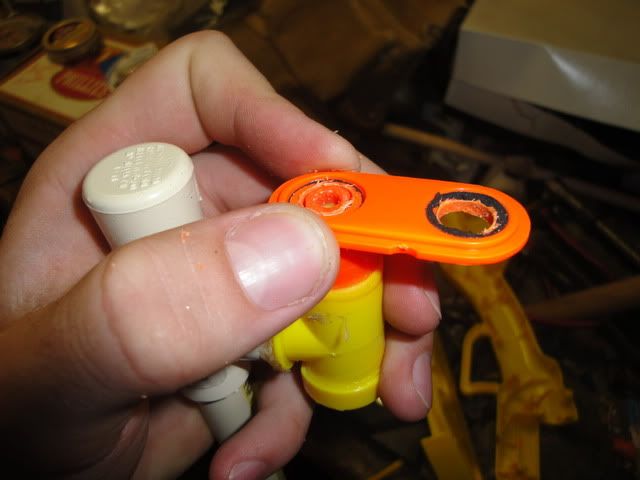
I forget which bit I used, but drill out the orange plate from the DS until the tank nubs fit nicely in it on both sides.

Posted Image

Glue the tanks onto the plate. It should look like this when finished.

3. Preparing the DS shell for the tanks


Posted Image

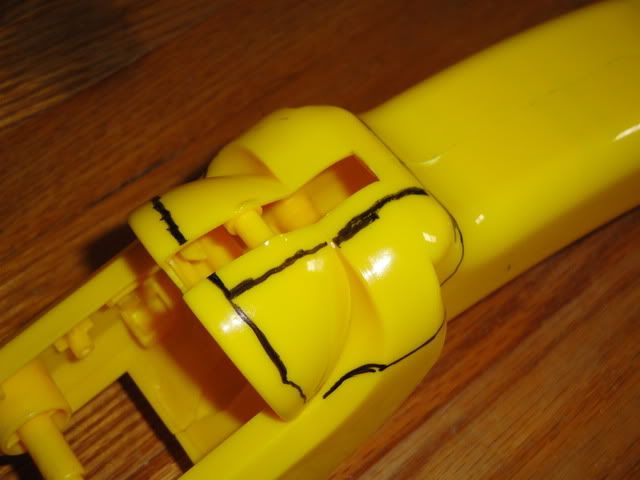
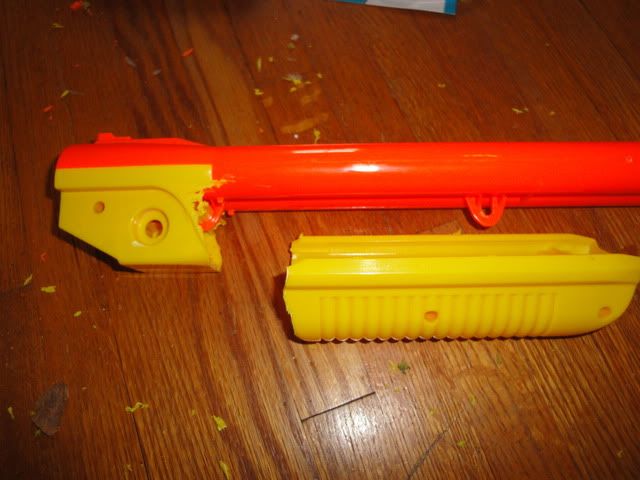
Mark off your DS shell, and cut it with your cutting disk on your dremel. If you have no dremel.....a hacksaw MIGHT work here. (NOTE: The black line down the middle of the piece I am cutting off is obsolete. Cut along the bottom line)

Posted Image

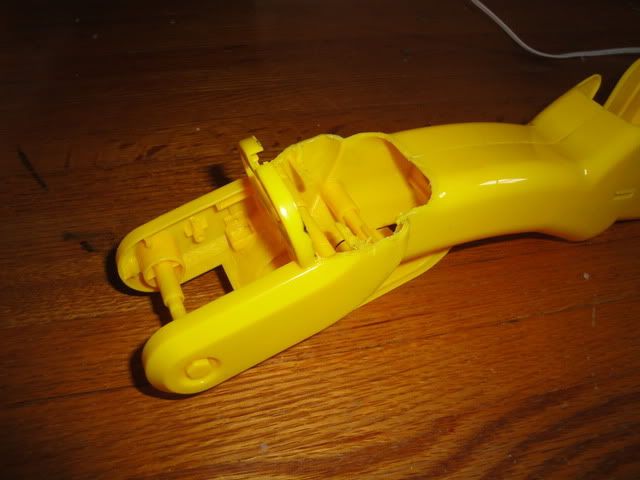
This is what the shell should look like after cutting. Clean the edges up with an exacto if you so please.

Posted Image

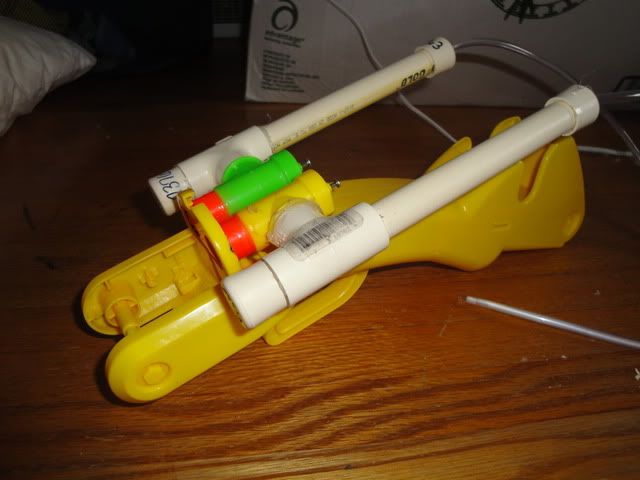
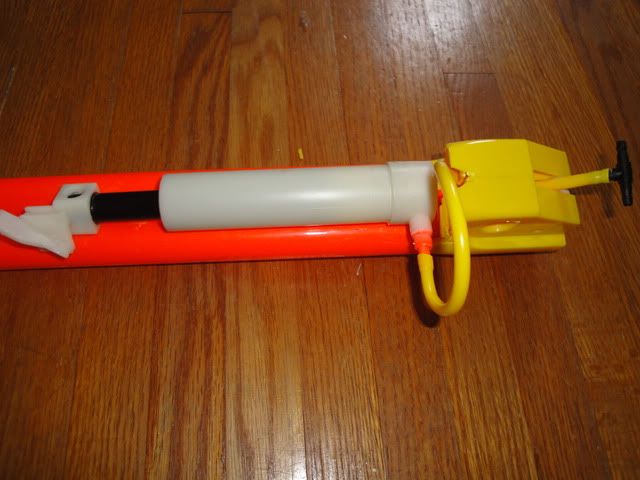
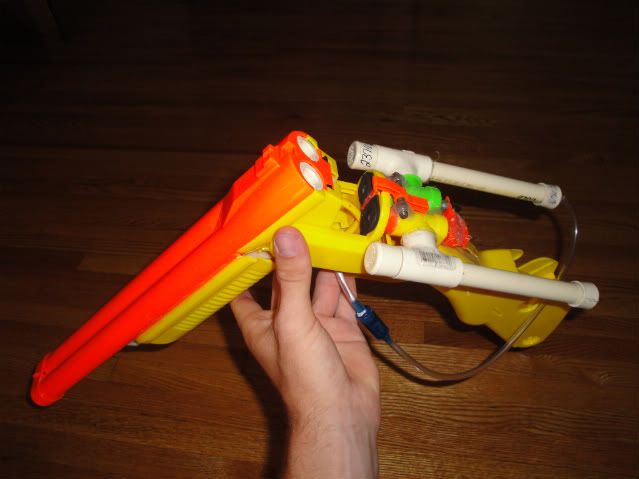
Dry fit your tank assembly in the newly cut shell. If the sides of the DS shell need to be cut down slightly to accommodate the expansions do so with a knife. The tanks should be supported by the shell though, not just hanging on the front plate.

4. Trigger assembly


DISCLAIMER: Before I say how I did the trigger, I would like to say that there are probably better ways to do this part of the mod. Mine was a lot of guess and check and the finished product is still inconsistent at times and finicky.

First get the pair of triggers from the Deluge blasters.

Posted Image

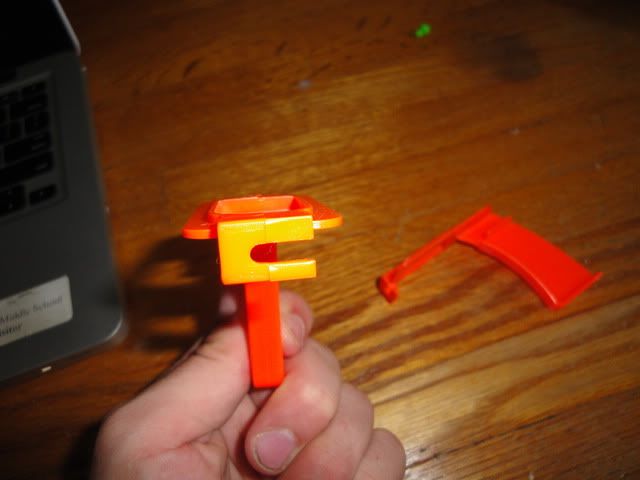
This piece of the trigger pulls the tank pin. Cut the "U" peice off the rest of the trigger. Do this for both triggers.

Posted Image

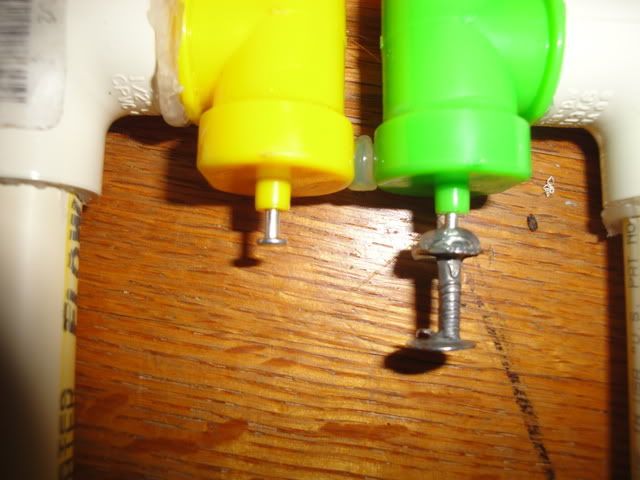
Next, I had to extend the trigger pin on one of the tanks so that I could have the independent trigger pulls. I used a nail, but there are probably countless ways to achieve this same effect.

The next part of the mod is difficult to describe because I just used the guess and check method to cut what needed to be cut, and glue pieces where they needed to be glued. Like I said earlier, if you try to recreate this, this is probably the part where you could find a better way to rig the trigger. Good luck to you. Hopefully my pictures help to show how I did mine, and I will try to describe what is going on as well.

Posted Image
Posted Image

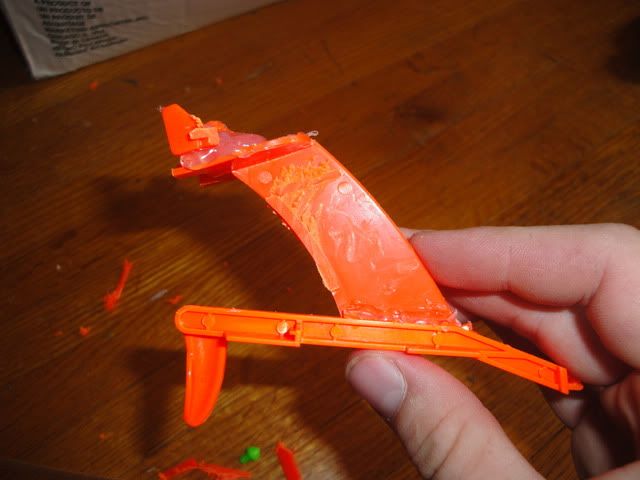
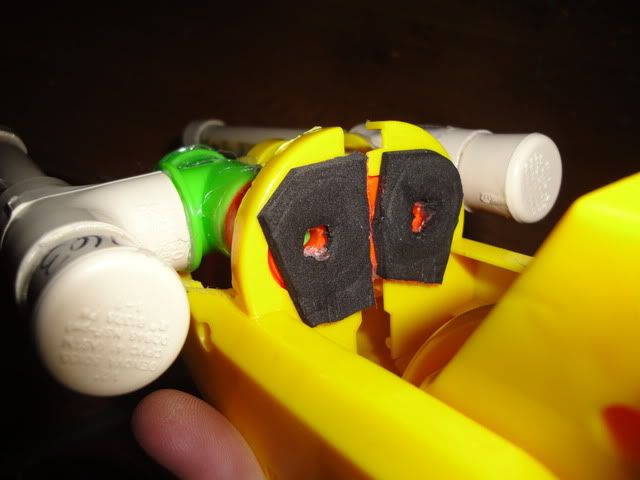
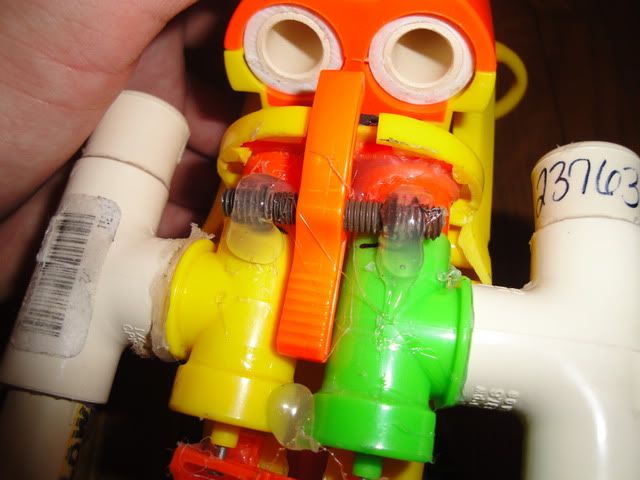
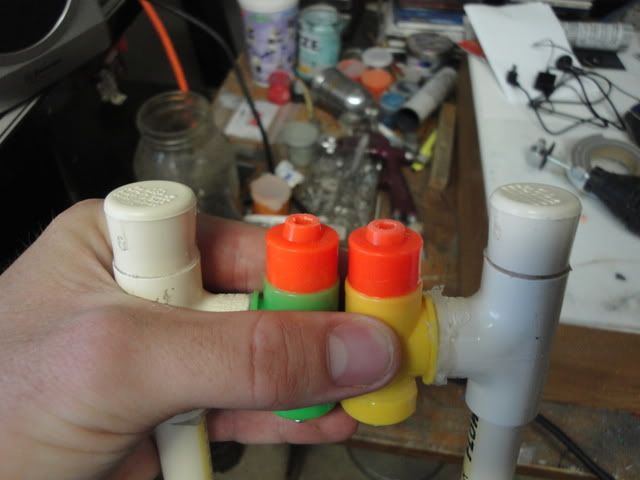
Essentially what has happened here is that I used the rest of the Deluge trigger and glued that onto the doubleshot trigger. I had to cut the Deluge trigger at an angle so that when the DS trigger is in the blaster, the "shelf" that holds the "U" pieces is parallel to the tank pins. I then dry fit the "U" pieces on the "shelf" so that one pulled the first tank pin immediately, and the second "U" was staggered back about 1/8 inch behind the first one.

Posted Image

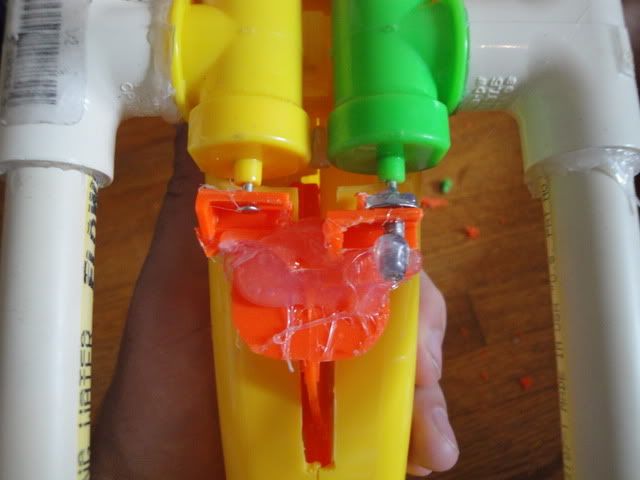
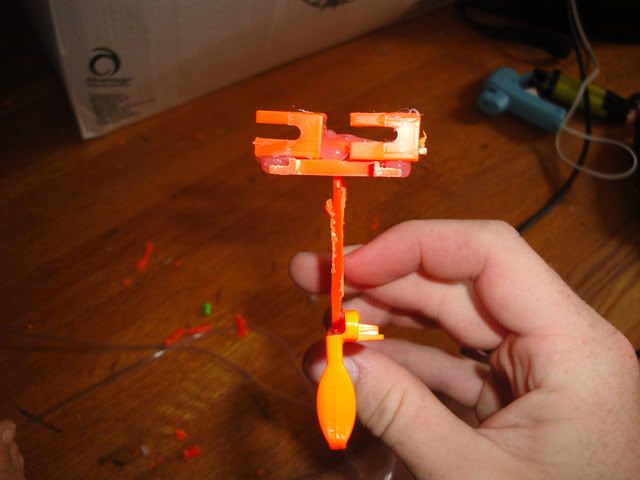
You can see in this picture that the first "U" (left side) is ready to immediately pull the pin when the trigger is pulled. Then the second "U" (right side) must travel about 1/4 inch before it starts to pull the second tank pin.

CONTINUED DUE TO PICTURE LIMIT! DON'T POST
  • 0

#2 Phree Agent

Phree Agent

    Member

  • Members
  • 402 posts

Posted 09 June 2010 - 04:30 PM

5. Shell Modification

Posted Image

I cut the foregrip from the DS off using my cutting wheel on my dremel. Originally I planned to use that foregrip to pump the blaster, but I later decided to just let it be a stationary cover for the pump tube. Dremel out the insides/ create a hole in the front for the pump to protrude from depending on what pump you are using. Then glue it on.


Posted Image

Next glue your pump of choice to the underside of the DS shell. I used a SM3k pump because that is what I had laying around. Other pumps would have been better, but harder to cover with the DS shell piece that you just cut off. Then feed your 1/4in tubing (I used stock AT3k tubing for this part) through the DS shell and out the back. Attach a "T" connector as shown to the end of this tube. When connecting the two tubes from the tank expansions, you will need to put a check valve on each before connecting them to the "T".

6. Barreling/tweaking


Posted Image

Here I used eight inches of 1/2in cpvc for my barrels and cut two rings of 1/2in PVC (sanded out slightly) to keep the barrels centered. Then gut the shell ejection system out of the DS shell and slide the barrels and stabilizers through the back of the DS and glue into place. Make sure the barrels come flush with the edge of the hole so that a good seal is achieved from the tanks.

Posted Image

Next, I added some craft foam on the front of the tank plate in order to create a good seal when the DS is closed up.

Posted Image

I found a bolt that fit the stock DS latch well and cut the head off of it. Then I dry fit the latch and bolt while I closed the DS hinge tightly against the foam. Mark where you need to glue on the bolt, then glue it.

With a little tweaking and fiddling with the trigger system you will be finished (and by little tweaking I mean: possibly redesigning and building)

Finished product:

Posted Image
Posted Image

Paintjob is on the way!
Ranges are in the 70s for both barrels. I am having a hard time getting the shots to fire independently consistently. My trigger needs some work still, but it works most times. All my objectives were met and it is a fun blaster to use.
This is my first write up, so if you have suggestions for me they would be appreciated. Also, if something is unclear or you would like more pictures I can can do my best to answer that stuff. Enjoy.

YOU MAY POST NOW :P

Edited by Phree Agent, 09 June 2010 - 04:43 PM.

  • 0

#3 MindWarrior

MindWarrior

    Member

  • Members
  • 152 posts

Posted 09 June 2010 - 04:41 PM

That looks great! But I think you'll find it easier to pump it to higher pressures if you shorten your CPVC extensions. Other than that it looks almost like something from start trek:
Posted Image


EDIT: I'll say right now that Hot glue is NOT a good sealant, I suggest that some more super glue to be used, or plumbers goop over the hot glue to ensure that no air escapes.

Edited by MindWarrior, 09 June 2010 - 04:46 PM.

  • 0
QUOTE(Ryan201821 @ Jan 2 2010, 03:20 PM) View Post

Seriously, no penis pumps or dildos on your Nerf blasters.

REVOLUTION BABY!

#4 JATDO

JATDO

    Member

  • Members
  • 350 posts

Posted 09 June 2010 - 08:23 PM

EDIT: I'll say right now that Hot glue is NOT a good sealant, I suggest that some more super glue to be used, or plumbers goop over the hot glue to ensure that no air escapes.

The super glue should be more then enough, have you ever tried to blow into a piece of CPVC with an endcap on it? Its hard, the super glue really just keeps it attached.

But on topic, this looks sick! I was waiting for the write up since I saw this in the Paint Job thread.
For keeping the tubing internal, which in my mind is near essential if you want to actually use this outside, right after the tee you could use a right angle down then another right angle towards the center leaving the endcaps right inside the shell!
It is just an idea, but if you ever make another..
Another question, how many times do you pump it? How many pumps does it get hard to pump at? Its hard to get max pressure with a 3k pump. Oh and there was a typo when you described what pump you used.

Edited by JATDO, 09 June 2010 - 08:23 PM.

  • 0
QUOTE
I remember when some girl in my English 101 class in college tried to cite The Onion as a source for her paper. The teacher lol'd.
QUOTE
The only time I got hit was when my spotter got hit and the enemy team realized there was a marksman in the bushes

#5 Phree Agent

Phree Agent

    Member

  • Members
  • 402 posts

Posted 09 June 2010 - 08:38 PM

That looks great! But I think you'll find it easier to pump it to higher pressures if you shorten your CPVC extensions. Other than that it looks almost like something from start trek: (pic and whatnot)


Thanks, glad you like it!

EDIT: I'll say right now that Hot glue is NOT a good sealant, I suggest that some more super glue to be used, or plumbers goop over the hot glue to ensure that no air escapes.

The super glue should be more then enough, have you ever tried to blow into a piece of CPVC with an endcap on it? Its hard, the super glue really just keeps it attached.

But on topic, this looks sick! I was waiting for the write up since I saw this in the Paint Job thread.
For keeping the tubing internal, which in my mind is near essential if you want to actually use this outside, right after the tee you could use a right angle down then another right angle towards the center leaving the endcaps right inside the shell!
It is just an idea, but if you ever make another..
Another question, how many times do you pump it? How many pumps does it get hard to pump at? Its hard to get max pressure with a 3k pump. Oh and there was a typo when you described what pump you used.


Haha I figured a few people were curious after seeing it in the paintjob thread. I actually HAD the tubing running internally, but where the 2 tubes converge at the "T" the tubing would kink because the shell was not wide enough. This could have been fixed with a few small holes to allow more room, but I got impatient and just ran them outside. Yes it was my mistake, I actually used an AT3k pump. It gets hard to pump at 6 or so pumps, and maxes out after 8 pumps.
  • 0

#6 JATDO

JATDO

    Member

  • Members
  • 350 posts

Posted 09 June 2010 - 08:59 PM

It gets hard to pump at 6 or so pumps, and maxes out after 8 pumps.

Chances are with a hornet/magstrike pump you could get a few more pumps but then again I don't know how strong the CPVC tank will be. But your ranges aren't bad at all.
Have you thought of using PETG for the barrel? Unless CPVC gives you a loose fit chances are you could get better ranges with PETG.
  • 0
QUOTE
I remember when some girl in my English 101 class in college tried to cite The Onion as a source for her paper. The teacher lol'd.
QUOTE
The only time I got hit was when my spotter got hit and the enemy team realized there was a marksman in the bushes

#7 TantumBull

TantumBull

    Member

  • Moderators
  • 1,929 posts

Posted 09 June 2010 - 09:42 PM

Excellent job. I love how different this is.
  • 0

#8 b1g13en

b1g13en

    Member

  • Members
  • 268 posts

Posted 09 June 2010 - 10:13 PM

Wow this is exactly what I am trying to do right now but with Tetrastrike tanks instead. When you pump it fills both tanks right?
  • 0

#9 The one donut

The one donut

    Member

  • Members
  • 30 posts

Posted 09 June 2010 - 10:29 PM

Dude. That's totally legit. :D

Do you plan on cutting off the front of the barrel? And does the PVC connecting to the tanks have to be so long? It seems like it would break easily. :/
  • 0
Eat foam you pesky cats!

#10 Phree Agent

Phree Agent

    Member

  • Members
  • 402 posts

Posted 09 June 2010 - 10:48 PM

It gets hard to pump at 6 or so pumps, and maxes out after 8 pumps.

Chances are with a hornet/magstrike pump you could get a few more pumps but then again I don't know how strong the CPVC tank will be. But your ranges aren't bad at all.
Have you thought of using PETG for the barrel? Unless CPVC gives you a loose fit chances are you could get better ranges with PETG.


Yeah I didn't want to spend money on a hornet/magstrike pump, but yes it would probably improve performance slightly. And the only PETG I have is REALLY loose on my darts, so I just prefer cpvc. But seeing how long my barrels are, the lessened friction would definitely improve ranges, probably a lot.

Excellent job. I love how different this is.


Thank you kind sir!

Wow this is exactly what I am trying to do right now but with Tetrastrike tanks instead. When you pump it fills both tanks right?


It's funny you say that because tetrastrike tanks were in my original plan, but I couldn't get my hands on one, and got impatient. Let me know how yours turns out though! Yes the tanks fill simultaneously but are fired independent of each other.

Dude. That's totally legit. :D

Do you plan on cutting off the front of the barrel? And does the PVC connecting to the tanks have to be so long? It seems like it would break easily. :/


I don't plan on cutting the DS barrels for two reasons: First, I like the look of the full blaster. Second, my cpvc barrels are almost as long as the DS ones anyway, so they aren't really hindering the blaster in any way. As for the tank expansions, they can be cut to any size you would like, but they are on there pretty good. The shell of the DS supports them well.
  • 0

#11 Ambience 327

Ambience 327

    Member

  • Members
  • 561 posts

Posted 10 June 2010 - 07:52 AM

I have had plans for, and been collecting the parts for, a similar blaster for quite some time. I've been too lazy and cheap to get around to actually putting it together - but this may be the kick in the pants I needed. Seeing that thing just stirs my heart in a way I can't really explain. The Double Shot was the second blaster I purchased for our indoor wars at my church, and I have always had a soft spot for it (due mainly to how it felt in my hands and how well it performed compared to the un-modded SM250's it was facing off against).

I absolutely love how this turned out, especially how close to the stock form you kept it. The "starship nacelle" tank expansions are a little ugly, but performance beats aesthetics in my book, so they are ok.

Great work - now I need to get off my butt and get to work on my own version!
  • 0
Foam in the Fort IV
The fourth exciting Nerf War in Fort Wayne, IN.

#12 Ham

Ham

    Member

  • Members
  • 1 posts

Posted 11 June 2010 - 06:25 AM

This is a sweet as mod good job :)
  • 0

#13 b1g13en

b1g13en

    Member

  • Members
  • 268 posts

Posted 11 June 2010 - 10:06 AM

Did you took out the check valves from the original tanks? If you did then did you put check valves on the tubing?
  • 0

#14 Phree Agent

Phree Agent

    Member

  • Members
  • 402 posts

Posted 11 June 2010 - 11:43 AM

This is a sweet as mod good job :)


Thank you

Did you took out the check valves from the original tanks? If you did then did you put check valves on the tubing?


The check valves I used are from Petco. I just put them in the tubing between the "T" and the tank expansions. I kinda zipped through that section of the write up so I am sorry the clarity is lacking.
  • 0

#15 HOTH

HOTH

    Member

  • DO NOT TRADE
  • 557 posts

Posted 11 June 2010 - 02:23 PM

Damn, thats awesome. I could see that as a primary.
  • 0
My YouTube

Solved the Rubik's Cube in 46 seconds

"Nobody understands quantum mechanics" - Richard Feynman

#16 b1g13en

b1g13en

    Member

  • Members
  • 268 posts

Posted 11 June 2010 - 11:17 PM

[quote name='b1g13en' post='277422' date='Jun 11 2010, 11:06 AM']
Did you took out the check valves from the original tanks? If you did then did you put check valves on the tubing?
[/quote]

The check valves I used are from Petco. I just put them in the tubing between the "T" and the tank expansions. I kinda zipped through that section of the write up so I am sorry the clarity is lacking.
[/quote]

Is the check valve the blue thingy before the T? I asked because if you shot the first tank what is keeping the second tank from leaking into the first one?
  • 0

#17 Phree Agent

Phree Agent

    Member

  • Members
  • 402 posts

Posted 12 June 2010 - 12:17 AM

Is the check valve the blue thingy before the T? I asked because if you shot the first tank what is keeping the second tank from leaking into the first one?


Yes, the check valves are the blue cylinders. They are between the tanks and the "T". That way, both can be pumped simultaneously, and released independently. The check valves prevent the tanks from leaking into each other.
  • 0


0 user(s) are reading this topic

0 members, 0 guests, 0 anonymous users