Jump to content


Photo

Nerf Mg Write-up *updated*

Tri-Pod Update: Page 2!

28 replies to this topic

#1 TantumBull

TantumBull

    Member

  • Moderators
  • 1,929 posts

Posted 31 March 2010 - 03:06 PM

This project was mostly a "just for fun" kind of deal, with no real intention of using it in an outdoor deathmatch setting. Although it definitely would work for objective/scenario games that are centered around it.

Project goals:
1. adjustable power output
2. adjustable ROF
3. mountable on camera tripod

Goals one and two have been met, three is currently being worked on.

Materials:
-working MS valve
-1/2" CPVC
-assortment of screws
-3/8" PEX or something else that will function as a screw spacer
-PVC w/ 5/8" ID, or just a CPVC coupler
-vinyl tubing
-1" PVC
-1" PVC coupler
-1" PVC end cap
-1.5" PVC
-1/2" PVC Wye
-1/2" PVC ball valve
-segment of SS1 plunger tube, or another pipe with the same OD
-spring that slides freely over 1/2" CPVC
-a small toggle or ball valve, spring loaded if you don't want to manually reset the trigger (valves from super soakers work nicely)

Tools / Adhesives / Tape / Etc:
-solvent weld or CA glue
-dry weather if you're using solvents (do that shit OUTSIDE)
-gorilla glue
-epoxy putty
-electrical tape
-dremel
-pipe cutters or hack saw

I think that's it. Let me know if you see something in the pics that I missed here. On to the write-up.

Cut a slot in a longish segment of CPVC so it fits around the tubing elbow on the MS valve.
Posted Image

Glue/solvent weld like so.
Posted Image

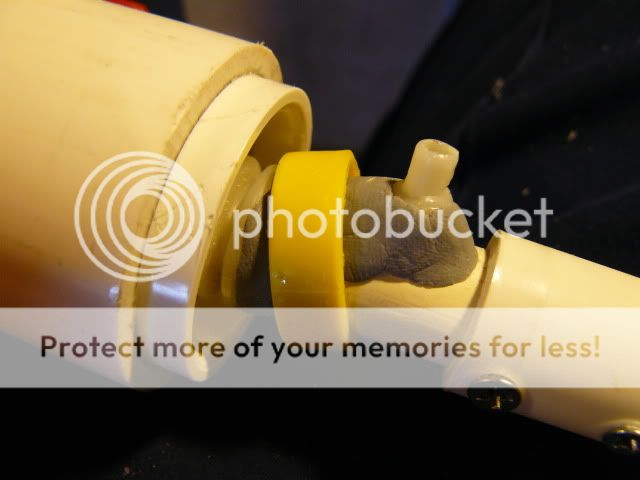
Apply a healthy amount of epoxy putty.
Posted Image

Cut off the excess CPVC a bit under an inch from the tubing elbow. Fill the CPVC with gorilla glue. I found this stuff to be an excellent filler to keep things from moving around, in this case the elbow.
Posted Image

Screw on the CPVC you cut off earlier. I used some wide-ID'd PVC I had on hand as a coupler. but a CPVC coupler could be used just as easily.
Posted Image

Glue 1" PVC onto the middle section of the valve. Notice mine is glued on in halves because I had stupidly started the tank expansion already. Don't do this. Ignore everything at the front of the valve.
Posted Image

Slide a segment of 1" PVC coupler over the 1" PVC, once again ignoring everything shown at the front of the valve.
Posted Image

Take a longish segment of 1" PVC and cut a slot for the tubing connected to the piston to slide through as the valve actuates. I don't have measurements, just make your own. It isn't at all hard.
Posted Image

Now slide some 1.5" PVC over the 1" PVC coupler segment. Slide the other half of the coupler segment into the back end of the 1.5" PVC. Fuss with the SS1 tube segment to get it over the barbed elbow of the piston. There will be much bending required, and you'll have to remove the stock tubing to do this.
Posted Image

Slide the yellow segment into the 1" PVC.
Posted Image

Wrap e-tape over where the yellow tube is nested.
Posted Image

Shove it in and slide the 1.5" PVC/1" PVC endcap over it a good ways.
Posted Image

Time to screw everything down. The first an most important screw goes through all the PVC and into the MS valve body itself. Be ABSOLUTELY sure that the screw goes into the very back and widest part of the valve body, where there is some room inside for a screw to protrude a little. Drill slowly and stop once you fell the bit break through. You need to do measurements before assembling all the PVC to know where to drill the hole. If your screw is too long, either cut it down, or use a spacer if you're lazy like me.
Posted Image

Also screw the 1.5" PVC sheath onto the 1" PVC behind the valve. I did one on each side of the tubing slot.
Posted Image

Now for the tank expansion. Drill a 1/4" hole as shown. You can also put on the PVC Wye now if you'd like, but don't glue it on. It helps to have on to help gauge where to drill. You'll need to wrap e-tape around the valve front for the wye to fit properly.
Posted Image

Edited by TantumBull, 10 April 2010 - 02:11 PM.

  • 0

#2 TantumBull

TantumBull

    Member

  • Moderators
  • 1,929 posts

Posted 31 March 2010 - 03:08 PM

Shave half CPVC, and then perfect the fit by wrapping sand paper around the thinnest/front-most part of the valve body and grinding the CPVC segment on it. Solvent weld/glue on the segment.
Posted Image

Cut down one end of a 1/2" PVC ball valve. Nest in a segment of PVC with a drilled out ID of 5/8". Solvent weld/glue that onto the CPVC stub. Goop around the edges after its dry to ensure airtight-ness. You can also put the wye back on when you're done, although it isn't pictured.
Posted Image

To the rear! Solvent weld/glue together a 1" PVC endcap and a 1/2" PVC coupler. Drill a centered 5/8" hole into the endcap. I used 3/8" PEX for further support.
Posted Image

Cut the 1" PVC body to the length at which your spring will go in snugly.
Posted Image

Here's my trigger valve and handle. No write-up for this as I don't think many people have the same valve I used lying around. Just make sure you can plug the front into the coupler we adhered onto the encap.
Posted Image

Screw on the endcap and then screw in your handle/trigger valve assembly.
Posted Image

Posted Image

Connect the tubing and you're done! Yay!
Posted Image

With a random barrel and clip size, its outperforming a vulcan. I'll be fine tuning the barrel and clip set-up later. Video will also be up later. Enjoy!

Edit: Oh wow, forgot to explain the ball valve tank expansion. When closed, there's not much expansion. At some point I will be adding a segment of PVC and an endcap to the ball valve so when open, its a much larger tank.

The spring can also be swapped out for another to change the pressure at which the valve actuates.

I have a toggle valve inline to the air source, so changing how much the nob is turned affects the flow and ROF.

EDIT: Tri-Pod Update on Page 2!

Edited by TantumBull, 10 April 2010 - 02:27 PM.

  • 0

#3 durka durka

durka durka

    Member

  • Members
  • 364 posts

Posted 31 March 2010 - 03:18 PM

Holy shit...
Looks a bit front heavy, but other than that, this gun seems great. Using a magstrike piston is a great idea.

Awesome job!
  • 0
"The warrior who cultivates his mind polishes his arms"

#4 Lt Stefan

Lt Stefan

    Member

  • Members
  • 892 posts

Posted 31 March 2010 - 03:30 PM

It looks cool.... But could you explain how it works?
  • 0

#5 TantumBull

TantumBull

    Member

  • Moderators
  • 1,929 posts

Posted 31 March 2010 - 04:00 PM

Holy shit...
Looks a bit front heavy, but other than that, this gun seems great. Using a magstrike piston is a great idea.

Awesome job!

Thanks, and yeah, definitely front heavy. Hopefully the tripod set-up I'm working on will alleviate some of that.

It looks cool.... But could you explain how it works?

At the core its just a MS valve. Air enters through the piston and goes through holes in the piston into the front chamber. As the front chamber pressurizes, it pushes back the piston and air begins to also fill the back chamber. The internal and external spring both act to regulate the amount of pressure needed to push back the piston. At the end of the pistons stroke, the front seal is pulled off and all of the air rushes out the front, and the spring pushes the piston back forward, resetting the cycle. It would make more sense if you've taken apart a MS valve and seen the internals. I believe they've been posted here somewhere.

Edited by TantumBull, 31 March 2010 - 04:01 PM.

  • 0

#6 Brutal 770

Brutal 770

    Member

  • Members
  • 40 posts

Posted 31 March 2010 - 04:29 PM

Wow.
Good job on making a vulcan replacement, I've been waiting for one of these...
  • 0

#7 LotusNerf

LotusNerf

    Member

  • Members
  • 143 posts

Posted 31 March 2010 - 06:41 PM

Sorry for proposing this noobish question in the middle of your thread. I don't want to start a whole new thread so essentially, how does the magstrike piston work? This way I can actually understand how this actually works.

Yes, I have done research here and all around the web, and have found nothing helpful.

-Lotus
  • 0

#8 TantumBull

TantumBull

    Member

  • Moderators
  • 1,929 posts

Posted 31 March 2010 - 06:49 PM

Sorry for proposing this noobish question in the middle of your thread. I don't want to start a whole new thread so essentially, how does the magstrike piston work? This way I can actually understand how this actually works.

Yes, I have done research here and all around the web, and have found nothing helpful.

-Lotus

Try reading what I wrote to Lt. stefan while looking at magstrike internals (the inside of the valve has been posted here before). If you actually have a magstrike, take apart the valve. First hand experience is the best way to understand it. I may draw something in paint at some point, but don't plan on it anytime soon. I remember reading a thread where someone gutted his valve and took pictures of everything and I think also drew up a diagram. Try to find that. Good luck!
  • 0

#9 LotusNerf

LotusNerf

    Member

  • Members
  • 143 posts

Posted 31 March 2010 - 06:58 PM

{What I said}.

Try reading what I wrote to Lt. stefan while looking at magstrike internals (the inside of the valve has been posted here before). If you actually have a magstrike, take apart the valve. First hand experience is the best way to understand it. I may draw something in paint at some point, but don't plan on it anytime soon. I remember reading a thread where someone gutted his valve and took pictures of everything and I think also drew up a diagram. Try to find that. Good luck!


Haha, if I actually had the valve, I would understand in a snap. Now I understand how it works through your explanation, so thanks. Oh, and I also used one of your videos to help.

-Lotus
  • 0

#10 TantumBull

TantumBull

    Member

  • Moderators
  • 1,929 posts

Posted 31 March 2010 - 07:00 PM

For anyone with further questions about how the valve works, refer to this thread:
http://nerfhaven.com...showtopic=12626

This is what I mentioned to Lotus a couple posts up.
  • 0

#11 roboman

roboman

    Member

  • Members
  • 489 posts

Posted 31 March 2010 - 08:31 PM

That's awesome. When you say "MS valve," does that include the trigger valve? If not, I may have to make one of these...

Edited by roboman, 31 March 2010 - 08:32 PM.

  • 0

Youtube

LS and Retaliator boltsleds are currently available at https://www.facebook.com/RoboM8/


#12 Lt Stefan

Lt Stefan

    Member

  • Members
  • 892 posts

Posted 31 March 2010 - 08:31 PM

Okay so I get how the valve works now. So is this gun basically a modded magstrike in a PVC shell or is there more to it?
  • 0

#13 nostyleguy

nostyleguy

    Member

  • Members
  • 54 posts

Posted 31 March 2010 - 10:01 PM

This looks so promising. I'd really like to see the tank expansion pressed to the limits. I've seen the Assault Magstrike mod, and other tank expansion mods, but they always seemed inconsistent or underwhelming.

The problem usually seems to be the need to re-barrel a magstrike which is a pain, or the system eats too much air to be worthwhile.

With your setup, the barreling problem is solved by having 1 stationary barrel, and the air capacity problem is solved (presumably) because you can have a huge external air source since the system will be mounted on a tripod and (presumably) non-mobile.

Speaking of which, what are your plans for an air source? I'd like to see a ridiculously over the top air tank made of like 5" PVC honestly.

I don't want to be too optimistic but with a large enough tank expansion, and a large enough reservoir, you could be laying down a constant stream of foam 100' away.
  • 0

#14 Blue

Blue

    Member

  • Members
  • 2,222 posts

Posted 31 March 2010 - 11:00 PM

So, the spring is what causes an increase in pressure right? Are you getting better ranges than a normal Magstrike because of this?
  • 0

#15 TantumBull

TantumBull

    Member

  • Moderators
  • 1,929 posts

Posted 01 April 2010 - 12:07 AM

That's awesome. When you say "MS valve," does that include the trigger valve? If not, I may have to make one of these...

It doesn't have to, but you'll need a different toggle valve if you don't use the stock MS one (I used a super soaker spring loaded ball valve).

Okay so I get how the valve works now. So is this gun basically a modded magstrike in a PVC shell or is there more to it?

Essentially, yes. A heavily modded MS valve in a PVC body.

This looks so promising. I'd really like to see the tank expansion pressed to the limits. I've seen the Assault Magstrike mod, and other tank expansion mods, but they always seemed inconsistent or underwhelming.

The problem usually seems to be the need to re-barrel a magstrike which is a pain, or the system eats too much air to be worthwhile.

With your setup, the barreling problem is solved by having 1 stationary barrel, and the air capacity problem is solved (presumably) because you can have a huge external air source since the system will be mounted on a tripod and (presumably) non-mobile.

Speaking of which, what are your plans for an air source? I'd like to see a ridiculously over the top air tank made of like 5" PVC honestly.

I don't want to be too optimistic but with a large enough tank expansion, and a large enough reservoir, you could be laying down a constant stream of foam 100' away.

Yes, a constant stream of 100' foam would be possible, but it would eat air at an ungodly rate. Not to mention the incredible inefficiency of a hopper clip which doesn't use a breech... But yes, assuming I got my hands on a real compressor and a HUGE air reservoir, this would be possible.

As for the air source, its currently running off 4 2L soda bottles. Once I get a nice air reg, I'll be able to take the reservoir up to higher pressures.

So, the spring is what causes an increase in pressure right? Are you getting better ranges than a normal Magstrike because of this?

Correct, the spring regulates the amount of pressure required to push back the piston and actuate the valve. This and the tank expansion (which increases volume, not pressure) both are helping the ranges.

Video is up!
I apologize for the weird sounds in between bursts, the camera must have been acting up.

Edited by TantumBull, 01 April 2010 - 12:08 AM.

  • 0

#16 nate the great

nate the great

    Member

  • Members
  • 219 posts

Posted 01 April 2010 - 07:19 AM

Wow :) I watched the video and now i understand how it works. That thing is pure awsomeness. I might try and recreate it witha magstrike which I messed up. Awsome right-up and great video. :D
  • 0
QUOTE
PRI you are a fucking idiot.

2 slingshot weights is basically a steel bullet with a foam sabot
-Mr BadWrench

QUOTE

You have a tampon on your gun. There's your problem.
-Hi Yah!

Join the Revolution!

#17 nisaburo

nisaburo

    Member

  • Members
  • 400 posts

Posted 01 April 2010 - 12:29 PM

And its still all war legal, since at its base its a magstrike! I love the use of an extra spring to increase the cycling pressure, very smart and much easier, conceptually at least, than a spring replacement in the MS valve. Did you do any testing with stronger springs? Is the tank expansion mainly to achieve one of your stated goals? It just doesn't seem all that necessary with the potential of adding and changing out springs. You may have solved a whole bunch of problems with air powered automatics with this mod.
  • 0

#18 TantumBull

TantumBull

    Member

  • Moderators
  • 1,929 posts

Posted 02 April 2010 - 03:59 PM

And its still all war legal, since at its base its a magstrike! I love the use of an extra spring to increase the cycling pressure, very smart and much easier, conceptually at least, than a spring replacement in the MS valve. Did you do any testing with stronger springs? Is the tank expansion mainly to achieve one of your stated goals? It just doesn't seem all that necessary with the potential of adding and changing out springs. You may have solved a whole bunch of problems with air powered automatics with this mod.

I haven't tried any stronger springs yet, but I'm sure I will at some point. The problem with stronger springs is that they require a higher pressure for the valve to cycle. Right now the required input pressure is ~40 PSI. If I go to much higher, I'm going to need a proper regulator and tank (aka not plastic soda bottles). Right now, I fill the tanks to 60 PSI, and then shoot until the pressure drops to 40. But yeah, I definitely am going to experiment with stronger springs either way.

As for the expansion, yeah, it's basically there to boost ranges and make up for the deadspace in a hopper clip. Sometime soon I'll be actually putting a proper expansion on the end of the ball valve, instead of the half inch of CPVC that it gets when the ball valve is closed.

Edited by TantumBull, 02 April 2010 - 03:59 PM.

  • 0

#19 TantumBull

TantumBull

    Member

  • Moderators
  • 1,929 posts

Posted 10 April 2010 - 02:24 PM

Sorry this took so long, it was one of my original goals, but it took me a while to get around to.

How to make the MG compatible with a camera tripod: (This is incredibly simple and can be done to pretty much anything. I'll probably be doing this to a vulcan sometime soon.)

3/8" OD, 1/4" ID PEX works extremely well as a socket to screw in the tripod attachment to. So, drill a 3/8" hole into the fatty PVC segment. Don't go into the valve! SOLVENT WELD (super glue actually won't work for this, I tried) a segment of 3/8" PEX into the hole. Make sure its long enough so that it protrudes from the PVC about .5". It'll get cut down later.
Posted Image

Take the jam door from a recon and cut a hole large enough for the PEX as shown. I used a dremel for the initial cuts and then widened/cleaned the hole with a 3/8" drill bit. Also, wrap sand paper around 1.5" PVC and slide the door back and forth over it, so it fits more naturally (sand it length-wise).
Posted Image

Super glue on the jam door as shown around the PEX. Drill and then screw it in via the angled sides (you want the surface to be completely flat, which is why you need to apply the screw on the siding). The super glue was just to hold it in place for drilling. I didn't weld it because I want the piece removable in-case I need to disassemble the PVC shell to access the firing valve. Also, shave then sand the PEX down till its level with the jam door face. Now you can see in the pic how the little black spring-loaded nub on the tri-pod piece will go into the hole on the jam door it's lined up with. This was part of the reason I used a jam door.
Posted Image

You're done! And here's what it looks like with the tri-pod piece attached:
Posted Image

And a pic of the mounted blaster:
Posted Image

Enjoy, lemme know if I need to clear anything up!
  • 0

#20 Niteshot

Niteshot

    Member

  • Members
  • 80 posts

Posted 18 April 2010 - 02:45 PM

That's freaking awesome. Good job, man!
  • 0
QUOTE(VACC @ Dec 7 2010, 10:31 AM) View Post

For the love of fuck. The next person who announces that they are using something in their signature, ever, is banned. I fucking hate you.

#21 TantumBull

TantumBull

    Member

  • Moderators
  • 1,929 posts

Posted 19 April 2010 - 10:32 PM

Thanks.

On a bit of a side-note, I'm having issues keeping the pex "tightening nut" to stay affixed to the blaster. I've tried super glue and PVC cement, both of which were ripped out. I think it is definitely partly due to me overtightening and the PEX segment being to small, but does anyone have any ideas for better adhesive methods?
  • 0

#22 roboman

roboman

    Member

  • Members
  • 489 posts

Posted 20 April 2010 - 12:00 AM

Try Loctite. After all, it is a thread-locker. I'm not sure how well it works on plastics, though. If all else fails, epoxy will definitely hold it.
  • 0

Youtube

LS and Retaliator boltsleds are currently available at https://www.facebook.com/RoboM8/


#23 iknowmy3tables

iknowmy3tables

    Member

  • Members
  • 35 posts

Posted 21 April 2010 - 09:00 AM

score the nut a little and use an epoxy or jbweld, any gel or paste (rather than a runny liquid or hand mold-able puddy) that dries into a strong thick solid, that basically "cements" the nut in place and should work better than just bonding with glues, or if you still want a clean chemical bond/weld you might want to try plastic bonder epoxy it should work better than just super glue

Edited by iknowmy3tables, 21 April 2010 - 09:02 AM.

  • 0

#24 PETGrevolution

PETGrevolution

    Member

  • Banned
  • 37 posts

Posted 21 April 2010 - 02:13 PM

I believe that PVC cement would work best on this application. If not, just use epoxy or the next best glue.
-Rev
Call me Rev

You call a wrap of e-tape a modification? It is just there to keep the breech more secure. Wow, you really are mentally retarted(Ryan Mcnumbers). -Nate the Great

Do it yourself and then come back.
Otherwise, Fuck off.
-Ilzot

#25 TantumBull

TantumBull

    Member

  • Moderators
  • 1,929 posts

Posted 21 April 2010 - 07:08 PM

The weld I used must not have bonded well with the PEX, which is odd, because the main ingredient is known to dissolve PEX. I'll probably just weld a longer piece in, because i think part of the problem is that it's actually getting pulled out of the hole as the mount pushes against the recon jam door.
  • 0


0 user(s) are reading this topic

0 members, 0 guests, 0 anonymous users