Jump to content


Photo

Pvat-piston Valve Air Tank

Update Pg. 4- 3/4" tank

56 replies to this topic

#1 Lt Stefan

Lt Stefan

    Member

  • Members
  • 892 posts

Posted 07 March 2010 - 06:19 PM

GO TO PG 4 FOR THE UPDATE

I’ve always thought that there must be a more effective way to make a homemade air gun than by using a ball valve as a trigger. Well I’m putting an end to that. I’d like to introduce to you the PVAT- Piston Valve Air Tank. It is a completely homemade airtank that has many different applications and can be fired like any other actual gun air tank with its built in piston valve. Think of it as a homemade at2k tank. This writeup is for the rev.2 version of this design which fixed leaks experienced in rev.1. The pictures may not be all unique to rev.2 but you get the idea.

Materials:

1” PVC
1” PVC coupler, end cap and 1” to 1/2” reducing bushing
4x 5/16” x 3/16” o-ring
5 1/2” 1/4” carriage bolt
4x 1/4” nuts
5/8L beveled faucet washer
Skinny strong spring (Ace #62 can work)
Vinyl tube of your choice
Fitting for said tubing
Air pump

McMaster parts list, doesn't include faucet washer

48925K93 – 1” PVC
4880K53 – 1” PVC Endcap
4880K73 – 1” PVC Coupler
4880K314 – 1” x 1/2” Reducer
94115K008 – O-rings
92356A564 – 5 1/2” x ¼” Carriage Bolt
91845A029 – 1/4” Hex nuts
9657K222 – Spring
9117T113 – Vinyl Tubing
5372K511 – Vinyl tubing fitting


EDIT
The bolt there is fully threaded and I can't find one that isn't so DON'T order that bolt. Just go to Lowes anyway it's easier. And get their hex bolts, they seem slightly thicker and make a better seal as I found out.

Tools:

Drill/Drill Press
Saw for cutting PVC
CA
Drill Bits
Sandpaper
Epoxy Putty


Step 1

Cut 3 5/8” of 1” PVC. Sand down the outside of the PVC and the inside of the fittings/plastic surfaces to be glued. Glue the bushing into the coupler then the coupler to the PVC. Make sure you shove it in all the way.

Posted Image

Step 2

Find the exact center of the endcap and drill with a 1/4” bit.

Posted Image

Step 3

Now take the faucet washer and drill the hole out to 1/4” so it fits on the bolt.

Posted Image

Step 4

Take the piece of 1” PVC assembly we glued earlier and mark and drill a hole right where the end cap would end when it’s fully on. Make sure the hole is perpendicular to the PVC and is a size such that it is slightly smaller than your tubing fitting; mine was 3/16” so I drilled a 3/16” hole. Apparently 3/16” is nominal. (The coupler isn’t pictured)

Posted Image

Step 5

Now take the fitting and make it look like this:

Posted Image

Then roughen up the smooth inside end and put some glue in the hole and stick the fitting in all the way. Then coat the joint with glue some more.

Step 6

Take the endcap we drilled before and put an o-ring on the bolt. Then put the bolt through the hole. We are going to be gluing the o-ring to the end cap, so lube up the bolt, put some glue on the outside of the end cap, and push the bolt down and the o-ring so it’s glued on.

Posted Image

Now do the same thing with the inside of the end cap.

Posted Image

*After I tested this in rev.2 I decided I am going to put two o-rings on each side and reinforce them with epoxy putty in future versions.

Step 7

Assemble the end cap/bolt (piston) like so:

Posted Image

It will seal against the coupler like so:

Posted Image

Put some glue on where the nut seals with the bolt so air can’t get through.

Now are you starting to get it? Heh.

Step 8

Last step! Glue the endcap onto the PVC. Make sure it goes down all the way.

Congrats, you’re done. Attach a pump, fill the tank, and pull the pin to start shooting!

The finished product with a Hornet pump:

Posted Image

How it works:

When you pump, the tank fills with air. The rubber washer makes a seal with the bushing so no air gets out. When you pull on the bolt, the washer is pulled back, creating a path for the air to go into the barrel. When you let go, the spring causes the washer to re-seal so the cycle can be continued.

Results:

I only used one o-ring on each side, so after 5 pumps it started to leak. Everything else held up perfectly. I am able to get well over 100’ with 5 pumps. It holds pressure for a long time as well. Another thing to note is this can be made with any length carriage bolt and with any size PVC. Imagine a 3’ 3’’ tank like this! I also think you can use these to replace tanks in guns. Broken sm1.5k? You can replace it with this. Also you can integrate these anywhere and can be made very cheaply.

About the spring, the one I used for this version was one I found in my spring bin. However Ace #62, when cut in half, should also work. If some of you are concerned about difficulty, I would say you should definitely have experience making this. You have to cut/glue some things in pretty precise of a way that I wouldn’t recommend for beginners. However I would not say it is extremely difficult to make.

Notes:

Sand the part of the bolt that will seal with the o-rings with fine sandpaper to smooth it down and lube all the surfaces that come in contact with each other. I didn’t use PVC cement because it doesn’t need it, and make sure you measure carefully before modding the design I used here.


I will probably be selling these so if you can't make one there is no need to worry.


Here is a video.


-EDIT- I have done some tests and after 15 mins it has not lost any noticeable pressure.

Edited by Lt. Stefan, 10 March 2010 - 09:42 PM.

  • 0

#2 Fome

Fome

    Member

  • Banned
  • 312 posts

Posted 07 March 2010 - 07:00 PM

Absolutely amazing work.

Edit: was the hornet pump plugged to get those ranges?

Edited by Fome, 07 March 2010 - 07:01 PM.


#3 MindWarrior

MindWarrior

    Member

  • Members
  • 152 posts

Posted 07 March 2010 - 07:06 PM

Absolutely amazing work.

Edit: was the hornet pump plugged to get those ranges?

Probably, he said he could pump more, but the tank started leaking. Anyways, thats really cool, too bad its probably gonna be banned at most wars, safety first I guess.

Edited by MindWarrior, 07 March 2010 - 07:06 PM.

  • 0
QUOTE(Ryan201821 @ Jan 2 2010, 03:20 PM) View Post

Seriously, no penis pumps or dildos on your Nerf blasters.

REVOLUTION BABY!

#4 Lt Stefan

Lt Stefan

    Member

  • Members
  • 892 posts

Posted 07 March 2010 - 07:09 PM

Probably, he said he could pump more, but the tank started leaking. Anyways, thats really cool, too bad its probably gonna be banned at most wars, safety first I guess.


@Fome Actuallly it was not plugged. Thanks.

@MindWarrior The thing is this model right here doesn't shoot father than a 4B. I could even make a short one with 3/4" PVC that would should less far than an at2k. I could also put an oprv on it. So depending on the setup, it either could or could not be banned. That's what is so great about it.
  • 0

#5 HOTH

HOTH

    Member

  • DO NOT TRADE
  • 557 posts

Posted 07 March 2010 - 07:09 PM

Wow. Thats amazing. I love it.
  • 0
My YouTube

Solved the Rubik's Cube in 46 seconds

"Nobody understands quantum mechanics" - Richard Feynman

#6 Draconis

Draconis

    I am not Lord Draconical

  • Members
  • 2,712 posts

Posted 07 March 2010 - 07:16 PM

Great job with this. You've put a lot of effort in. You may get better sealing against the bolt shaft if you polish and lubricate it with grease. also, a slight modification to the end cap may help as well. If you bevel the edges of the hole a bit before you adhere the o-rings, they will have more surface area with which to adhere. You may also have better longevity of the assembly by simply solvent welding the tubing directly in to the port on the side of the tank. Those (look like polypropylene) hose barbs don't adhere well to most glues, and you are likely to find that they come loose and shoot out at pressure.

One more thing, though... This thing is huge. Without significant reduction in size, it would not fit in to a 1500 shell. And without an OPRV or at least a gauge, you are likely to find this size tank to be treated more like a singled Titan or BBBB tank.
  • 0
[15:51] <+Noodle> titties
[15:51] <+Rhadamanthys> titties
[15:51] <+jakejagan> titties
[15:51] <+Lucian> boobs
[15:51] <+Gears> titties
[15:51] <@Draconis> Titties.
[15:52] <+Noodle> why is this so hard?

#7 MindWarrior

MindWarrior

    Member

  • Members
  • 152 posts

Posted 07 March 2010 - 07:18 PM

Probably, he said he could pump more, but the tank started leaking. Anyways, thats really cool, too bad its probably gonna be banned at most wars, safety first I guess.


@Fome Actuallly it was not plugged. Thanks.

@MindWarrior The thing is this model right here doesn't shoot father than a 4B. I could even make a short one with 3/4" PVC that would should less far than an at2k. I could also put an oprv on it. So depending on the setup, it either could or could not be banned. That's what is so great about it.

If the hornet pump is unplugged, then that means that this could be war legal, it could regulate the power easily.
  • 0
QUOTE(Ryan201821 @ Jan 2 2010, 03:20 PM) View Post

Seriously, no penis pumps or dildos on your Nerf blasters.

REVOLUTION BABY!

#8 Lt Stefan

Lt Stefan

    Member

  • Members
  • 892 posts

Posted 07 March 2010 - 07:22 PM

@HOTH- Thanks

@JSB- I have some non-beveled faucet washers that would work well to seal against the endcap, but I'm not sure how the bolt-to-oring seal would be made. I could drill it out to 1/4" but to get it to the end I'd have to twist it on the threads so it might ruin the seal. Maybe that along with the o-rings would work well.

@Draconis- I did sand the bolt with 600 grit sandpaper and lubed it. As for the bard fitting it works well for now, on the next version I'll probably use epoxy putty as well. After I sanded it and put glue all around the hole and shoved it in, it stuck temporarily until I got the mallet out and whacked it in. It seemed pretty solid, but I'll keep an eye on that.

-EDIT-

@MW- Along with a decrease in size I wouldn't think there should be a problem with legality. But if I used a ball pump that might be a different story...

Edited by Lt. Stefan, 07 March 2010 - 07:23 PM.

  • 0

#9 MindWarrior

MindWarrior

    Member

  • Members
  • 152 posts

Posted 07 March 2010 - 07:26 PM

@ boss- Bah, hornet pumps are still good, but imagine a titan pump...
  • 0
QUOTE(Ryan201821 @ Jan 2 2010, 03:20 PM) View Post

Seriously, no penis pumps or dildos on your Nerf blasters.

REVOLUTION BABY!

#10 Lt Stefan

Lt Stefan

    Member

  • Members
  • 892 posts

Posted 07 March 2010 - 07:28 PM

If I used 3" PVC I could hook it up to a compressor and make a stationary tennis ball shooting monstrosity, but then again this isn't spudfiles. :)
  • 0

#11 rork

rork

    Member

  • Members
  • 1,008 posts

Posted 07 March 2010 - 07:53 PM

This is awesome. Personally, I would try to eliminate the excess PVC between the cap and the coupler. Smaller volume is definitely the way to go.
  • 0
<a href="http://nerfhaven.com...howtopic=20296" target="_blank">SNAPbow Mk. V</a>
<a href="http://nerfhaven.com...howtopic=20409" target="_blank">Make it pump-action</a>

#12 Lt Stefan

Lt Stefan

    Member

  • Members
  • 892 posts

Posted 07 March 2010 - 07:56 PM

This is awesome. Personally, I would try to eliminate the excess PVC between the cap and the coupler. Smaller volume is definitely the way to go.


This was basically just an experiment. When I get around to building more different ones I will definitely need to try that. Except Home Depot isn't in my backyard and I don't have a PVC fitting/ carriage bolt factory in my basement... :)
  • 0

#13 Broderick

Broderick

    Member

  • Members
  • 279 posts

Posted 07 March 2010 - 08:42 PM

After reading Bob's post about how the curved endcap causing problems, do you think you could make this with a plug? I mean, it would definetly make it a bit bigger than it needs to be for the volume inside, but I know that the plugs at Lowe's I saw earlier today are flat. The other concern is how deep of a hole you'd need to drill in the plug. It's just an idea if you have more leaking problems like this.
As for the incoming compliments: this is seriously just, ...wow. I really don't have words. It's like the magic key for unlocking a new age of homemades.
  • 0

#14 Lt Stefan

Lt Stefan

    Member

  • Members
  • 892 posts

Posted 07 March 2010 - 08:46 PM

I have seen flat endcaps as well which might help...

It's like the magic key for unlocking a new age of homemades.


Haha I like that. Thanks.
  • 0

#15 Lt Stefan

Lt Stefan

    Member

  • Members
  • 892 posts

Posted 07 March 2010 - 09:05 PM

I'm not quite sure I know what the big fitting in the middle does, if it's a checkvalve how would that take place of the current sealing/firing mechanism?
  • 0

#16 Zorns Lemma

Zorns Lemma

    Sir Scrt

  • Moderators
  • 1,277 posts

Posted 07 March 2010 - 09:11 PM

Nice job discovering the faucet washer. Much better way to seal than flat washer or o-rings.
  • 0
"In short, the same knowledge that underlies the ability to produce correct judgement is also the knowledge that underlies the ability to recognize correct judgement. To lack the former is to be deficient in the latter."
Kruger and Dunning (1999)

#17 Lt Stefan

Lt Stefan

    Member

  • Members
  • 892 posts

Posted 07 March 2010 - 09:12 PM

Ah, I see. Is there an easy way to attach a bolt to it? And where do you find these things? They also look pretty cumbersome as well...
  • 0

#18 Lt Stefan

Lt Stefan

    Member

  • Members
  • 892 posts

Posted 07 March 2010 - 09:28 PM

I guess I'll have to look for those then. But the thing is I like making all the parts so I can change the size of everything. Tomorrow I'll be making a 3/4" version and I'm not sure if those check valves are that small.
  • 0

#19 Hipponater

Hipponater

    Member

  • Members
  • 297 posts

Posted 07 March 2010 - 10:25 PM

Very nice work, clever idea on the faucet washer and the spring. A plug on the other side would help with the sealing, but if you can already get 100' out of it, it's pretty darn good. A plug would be ideal to get smaller versions up to that kind of range, though.

The check valve is interesting, but I really like this idea here because of the inexpensive parts, as well as the relatively easy construction. I look forward to seeing the 3/4" version, good work so far.

Edit: How reliable is it? Does it seal perfectly every time, or is there any fussing with it?

Edited by Hipponater, 07 March 2010 - 10:25 PM.

  • 0

#20 Lt Stefan

Lt Stefan

    Member

  • Members
  • 892 posts

Posted 07 March 2010 - 11:00 PM

Rev.1 had a finicky piston head, but I upgraded to the 5/8L beveled washer and it works fine. You let go and it seals right in place. I'll try to find a flat endcap and see how that goes. Also tomorrow I hope to build the 3/4" version but I will not be able to make any more until the end of the week when I have enough money to buy a carriage bolt. Sad, I know. I'll keep this thread updated.

Also, if anyone would like to buy one of these, please pm me.
  • 0

#21 Doom

Doom

    NH's Official In-House Physicist

  • Administrators
  • 559 posts

Posted 07 March 2010 - 11:39 PM

I'm a little annoyed by the first sentence of the OP. The only people who use ball valves are ignorant of the other options. Apologies if this comes across as threadjacking, but I think those who choose a ball valve or something like this because they think nothing else is available are ignorant of precisely what is available. This ignorance seems to lead to hyperbolic statements like how this "unlocks a new age of homemades."

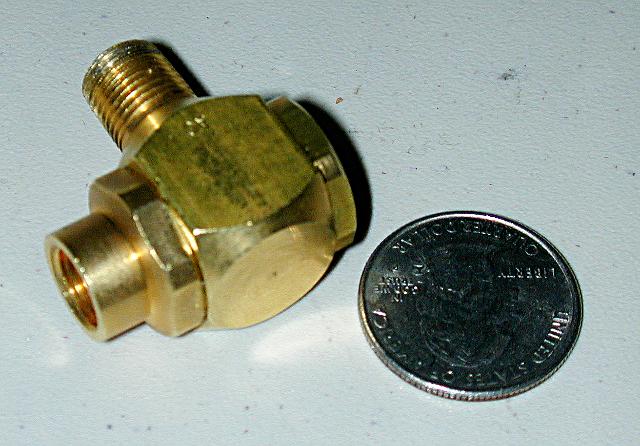
At the moment I prefer quick exhaust valves. QEVs are reasonably cheap off-the-shelf components designed to be reliable over hundreds of thousands of cycles. They are made from metal, which I've made a requirement in my pneumatics for components under continuous stress from pressure. They can operate however you want them to. I've seen configurations for single shot, semi-auto, and even full-auto. They come in all sizes. They actuate fast. They're great all around.

Below is a photo of one I plan to use in a Nerf gun (Clippard JEV-F2M2) next to a quarter.

Posted Image

The main disadvantages of QEVs are that they requre a pilot valve to actuate the QEV (I use Clippard's MJVO-3) and that they are relatively expensive. They cost perhaps more than what you describe here Lt. Stefan, but they certainly are cheaper if you factor in labor.

To me, there's no reason to screw around with homemade valves given the huge advantages off-the-shelf valves offer.

If you're going for completely homemade, I suppose this would be one way to do it, but I don't see any compelling reason to do this aside from some desire for "homemade purity." And at that point you might as well buy a mill and lathe.

By the way, you can buy QEVs at places like McMaster-Carr and Fastenal (in their stores or online). And there are many Clippard distributors. I've had someone tell me they found a Clippard distributor only a block or two away from their workplace.

To respond to some of what Lt. Stefan addressed below, these can be found locally as I mentioned in the paragraph above (though I don't suspect this is an issue for most). As for complexity, I find buying an item that only needs to be threaded on to other ones far simpler than the build procedure here.

Edited by Doom, 08 March 2010 - 12:08 AM.

  • 0

#22 Lt Stefan

Lt Stefan

    Member

  • Members
  • 892 posts

Posted 07 March 2010 - 11:48 PM

I'm not sure I know what to say to this. All I wanted to do was build a tank that operated the same way as you find in off the shelf blasters. I have never used a QEV before so I can't say that I wouldn't like it, but I can say that this PVAT is what I wanted to build. I am not saying it is the best or most efficient way to get this done, but it's made from materials you can get at Home Depot and it's not made with something you have to order online and would be complicated for the average nerfer.
  • 0

#23 CaptainSlug

CaptainSlug

    Resident Mad Scientist

  • Administrators
  • 4,763 posts

Posted 08 March 2010 - 12:46 PM

Below is a photo of one I plan to use in a Nerf gun (Clippard JEV-F2M2) next to a quarter.

That's going to have a really low flow rate and won't perform very well when it comes to firing darts.

The whole point of being able to build a valve yourself is that it will be dirt cheap, simple, and perform as you need it to.

Edited by CaptainSlug, 08 March 2010 - 12:47 PM.

  • 0
The little critters of nature, they don't know that they're ugly. That's very funny, a fly marrying a bumble bee. I told you I'd shoot, but you didn't believe me. Why didn't you believe me?

#24 minsc

minsc

    Member

  • Members
  • 154 posts

Posted 08 March 2010 - 12:50 PM

The thing that I'm most impressed with, is the fact that you took the time to build it. This design was part of a concept thread a year ago or two, and everyone just bickered back and forth for 3 pages about whether the pullback rod in the back would seal or not. This is simple and effective, and I look forward to your revisions.

Here's an older design by NerfCrazy
And...
Aformentioned Bitch Thread. Galaxy613's design may work for a smaller, more war legal airtank
  • 0
QUOTE(Zorn's Lemma @ Jul 25 2010, 12:18 AM) View Post

You'll do a lot better if you spread the lips with the front. Trying to wriggle the back in there first seems a bit counterintuitive.

RSCBow

#25 Doom

Doom

    NH's Official In-House Physicist

  • Administrators
  • 559 posts

Posted 08 March 2010 - 01:09 PM

That's going to have a really low flow rate and won't perform very well when it comes to firing darts.

The whole point of being able to build a valve yourself is that it will be dirt cheap, simple, and perform as you need it to.


How do you know that it won't perform well?

I haven't used this one yet, but I've been told by someone who has that it works great for Nerf. That's why I selected it. The valve's Cv value is about 1.1, which is better than most valves in Nerf as far as I know. Anyway, if it doesn't work well, I could upgrade, so there's no real problem.

Edit: I just tested it. At about 80 to 90 psi the dart penetrated two layers deep in cardboard. At about 40 psi it did not penetrate the cardboard and seemed to be good for Nerf. Given the size and price, this valve is a fantastic deal.

I'll leave this for now. Homemade valves are not the only option and I think people would be far better served by off-the-shelf components. If people choose homemade valves, that is their decision, but I think that's silly when there are options that work better for far less effort, even if they are somewhat more expensive. The effort required to make a valve easily offsets the money saved, which is exaggerated at best anyway.

Edited by Doom, 08 March 2010 - 09:47 PM.

  • 0


0 user(s) are reading this topic

0 members, 0 guests, 0 anonymous users