Jump to content


Photo

The 65-b 6 Barrel Buzz Bee Big Blast

Rear loading.

18 replies to this topic

#1 cheyner

cheyner

    Member

  • Members
  • 240 posts

Posted 02 March 2010 - 10:36 PM

I was sitting around one night when I just happened to look at a Tek 6 turret that was laying next to a Big Blast, when I noticed the Tek 6 turret is the same size as the opening in the front of the Big Blast. Right away I knew what had to be done, that turret needed to go into that Big Blast.

Materials:
Buzz Bee Big Blast
Tek 6 Turret (I suggest one that does NOT have cross style posts)
6ish feet of cpvc (much, much less if you use another barrel material)
4ish inches of 1/2" pvc
1 cpvc coupler
1 cpvc street elbow
1 pvc coupler (or whatever you use to couple a Big Blast)
Glue of some sort
Dremel


First start with your turret. I highly suggest NOT using one with cross style posts. These turrets are one solid peice with the posts glued from the back.
Posted Image
Posted Image


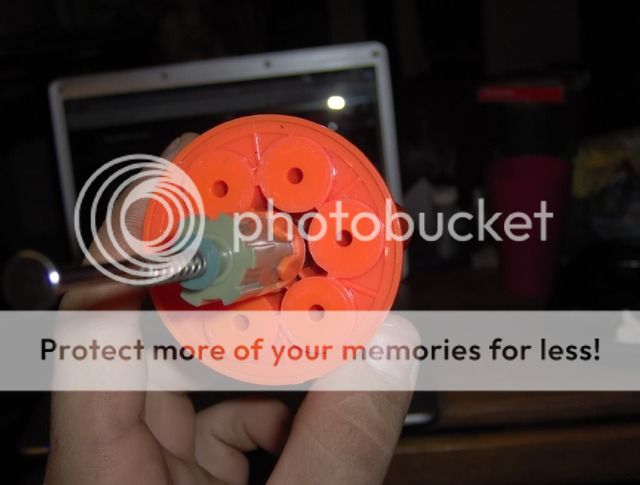
Remove the screw from the front and take out the star shaped peice, this will be important so dont lose it. Now remove the posts with your desired method. I twisted off the posts and then hammered out the rest with a metal rod I had lying around. You have now created your perfect rear loading holes in the back of the turret. You will also notice that the rotation mech is attatched to the barrels. This is why you dont want to use this turret if you can avoid it. Huge pain in the ass.
Posted Image
Posted Image


Time to bust out the dremel. Basically cut off everything, try and save as much of the slots that the rotation mech slides in as you can. I noticed these too late, and as such mine are a bit short, well the perfect length, but i wish they were just a bit longer. To remove the rotation mech just cut around the hole the screw goes in and it should fall right out. In the end you should have this:
Posted Image
Posted Image


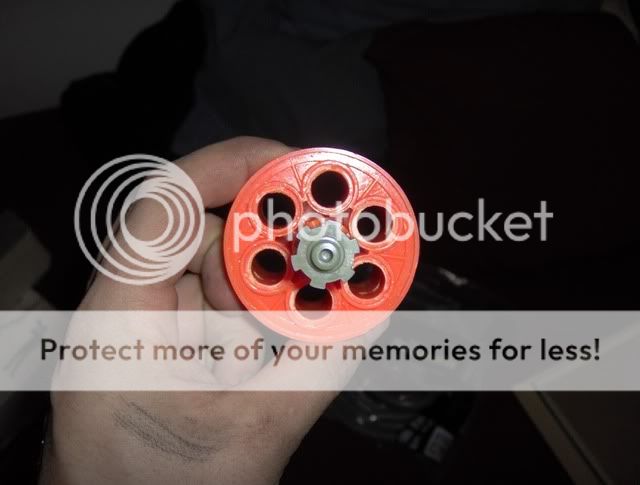
The second star shaped piece has been stolen from another Tek 6. It's more or less a cosmetic peice on this style of turret so it will not be missed on a stock blaster. Enlarge the hole so that the screw can fit through it.
Posted Image


Cut a length of cpvc, the length depends on your screwdriver. Cut it as long as the shaft on your screwdriver.
Posted Image


Sand down the ends so that your star shaped peices can fit on. Glue them in place, you now have a good length barrel spacer.
Posted Image

Picture limit

Edited by cheyner, 04 March 2010 - 12:23 AM.

  • 0

Beaver's post claiming Kane's post claiming Demon Lord's post is correct is correct is correct.


Canadian Nerfers-R.I.P.

#2 cheyner

cheyner

    Member

  • Members
  • 240 posts

Posted 02 March 2010 - 10:38 PM

Set these peices aside, we will come back to them after we have something to hold them.
Grab the tee and cut the top coupler off. Sand out the hole so that the street elbow will fit.
I found that the sanding drum dremel attatchment is a perfect fit.
Posted Image
Posted Image


Take the street elbow and cut a notch in it so air can still pass freely in the tee. Only on one side though.
Posted Image


Cut a section of cpvc (mine was roughly 2 1/2" it can be longer, or shorter) and glue it into the street elbow. Now glue the elbow into the top of the tee. I sanded them down on the top (tee) and bottom (elbow) so they would fit together better.
Posted Image


Grab your rotation mech and cut off the back half of the teeth-dealies. You can cut off all of the teeth, or leave 2 like I did. This is because the rotation mech with the teeth off is a tight fit in 1/2" pvc and I am not glueing it in, the teeth are just a little added assurance that im not turning the rotation mech in the pvc. Cut 2 notches big enough to fit those teeth in the end of the pvc. Stick the rotation mech in the pvc and cut the pvc down so that there is about half an inch of space behind the rotation mech.
Posted Image
Posted Image


Cut a bit of cpvc, around 1 1/4". Sand down one end so that it fits in the pvc. Fill it with hot glue and glue it into the tee. Now glue on the pvc.
Posted Image


Cut 2 rings of pvc about half an inch long. Cut a notch into one so that it will not hit the tee, glue this peice onto the end of the cpvc sticking out of the elbow. Cut a 1" section of cpvc and sand down one end enough so that the other pvc ring fits. Glue this onto the other end of the tee.
Posted Image


Now for the fun part, the barrels. Slide the turret base over the rotation mech and then slide the rotation mech into the pvc.
Posted Image
  • 0

Beaver's post claiming Kane's post claiming Demon Lord's post is correct is correct is correct.


Canadian Nerfers-R.I.P.

#3 cheyner

cheyner

    Member

  • Members
  • 240 posts

Posted 02 March 2010 - 10:39 PM

Screw the spacer onto the rotation mech and start glueing on the barrels. While you do this, you have to make sure that the rotation mech stays in the tabs.
Posted Image


The main reason the rotation mech is not glued to the pvc is for fine tuning. For the seal I used a bit of arrow foam, glue the foam to the pvc/cpvc on the elbow. To stabilize the turret i cut a bit of the original barrel and notched it so that it fits the pvc rotation mech holder. Foam has been glued to this as well to help put a little bit more pressure on the top. Another thing I did to improve the seal a bit was fill the back of the turret with hot glue.
Posted Image
Posted Image
Posted Image


Cut the barrel off of your Big Blast and slap a 1/2" pvc coupler on there however you see fit.
Cut a hole in your Big Blast shell for rear loading the turret. Close the shell back up and insert the tee into the coupler.
Posted Image
Posted Image
Posted Image
Posted Image


Finished.
No ranges yet, as its too cold and windy to bother.
All measurements are guesstimates.
The barrels are temporary as well so I dont want to hear about how shitty they look.
Questions? Comments?

Edited by cheyner, 02 March 2010 - 10:44 PM.

  • 0

Beaver's post claiming Kane's post claiming Demon Lord's post is correct is correct is correct.


Canadian Nerfers-R.I.P.

#4 Blue

Blue

    Member

  • Members
  • 2,222 posts

Posted 02 March 2010 - 10:44 PM

Wow, that is really cool. Nice job with the CPVC and PVC tweaking, the gun looks great.
  • 0

#5 bleachmaniac

bleachmaniac

    Member

  • Members
  • 7 posts

Posted 02 March 2010 - 10:45 PM

Wow. That's simply amazing.

However, although I've never integrated a turret onto a non-turret blaster, I wonder if the added weight in front of the blaster will detach the coupler from the blaster or not. Is there something that will support the added weight or is it alright the way it is ?
  • 0

#6 berserker

berserker

    Member

  • Members
  • 23 posts

Posted 02 March 2010 - 10:58 PM

I normally never post, but I had to say - that's fucking amazing. It looks so clean and sounds so effective. Good job.
  • 0
"He who can modify his tactics in relation to his
opponent and thereby succeed in winning, may be
called a heaven-born captain."
-Sun Tzu.

#7 ahtanie

ahtanie

    Member

  • Members
  • 80 posts

Posted 02 March 2010 - 11:16 PM

That's freaking cool. Mad props!
  • 0

#8 HOTH

HOTH

    Member

  • DO NOT TRADE
  • 557 posts

Posted 02 March 2010 - 11:25 PM

The rear loading is the sexiest thing I have ever seen on a big blast. Dude, you have accomplished something great.
  • 0
My YouTube

Solved the Rubik's Cube in 46 seconds

"Nobody understands quantum mechanics" - Richard Feynman

#9 cheyner

cheyner

    Member

  • Members
  • 240 posts

Posted 02 March 2010 - 11:28 PM

However, although I've never integrated a turret onto a non-turret blaster, I wonder if the added weight in front of the blaster will detach the coupler from the blaster or not. Is there something that will support the added weight or is it alright the way it is ?


The barrel is cut off at the first plastic wall with a nub sticking out flush with the inside of the coupler. The coupler is crazy glued and hot glued to both the barrel and the shell.
I took a shit load of pictures, but for some reason none with the shell open.

Thanks for all of the positive feed back so far everybody.
  • 0

Beaver's post claiming Kane's post claiming Demon Lord's post is correct is correct is correct.


Canadian Nerfers-R.I.P.

#10 Phree Agent

Phree Agent

    Member

  • Members
  • 402 posts

Posted 02 March 2010 - 11:34 PM

Craftsmanship here is top notch. I appreciate mods that look good and function well. Congrats, not to mention this may be the first BBBB mod in a while that actually makes me want to buy one.
  • 0

#11 nostyleguy

nostyleguy

    Member

  • Members
  • 54 posts

Posted 03 March 2010 - 12:37 AM

That looks amazing.

Is the tek 6 turret piece actually stabilized in the 'end cap' of the BBBB? if not, would it be practical to move the entire turret assembly back to the very beginning of the BBBB tank and thus minimize the overall length of the gun by about 6 inches?
I don't own a BBBB so i'm not sure how narrow the actual internals are, but there seems to be a lot of unnecessary length of 'barrel' before the end of the blaster (in all BBBB's)
  • 0

#12 CA13

CA13

    Nude Nerfer

  • Members
  • 234 posts

Posted 03 March 2010 - 07:35 PM

Sweet. Couldn't you stick some epoxy on the side of the street elbow cut (facing the rotation mech) to seal it better? It would suck if that redirection work was leaking out air. Also, at the turret seal, you could cut half of an end cap and stick it on the end, leaving an inner "lip" for a rubber gasket to be seated.
  • 0
Doing this as I speak. I have no idea when I got it...my DAD got it some 15 years ago, but that doesn't matter. Anyways, it keeps jerking around all over the place. I try to hold it with a rag...It doesn't look like...much.

#13 billyblue888

billyblue888

    Member

  • Members
  • 39 posts

Posted 03 March 2010 - 07:52 PM

The rearloading is really cool good job.
  • 0

#14 archangel24

archangel24

    Member

  • Members
  • 215 posts

Posted 03 March 2010 - 10:24 PM

Nice Job, to me it sort of looks like it cam that way Because it is so clean on the outside.
  • 0
QUOTE(Talio @ Oct 14 2010, 10:37 PM) View Post

I would much perfer a game that's free of KY. I like it rough. Right, Vacc?

"She went all Ghetto Fab on you."

#15 Griff Zombie

Griff Zombie

    Member

  • Members
  • 18 posts

Posted 03 March 2010 - 11:07 PM

On the topic of your barrells, I suggest PETG, possiby from OMC. All in all it seems very simple yet effective, you may.want to seal your rearloding slot so your not loosing darts into your gun. Do pics if you replace the barrells soonish.
  • 0
I'm here, I'm ''Nerfing''

#16 jerm78

jerm78

    Member

  • Members
  • 243 posts

Posted 03 March 2010 - 11:11 PM

Wow! I gotta try this
  • 0

#17 cheyner

cheyner

    Member

  • Members
  • 240 posts

Posted 04 March 2010 - 12:17 AM

Is the tek 6 turret piece actually stabilized in the 'end cap' of the BBBB? if not, would it be practical to move the entire turret assembly back to the very beginning of the BBBB tank and thus minimize the overall length of the gun by about 6 inches?
I don't own a BBBB so i'm not sure how narrow the actual internals are, but there seems to be a lot of unnecessary length of 'barrel' before the end of the blaster (in all BBBB's)


Once I get ahold of some e-putty it will be supported on the lip, it more or less just needs to have a slot built. It's literally like Buzz-Bee was going to do this themselves, the turret is a perfect fit.
And you could easily move this back with some more cutting, as is I can pull the whole thing off and stick it on any other gun with a 1/2 inch pvc coupler.

Sweet. Couldn't you stick some epoxy on the side of the street elbow cut (facing the rotation mech) to seal it better? It would suck if that redirection work was leaking out air. Also, at the turret seal, you could cut half of an end cap and stick it on the end, leaving an inner "lip" for a rubber gasket to be seated.


Foam was all I had handy at the time. I am deffinantly going to try that end cap idea, but instead of the end cap I'm going to move the pvc section up a hair. As is though, the foam slides much better over the glue then rubber would. I am hoping to eventually replace the glue with e-putty, or something similar.

On the topic of your barrells, I suggest PETG, possiby from OMC. All in all it seems very simple yet effective, you may.want to seal your rearloding slot so your not loosing darts into your gun. Do pics if you replace the barrells soonish.


Once there is room in my budget I will be shooting a pm to whoever is selling at the time, which would be Split at the moment. The barrels are a bit tight for an air-gun, so I'm not to worried about darts falling out.
Plus, the only things that are cut on the shell are the rear loading slot and the orange ring on the front, so darts wont go to far if they do fall out.


Once again, thanks for all the positive feed back.
  • 0

Beaver's post claiming Kane's post claiming Demon Lord's post is correct is correct is correct.


Canadian Nerfers-R.I.P.

#18 mcwario13

mcwario13

    Member

  • Members
  • 18 posts

Posted 05 September 2010 - 02:28 PM

Wow. I find this very helpful and amusing. Where can i get an aluminum trigger for a bbbb?
  • 0
If your gonna do this just shove some taggers in a 12 gage! jese!!

#19 VACC

VACC

    Vacc is Legend

  • Founders
  • 3,265 posts

Posted 05 September 2010 - 03:37 PM

Wow. I find this very helpful and amusing. Where can i get an aluminum trigger for a bbbb?


This thread is 6 months old and your post adds nothing. Read the code of conduct and follow it.

Replying to this thread from this point forward will also constitute a violation of our c.o.c.
  • 0


1 user(s) are reading this topic

0 members, 1 guests, 0 anonymous users