Jump to content


Photo

Home-rigged Vertical Lathe

For CPVC

18 replies to this topic

#1 cheesypiza001

cheesypiza001

    Member

  • Members
  • 752 posts

Posted 06 February 2010 - 05:33 PM

VIDEO

Let me know what you think. Thanks for watching.


Posted Image


Here are some pictures of how I got the CPVC to lock into the chuck:

Posted Image

Posted Image

The blue (or purple) pen body is filled with hot glue and has a hole drilled through both sides which lines up with an identical set of holes in NF laser tube that has a larger outer diameter than the pen body and therefore allows the pen body to fit inside with a tight squeeze. A metal pin is then hammered through the holes to ensure that the reducers do not fall out. As I just said, it's basically just a system of reducers to make it possible for the CPVC to be "anchored" in.

Edited by cheesypiza001, 07 March 2010 - 09:04 AM.

  • 0

#2 Hipponater

Hipponater

    Member

  • Members
  • 297 posts

Posted 06 February 2010 - 05:38 PM

Thoughts include: Risky, shoddy, dangerous.

Really just not worth it. You're using pliers in place of actual lathe tools as well. It's an accident waiting to happen.
  • 0

#3 cheesypiza001

cheesypiza001

    Member

  • Members
  • 752 posts

Posted 06 February 2010 - 05:47 PM

Thoughts include: Risky, shoddy, dangerous.

Really just not worth it. You're using pliers in place of actual lathe tools as well. It's an accident waiting to happen.


I am aware that pliers are not the best tool to be using for this, but I have to say, they work quite well. The only major problem I have encountered is that if I grind away for too long, the CPVC will heat up too much and will melt apart. However, this issue could be fixed if I laid the whole thing horizontally and had a small amount of water flowing onto the CPVC where I was grinding away.

Also, I do not intend to use this for anything serious. It was simply just a quick experiment to see if it would work. I realize that this is not very practical and somewhat dangerous.
  • 0

#4 LotusNerf

LotusNerf

    Member

  • Members
  • 143 posts

Posted 06 February 2010 - 06:39 PM

I actually really like the idea of making homemade rigs for tools. However dangerous, the purpose of them is to make for cheap. How much did it cost for materials? (Without the cost of the drill.)

-Lotus
  • 0

#5 Split

Split

    Member

  • Members
  • 1,771 posts

Posted 06 February 2010 - 07:13 PM

I'm gonna go ahead and say I'm really impressed. How much did it cost you? It seems like there would be a simpler solution to a few of the problems. For instance, for a trigger lock, you can do similar to what jig saws do and have a pin run through the depressed trigger. Instead of a cordless drill, a corded one will be more reliable.

I'm not quite sure why it's vertical, but I do like it a lot.
  • 0
Teehee.

#6 cheesypiza001

cheesypiza001

    Member

  • Members
  • 752 posts

Posted 06 February 2010 - 10:09 PM

I actually really like the idea of making homemade rigs for tools. However dangerous, the purpose of them is to make for cheap. How much did it cost for materials? (Without the cost of the drill.)

-Lotus


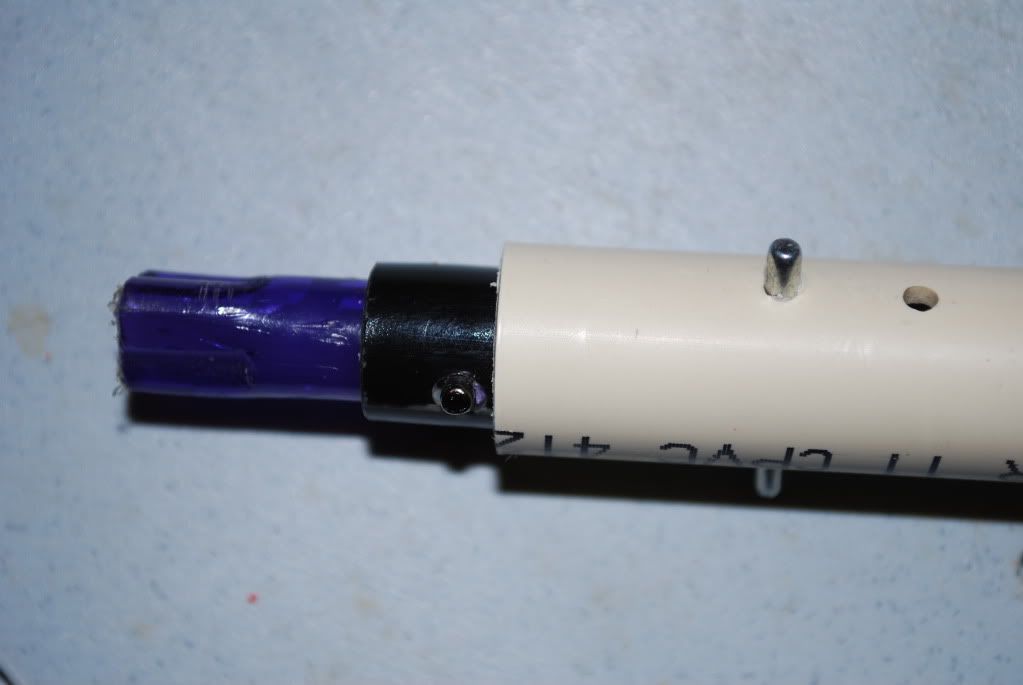
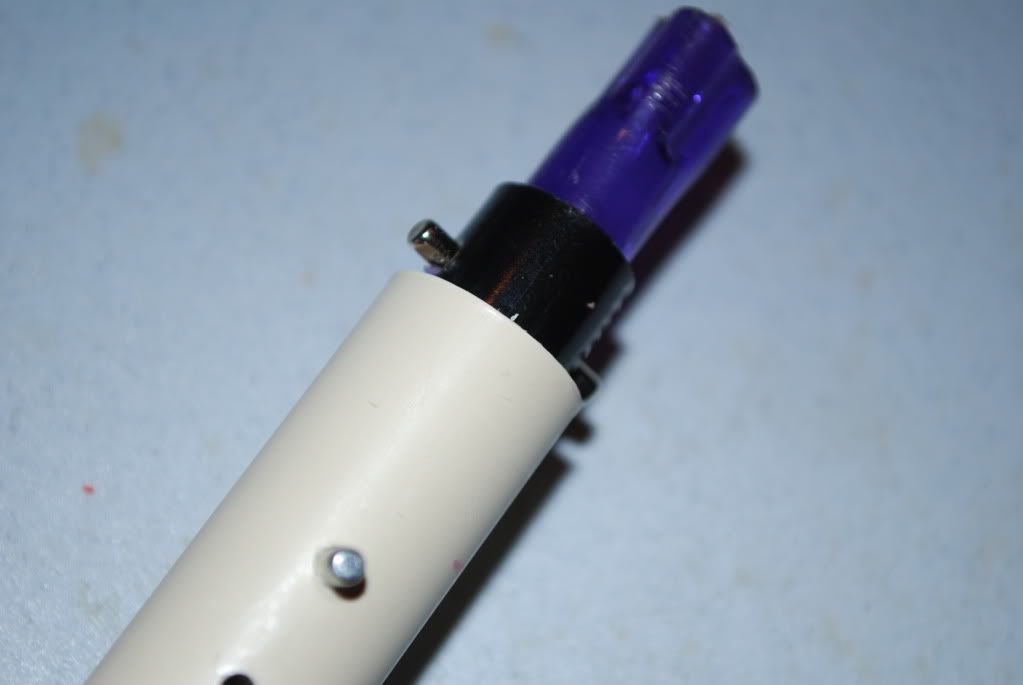
Without the drill and the press, I only used a 1" long piece of 1/2" PVC (drilled out with a 5/8" bit), CPVC, part of a pen, part of the laser tube from a NF, 2 metal pins, hot glue. However, that list does not include that parts/materials I used to refurbish the press.

I will post pictures at the top of the page that show how I got the CPVC to lock into the chuck, as the OD of the CPVC is too large to fit in it directly.


I'm gonna go ahead and say I'm really impressed. How much did it cost you? It seems like there would be a simpler solution to a few of the problems. For instance, for a trigger lock, you can do similar to what jig saws do and have a pin run through the depressed trigger. Instead of a cordless drill, a corded one will be more reliable.

I'm not quite sure why it's vertical, but I do like it a lot.


Thank you very much for the compliments.

Cost: I found the "drill press" in my garage. My dad bought it back in the 80's apparently. It is basically just a drill press that has a clamp for the drill so that you can switch out drills. Seeing as it was sitting in my garage for about 30 years, I had to spend a little while dusting the whole thing off, lubricating the knobs and levers, and adding in a spring so that the drill stayed up by default.

The trigger lock solution: Excellent idea, however, I first want to be sure that the trigger is just a hollow piece of plastic before I drill through it.

Corded Drill: The drill installed in the press is in fact a corded one.


Thanks for all the tips.
  • 0

#7 TantumBull

TantumBull

    Member

  • Moderators
  • 1,929 posts

Posted 06 February 2010 - 10:17 PM

This is real neat, great work. I guess my only question is what are you trying to achieve by being able to shave rings into CPVC? Is this for a specific project, or more of just a proof of concept sort of deal?
  • 0

#8 cheesypiza001

cheesypiza001

    Member

  • Members
  • 752 posts

Posted 06 February 2010 - 10:20 PM

This is real neat, great work. I guess my only question is what are you trying to achieve by being able to shave rings into CPVC? Is this for a specific project, or more of just a proof of concept sort of deal?


This technique can be used if the CPVC cannot fit into a barrel or other pipe because its OD is too large. In such a situation, one could simply decrease the outer diameter of the CPVC.
  • 0

#9 Broderick

Broderick

    Member

  • Members
  • 279 posts

Posted 07 February 2010 - 12:10 AM

This is real neat, great work. I guess my only question is what are you trying to achieve by being able to shave rings into CPVC? Is this for a specific project, or more of just a proof of concept sort of deal?


This technique can be used if the CPVC cannot fit into a barrel or other pipe because its OD is too large. In such a situation, one could simply decrease the outer diameter of the CPVC.

I do just that with a dremel, patience, and a good eye, but I think that's honestly just as dangerous as this homebrew lathe; I've breathed in more dust than I've needed to in the course of Nerf modifications.
My only concern with this would be firstly the CPVC wobbling and you injuring youself, but that was before I watched the video and saw you have a piece of PVC to act as a stablizer. But, after seeing how tight the fit looks* in the video, how hot does that piece get? It seems if you go too much without letting it cool down, that would melt, then the CPVC would become unstable.
Either way though, it's still pretty badass, and seems like it would have a lot of use, especially for making clean cuts. Everyone hates de-burring and sanding flush...
  • 0

#10 cheesypiza001

cheesypiza001

    Member

  • Members
  • 752 posts

Posted 07 February 2010 - 01:12 PM

This is real neat, great work. I guess my only question is what are you trying to achieve by being able to shave rings into CPVC? Is this for a specific project, or more of just a proof of concept sort of deal?


This technique can be used if the CPVC cannot fit into a barrel or other pipe because its OD is too large. In such a situation, one could simply decrease the outer diameter of the CPVC.

I do just that with a dremel, patience, and a good eye, but I think that's honestly just as dangerous as this homebrew lathe; I've breathed in more dust than I've needed to in the course of Nerf modifications.
My only concern with this would be firstly the CPVC wobbling and you injuring youself, but that was before I watched the video and saw you have a piece of PVC to act as a stablizer. But, after seeing how tight the fit looks* in the video, how hot does that piece get? It seems if you go too much without letting it cool down, that would melt, then the CPVC would become unstable.
Either way though, it's still pretty badass, and seems like it would have a lot of use, especially for making clean cuts. Everyone hates de-burring and sanding flush...


Yeah, I can see how people might think it's dangerous, but I don't see that anything that could go wrong. Every part of the setup is very stable. Also, this technique produces almost no dust whatsoever, just shrivels of CPVC. As for your dust problem, I highly suggest getting a respirator, as they are definitely worth the 40 or so dollars in the long run in terms of health. Lastly, I already mentioned that the melting was a small problem here.
  • 0

#11 JATDO

JATDO

    Member

  • Members
  • 350 posts

Posted 07 February 2010 - 05:49 PM

I have a feeling people think it is dangerous by the look of the giant rubber band on the top of the drill. Now that you say it is a drill press, it seems a alot safer. At first glance it just looks like you whipped it up in a few seconds.
  • 0
QUOTE
I remember when some girl in my English 101 class in college tried to cite The Onion as a source for her paper. The teacher lol'd.
QUOTE
The only time I got hit was when my spotter got hit and the enemy team realized there was a marksman in the bushes

#12 CA13

CA13

    Nude Nerfer

  • Members
  • 234 posts

Posted 07 February 2010 - 08:12 PM

Dude, it works better on the old oversized portable drills.
  • 0
Doing this as I speak. I have no idea when I got it...my DAD got it some 15 years ago, but that doesn't matter. Anyways, it keeps jerking around all over the place. I try to hold it with a rag...It doesn't look like...much.

#13 cheesypiza001

cheesypiza001

    Member

  • Members
  • 752 posts

Posted 07 February 2010 - 10:49 PM

I have a feeling people think it is dangerous by the look of the giant rubber band on the top of the drill. Now that you say it is a drill press, it seems a alot safer. At first glance it just looks like you whipped it up in a few seconds.


Yeah, I think you're right. The rubber band is only there to keep the drill at a certain angle and I don't know if you can tell from the picture, but the rubber band is extraordinarily strong. Even if the rubber band snapped (which it wouldn't), the drill would still not move to the weight of itself pushing it into the loop. Basically, the drill cannot turn or come out of the loop without me taking it out or turning it.

Dude, it works better on the old oversized portable drills.


This is an old oversized and extremely heavy drill. Like I said, it's from around the 80's.
  • 0

#14 Hipponater

Hipponater

    Member

  • Members
  • 297 posts

Posted 08 February 2010 - 12:54 AM

Ah, I thought the rubber band was holding up the drill, which would be pretty dangerous. Seeing as how it's based off of a real drill press, it's much more legit than a drill rubber banded onto a rod.

I'd recommend trying a chisel (if you have one) in place of the pliers. The sharper edge should give you a better edge than the roughness the pliers seemed to give you. Just be careful though.
  • 0

#15 cheesypiza001

cheesypiza001

    Member

  • Members
  • 752 posts

Posted 08 February 2010 - 06:08 PM

Ah, I thought the rubber band was holding up the drill, which would be pretty dangerous. Seeing as how it's based off of a real drill press, it's much more legit than a drill rubber banded onto a rod.

I'd recommend trying a chisel (if you have one) in place of the pliers. The sharper edge should give you a better edge than the roughness the pliers seemed to give you. Just be careful though.


The problem with doing something of that sort (using a blade of some type, a chisel, ect.) is that doing so will cause the CPVC to bend and become off center which will screw the whole thing up. The reason I used pliers was that I could grind away at the CPVC while stabilizing it with the pliers. However, I suppose I could mount a tool rest onto the side. I might be able to then use a chisel. I'll try that out.

Edited by cheesypiza001, 08 February 2010 - 06:09 PM.

  • 0

#16 CA13

CA13

    Nude Nerfer

  • Members
  • 234 posts

Posted 08 February 2010 - 11:39 PM

I'm talking 'bout the ones that have the same torque as pneumatic wrenches. Also you should rig it horizontally, and find some skateboard bearings for the other side of the chuck. I remember I made one of these with some bolted together angle iron, but I couldn't get it up high enough for woodturning.

If you need something better, try finding an electric motor from a washer/ dryer at a local surplus shop. Those things are fucking cake.
  • 0
Doing this as I speak. I have no idea when I got it...my DAD got it some 15 years ago, but that doesn't matter. Anyways, it keeps jerking around all over the place. I try to hold it with a rag...It doesn't look like...much.

#17 cheesypiza001

cheesypiza001

    Member

  • Members
  • 752 posts

Posted 09 February 2010 - 12:16 AM

I'm talking 'bout the ones that have the same torque as pneumatic wrenches. Also you should rig it horizontally, and find some skateboard bearings for the other side of the chuck. I remember I made one of these with some bolted together angle iron, but I couldn't get it up high enough for woodturning.

If you need something better, try finding an electric motor from a washer/ dryer at a local surplus shop. Those things are fucking cake.


The drill I am currently using has more than enough power to run this "lathe"...trust me. As for your other suggestion, I had already thought of creating a chuck like this (I'm pretty sure this is what you're describing):

Posted Image
(Not my photo)

However, I realized that it might be difficult to get the pipe perfectly centered when each of the 4 (or possibly 3) jaw bolts has to be tightened simultaneously. If they are not, then the pipe will be off center and even if it is only by 1/16", it will not be properly balanced resulting in inaccurate carving/grinding.
  • 0

#18 thedecimator

thedecimator

    Member

  • Members
  • 28 posts

Posted 09 February 2010 - 08:42 PM

I think this is awesome but for all those who want a cheap drill powered horizontal lathe check this out.
http://grizzly.com/products/H2669
  • 0
i got a night finder to go 300 ft.
then it smashed when it hit the pavement

#19 cheesypiza001

cheesypiza001

    Member

  • Members
  • 752 posts

Posted 10 February 2010 - 11:22 PM

I think this is awesome but for all those who want a cheap drill powered horizontal lathe check this out.
http://grizzly.com/products/H2669


Nice find.
  • 0


0 user(s) are reading this topic

0 members, 0 guests, 0 anonymous users