Jump to content


Photo

Semi-automatic Valve

** UPDATE PAGE 2 **

22 replies to this topic

#1 cheesypiza001

cheesypiza001

    Member

  • Members
  • 752 posts

Posted 15 November 2009 - 07:54 PM

This design is now obsolete. Check here for an updated version.

This is mostly a proof of concept and is also for testing purposes.

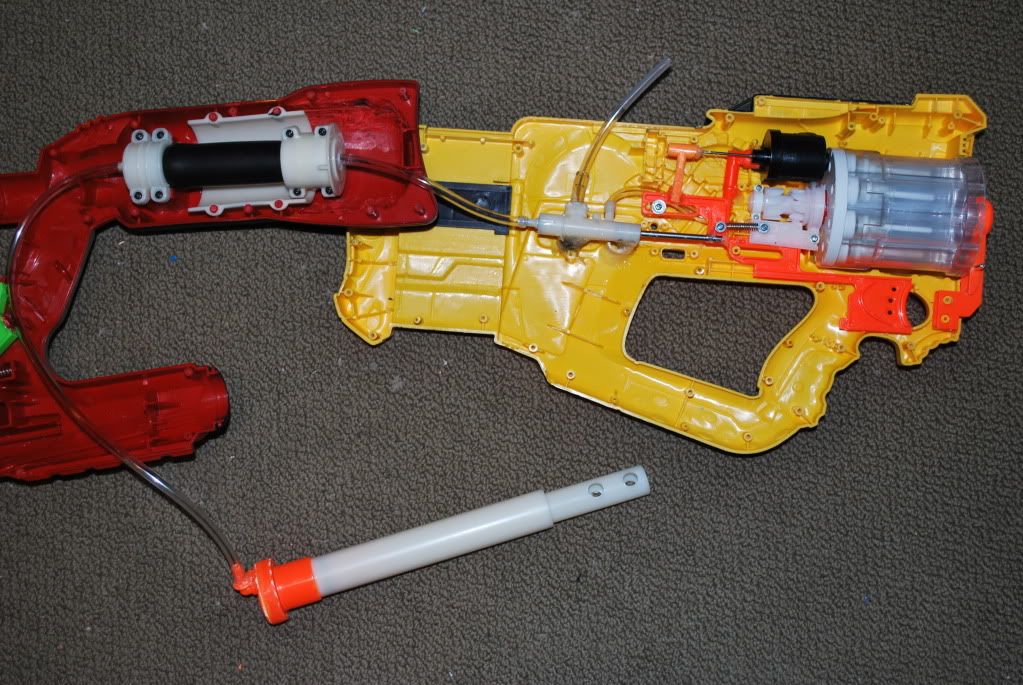
After seeing this post by southpaw, featuring a true semi-automatic AT2K, I became inspired to create one of my own (well, at least a variation of it). I read that he used a valve from a super soaker, which I did not have, so I set to work on creating one from a hornet trigger system. This is not a complete writeup, but the pictures will hopefully suffice.

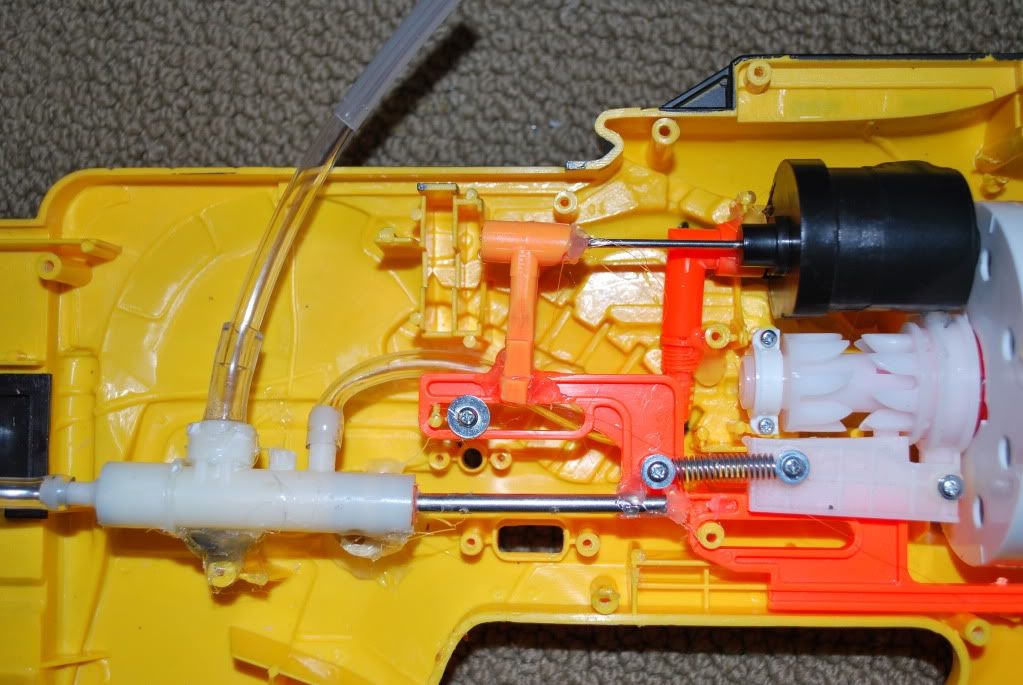
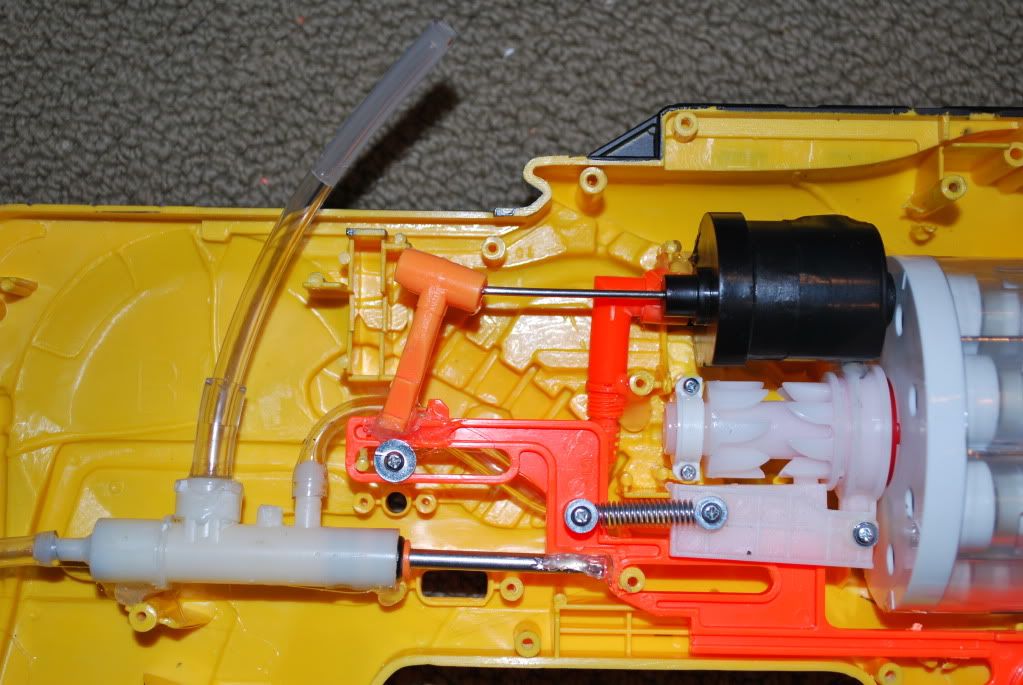
This is the basic idea of the whole thing.

Posted Image

Posted Image

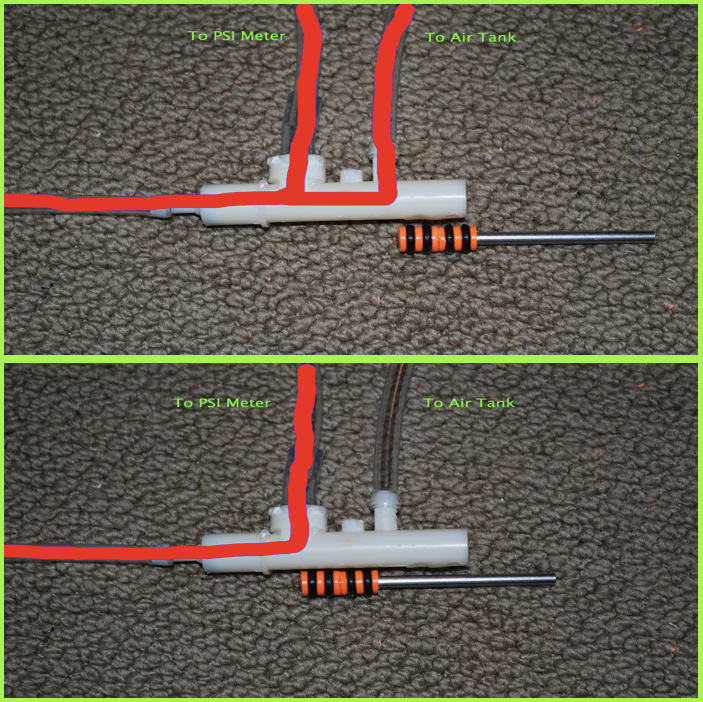
When the trigger is partially pulled, the valve quickly shuts closing the path for the air to reach the tank, then when the trigger is pulled the full way back, the tank is fired. This means that whenever the trigger is in the un-pulled position, the air from the bladder will rush in and fill the tank. However, once the trigger starts to be pulled backwards, it closes the bladder. This system makes the whole semi-auto system much more efficient. By employing this concept, no air is wasted in the entire process of firing and refilling.


Here's the writeup part of this topic:

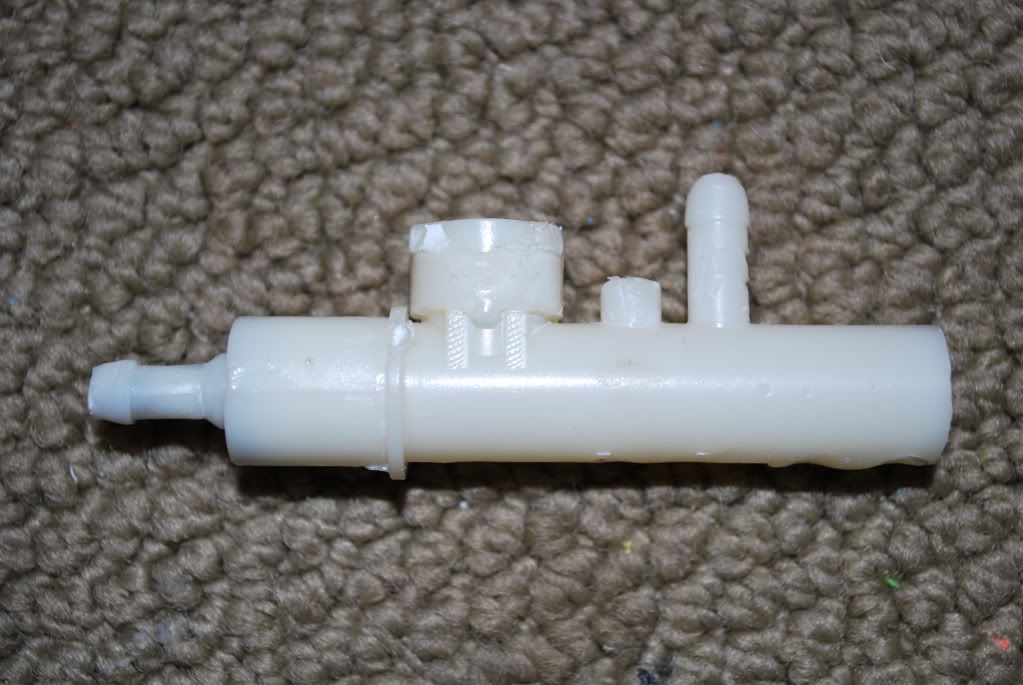
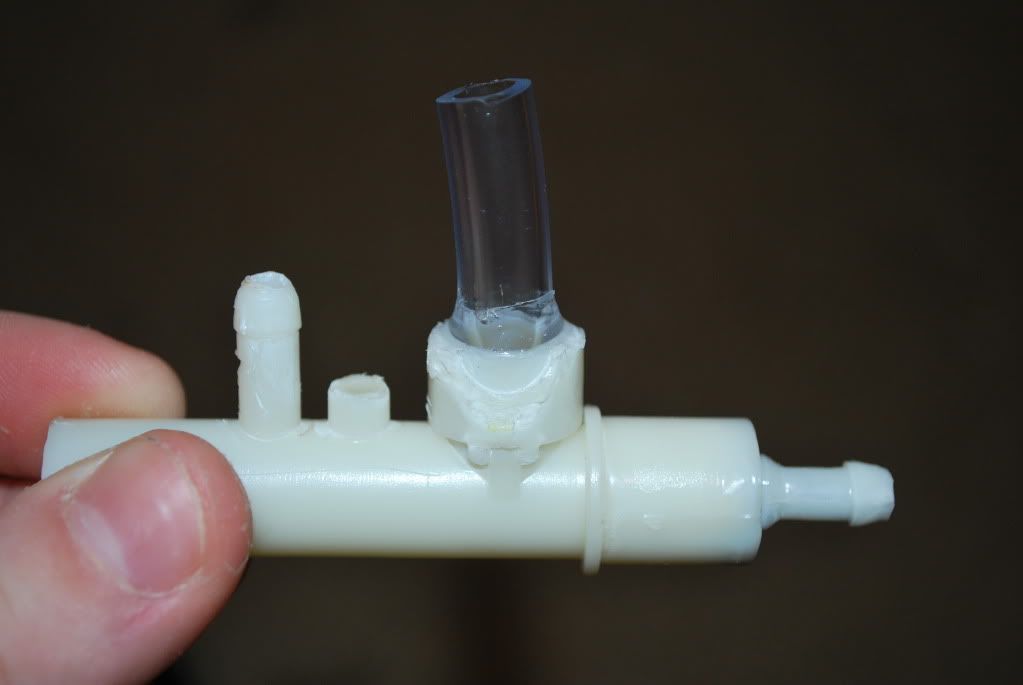
1. Cut your Hornet trigger system to look like this:

Posted Image


2. Fill the shown holes with hot glue.

Posted Image

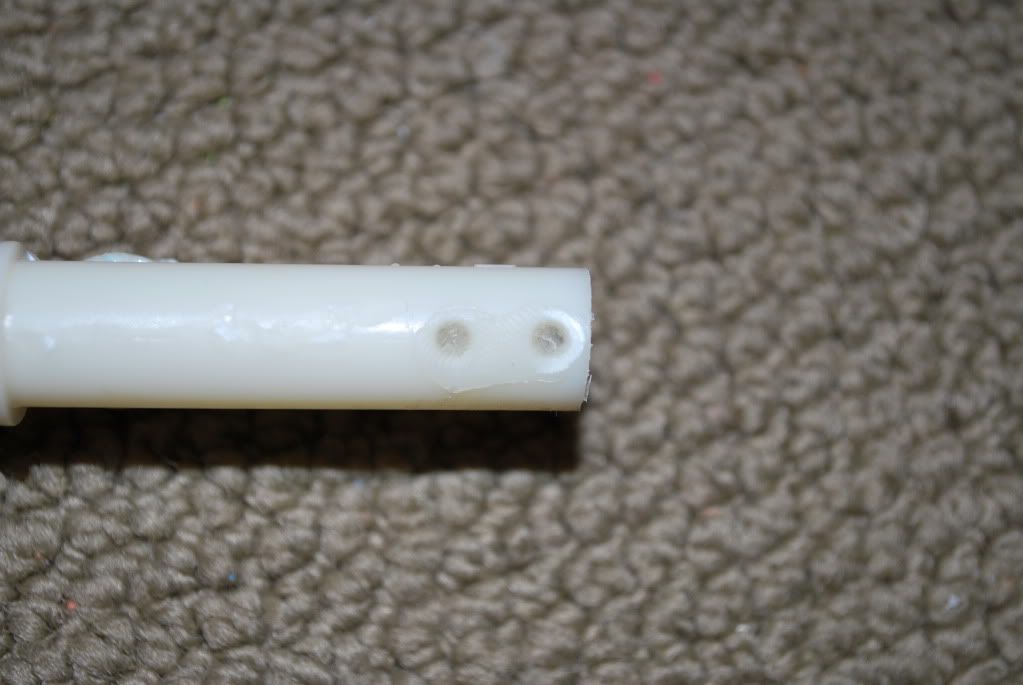
(middle hole in the second pic)

Posted Image


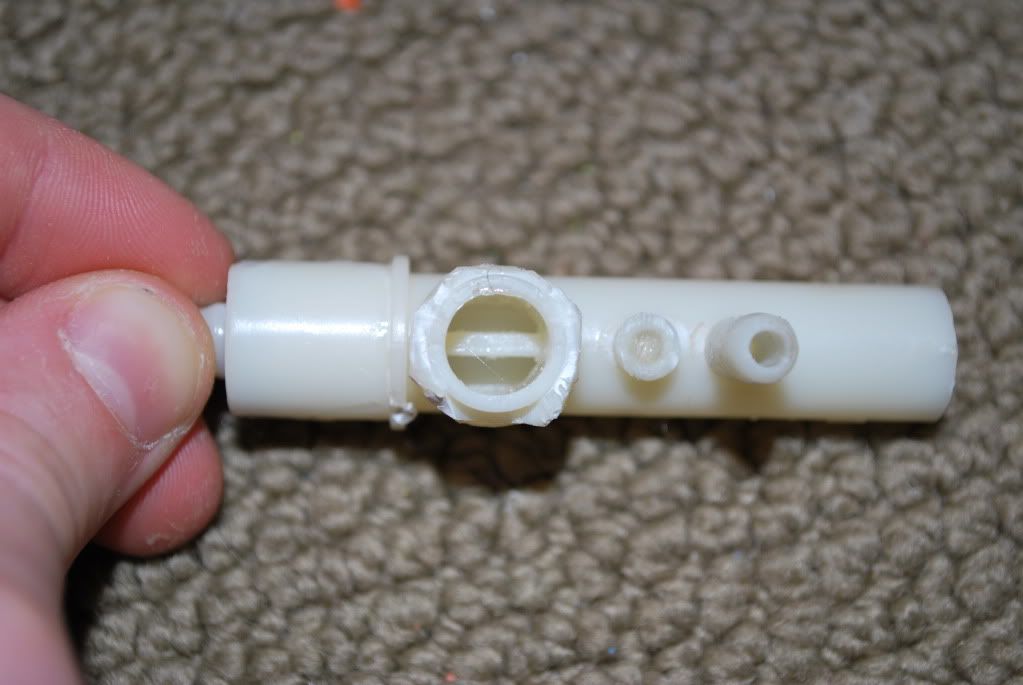
3. Drill a hole through the check valve in the part of the trigger.

Posted Image


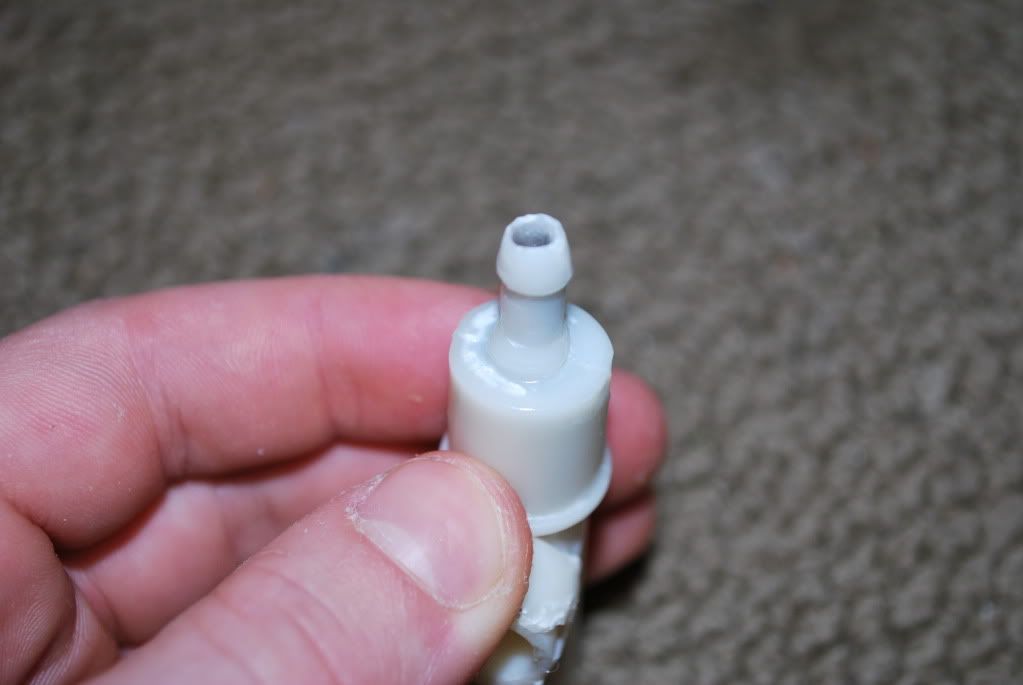
4. (This next part is optional. If you would like to install a PSI meter, then do this, but if not, then just fill the hole with hot glue.) goop a little stub of vinyl tubing the next size up from whatever vinyl tubing you usually use. This will act as a coupler for the vinyl tubing that connects to the PSI meter.

Posted Image


5. Cut off the heads of two hornet triggers.

Posted Image

Posted Image


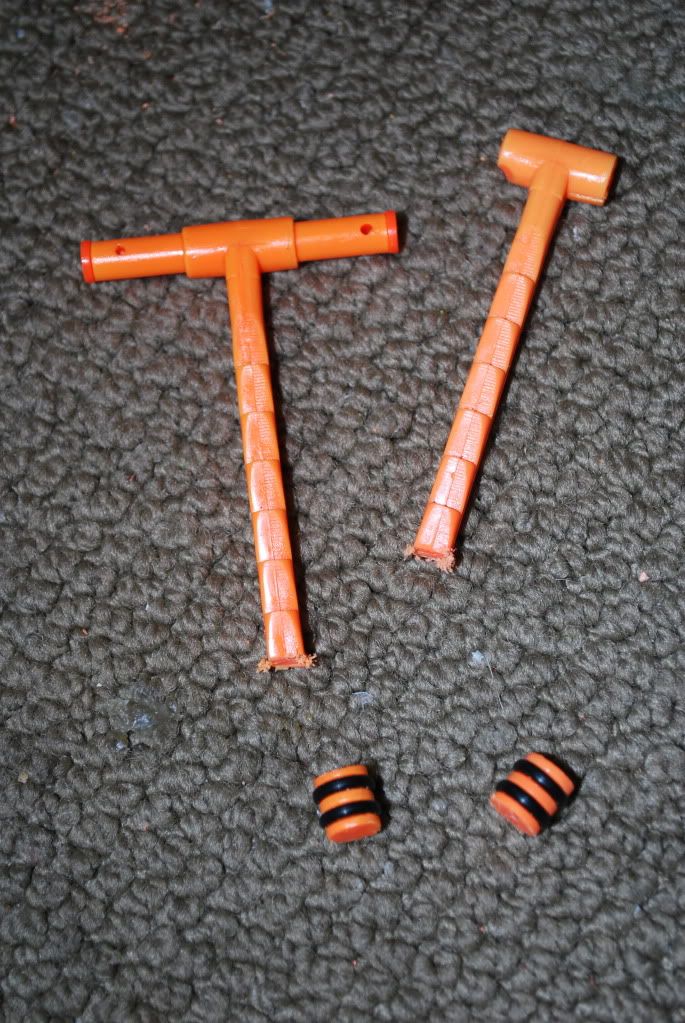
6. Find a long piece of metal rod. The diameter of the rod should be smaller than the diameter of the trigger heads. Drill a hole in both trigger heads that is as large as the diameter of the metal rod you chose.

Posted Image


7. Slide both heads onto one end of the metal rod and goop them in place.

Posted Image


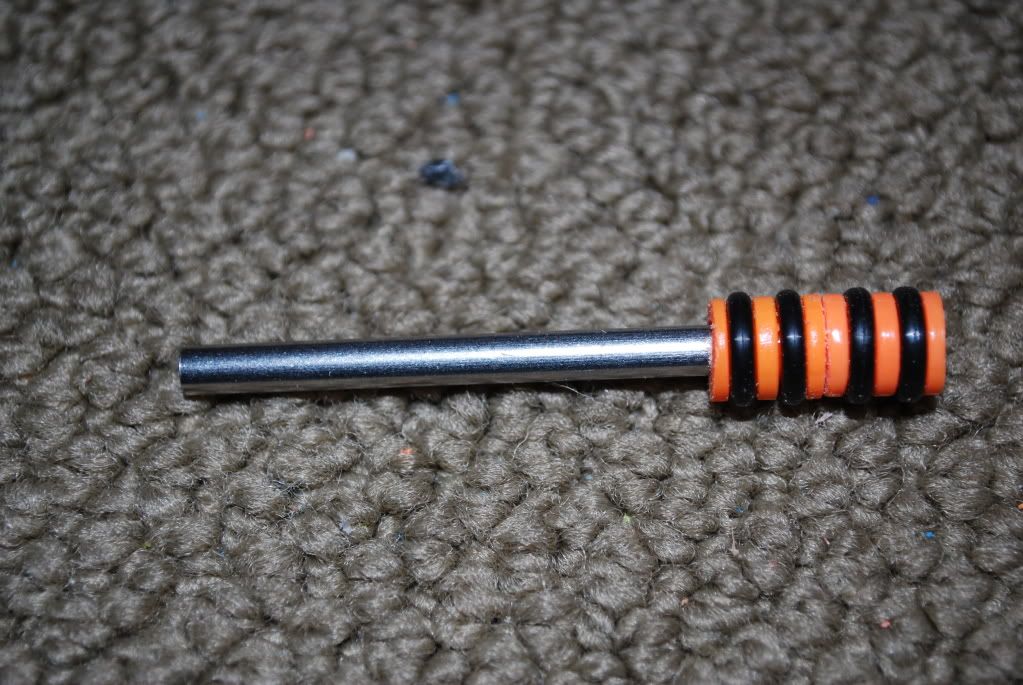
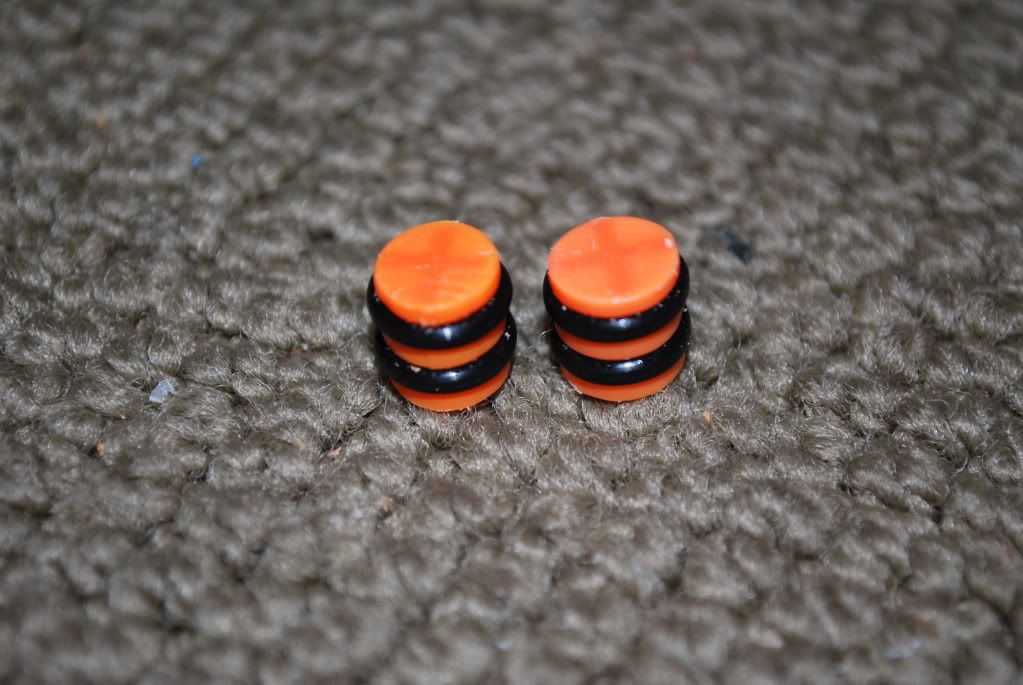
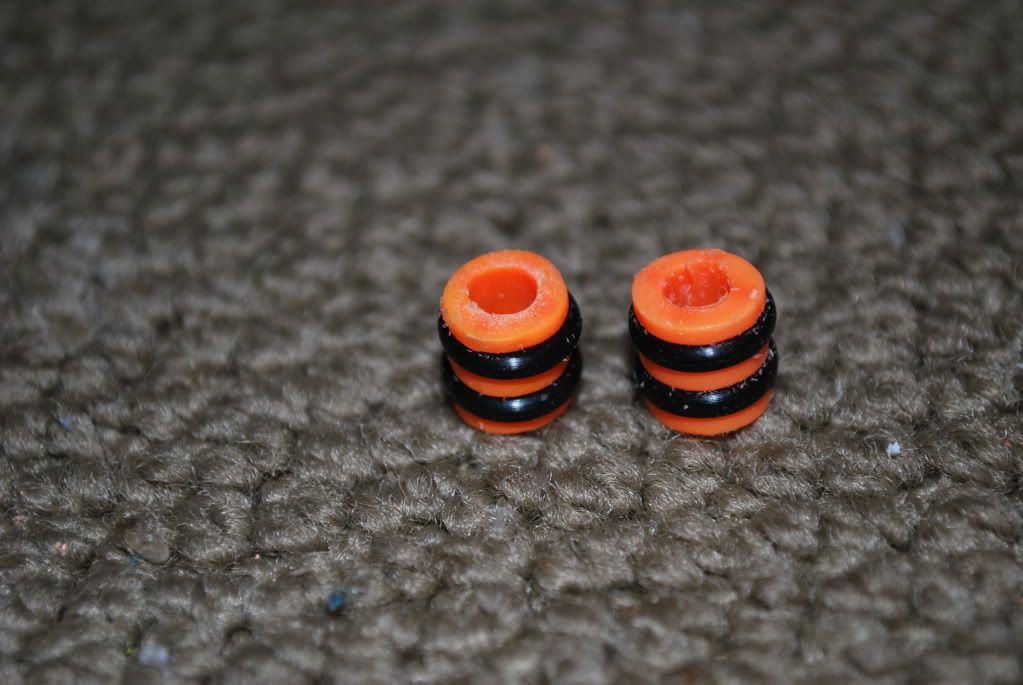
8. Wait for Goop to dry then apply the lubricant of your choice (I used lithium grease) to the O-rings, and insert the new trigger into the tube.


Your trigger system is now complete!

Posted Image


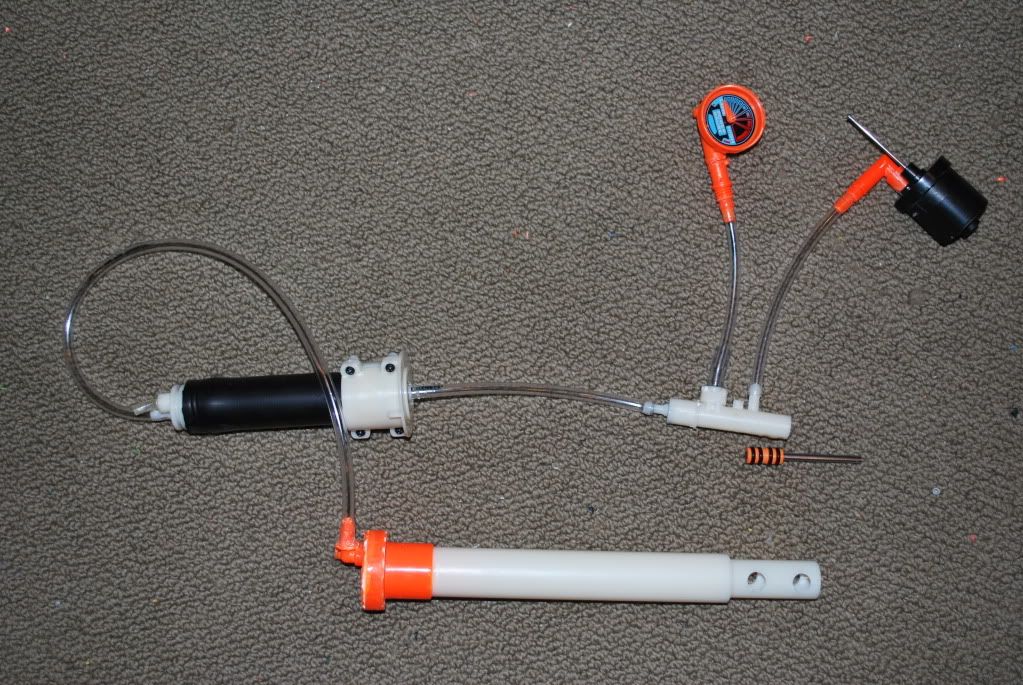
This is the final setup that I will employ in my soon to be primary. Though I pretty much revealed all of it, the rest is a surprise... ;)

Posted Image

Closeup:

Posted Image

The above picture is once again just a proof of concept. When I actually put this stuff into the Firefly shell, I will make everything more permanent.


Feel free to post with any questions, comments, or suggestions. Thanks.

Edited by cheesypiza001, 25 December 2009 - 12:53 AM.

  • 0

#2 nerfer63

nerfer63

    Member

  • Members
  • 386 posts

Posted 15 November 2009 - 07:55 PM

very good*evily laughs*.


N63
  • 0

#3 atomatron

atomatron

    Member

  • Members
  • 579 posts

Posted 15 November 2009 - 08:14 PM

Interesting, I entertained the idea of a semi auto blaster a while back, your design is pretty similar to the first design I came up with. The second design will someday be sported as a conglomeration of overkill.

Nice work.

Edited by atomatron, 15 November 2009 - 08:14 PM.

  • 0
Perche Germolgi. [Because it shoots]

Rainbow Clan

#4 Possemhunter

Possemhunter

    Member

  • Members
  • 138 posts

Posted 15 November 2009 - 09:14 PM

I love how you did this. This has to be the simplest semi auto configuration I've seen that looks like it works. Great job.
  • 0

#5 Hipponater

Hipponater

    Member

  • Members
  • 297 posts

Posted 15 November 2009 - 09:52 PM

Very nice. A good idea with solid execution.

I'm interested in how the ranges change with how many shots you do in succession, however. Is there a big drop, or a slow consistant decline, if any? I've never dealt with or seen a magstrike pump, so I don't know how well it refills the tank.
  • 0

#6 TantumBull

TantumBull

    Member

  • Moderators
  • 1,929 posts

Posted 15 November 2009 - 09:57 PM

The mod is cool and all, but there is one thing that really stood out tome in this thread. When I saw the title, I was like, well shit, some asshole connected a paintball tank to a big salvo and is calling it's nerf gun. Then I saw the pump and the MS bladder. Fucking props on not trying to ruin this hobby. And as I Said, your setup looks great but thisis what stood out to me.

Edited by TantumBull, 15 November 2009 - 10:01 PM.

  • 0

#7 freewave04

freewave04

    Member

  • Members
  • 4 posts

Posted 15 November 2009 - 09:58 PM

So...

Does it work?
  • 0

#8 Bedhed117

Bedhed117

    Member

  • Members
  • 184 posts

Posted 15 November 2009 - 10:30 PM

Thank you a million! I was in the process of building a semi auto and this saves me several hours of frustration trying to build my own design for a valve.
  • 0
QUOTE(Bedhed117 @ Aug 18 2009, 09:48 AM)

Anyone who's sig is a quote of themselves is an enormous douchebag.

Join the Revolution

#9 Phibonnachee

Phibonnachee

    Member

  • Members
  • 28 posts

Posted 15 November 2009 - 11:22 PM

Wow this is a really neat idea, and I just happen to have a broken hornet to use. I can see guns with rotating barrels that rotate from the trigger pull to have a great benefit from this (maverick).
  • 0
De-single your longshot Longshot --- 4B magazine breech BBBB

#10 cheesypiza001

cheesypiza001

    Member

  • Members
  • 752 posts

Posted 15 November 2009 - 11:29 PM

very good*evily laughs*.


N63


Thanks.

Interesting, I entertained the idea of a semi auto blaster a while back, your design is pretty similar to the first design I came up with. The second design will someday be sported as a conglomeration of overkill.

Nice work.


Good luck with your design and thanks for the compliment.


I love how you did this. This has to be the simplest semi auto configuration I've seen that looks like it works. Great job.


Yeah, I was looking for something pretty simple. However, I have a completely different approach to a semi-auto valve in the back of my mind that would be even much simpler than this. I'll keep you guys updated.

Very nice. A good idea with solid execution.

I'm interested in how the ranges change with how many shots you do in succession, however. Is there a big drop, or a slow consistant decline, if any? I've never dealt with or seen a magstrike pump, so I don't know how well it refills the tank.


I haven't really gotten that far yet. Every time, the back of the magstrike bladder blows off after I complete the second pump (Even though I clamped it on). Also, it has a titan pump, not a magstrike pump.

The mod is cool and all, but there is one thing that really stood out tome in this thread. When I saw the title, I was like, well shit, some asshole connected a paintball tank to a big salvo and is calling it's nerf gun. Then I saw the pump and the MS bladder. Fucking props on not trying to ruin this hobby. And as I Said, your setup looks great but thisis what stood out to me.


Thanks man. I'm all for keeping Nerf what it is, and so because of that, I think I may have to go have to using my SM1500 after completing this project, as it already seems to be "unfair." I was planning to add an airtight seal between the tank and the turret, replace the barrels with 12" PETG, add a spacer plate, and make it rear-loading. However, I feel that this could have a very negative effect on the mood of the game.

So...

Does it work?


Haha. Good question. As explained a few responses up, I have not yet been able to get it past two pumps. I will keep everyone updated so check back soon.

Thank you a million! I was in the process of building a semi auto and this saves me several hours of frustration trying to build my own design for a valve.


I would not suggest following this writeup until I have completed this design and made sure that it works 100%. Most of this lies in me getting a hose clamp to secure the bladder to the plastic end piece of the bladder.
  • 0

#11 Zorns Lemma

Zorns Lemma

    Sir Scrt

  • Moderators
  • 1,277 posts

Posted 16 November 2009 - 04:08 AM

Unless I'm mistaken in estimating the draws, you're going to have some air leak when you open the 2k tank valve and close the bladder->tank valve.

Hopefully because of the difference in ID between the valves, it won't be much, but you should look into making the "plug" on the trigger larger or adding a check valve right before the 2k tank.

Also, does it work without the bladder in the setup? (Just pump it straight up and then fire 1 shot). It seems like timing in the various phases of the trigger (tank valve, turret rotation, trigger valve) would be a bitch to synchronize.

Actually, if you swapped the 2k tank out for a backpressure tank, you could skip one of the timing parts entirely, and also not worry about air leak. The existing design hooked up to a bpr tank would work both to close the connection from the bladder and vent air for the dump valve in the air tank. Then you'd just have to synronize with trigger pull, but that's trivial since with only 2 pieces, and a the valve being able to be designed however you want, just make the valve close/vent at the very end of trigger pull.
  • 0
"In short, the same knowledge that underlies the ability to produce correct judgement is also the knowledge that underlies the ability to recognize correct judgement. To lack the former is to be deficient in the latter."
Kruger and Dunning (1999)

#12 TantumBull

TantumBull

    Member

  • Moderators
  • 1,929 posts

Posted 16 November 2009 - 10:17 AM

If you were going with a back pressure tank, at that point you could really just use a directional control valve, though I suppose this would be a cheaper set-up.
  • 0

#13 JATDO

JATDO

    Member

  • Members
  • 350 posts

Posted 16 November 2009 - 03:36 PM

Very Very cool. I would love to see this gun when it is finished. Great idea even if it doesn't work. You could try and make your own PVC tank to keep the pressure up. And the firefly has enough dead space in the shell to fit it.
  • 0
QUOTE
I remember when some girl in my English 101 class in college tried to cite The Onion as a source for her paper. The teacher lol'd.
QUOTE
The only time I got hit was when my spotter got hit and the enemy team realized there was a marksman in the bushes

#14 Blasphemy

Blasphemy

    Member

  • Members
  • 355 posts

Posted 16 November 2009 - 08:26 PM

Hell yes! *Dusts off Firefly and Hornet parts and cobbles them together.* Very good, I'm looking forward to this mod's completion because I have most of the parts sitting around out of use and all my ideas as to what to do with them were either way to ambitious or a total waste.

Now I just need to find something to use in place of the Magstrike bladder. Any suggestions?
  • 0
When speaking about a swallow, always make sure you know whether it is an African or European swallow. It is very important.

#15 cheesypiza001

cheesypiza001

    Member

  • Members
  • 752 posts

Posted 16 November 2009 - 09:49 PM

Okay I just got it to work.

I pumped it 4 times and I got off 5 shots. However, only the first 3 shots seemed to be powerful. In addition, it was extremely difficult to pull the trigger for the first shot. I will be able to get more accurate information once I brace down everything instead of just using hotglue. If I pump it anymore than 4 times, the hornet trigger system shoots backwards due to the force of the rod pushing outwards.

Here's a picture of my current setup:

Posted Image

Posted Image

Once again, feel free to post with any questions, comments, or suggestions.

Edited by cheesypiza001, 16 November 2009 - 09:53 PM.

  • 0

#16 OnyxZenith

OnyxZenith

    Member

  • Members
  • 191 posts

Posted 16 November 2009 - 10:47 PM

Damnit, you beat me to it, I was going to do this same idead with magstrike internals and put it in the deadspace of the furyfire! >:o
  • 0
SoothSayer-


"Just adding some lube and twisting it back and forth for a while should make it easier"

Subscribe to my Music page and mods >> http://www.youtube.com/user/OnyxMP312

#17 cheesypiza001

cheesypiza001

    Member

  • Members
  • 752 posts

Posted 16 November 2009 - 10:54 PM

This whole thing is really starting to piss me off right about now. The trigger (the actual firefly trigger) just got really messed up and suddenly, everything (about 5 different things) is starting to sprout a leak. Like I said, this is really frustrating me, so I think I will come back to this in a few days.
  • 0

#18 Hipponater

Hipponater

    Member

  • Members
  • 297 posts

Posted 16 November 2009 - 11:11 PM

This whole thing is really starting to piss me off right about now. The trigger (the actual firefly trigger) just got really messed up and suddenly, everything (about 5 different things) is starting to sprout a leak. Like I said, this is really frustrating me, so I think I will come back to this in a few days.


Is there goop on all the tubing to seal it? That alone can make a big difference in leaks. As for the firefly trigger, I'd replace some of the hot with epoxy or epoxy putty, especially the hot glue holding the part that pulls the AT3K tank pin.

Furthermore, I would band the bladder to squeeze it to higher pressures. Higher pressure will really help the air tank retain its power. As a side note, and out of curiosity, does anyone know what pressure air tanks typically use? Just PM me the answer if you know, not to clog up Cheesy's thread.

Also, JSB's idea would be good, though I can't visualize it now. Not having to work against the pressure would really help the trigger.

I'm really interested to see how this pans out, very nice.
  • 0

#19 cheesypiza001

cheesypiza001

    Member

  • Members
  • 752 posts

Posted 16 November 2009 - 11:26 PM

This whole thing is really starting to piss me off right about now. The trigger (the actual firefly trigger) just got really messed up and suddenly, everything (about 5 different things) is starting to sprout a leak. Like I said, this is really frustrating me, so I think I will come back to this in a few days.


Is there goop on all the tubing to seal it? That alone can make a big difference in leaks. As for the firefly trigger, I'd replace some of the hot with epoxy or epoxy putty, especially the hot glue holding the part that pulls the AT3K tank pin.

Furthermore, I would band the bladder to squeeze it to higher pressures. Higher pressure will really help the air tank retain its power. As a side note, and out of curiosity, does anyone know what pressure air tanks typically use? Just PM me the answer if you know, not to clog up Cheesy's thread.

Also, JSB's idea would be good, though I can't visualize it now. Not having to work against the pressure would really help the trigger.

I'm really interested to see how this pans out, very nice.


Actually, please post the bladder pressure here as well. Thanks. I know where to leaks are coming from and they are all easily fixable. One is coming from the tank. I accidentally cracked part of the tank when I used pliers to rip off the plastic stabilizer that holds the tank to the screws. Another is coming from the hornet trigger moving (also fixable. The others, I already fixed. Banding the bladder and using epoxy putty would definitely help, but I was first going to see if it worked (proof of concept), then make it permanent. I guess I might as well make it permanent, otherwise I won't be able to see if it works or not.
  • 0

#20 Galaxy613

Galaxy613

    Member

  • Members
  • 999 posts

Posted 17 November 2009 - 12:02 AM

Good job so far, it's great to see someone trying to make a mod instead of speculating about a mod. If this turns out to be a failure it's something we can all learn from, but I hope it is successful. :)

Damnit, you beat me to it, I was going to do this same idead with magstrike internals and put it in the deadspace of the furyfire! >:o


Nothing is stopping you to completing it. In fact please do, because I'm interested in how you do it.
  • 0
[Former Caretaker of the Guru Mk2]

#21 TantumBull

TantumBull

    Member

  • Moderators
  • 1,929 posts

Posted 17 November 2009 - 01:04 AM

You really should be doing what bob suggested if you want to put less stress on the parts, and then you could still get away with hot glue.
  • 0

#22 cheesypiza001

cheesypiza001

    Member

  • Members
  • 752 posts

Posted 17 November 2009 - 03:02 PM

You really should be doing what bob suggested if you want to put less stress on the parts, and then you could still get away with hot glue.


Okay, I will. I'm also gonna use epoxy putty due to the fact that I have a spare Firefly shell.

Edited by cheesypiza001, 17 November 2009 - 03:02 PM.

  • 0

#23 southpaw

southpaw

    Member

  • Members
  • 143 posts

Posted 20 November 2009 - 10:01 PM

Awesome! It's great to see something I did 4.5 years ago has found itself reincarnated (sorta) with you. Your version seems to be a much better design than my ghetto original.

I had a hard time with the "isolation" valve because at higher pressure, it was harder to seal and pull backward. The trigger needed alot of forward pressure to work. Too much actually, and instead of using enough rubber bands, I actually had to give the trigger a little forward nudge with my finger in order for it to work.

And I guess I had the "true" semi-auto down as far as the valves worked, but I still had to manually rotate the 2K turret. I see you've got an actual semi going on.

So yeah, in a nutshell, great job! Hope everything ends up working for ya.
  • 0
Sup?


0 user(s) are reading this topic

0 members, 0 guests, 0 anonymous users