Jump to content


Photo

Breech Lock N' Load


21 replies to this topic

#1 popatachi

popatachi

    Member

  • Members
  • 206 posts

Posted 20 October 2009 - 09:47 PM

The majority of this modification is the same most re-barreled Lock n' Loads. The only difference is the breech so that it doesn't have a ram rod and because I think it looks cool.

Thanks to Cxwq and Forsaken_angel24 for the knowledge and inspiration.

Materials:Lock 'n Load
PVC: 1/2"
Brass: 17/32" & 19/16"
Paperclip
1/16" drill bit
Electrical Tape
Key Ring
Tools:Dremel
Glue: Zap-a-Gap
Files
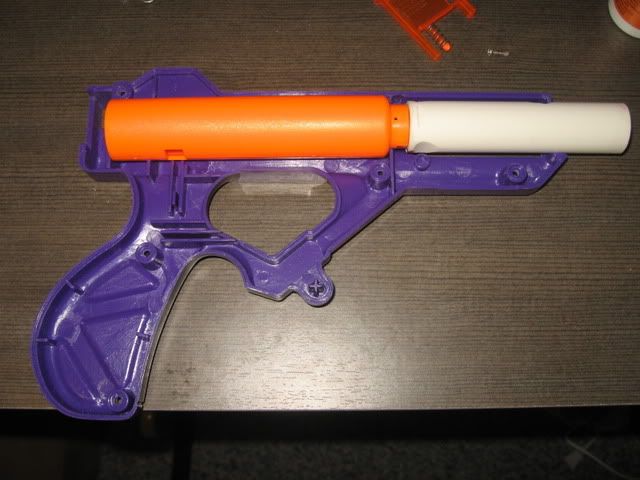
Step 1: Remove the screws and open up the shell

Open the Lock n' Load and put away the green top shell and the bottom dart holder. These aren't needed. This is also a good time to trim and cut away any excess from the shell as desired. I trimmed the sides and back of the shell.

Step 2: Cut the barrel

Take the orange barrel and cut 1/4" from the plunger tube. Do not throw the barrel away just yet.

Step 3: Create the breech in the barrel

Take your 9/16" brass and cut a 4" length
Take your 17/32" brass and cut a 3 5/8" length (this could be a bit shorter as well)
Take your PVC and cut a 3 5/8" length

Start with the PVC length and measure your dart's (my darts are about 2") length 1/8" away from one end and draw the opening for the breech.
Cut this away and smooth the edges.

Insert the 9/16" brass into the PVC making sure that the two ends are flush at the opposite ends of the breech (away from the opening) and mark the opening on the brass using the PVC as your guide.
Cut this away and smooth the edges.

Use two layers of electrical tape around the 9/16" brass and insert the brass into the PVC. Dry fit the pieces together and once set, use glue on both ends of the breech to secure and make the breech air tight (so that air will only go through the brass and not leak between the brass and the PVC)

Wrap a single layer of electrical tape around the exposed 9/16" brass to give a better fit into the orange barrel.

Posted Image

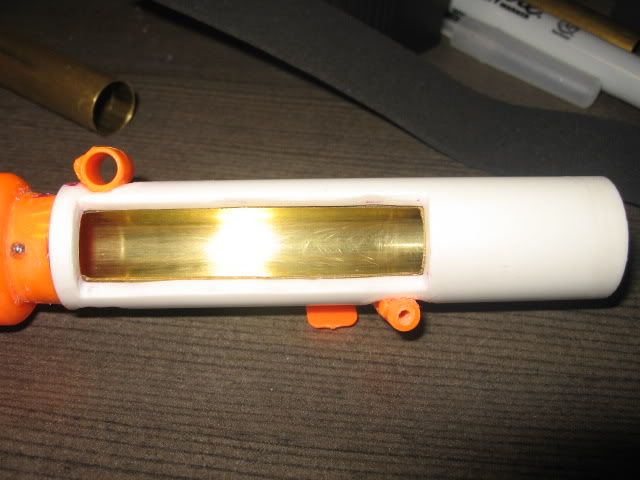
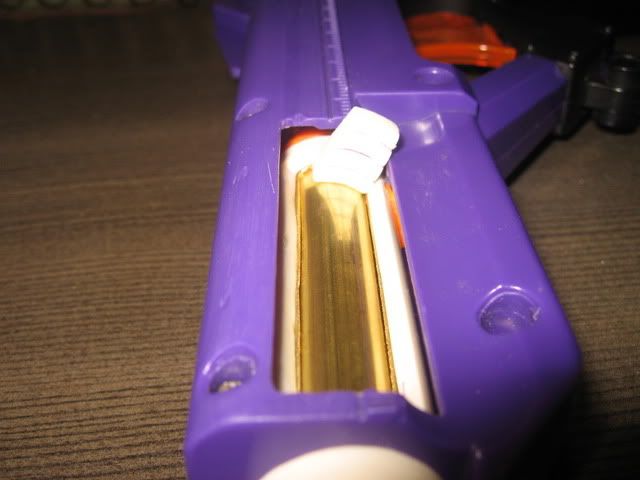
Step 4: Create the breech opening in the shell

Insert the new barrel into the orange barrel. Make sure to line the opening in the plunger at the bottom and decide which side you want the breech to be on and twist the two pieces until it is to your liking.

And now the scary part.
Take a small drill and make a pilot hole into the side of the shell trying to get the center of breech. Hopefully you will see the brass directly below. Take a wider drill and open up the hole so that you can now see where the breech is located.

Remove the shell and slowly cut away the shell to expose the entire breech. Measure as many times as you need and go as slow as possible. Remember to take into account any filing or sanding that you might do for the edges so don't try to make your cuts final, let the file make the final edge.

Posted Image

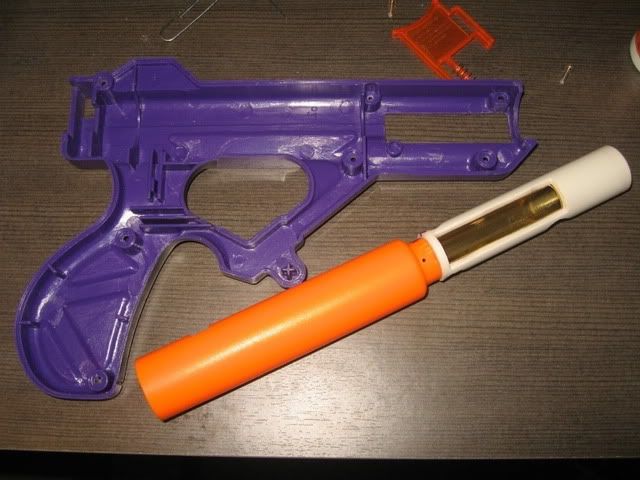
The opening in the shell is about the width of a 9 volt battery as a point of reference.

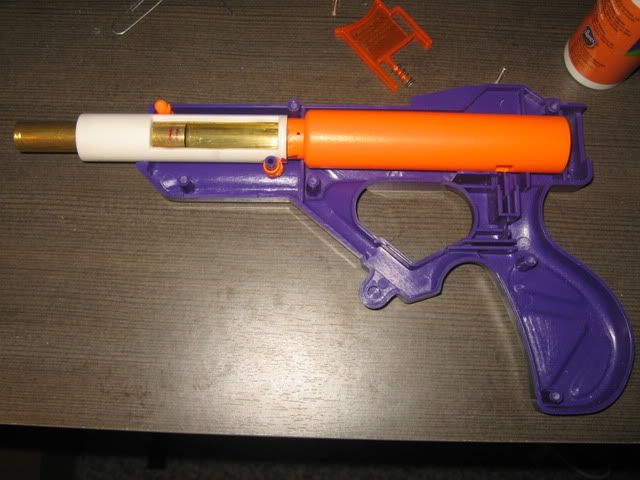
Step 5: Fit the barrel into the shell

Use your dremel to widen the opening of the blaster to be able to fit the PVC. Work slowly in a full circular motion. The difference isn't too big.

In order to keep the barrel and plunger from spinning, I files two grooves into the PVC. One at the top in front and another at the bottom in the back.

Take the original orange barrel and cut the corresponding posts and trim down any excess flash. And dry fit these in place against the PVC. Make sure to not trim too much away. Once you have the fit, glue these posts to the PVC.

Posted Image

Posted Image

Posted Image

Alternatively, you could just hot glue the PVC against one of the shells to keep it from moving.

To keep darts from falling into the plunger tube, drill through the orange barrel and through the brass. I used a 1/16" drill bit.
Open your paperclip and insert a straight length through the openings and clip off a length enough so that the wire overhangs the barrel.

Re-insert the paperclip and glue this into place. When the glue is dry, use your dremel to sand the ends of the clip and push down to help fill in the gap and make it flush to the barrel. Add glue to seal it up.

Posted Image

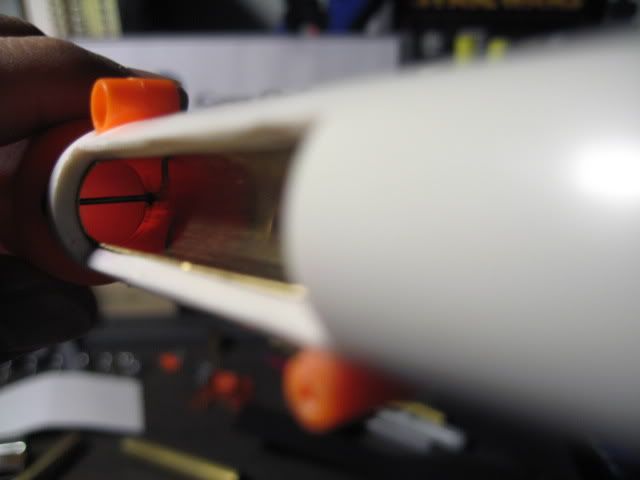
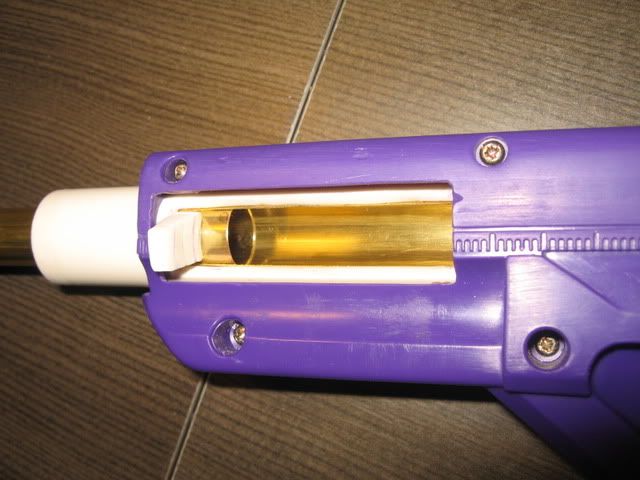
Step 6: Create breech tab

Put the barrel into the shells and close it up.

Insert the 17/32" brass length into the breech and close the opening.

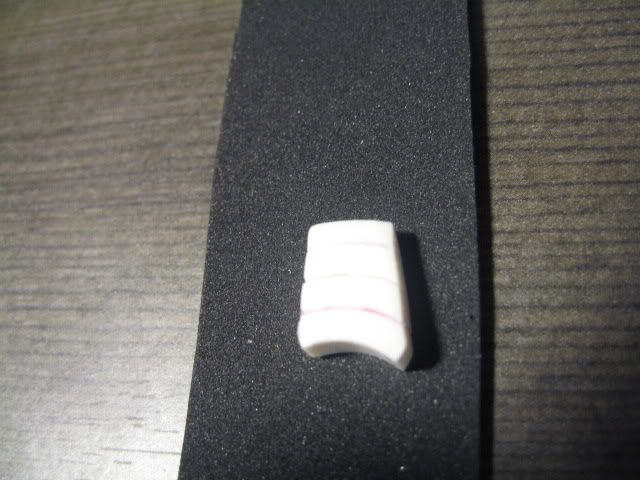
I used the PVC left over from the breech opening and cut four small pieces roughly the same size. These were filed and glued on top of each other. File these into a tab and determine how you want your tab to look and where to position it.

Posted Image

Once you are satisfied with the tab, push the 17/32" length a little past the opening of the breech. This will make sure it is properly sealed. Do not push the length all the way to the back of the barrel because when you open the breech, the opening will smaller due to that plus the tab.

Slide the 17/32" into the middle position, mark where your tab will be and glue it to the brass being sure to not use too much glue.

Posted Image

Step 7: Plunger Rod and Key Ring

Make sure to clean the plunger tube and rod. Wrap two layers of electrical tape around the plunger head for a better seal. If you have an extra or different spring, add that in place. I didn't have a replacement spring for this write up.

If you have a key ring, attach that to the end of the plunger rod.

Assemble all the parts.
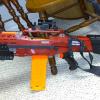
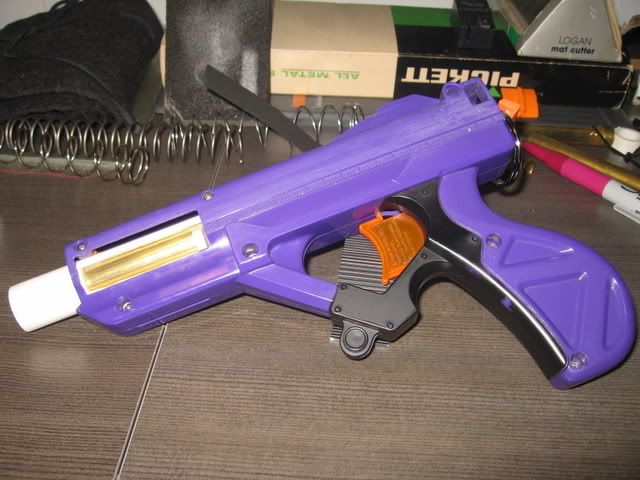
Step 8: Finished

All done! Ranges are about 40 ft flat and very accurate.
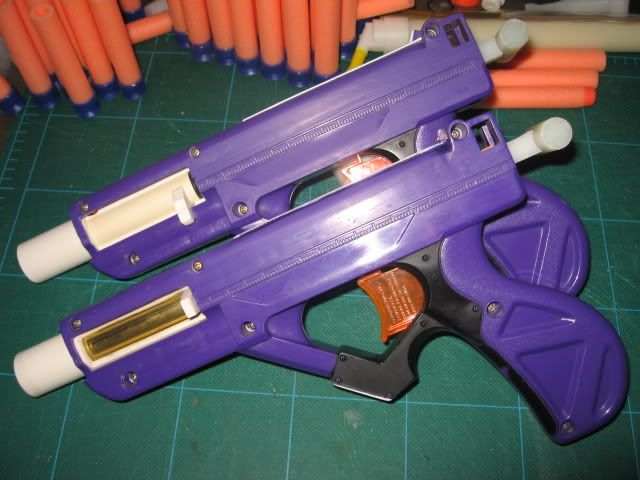
Posted Image

Posted Image

UPDATE:

Completed my second LnL with a CPVC breech. Both blasters have chainblazer replacement springs and some shell work. Also, a plunger handle has been added instead of the keyring.

Posted Image

Edited by popatachi, 22 April 2010 - 12:36 PM.

  • 0

#2 k9turrent

k9turrent

    Member

  • Members
  • 829 posts

Posted 20 October 2009 - 09:50 PM

Pretty
  • 0
QUOTE View Post

That's about it. And thanks Angela who helped me with these pictures.. It looks huge in her hands.


HOLY CRAP!

FU ALL

#3 JATDO

JATDO

    Member

  • Members
  • 350 posts

Posted 20 October 2009 - 09:57 PM

Holy shit thats clean, and functional!
  • 0
QUOTE
I remember when some girl in my English 101 class in college tried to cite The Onion as a source for her paper. The teacher lol'd.
QUOTE
The only time I got hit was when my spotter got hit and the enemy team realized there was a marksman in the bushes

#4 jubjub517

jubjub517

    Member

  • Members
  • 174 posts

Posted 20 October 2009 - 10:26 PM

I like this. Just disappointed with the range.

Edit: Blue brought up a good point.

Edited by jubjub517, 20 October 2009 - 11:14 PM.

  • 0
[18:17] <+Jugs> Hey beefy
[18:17] <+Nerfer> pls dont call me that
[18:18] * Nerfer is now known as Guest17574
[18:18] <+Lucian151> Woah its Beefy Theify
[18:19] <+Guest17574> STOP CALLING ME THAT IM NOT FAT
[18:19] <+Guest17574> pls

#5 Blue

Blue

    Member

  • Members
  • 2,222 posts

Posted 20 October 2009 - 10:42 PM

If the ranges are without bands and no spring replacement, then they are fantastic. The mod looks great.
  • 0

#6 heavencloud92

heavencloud92

    Member

  • Members
  • 17 posts

Posted 20 October 2009 - 10:56 PM

I was seriously just thinking about this today. Would tightening rings interfere with the breech system at all? That could add to the performance greatly, if not.
  • 0
If I was blue, I'd da ba dee da ba die.

#7 xbox180

xbox180

    Member

  • Members
  • 231 posts

Posted 20 October 2009 - 11:01 PM

I was seriously just thinking about this today. Would tightening rings interfere with the breech system at all? That could add to the performance greatly, if not.


Well you have to put the above the 17/32 if I'm correct.
  • 0
"Congrats on Buy a Peice of Plastic thats most likely older than you, for half- a grand, your awesome man." Nerf Monkey

My Webpage
MY Youtube

#8 popatachi

popatachi

    Member

  • Members
  • 206 posts

Posted 20 October 2009 - 11:24 PM

@jubjub517: The ranges are with just the stock spring and no bands. I am hoping to find a better spring if I come across one. I don't like the look of bands or bungees, so the range is fine for me.

@heavencloud92: You could add tightening rings in the 17/32" as xbox180 stated. I don't think it would interfere with the system at all.
  • 0

#9 cheesypiza001

cheesypiza001

    Member

  • Members
  • 752 posts

Posted 21 October 2009 - 05:09 AM

Damn that looks nice. I wish my Ln'L was stock again.

EDIT: When modding my Ln'L, I decided against adding e-taping around the outside of the plunger head. Instead I wrapped e-tape around the outside of the inside circle thus forcing the outer sealer to flare out and create a better seal. I got really good ranges so I suggest doing this.

Edited by cheesypiza001, 21 October 2009 - 05:27 AM.

  • 0

#10 Hi Yah

Hi Yah

    Member

  • Members
  • 294 posts

Posted 21 October 2009 - 06:39 AM

I think if you made the 4 inches you might get better results. Nice job.
  • 0
The yellow balls are also slightly smaller in diameter than the green ones.

#11 popatachi

popatachi

    Member

  • Members
  • 206 posts

Posted 21 October 2009 - 08:00 AM

@cheesypiza001: I'll try that out. Thanks for the suggestion!
  • 0

#12 Ambience 327

Ambience 327

    Member

  • Members
  • 561 posts

Posted 21 October 2009 - 08:11 AM

That is one fantastic looking breech. It is very clean, and I love your use of the PVC off-cuts for the actuator tab. Excellent work.
  • 0
Foam in the Fort IV
The fourth exciting Nerf War in Fort Wayne, IN.

#13 Eh Watt

Eh Watt

    Member

  • Members
  • 265 posts

Posted 21 October 2009 - 09:38 AM

That is one of the cleanest things I have ever seen here. Would the bungees get in the way of the breech? I suppose you could even put it on the top, with a little bit more of trouble... Anyways, great job, man! :)

Edited by Eh_Watt?, 21 October 2009 - 09:40 AM.

  • 0
John Hancock

#14 white moonlight

white moonlight

    Member

  • Members
  • 305 posts

Posted 21 October 2009 - 12:51 PM

That is AWESOME.

The ranges seem a little low, but it may be the shortness in the barrel.
Very, very cool I was thin king of doing something like this if I were to ever get an Ln'L.

I love how cleanly done it is.

Are those ranges with bands or no?
Why didn't you make the barrel longer and pull on that instead of having the 4 pieces of PVC?

Once again great mod and nice writeup.

Edited by white moonlight, 21 October 2009 - 02:08 PM.

  • 0
On his trec to Colonfest...
VengefulWaffle BOY, 12 KILLED IN MOUNTAIN PASS BY WILD RACCON, EXPERTS SAY HE ATTEMPTED TO HOLD IT OFF WITH NERF NITEFINDERS
POLICE SAY: ALCOHOL MAY HAVE BEEN INVOLVED
Guess who he was talking about...

#15 Mehku

Mehku

    Member

  • Members
  • 383 posts

Posted 21 October 2009 - 04:09 PM

That is officially the coolest Lock N' Load ever.
  • 0

#16 popatachi

popatachi

    Member

  • Members
  • 206 posts

Posted 21 October 2009 - 08:28 PM

@white moonlight: The ranges are with no bands or a replacement spring. Just the stock spring and electrical tape around the plunger head.

As for the barrel length, I followed the instructions from Cxwq and FA24's individual write ups that use a 4" barrel. I wanted to keep the length at 4" and so I created the tab.

@everyone else: Thanks for the compliments! This was a lot of fun!
  • 0

#17 Banshee

Banshee

    Member

  • Members
  • 668 posts

Posted 22 October 2009 - 12:26 AM

Incredibly clean, but am I the only one who would find just as easy if not easier to put the dart in through the front. I mean the barrel isn't THAT long, you stick in the dart and push it in with your pinky and you're at the same point. I mean don't get me wrong, I love the work, but I just feel this effort could be put to better use in a longer range gun. Sweet mod though!
  • 0
Like my page on Facebook! PM me, I do commissions!

#18 popatachi

popatachi

    Member

  • Members
  • 206 posts

Posted 22 October 2009 - 09:13 AM

@Banshee: Of course it's easier to just front load the gun and use a ramrod (you must have extremely thin fingers if you can fit your pinky through 17/32" brass, I can't). This was just to eliminate the ramrod part of loading and get the dart to sit at the back of the barrel.

And where my effort should go is entirely up to me thanks. :P
  • 0

#19 ggk

ggk

    Member

  • Members
  • 113 posts

Posted 22 October 2009 - 11:19 AM

Nice job. Very clean.
Banshee with the right spring/bungees lnl's will shoot quite far and ramrodding sucks.
  • 0
17:18 Snake51886 to those who hamp: you do not nerf well, you paintball poorly

#20 Banshee

Banshee

    Member

  • Members
  • 668 posts

Posted 22 October 2009 - 10:26 PM

Well the barrel is what, 3 inches long? So you stick your 2 inch dart in and vacuum loading usually does the rest. I'm not saying anyone did anything wrong here, its just like putting a spoiler on your car, its cool to look and say you have one (in some cases) but really doesn't help you unless you're going 200mph. So again, I don't care what you do with your guns, I'm just saying, next time do it to like an AT2K.
  • 0
Like my page on Facebook! PM me, I do commissions!

#21 Blacksunshine

Blacksunshine

    Member

  • Members
  • 948 posts

Posted 02 December 2009 - 12:35 AM

Added to the directory!
  • 0
Forgive my spelling and grammar. I post from my cell phone a lot. Sometimes when I'm on the can at work.

#22 J cobbers

J cobbers

    Member

  • Members
  • 586 posts

Posted 02 December 2009 - 07:42 AM

Very clean, very nice. As for the ranges, well you used brass, which is great for pump and valve based blasters, but not as great for plunger guns. Barrels that have higher friction allow the plunger to push further and build up more pressure before the dart starts moving, thus creating more velocity.

If you can either add some tightening rings, or a small length of CPVC at the base you may find improved performance.
  • 0

Don't forget to eat your meat based vegetable substitute children.


1 user(s) are reading this topic

0 members, 1 guests, 0 anonymous users