Jump to content


Photo

Bbb Coupler Writeup

and a bit more

27 replies to this topic

#1 Glint

Glint

    Member

  • Members
  • 315 posts

Posted 24 April 2009 - 08:33 PM

Alright, so my friend (hardshot, if anyone knows the name; he's new to the Haven) and I were modding a BBB and realized that we couldn't find a coupler mod in the directory to go by. Me being the person I am, I said screw it, it can't be that hard. So I just took some existing knowledge and mixed it up with some existing mods, and voila! A BBB coupler writeup!

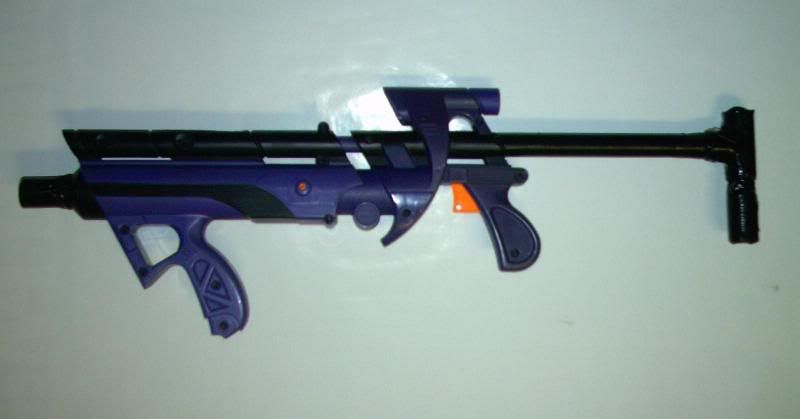
Okay, so starting off I want to make it clear that I'm using ¾ CPVC in this writeup. Or at least it looks that way. Really, I have PETG nested inside the CPVC using electrical tape and some plumbers goop, and the CPVC is there for speed loading and couplers. I've heard this called a bone marrow-style barrel, so that's what I'll refer to it as. If you are using ½, it's the exact same thing except your finished product will look a touch different.

I'll be running through some basic mods here that I collaborated from existing ones, just for the sake of actually knowing what I did.

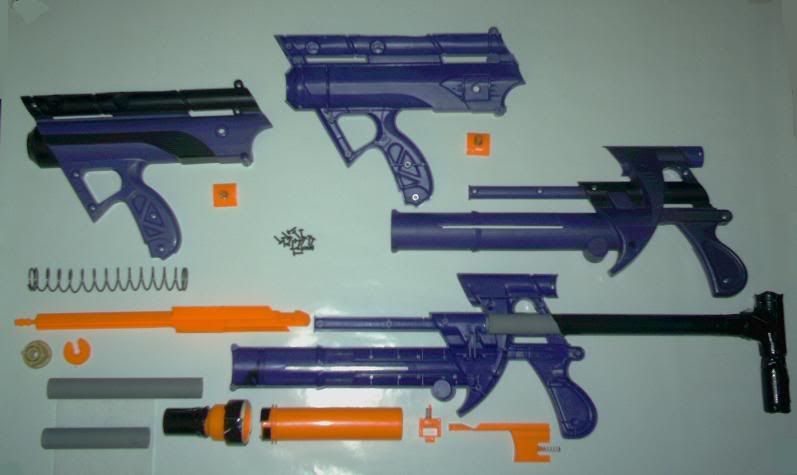
First off, you want to saw/shave down the existing orange barrel part until it's flush with the big orange part that holds the AR.
Posted Image

Next sand/cut down the inside of the AR ring itself until it's just a ring, with no ridge on one side or anything. The inside should be completely smooth.
Posted Image
Posted Image

Now you can take your CPVC coupler and cut it in half (if you want, not necessary. It just makes for a smaller more compact look, and you get two couplers for the price of one). Sand down the side you cut with a Dremel sanding bit until you can eyeball it's fairly straight, then manually sand it until you know it's perfectly straight (shove a piece of CPVC in there and let it rest on the orange barrel part we trimmed down before then take a ruler to it). It is extremely important this side of your coupler is perfectly straight, or else the whole barrel itself winds up crooked, and that's a practically completely useless gun right there.

Here comes the part where my writeup differs a bit from the rest. This might be the way people did this, but I don't exactly know so I'll show you what I did. We'll be getting rid of all the dead space in the barrel/AR area and creating a new, safer place for the the plunger head to hit so your gun can be durable over time.

Stick your AR ring inside the barrel area the way it should go. Now take a piece of PETG (or CPVC might work better, the PETG was a little wobbly but worked nonetheless) lube it all over one end. When I mean all over, I mean go crazy. Get like 5 or more inches of the barrel insanely lubed up, and a bit inside just for safe keeping. Go absolutely nuts without worrying. Once that's done , put that lubed side of the PETG in the barrel area and hold it there with your hand like this:
Posted Image
So that the lubed side of the PETG is all inside the barrel area, and some it protruding out also.

Now completely go to town with hot glue in there. Keep on pouring it all in there until you have a hot glue that's flush with or a bit above (enveloping the top) of the AR ring. Leave the hot glue to dry for a while, as multitudes of hot glue take longer to dry upon themselves. Once it's dry, pull out the PETG barrel. I had a really hard time with this and had to spray some lube on the top of the hot glue plateau and hope it got down in there. After a lot of pushing my PETG finally same out, leaving behind a fairly clean hole down the centre of the hot glue. Just to make it cleaner I took a sanding bit of a Dremel and put it as far as I could down both sides of the hot glue/barrel end so make it perfect.
Here's the final product:
Posted Image
Warning: I had to cut off about 4 inches of the end of my PETG because there was hot glue still stuck to it that I couldn’t get off. So if you're sexually attracted to your PETG or something and don't want to waste like 4 inches of it, find something else to use. Just warning you.

Now all you need to do is add your coupler on the top of the barrel end with all the hotglue in it now. On the end where the old, arrow barrel used to be is where it goes. Epoxy it down, and then spread some Plumbers Goop around the edges where it meets the barrel end. Leave it to dry.

In the meantime do whatever other mods you want/can find. The only other thing I did was reinforce the washer on the end of the plunger rod:
Posted Image
Even though I didn't add a new spring, I just did it to be safe and to keep the gun stable and durable.
Now would also be a good time to make your speedloader and bone marrow barrels.

Once you're all dried up slap 'er all back together and you've got yourself a clean, durable and great working BBB with a higher RoF than most. Simple mods that don't really deserve a post this big, but they have it anyways.

Posted Image

Posted Image


I'd like to thank boom13 and joeyaglr444 for their BBB mods, and FA24 for his post in joeyaglr444's mod showing a better way to use the hot glue mess. His way of hot gluing a spring in the Doomsayer mod also gave me the idea to sue PETG to keep the hole in the barrel end amid all the hot glue.

Hope everything was clear. Sorry if the pictures were a bit blurry, my camera's not the best. But hopefully my explanations got the point across.

Edited by Glint, 24 April 2009 - 09:42 PM.

  • 0
QUOTE

This has spiraled beyond uselessness into utterly stupidy.
- VACC
Read it again until you figure it out.

#2 alextwin007

alextwin007

    Member

  • Members
  • 96 posts

Posted 24 April 2009 - 08:56 PM

Nice job Glint, looks really clean. Similar to what Diamond back did to his BBB.
  • 0
Join the revolution
Nerf Revolution

#3 hardshot

hardshot

    Member

  • Members
  • 118 posts

Posted 24 April 2009 - 08:57 PM

I will post the ranges tomorrow when the plumbers goop dries. I hope this helps people out with their bbb's.
  • 0
QUOTE
NEON GREEN DARTS! FINALLY!

I've Been Dreaming of this day.

-Baghead


If you are CANADIAN, Join the Canadian nerf site right now! Click me if your canadian

#4 spartan062

spartan062

    Member

  • Members
  • 206 posts

Posted 24 April 2009 - 08:59 PM

Is it just me, or does the barrel look crooked?
  • 0
Join the Revolution- NerfRevolution.com

#5 diamondbacknf1626

diamondbacknf1626

    Member

  • Members
  • 835 posts

Posted 24 April 2009 - 09:04 PM

This actually is kinda similar to what I did. However, there were a few differences.

1. I used a male threaded adaptor with the threads cut off (I didn't have a coupler handy)
2. I removed deadspace in the orange piece using PETG and surounded it with hot glue.
3. I have a RFSG and Stock purple BBB spring in mine
4. All the internals are sealed up with E-tape

But visually and essentially, it is pretty similar. I'm interested to see what ranges you get out of it.
  • 0
QUOTE(TxNerfer @ Nov 13 2010, 12:42 PM) View Post

Hey...I got a crazy idea: how about you stop all that sigging stuff? It's not even my thread and it annoys me.

#6 Glint

Glint

    Member

  • Members
  • 315 posts

Posted 24 April 2009 - 09:10 PM

Nice job Glint, looks really clean. Similar to what Diamond back did to his BBB.

Thanks. Clean is soemthing really close to my heart when it comes to mods. I understand it doesn't have to be clean, but I like it so much better when they are. Means a lot.


Is it just me, or does the barrel look crooked?

Nah, that'd just be the angle of the picture ( see what you mean by the picture). The coupler's perfectly straight on the barrel, and the barrels and find in the coupler. It's probably just the e-tape and that black shadowy part at the end of the barrel that's in the coupler. Really, the barrel's perfect


This actually is kinda similar to what I did. However, there were a few differences.

"Differences"

But visually and essentially, it is pretty similar. I'm interested to see what ranges you get out of it.

Seeing as you did a bit more than me mod-wise, yours'll probably be getting a bit better ranges that this one. I really like the cleanliness of both of them, it makes the BBB look really good and proffesional.

Edited by Glint, 24 April 2009 - 09:14 PM.

  • 0
QUOTE

This has spiraled beyond uselessness into utterly stupidy.
- VACC
Read it again until you figure it out.

#7 diamondbacknf1626

diamondbacknf1626

    Member

  • Members
  • 835 posts

Posted 24 April 2009 - 09:12 PM

This actually is kinda similar to what I did. However, there were a few differences.

"Differences"

But visually and essentially, it is pretty similar. I'm interested to see what ranges you get out of it.

Seeing as you did a bit more than me mod-wise, yours'll probably be getting a bit better ranges that this one. I really like the cleanliness of both of them, it makes the BBB look really good.


Yeah, as yours does, mine came out really clean as well. I have no pics currently, but I have a bulk mods/paintjobs thread post coming up some time soon, so it'll be there. Alextwin007 can attest for its cleanliness.

I'm honestly not entirely sure what mine hits rangewise, but I know it's powerful enough to use a full 12" barrel.

Edited by diamondbacknf1626, 24 April 2009 - 09:13 PM.

  • 0
QUOTE(TxNerfer @ Nov 13 2010, 12:42 PM) View Post

Hey...I got a crazy idea: how about you stop all that sigging stuff? It's not even my thread and it annoys me.

#8 Glint

Glint

    Member

  • Members
  • 315 posts

Posted 24 April 2009 - 09:17 PM

Yeah, as yours does, mine came out really clean as well. I have no pics currently, but I have a bulk mods/paintjobs thread post coming up some time soon, so it'll be there. Alextwin007 can attest for its cleanliness.

I'm honestly not entirely sure what mine hits rangewise, but I know it's powerful enough to use a full 12" barrel.


Ah, that's probably why I hadn't remebered seeing anything BBB-wise that you made when Alextwin007 mentioned it. But I can see the similarities in looks the way you described yours.
And I was pretty comfortable going with the foot-long barrel. I hadn't actually read what anyone else was using, but judging by what I knew and had heard about of the air output of BBB's, I thought it could handle a 12''.

Edited by Glint, 24 April 2009 - 09:18 PM.

  • 0
QUOTE

This has spiraled beyond uselessness into utterly stupidy.
- VACC
Read it again until you figure it out.

#9 diamondbacknf1626

diamondbacknf1626

    Member

  • Members
  • 835 posts

Posted 24 April 2009 - 09:40 PM

Yeah, as yours does, mine came out really clean as well. I have no pics currently, but I have a bulk mods/paintjobs thread post coming up some time soon, so it'll be there. Alextwin007 can attest for its cleanliness.

I'm honestly not entirely sure what mine hits rangewise, but I know it's powerful enough to use a full 12" barrel.


Ah, that's probably why I hadn't remebered seeing anything BBB-wise that you made when Alextwin007 mentioned it. But I can see the similarities in looks the way you described yours.
And I was pretty comfortable going with the foot-long barrel. I hadn't actually read what anyone else was using, but judging by what I knew and had heard about of the air output of BBB's, I thought it could handle a 12''.


I had absolutely no idea on barrel length. I just happened to have a 12" barrel speedloader laying around, so I tested it with that. It worked.
  • 0
QUOTE(TxNerfer @ Nov 13 2010, 12:42 PM) View Post

Hey...I got a crazy idea: how about you stop all that sigging stuff? It's not even my thread and it annoys me.

#10 atomatron

atomatron

    Member

  • Members
  • 579 posts

Posted 24 April 2009 - 09:43 PM

Nice, easy to understand writeup.

Here's how I put a coupler on a BBB:

I leave 3/8" of the original barrel, drill two holes opposite to each other through it, insert piano wire and goop this is to act as a dart stop (my BBB's have a tenancy to eat darts), then I glue a 1/2" to 3/4" CPVC coupler over/to that, done.


A 12" barrel? Mine would often fail with a barrel like that, 6" has worked the best for me.

Edited by atomatron, 24 April 2009 - 09:48 PM.

  • 0
Perche Germolgi. [Because it shoots]

Rainbow Clan

#11 Glint

Glint

    Member

  • Members
  • 315 posts

Posted 24 April 2009 - 09:45 PM

I leave 3/8" of the original barrel, drill two holes opposite to each other through it, insert piano wire and goop this is to act as a dart stop (my BBB's have a tenancy to eat darts), then I glue a 1/2" to 3/4" CPVC coupler over/to that, done.


That's one thing I didn't do, was create a stopper so it doesn't vaccuum darts or anything. If I ever get another crack inside this thing I'll be adding that just to be safe.

Edited by Glint, 24 April 2009 - 09:45 PM.

  • 0
QUOTE

This has spiraled beyond uselessness into utterly stupidy.
- VACC
Read it again until you figure it out.

#12 TantumBull

TantumBull

    Member

  • Moderators
  • 1,929 posts

Posted 24 April 2009 - 09:50 PM

That was a nice mod, and a good write up, but the pictures were a little blurry. I just have to adress someting here.

Sorry if the pictures were a bit blurry, my camera's not the best.


I see a lot of people using this as an excuse for blurry pictures, but the truth is, you could be using the shittiest camera ever and you could still easily be taking clear and informative pictures that aren't out of focus or blurry. Proof of this is JSB's pictures. His pics are a fucking work of art (most of them anyway) and he uses a 3 MP, fucking old digital camera. I probably pick stuff like this up because I'm very fond of photography, and spend time with the hobby myself: his lighting is fantastic, his coloring is usually good (it can sometimes have to many blue and green tones), and his composition is astounding. He says he doesn't set up his shots, but for some of them, there's no way that's possible.

Anyway, lemme tell you how to fix your issues.

1. Focus

A lot of your pics are out of focus, and as a result, are blurred. From your pictures I can tell your camera doesn't have a very wide angle lens. This means that your holding the object too close to the lens. Try holding it back a little. Either that or your aperture setting are off, try going to around f3 (I'm not sure if your camera allows you to manually adjust the aperture).

2. Motion Blur / Lighting

The next problem is that your shots are sometimes blurred because of a lack of light or you shaking the camera. Try to shoot your pictures with the subject under the light of a lamp, or some other light source besides your ceiling lights. This will fix most of your problems in this category.

When you can't get good enough lighting, then its time to refine your hand movement. When I shoot in low light conditions and I don't have my tri-pod handy, I either a) use a flash; or B rest my camera on something and then lightly depress the shutter. My knee comes in handy if I'm sitting down.

Edited by TantumBull, 24 April 2009 - 09:51 PM.

  • 0

#13 Glint

Glint

    Member

  • Members
  • 315 posts

Posted 24 April 2009 - 10:02 PM

Alright, thanks Tantum. I realise that it's not all the camera's fault. In fact, as you pointed out it's barely the camera's fault at all. I'll keep those points in mind next time I need to take pictures. Hopefully they'll turn out better. Thanks for the tips!

Edited by Glint, 24 April 2009 - 10:03 PM.

  • 0
QUOTE

This has spiraled beyond uselessness into utterly stupidy.
- VACC
Read it again until you figure it out.

#14 alextwin007

alextwin007

    Member

  • Members
  • 96 posts

Posted 24 April 2009 - 10:05 PM

Many cameras have a micro mode for shooting very close range photos. In my camera it’s the symbol of a flower, like most Kodak cameras. I use this mode and I have yet to take a blurry picture.
  • 0
Join the revolution
Nerf Revolution

#15 PointBlank

PointBlank

    Member

  • Members
  • 528 posts

Posted 25 April 2009 - 12:04 AM

It's a nice, clean write up, but there is nothing really new. Also you need better pics. Good job though.
  • 0
You can agree with me.... or you can be wrong.

My Latest Mods
The Cyclops
Pointblank Titan

#16 TimberwolfCY

TimberwolfCY

    Member

  • Members
  • 249 posts

Posted 25 April 2009 - 01:22 AM

There are a few BBB coupler write-ups around, but they are a bit difficult to find...or at least they were about 3 years ago, when I did mine. Those particular theads/sites may be down now...

Here's a couple pics of mine:

Posted Image

Posted Image

I just took mine out of storage a short time ago, it needs considerable maintainence and a new barrel...right now I'm just using 8" straight PVC...5/8? Whatever shoots mega-Stefans. It gets right around 70' or so (probably slightly more) with a good dart...but I need to do some work, get an actual good barrel with it, etc. I also have shotgun barrels (the smaller barrel in the exploded view) that are 6" or so; the plan would be to carry 8 of them (I have them already ready...already...) preloaded with shotgun-darts (4 to a barrel each) and just pull out the standard barrel, load a shotty, shoot, detach and then attach new, and continue as needed. I don't think I'd really be able to carry more than 8 barrels like that at once though (plus standard); in war, it's really only meant as a stop-gap anyway, although it would be great indoors I think...maybe have to cut a bunch more barrels now... :ph34r: As with my Xbow, it's never been used in a war yet, but I think the idea is sound. In tests the shot-barrels get around 55 ft or so with about a 1 to 1 1/2 foot spread...I'm trying to figure out a way to widen the spread a bit somehow right now though.

I did my coupler mod very similar to what was stated above: I sawed off most of the original barrel, but left on about 1/4 inch or slightly more, and then fitted the coupler over that with a ton of Plumber's Goop, and then black duct-tape over that to keep it secure and provide color matching, after the Goop dried. The "nub" left after taking off the original barrel serves as a great guide for the coupler: this aids a great deal in getting the thing on straight, which of course then aids accuracy.

The stock is just PVC with a t-joint or whatever, and a couple end-caps Gooped together, and then given more black duct-tape. The stock is considerably shorter now than in those pictures, it works great, but does make it a bit unwieldy, but gives it a very nice pseudo-Xbow feel. I think I'm going to get one of the new BBBs out now probably a month from now when I will have a bit more money, and basically re-do this entire mod, but do it not so rushedly (this particular BBB was meant for SENO '05...which unfortunately I did not make...:ph34r: ); properly paint it all, etc....though I really do like the current red-black of the current model; I may gift it to a friend of mine before we do the war I'm planning here in Warrensburg, MO...we'll see.

Finally, also, I meant to say thanks for posting your write-up: it's good to have a current reference people can get to easily, even if this particular mod's been around almost since the BBB's inception.

Edited by TimberwolfCY, 25 April 2009 - 01:27 AM.

  • 0
"Denial is the most predictable of all human responses. But, rest assured, this will be the sixth time we have destroyed it, and we have become exceedingly efficient at it." - The Architect, The Matrix: Reloaded

TimberwolfCY
of NH, NHQ, NO, NC

#17 mystefansdontflystraight

mystefansdontflystraight

    Member

  • Members
  • 1,176 posts

Posted 25 April 2009 - 03:51 AM

I had always wondered how 3/4 CPVC worked acting as 1/2 PVC.... Are the OD's the same? If I am not mistaken, PVC is measured by ID, and CPVC is measured by OD. Does 1/2 CPVC fit in 3/4 CPVC? I would expect that it does, but again I may be mistaken about the measuring method.
Good job, hope to get shot by it at mass4.
  • 0
QUOTE(Blacksunshine @ Dec 24 2009, 02:15 PM) View Post

QUOTE(white moonlight @ Dec 23 2009, 01:29 PM) View Post

It's just screaming to be rearloading...

I seen a movie about that once.


#18 diamondbacknf1626

diamondbacknf1626

    Member

  • Members
  • 835 posts

Posted 25 April 2009 - 05:07 AM

I had always wondered how 3/4 CPVC worked acting as 1/2 PVC.... Are the OD's the same? If I am not mistaken, PVC is measured by ID, and CPVC is measured by OD. Does 1/2 CPVC fit in 3/4 CPVC? I would expect that it does, but again I may be mistaken about the measuring method.
Good job, hope to get shot by it at mass4.


No, the OD's aren't the same. 3/4" CPVC has a bit larger of an OD, and doesn't work with PVC couplers and oher PVC fittings. I'm not quite sure of the measuring method, but I can tell you that 1/2" CPVC does fit in 3/4" PVC with a little extra room still on the sides.

Edited by diamondbacknf1626, 25 April 2009 - 05:08 AM.

  • 0
QUOTE(TxNerfer @ Nov 13 2010, 12:42 PM) View Post

Hey...I got a crazy idea: how about you stop all that sigging stuff? It's not even my thread and it annoys me.

#19 flyingchicken

flyingchicken

    Member

  • Members
  • 414 posts

Posted 25 April 2009 - 08:58 AM

Very nice work Glint. I was actually going to do almost the same thing (post a coupler write-up), but you beat me to it!
  • 0
I am so omniscient; if there was to be two omnisciences, I would be both!

#20 hardshot

hardshot

    Member

  • Members
  • 118 posts

Posted 25 April 2009 - 09:21 PM

Okay I got some less blurry pictures of the gun...


Full gun

Front of the gun

Speed loader

how we put the pluger tube and other internals into the shell (I think we did it wrong)

How the gun looks after I unscrew it from being stuck

Sorry about the links. I tried to post pictures but some message about "no posting dynastic pictures allowed" or something.

I am having some difficulties with the internals though. I think I have the orange pieces with the spring that go into the groove and the plumger toob assembly in the wrong places. It would be great if somebody could help me out with this. Also the problem is that the gun is cocking out and shooting, but after the shot it kinda locks in place and wont come back in.
  • 0
QUOTE
NEON GREEN DARTS! FINALLY!

I've Been Dreaming of this day.

-Baghead


If you are CANADIAN, Join the Canadian nerf site right now! Click me if your canadian

#21 diamondbacknf1626

diamondbacknf1626

    Member

  • Members
  • 835 posts

Posted 25 April 2009 - 09:24 PM

Okay I got some less blurry pictures of the gun...


Full gun

Front of the gun

Speed loader

how we put the pluger tube and other internals into the shell (I think we did it wrong)

How the gun looks after I unscrew it from being stuck

Sorry about the links. I tried to post pictures but some message about "no posting dynastic pictures allowed" or something.

I am having some difficulties with the internals though. I think I have the orange pieces with the spring that go into the groove and the plumger toob assembly in the wrong places. It would be great if somebody could help me out with this. Also the problem is that the gun is cocking out and shooting, but after the shot it kinda locks in place and wont come back in.


Damn. You're not in great shape if this is happening. Same thing happened to one of mine. I'd recommend just opening the front part of the shell up, checking to ensure everything is in place, and close it up again. You may very well fix your problem.
  • 0
QUOTE(TxNerfer @ Nov 13 2010, 12:42 PM) View Post

Hey...I got a crazy idea: how about you stop all that sigging stuff? It's not even my thread and it annoys me.

#22 1337

1337

    Member

  • Members
  • 375 posts

Posted 25 April 2009 - 09:25 PM

Is it my computer or are the pics not working?
  • 0
Join the REVOLUTION!

#23 diamondbacknf1626

diamondbacknf1626

    Member

  • Members
  • 835 posts

Posted 25 April 2009 - 09:29 PM

Is it my computer or are the pics not working?


No, they're not working on mine either.
  • 0
QUOTE(TxNerfer @ Nov 13 2010, 12:42 PM) View Post

Hey...I got a crazy idea: how about you stop all that sigging stuff? It's not even my thread and it annoys me.

#24 nerfer63

nerfer63

    Member

  • Members
  • 386 posts

Posted 25 April 2009 - 09:36 PM

Is it my computer or are the pics not working?


No, they're not working on mine either.


mine too.
  • 0

#25 b00m13

b00m13

    Member

  • Members
  • 386 posts

Posted 25 April 2009 - 09:45 PM

Okay I got some less blurry pictures of the gun...


Full gun

Front of the gun

Speed loader

how we put the pluger tube and other internals into the shell (I think we did it wrong)

How the gun looks after I unscrew it from being stuck

Sorry about the links. I tried to post pictures but some message about "no posting dynastic pictures allowed" or something.

I am having some difficulties with the internals though. I think I have the orange pieces with the spring that go into the groove and the plumger toob assembly in the wrong places. It would be great if somebody could help me out with this. Also the problem is that the gun is cocking out and shooting, but after the shot it kinda locks in place and wont come back in.


Damn. You're not in great shape if this is happening. Same thing happened to one of mine. I'd recommend just opening the front part of the shell up, checking to ensure everything is in place, and close it up again. You may very well fix your problem.


This problem was dealt with a while ago. I forget who explained the reasons behind it, but to fix the problem; you'll need to slice off about 40% of the TAN-COLOR rubber plunger head. (Just get an exacto knife and slice that ***** in 2). It's supposed to give the plunger room to "unlock" itself after each fire/etc.
I had this problem a few months ago myself. It drove me nuts until someone recommended it to me, and since then I've done it to all of my BBB mods that had the same problem, and they don't have it anymore :D

Try it for yourselves, I'm pretty sure it'll fix your locking/jamming problem as well~

Read the paragraphs above the 2nd pic if you need a more detailed explaination.

Edited by b00m13, 25 April 2009 - 09:47 PM.

  • 0
The only place Wal-Mart exists in New York, is in our TV's.


1 user(s) are reading this topic

0 members, 1 guests, 0 anonymous users