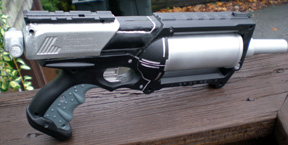
This is my Maverick with Titan Integration, or perhaps ‘combination’ would be more accurate.
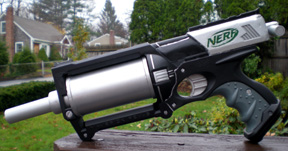
The goal of this mod was to give the Maverick a power boost yet keep it looking somewhat stock. It has been singled, so it is probably not the best choice as a sidearm for war; however what it looses in number of rounds it makes up for in power. The power comes from a Titan air tank, positioned where the turret used to be. The tank is charged with an AT3k plunger and tube concealed behind the slide. The barrel was replaced with a coupler that accepts different barrel attachments. For the purposes of test firing this mod, I am using a single barrel of PETG set inside a 3-inch long piece of ½” PVC.
Shopping List:
Maverick
Titan air tank
AT3k plunger and plunger tube
PVC Coupler
Length of ½” PVC
Length of PETG
Twist-tie from a Nerf box
Black plastic strip from a Nerf box
3/8” diameter Aluminum rod
2 Nylon spacers
E-tape, hot glue, epoxy and putty
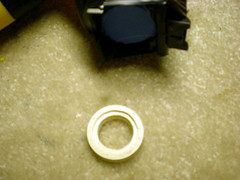
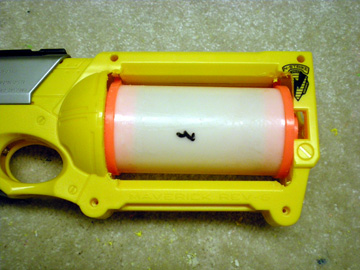
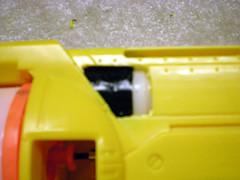
Step one, I began by opening the Maverick and removing the turret and all the internal components, the only thing I kept was the trigger assembly. The opening where the turret usually sits needed a little Dremel work to fit the Titan’s tank. It was also necessary to remove the colored ring at the top of the tank.
With very few modifications the tank fit amazingly well.
I also cut off the air nozzle and tubing that connects the tank to the Hornet. I jammed a tiny screw into the open nozzle hole and glued it shut. I then removed the short tube that connected the tank to its own pump and trimmed down that nozzle about a half-inch.
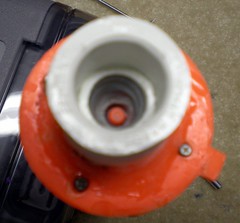
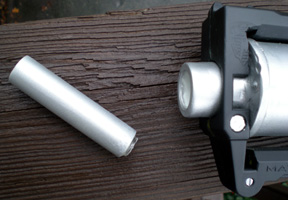
I removed the threaded barrel on the front of the Titan tank. The removal had to be done carefully as to not damage the valve that holds back the air. I cut about three-quarters of the threaded barrel’s length in the first pass. I could have gone a little further, except I didn’t know where the valve started. After I could see the valve, I used the Dremel to take the remaining barrel edge down the rest of the way and make it flush. Flush is important in ensuring the barrel straightness later on. At this point I put the shell back together with the Titan tank in-place to confirm that the shell could close unhindered. I had to make a few small adjustments to the shell with the Dremel to make it close properly around its various protrusions.
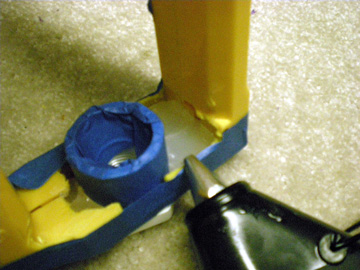
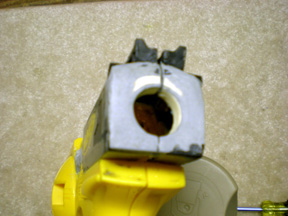
Step Two, I chose a small coupler for the barrel, 1 ½” x ½” (not threaded). I glued the coupler to the tank, trying to keep its opening as perfectly centered above the valve as possible. After the glue dried I added plumber’s putty to the inside of the coupler. This performed two functions; the putty strengthened the bond between coupler and tank and also helped fill in dead space. I had to be very careful with the putty as not to plug up the valve.
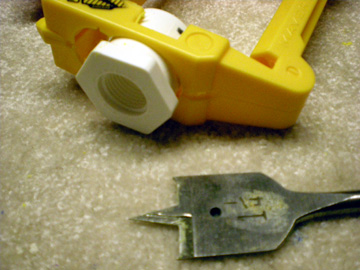
I then cut a circle in the front of the gun shell to accommodate this coupler. I used a flat wood drill bit (there is probably a better choice of bit, a hole cutter for example, but I’m working with what I had available). Be careful with the flat wood drill bit as they can grab an edge on an odd angle and rip things apart. I taped the shell closed and stuck it in a vice so it wouldn’t jump or vibrate too much while making the hole. Even scoring the surface of the plastic and finishing it off with a Dremel will help achieve a perfectly round hole.
Step Three, as there is very little room in the shell, I connected the plunger tube directly to the tank straight-on (totally eliminating hoses). I laid the tank and pump out inside the shell, making sure the pump tube was clear of the triggering rod.
When I was sure of the positioning, I marked the pump tube where I needed to drill. The nozzle on the tank needed to be inserted directly into the plunger tube. Caution, just behind the back wall of the tube is a rubber disk that acts as a baffle for air. When I drilled through the back wall of the tube, I had to do so slowly and go just deep enough to pierce the plastic and without cutting into the rubber. Then I inserted the trimmed tank nozzle into the hole in the pump tube and slathered it up with epoxy. I let harden and then added more epoxy. Later on when everything dried, I applied plumber’s putty around the joint and from tube to tank, essentially encapsulating and immobilizing the entire connection.
The reason I chose the AT3k plunger and tube was for the same reason as above, limited space. The AT3k tube fit reasonably well in the Mav shell without too many changes, whereas the Titan plunger tube was just too big.
Step four; the shell also needed Dremel work in the back to accept the plunger tube which is a tad fatter and longer than the slide. What I did here was to Dremel the shell heavily in top and side areas to accept the tube. After Dremel work I was able to squeeze the shell shut around the tube, except where the e-tape is securing the before-mentioned nozzle that I sealed up. To fix this I needed to notch holes in the shell, just on the sides where the taped plunger tube area was pushing against the shell and preventing it from closing.
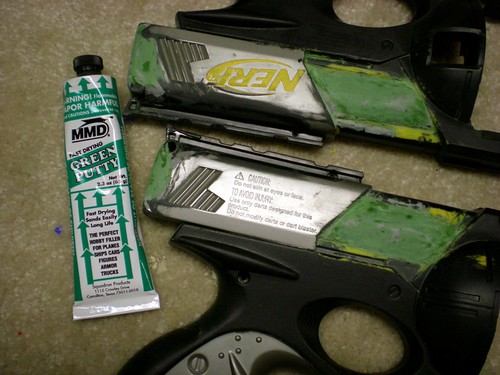
Later during cosmetic work I covered both of these cuts in the shell with putty. I applied blue painter’s tape inside the shell, covering over each opening from inside, then reassembled the shell with the plunger tube in its proper place (this caused the tape to bulge outward slightly). I then applied plumber’s putty to the openings and mashed them into place, covering the holes and shaping the putty to look more like it was supposed to be there. Hint: apply painter’s tape in areas that you do not want the putty to adhere to, and then during the drying process, before the putty hardens completely, come back at the putty with an Exacto knife and trim the edges. This cuts down on sanding time later.
For cosmetic reasons I also sealed up the old barrel opening in the shell as the new hole and coupler were positioned more in the middle. To seal it up, I first used blue painter’s tape to cover the hole on the outside of the shell, notching the tape for the coupler which tends to overlap the hole. I took a spare coupler and covered it with blue tape and inserted it into the shell where the real one would sit when finished. This formed a basin between the shell, the coupler and the tape where the original barrel opening was.
I filled this basin with hot glue (on the inside of the shell). When the glue hardened, I removed all the tape, took out the coupler and viola! The gap in the shell was perfectly filled solid with hot glue. With a little primer and paint, no one can tell there was once a hole there.
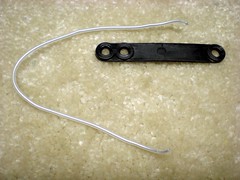
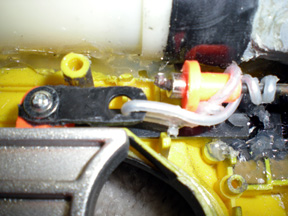
Step five; the trigger assembly for the Maverick consists of a trigger, an extension spring, and a plastic bar that is attached to the trigger with a screw. The goal here was to connect that screw on the Mav trigger to the release-rod on the Titan tank. For this we need two items off a Nerf box a twist tie and one of those flat black strips of plastic that anchor the twisty ties to the Nerf boxes.
I was going to do some elaborate machining of some aluminum, but I decided against it and knocked this up in about a minute and a half.
The strip of plastic from the Nerf box already had a hole in one end so cut the strip to a one-inch length and drilled a smaller second hole at the end opposite the larger hole. I removed the screw from the trigger; put it through the smaller hole in the strip of plastic and replaced the screw back in the trigger. I had to shave down one edge of the plastic strip to keep it from getting pinched when I closed the shell. By trimming a thin strip off the bottom of the plastic piece I was able to fit it all inside the shell completely. It sounds like a ridiculously tiny detail, but if its poking through the shell, it can potentially get hung-up or snagged on the shell edge and you don’t want anything interfering with the triggering mechanism, better to keep it all inside.
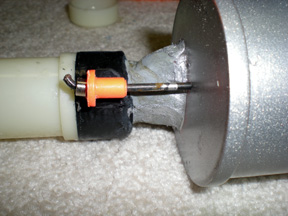
The release-rod on the Tank has an orange plastic piece around it to which I was able to anchor the twisty tie. I used two pairs of needle nose pliers to do this, one to hold, one to twist. The other end of the twisty tie went through the hole in the plastic strip and back up to the release rod again. I took up as much slack as possible before securing it to the release rod, then snipped off any excess tie with some wire clippers. Done, the trigger now controls the release-rod.
Step six, the plunger handle need to be plugged. The AT3k plunger cannot get but a couple pumps before the safety valve on the plunger kicks in so to get any good air in the tank, I had to hot glue the hole in the top closed. At the other end, I removed a plastic piece that was on the plunger rod itself, leaving the cube-shaped piece of plastic that was attached to the rod.
On the sides of this cube were holes that I used as guides for my drill bit. I drilled past the holes and through the rod itself. Through this I installed a 3” piece of 3/8” solid aluminum rod.

On each end of the rod I attached nylon spacers and glued it all together. The result is a grip for operating the plunger rod.
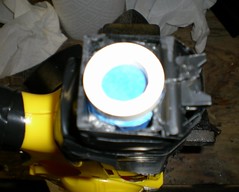
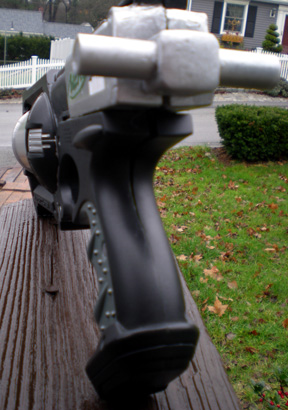
For this mod, the stock Maverick slide handles were only cosmetic so I cut the back end off each piece for the plunger rod, Dremelled the back a bit and then glued them onto the shell in a position somewhat back from where they usually sit at rest. From the rear view, It can be seen that the end of the pump tube is wider than the plunger handle, which means the plunger tube flops around loosely and at odd angels when not in-use. This had to be fixed and at the same time make it so the plunger does not fall out during pumping. To that end, I fabricated a ring made from a ¼” long piece of ¾” CPVC glued to the inside a ¼” long piece of CPVC coupler.
I cut this ring in half and glued each half to the sides of the shell, so that when the shell closes around the plunger handle it captures it and sits right at the opening of the plunger tube. Both the ring and tube are approximately the same OD (outside diameter), but the ring has a smaller ID (inside diameter). This means the plunger can operate in the tube, but is stopped just short of exiting the tube.
Permanently affixing each half-ring to one side of the shell allows the shell to be opened at will. The cutting in half also allowed me to get the ring around the plunger handle without dismantling said plunger. The fit does not have to be snug, the plunger handle just needs to be able to move freely. The ring is only acting as a guide to keep the rod straight and to keep the plunger from falling out of the gun.
I taped up the plunger tube to protect it against dripping residue inside, and then I applied hot glue around the ring to secure it in place.
Epoxy proved too thin for this and dripped down into the gun, bad. The hot glue stayed as a blob and held its position. Before laying down the glue I jammed some FBR into each of the corners to act as a platform for the hot glue. Later when everything hardened I was able to open up the shell and remove the foam pieces. However, before the glue hardened completely, I ran my Exacto knife down the two cuts in the ring to make sure the separation between the two halves was clean.
For cosmetic reasons, I added putty to the outside of the ring, covering the hot glue. I added some on the sides as well to fill in gaps. I tried to make it a smooth as possible to reduce sanding time later. Before it hardened completely, I ran the Exacto knife down the center cuts again to make sure the two haves remained separate. I also ran the Exacto around the inside of the ring to clear out any residue.
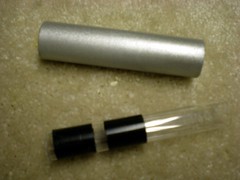
The barrel can be anything you want, single or shotgun, long or short. For this mod I went with short, but as it’s couplered I can swap it out at any time. I cut a 3” long piece of ½” PVC tubbing and lined it with PETG. I put tape around the PETG at one end, and then glued the PETG to the inside of the PVC. The barrel is loaded by removing the PVC from the coupler and inserting the projectile into the rear then replacing the PVC into the coupler. One could just push it down the barrel, but it would require a push-rod to push it all the way to the back.
The mod is done. From this point onwards are the cosmetics of the project, aka paint. The Tank and barrel were first primed in silver using Vinyl Dye, and then painted with silver. Most of the rest was primed with black vinyl dye, and then painted with flat black. I used a gray colored enamel for the grip and silver highlights on the various screw heads and lines.
Ranges, using the three inch PETG barrel and fishing-weight Stefans:
Flat with 30 pumps: average 45 feet,
Flat with 40 pumps: average 65 feet.
More pumps will get more distance but accuracy drops off because of the three-inch barrel.
I hope you enjoyed this. Happy Nerfing!
*Note: To those who saw the original write-up for this on Foam Universe will notice that this has half the amount of pictures. This is due to restrictions on the pictures that can post on this forum. The most important stuff is here so you are not missing anything. If you have a question I will be happy to answer and post supporting pics.
By NerfDude1138
Disclaimer: Modifying Nerf toys is a dangerous business and should never be attempted by anybody for any reason at any time. Do not attempt to follow my precise and detailed step-by-step instructions on how to recreate this awesome mod. In fact the world is a dangerous place; you should probably just stay indoors and never leave your house.