Jump to content


Photo

The Exhaustive Guide To Crossbows NOW ON NH

With every detail in between, through almost 50 pictures and 3500 word

33 replies to this topic

#1 Split

Split

    Member

  • Members
  • 1,771 posts

Posted 01 December 2008 - 06:25 PM

Here's the very long guide that shows a lot of classic techniques for restoring blasters. For the updated supplement that came a year later, see here

The latest upgrade is the Supreme crossbow kits, writeup here

Some key features:
Replaced plunger tube
Full internal reinforcement, including plunger
Singled 1500 integration with linked trigger
Swappable trigger grips for comfort
110' flat, no bungies, via perfect plunger head seal and DT3 arrowshooter spring
How to repair: Plunger, plunger head, screw posts and shell holes and imperfections
How to redo a paintjob

::Long, sappy intro about crossbows here::

Well, now that that's out of the way, I want to put up the new guide to modding a crossbow, from start to finish, and from someone else's terrible finish, back to start, and up to your perfect finish. This is completely intended to replace the old article about levels (I mean seriously, a Level 2 crossbow is stock, but with E-tape to cover the hole in the original barrel).

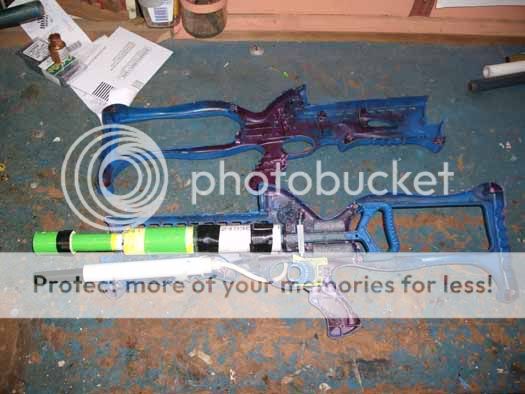
Here is our subject: The crossbow. This one has been through two owners, and two waves of modifications. The first was to bring it up to “Level 4,” which is merely a reinforced spring rest and having the barrel out the front. The second included gashing holes for integrations and adding epoxy and hot glue galore. Add on an “intentionally rough” paintjob and you have this:

Posted Image
Posted Image

We begin.

Clean up.

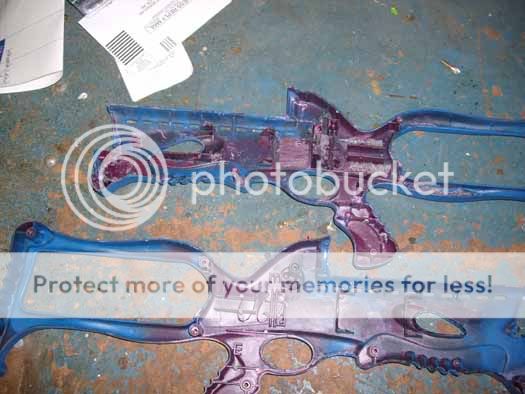
Taking out the internals, rip off that “integration” glued to the side, and set it all out of the way for now. Don’t be afraid if you find things like this:

Posted Image

What you want to do is to rip all pre-existing mods out of it, or at least the ones that you’re not completely positive are very well done. This is, after all, your crossbow.

Posted Image

There are a lot of tricks to doing all of these things right, well, and easily. I’ll put down most of the big, important ones.

Removing hotglued metal: A good set of pliers does you well here. You can generally just hold the shell or piece and pull. If the metal is shrouded in hotglue (i.e. nail in glue, post reinforcement), the same applies. Grab at the hot glue and pull. It will either start coming out and exposing the metal, or it will break off into chunks. If the latter, keep at it until you can get the metal.

Removing hotglue on the shell: This is a really common one. Again, start with a good set of needlenose pliers. The hotglue prefers to stick to itself than to the shell, so it will generally pull right out in one or two big pieces, pretty cleanly. There are two major exceptions to this – 1) the glue is a thin layer 2) the glue flakes off. Solutions: 1) There are two ways to go about this. The first is to add more hot glue on top, then go back to the pliers. The second is to spray a good amount of silicone based lubricant onto the glue. After letting it soak in (approx. 20-30 minutes), try prying it out with a dull chisel, or narrow (<1″) head scraper.

Removing items that were epoxied on: Be gentle with these. Rocking the item back and forth for a few minutes almost always does the job. If it’s a small piece, and it hard to grab hold of, blunt nose pliars are much better over the often damaging needlenose version in this situation. Another answer here is to use a chisel or fine tipped tool to carefully pry the epoxy off of the sides of the attached piece, until it comes out. Use needlenose pliers to remove as much epoxy as possible.

Foam Backer Rod (FBR) or Caulk Saver hotglued: Pull the foam out either with needlenose pliers, or with your hands. This will leave a small layer of left over foam with the hotglue. Now you can use the method for removing hotglue on the shell.

Small pieces, attached to small pieces: Here’s a good example of what I had to deal with. The crossbow trigger is small, and while not completely uncomfortable, could use improvement. That will be dealt with later. This is the product of an attempt at that mod:

Posted Image

Quite unacceptable. A few smacks with a rubber mallet should pop it right off. Since most people don’t use the most secure way of attaching pieces to each other (covered later), this is generally not a problem. If the small pieces can’t really be hit with a mallet, vise or hold one object at the joint, and use needlenose pliers on the other piece at the joint, and pry them away from each other in order to break the connection.

Sanding, and otherwise redoing the paintjob.

Clean and sexy. Words commonly used to describe a good cosmetic job. That’s not what’s on this bow. But it will be.

Start by roughing off the top layer or so of paint with 60 grit sandpaper. Gradually work up to a 600 grit. Wet sanding is definitely your friend here. This will be the most time consuming part of this whole guide. Both shells together took about 11 hours of total sanding. By the time you go to paint it, you’ll want it at 800 grit, but I’ll cover the repainting part later in this guide.

Posted Image
Posted Image

Hit the plunger tube pretty lightly as well. You can also sand the outside of your integration tank if need be, but don’t go overboard. I did mine just to show; my entire integration is internal.

Plunger Repair and reinforcement
Inc: Catch reinforcement, spring replacement, plunger head repair and replacement

For this next part, you will need the following:

Posted Image

That metal is 1/16″ aluminum, that can be bought from Home Depot or Lowe’s for about $3 for 6 feet. Very cheap, very useful.

Now the plunger for this crossbow isn’t broken at the catch (or at all) like most, but if it is, the same steps apply for repair.

First and foremost, we need to cut the aluminum. Using the snips, cut it to equal the length between the plunger head base to the longer side. Then cut straight down the center along the length. You should end up with something like this:

Posted Image

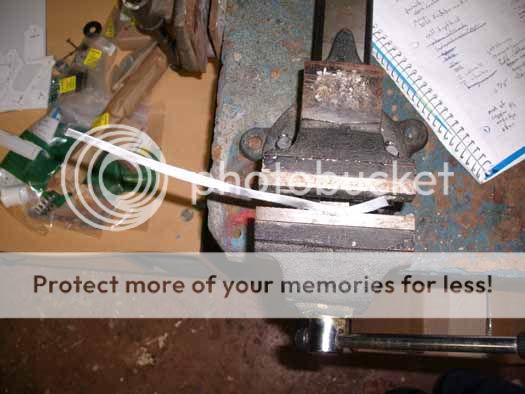
The snips probably have mangled it like so. All you need to do is to vise it at the turns, and squeeze it down. This may take a while, but it’s important that it’s flat in all directions.

Once it’s straight, snip down the one side to the proper length (one side will need to be shorter than the other), and mark the catch spot, as well as any spots that are too wide, and need to be shaved down:

Posted Image
Posted Image

The rest is continued later in the thread, click HERE

Edited by Split, 15 June 2011 - 02:39 PM.

  • 0
Teehee.

#2 sam

sam

    Member

  • Members
  • 1,059 posts

Posted 01 December 2008 - 06:41 PM

Simply Awesome.

One thing I found was that adding a stronger trigger spring improved the trigger feel immensely, and was the easiest way to give it a "super hair trigger," as you put it.

Edited by sam, 01 December 2008 - 06:41 PM.

  • 0

#3 Hoceky

Hoceky

    Member

  • Members
  • 182 posts

Posted 01 December 2008 - 06:45 PM

I like this alot. I wish I had a Crossbow. :unsure:
  • 0
meh.

#4 mystefansdontflystraight

mystefansdontflystraight

    Member

  • Members
  • 1,176 posts

Posted 01 December 2008 - 06:45 PM

Im ashamed to have screwed the thing up so badly. I thank you for restoring it to glory. Awesome job, you are an inspiration.
  • 0
QUOTE(Blacksunshine @ Dec 24 2009, 02:15 PM) View Post

QUOTE(white moonlight @ Dec 23 2009, 01:29 PM) View Post

It's just screaming to be rearloading...

I seen a movie about that once.


#5 Draconis

Draconis

    I am not Lord Draconical

  • Members
  • 2,712 posts

Posted 01 December 2008 - 07:19 PM

Im ashamed to have screwed the thing up so badly. I thank you for restoring it to glory. Awesome job, you are an inspiration.


Hey now, don't be to hard on yourself. Most of you aren't born awesome. Canadians I mean. :unsure:
  • 0
[15:51] <+Noodle> titties
[15:51] <+Rhadamanthys> titties
[15:51] <+jakejagan> titties
[15:51] <+Lucian> boobs
[15:51] <+Gears> titties
[15:51] <@Draconis> Titties.
[15:52] <+Noodle> why is this so hard?

#6 Icespartan 1114

Icespartan 1114

    Do NOT buy/sell with me

  • DO NOT TRADE
  • 934 posts

Posted 01 December 2008 - 07:30 PM

Its so beautiful, and its all mine! I must hand it to you Splitlip you did an awesome job on the crossbow. I payed 190 for this crossbow and it was worth every penny.
  • 0
QUOTE(Zaxbys @ Mar 2 2009, 02:08 PM) View Post
I won't be there til about 1-2...

Church... gotta soak up that Jesus!


NERFSTRONG #51

#7 Kid Flash

Kid Flash

    Member

  • Members
  • 1,985 posts

Posted 01 December 2008 - 07:37 PM

You definitely restored it to a much better condition than what it was in when you got it. Very nice job.
  • 0

#8 Split

Split

    Member

  • Members
  • 1,771 posts

Posted 01 December 2008 - 07:40 PM

There's also a cabinet latch at the front holding it together. Couldn't add a screw post there because of the holes. Thanks for the comments guys, I put a lot of work into this, then just got the paintjob done last week, so I figured I had no excuse for not finishing the writeup. :unsure:
  • 0
Teehee.

#9 Blasphemy

Blasphemy

    Member

  • Members
  • 355 posts

Posted 01 December 2008 - 07:41 PM

Excellent job here, I can't believe how well you cleaned it up. By the way, the posts are called standoffs.
  • 0
When speaking about a swallow, always make sure you know whether it is an African or European swallow. It is very important.

#10 Jedijoe9

Jedijoe9

    Member

  • Members
  • 251 posts

Posted 01 December 2008 - 08:09 PM

Awesome guide and awesome job on the crossbow!

I think the best part of this guide is is that this truly is exhaustive and it should serve as a resource for a long time to come. It's pretty interesting how far crossbow modification has come in the (relatively) short time since the blaster was released. (e-tape on the barrel hole...does that even count?!?)

Also, it's kickass that there are now nerf articles in my RSS feed thanks to the LGLF. Rock on.
  • 0
"If you watch jaws backwards it's about a huge shark that throws up so many people that they need to open a beach."

I nerf like a four year old.

#11 jackster57

jackster57

    Member

  • Members
  • 436 posts

Posted 01 December 2008 - 09:02 PM

Wow. Great Job. Pretty Much Covers any questions someone could have about a crossbow.
  • 0

#12 venom213

venom213

    Member

  • Validating
  • 1,294 posts

Posted 01 December 2008 - 09:04 PM

Great mod as usual Split. If I do ever acquire a X-bow, it would probably be from a thrift store or garage sale, so it probably won't be in very good condition. It reminds me of my PAS. I got sick of the parts breaking, or looking like they could break at any time, so I replaced many of the parts in that, just like this

Edited by venom213, 01 December 2008 - 09:05 PM.

  • 0

#13 Talio

Talio

    Not your mother

  • Contributors
  • 2,781 posts

Posted 02 December 2008 - 01:09 AM

Wow. That blue crossbow may be the pimpest fucking thing I've ever seen. Bravo, sir. Bravo.
  • 0
New posts on my blog, check it out. - Click on the ad too, cause I get money per click. Give back to the Admin team for once!

#14 Langley

Langley

    LGLF - Since 2002

  • Administrators
  • 2,997 posts

Posted 02 December 2008 - 09:39 AM

Nice job. That gun is just awesome.
  • 0

You can poop in my toilet anytime champ.

2016 Nerf War Schedule
Bless you, my son. Now recite 3 New Members Guides and 5 Code of Conducts for your sins.


#15 Crankymonky

Crankymonky

    It's The Dean!

  • Members
  • 687 posts

Posted 02 December 2008 - 11:12 AM

I think the best part of this guide is is that this truly is exhaustive and it should serve as a resource for a long time to come. It's pretty interesting how far crossbow modification has come in the (relatively) short time since the blaster was released.


The crossbow is one of the oldest nerf guns. While I can't remember the exact year, it is around 10 years old. I can check the copyright date later.

Splitlip, your link doesn't work at the moment, other than that...

Here

That link worked for me.

I like the bit about replacing the plunger. Now I have to go check what spare crossbow parts I have.
  • 0
Tyranny Response Team

#16 Langley

Langley

    LGLF - Since 2002

  • Administrators
  • 2,997 posts

Posted 02 December 2008 - 01:57 PM

Oops. That was my fault. The blog indexes posts by month, and I changed the date from the day Split started writing the post to the day he published it so that it would show up at the top of the Main Page, which changed the URL from ...11/splits-xbow/ to ...12/splits-xbow/.
I fixed it, and it's now back to the link in the first post (although crankymonky's link is now dead)
  • 0

You can poop in my toilet anytime champ.

2016 Nerf War Schedule
Bless you, my son. Now recite 3 New Members Guides and 5 Code of Conducts for your sins.


#17 Jedijoe9

Jedijoe9

    Member

  • Members
  • 251 posts

Posted 02 December 2008 - 03:55 PM

The crossbow is one of the oldest nerf guns. While I can't remember the exact year, it is around 10 years old. I can check the copyright date later.


I realize that. I suppose I was merely musing on how far modding has come in general in the short (10-15) years that the hobby has been around. Comparing this crossbow mod to say, a mod from around it's release shows how far we have come as a hobby.
  • 0
"If you watch jaws backwards it's about a huge shark that throws up so many people that they need to open a beach."

I nerf like a four year old.

#18 Split

Split

    Member

  • Members
  • 1,771 posts

Posted 02 December 2008 - 04:02 PM

Thanks everyone. Phil, don't fuck with my stuff too much, k? The date is fine, but don't go overboard. I actually really like this paintjob, and I'm not a blue person myself. It is pretty remarkable how far this hobby has come, hearing about the days of Ballzooka rapeage and mega firing e-taped xbows.
  • 0
Teehee.

#19 Falcon

Falcon

    Velcro'd Beanpole

  • Members
  • 1,375 posts

Posted 03 December 2008 - 12:16 AM

This is completely intended to replace the old article about levels (I mean seriously, a Level 2 crossbow is stock, but with E-tape to cover the hole in the original barrel).


I don't think there's ever going to be a reason to replace Rag's article and system. True, basically every crossbow that's actually been modded, really, is a "Level 4" 'bow. But for the time, it was a legitimate system because there were still a fair number of people using stock darts. Even today, there are a good chunk of nerfers who use stock darts and crayolas or something of the like.

I don't see your writeup as a replacement for that, so much as a separate take entirely. You've taken an excellent look at restoration from a previous owner's work, and then there's a complete replacement of the plunger casing. I don't see that as anything related to what Rags did with his article.

So what we have here currently is a set of THREE schools of thought for how to make crossbows work well. At some point soon after my new 'bow arrives, I'm planning on adding a fourth. In the meantime, we have Rag's article, which describes the concept of the barrel relocation. Then we have Ray's mod, which it appears the former owner of your project's subject used in some form or another, judging by the coupler out in front of the gun on PVC. And now, we have yours, which goes into detail about replacing the plunger casing entirely.

I see it as a reasonable option for crossbow users, but I can't bring myself to say that this is the new standard. For breathing new life into a crossbow that's seen too many dremels and spraycans, it's great. Wonderful. I hate to see them go to waste and become naught but comfy shells for integrations. But telling nerfers that the best thing they can do to any crossbow is replace the largest part of the firing mechanism with a foreign part, I don't see being necessary because of the results you can get with the stock plunger on its own.
  • 0
----------||||||||)
QUOTE(Ilùvatar @ 0000) View Post
Of the theme that I have declared to you, I will now that ye make in harmony together a Great Music.

#20 Talio

Talio

    Not your mother

  • Contributors
  • 2,781 posts

Posted 03 December 2008 - 12:36 AM

Cranks...it was 93.
  • 0
New posts on my blog, check it out. - Click on the ad too, cause I get money per click. Give back to the Admin team for once!

#21 Rover

Rover

    Member

  • Members
  • 143 posts

Posted 03 December 2008 - 01:19 AM

Then we have Ray's mod, which it appears the former owner of your project's subject used in some form or another, judging by the coupler out in front of the gun on PVC.

Funny you should say that. I was the one who constructed that plunger tube for use in MY crossbow. It is a piece of 1" thinwall sch40 pvc with half of a coupler glued inside. I then followed Rawray's barrel and coupler mods, mostly cause I didn't want to cut the shell of my otherwise pristine crossbow. I've since retired said crossbow and returned it to it's stock setup, but it's wierd to see something I made pop up in this guide.
  • 0

#22 mystefansdontflystraight

mystefansdontflystraight

    Member

  • Members
  • 1,176 posts

Posted 03 December 2008 - 08:02 AM

I have to disagree with falcon on this one. I never got any kind of satisfactory results with the stock plunger tube. Due to the telescoping plunger tube (narrows towards the front) what was a good seal with etape was soon compressed to the point of having the worst seal ever. Range testing with 11 darts had it going 100 all the way down to 60 with bungies. Thats when I decided to replace the plunger tube: I bought Rover's for a DT3 spring. I NEVER had any range dropping issues after that. I got, and Icespartan 1114 can back me up, 145ft flat with bungies. I would reccomend replacing the plunger tube to anyone.
  • 0
QUOTE(Blacksunshine @ Dec 24 2009, 02:15 PM) View Post

QUOTE(white moonlight @ Dec 23 2009, 01:29 PM) View Post

It's just screaming to be rearloading...

I seen a movie about that once.


#23 Falcon

Falcon

    Velcro'd Beanpole

  • Members
  • 1,375 posts

Posted 03 December 2008 - 11:50 AM

And therein lies the problem.

...what was a good seal with etape was soon compressed to the point of having the worst seal ever.

I don't etape my crossbow plunger heads. Never have.

Etaping it will, of course, increase the seal at the back end a bit, but it's already good enough back there. When you etape it, the conical plunger casing squeezes the tape together as you've found, but the tape's inherent stickiness causes it to not expand back out to the proper size. If you hadn't etaped it, the rubber head would be able to expand and contract with the plunger casing without any issues.

It's still a good way to replace the plunger casing if you have unfixable problems with your stock casing, don't get me wrong. But etaping the stock plunger head for use with the stock plunger casing is completely unnecessary.

Edited by Falcon, 03 December 2008 - 11:52 AM.

  • 0
----------||||||||)
QUOTE(Ilùvatar @ 0000) View Post
Of the theme that I have declared to you, I will now that ye make in harmony together a Great Music.

#24 Icespartan 1114

Icespartan 1114

    Do NOT buy/sell with me

  • DO NOT TRADE
  • 934 posts

Posted 03 December 2008 - 01:41 PM

I have to disagree with falcon on this one. I never got any kind of satisfactory results with the stock plunger tube. Due to the telescoping plunger tube (narrows towards the front) what was a good seal with etape was soon compressed to the point of having the worst seal ever. Range testing with 11 darts had it going 100 all the way down to 60 with bungies. Thats when I decided to replace the plunger tube: I bought Rover's for a DT3 spring. I NEVER had any range dropping issues after that. I got, and Icespartan 1114 can back me up, 145ft flat with bungies. I would reccomend replacing the plunger tube to anyone.


I will back you up on this. Since I am the current owner of this crossbow, I know what the ranges are. I got 110 feet flat without bungees and about 145 with bungees. If any was wondering about the Sm1500 it only get about 55 before the over pressure valve kicks in. I personal dislike using the bungees. I don't like using them because I think that the plunger is just going to release its self by accident and make the gun dry fire. I know that is kinda unlikely but I don't like taking the chance. When I am using bungees I use 2 10in" black bungees, I have used a mega bungees with those 2 bungees but its just a real bitch to pull. Splitlip, you did a fantastic job on this crossbow and I am very happy with it. Glad everyone likes it.
  • 0
QUOTE(Zaxbys @ Mar 2 2009, 02:08 PM) View Post
I won't be there til about 1-2...

Church... gotta soak up that Jesus!


NERFSTRONG #51

#25 Langley

Langley

    LGLF - Since 2002

  • Administrators
  • 2,997 posts

Posted 03 December 2008 - 02:52 PM

Why are you getting poorer range with the 1500? I've never gotten anything less than 90 out of a 1500, and that was back when I was still using megas. Even without the pump plugged you should be getting close to crossbow range out of the 1500. Maybe you should try a longer barrel or something.

Edit: Split, how would you go about setting up the trigger mech if you wanted the 1500 to fire first?

Edited by Langley, 03 December 2008 - 02:53 PM.

  • 0

You can poop in my toilet anytime champ.

2016 Nerf War Schedule
Bless you, my son. Now recite 3 New Members Guides and 5 Code of Conducts for your sins.


1 user(s) are reading this topic

0 members, 1 guests, 0 anonymous users