Jump to content


Photo

Crossbow Plunger Head


19 replies to this topic

#1 ChiliPepperFender

ChiliPepperFender

    Member

  • Members
  • 599 posts

Posted 05 May 2008 - 07:18 PM

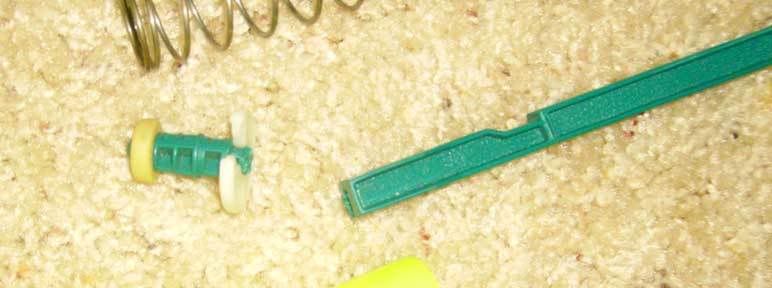
I recently got a Crossbow from Mayhem(Thank you), and there is only one thing wrong with it. The plunger head broke off. I haven't seen anyone else have this problem. Does anyone know my best bet in connecting the two pieces back on? I was thinking glue, maybe gorrilla glue? I don't have any experience with epoxy or plumber's goop, but I know they're strong. Keep in mind, the glue has to be able to hold alot, i.e. when the spring is compressed over and over again. Here's a picture of what I'm talking about how it is broken.
Posted Image

Thanks in advanced for your help.
  • 0
[The Blue Tiger][Manta Star]
WTS: Stock Crossbow. PM me if you have interest.

#2 bpso86

bpso86

    Member

  • Members
  • 618 posts

Posted 05 May 2008 - 07:28 PM

Mine had the same part broken, and I can tell you that no glue will hold that type of joint over time. I think realistically the best bet for longevity would be to make your own plunger head out of washers and try to screw it in, but that front part is hard to work with. I actually cut off the front part for the dt3 arrow shooter and attached that to mine, except I haven't gotten around to reinforcing it with metal yet, so I can't tell you how well it's worked.
  • 0

#3 ChiliPepperFender

ChiliPepperFender

    Member

  • Members
  • 599 posts

Posted 05 May 2008 - 07:30 PM

I'm still using the stock spring, I thought about making my own plunger but if possible I'd like to keep the stock one.
  • 0
[The Blue Tiger][Manta Star]
WTS: Stock Crossbow. PM me if you have interest.

#4 Rover

Rover

    Member

  • Members
  • 143 posts

Posted 05 May 2008 - 07:44 PM

If you are intent on using the stock plunger, may I suggest attemping to create another plunger rod out of polycarbonate and then holding the stock head on with a some kind of fastening device?

Edited by Rover, 05 May 2008 - 07:45 PM.

  • 0

#5 Cmdrmack

Cmdrmack

    Member

  • Members
  • 545 posts

Posted 05 May 2008 - 08:40 PM

I'd recommend screwing it in from the front, and then epoxy-ing the crap out of it, as it will probably have some exposed threads.
  • 0
QUOTE(Predalien_Ro @ Apr 7 2008, 10:24 PM) View Post

Oompa: FECES!? Who in their right mind would try that shit!?


Bigger Salvo

{FWPC}

#6 ChiliPepperFender

ChiliPepperFender

    Member

  • Members
  • 599 posts

Posted 05 May 2008 - 08:46 PM

If you are intent on using the stock plunger, may I suggest attemping to create another plunger rod out of polycarbonate and then holding the stock head on with a some kind of fastening device?


I've never machined anything out of polycarbonate. I'll keep that in mind.

I'd recommend screwing it in from the front, and then epoxy-ing the crap out of it, as it will probably have some exposed threads.


What do you mean by screwing it in the front?
  • 0
[The Blue Tiger][Manta Star]
WTS: Stock Crossbow. PM me if you have interest.

#7 Ccapogreca

Ccapogreca

    Member

  • Members
  • 154 posts

Posted 05 May 2008 - 08:47 PM

I'd recommend screwing it in from the front, and then epoxy-ing the crap out of it, as it will probably have some exposed threads.

Yeah, just do that, I've seen people drill theres in, with a right size screw, and they held perfectly well. I think.
  • 0
QUOTE(keef @ Oct 25 2007, 05:41 PM) View Post

Grow a penis and say it to his face. Hes a bodybuilder and would eat you for breakfast.

#8 Ryan201821

Ryan201821

    Prince Edward

  • Contributors
  • 1,892 posts

Posted 05 May 2008 - 08:47 PM

I can make you a custom plunger if you want. PM for details.

There is no real solution to fixing this. Anything will eventually break overtime causing frustration. A homemade plunger is your best bet.
  • 0

#9 ChiliPepperFender

ChiliPepperFender

    Member

  • Members
  • 599 posts

Posted 05 May 2008 - 08:48 PM

I can make you a custom plunger if you want. PM for details.

There is no real solution to fixing this. Anything will eventually break overtime causing frustration. A homemade plunger is your best bet.


Thanks, I'll pm you.
  • 0
[The Blue Tiger][Manta Star]
WTS: Stock Crossbow. PM me if you have interest.

#10 Galaxy613

Galaxy613

    Member

  • Members
  • 999 posts

Posted 05 May 2008 - 08:54 PM

*nvm*

Edited by Galaxy613, 05 May 2008 - 08:54 PM.

  • 0
[Former Caretaker of the Guru Mk2]

#11 VACC

VACC

    Vacc is Legend

  • Founders
  • 3,265 posts

Posted 05 May 2008 - 10:07 PM

Yeah, take the thing to your local hardware store and pick up a screw long and thin enough to drill from the tip of the head into the wider surface where the plunger head separated.
  • 0

#12 ChiliPepperFender

ChiliPepperFender

    Member

  • Members
  • 599 posts

Posted 05 May 2008 - 10:23 PM

Thanks for the help everyone, I'll try that this week.

EDIT: After looking at the end of my plunger where there is no plunger head, it is extremely small, less than a quarter inch. I guess I'll have to find a small screw.

Edited by ChiliPepperFender, 05 May 2008 - 10:37 PM.

  • 0
[The Blue Tiger][Manta Star]
WTS: Stock Crossbow. PM me if you have interest.

#13 Cannonball

Cannonball

    Member

  • Members
  • 357 posts

Posted 05 May 2008 - 11:46 PM

I dont think anyone has said this, but as for epoxy, I suggest Devcon Plastic welder. You will not be disappointed.
  • 0

#14 ejrasmussen

ejrasmussen

    Member

  • Members
  • 205 posts

Posted 06 May 2008 - 12:00 AM

Epoxy Putty!
  • 0

#15 ChiliPepperFender

ChiliPepperFender

    Member

  • Members
  • 599 posts

Posted 06 May 2008 - 12:06 AM

Epoxy Putty!


If adding a screw doesn't work out with the plunger head, does this sound sensable, to epoxy the plunger head to the plunger then add epoxy putty? Or would adding the putty do nothing? This is all of course, if the screw thing doesn't work out.
  • 0
[The Blue Tiger][Manta Star]
WTS: Stock Crossbow. PM me if you have interest.

#16 OfAllTheNerf

OfAllTheNerf

    Member

  • Members
  • 714 posts

Posted 06 May 2008 - 09:49 AM

Putty is good or body with but isnt a terribly good adhesive. I would recommend fishin' glue, from what Ive experienced its damn strong.
  • 0
[color=#FF6600][Finesse]-[BitchX]

#17 ompa

ompa

    Introductinator

  • Moderators
  • 2,368 posts

Posted 06 May 2008 - 10:10 AM

I agree; the putty is great for filling space/providing support when the adhesive properties are secondary, from my experience, although FA may have more experience with the stuff.

I'd ask CS about types of plastic welder he'd recommend, as he seems to have experience in the area.

~ompa
  • 0

#18 sam

sam

    Member

  • Members
  • 1,059 posts

Posted 06 May 2008 - 10:50 AM

I would use a combination on things. First increase the area of which you can put a screw into by gluing some polycarbonate, or plastic of some sort right near the break on the plunger rod, maybe a half in strip on each side. Then wrap the newly thickened part of the plunger rod in some aluminum sheeting or something like that to reinforce it. Then use a long thin screw and put it all the way through the plunger head and into the thickened plunger plunger rod. Hopefully that made sense.
  • 0

#19 Nonsense Man

Nonsense Man

    Member

  • Members
  • 308 posts

Posted 06 May 2008 - 04:27 PM

I think IPS weld on #3 or #4 would be you best bet here is a quote from Captain Slug's Machining Plastics thread. He also mentions other plastic glues on pg 3229. As other people have suggested I suggest finding a screw that will fit on the plunger head and running that through then using you plastic glue of choice and gluing that joint then get some aluminum sheet 8 by 12 (I think) sheet for around $5 and gluing (with your glue of choice) the aluminum in that area and along the hole plunger rod (if you want0 for maximum strength. Epoxy Putty isn't really made to be the main holding force of something under tension more as a extra measure (not a lot though).

IPS Weld-on #3 or #4: This is an extremely useful and effective plastic solvent that fuses ABS, Polycarbonate, and Acrylic together (in any pure combination of the three). Simple brush onto or apply to contact area with syringe then secure pieces together in the final form you want. #3 formula is slightly thicker and faster setting, while #4 is water-thin and sets more securely. #4 is recommended for anything you are trying to make air-tight because it's thin enough to use capillary action to fill all of the gaps between the sheets you are joining together. In order to join sheet edges securely and tightly make sure they are sanded to atleast 400grit level and are straight enough to make a scure bond. You do not have to apply any contact pressure to get a good chemical bond. Over application will lead to ugly, but working joints. Can be applied an reapplied as needed without complications.
It's a good idea to use this in a ventilated area, and while it will not adhere your skin to plastic it WILL create permanent fingerprints. This is a mildly toxic substances so excessive skin contact is not a good idea.
It with also work with butyrates and styrenes, but I have not tested it on polypropylene or polyethylene yet so you'll need to ask a plastics shop about compatability. I do know that it is completely incompatible with all PVC plastic blends so avoid buying ABS/PVC (Kydex T). ABS/PVC is a crappy plastic anyways. If you need a specific solvent for a material, check out the wide range of products available from IPS: http://www.ipscorp.com
Both #3 and #4 (and a whole host of other plastic adhesives) are available from McMaster (page 3229).
To apply Weld-on accurately and safely I recommend using 3ml luer-lock syringes with flexible PTFE tubing "needles".
These can be purchased from medical supply, or through industrial supply catalogs such as McMaster (part #s 7510A651 & 75175A691)


Edited by Nonsense Man, 06 May 2008 - 04:32 PM.

  • 0
QUOTE(1lastnerfgun @ Apr 19 2008, 08:39 AM) View Post

40 shots for 40 cocks


#20 The Crackerjack Man

The Crackerjack Man

    Member

  • Members
  • 203 posts

Posted 08 May 2008 - 03:04 PM

If you don't want to spend the money on a custom plunger, no offence to anyone who is trying to sell one to him or somthing along those lines, I think you should stick with the broken one. Put a nail or some sort of metal rod through the front, around where the old plunger used to be. And make sure its small enough that it won't hit the plunger tube, but big enough so it holds the spring back. Then make a custom plunger head out of some washers and O-rings, or just use the old one and lube it up.

Just a suggestion.
  • 0
"Wow, you realy screwed that guy over"


0 user(s) are reading this topic

0 members, 0 guests, 0 anonymous users