Jump to content


Photo

My Answer To The Great Homemade Manta Debate

A little elaboration on my current project
cosmetics writeup

25 replies to this topic

#1 baghead

baghead

    Cheetos

  • Members
  • 1,366 posts

Posted 26 January 2008 - 01:14 PM

Last weekend Falcon and I spent a great deal of time working on Bringing our Signature Primaries back to life, In his case, finally refining his beastly X-bow...I'll let him share it with you when it's ready... and I finally decided to sit down and get to work on The Second coming of Sicklefin.

I had learned from the first one, that Gratuitous amounts of epoxy is not a viable way to modify a manta shell for long term heavy use. Hence why I had to rebuild it's upper half a couple of times. Epoxy simply doesn't allow for enough flex, and falls apart if you bend it too much. I also decided that most other adhesives would suffer from other similar weakness, or from lack of the required strength to hold it in place.

Because of that, I decided that this time, I'd most likely be fabricating an entirely NEW upper shell for Sicklefin II. At First, I considered making it out of a single piece of sheet plastic. But there were many reasons that eventually deterred me from doing that.

* It dances down the line of questionable war legality
* It makes fabrication of a nerf shield Too easy, which would also put legality into question
* Although it would help avoid some of the flexibility issues, it would still suffer from many of a Stock Manta's weakness related to stress points, many due to the fact that it is one solid piece.
* It's rather costly for a large enough plastic sheet, and if I screwed up, it would be a pain to replace.
* It would be equally challenging to adjust it's contours to be similar to that of a stock manta.
* A single sheet would look very plain, even when ornately painted
* Ect...

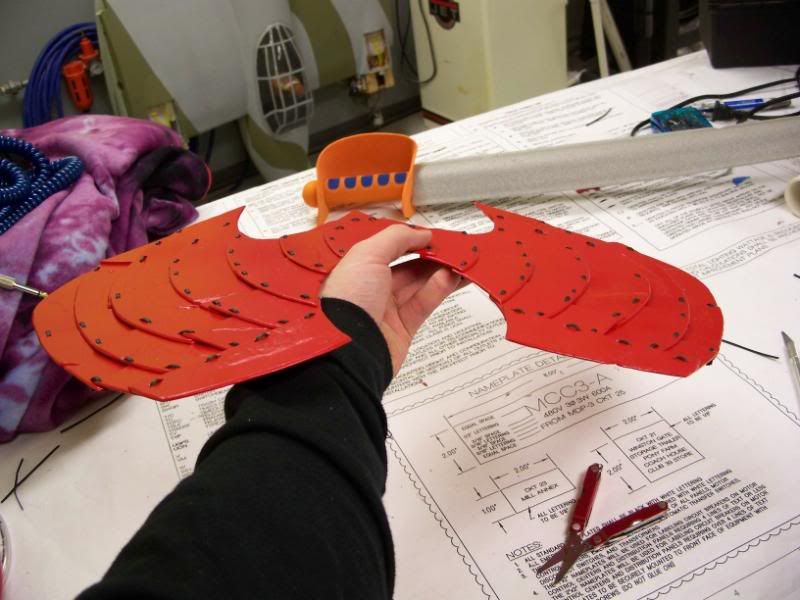
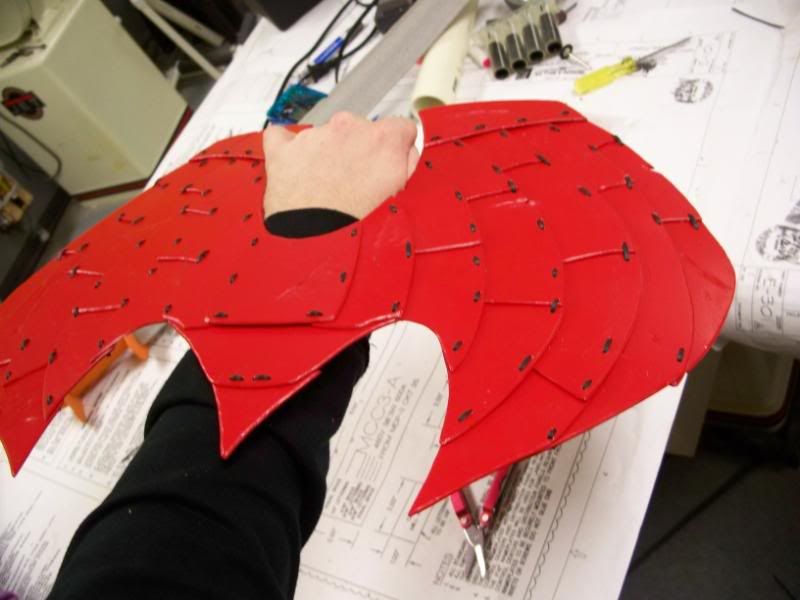
So As I went shopping at on of the many hobby shops I haunt when working on major nerf projects for sheet plastic with Falcon last weekend, it came to me. Fabrication of several small layered shingles, like samurai plate armor! It would make building it somewhat easier in some ways, and it would also be far more challenging and require much more time to do. It also quickly came to me that the best way to affix the individual parts together was not with adhesive, but small Cable Zip Ties, suddenly, there was no need for glue at all. More advantages keep popping into my head as I continued to quite vocally work on the concept with Falcon.

Reasons to go with the Samurai Armor concept:
* Small pieces makes fabrication possible when limited to the availability of smaller pieces of sheet plastic than could be used to fabricate a solid one piece manta shell.
* Individual plates can be easily re-fabricated if damaged, as removal of a broken piece and replacement could be done with little effect to the overall structure
* Zip ties give not only a strong connection, but one that flexes some, this is also attributed to the small plates
* Fabrication of such parts would make it a fairly long and arduous task, which would mean that the kind of work put into it alone makes it worth consideration for war legality
* Makes matching a size restriction, similar to the original Sicklefin more than just possible, but also adjustable.
* it naturally bends some with gravity, allowing it to have a more stock Manta-esque shape
* Durability do to superior flexibility and structural independence.
* It allows for FULL customization of the Manta Ray's look for any individual.
* when completely built, it would look really really ridiculously awesome
* Ect...

I had long been on the fence on the debate of homemade mantas, and I mainly leaned towards the side of saying "no" until I Figured out this concept. Because of the great amount of time fabrication of this takes, it shows much dedication to the hobby than just cutting out a simple one piece cardboard or plastic shield. That coupled with the difficulty of the task also keeps it from being something everyone is going to be willing to do.

As the idea became more and more feasible sounding, Falcon and I decided to lay down some guidelines for it's use in at least our wars, hopefully the rest of the community will agree with us.

1. Like a stock manta ray shell, it MUST be attached to a working Nerf blaster.
2. It must have the same opening for the hand that a stock Manta allows, leaving the user's hand exposed.(Approximately 4 inches wide)
3. Also just like a stock manta, only shots that impact the actual shield area count as deflections, anything that hits the attached blaster areas still counts like a gun hit.
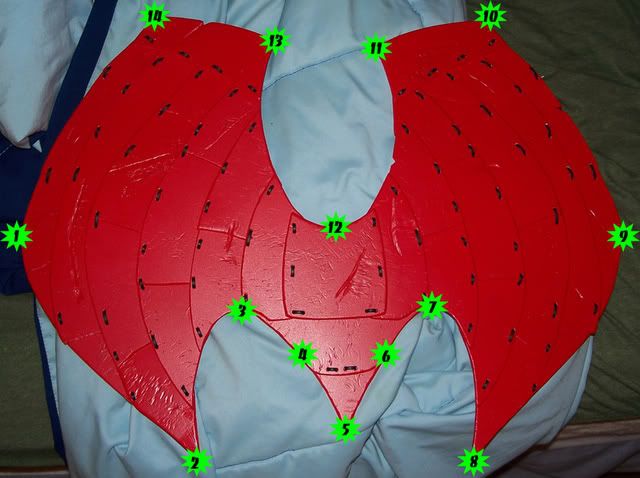
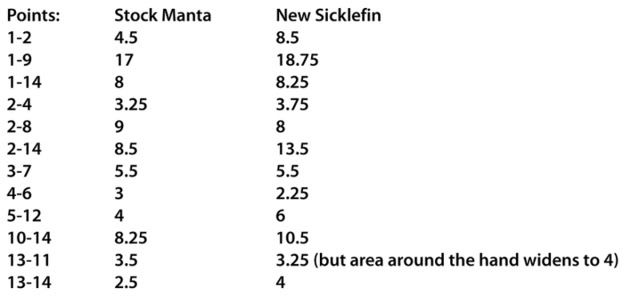
4. it's dimensions Must not Exceed a width of 20 inches and a length of 14 inches (roughly the size of the first sicklefin and my new design; which is 19 x 13.5, This also is a more reasonable shield relative to the more “adult” size of the average nerfer. I also believe that a stock manta shell flattened is about 17 inches wide, so we're talking roughly and extra 1.5 inches to the width on each side.)
5. It's generic shape must be somewhat similar to a stock manta, albeit you can have artistic flourishes. (like the extended rear fin areas I built on mine, or if one was to make one with say sawblade inspired notches)
6. It mush be made of no less than 20 pieces. (mine is made of 37 pieces and has 78 zip ties)
7. It cannot be used as a way to make Nerf Body Armor, only to make a single manta-shaped shield.
8 * I'm also tempted to say that you're limited One of these per blaster, so you an put one on both sides of a magstrike or something, but I think the time it takes to produce should help keep that in check*

We also agreed that If you went to the kind of trouble I did to make one, you've earned the right to use it. This project took me roughly three days straight of non-stop work dedicated to all the steps of fabrication, so trust me it's more than a little time consuming.

So with all of this in mind, are you ready for a walk though on how to do it yourself?

Good.

How To Fabricate your own hardcore homemade manta shell:

Materials Needed:
*Sheet plastic ( I used 1/8th inch thickness hobby styrene, but most types would work just fine, I can't define the amount as It will vary depending on each shell's shape and number of pieces.)
*1 100 pack of Cable Zip Ties (approx $2.50)
*wire cutters
*Power Drill or drill press, with a bit slightly larger than the width of the cable ties
*Some method for cutting your sheet plastic ( I used a bandsaw, but there's other ways you could do it)
*Dremmel
*Sandpaper or table mounted belt sander (you could also use the dremmel)
*Sharp hobby Knife (I prefer X-acto)

Actual Process: Take note now, these are fairly rough guidelines, also, it's worth noting that this does not quite as heavily rely on precision as say, Capitan Slug's Plusbow. It's more of a Rough n' tumble fabrication process that takes patience, ingenuity, experience, and a little luck.

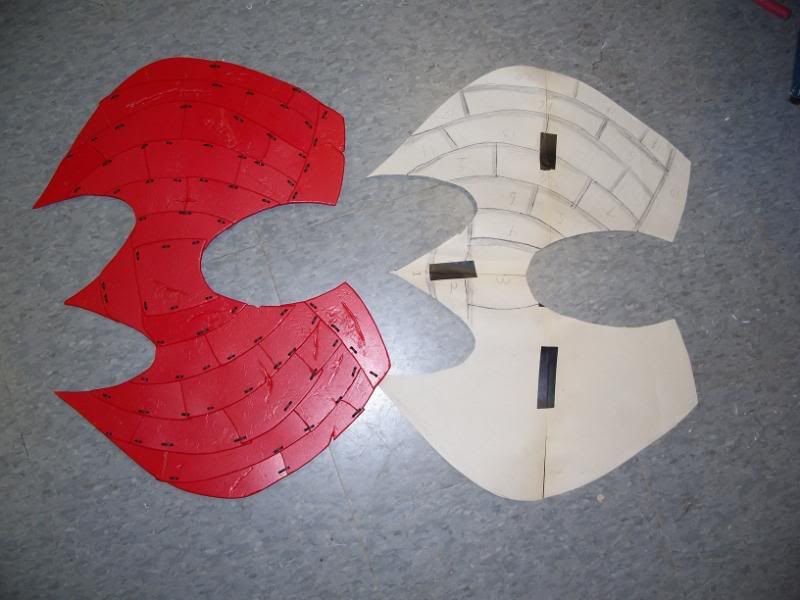
Step one: Sketch a rough outline template on paper, then cut that template out:

SicklefinII_001.jpg
SicklefinII_002.jpg

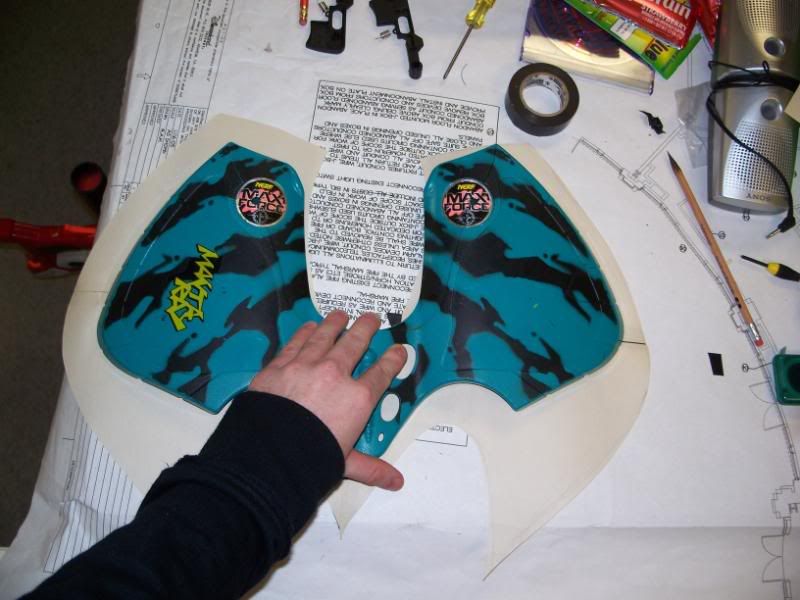
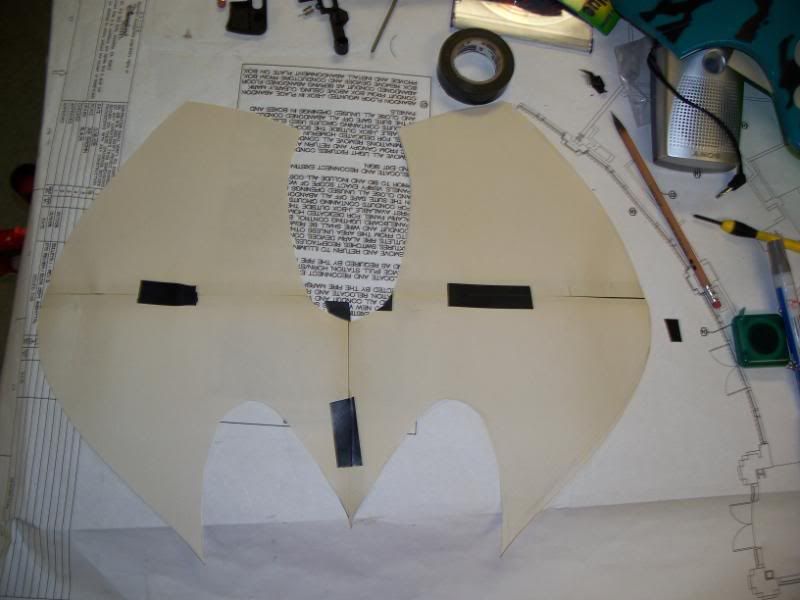
I made mine using a stock manta for reference, if you don't have one, just remember it's general shape and the size guidelines I mentioned earlier. I also would like to note that my template was a little larger than the final result, as overlapping parts leads to some minor downsizing.

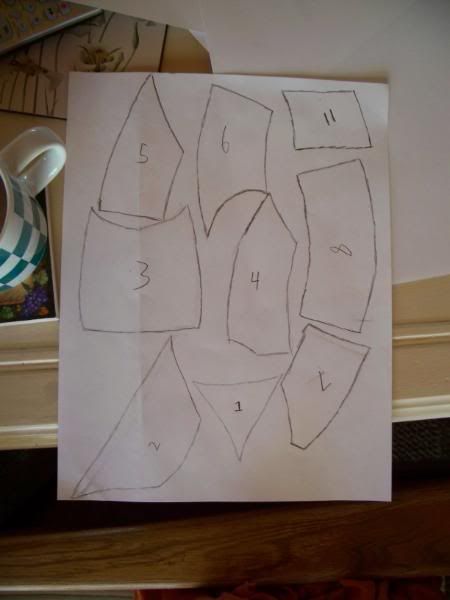
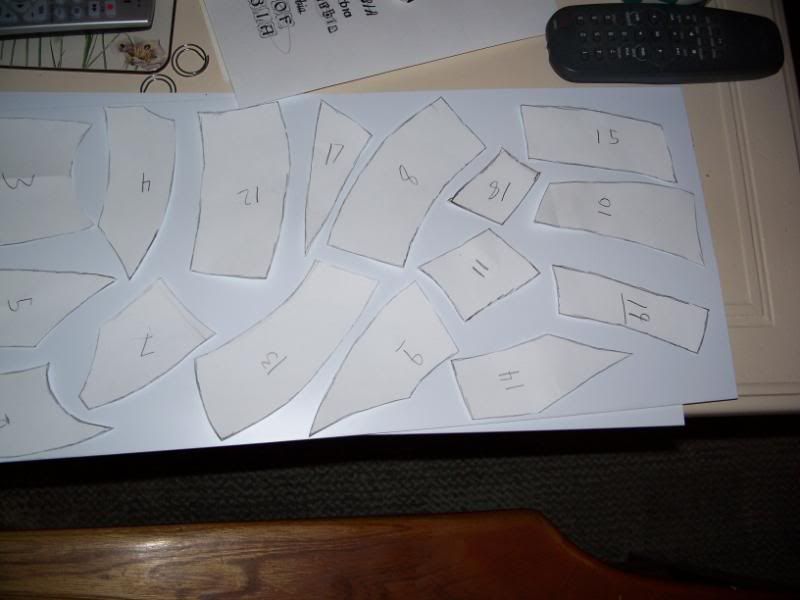
Step two:Sketch out a fairly detailed idea of how you want to layout your pieces.

SicklefinII_003.jpg
SicklefinII_004.jpg

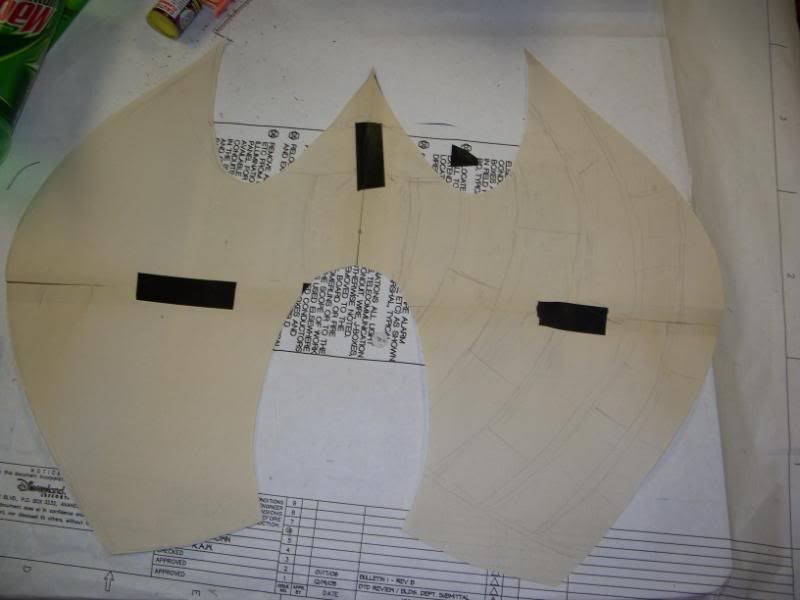
You really should only have to do this on one side of your shell template, unless you decide to make it asymmetrical, which will simply give you Much more work to do in the long run (but it could lead to some really cool looking designs). Make sure to not only define the shape of the exposed parts of the panels, but also where they will overlap. I did this by outlining the visible areas in black pen, and shading the overlapping areas gray.

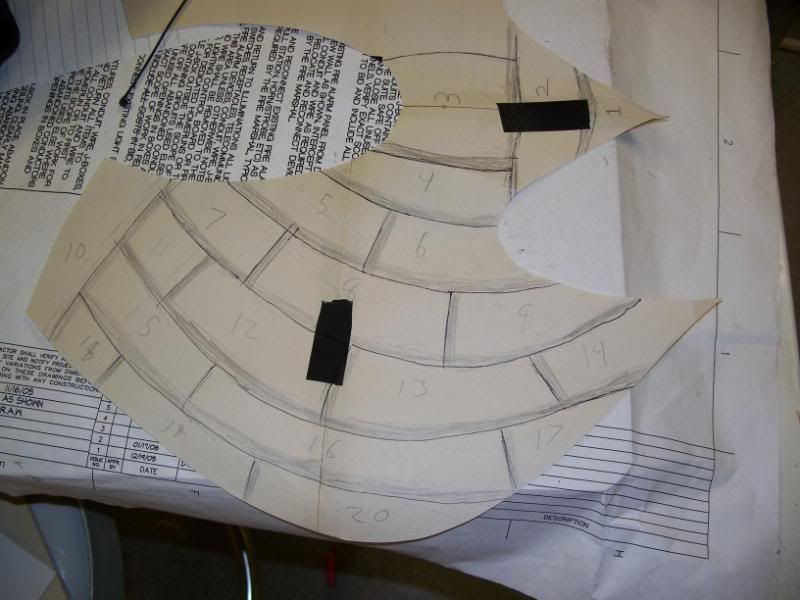
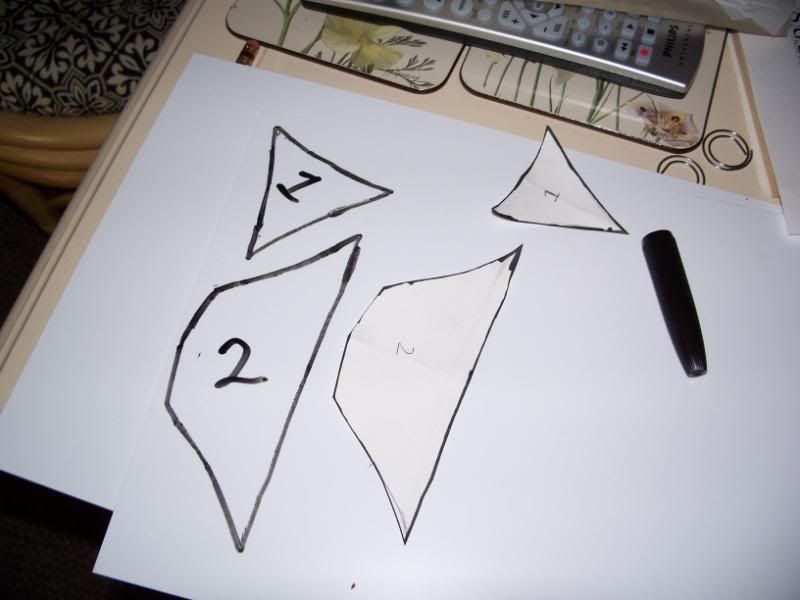
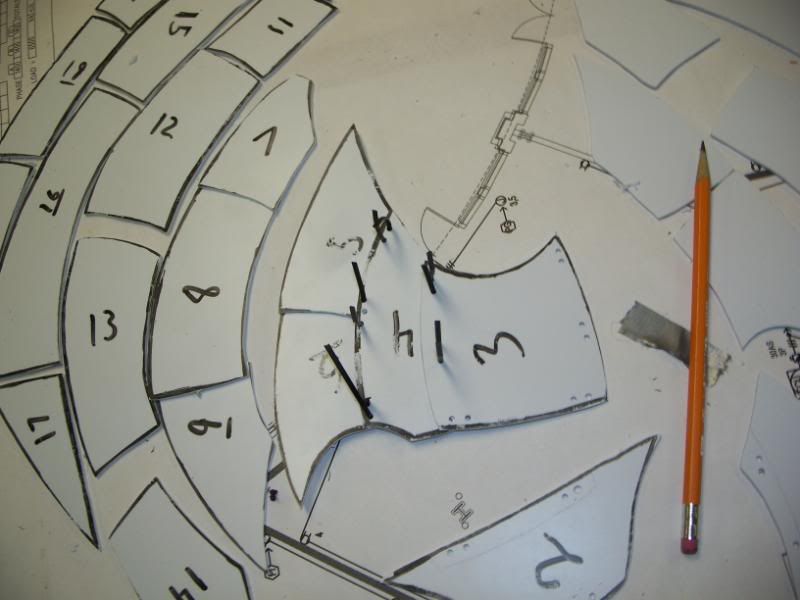
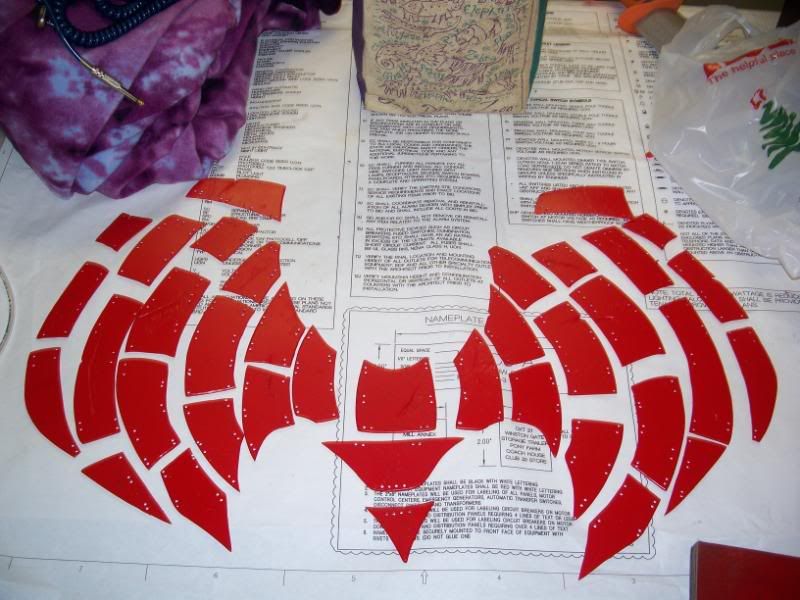
Step Three: Using your large template, Number and Draw your templates for individual pieces, then cut them out.

SicklefinII_006.jpg
SicklefinII_007.jpg
SicklefinII_008.jpg
SicklefinII_009.jpg

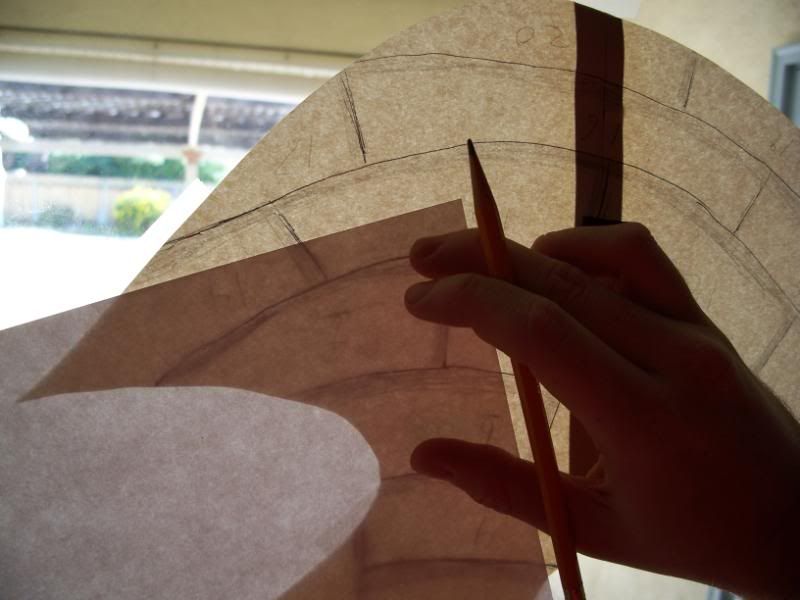
I did this by placing my template against a sliding glass door (it's far more accessible to most than a light table, which would also do the trick) and drawing all my unique pieces onto more paper. For overall organizational purposes Number both the individual pieces and their corresponding area on the large template. From there cut each template piece out. (If you were to do this with Clear sheet plastic, you could save yourself some time here, but you risk keeping your duplicate parts uniform becoming a bigger challenge.)

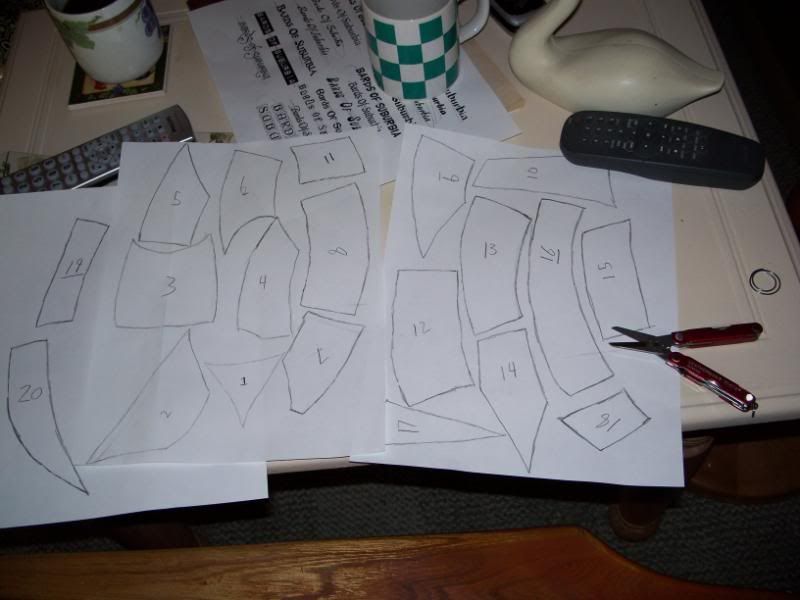
Step Four: Plan out your use of the sheet plastic.

SicklefinII_010.jpg
SicklefinII_011.jpg
SicklefinII_012.jpg
SicklefinII_013.jpg

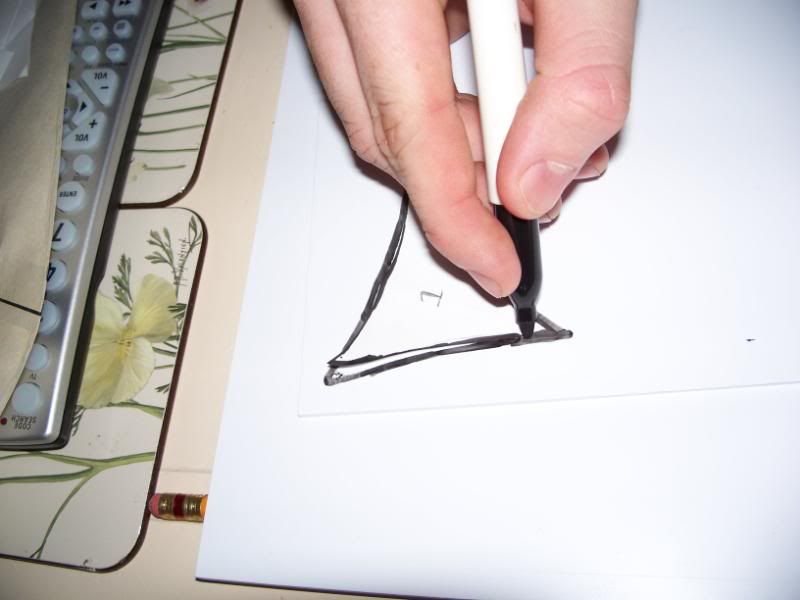
Using the new templates I drew outlines of all my parts on my plastic sheets. Making sure to have all of the unique parts, as well as all the duplicates. This is part of why the numbering comes in handy, you can check that you have all your needed parts before you start cutting things to bits. You don't need to flip your parts for the opposite side while you're drawing your cutting guidelines, you can just flip them over after you've cut them out.

Step Five: Cut out and clean up your pieces

SicklefinII_014.jpg
SicklefinII_015.jpg
SicklefinII_016.jpg

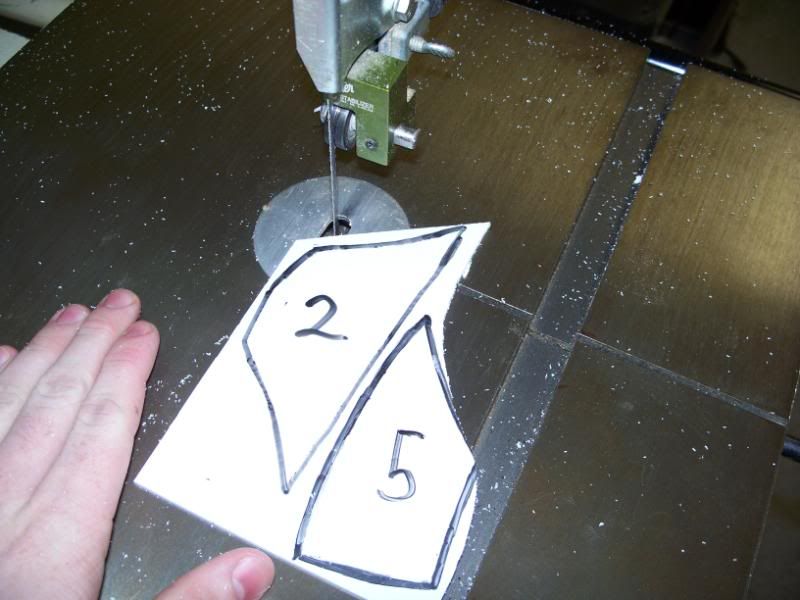
This is possibly the least challenging part of the whole process, because all you have to do is cut along your lines well. Then from there take your finished pieces and sand the outside edges, this will clean things up some, I also highly recommend that you do some minor adjustments to make sure the mirrored pieces are fairly close in size. Scrape around the edges with an x-acto knife to help remove any excess that wasn't removed via sanding.

(image limit)


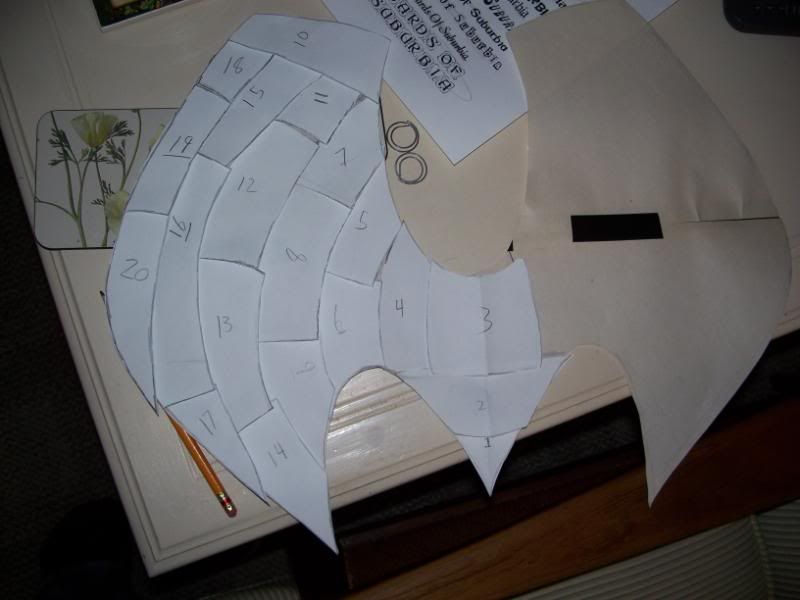
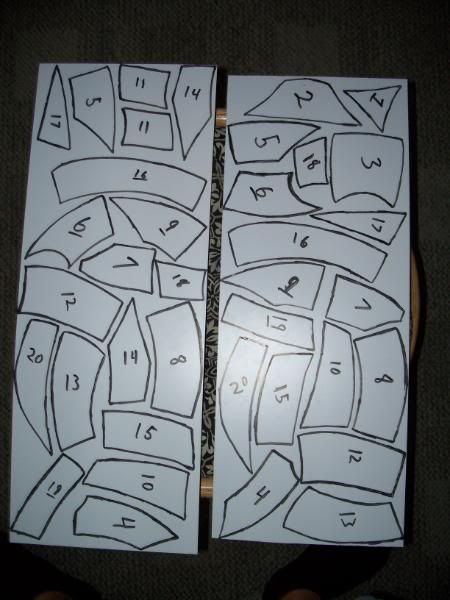
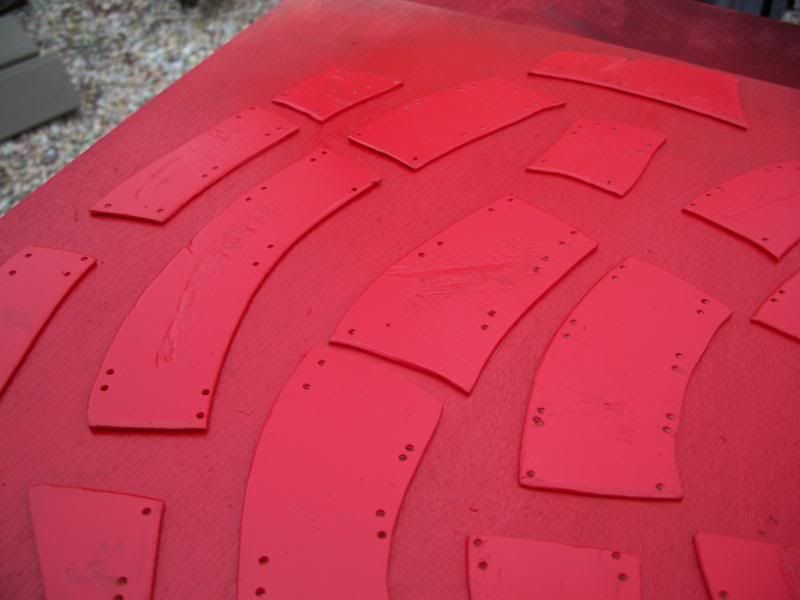
Step Six: Lay out your Parts

SicklefinII_017.jpg

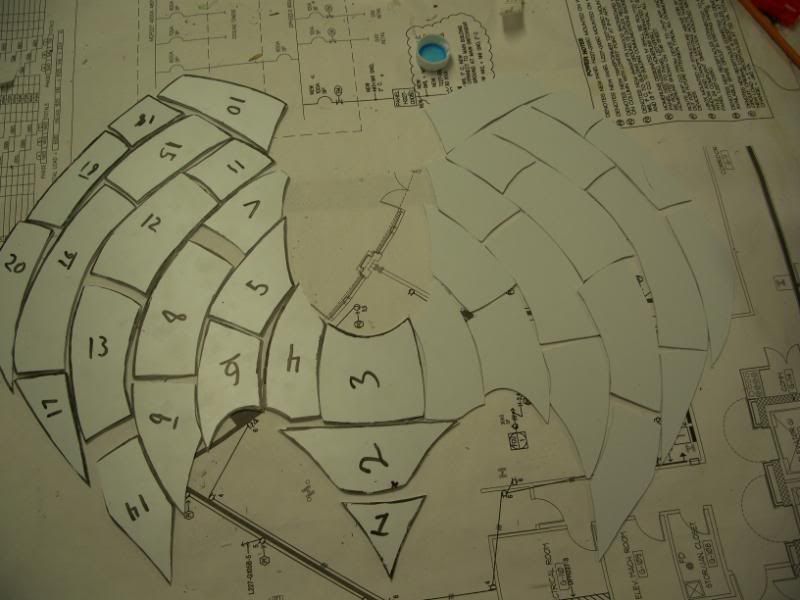
This is actually a curtail step, and where this goes from cool idea to sadistic nerf puzzle, This is why I suggested numbering both the complete template and the individual parts. Make sure you have the workspace to Keep these parts laid out like this for the rest of your project, as it will help keep things organized as this gets to the more intense parts. You also may once again want to test out how everything is going to overlap during this phase.

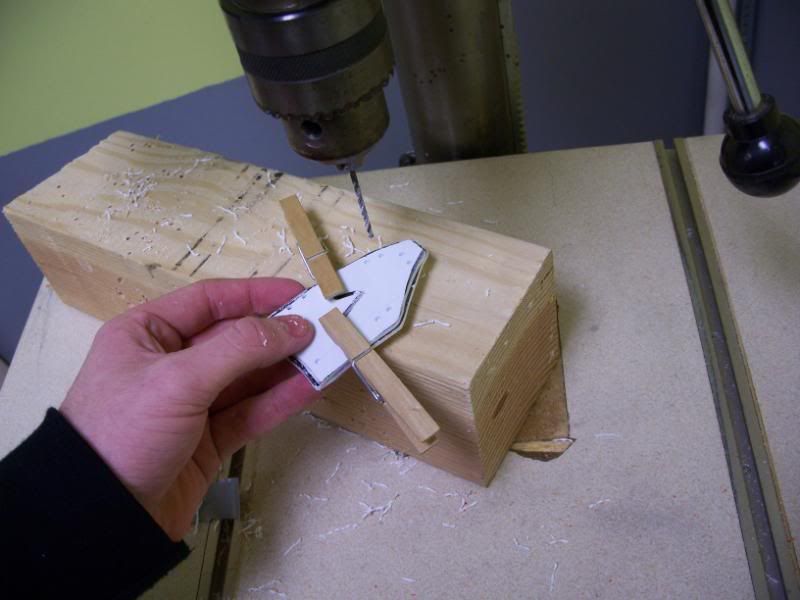
Step seven: Drilling Holes

This is possibly the most complicated and challenging part of the whole process, but it really is one big step, even though it can be broken down into smaller parts. As it only gets harder as it goes, I suggest fully building one whole side of the shell first, after that, you can simply drill duplicate holes on the opposite side. This however is not a prefect process and you may have to do some minor tweaks along the way. Don't worry, that's just how it goes. If you've decided to make an Asymmetrical design, you'll have to make unique holes for every part.

SicklefinII_018.jpg

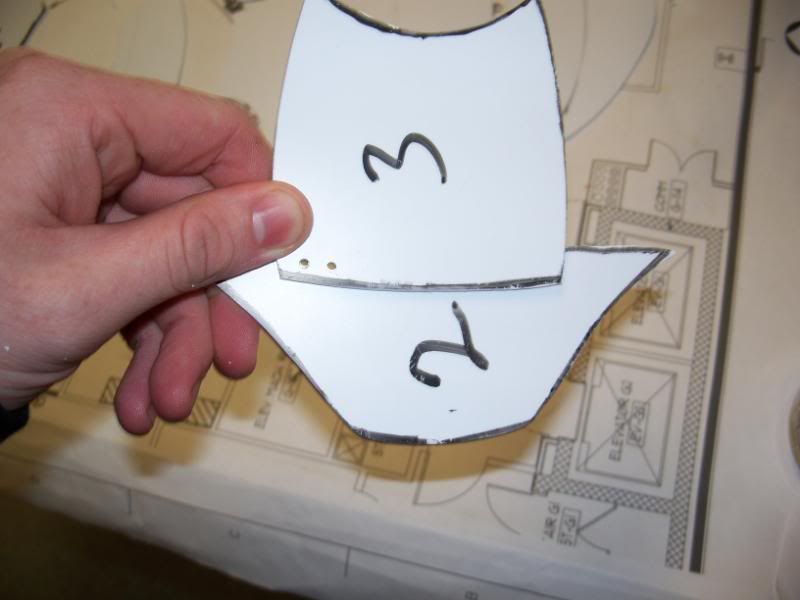
Anyway, You need to line up the parts How you want them to overlap, and then drill the required holes. Each Zip tie takes two holes, and you should have at least two zip ties holding a piece to another. Also, your holes should be drilled about 1/8 -1/4 of an inch from the outside edges of your parts, this will keep them from breaking off easily. In some cases, it is not a bad idea to actually have a hole that runs through three pieces rather than just two.

SicklefinII_023.jpg
SicklefinII_024.jpg

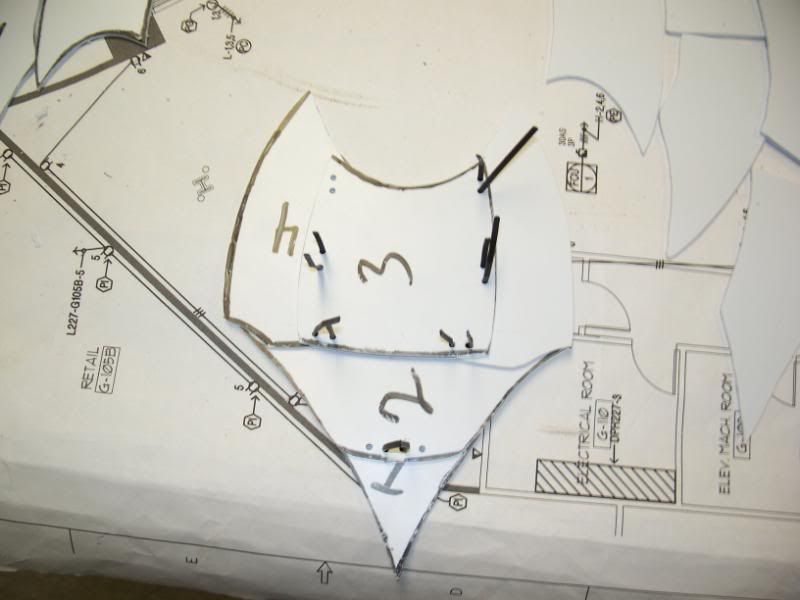
As this is going along, you may want to make sure everything is lining up overall, so I suggest either sacrificing a few zip ties for this stage, or threading something else through the holes.

As you get to the outer edges of your shell, you may find that it's hard to keep things all lined up unless you try to do it all at once. You can keep a whole level of panels together with duct tape while you drill your holes.

SicklefinII_026.jpg
SicklefinII_027.jpg

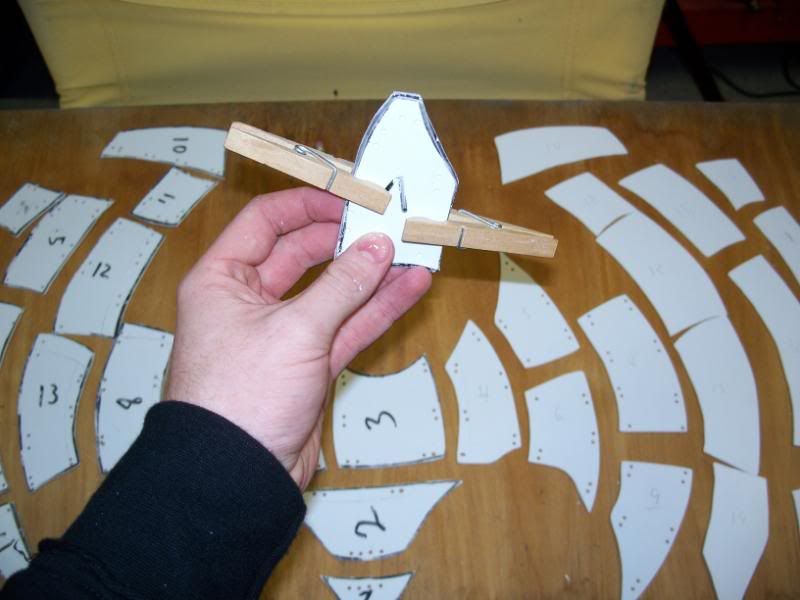
After you've made one half of the shell completely, you can line up your other halves and drill through the holes you already made, to help drill them all cleanly you can clamp the two matching parts together with clothespins or small clamps.

SicklefinII_028.jpg

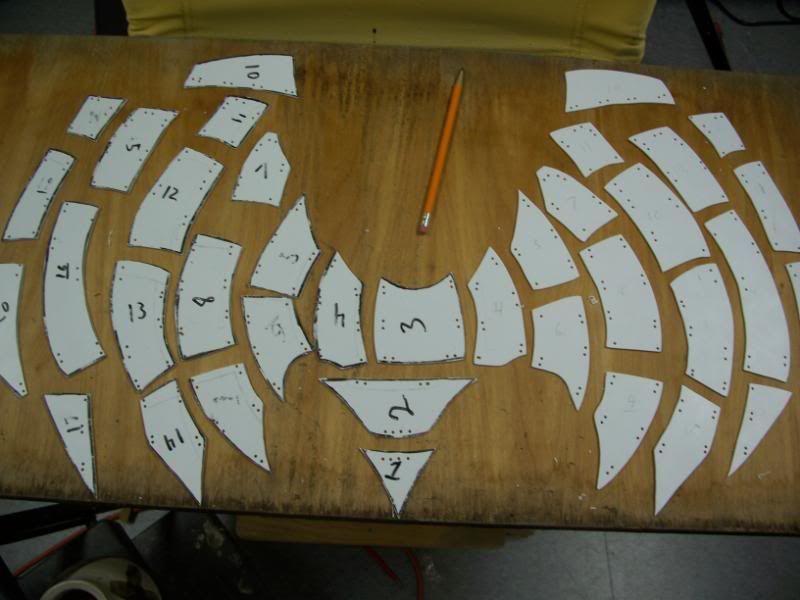
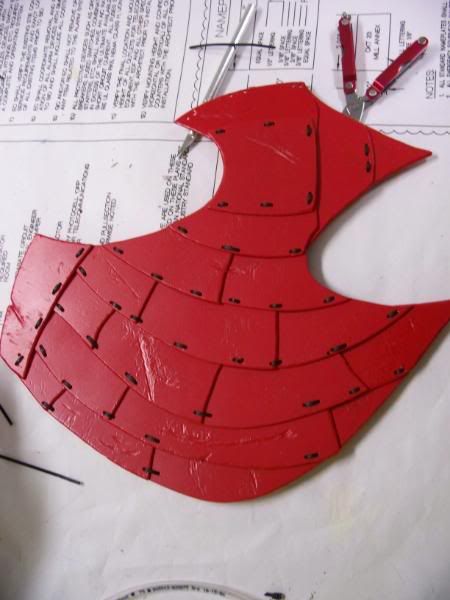
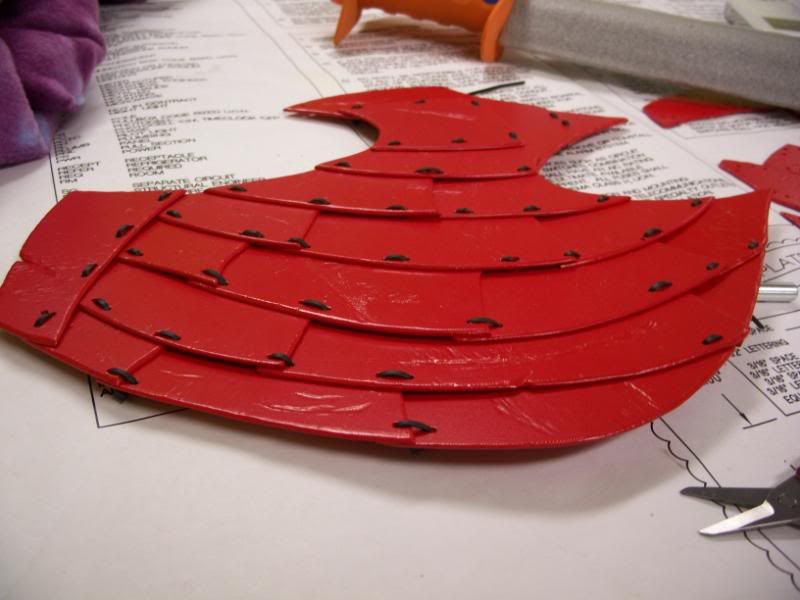
Step Eight: Further cleanup: Smoothing, Weathering, and painting.
(I don't have pictures of the weathering process as I had to recharge my camera's batteries while I was doing that part of the work, there are pics of after I painted though)

SicklefinII_029.jpg
SicklefinII_030.jpg
SicklefinII_031.jpg
SicklefinII_032.jpg

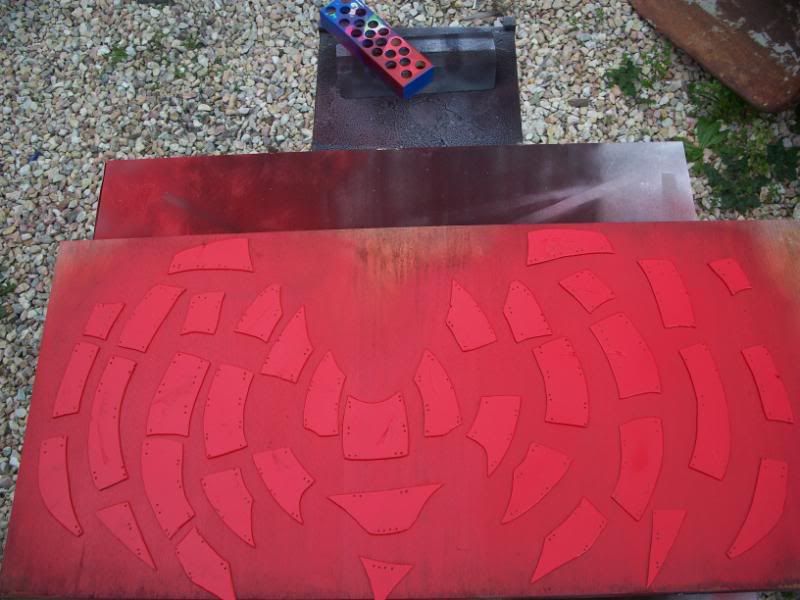
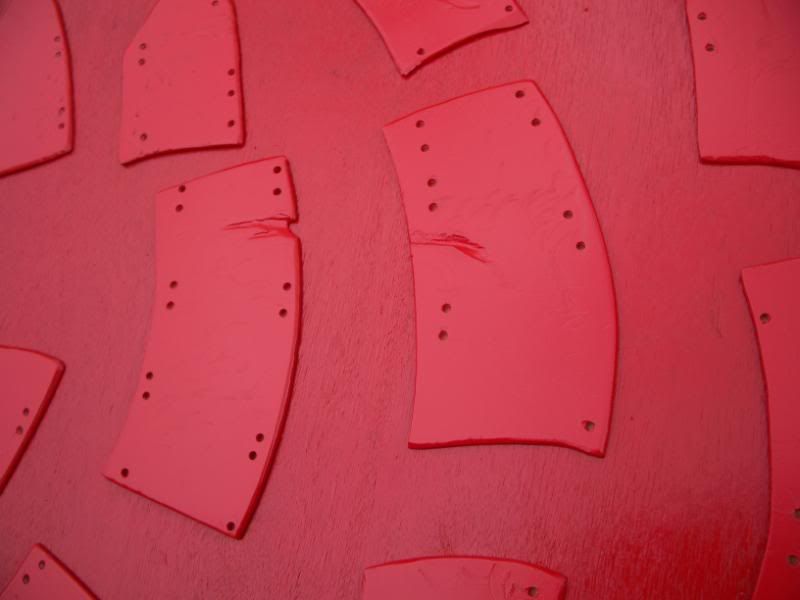
The Bulk of this step is all personal choice, I wanted my particular shell look more like leather samurai armor, I achieved this by softly sanding all the faces as well as doing intentional damage with my dremmel's wire brush attachment. Be wary of where all your holes are, and make sure you don't break any of them open. It is also important to take note, that If you plan on putting a notch into the edge of one piece, for overall effect you should continue the cut into the piece that notch overlaps. After the sanding you can clean up all your edges with an x-acto knife. I then Painted the parts with red Vinyl Dye, which adheres to all the small little scratches rather than filing them in.


Step Nine: Assembly.

SicklefinII_033.jpg
SicklefinII_034.jpg
SicklefinII_035.jpg
SicklefinII_036.jpg


SicklefinII_037.jpg
SicklefinII_038.jpg
SicklefinII_039.jpg

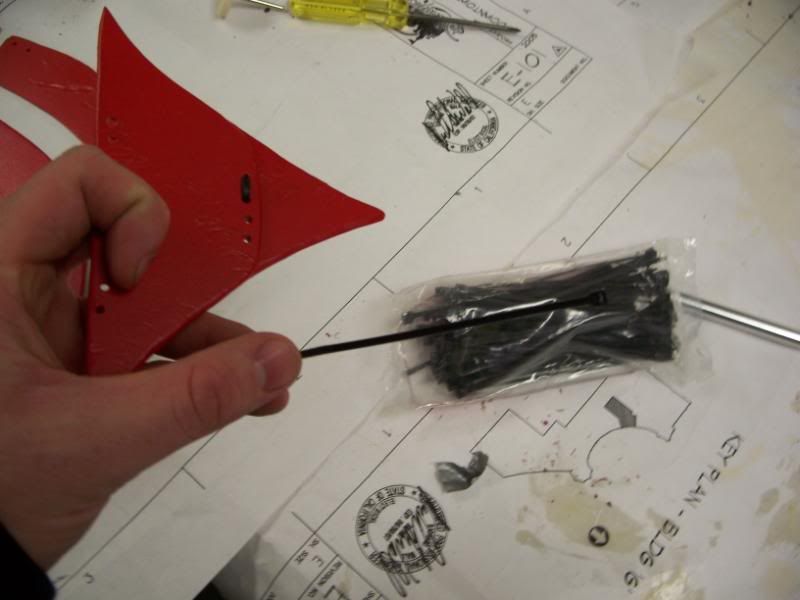
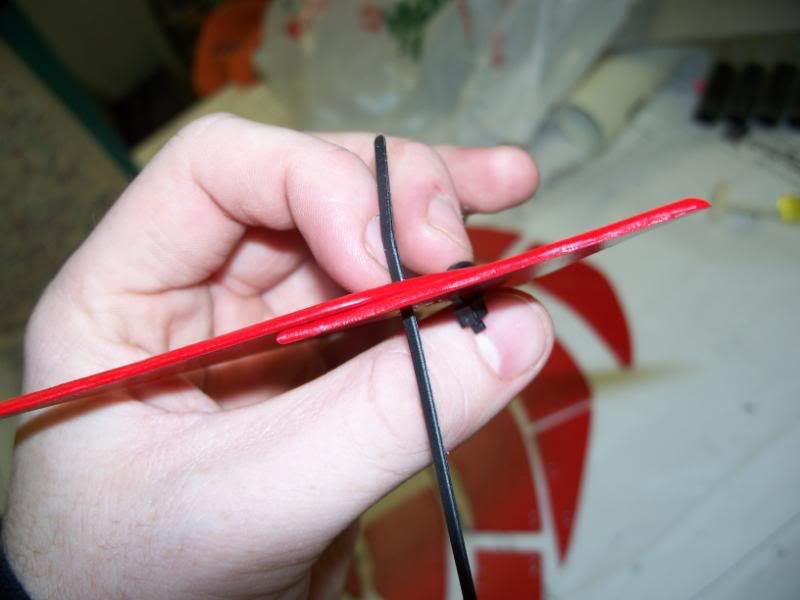
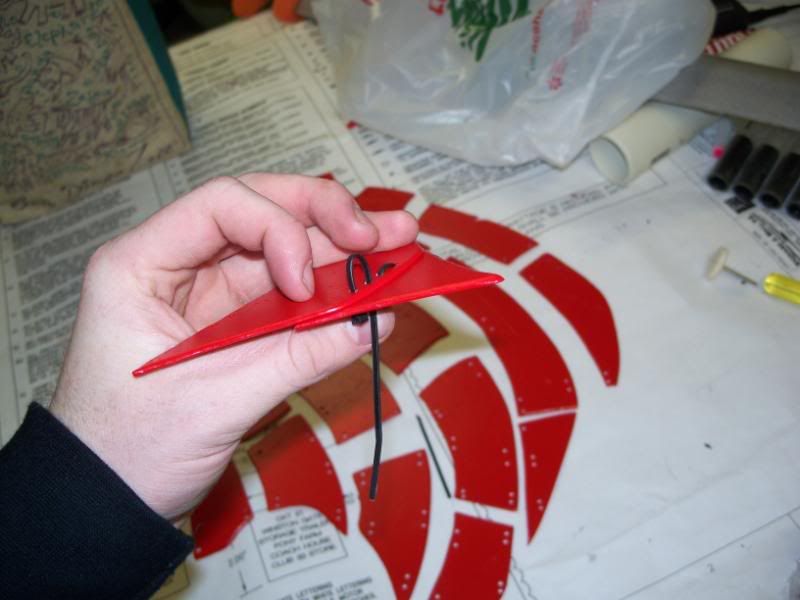
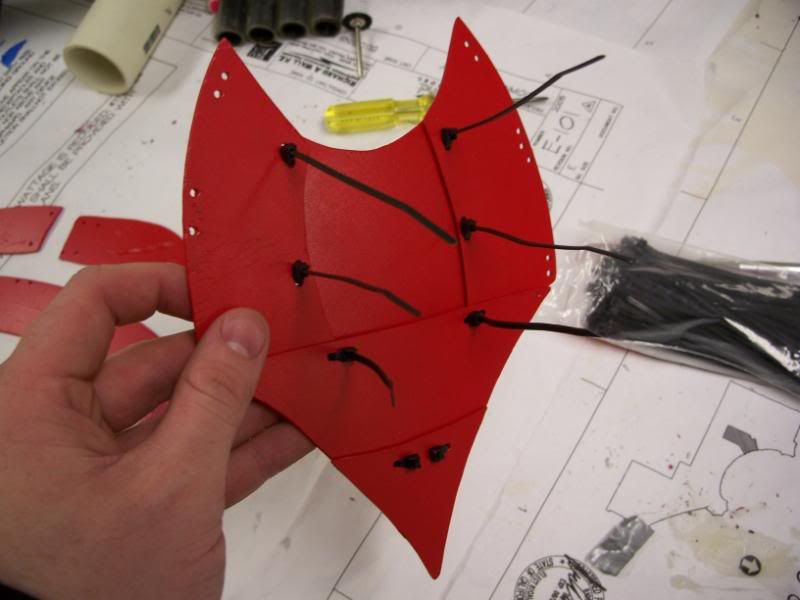
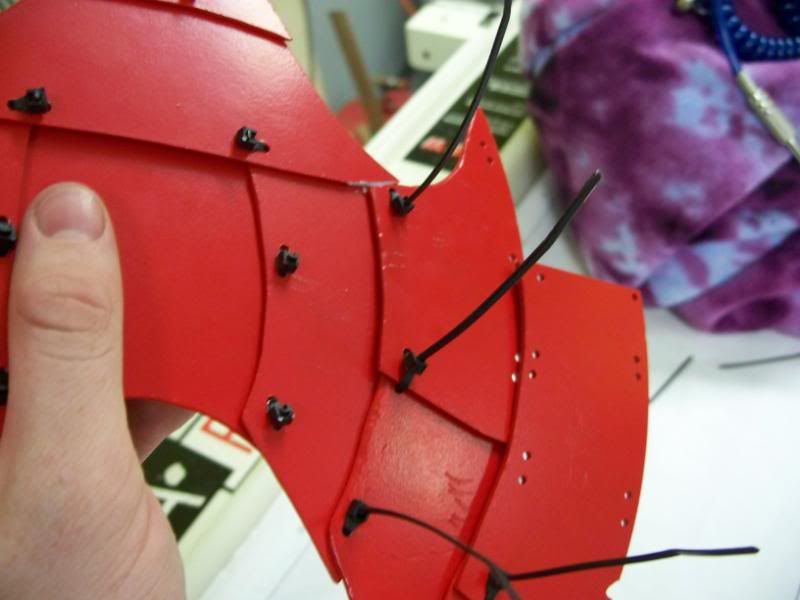
This part really isn't very difficult if you've been diligent in doing all the other steps, it's just lots of lining up pieces and threading zip ties through. Once you zip down a zip tie, cut the extending tail off. As you go along, you may find that some parts don't quite line up as you hoped, or overlapping areas cause problems, don't worry. Just cut off intruding overlap and don't be afraid to drill a couple new holes. It's all part of the process. Eventually you should have something that looks a lot like a manta ray shell in your hands! Be proud of your hard work, it was well worth it. The underside of the shell may not be to comfy, as the clipped off zip ties are rather sharp. I plan on putting a layer of foam craft sheet on the exposed underside of mine when the time comes to actually put this to use.
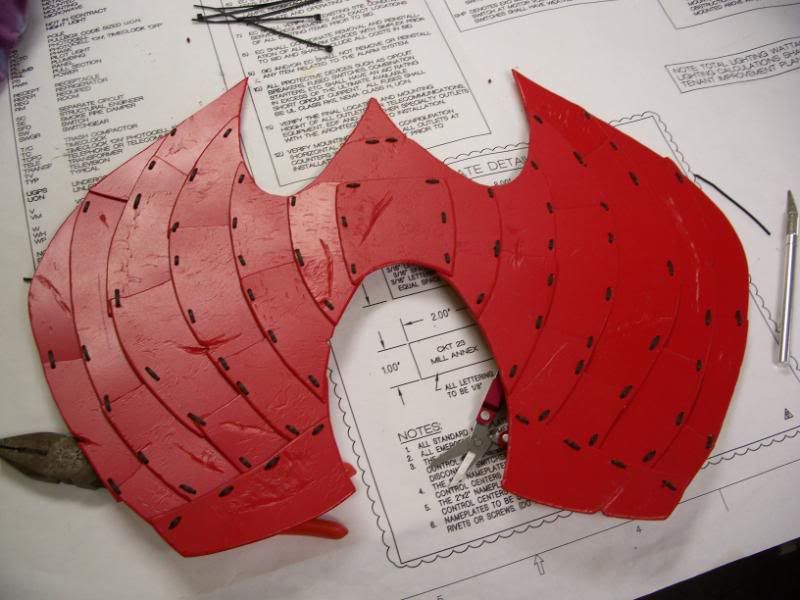
SicklefinII_040.jpg
SicklefinII_041.jpg
SicklefinII_042.jpg
SicklefinII_043.jpg

Step Ten: Mounting

I personally haven't gotten to this step yet, but I would say that it's really up to you and what you plan to use your shell for. I will be putting this on the top of a stock manta base shell that's had a pair of splitfires integrated into it. And As I don't know what is going where exactly just yet, I can't point this stage out in detail, and even if I did, it would only be beneficial if you were trying to attach it to a stock manta lower shell that's had splitfires integrated into it. I would suggest mounting it similarly to how The Plusbow is held together, with adjustable hardware rather than with any form of glue. As that would lead to issues in being able to cleanly remove/repair/replace damaged parts.

And with That the How To part is covered.


I hope this in-depth look into a possible way to make a detailed homemade manta style shell becomes considered a viable way to have one that is war legal amongst the community. The Amount of time and effort put into it alone should be a strong enough case, and when coupled with making one within the earlier mentioned guidelines, could really be an excellent way to keep the single legal nerf shield available to those who can't find one or want a more “unique” one, and happen to have a lot of time on their hands. I'm sure someone like Capitan Slug, or one of our other diligent members who has more patience and experience with CAD than I could draw up a slick digital template. But I liked taking a complete hands on approach, I'm just that kind of a fabricator.

Overall cost for this was about 20 bucks, so as rarity grows, it may become a very cost effective way to have a manta. Don't forget this took me almost three whole days(like over 12 hours per day kind of whole) of straight work to make, and that was accelerated by me having access to my grandpa's workshop of powertools, doing this by hand with a dremmel or even just hand sanding would greatly increase the time taken to build one, but it is still completely possible. Also, this idea is not limited to using sheet plastic, although, most other materials would either not be durable enough, too heavy, or too costly.

So... Questions, Comments, Complaints, Suggestions, Ect?

-Bags


Edited by Aeromech, 23 November 2015 - 03:15 AM.

  • 0

Don't call it a comeback, I never left.


#2 Prometheus

Prometheus

    Member

  • Members
  • 780 posts

Posted 26 January 2008 - 01:19 PM

All I can say is, this must have taken forever, that is some serious commitment man.
  • 0
QUOTE(VACC @ Jan 24 2008, 06:12 AM) View Post
I am NEVER going to sleep naked in the bed of a former child star ever again....seriously

#3 Cmdrmack

Cmdrmack

    Member

  • Members
  • 545 posts

Posted 26 January 2008 - 01:29 PM

Wow.

January's been a good month for us. A Homemade Crossbow and a homemade Manta Ray is quick succession.

Great job Bags.
  • 0
QUOTE(Predalien_Ro @ Apr 7 2008, 10:24 PM) View Post

Oompa: FECES!? Who in their right mind would try that shit!?


Bigger Salvo

{FWPC}

#4 sam

sam

    Member

  • Members
  • 1,059 posts

Posted 26 January 2008 - 02:23 PM

Rhombus!
Amazing! With that beautiful red, it looks like some SMDTGs would work perfectly on this shell. Interested to see how you attach this to the bottom half of a manta.

P.S. Thanks for introducing me to Adventure Time via your Deviant Art.

Edited by sam, 26 January 2008 - 05:12 PM.

  • 0

#5 Carbon

Carbon

    Contriberator

  • Moderators
  • 1,894 posts

Posted 26 January 2008 - 02:24 PM

Heh...you sewed yourself a Manta Ray. Incredible work.

The projects coming out this month make me wonder about war acceptance of homemades on a larger scale. Being able to use a homemade has always been an exception rather than the rule, but I wonder if projects that aim to model Nerf construction could gain wider acceptance.
  • 0
Hello. I am Indigo of the Rainbow Clan. You Nerfed my father. Prepare to die.

#6 Dayko

Dayko

    Member

  • Members
  • 1,037 posts

Posted 26 January 2008 - 03:13 PM

That is vary cool. Nicely done.
  • 0

< One foot in death...The other in life. >


#7 Cmdrmack

Cmdrmack

    Member

  • Members
  • 545 posts

Posted 26 January 2008 - 03:50 PM

Heh...you sewed yourself a Manta Ray. Incredible work.

The projects coming out this month make me wonder about war acceptance of homemades on a larger scale. Being able to use a homemade has always been an exception rather than the rule, but I wonder if projects that aim to model Nerf construction could gain wider acceptance.


I think part of the reason homemades are rare on the nerf battlefield is the difficulty in retaining a balance. So Many homemades are supercharged pieces of incredible power, but these variations of homemades, like many of the SNAPs, are reasonable. Any advantages they may have over a Nerf gun can be circumvented without too much difficulty.
  • 0
QUOTE(Predalien_Ro @ Apr 7 2008, 10:24 PM) View Post

Oompa: FECES!? Who in their right mind would try that shit!?


Bigger Salvo

{FWPC}

#8 baghead

baghead

    Cheetos

  • Members
  • 1,366 posts

Posted 26 January 2008 - 05:51 PM

All I can say is, this must have taken forever, that is some serious commitment man.


That it did, but after I started to see the result, I was more than confident that it was worth it.

Wow.

January's been a good month for us. A Homemade Crossbow and a homemade Manta Ray is quick succession.

Great job Bags.


aye, but this is not a complete homemade, it's just a really painstakingly long way to fabricate the top half of a manta, and since it's designed to be used with Mods, it's kinda like a Mod/homade hybrid thingy.

Rhombus!
Amazing! With that beautiful red, it looks like some SMDTGs would work perfectly on this shell. Interested to see how you attach this to the bottom half of a manta.

P.S. Thanks for introducing me to Adventure Time via your Deviant Art.


Mathmatical! I'm not entirely sure that I'm going to use SMDTGs on Sicklefin anymore, the more I think about it, the extra air hoses may be more of a hindrance than a help. But I'm still thinking about it.

Ps: You're welcome, adventure time rocks.

Heh...you sewed yourself a Manta Ray. Incredible work.

The projects coming out this month make me wonder about war acceptance of homemades on a larger scale. Being able to use a homemade has always been an exception rather than the rule, but I wonder if projects that aim to model Nerf construction could gain wider acceptance.


Would you expect anything less from someone who makes plushies?

Yeah, the debate about legality of homemades has always been one that vexed me. and until I thought of this I would have been against a Homemade manta shell, but as I integrated elements of how the original Sickelfin became war legal (not a major size difference, looks really cool, tool a lot of work, ect) My fellow SCUN co-dictator and I agreed that it was fair game.

I think part of the reason homemades are rare on the nerf battlefield is the difficulty in retaining a balance. So Many homemades are supercharged pieces of incredible power, but these variations of homemades, like many of the SNAPs, are reasonable. Any advantages they may have over a Nerf gun can be circumvented without too much difficulty.


As we are starting to see an improvement in the Balance of Power when It comes to homemades, generally in the past homemade blasters have been usually way over powered or unreliable (in a dangerous way) when compared to manufactured blasters. But I think that it really is a case by case basis on those kind of things, and as we've seen a growth in the field of spring-powered Homemades, I'm starting to see plenty of justification for how the lines have blurred.

I really hope someone else is brave enough to make one of these... because the possibilities are endless and I can't wait to see another nerfer's take on the concept.

-Bags

Edited by baghead, 26 January 2008 - 05:52 PM.

  • 0

Don't call it a comeback, I never left.


#9 PC III

PC III

    Member

  • Members
  • 389 posts

Posted 26 January 2008 - 05:59 PM

Is it very stiff? It seams like it could bend around...
  • 0
QUOTE(ultra920 @ May 19 2008, 06:18 PM) View Post

Don't want to shove balls in tight spaces. Trust me, bad idea.

For sale: Vintage WWII French rifles. Dropped once, never fired.

#10 sam

sam

    Member

  • Members
  • 1,059 posts

Posted 26 January 2008 - 06:03 PM

I think I'm may have to give this a whirl in the summer. It doesn't look too terribly difficulty, just looks like it would take a hell of a lot of time. I'm currently think about some sort of PVC frame for the lower portion of this that will allow blaster to be easily removed.
  • 0

#11 baghead

baghead

    Cheetos

  • Members
  • 1,366 posts

Posted 26 January 2008 - 06:09 PM

Is it very stiff? It seems like it could bend around...

Actually, it is rather stiff, but it has a nice little bit of flex to it, which I learned with the first Sicklefin, it's necessary when you have this big of a flat surface taking shots from high powered nerf guns.

I think I'm may have to give this a whirl in the summer. It doesn't look too terribly difficulty, just looks like it would take a hell of a lot of time. I'm currently think about some sort of PVC frame for the lower portion of this that will allow blaster to be easily removed.


Sounds like a good idea. Can't wait to see what you'll do. It really isn't all that difficult, it just takes quite a bit of dedication to a project. My College had a really long intercession this year, I've been out since mid December and I don't go back until Feb 11th, so I've had more than enough time to kill.

-Bags
  • 0

Don't call it a comeback, I never left.


#12 penguin807

penguin807

    Member

  • Members
  • 358 posts

Posted 26 January 2008 - 10:26 PM

Wow. You guys keep feeding me new summer projects. I'm not sure if that's good or bad. Anyway, If this becomes a legal shield in wars, I think there should be rules about it being at most a bit larger than a normal Manta, it has to be approved in person by who ever is hosting the war, and it can't be made out of cardboard.

Nice work Bags.

EDIT: Oops... I need to read better. Feel free to ignore the above

Edited by penguin807, 26 January 2008 - 10:32 PM.

  • 0

#13 Ubermensch

Ubermensch

    Member

  • Members
  • 1,056 posts

Posted 27 January 2008 - 07:58 AM

Oh my god... I'm in awe...

That is one cool sword in the backround of the 30th picture.


Oh, and the Manta is okay too.
  • 0
"In order to make an apple pie from scratch, you must first create the universe."-Carl Sagan
Nerf Rocket Air Launcher

#14 2nd Sniper

2nd Sniper

    Member

  • Members
  • 31 posts

Posted 27 January 2008 - 09:34 AM

I have to say, that is pretty... badass. It's like a batman weapon from hell.
  • 0
"One love, one heart, lets get together and feel alright" Bob Marley (Rest in Peace)

#15 Diablo

Diablo

    Member

  • Members
  • 289 posts

Posted 28 January 2008 - 01:12 AM

Bags is the man.

Great work for sure. I can't wait to see what you do when you finally attach some blasters to it.
  • 0

-Diablo

NHQ Administrator | www.nerfhq.com


#16 lionhead333

lionhead333

    Aslan

  • Members
  • 252 posts

Posted 28 January 2008 - 06:54 AM

What craft stores did you go to? Which one had the plastic?
If it was in the post, I'm sorry. I have a headache and may have skipped over it.


This is a wonderful idea. I may use this to repair my manta.
  • 0
QUOTE(Ubermensch)
If I were you, I wouldn't mess with the mods, or make stupid mistakes like misspelling their names. I mean, CAVV is really tough on that kind of thing

Most recent write up-
Sharpshooter 2

#17 Forsaken angel24

Forsaken angel24

    Member

  • Contributors
  • 2,472 posts

Posted 28 January 2008 - 10:48 AM

I am very impressed with the flexibility and the out of the box thinking you used on this one.

Great job mate!
  • 0
I don't get my kicks out of you,
I don't feel the way I used to do.
I know its bad,
After what we had,
But I’m just not the angel you knew.

#18 baghead

baghead

    Cheetos

  • Members
  • 1,366 posts

Posted 28 January 2008 - 02:26 PM

Oh my god... I'm in awe...

That is one cool sword in the backround of the 30th picture.


Oh, and the Manta is okay too.

Yeah, Aren't those Cheezy pirate swords from Wall*Mart just amazing!?

I have to say, that is pretty... badass. It's like a batman weapon from hell.


Why does everyone immediately go to Batman when they see this shell shape? It's modeled off a real Animal.
http://diver.net/pic...PC281697xlr.jpg

Bags is the man.

Great work for sure. I can't wait to see what you do when you finally attach some blasters to it.


Yeah, I can't wait to put ablaster under it either!

What craft stores did you go to? Which one had the plastic?
If it was in the post, I'm sorry. I have a headache and may have skipped over it.


This is a wonderful idea. I may use this to repair my manta.


I bought it at a local Hobby shop, they sell sheet plastic at most hobby stores that sell model train stuff.


I am very impressed with the flexibility and the out of the box thinking you used on this one.

Great job mate!


Thank you. It seriously was more than a little mental exercise.


Carbon brought this up in a Pm to me, But I decided to share this info with everyone: for those who don't have access to a stock manta, I went ahead and made some direct comparison measurements for y'all to put to use in trying to make one of these for yourself.

Ok, So the way I did this was I picked key reference points on the shell and then I made straight point to point measurements with a tape measurer, all measurements are in inches and approximations to the nearest quarter inch.

Posted Image
Posted Image
Posted Image

I'd add this info to the first post, but I can't even edit it... because I exceed the image limit...lollerskates.

-Bags

Edited by baghead, 28 January 2008 - 02:28 PM.

  • 0

Don't call it a comeback, I never left.


#19 imaseoulman

imaseoulman

    Member

  • Members
  • 1,005 posts

Posted 28 January 2008 - 10:41 PM

Bags, I really like this idea alot. I experienced similar problems (too rigid) after building Arachnophobia. My solution also involved zip ties- I ziptied my handle and pump tubes to the shell to allow more flexibility.

This topic has, however, brought up some questions for the community at large to answer. I have been working on some "super secret projects" lately and one of them employs multiple manta rays. I wasn't planning on unveiling this until the next major NERF war I attend (something on the east coast after mid-April). Now I'm wondering if it might not violate some accepted NERF protocol pertaining to Manta Rays. I don't mean to hijack this thread, but since "Manta Debate" is in the topic title, perhaps this is the appropriate place. (If not I can delete this post and open a new thread). Anyway, without any more rambling, would those that have been attending major NERF wars for some time (specifically East Coast NERF wars as that is where I will be this Summer) please state what they understand the specific guidelines of Manta Ray usage to be. Thank you.
  • 0

#20 VACC

VACC

    Vacc is Legend

  • Founders
  • 3,265 posts

Posted 29 January 2008 - 09:35 AM

Bags, I really like this idea alot. I experienced similar problems (too rigid) after building Arachnophobia. My solution also involved zip ties- I ziptied my handle and pump tubes to the shell to allow more flexibility.

This topic has, however, brought up some questions for the community at large to answer. I have been working on some "super secret projects" lately and one of them employs multiple manta rays. I wasn't planning on unveiling this until the next major NERF war I attend (something on the east coast after mid-April). Now I'm wondering if it might not violate some accepted NERF protocol pertaining to Manta Rays. I don't mean to hijack this thread, but since "Manta Debate" is in the topic title, perhaps this is the appropriate place. (If not I can delete this post and open a new thread). Anyway, without any more rambling, would those that have been attending major NERF wars for some time (specifically East Coast NERF wars as that is where I will be this Summer) please state what they understand the specific guidelines of Manta Ray usage to be. Thank you.


There is nothing written, but there are some rules that should be understood. You cannot use multiple manta rays attached to one another. Mantaray shells may not be worn as armor or attached to anything that is not a nerf gun. In general, if the shell of a mantaray is attached to another weapon I would no let it slide unless the weapon was similar in spirit to a manta-ray (relatively short range, one handed). For example, I had a manta shell on a lock N load for 2 wars, and while it really was not as efficient as simply dodging, no one had too much of a problem with it. I initially thought it would be quite entertaining, but personally, I would not repeat that mod, and would probably not allow it at any war I was hosting. It's just a slippery slope to start down.

Similarly, I would likely not allow a homemade manta in any form. That said, if I was presented with a compelling argument I would certainly consider and evaluate it on a weapon by weapon basis. You'll probably find other war organisers a little more lenient than me, but you could catch a good deal of flak from the other war attendees at larger east coast events. I'd reccomend you bring it to the war, and see what the reaction is. There's no harm in asking as long as you don't argue with the organisers and have other weapons to fall back on.
  • 0

#21 Langley

Langley

    LGLF - Since 2002

  • Administrators
  • 2,997 posts

Posted 29 January 2008 - 12:33 PM

...you could catch a good deal of flak from the other war attendees at larger east coast events.


It's going to happen eventually, may as well be for something good. But if you're going to just bolt a couple of manta's to something, honestly that's pretty lame. Like Vacc said, if it's in the spirit of the Manta that would be cool. Generally if you're holding it by the original handle that's cool, but keep in mind that you're not going to be able to use the side of a gun very effectively as a shield no matter what you do, since it's going to be useless whenever you're aiming it at someone. And sometimes you're less likely to get hit if you're pointing a gun at someone than if you're holding a dinky anthropomorphic shield up.

Oh, and a good rule of thumb--'super secret' projects never turn out quite as awesome as you think. People around here aren't usually first adopters anyway, so if you come up with something new, you can expect to be the only person using it for at least a little while whether you tell anyone what you're up to or not.
  • 0

You can poop in my toilet anytime champ.

2016 Nerf War Schedule
Bless you, my son. Now recite 3 New Members Guides and 5 Code of Conducts for your sins.


#22 VACC

VACC

    Vacc is Legend

  • Founders
  • 3,265 posts

Posted 29 January 2008 - 12:46 PM

I second Langley's notion regarding shields, but that isn't to say no one uses them correctly. Death is pretty proficient with his, though I still would not recomend that playstyle. I'm a pretty well rounded nerfer and used to be very attached to the mantaray for indoor wars. At close range I was prety good at defelcting shots and found even in outdoor wars once or twice that while stationary I could still block crossbow shots pretty well. The problem is, when am I stationary? When using the Lock N Block (nevermore) I found that I'd have to actually wait for a dart to hit my shield or bring my shield TO the dart in order to block most shots. It's simply more efficient to move out of the way of the dart as opposed to blocking it. When blocking your defense if purely reactionary and much slower. You are a target and not much more. When dodging you can translate a defensinve maneuver into instant offense. I was the last man standing in the last round I played with the LockNBlock (gunslinger heaven at apoc07) and yet I didn't block a single shot with the mantaray attachment. The only real advantage is that people often decline to shoot at you as much when you have a mantaray.

VACC
  • 0

#23 Langley

Langley

    LGLF - Since 2002

  • Administrators
  • 2,997 posts

Posted 29 January 2008 - 01:00 PM

The only real advantage is that people often decline to shoot at you as much when you have a mantaray.


Whenever I've been at a war with Joe (Death), I've noticed a huge chunk of the opposing team will break off and will--as cautiously and slowly as possible--circle him and take pot shots at him while he deflects them, leading the rest of the opposing team hopelessly outnumbered. This may be more to do with Joe's reputation than his manta ray, but in this case it seems like more people try to hit him than otherwise.
  • 0

You can poop in my toilet anytime champ.

2016 Nerf War Schedule
Bless you, my son. Now recite 3 New Members Guides and 5 Code of Conducts for your sins.


#24 KBarker

KBarker

    Member

  • Members
  • 131 posts

Posted 31 January 2008 - 01:08 AM

That is freaking crazy awesome!
  • 0
-KBarker

My Fighting Robots: http://www.TeamVelocityRobotics.com/

#25 VACC

VACC

    Vacc is Legend

  • Founders
  • 3,265 posts

Posted 31 January 2008 - 08:27 AM

The only real advantage is that people often decline to shoot at you as much when you have a mantaray.


Whenever I've been at a war with Joe (Death), I've noticed a huge chunk of the opposing team will break off and will--as cautiously and slowly as possible--circle him and take pot shots at him while he deflects them, leading the rest of the opposing team hopelessly outnumbered. This may be more to do with Joe's reputation than his manta ray, but in this case it seems like more people try to hit him than otherwise.


That's because they know joe will not shoot back at them. Don't get me wrong, he's a fantastic waste of time for the opposition, but if you are a more offensive player the distraction strategy employing a manta-ray does not work. If you would like to craft your strategy around being a stationary target AND have the massive amount of experience and aptitude for the roll, knock yourself out. Otherwise, I'd prefer the sabre to the shield. It's not like a nerf dart is going to kill you.

VACC
  • 0


Also tagged with one or more of these keywords: cosmetics, writeup

0 user(s) are reading this topic

0 members, 0 guests, 0 anonymous users