Jump to content


Photo

+bow: Diy Thread

You do it

354 replies to this topic

#1 CaptainSlug

CaptainSlug

    Resident Mad Scientist

  • Administrators
  • 4,763 posts

Posted 08 January 2008 - 01:13 PM

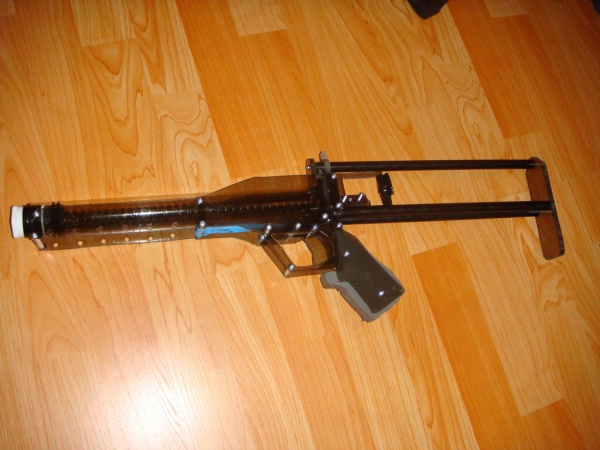
Like other projects before it, the +bow is an open source project for the benefit of the NIC.

In order to keep the original topic focused on the original design, this thread will instead be focused on the +bows that the community makes. Share photos of you guns, finished preferably, but mostly finished is fine too. Ask each other questions about what you did or did not do differently. That kind of thing. However if you are not making one right now or haven't finished one then there's no real reason for you to post in this thread.

It's not the easiest thing in the world to make and the amount of supplies needed is slightly higher than those of the FAR. So I'm expecting many of you will need some help or advice at some point.
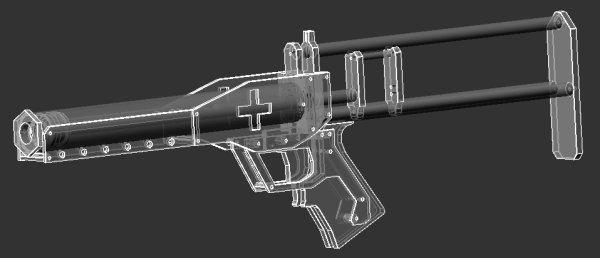
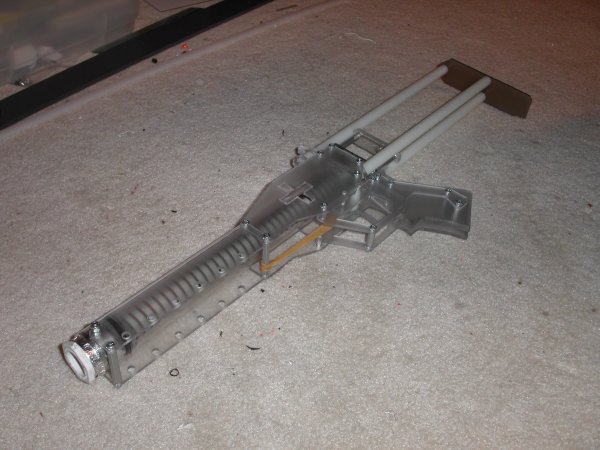
bow_3d3.jpg
bow2_001.jpg
Original Thread

Rev.3 Construction write-up Added July 4th, 2016
Rev.2 Construction write-up Added September 23rd, 2008
Rev.1 Construction write-up (Updated September 1st to revised trigger assembly photos and text)
Rev.1 Mirror version at Instructables

Rev.2 Autocad 2000 DWG for all of the parts that need to be cut from 1/8" thickness polycarbonate
Rev.2 Autocad 2000 DWG for all of the parts that need to be cut from 1/4" thickness polycarbonate

Rev.1 Autocad 2000 DWG for all of the parts that need to be cut from 1/8" thickness polycarbonate
Rev.1 Autocad 2000 DWG for all of the parts that need to be cut from 1/4" thickness polycarbonate

Rev.1 CAD files in Alibre Part and STEP 214 formats (700kb zip)


Here is the new plunger head:
GEDC2054.jpg
It is part number 9562K46, with two 1.25" diameter polycarbonate circles, and 5/32" holes drilled in the centers. It is tightened heavily onto the rod, as there are small dimples in the front that need to be closed off by the front piece of polycarb.
To demonstrate the seal, the same test:
GEDC2053.jpg

Edited by CaptainSlug, 04 July 2016 - 09:15 PM.

  • 0
The little critters of nature, they don't know that they're ugly. That's very funny, a fly marrying a bumble bee. I told you I'd shoot, but you didn't believe me. Why didn't you believe me?

#2 VACC

VACC

    Vacc is Legend

  • Founders
  • 3,265 posts

Posted 08 January 2008 - 01:29 PM

Please do not post in this topic unless you are building this homemade or a variant of it. Please post coherently and concisely. Your posts may be edited or removed to increase the utility of this topic.

Thank you,
VACC
  • 0

#3 keef

keef

    Member

  • Members
  • 1,390 posts

Posted 08 January 2008 - 02:52 PM

If I had access to a laser table cutter, how would I use it to cut the plastic?
  • 0

#4 bobafan

bobafan

    Member

  • Members
  • 635 posts

Posted 08 January 2008 - 04:15 PM

Is the use of an ice pick a serious suggestion?
  • 0
thaygor: all i remimber is pumping it hard and shooting than trying to pump again

---

<death09>my girlfriend broke up with me and sent me pix of her and her new boyfriend in bed
<ktp753>ouch.
<death09>yeah.i sent them to her dad

#5 CaptainSlug

CaptainSlug

    Resident Mad Scientist

  • Administrators
  • 4,763 posts

Posted 08 January 2008 - 11:32 PM

If I had access to a laser cutting table, how would I use it to cut the plastic?

First, the laser cutting table will have to be powerful enough to be useful for cutting through thick sheets of plastic. From what I've read the minimum seems to be a 40W laser.
To cut the parts out you would need to create a set of DXF drawings from the CAD model that you can send to the laser cutting table to tell it where the cutting paths are on the sheet you're having it cut. That will involve quite a bit of work to setup initially and you would have to have some practice using CAD and its mechanical drawing functions.

Is the use of an ice pick a serious suggestion?

An ice pick or dental pick is what I used to poke through the electrical tape. You could probably drill through it with a really small bit instead.
  • 0
The little critters of nature, they don't know that they're ugly. That's very funny, a fly marrying a bumble bee. I told you I'd shoot, but you didn't believe me. Why didn't you believe me?

#6 bobafan

bobafan

    Member

  • Members
  • 635 posts

Posted 08 January 2008 - 11:44 PM

Is the use of an ice pick a serious suggestion?

An ice pick or dental pick is what I used to poke through the electrical tape. You could probably drill through it with a really small bit instead.

Ok, I was thinking like this:
Posted Image
that makes more sense.
  • 0
thaygor: all i remimber is pumping it hard and shooting than trying to pump again

---

<death09>my girlfriend broke up with me and sent me pix of her and her new boyfriend in bed
<ktp753>ouch.
<death09>yeah.i sent them to her dad

#7 CaptainSlug

CaptainSlug

    Resident Mad Scientist

  • Administrators
  • 4,763 posts

Posted 08 January 2008 - 11:59 PM

That's an ice axe or ice tool
  • 0
The little critters of nature, they don't know that they're ugly. That's very funny, a fly marrying a bumble bee. I told you I'd shoot, but you didn't believe me. Why didn't you believe me?

#8 Skitzo

Skitzo

    Member

  • Members
  • 270 posts

Posted 17 January 2008 - 05:09 PM

I just received all of the parts in the mail.
All I need is a new blade for my band saw and I'll be set.
While looking through the plans I couldn't find how long the plunger rod is supposed to be.
How much space would be between the two end lables of the plunger rod?
What brand of silicon lubricant do you recommend?
Also I don't have labeling paper, could I just use a glue stick or something to glue the paper templates to the protective covering of the plastic?
EDIT: Would using a hand held jigsaw to cut the plastic work?
Thanks in advance.

Skitzo-

100th post!

Edited by Skitzo, 17 January 2008 - 05:22 PM.

  • 0
If soldiers were to begin to think, not one of them would remain in the army.- Frederick The Great

#9 CaptainSlug

CaptainSlug

    Resident Mad Scientist

  • Administrators
  • 4,763 posts

Posted 17 January 2008 - 05:31 PM

1. While looking through the plans I couldn't find how long the plunger rod is supposed to be.
2. How much space would be between the two end lables of the plunger rod?
3. What brand of silicon lubricant do you recommend?
4. Also I don't have labeling paper, could I just use a glue stick or something to glue the paper templates to the protective covering of the plastic?
5. EDIT: Would using a hand held jigsaw to cut the plastic work?

1. 13-1/4 x 1/2 inches as outlined in Step Two.
2. The labels go at opposite ends of the plunger rod.
3. I don't have any preference
4. Label paper is the only thing that's really going to work reliably. It is expensive to buy, but it will prevent you from screwing up the dimensions of any of the parts.
5. You would have to have a very small blade for it. You would have to use the jigsaw to do the internal cuts prior to doing any of the external cuts to free the parts from the sheet. I personally wouldn't recommend it for safety reasons, but you can try it if you want to.
  • 0
The little critters of nature, they don't know that they're ugly. That's very funny, a fly marrying a bumble bee. I told you I'd shoot, but you didn't believe me. Why didn't you believe me?

#10 CaptainSlug

CaptainSlug

    Resident Mad Scientist

  • Administrators
  • 4,763 posts

Posted 21 January 2008 - 11:35 AM

Chill vacc

He posted what I asked him to. This thread is for pictures of +bows in-progress or finished, or specific questions concerning supplies, tools, and assembly.
  • 0
The little critters of nature, they don't know that they're ugly. That's very funny, a fly marrying a bumble bee. I told you I'd shoot, but you didn't believe me. Why didn't you believe me?

#11 bobafan

bobafan

    Member

  • Members
  • 635 posts

Posted 21 January 2008 - 10:20 PM

Is there any way to keep the screws from becoming loose other than using ones which are self-locking?
  • 0
thaygor: all i remimber is pumping it hard and shooting than trying to pump again

---

<death09>my girlfriend broke up with me and sent me pix of her and her new boyfriend in bed
<ktp753>ouch.
<death09>yeah.i sent them to her dad

#12 CaptainSlug

CaptainSlug

    Resident Mad Scientist

  • Administrators
  • 4,763 posts

Posted 22 January 2008 - 12:00 AM

You can add loctite to the threads, but it's much easier to just use screws with nested lock washers.
  • 0
The little critters of nature, they don't know that they're ugly. That's very funny, a fly marrying a bumble bee. I told you I'd shoot, but you didn't believe me. Why didn't you believe me?

#13 General Cole

General Cole

    Member

  • Banned
  • 868 posts

Posted 22 January 2008 - 12:33 AM

An update on my three. McMasterCarr jacked my order up bad and I got black rod for the stocks, and all my plastic sheeting was tinted. And I can't find my taps and I cut most of one finger off because I forgot how it felt to use a scroll saw. The finger might heal AFTER they reattach it, so its all on hold now. But yeah, I spend 120 bucks and I need to get more 1/8in sheet. A reccomendation, buy a 12x24 sheet for more than one gun.
We should stop calling out/making fun of/pissing GC off. He's actually contributed and is available for trade. He's a better than average member no doubt. Got your back Cole.
-Nerfer34

You know what... I know it's kinda late... but Props Cole.
-Baghead

#14 CaptainSlug

CaptainSlug

    Resident Mad Scientist

  • Administrators
  • 4,763 posts

Posted 22 January 2008 - 08:59 AM

The black rod is normal, it doesn't matter what color it is, I just chose the more affordable stuff.
The sheets are supposed to be tinted because that's the more affordable stuff too.
Many of the parts I made my gun out of are clear because that's scrap that I bought from Piedmont Plastics.

Good luck with your recovery.
  • 0
The little critters of nature, they don't know that they're ugly. That's very funny, a fly marrying a bumble bee. I told you I'd shoot, but you didn't believe me. Why didn't you believe me?

#15 General Cole

General Cole

    Member

  • Banned
  • 868 posts

Posted 22 January 2008 - 11:55 PM

Ahhhh thanks. The tinted looks good too, but I was just wondering. The guns are still waiting for the plastic tap to be found in the bed of the truck and I was wondering what the little screws on the side of the gun are for. I can't see what they attach too. The finger will probably be okay, but typing and video games and the like are pretty hard so far.
We should stop calling out/making fun of/pissing GC off. He's actually contributed and is available for trade. He's a better than average member no doubt. Got your back Cole.
-Nerfer34

You know what... I know it's kinda late... but Props Cole.
-Baghead

#16 CaptainSlug

CaptainSlug

    Resident Mad Scientist

  • Administrators
  • 4,763 posts

Posted 23 January 2008 - 03:32 PM

The side plates have screws to
+ Hold the plunger tube in place (particularly when the plunger is hammering the back of the hex bushing)
+ Hold the frame pieces in place
+ Attach the grip to the rest of the gun
+ Clamp down on standoffs to add stability to the gun shape.

There are no useless parts in the design. The only part that doesn't need to be there in order for the gun to work are the rubber band that improves the feel of the trigger, and the foam grip core to improve the ergonomics of the gun.

Edited by CaptainSlug, 23 January 2008 - 03:34 PM.

  • 0
The little critters of nature, they don't know that they're ugly. That's very funny, a fly marrying a bumble bee. I told you I'd shoot, but you didn't believe me. Why didn't you believe me?

#17 CaptainSlug

CaptainSlug

    Resident Mad Scientist

  • Administrators
  • 4,763 posts

Posted 29 January 2008 - 05:29 PM

First picture sent in by Chris Eaton. This is what the +bow looks like when the provided supply list is used.
Posted Image

Edited by CaptainSlug, 29 January 2008 - 07:31 PM.

  • 0
The little critters of nature, they don't know that they're ugly. That's very funny, a fly marrying a bumble bee. I told you I'd shoot, but you didn't believe me. Why didn't you believe me?

#18 KBarker

KBarker

    Member

  • Members
  • 131 posts

Posted 03 February 2008 - 03:36 AM

I use paper templates a lot for all sorts of parts, and I attach them with thin double-stick tape. You don't have to get it on there real good, just enough so that it doesn't shift around while you're cutting and drilling. CS, could you try uploading your CAD files to www.3dcontentcentral.com? It converts the files into whatever format you want when someone downloads it.
  • 0
-KBarker

My Fighting Robots: http://www.TeamVelocityRobotics.com/

#19 Twitch

Twitch

    Member

  • Members
  • 224 posts

Posted 14 March 2008 - 07:57 AM

My +Bow: Lethal Injection

Posted Image
The barrel being cut at that angle (to look more like a syringe needle) does not seem to affect accuracy or ranges.

My Insignia
Posted Image

Lethal Injection in her carrying case; a genuine postmortem bag (body bag), complete with toe-tags to document kills.
Posted Image

Edited by Twitch, 14 March 2008 - 07:59 AM.

  • 0
QUOTE
"If Groove was a woman, I'd totally have asked him to go home with me tonight ...is that weird?"
~bpso86


QUOTE
"Being a moderator on NHQ is like being a judge in the Special Olympics."
~JediJoe9

#20 CaptainSlug

CaptainSlug

    Resident Mad Scientist

  • Administrators
  • 4,763 posts

Posted 14 March 2008 - 08:49 AM

Looks good, but could have been cleaner if you took it apart to paint it. You also would have had a much better finish on the colors if you had used spray-on vinyl dye.

Edited by CaptainSlug, 14 March 2008 - 08:51 AM.

  • 0
The little critters of nature, they don't know that they're ugly. That's very funny, a fly marrying a bumble bee. I told you I'd shoot, but you didn't believe me. Why didn't you believe me?

#21 Lynx

Lynx

    Member

  • Members
  • 983 posts

Posted 14 March 2008 - 09:30 PM

If you are going to OHNO:
I will have to say that is a uber homemade dart blaster and I will not play with it on the Nerf field...
I'm going to get owned by this beast!

Also, I'm very happy to see that Slug's +bow has been utilized the way he intended it to be used.
  • 0
Columbus' original crazy asshole now comes with:

AWESOME NITEFINDER

#22 Swatch

Swatch

    Member

  • Members
  • 3 posts

Posted 15 March 2008 - 11:48 PM

While it may not be "pretty", I can vouch for Twitch's bow, its pretty slick. (and the toe tags prove this)

Anywho... Twitch's Lethal Injection is but one of six that we rushed to finish in time to freak out many an opponent at our weekly Wars.

Hopefully I'll get around to posting pictures of my own, but in the meantime I want to put forth a few of the issues that we had in completing ours so that others may learn from them.

But first, CaptSlug this is a wonderful design that none of the following issues should take away from, so don't take these in a bad light.


1) The biggest issue we had in materials was that of the polycarb plunger tube. On all except one of ours, it developed spidercracks along its length (hence the duct tape wrap you can see above). At first we thought it was due to two o-rings, but it happened with one as well. If you see this happen, just sacrifice the clearness and wrap it in duct-tape or some other stiffer tape (electrical would likely stretch and provide no real additional regidity). Since others haven't had this problem, I'm assuming this may be caused by manufacturing differences.

2) Step 33 calls for a 1" screw on the trigger... I'm not sure if this is a typo, but on our guns, you would need at least an inch and a qtr. The math works out too, 2 x 1/8" handle plastic + 2 x 1/4" spaces + 1 x 1/4" trigger plastic = 1", so no extra to put the nut on. Minor, but just something to be aware of.

3) This is more a suggestion. I had some issues with my trigger, so I replaced it with a pivoting trigger as opposed to the designed sliding trigger. I can post some pictures at some point, but it was pretty easy to modify the design. I find that I like the action of it better, and I believe it will be more reliable in the long run since it provides direct line of action on the trigger plate, as opposed to a sliding contact surface.

4) As CaptSlug mentions, the weakest point in the gun (and almost all springers for that manner) is that of the plunger rod. Primarily where it connects to the plunger itself. I encourage you all to make some replacements and take care when drilling the holes in the end. We've lost two rods at this point, and will likely lose othere (mind you, this isn't a design problem as best I can tell, but its primarily a fabrication issue). That doesn't mean it can't be improved though... and I'm looking into how to do that.

All in all, these are amazing guns though and I greatly enjoyed making and now enjoy using them. Great job CaptSlug.
  • 0

#23 CaptainSlug

CaptainSlug

    Resident Mad Scientist

  • Administrators
  • 4,763 posts

Posted 16 March 2008 - 12:01 AM

Screw length is probably a typo. I think the ones on my gun are 1-1/2" length.
  • 0
The little critters of nature, they don't know that they're ugly. That's very funny, a fly marrying a bumble bee. I told you I'd shoot, but you didn't believe me. Why didn't you believe me?

#24 CaptainSlug

CaptainSlug

    Resident Mad Scientist

  • Administrators
  • 4,763 posts

Posted 18 March 2008 - 04:27 PM

I'm getting word from many of your that your plunger tubes are developing cracks. I have not had this issue, but I'm fairly sure the cause is the result of some of you over-tightening the hex nut on the 2"-length bolt. It is not meant to be tightened all of the way.
The plunger tube itself is not meant to handle the impact stress. That's what the bushing and the side panels are for. The holes in the plunger tube that the screw has to pass through should be drilled larger than the holes in the hex bushing. These holes only act to hold the plunger tube in place.

I may try nylon using for the plunger tube since it's available in the same dimensions.

Edited by CaptainSlug, 19 March 2008 - 03:17 PM.

  • 0
The little critters of nature, they don't know that they're ugly. That's very funny, a fly marrying a bumble bee. I told you I'd shoot, but you didn't believe me. Why didn't you believe me?

#25 General Cole

General Cole

    Member

  • Banned
  • 868 posts

Posted 21 March 2008 - 09:39 PM

Now that I am 3/4 of the way through my +bow I have some suggestions.

1. Replace 13.25in Plunger rod with precut aluminum. Then drill and tap holes.
2. Build .125 thickness pieces out of .100 thickness polycarb.
3. Use a mill and lathe.

Thats it. And it looks and fuctions great. .100 is available anywhere with .25. That was only to make creating it easier if you fudge parts.
We should stop calling out/making fun of/pissing GC off. He's actually contributed and is available for trade. He's a better than average member no doubt. Got your back Cole.
-Nerfer34

You know what... I know it's kinda late... but Props Cole.
-Baghead


0 user(s) are reading this topic

0 members, 0 guests, 0 anonymous users