Jump to content


Photo

Supermaxx 3000 Valve Problems

The valve is now fixed!

22 replies to this topic

#1 frost vectron

frost vectron

    Member

  • Members
  • 526 posts

Posted 21 June 2007 - 05:13 AM

Hey Nerfhaven,

The Story:

I persuaded a buddy of mine to help me out and buy a gun from me. It was an SM3000 that I had recently won on Ebay. I told him that I had no idea what condition the gun was in, but I'd try hard to repair it if necessary. I CPVC'd it and he used it for a day. He had a blast. At the end of the day though, it wasn't firing anymore. I figured it was something easy--but after opening it, I think the gun is toast.

My last hope is to post this up, hoping that someone can give me insight for a reasonable fix. I feel pretty guilty about this, so here's hoping it can be repaired!

The problem:

Pulling the firing pin does not fire the gun. Most Supermaxx guns use the same valve set-up. The metal rod is pulled back, which pulls a rubber disk inside of the air tank and releases the air. The problem seems to be that the metal rod is no longer connected to that rubber disk. So pulling the rod back does nothing to fire the gun.

The video:

I made a troubleshooting video to help understand what's going on with the gun.


I am more of a spring guy myself, and I don't have the know-how to tackle this valve issue myself. If anybody could jump in here and give me a hand, I would be grateful. I don't know where to start--the air tank is all glued up. I'm hesitant to saw a hole in it and try to re-attach that metal rod, because I have no clue how to seal the sucker back up.

Thanks in advance, NH.

Edited by frost vectron, 13 July 2007 - 07:27 AM.

  • 0
Latest Modification: The Professional

"I am a leaf on the wind--watch how I soar" - Hoban "Wash" Washburne, Serenity.

#2 lionhead333

lionhead333

    Aslan

  • Members
  • 252 posts

Posted 21 June 2007 - 07:42 AM

My solution is probably much more complicated than it needs to be. I took one of the barrels out, and swung it firing position. Then, i took a bent paperclip, dipped it in epoxy, and after many minutes of frustration and swearing, I managed to smear the bottom of the plate. After this, simply make sure the firing pin is connected, let it set, and it should work.
I don't recommend my method unless you really have to. If you are sloppy with the epoxy, it may cripple the air seal for good. It almost happened to me.
  • 0
QUOTE(Ubermensch)
If I were you, I wouldn't mess with the mods, or make stupid mistakes like misspelling their names. I mean, CAVV is really tough on that kind of thing

Most recent write up-
Sharpshooter 2

#3 baseballnolan5

baseballnolan5

    Member

  • Members
  • 90 posts

Posted 21 June 2007 - 09:52 AM

Is the firing pin still attached to the rubber disk? If not do something like what renegade did. Be careful with the epoxy though.
  • 0
QUOTE View Post

QUOTE

About how much are you holding in the pictures on the spools?

A shit ton.

QUOTE(Langley @ Aug 6 2007, 05:41 PM) View Post

The shot hit Andy squarely in the forehead. He was, in fact, on my team.


#4 Guest_DarkInfection_*

Guest_DarkInfection_*
  • Guests

Posted 21 June 2007 - 09:57 AM

One, that isn't Renegade, and two, he already said that the rubber disk wasn't connected.
  • 0

#5 baseballnolan5

baseballnolan5

    Member

  • Members
  • 90 posts

Posted 21 June 2007 - 10:02 AM

One. Whoops. Same avatar. Two, he said seems to be. Thats my guess is that it's not.
  • 0
QUOTE View Post

QUOTE

About how much are you holding in the pictures on the spools?

A shit ton.

QUOTE(Langley @ Aug 6 2007, 05:41 PM) View Post

The shot hit Andy squarely in the forehead. He was, in fact, on my team.


#6 Flaming Hilt

Flaming Hilt

    Member

  • Members
  • 1,070 posts

Posted 21 June 2007 - 03:39 PM

I'm unfamiliar with the valve-turret connection on that gun but it sounds to me like unless you can do what lionhead did or unless it magically fixes itself (which happens sometimes...) you're going to have to get a new valve. Since you're not much on air guns my guess is you don't have a spare 2k lying around but try and find something cheap or just an air tank for a buck or two from someone and swap it out.

If that's legitimate. I know, for example, that there's no way you could swap an Ak3k valve with, say, a 2k valve. If somebody else a little more familiar with this gun can't confirm your options then post a pic and I sure can.
  • 0
" Beneath this mask there is more than flesh, Mr. Creedy. Beneath this mask there is an idea...
...and ideas are bulletproof. "
V

#7 SirTofu

SirTofu

    Member

  • Members
  • 424 posts

Posted 21 June 2007 - 07:50 PM

If that rod is no longer connected, I would call "screwed" on that.
However, I see two possibilities:

1. Saw open the airtank (very neatly), Glue rod back to rubber disk. Then seal the cracks in the air tank with plumber's goop. Just be sure to give plumber's goop 2 days of curing just to be safe.
2. Do what I did with 2 airtech 2ks on a bbb (http://nerfhaven.com...?showtopic=8798). Use the supermaxx tank as an air reserve and hook another tank to it. However, the 3k tank I am sure is built someway to accommodate a turret. I own a yellow one myself. So this is probably useless advice.
  • 0
Nobody online Nerfs in the SE :(

#8 frost vectron

frost vectron

    Member

  • Members
  • 526 posts

Posted 13 July 2007 - 07:18 AM

Well, it looks like I have fixed the problem :D.

I took SirTofu's advice and carefully cut a hole in the SM3k(blue) airtank. I am sure Lionhead333's method would have also worked, but I lack the patience to pull it off.

Posted Image

After cutting the hole, I located the problem. The metal rod is bent at a 90 degree angle and sits inside a tab with a hole in it. The tab had broken off, so there was a U-shaped "broke-ass plastic" piece floating around in the air tank. I pulled it out of the airtank. I also took note that the outer diameter of the air tank is approximately equal to the outer diameter of 1" PVC. To seal up the hole I made, I cut myself a square of a 1" PVC Coupling.

Posted Image

First I put plumber's goop on a toothpick and worked a generous amount of goop onto the bottom of the metal rod. This is tricky since there is the spring blocking the way. I used a flathead screwdriver to open up the spring a little and then maneuvered the toothpick in. I then smashed the metal rod against the white disc and let it sit for a day. Then I used krazy glue (with its nice small applicator) to reinforce the bond. I was a little less generous with the krazy glue because it is thinner and more prone to running. I did not want to glue the valve shut on accident.

Posted Image

After letting that dry, I sanded the surface of the air tank and the inside of the 1" PVC Coupling segment. I gooped the two together, letting it dry for another twenty-four hours. I put the internals back into place.

Posted Image

To close the gun, though, some space must be made for the 1" PVC Coupling segment. I used a pair of pliers to simply pull off some material on one of the walls. It should be fairly easy to locate which wall you have to thin down. The plastic is thin enough that you can do with a pair of pliers. Since the internals are screwed down anyways, I wasn't worried about being a little sloppy.

There it is. The SM3000 (blue) firing pin should be fairly secure.

Edited by frost vectron, 13 July 2007 - 07:19 AM.

  • 0
Latest Modification: The Professional

"I am a leaf on the wind--watch how I soar" - Hoban "Wash" Washburne, Serenity.

#9 b00m13

b00m13

    Member

  • Members
  • 386 posts

Posted 13 July 2007 - 12:26 PM

Nice fix Frost!!
This really boosts my confidence that you can open an air tank up, and repair it so that air won't escape again.
I've been trying to make a home made air tank out of a crayola tube and pvc tube, and it hasn't been going too well (Air kept finding a way out), but seeing it's possible to patch air holes, I'm going to keep at it. :D
  • 0
The only place Wal-Mart exists in New York, is in our TV's.

#10 frost vectron

frost vectron

    Member

  • Members
  • 526 posts

Posted 14 July 2007 - 01:45 AM

Well, shit.

The fix held up for a good thirty shots. It feels like the pin is disconnected again. I'm going to cut full into the tank sometime in the near future, so I can bust out the steel and not do that pansy-shit adhesive stuff.

Will start working on a mechanical solution rather than a chemical one.

Sm3000, I swear I will kick your ass!
  • 0
Latest Modification: The Professional

"I am a leaf on the wind--watch how I soar" - Hoban "Wash" Washburne, Serenity.

#11 b00m13

b00m13

    Member

  • Members
  • 386 posts

Posted 14 July 2007 - 01:52 AM

I feel your pain, the homemade air tank held up for 3 shots until a hole appeared. It's like once you crack into an air tank it's never going to be the same again... unless maybe if you put a layer of rubber between the crack and the seal.
  • 0
The only place Wal-Mart exists in New York, is in our TV's.

#12 frost vectron

frost vectron

    Member

  • Members
  • 526 posts

Posted 14 July 2007 - 01:57 AM

Plumber's Goop should be your friend in sealing up cracks/holes. It can be found at most hardware stores, as well as some Wal-Marts. I think I bought mine for $4-5 a tube.
  • 0
Latest Modification: The Professional

"I am a leaf on the wind--watch how I soar" - Hoban "Wash" Washburne, Serenity.

#13 frost vectron

frost vectron

    Member

  • Members
  • 526 posts

Posted 01 December 2007 - 07:20 PM

So I fixed the valve again, and it seems to be permanent. :lol: This is better than my previous method.

First, you need to cut the airtank in half horizontally. I suggest that you use a dremel and draw lines using a sharpie so you can line up how the tank was originally oriented when you glue the thing back together. Be careful not to cut the turret's vital moving pieces! As far as I could tell, the turret couldn't be removed from the tank.

Posted Image

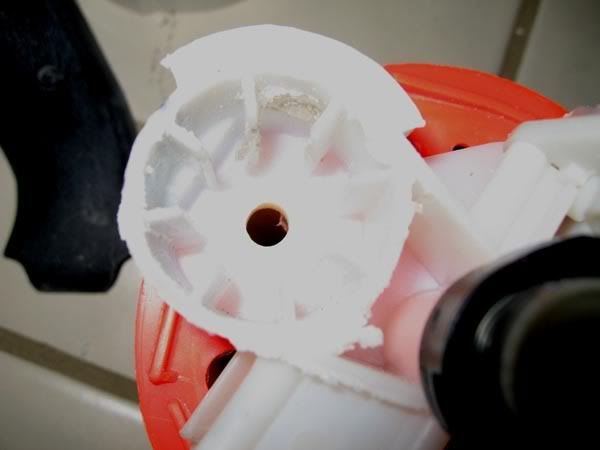
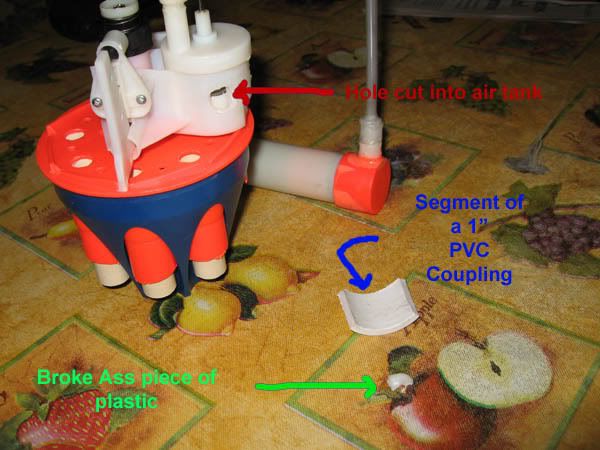
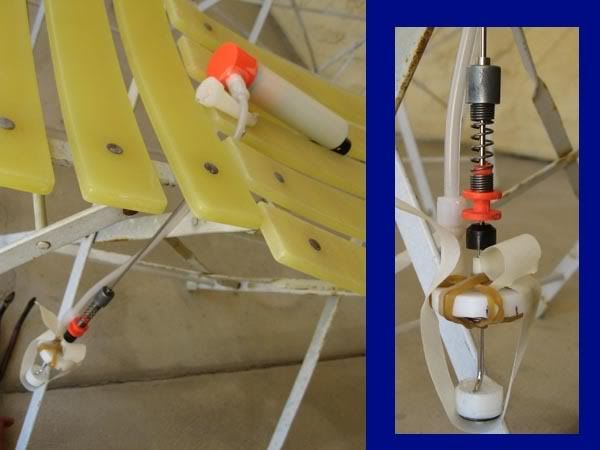
Here is where the terminal breakage occured on my SM3000

Posted Image

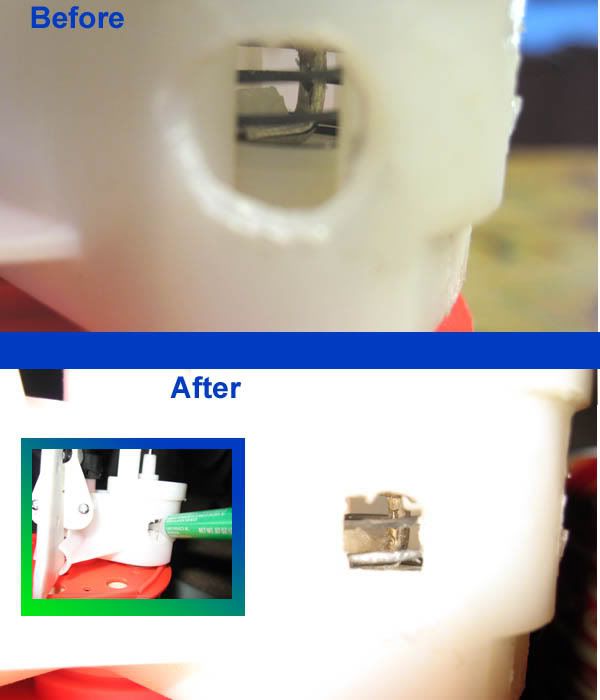
That little plastic nub used to have a plastic loop attached. The metal bar that actuated the valve pulled this front valve piece (the part that seals the front of the tank) by pulling on the loop. When pulled, the front valve piece would move backwards into the tank and release the air. The loop broke after some use, so the gun would not release air when firing.

Secondly, you want to goop the metal bar directly to the front valve piece. How should we approach this? Well, I found something interesting about the front valve piece--it is actually hollow! So I tested a theory and here's what I got:

Posted Image

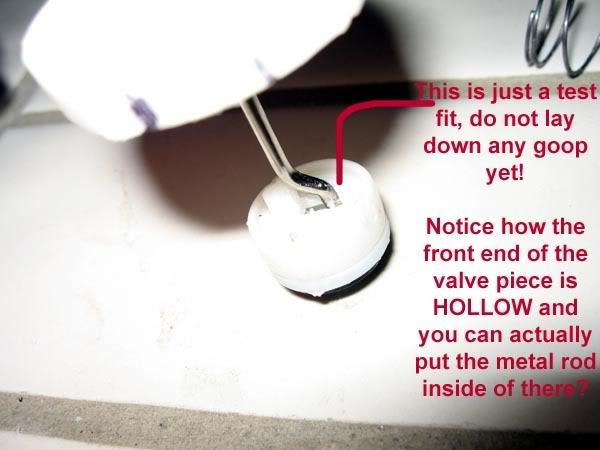
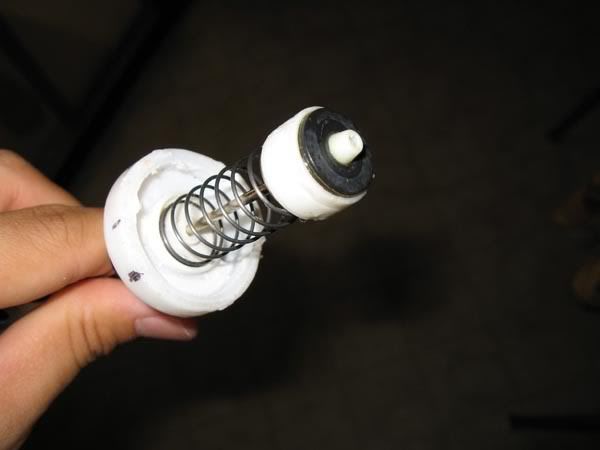
The metal bar can actually fit inside of the piece (it has 90 degree bend at the end of the bar, which is the part that goes into the front piece). Anyways, don't goop anything into place just yet because you still need the spring inbetween there (otherwise the tank won't seal when you pump it up. It will be stuck "open").

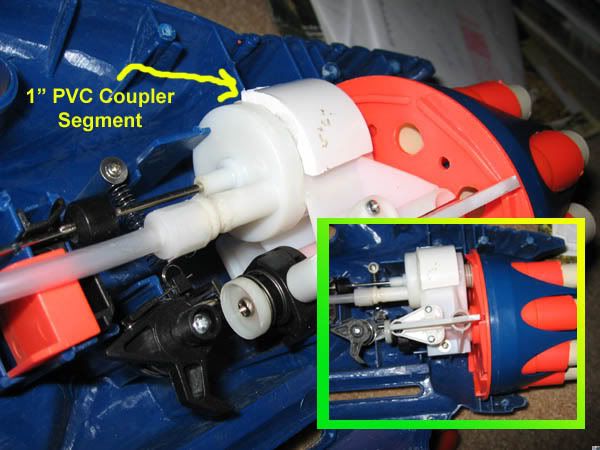
Here is what my set-up looks like:

Posted Image

Posted Image

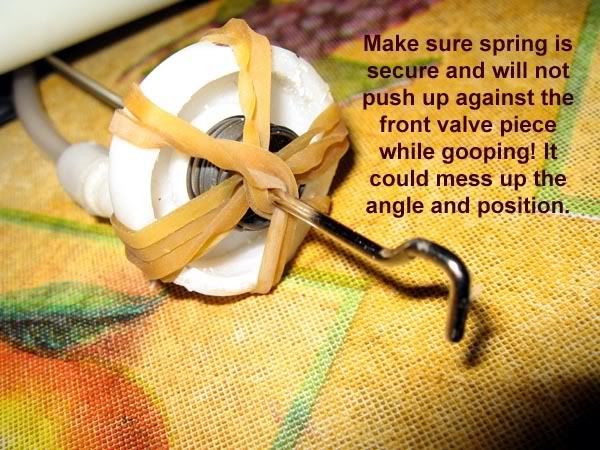
The rubber bands are there to keep the spring from touching the gooped connection while it dries. This would ensure that they don't dry at some funny angle or something. Additionally:

Posted Image

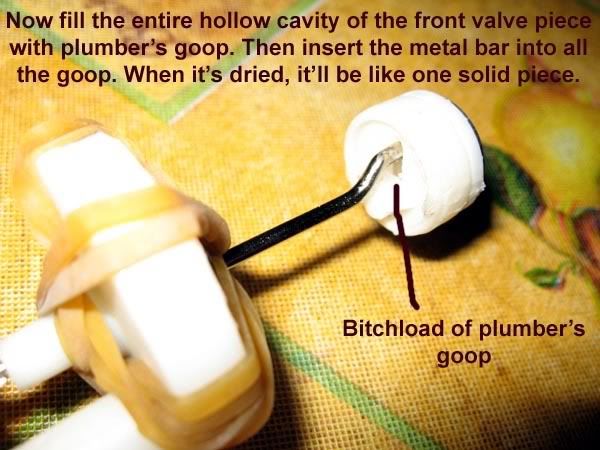
This is how I let it dry. I wanted it hanging down vertically so the front valve piece will be perpendicular to the front of the tank once I re-gooped the halves together. If your front valve piece is not oriented correctly when you goop the tank back together, the gun will not seal! Take care in making sure it is centered and at the right angle. I let it dry for 3 days before cutting the rubber bands and letting the spring rest up against it.

Posted Image

That is the end of the difficult part! There are some additional steps that you need to do before the gun will be working again:

1) Spray silicone lube on black rubber portion of the front valve piece (for good seals).
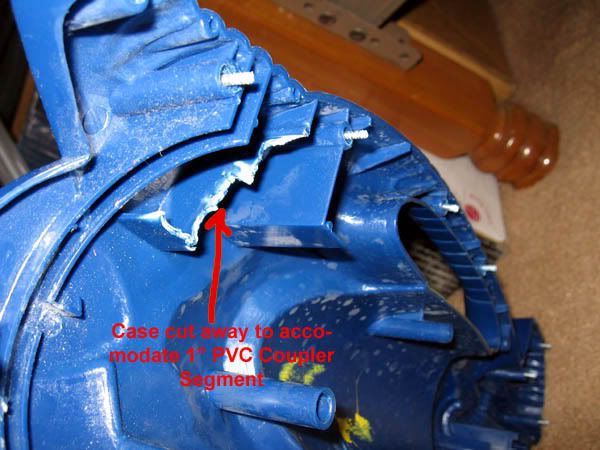
2) Goop the tank back together again (you may need clamps/rubber bands again since the spring will want to keep the tank from closing together). Be sure to use plenty of goop, line up the sharpie marks you made earlier, and not to accidentally goop the turret together! I also recommend cleaning out as much dust and plastic bits inside the tank as possible.
3) Reassemble the gun.

I find that this method works because the metal rod pulls directly on the front valve piece now. It does not pull on a weak plastic loop, nor does it pull on a chemical bond made by adhesives (previous method). The only way this will break now is if the entire front valve piece falls apart, and even that is more unlikely now that it's practically a solid mound of plumber's goop!

Hope this was of some help to somebody out there!

Edited by frost vectron, 01 December 2007 - 07:23 PM.

  • 0
Latest Modification: The Professional

"I am a leaf on the wind--watch how I soar" - Hoban "Wash" Washburne, Serenity.

#14 lionhead333

lionhead333

    Aslan

  • Members
  • 252 posts

Posted 01 December 2007 - 07:26 PM

VERY nice job, frost. My method actually wore off a few weeks ago. I'll definately be doing this.
  • 0
QUOTE(Ubermensch)
If I were you, I wouldn't mess with the mods, or make stupid mistakes like misspelling their names. I mean, CAVV is really tough on that kind of thing

Most recent write up-
Sharpshooter 2

#15 Forsaken angel24

Forsaken angel24

    Member

  • Contributors
  • 2,472 posts

Posted 01 December 2007 - 07:38 PM

Personally I hate the Sm3K.
Good work though.
  • 0
I don't get my kicks out of you,
I don't feel the way I used to do.
I know its bad,
After what we had,
But I’m just not the angel you knew.

#16 venom213

venom213

    Member

  • Validating
  • 1,294 posts

Posted 01 December 2007 - 07:39 PM

Thanks a lot frost. I was waiting half the summer for you to put this on. I will do this very soon. The thing about my SM3000 is that I got it at a garage sale for 50 cents, of coarse no darts and broken, but they said it worked, they just lost all the darts. Has this effected the ranges the gun gets at all?
  • 0

#17 frost vectron

frost vectron

    Member

  • Members
  • 526 posts

Posted 01 December 2007 - 07:57 PM

Lionhead: If you have any problems, don't hesitate to ask me. The trickier parts is getting the tank cut since the turret really gets in your way. Also, you've got to be really careful in lining it back up as well.

Forsaken: Thanks. After doing all this, I think I hate the sm3k as well. :lol:

Venom: Sorry about the wait! I had completely forgotten I had these photos on my hard drive. As for ranges, not that I can think of. The ranges are the same as they were before. Slap some barrels on and use decent stefans and you should be hitting 70-80's. Also be sure to reinforce the pump handle because that breaks very easily (moreso if you have plugged the pump).
  • 0
Latest Modification: The Professional

"I am a leaf on the wind--watch how I soar" - Hoban "Wash" Washburne, Serenity.

#18 venom213

venom213

    Member

  • Validating
  • 1,294 posts

Posted 01 December 2007 - 08:17 PM

I modded it when I first got it, which was before you posted the original write-up and video. I thought that that would fix it for some reason. Later I tried the thing with the screwdriver and found out I had the same problem.

Edited by venom213, 01 December 2007 - 08:17 PM.

  • 0

#19 OfAllTheNerf

OfAllTheNerf

    Member

  • Members
  • 714 posts

Posted 02 December 2007 - 08:16 AM

Great job.

I just had to do (something like ) this on my sm5000 valve (which is now in an At2k shell). Unfortunely it has a slight leak, and lets out all the air in around 30 minutes.

Props!
  • 0
[color=#FF6600][Finesse]-[BitchX]

#20 frost vectron

frost vectron

    Member

  • Members
  • 526 posts

Posted 02 December 2007 - 04:36 PM

With my SM5000 valve, the air leaked out of the front of the valve. The black rubber ring that sealed the valve somehow came off of the moving part in the valve. I had to somehow superglue that black ring back onto the plastic base. After that and a little silicone spray, it seals fine and holds pressure well.

I suggest you use a spray bottle and spray water over the tank and the tubes to see where the air leaks out (or submerge it all in water), then goop over wherever it is leaking (usually around the tubing connections).
  • 0
Latest Modification: The Professional

"I am a leaf on the wind--watch how I soar" - Hoban "Wash" Washburne, Serenity.

#21 Jedijoe9

Jedijoe9

    Member

  • Members
  • 251 posts

Posted 03 December 2007 - 05:09 PM

I recently purchases a SM3k (for $0.90 no less) and I've been having the same problems you mentioned. Thanks for posting this-- I'm excited that I will be able to fix what I had already written off as a lost cause.

Time to get some more plumbers goop...
  • 0
"If you watch jaws backwards it's about a huge shark that throws up so many people that they need to open a beach."

I nerf like a four year old.

#22 OfAllTheNerf

OfAllTheNerf

    Member

  • Members
  • 714 posts

Posted 05 December 2007 - 09:24 PM

With my SM5000 valve, the air leaked out of the front of the valve. The black rubber ring that sealed the valve somehow came off of the moving part in the valve. I had to somehow superglue that black ring back onto the plastic base. After that and a little silicone spray, it seals fine and holds pressure well.

I suggest you use a spray bottle and spray water over the tank and the tubes to see where the air leaks out (or submerge it all in water), then goop over wherever it is leaking (usually around the tubing connections).


Well, with mine, the rubber part that seals the front of the valve (it's about half an inch thick) somehow split in half, and so it would hold pressure, but not release (but if there was no pressure, it would fall back if you held it upsidedown). Anyways, I opened it up (the valve), and superglued the two rubber pieces together (a whole friggin' tube). Now I think it has a slight leak, but I think using silicone spray as you mentioned might fix it.

Thanks a ton!

-OfAll'
  • 0
[color=#FF6600][Finesse]-[BitchX]

#23 frost vectron

frost vectron

    Member

  • Members
  • 526 posts

Posted 06 December 2007 - 01:38 AM

If it doesn't fix the leak, you should be able to replace the rubber disk with another from the hardware store. Just glue that sucker on top of the plastic piece that the old disk sat on top of.
  • 0
Latest Modification: The Professional

"I am a leaf on the wind--watch how I soar" - Hoban "Wash" Washburne, Serenity.


0 user(s) are reading this topic

0 members, 0 guests, 0 anonymous users