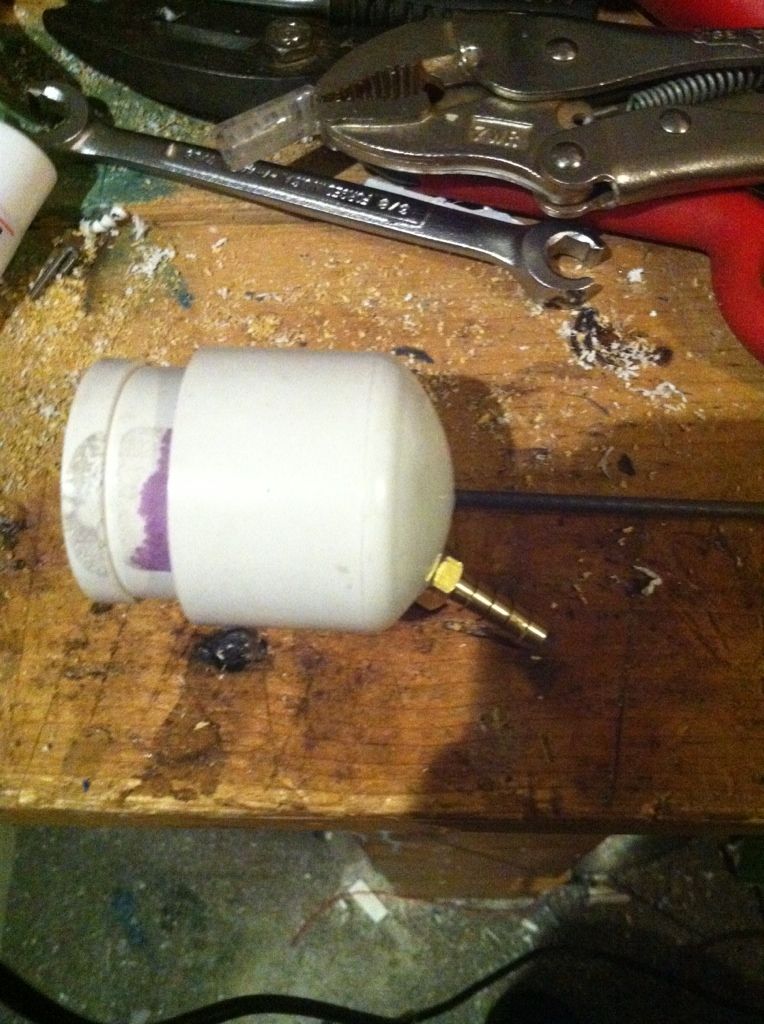
Jump to content


Photo

2k style valve/tank


6 replies to this topic

#1 zx532

zx532

    Member

  • Members
  • 216 posts

Posted 08 July 2012 - 11:35 PM

This will be instructions on how to make a 2k style tank (I only mention 2k, because I have no experience with the 3k, and have no idea how similar/dissimilar it is)

Materials:
1 1/4" PVC endcap
1 1/4"->1/2" flat PVC adapter (see bolow, I don't think I called that the right thing)
PVC to make a disk out of
2 #10 O rings (1/4" OD 1/8" ID)
1/8" Music wire
Rubber suction cup
Spring
brass hose barb (mine is 1/4")

Posted Image
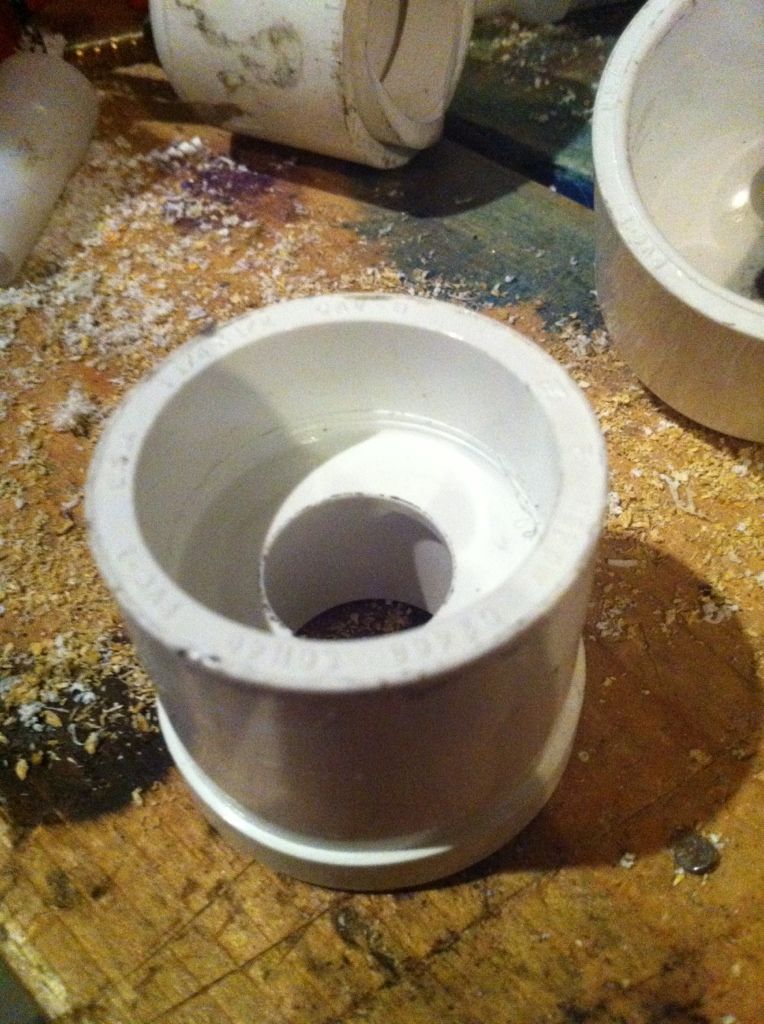
That is what the adapter looks like

Endcap:
Posted Image
Posted Image
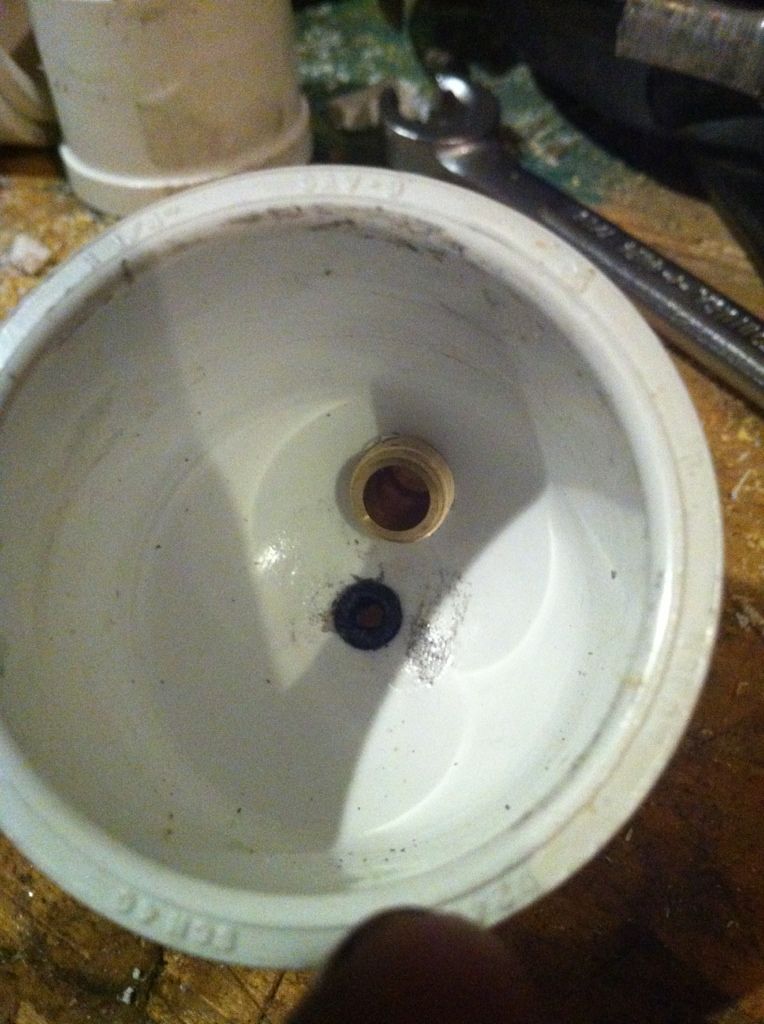
At the center drill a 9/64" hole all the way through
From the back drill a 1/4 hole part of the way through (in hindsight, I would have used a bit that was slightly smaller than 1/4, so that the o rings were a bit tighter)
Put the 2 #10 O rings in the 1/4(ish) hole, and grease them
Then away from the center (but still on the back part of the endcap) drill a hole that you can screw the hose barb into

Firing rod:
Posted Image
Posted Image
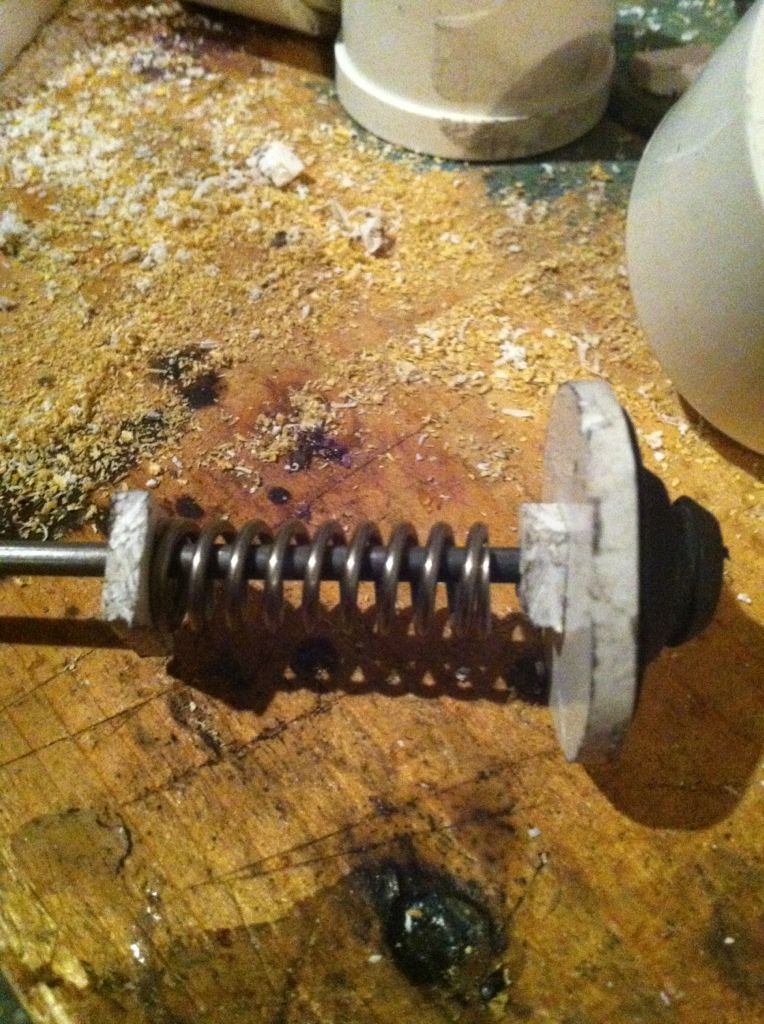
The spring is from a random assortment of springs that I got from Tractor Supply Co. (I highly suggest it, there are some good catch springs in there)
the large PVC disk and spacers were made from a 4" end cap (the diameter of the disk is similar to the inner diameter (on the 1 1/4 side) of the adapter gthey all have 9/64" holes in them
I cant really give any specifics on the rubber suction cup, I found it while cleaning my basement. All I do know is it was used to hang something on a window at some point
finally the music wire, bend the last 1/4" about 90 degrees, and slide everything onto it (in the order pictured above)
grease the rubber suction cup
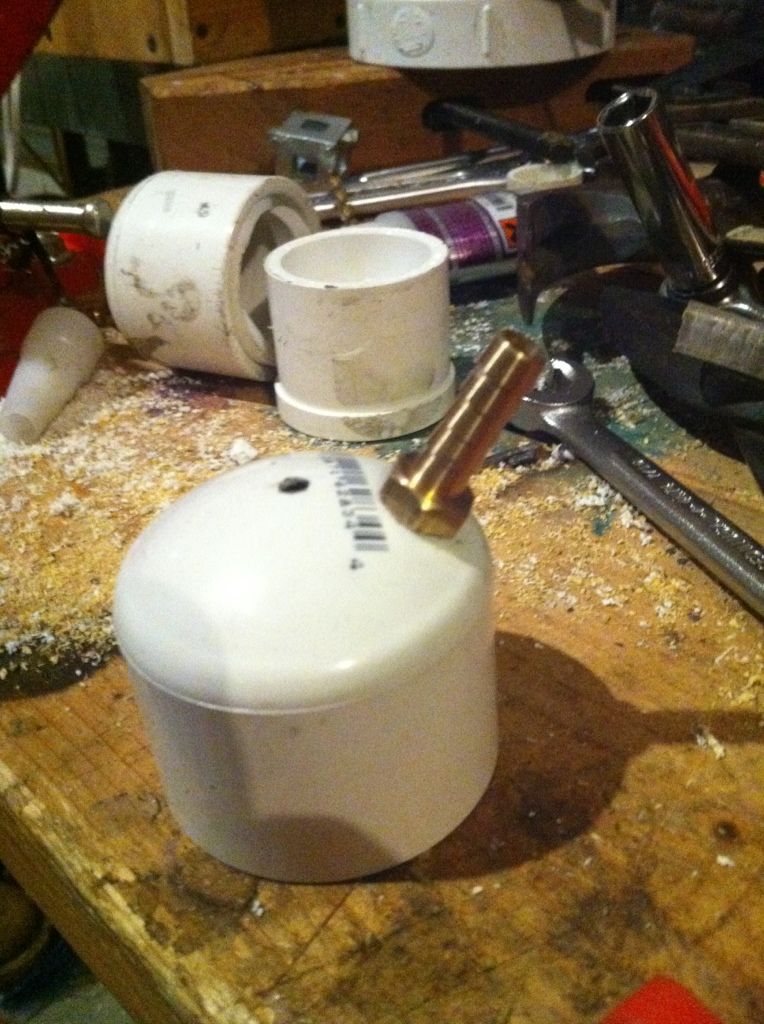
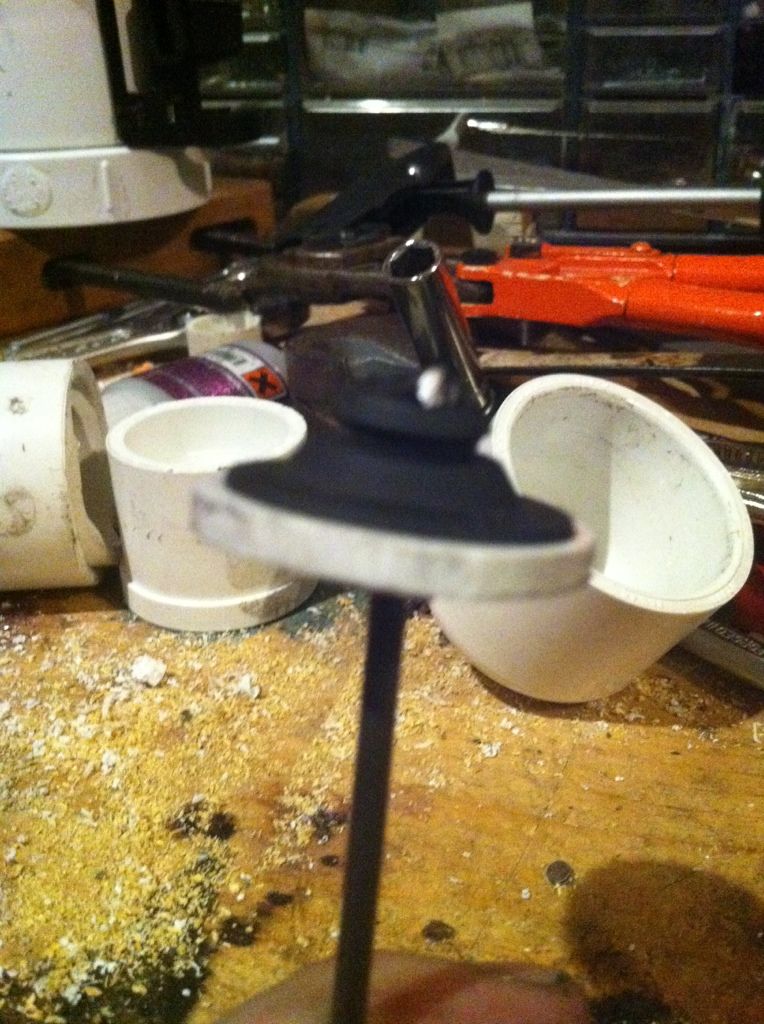
Final assembly:
use purple primer on the inside of the endcap (dont let it drip down near the O rings, I don't actually know what happens, but it cant be very good)
also use the primer on the outside of the adapter
slide the firing rod into the endcap
and glue the outside of the adapter and attatch that
push it in until the suction cup touches the adapter, and then a bit (2-3mm) more
That's it, youre done! It should look something like this:
Posted Image
  • 0
Progress: Just a long line of people saying "See? I told you it could be done"

#2 Pause

Pause

    Member

  • Members
  • 107 posts

Posted 08 July 2012 - 11:43 PM

Very cool. How does it seal? Have you tested its range?
  • 0
-Pause-

http://nerfpause.blogspot.com/

Heh.

USER WAS BLAND IN THIS POST


#3 zx532

zx532

    Member

  • Members
  • 216 posts

Posted 08 July 2012 - 11:48 PM

Very cool. How does it seal? Have you tested its range?


The seal isn't terrible (at the front it is great actually) like I said, I wouldve made the hole for the O rings slightly smaller

Haven't range tested it, because I have nothing to put it into (yet) not that a range test would give relevant information, since I dont have a 2k tank that I could test alongside it (The volume is greater than a 2k tank though)
  • 0
Progress: Just a long line of people saying "See? I told you it could be done"

#4 BOSS9

BOSS9

    Member

  • Members
  • 137 posts

Posted 09 July 2012 - 12:34 AM

This is pretty cool, it has some interesting features I haven't seen before. I REALLY like how the spring and air pressure press down on the rear o-ring, just like many stock tanks.

I've done pretty extensive testing with PVATs, and there are a few elements of your design that could be improved or discussed. Hopefully the things I've learned can help you and others in the community.

1. The rear seal shown in Venom's write-up is an easy, reliable, modular setup that in my experience makes flawless seals. The only ways I would differ from his write-up are not gooping the rear seal and not using the nut. Having the pin and seal based around a 1/4" carriage bolt also make it very easy to test and swap out seals. I think modifying the current seal would be interesting, and may turn out a better result.

2. The second thing that might limit your performance potential is the efficiency of the airflow around the dump valve. It looks like the front seal is very wide, and would be close enough to the walls of the tank that airflow around it would be restricted after the valve opens. In your case trimming the rubber seal and the backing piece to just wide enough to seal the front should greatly increase the flow. It looks like the cone-ish shape of your seal would center it in the dump valve well, so that shouldn't be a concern.

3. Because of the large diameter of the dump valve (~3/4", though it depends on the brand of the fitting) and the large face of your seal, your trigger pull might be too hard at decent pressures. In my latest PVAT I've tried to shrink it to a universally war-legal volume and use higher pressure. I found that the unmodified front bushing made the firing pin horribly hard to pull at ~40+PSI. Reducing the dump valve diameter to 1/2" completely solved this, and it's less ridiculous overkill.

EDIT: It also pains me that you can't open it up, though I do admire its compactness.

Edited by BOSS9, 09 July 2012 - 12:45 AM.

  • 0

#5 zx532

zx532

    Member

  • Members
  • 216 posts

Posted 09 July 2012 - 12:59 AM

there are a few elements of your design that could be improved or discussed

1. The rear seal...

2. It looks like the front seal is very wide...

3. trigger pull might be too hard...


Couldnt agree more, There are undoubtedly some problems with it.

1. Yeah, it needs a bit of work (I might cut it open and redo the back entirely)

2. The front seal is actually small enough that it is nowhere near the walls so that isn't an issue (only problem that might arise along these lines is the PVC disk is about a millimeter away from the wall, I dont think that will have much of an effect on airflow)

3. dont know anything about that, we'll find out when I put it into a blaster (something similar to Popatachi's Raider)

EDIT: I agree, I also wish I could open it

EDIT #2: I should be able to replace mine the PVAT 2.0 style rear seal, without cutting everything up (for the second time, you can actually see the remains of the first one in the background of the picture of the suction cup)

Edited by zx532, 09 July 2012 - 01:17 AM.

  • 0
Progress: Just a long line of people saying "See? I told you it could be done"

#6 proplus

proplus

    Member

  • Members
  • 85 posts

Posted 09 July 2012 - 10:05 AM

very nice.
homade tanks have always been a bitch to make, even PVATS.
Have you ever tried zero talent's basic valve? ]http://nerfhaven.com/homemade/zero_basicvalve/[/topic]
It's probably the easiest tank to make
  • 0
"the peinus itself is a handle"

- Kane the medeocre

#7 Daniel Beaver

Daniel Beaver

    HQRSE CQCK

  • Moderators
  • 2,097 posts

Posted 09 July 2012 - 10:51 AM

Aha, the reversed suction cup makes a lot of sense! And it just seals directly against the coupler, correct? This is really slick, and it looks like it has quite a bit of volume.
  • 0


0 user(s) are reading this topic

0 members, 0 guests, 0 anonymous users