I had this idea, among many others, trying to make an entry to the recently announced NIC Homemades Creation Contest. Instead of the usual path of "work on something until it's awesome, then post results later", I thought, "Why not make the whole thing public?" While I'm unsure of the moderators' opinion on a thread of this type (they could simply say "MAKE YOUR OWN BLOG" and close it, or like it, I have no clue), I think that doing something in this fashion would be beneficial for all, as all can share insights as to how to build, what' doesn't work, what does work, and in the end have much more knowledge imparted to the NIC.
So without further ado, I'll outline my thinking and progress thus far. (First post coming in a few minutes)

Adventures in Airguns
The process of creating a Homemade Airgun
Started by Buffdaddy, May 21 2011 06:02 PM
27 replies to this topic
#1

Buffdaddy
-
- DO NOT TRADE
- 824 posts
Do not buy from this member


#2
Buffdaddy
-
- DO NOT TRADE
- 824 posts
Do not buy from this member
Posted 21 May 2011 - 06:27 PM
First things first: For my homemade escapades, I decided to try my hand at piston valves. We already have plenty of springers, and while the "normal" airguns (a la an At2K tank) are rather lacking as well, we have things like the P-VAT. So this is relatively uncharted territory.
Piston valve tanks (also known as backpressure tanks) are the things powering the Hornet, Big Salvo, Sonic Bazooka, and SSPB, among others. The mechanism relies on pressure differentials. For easier explanations, I'll simply add the links below:
Spudfiles
Secret Strike Internals
You fill the tank, equalizingthe pressure throughout, with air essentially leaking past /around the piston to the rest of the tank. The initial pumping seals off the barrel. Once you've pressurized, you open a valve to release the air behind the piston. With the front of the piston suddenly under more force, the piston flies back, sealing off the leak, and letting the rest of the air go down the barrel.
There are several different methods of piston construction. Spudding (potato launching, for the uninitiated) often involves large piston valve setups. The massive amount of air that needs to be moved, however, means that you need a nice ball valve or some other method to quickly leak out the air - not ideal for Nerfing. The cmmon nerf designs look more like the following from the Autopsy thread:
Autopsy Thread
In these, there is often a rubber tip on the front of a plastic tube, which sits inside another tube ("I'm a dude, playing a dude, disguised as another dude!"). It operates on the same principle, but is meant to maximize the tank space used for launching the projectile.Once the tiny tubes get sealed off by the rubber piece, the rest of the air comes out the barrel. This is a reason why Big Salvo tanks are so awesome. In addition, you leak less air to start the process, which means you can use things like blast buttons. (Use the search function, there have already been some efforts in this area).
So that sums up what I'm trying to accomplish: a working homemade piston valve, with relatively cheap and easy construction. Whether it's possible or not, I don't know. Well, actually, I do, it should be possible. The real question is whether I can make a working design(s), or if someone else has the insight to do it. It's a totally open area for Nerf innovation, and we may end up with several different designs.
In any case, let's make this a learning experience, shall we?
#3
Buffdaddy
-
- DO NOT TRADE
- 824 posts
Do not buy from this member
Posted 21 May 2011 - 06:47 PM
A bit more mechanism talk, before getting into actual attempts (and my first two failed miserably, I assure you).
Piston valves require a free-moving piston, generally speaking. A few variations require o-rings for sealing things off, but usually you have a slightly-not airtight piston, as this allows leakage. You then rely on quick air dumping to drive the piston back before too much air leaks back around the piston, and nothing happens. Alternatively, you could make the piston air-tight, but place a check valve in the piston to allow one-way air movement. This of course means you'd better have excellent seal and lubrication. Bu we're talking about the NIC, don't we already do this to maximize the power of our springers?
Furthermore, there is a relationship between the size of the piston and the size of the barrel. Let's assume an overly large piston, and a small barrel you've sealed off. You start to fire the piston, and it does so easily (you have massive surface area driving the piston back). But there's the possibility of the pressure relieving out the barrel faster than the pilot area, and so the piston seals up again without all the air coming out.
Now shrink the ration of piston diameter to barrel diameter, approaching close to a 1:1 ratio. You start the process, and air leaks out the blast button or what have you. This process is slow and will leak a bit more air in the process to get the piston moving, but once it does, the piston should fly back the rest of the way and allow the remaining air to evacuate via the barrel.
There are a few ways to mitigate the weaknesses of different designs, but you should just remember the basics. You need a fast way to bleed air (in relation to tank size; remember the spud cannons need ball valves and all that), a good piston with slight but not serious leakage, and good seals on the barrel.
(Post will be edited if needed for info correction/addition)
#4
Guest_Just Some Bob_*
Guest_Just Some Bob_*
-

- Guests
Posted 21 May 2011 - 06:53 PM
I've been thinking along the same lines for a while. The biggest challenge to me has always been locating two readily available plastic tubes that slide freely and yet almost seal. Certainly one could use brass, but I choose not to. Another factor that catches many people up is that the outlet opening for the barrel must have a smaller area than the piston cross section. People who have opened up the outlet on backpressure tanks often learn that lesson the hard way - Hornet tanks in particular. If the areas are close, the piston will move sluggishly or not at all. To get it to really snap, there needs to be a significant difference, and a larger piston volume means a larger release of triggering air "wasted" out the back. But that's what it takes to get performance. The pistons in the Jobar/Cobra/Pango are about 3/4" while the blast outlets are more like 3/8" (double the diameter = four times the area).
Edit: I see you posted again while I was composing. No, you will never be able to get even close to a 1:1 ratio.Such a piston will never move. The relative vacuum impinging on the portion of it exposed inside the barrel will keep it closed. Also, many excellent spudguns have been built with pistons having an air-tight seal. The trick there is to put a checkvalve inside the piston as well.
Edit: I see you posted again while I was composing. No, you will never be able to get even close to a 1:1 ratio.Such a piston will never move. The relative vacuum impinging on the portion of it exposed inside the barrel will keep it closed. Also, many excellent spudguns have been built with pistons having an air-tight seal. The trick there is to put a checkvalve inside the piston as well.
Edited by Just Some Bob, 21 May 2011 - 06:59 PM.
#5
Buffdaddy
-
- DO NOT TRADE
- 824 posts
Do not buy from this member
Posted 21 May 2011 - 06:59 PM
I know, this has been a problem. If you look carefully, there are several fittings that fit inside other diameter tubes (1 1/4" PVC fittings in 2" pipe, or 3/4" fittings in 1 1/4" Pipe), but ever then, the difference is great enough that E-tape or some other method would be needed to get it to the right fit. As for the nerfy version, there are a few possibilities. Notably, 19/32" Brass goes into 1/2" PVC (usually), but it's close enough for air to not leak past. Filing a few channels on the inside of the PVC wall should solve that problem....but I have another sealing issue on that design.
There's multiple possibilities, but those are the ones I'm testing right now.
On a more humorous note, attempt one was, inf fact, just having the piston sit against the front wall. So essentially, barrel area = piston face and it didn't work. But the way I set it up led to a lot of other ideas in the process, so it was a good thing.
OBOB: I realize those things, but thanks for clarifying! There is a good balance you have to find, between how much air you bled, how fast the pilot flies closed, etc. It's just seeing what works And I did list the check valve possibility, I am going to try that on one design that failed earlier.
There's multiple possibilities, but those are the ones I'm testing right now.
On a more humorous note, attempt one was, inf fact, just having the piston sit against the front wall. So essentially, barrel area = piston face and it didn't work. But the way I set it up led to a lot of other ideas in the process, so it was a good thing.
OBOB: I realize those things, but thanks for clarifying! There is a good balance you have to find, between how much air you bled, how fast the pilot flies closed, etc. It's just seeing what works
And I did list the check valve possibility, I am going to try that on one design that failed earlier.
Edited by Buffdaddy, 21 May 2011 - 07:16 PM.
#6
andtheherois
-

- Banned
- 821 posts
Member
Posted 21 May 2011 - 07:22 PM
Very interesting idea. I can't wait to see a completed version. Since you're making this for the homemades thread I'm going to guess you're making this large enough to be a standalone blaster. What I'm wondering however, is that if your idea works, will you be able to scale them down to a small enough size so that we can integrate them into other blasters or at least the more popular blasters/shells with enough space?
The YooToobz
Photobucket
Photobucket
Winning rounds is rewarding, deal with it. We don't play fucking patty cake over here.
#7
Guest_Just Some Bob_*
Guest_Just Some Bob_*
-
- Guests
Posted 21 May 2011 - 07:35 PM
Overall size? The backpressure tank designs I'm working on are based on 1.25" PVC as the exterior, and less than 7" long. In general, it should be easy to lengthen or shorten most homemade designs, just as it is with springers, but without any cutting of springs. I'm hoping for reasonable power from a 4" chamber, but results haven't been good yet. A lot depends on finding the same reducer bushings that I already have a few of, and that's been difficult. Newer ones all seem to have the "webbed" parts on the outside, cutting too much into chamber volume for the same overall length.
So yes, fitting one inside a NF shell is rather unlikely. But it's not impossible that, if I can get it working, it might be scaled down to 1" PVC. Unfortunately the reducer bushings tend to be solid, again removing chamber volume, so it might have to be 7" long to get any power. Won't know until I try.
So yes, fitting one inside a NF shell is rather unlikely. But it's not impossible that, if I can get it working, it might be scaled down to 1" PVC. Unfortunately the reducer bushings tend to be solid, again removing chamber volume, so it might have to be 7" long to get any power. Won't know until I try.
Edited by Just Some Bob, 21 May 2011 - 07:39 PM.
#8
Langley
-

- Administrators
- 2,997 posts
LGLF - Since 2002
Posted 21 May 2011 - 10:33 PM
Won't know until I try.
I think that pretty much sums up the thread. I don't see the problem with a build log, but maybe you could hold off on posting until you have something built that you can log? What you're doing is cool and all, but right now it looks suspiciously like an idea thread.
You can poop in my toilet anytime champ.
2016 Nerf War Schedule
Bless you, my son. Now recite 3 New Members Guides and 5 Code of Conducts for your sins.
#9
Buffdaddy
-
- DO NOT TRADE
- 824 posts
Do not buy from this member
Posted 21 May 2011 - 10:41 PM
Be assured, I'm posting the actual stuff...but in the morning. It's nearly midnight, here.
But for now, does this satisfy your curiosity?

But for now, does this satisfy your curiosity?
Edited by Buffdaddy, 21 May 2011 - 10:42 PM.
#10
shardbearer
-

- Members
- 177 posts
Member
Posted 21 May 2011 - 10:56 PM
Yeah, barrel face=sealing face does not work cause there is no air in front of it. Extend the barrel backwards a bit and it should work like a charm. And a 1:1 ratio does work, but needs mechanical actuation instead of pneumatic. This is probably better for nerf as no air is wasted as a pilot volume. For an example, search for the quick dump valve (usually called a QDV) on spudfiles, it uses a piston floating on a rod to improve opening time.
#11
Buffdaddy
-
- DO NOT TRADE
- 824 posts
Do not buy from this member
Posted 22 May 2011 - 11:50 AM
Apologies for not starting the build log part as soon as I could, but we'll rectify that.
I've been going along the spud cannon line of thinking for the past few days. I have two designs for it, with roughly the same chamber volume for firing the dart. I'll show the process on the second (and working) version.
Here's the pieces of the chamber, laid out for viewing pleasure:

1 1/4" PVC bushing, coupler, 3 inches of 1 1/4" PVC, another coupler, another bushing. The e-tape wrapped thing you see?

This is a 3/4" PVC endcap, wrapped in a bit of e-tape. A craft foam bumper gets placed on the front, for sealing off the barrel.

This is the rear bushing of the chamber, with a craft foam ring to seal off the piston when it moves back. I could only find 1 1/4" to 3/4" bushings, so you need another bushing to get down to the 1/2" PVC we all know and love.

For the front, we have 1/2" CPVC hammered into 1/2" PVC. The CPVC sticks about 2 3/4" into the chamber, and gets capped with a 1/2" to 3/4" bushing. Why? To have a nice flat surface for sealing with the piston.
For the rear of my blaster, to reduce space for testing, I have a 3/4" PVC cross with a dual-action bike pump shoved in the bottom, a 3/4" ball valve on the back, and a McMaster OPV on top. Hardly war worthy, but good for testing.

This shows the larger version of my piston, made with 2" PVC parts (it failed....). I'm using 2-part epoxy to seal it off; something I can use sparingly to get a decent seal, but get apart with a pair of channel lock pliers.
This rig is hardly war-worthy, but it at least proves the concept. Pumping to 50 psi, I'm getting about 70 feet with bb stefans. There's obviously more work to do.
I've been going along the spud cannon line of thinking for the past few days. I have two designs for it, with roughly the same chamber volume for firing the dart. I'll show the process on the second (and working) version.
Here's the pieces of the chamber, laid out for viewing pleasure:
1 1/4" PVC bushing, coupler, 3 inches of 1 1/4" PVC, another coupler, another bushing. The e-tape wrapped thing you see?
This is a 3/4" PVC endcap, wrapped in a bit of e-tape. A craft foam bumper gets placed on the front, for sealing off the barrel.
This is the rear bushing of the chamber, with a craft foam ring to seal off the piston when it moves back. I could only find 1 1/4" to 3/4" bushings, so you need another bushing to get down to the 1/2" PVC we all know and love.
For the front, we have 1/2" CPVC hammered into 1/2" PVC. The CPVC sticks about 2 3/4" into the chamber, and gets capped with a 1/2" to 3/4" bushing. Why? To have a nice flat surface for sealing with the piston.
For the rear of my blaster, to reduce space for testing, I have a 3/4" PVC cross with a dual-action bike pump shoved in the bottom, a 3/4" ball valve on the back, and a McMaster OPV on top. Hardly war worthy, but good for testing.
This shows the larger version of my piston, made with 2" PVC parts (it failed....). I'm using 2-part epoxy to seal it off; something I can use sparingly to get a decent seal, but get apart with a pair of channel lock pliers.
This rig is hardly war-worthy, but it at least proves the concept. Pumping to 50 psi, I'm getting about 70 feet with bb stefans. There's obviously more work to do.
#12
Guest_Just Some Bob_*
Guest_Just Some Bob_*
-
- Guests
Posted 22 May 2011 - 02:10 PM
here is my other design:
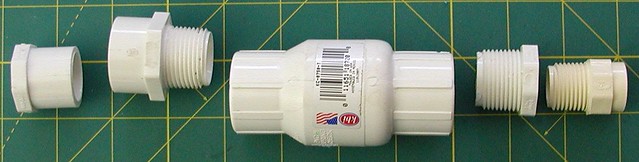
It relies on the builder being able to find a PVC check valve constructed such that you can attach a trigger rod:
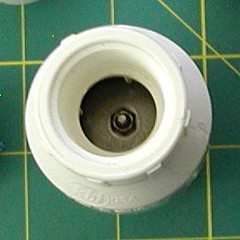 my local OSH hardware stores have had about 50% of their stock be this style. I've also seen them at Ace.
I've been able to make it fire without modding any of the PVC parts shown, other than the plug on the far left (Unless glue counts, then the left two were "modded" but the rest were just threaded together, because I wanted to be able to return most of it if the concept failed). The plug just gets a hole through it, for the trigger rod, which attaches to the threaded end of the pin through the valve. An o-ring over the rod, and a PVC disc that compresses it a little, completed the back seal. The beige piece on the far right is a CPVC coupler, where I plugged in a pump with a CPVC end for pressurizing, then removed that (to then insert a barrel). Popped great in testing, even a little too powerful for my own preferences.
But this is not back-pressure, and I haven't worked on it at all for a year.
It relies on the builder being able to find a PVC check valve constructed such that you can attach a trigger rod:
my local OSH hardware stores have had about 50% of their stock be this style. I've also seen them at Ace.I've been able to make it fire without modding any of the PVC parts shown, other than the plug on the far left (Unless glue counts, then the left two were "modded" but the rest were just threaded together, because I wanted to be able to return most of it if the concept failed). The plug just gets a hole through it, for the trigger rod, which attaches to the threaded end of the pin through the valve. An o-ring over the rod, and a PVC disc that compresses it a little, completed the back seal. The beige piece on the far right is a CPVC coupler, where I plugged in a pump with a CPVC end for pressurizing, then removed that (to then insert a barrel). Popped great in testing, even a little too powerful for my own preferences.
But this is not back-pressure, and I haven't worked on it at all for a year.
#13
Buffdaddy
-
- DO NOT TRADE
- 824 posts
Do not buy from this member
Posted 22 May 2011 - 08:49 PM
I'm currently revising the design, and going the normal, nerfy piston valve direction to boot.
On the old: It would make sense to invert the sliding cap. That way, you have a smaller area of air you have to suck out to actuate the piston, and you can get more power from the same size cylinder, or the same from a smaller one.
New discovery: 3/4" CPVC endcaps slide nicely on 1.2" PVC. You'll see it tomorrow.
#14
SgNerf
-

- Members
- 204 posts
Member
Posted 23 May 2011 - 03:28 AM
Just Some Bob,here is my other design:
It relies on the builder being able to find a PVC check valve constructed such that you can attach a trigger rod:
I've been able to make it fire without modding any of the PVC parts shown, other than the plug on the far left (Unless glue counts, then the left two were "modded" but the rest were just threaded together, because I wanted to be able to return most of it if the concept failed). The plug just gets a hole through it, for the trigger rod, which attaches to the threaded end of the pin through the valve. An o-ring over the rod, and a PVC disc that compresses it a little, completed the back seal. The beige piece on the far right is a CPVC coupler, where I plugged in a pump with a CPVC end for pressurizing, then removed that (to then insert a barrel). Popped great in testing, even a little too powerful for my own preferences.
But this is not back-pressure, and I haven't worked on it at all for a year.
You'll be glad to know that using a check valve as an air-tank blaster trigger does work!
3DBBQ from Taiwan successfully created his JSPB V6 design based on such a concept, and it even includes a semi-auto firing feature (ie. pump up the air tank, then can fire 6-7 shots individually in sequence), and that was done by simply positioning a ball valve behind (only slightly opened) as a rudimentary adjustable air regulator to control the air flow from the main tank space to the secondary tank space.
This was 3DBBQ's V6 design (imho, the dude has amazing blaster style and colour schemes):

You can see the video if it operating here:
http://www.youtube.com/watch?v=j1brsertLAg
http://sites.google....oduce/jspb/2010
And his check valve trigger build guides (the photos should explain everything quite clearly, no need to translate):
http://sites.google....print/triggerT1
http://sites.google....print/triggerl1
He posted up that design back in end-2009 (i think he might have also posted something about it on NerfHaven too, not sure though)... when i saw it back then i immediately drove out to get the parts (we seem to have similiar types of pipes, joints and valves in SG too) and built a version of it to try out... and it works! It fires in semi-auto style too, just like in his video. Anyways, here was my replicated build:
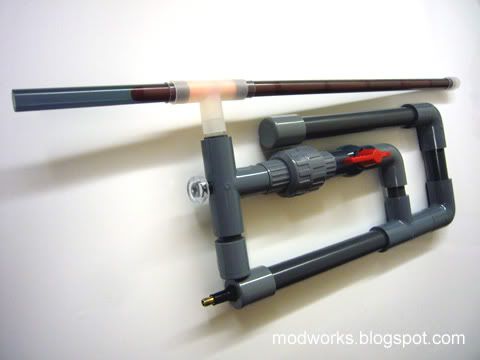
Main difference is mine uses a tire valve instead, 'cos i preferred to have the option to connect it to a manual pump or portable air compressor.
BuffDaddy, sorry for "hijacking" your thread with a different air-tank blaster trigger setup, just sharing some info to add on to Just Some Bob's post.

Edited by SgNerf, 23 May 2011 - 04:10 AM.
Nerf News & Reviews! >> http://www.sgnerf.blogspot.com
Nerf Mod Guides! >> http://www.modworks.blogspot.com
Nerf Mod Guides! >> http://www.modworks.blogspot.com
#15
Buffdaddy
-
- DO NOT TRADE
- 824 posts
Do not buy from this member
Posted 23 May 2011 - 04:57 PM
BuffDaddy, sorry for "hijacking" your thread with a different air-tank blaster trigger setup, just sharing some info to add on to Just Some Bob's post.
HOW DARE YOU!!!!!!

No matter, we're kinda just sharing our experiments here.
#16
Buffdaddy
-
- DO NOT TRADE
- 824 posts
Do not buy from this member
Posted 23 May 2011 - 10:15 PM
Update on my experimentation:
Simply put, the E-tape method isn't working very well. Unless it's EXACTLY perfect, you're either not moving the piston at all, or leaking too much air when it does. Which means we gotta start using O-rings.
I can fix my old designs later, but I did a new one, as that's what I saw when sketching out what I need in a blaster.
Here's the flash animation of how it works: (EDIT: Not my own, borrowing from the web)
Barrel sealing
Essentially, imagine a Big Salvo or Hornet tank with an expansion jutting out the side, and with a large piston instead of a tiny one.
Doing it like this would make things so much better, as you can A) NOT have a long chamber with lots of dead space behind the dart, Use the reservoir as a handle for your blaster, and C) Regulate your range by the size of your handle. Yup, you could make it shoot as you see fit.


We have our chamber, made with all the flat surfaces we need for proper sealing. We have a piston, with o-rings sealing it nicely, and a check valve to let air pass, and we have the tiny bleed hole that fills the reservoir. Using lung pressure only, I can already feel a tiny puff of air coming out the barrel as I operate it manually, so the design seems solid. We'll have more work later, and hopefully a few of the other designs I had will also work.
Simply put, the E-tape method isn't working very well. Unless it's EXACTLY perfect, you're either not moving the piston at all, or leaking too much air when it does. Which means we gotta start using O-rings.
I can fix my old designs later, but I did a new one, as that's what I saw when sketching out what I need in a blaster.
Here's the flash animation of how it works: (EDIT: Not my own, borrowing from the web)
Barrel sealing
Essentially, imagine a Big Salvo or Hornet tank with an expansion jutting out the side, and with a large piston instead of a tiny one.
Doing it like this would make things so much better, as you can A) NOT have a long chamber with lots of dead space behind the dart,
Use the reservoir as a handle for your blaster, and C) Regulate your range by the size of your handle. Yup, you could make it shoot as you see fit.We have our chamber, made with all the flat surfaces we need for proper sealing. We have a piston, with o-rings sealing it nicely, and a check valve to let air pass, and we have the tiny bleed hole that fills the reservoir. Using lung pressure only, I can already feel a tiny puff of air coming out the barrel as I operate it manually, so the design seems solid. We'll have more work later, and hopefully a few of the other designs I had will also work.
Edited by Buffdaddy, 23 May 2011 - 10:27 PM.
#17
nightcrafter27
-
- Members
- 1 posts
Member
Posted 23 May 2011 - 10:21 PM
I must say, that animation was absolutely awesome. I have always been fascinated by the complicated simplicity (if you will) of nerf blasters, and your explanation has helped me a lot. No one needs me to talk about the advantages of a varying tank size, and this design might push me into building on myself. Great job.
#18
PVC Arsenal 17
-
- Members
- 115 posts
Member
Posted 25 May 2011 - 07:51 PM
I'm not usually one to say this in regard to nerf guns but - this seems like overkill. A homemade piston valve of this size is too large/powerful for nerf darts. If you're willing to sacrifice around $10, you can buy a small, commercially made quick exhaust valve which would provide safer and more reliable service. Though my username might suggest otherwise, I'm wary about using plastic parts for anything kept under pressure. Especially so for nerf guns which could be subjected to drops and impacts during use.
You're making great progress nonetheless and it'll be interesting to see how this project will benefit the hobby.
You're making great progress nonetheless and it'll be interesting to see how this project will benefit the hobby.
#19
TantumBull
-

- Moderators
- 1,929 posts
Member
Posted 25 May 2011 - 08:09 PM
Why not just use an off-the-shelf QEV? In the end you'd probably actually end up saving on materials, and obviously on labor (if you account for that). I know you may score lower in the contest, but it makes a lot more sense in every other way.
#20
Buffdaddy
-
- DO NOT TRADE
- 824 posts
Do not buy from this member
Posted 26 May 2011 - 11:52 AM
I'm not usually one to say this in regard to nerf guns but - this seems like overkill. A homemade piston valve of this size is too large/powerful for nerf darts. If you're willing to sacrifice around $10, you can buy a small, commercially made quick exhaust valve which would provide safer and more reliable service. Though my username might suggest otherwise, I'm wary about using plastic parts for anything kept under pressure. Especially so for nerf guns which could be subjected to drops and impacts during use.
You're making great progress nonetheless and it'll be interesting to see how this project will benefit the hobby.
Why not just use an off-the-shelf QEV? In the end you'd probably actually end up saving on materials, and obviously on labor (if you account for that). I know you may score lower in the contest, but it makes a lot more sense in every other way.
QEV would certainly be cheaper in both time and money; but it doesn't appear to have too much of an advantage (at least until I get home from work and test the fully-built blaster). Right now, sans pump, the total cost is coming in around $17 for a ~45 cc (I think) chamber/valve/trigger/etc. A basic Dual action bike frame pump is $10 by itself, but if I can get the homemade pump to work efficiently, then you pretty much have a $20 homemade blaster. So assuming everything works as planned (isn't that always a big assumption
), this could work out pretty nicely.Yes, pressurizing PVC is always a concern (this is air, not water, so if something fails, then you're gonna get a blaster in pieces from the rapid air expansion (at best) and shrapnel at worst. Even so, I have things sealed up nicely, there's lots of layers of PVC by the time everything gets put together, and the McMaster OPV won't let you go above 50 psi with its lowest-rated spring. So I think I'll be fine.
Dropping? Don't plan on doing that, naturally. But you never know.....the prototype might end up going Mythbusters on us (let's test to confirm the myth...THEN MAKE IT EXPLODE) if more get built.
#21
PVC Arsenal 17
-
- Members
- 115 posts
Member
Posted 26 May 2011 - 04:48 PM
Just a suggestion since you mentioned it: Typical OPRV's from hardware stores can be modified to crack at lower pressures. Just drill out the part that's been pinned, remove the top plug, and switch out the spring for a lighter one and adjust the thread depth until you get the cracking pressure you desire. It could save a couple bucks for anyone looking to incorporate some safety features in their projects (always a good practice).
And what do you plan on using for the fill and pilot valves? (Sorry if you already covered that) Individual valves like the ones shown in the diagram above aren't ideal for a handheld blaster. You can accomplish both filling and piloting with just one Normally Open 3-way valve. They can be costly (and can't be found on McMaster... trust me) but you can substitute in a sleeve valve/slide check valve which works just as well (and can be found on McMaster).
Here's my example: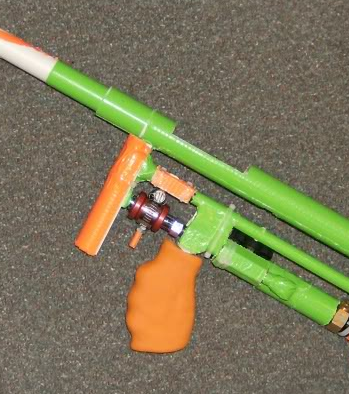
You of course need to improvise with the trigger and prevent the sleeve from rotating, but that's easy. They're cheap too.
The more expensive route can look much neater, though: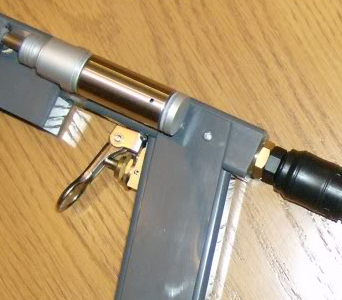
#22
shardbearer
-
- Members
- 177 posts
Member
Posted 28 May 2011 - 11:04 AM
Sleeve valves on mcmaster are $17-30, but if you get ones made for paintball they are like $10, and known as slide checks. One of these and a QEV is pretty much the simplest semi auto you can make.
#23
Buffdaddy
-
- DO NOT TRADE
- 824 posts
Do not buy from this member
Posted 29 May 2011 - 07:05 PM

Still fixing leaks, but it did fire with virtually no pressure. So it's a good sign.
Writeup coming tonight or tomorrow!
In the meantime, some thoughts on making more nerf-style Piston valves (like a Big Salvo). Obviously brass telescopes. That can work. Another thought: CPVC at the hardware store comes in copper tubing sizes. So, assuming the best, you could use that to readily make your setup. More work to do......
#24
Buffdaddy
-
- DO NOT TRADE
- 824 posts
Do not buy from this member
Posted 30 May 2011 - 10:13 PM
As promised to some earlier, here are some attempts that did not work. Good concepts....in theory.
First, the sliding brass blast button: an attempt to emulate the action of trumpet valves, for efficient air dumping.


You had a 2" piece of 5/8" brass, with a 1.25" piece of 19/32" inside. there were holes in each one, which when lined up, dunped air out one end of the setup (the other was sealed off with a 1/2" CPVC cap). All this was stuffed in a CPVC tee, and installed with a spring to keep it normally shut.
Sadly, it was not to be. There was plenty of space for it to seal, but telescoping brass seems to not be as airtight as I'd hoped it to be. Certainly good for barrels, breeches, etc. But facing actual loads of pressure? Doesn't seem to hold up. Regardless, it always leaked.
Also, it turns out 3/4" plugs are the best balance for making homemade blast buttons. There's plenty of space to stuff a medium-sized rubber stopper in there, and to carve a large hole for air to vent, all with it still sealing up. I used craft foam for sealing.....not ideal, but it works.

Smaller sizes, I have yet to get good success. My setups with rather large tanks need to bleed more than these can handle. But, they'd be great for hooking up to nerfy components, a la THIS PROJECT. 3/4" cap, 3/4" plug would seem to work well for a blast button.
First, the sliding brass blast button: an attempt to emulate the action of trumpet valves, for efficient air dumping.
You had a 2" piece of 5/8" brass, with a 1.25" piece of 19/32" inside. there were holes in each one, which when lined up, dunped air out one end of the setup (the other was sealed off with a 1/2" CPVC cap). All this was stuffed in a CPVC tee, and installed with a spring to keep it normally shut.
Sadly, it was not to be. There was plenty of space for it to seal, but telescoping brass seems to not be as airtight as I'd hoped it to be. Certainly good for barrels, breeches, etc. But facing actual loads of pressure? Doesn't seem to hold up. Regardless, it always leaked.
Also, it turns out 3/4" plugs are the best balance for making homemade blast buttons. There's plenty of space to stuff a medium-sized rubber stopper in there, and to carve a large hole for air to vent, all with it still sealing up. I used craft foam for sealing.....not ideal, but it works.
Smaller sizes, I have yet to get good success. My setups with rather large tanks need to bleed more than these can handle. But, they'd be great for hooking up to nerfy components, a la THIS PROJECT. 3/4" cap, 3/4" plug would seem to work well for a blast button.
#25
Buffdaddy
-
- DO NOT TRADE
- 824 posts
Do not buy from this member
Posted 05 June 2011 - 11:57 PM
More updates!
While progress on the BUFF is moving along swimmingly, I'm posting on another design that finally worked!
The principle is as follows: 3/4" CPVC has only a slightly higher OD than 1/2" PVC. In theory, this should mean than, using a 3/4" CPVC fitting as a piston, you can have it seal against the barrel, air leak through the gap to fill the chamber, and everyone is happy.
I tried that - and it worked. But only barely. I could squeeze 30 feet out of it, but a ton of air was leaking out the pilot side during the firing process.
The solution? Handy dandy electrical tape!


These show my setup, using 2" to 1/2" bushings, a 2" PVC piece (a spacer, really, to make more room for piston movement), and a 2" PVC coupler to create the tank. Craft foam seals the barrel off, as well as the pilot side, depending on piston position. More importantly, I have 1 layer of e-tape wrapped around the 1/2" PVC sticking into the chamber. It's not a complete loop of tape, there's about a 1/8" to 1/4" gap between the two ends (that means I'm covering.....330 degrees of a full circle?) It's enough that the coupler barely slides past, and has a really tight fit. But if put under pressure, air can and does leak into the chamber. Then once you pull the trigger/blast button, that tight fitting means that much less/no air leaks from the chamber back through the pilot space, making for a much more effective pop.
On the barrel side, to make things work, the piston seals against a 1/2" to 3/8" copper reducing coupling. In case you didn't know, the CPVC you buy at the hardware store comes in copper pipe sizes. So the 1/2" end is glued to CPVC, which is in turn hammered into 1/2" PVC. This makes for a stable base. with the 3/8" end facing the piston, you have a large ratio of sealing face to barrel area, and the system works.
Sorry the copper side isn't pictured; I'm trying a couple other things before this gets placed in a finalized design. But this is serious shrinkage in size from my spudding=based design.
While progress on the BUFF is moving along swimmingly, I'm posting on another design that finally worked!
The principle is as follows: 3/4" CPVC has only a slightly higher OD than 1/2" PVC. In theory, this should mean than, using a 3/4" CPVC fitting as a piston, you can have it seal against the barrel, air leak through the gap to fill the chamber, and everyone is happy.
I tried that - and it worked. But only barely. I could squeeze 30 feet out of it, but a ton of air was leaking out the pilot side during the firing process.
The solution? Handy dandy electrical tape!
These show my setup, using 2" to 1/2" bushings, a 2" PVC piece (a spacer, really, to make more room for piston movement), and a 2" PVC coupler to create the tank. Craft foam seals the barrel off, as well as the pilot side, depending on piston position. More importantly, I have 1 layer of e-tape wrapped around the 1/2" PVC sticking into the chamber. It's not a complete loop of tape, there's about a 1/8" to 1/4" gap between the two ends (that means I'm covering.....330 degrees of a full circle?) It's enough that the coupler barely slides past, and has a really tight fit. But if put under pressure, air can and does leak into the chamber. Then once you pull the trigger/blast button, that tight fitting means that much less/no air leaks from the chamber back through the pilot space, making for a much more effective pop.
On the barrel side, to make things work, the piston seals against a 1/2" to 3/8" copper reducing coupling. In case you didn't know, the CPVC you buy at the hardware store comes in copper pipe sizes. So the 1/2" end is glued to CPVC, which is in turn hammered into 1/2" PVC. This makes for a stable base. with the 3/8" end facing the piston, you have a large ratio of sealing face to barrel area, and the system works.
Sorry the copper side isn't pictured; I'm trying a couple other things before this gets placed in a finalized design. But this is serious shrinkage in size from my spudding=based design.
0 user(s) are reading this topic
0 members, 0 guests, 0 anonymous users

