#1
Posted 04 November 2007 - 06:27 PM
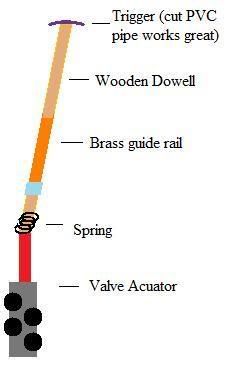
First I completely gutted the Manta Ray, handle and all. All I kept was the shell. Next I epoxied and hot glued the pump tube from one of the Big Salvo to the underside of the shell close to the hand hole. Then, after adding various length CPVC barrels to each of the four blast chambers, I epoxied and hot glued three of the blast chambers side by side next to the pump shaft and the fourth went on the underside of the middle tank. I ran the tubing so the gun fires from the inside out and then the bottom barrel last. The barrels are intentionally angled slightly inward to maximize accuracy (after much experimentation). I did the same to the other side and then began to tackle adding a handle. (Oh yeah, to make sure the barrels weren't pointing downward I dremelled off the lip that runs around the gun on the parts where the barrels portruded). After experimenting with various handles I decided that CPVC was the most comfortable. I tried gluing it in place, but it wasn't stable enough so I drilled a hole in it and put a thick zip-tie through it and the shell. That and the glue seemed to do the job well. Lastly I had to find a way to extend the triggers. That was no walk in the park. I took a hand size trigger (squeezed by four fingers) from a REALLY old NERF gun and cut into two parts, one for my index finger and one for my other three fingers (I like to hold the gun/shield in my left hand so I applied the triggers accordingly). Then I mounted the triggers on wooden dowells (using hot glue which has held remarkably well) and then mounted brass tubing (I think it was somewhere around 3/8") onto the underside of the gun to act as guide rails for the trigger system. I then cut off the Big Salvo triggers to the point where the spring attaches and attached the wooden dowell to that post (I kept the spring on the trigger and put the rod inside it which allowed for some flexibility). That sounds pretty complicated, so here's a pic of the underside of the gun:
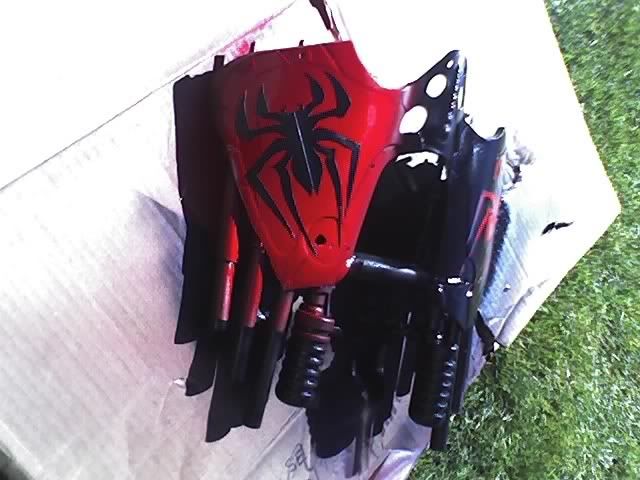
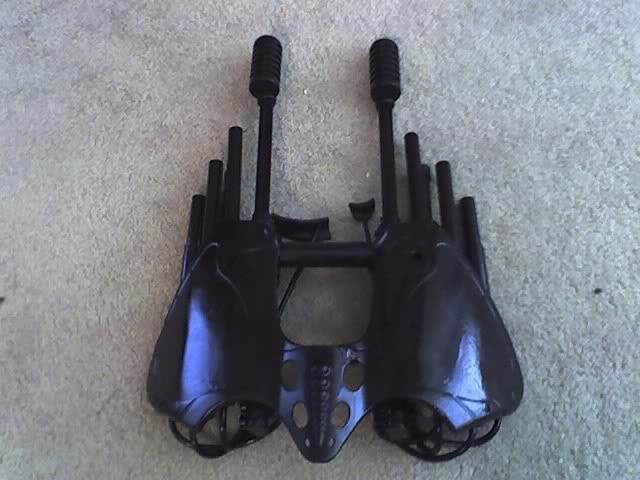
I wanted to name the gun something that made reference to the number of barrels. Eventually I came up with the name aracnophobia and painted the gun accordingly. Here's a pic of the gun, black, with the pump handles extended:
I then made a paper template and added a red spider to each side. Here's the finished product:
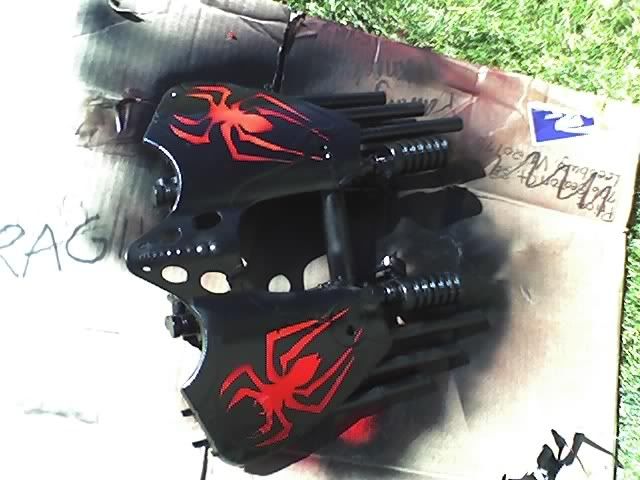
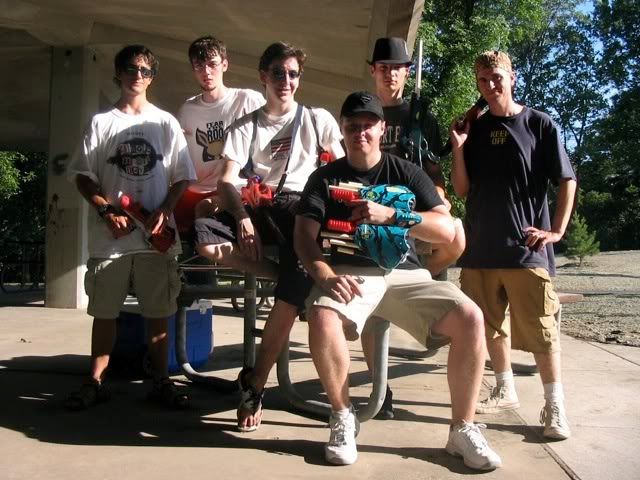
A picture of the gun in hand:
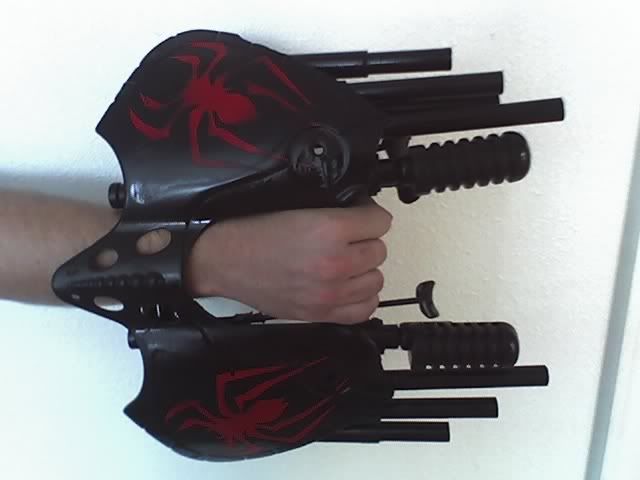
And there you have it! Eight barrels striking fear into my opponents twice a month in Southeastern Idaho!
Since taking these pictures I have repainted it (if you look closely you can see why) so the shell is red and the spiders are black; the barrels and pumps are still black. It looks a lot better. When I get my camera working (or get a new camera) I will post more pics.
#2 Guest_CornMan_*
Posted 04 November 2007 - 06:34 PM
#3
Posted 04 November 2007 - 06:45 PM
Wow, Big Salvos really have been rising in popularity as of late, haven't they?
I don't really undestand why General Cole is making articles of clothing with my name on it. First it frightened me, but after a few hours I got over it. It seems obvious that General Cole is hoping to have sex with me.
#4
Posted 04 November 2007 - 06:45 PM
I think 8 shots is a waste of time. If you miss with 4, you are VERY sad, but I understand a few more barrels on a different trigger for backup.
But, 8? Really? Why not save the manta ray for close up and have the smdtg for longer ranges?
If you don't have a smdtg why not integrate just one big salvo and just keep the manta ray? I think you wasted a big salvo...
AWESOME NITEFINDER
#5
Posted 04 November 2007 - 07:02 PM
Dude, that is one SUWEET paint job! I like the spiders.
Unspeakablely sick, man.
Thanks!
1.) Why didn't you just integrate a spiderman dart tag gun and modified the manta ray?
2.) I think 8 shots is a waste of time. If you miss with 4, you are VERY sad, but I understand a few more barrels on a different trigger for backup.
But, 8? Really? Why not save the manta ray for close up and have the smdtg for longer ranges?
3.) If you don't have a smdtg why not integrate just one big salvo and just keep the manta ray? I think you wasted a big salvo...
1.) I made this gun in April, before the release of the SMDTG. Also, Big Salvos get MUCH better range than the smdtg.
2.) I primarily play capture the flag and spend much of that time taking on a base full of people. If I missed with four shots then I would be very sad, however, when I invade a base with this gun and a primary I typically eliminate five players. And yes, you're right, having four back-up shots is nice. I primarily use the right side and save the left side for emergencies.
3.) I don't feel like I wasted a Big Salvo...I own eight. I bought a bunch this summer when they were on sale at Amazon with free shipping (they were less than ten dollars a piece).
Edited by imaseoulman, 04 November 2007 - 07:02 PM.
#6
Posted 04 November 2007 - 07:11 PM
Any chance of a video showing it's capabilities? Either in-war footage or just a demonstration would be really cool.
#7
Posted 04 November 2007 - 07:16 PM
Any chance of a video showing it's capabilities? Either in-war footage or just a demonstration would be really cool.
I don't have a video camera right now, but I'm expecting a son on Jan. 5th, so I need to buy a digital camcorder before then. I hadn't thought of getting in-war footage...that would be pretty sweet. The next war I'm hosting will be in less than two weeks, so if I can get a camera by then I'll post some footage of me single handedly taking out half a team.
#9
Posted 04 November 2007 - 07:34 PM
Congratulations on your son by the way.
Edited by Dr. Moose, 04 November 2007 - 07:36 PM.
#10
Posted 04 November 2007 - 07:46 PM
Thank you! I take that as a HUGE compliment. Bags' Sickle Fin is one of my favorite guns ever. It's right up there with Groove's Guru.That gun is amazing. It reminds me of Bag's Sickle fin, for some reason.
I like it. The only thing I would do is have the triggers right next to eachother so it could be fired by the index finger and the ring finger so you could just alternate shots really fast.
Congratulations on your son by the way.
Thank you. I guess the pics must not show it very well, because the triggers are in fact quite close together. I can fire all eight at once if I want to, or one at a time, or any other possible permutation (there are a lot possible combinations suitable for different situations).
#11
Posted 04 November 2007 - 07:48 PM
The only thing I would change would be to connect the pumps using a bridge of plastic in order to make priming easier.
#12
Posted 04 November 2007 - 08:18 PM
Edited by All Star, 04 November 2007 - 08:20 PM.
- DR. SEUSS
" Would you eat them on a train, would you eat them on a plane?"
- SAM I AM
#13
Posted 04 November 2007 - 09:00 PM
Awesome! The spider seems brighter in the second to last pic. Is that just the sunlight?
The second to last picture is closest to the way it normally looks. I don't have any pictures of the new painjob (inverted) but here's a picture I took before I finished this last paint job:
The barrels are black in the finished product.
#14
Posted 04 November 2007 - 10:07 PM
Wicked sick mod you have there... I just makes me want to get my next couple of Manta-based projects off the ground.
So about your Paint job... did you leave it half and half red/black or is it primarily red now with black spiders?
*Gives imaseoulman an E-High-five*
-bags
Edited by baghead, 04 November 2007 - 10:21 PM.
Don't call it a comeback, I never left.
#15
Posted 04 November 2007 - 10:12 PM
#16
Posted 04 November 2007 - 10:31 PM
CRAZY MANTA INTEGRATIONS FOR THE WIN!!!!!!
Wicked sick mod you have there... I just makes me want to get my next couple of Manta-based projects off the ground.
So about your Paint job... did you leave it half and half red/black or is it primarily red now with black spiders?
*Gives imaseoulman an E-High-five*
-bags
*E-High-five* back at ya!
The shell is now primarily red with black spiders (and barrels, triggers, pump, etc. are all black. The tubing isn't painted, left clear). My camera broke and that's the last picture I was able to get of it.
#17
Posted 04 November 2007 - 10:47 PM
Disgusting as in sick; sick as in awesome, and awesome as in totally rad. Would love to see some updated pictures. Great job.
-Groove
"Too close for missiles, I'm switchin' to guns"
#18
Posted 05 November 2007 - 12:50 AM
#19
Posted 05 November 2007 - 09:00 AM
#20
Posted 05 November 2007 - 03:14 PM
#21
Posted 05 November 2007 - 11:01 PM
I am going to add it to the directory because the directions seem simple enough. Just alot of trial and error I guess with getting the barrels lined up.
If you do another write up and I hope you do. Try and have more photos explaining steps and such.
Excellent integration.
Excellent paint job.
Excellent ROF.
Most likely excellent range.
I put this gun up with the best.
Looking forward to your next creation.
I don't feel the way I used to do.
I know its bad,
After what we had,
But I’m just not the angel you knew.
#22
Posted 21 November 2007 - 09:19 PM
Materials Needed:
Wooden dowell
Brass tubing w/ ID slightly greater than dowell OD
Hot Glue
(I forgot to label the blue segment beneath the brass...that's hot glue)
(Also, the only parts mounted to anything are the VA and brass...most likely mounted on the pump...everything else is free-moving)
The biggest problem with integrating a Big Salvo is that the VA and trigger are usually not in allignment. One way to resolve this is to use a guided rail system (the method I used). To do this you decide where your trigger is going to be (on a Manta Ray it's up front). Hold your gun in the position you will be holding it while firing and put your finger where you want the trigger to be. Next, cut a length of dowell that runs from your finger to the opening in the VA (where the red trigger post normally enters) and glue your trigger to the dowell.
The next thing you want to do is cut the VA's red trigger until all you have is a post with an o-ring on one end (that goes into the VA) and a spring on the other end (the stretch spring that is originally screwed on the BS trigger).
Cut a short piece (about an inch) of your brass and slide that over the dowell and then stick the dowell into the spring coil that is attached to the VA's red post. What you should have is VA, then red post, then dowell in spring, then the brass, then the trigger glued to the end of that (see picture). Again hold the gun in your hand as if you were firing and push the trigger assembly with your trigger finger. This is experiment time. Little by little shorten the dowell until it's length is just right. Make sure you can get full range of motion (the red post moving through the entire VA) when pulling back the trigger. While doing this try to press the brass against the part of gun (or spacer) where it will be mounted. Most likely the direction you push your trigger will not be parallel to the motion of the red post in the VA (sometimes it is and that's GREAT!). The dowell in the spring should act as a joint, flexing, and allow you to push at an off angle.
After you feel like the dowell is the right length and you know where the brass should go, mount the brass to the gun/spacer. Put a little hot glue in the spring coil and adhere the dowell. Now all you have to do is slide the dowell forward until the VA's red post is in the appropriate position to begin pumping (pulled almost all the way out but not quite) and mark on the dowell where the dowell meets the brass. Put a ring of hot glue around the dowell where you mared it so that when you're pumping the gun the red post can't be pushed out and you'll get your seal. This hard to get right and you may need to remelt your glue ring several times moving it slightly up or down on the dowell until it's perfect. Instead of a glue ring you could use a washer or whatever.
So the basic idea is that the spring acts as a joing allowing the flexibility of depressing the trigger at an off angle, the glue ring prevents the red post from being pushed out of the VA and allows the post to seal as it is supposed to, and the bass guides the direction of the trigger pull.
Last, but not least, if you want to have your trigger closer to the VA then instead of mounting a trigger on the dowell, adhere wire cable to the end of the dowell (you can probably make the dowell much shorter) and run it back through the brass and tie the end to a key ring to use as your trigger.
Hope this helps. I'm getting a camcorder for Christmas so by then I'll be able to post a video explaining how the trigger assembly works.
Edited by imaseoulman, 21 November 2007 - 09:20 PM.
1 user(s) are reading this topic
0 members, 1 guests, 0 anonymous users