
 Find content


Well, I doubt any of you have ever heard of the genre of music Cyber-GrindCore. Basically, it's just electronic instrumental arrangements (Guitar, drums, bass, and lots of synth), using computer programs such as FL8, and adding vocals that sound like dying animals. I got in to making it, and even though many people think it's just noise, it's actually very fun to make. I don't take making this music seriously, so don't tell me how much it sucks or whatever. What do you guys think of the genre itself?
Here is mine, called Mutated Abomination:
http://www.myspace.c...atedabomination
If I say so myself, it is a good representation of the genre. Tell me what you guys think.
Liam
Member Since 23 May 2007Offline Last Active May 16 2011 08:33 PM
Topics I've Started
Lbb (lanard Blast Bazooka) Modification Write Up Video Added
13 May 2009 - 04:24 PM
Alright, I haven't posted anything useful in a long time, so I figured I'd post a write up.
This will be a full instructional guide on how to do the following mods to your LBB.
Materials needed:
-Aprox. 15in of 1/2in PVC
-(2) 1/2 in PVC coupler
-1/2in of 1/2in CPVC
-12 in of brass (or any barrel material that can easily fit inside of 1/2 PVC)
-Hot Glue
-Super Glue
-Any other preferred adhesives
-1/16in foam sheet
-Dremel
-Dremel: Sanding Bit
-Dremel: Cutting wheel bit
-Lanard Blast Bazooka
-Screwdriver
-Electrical Tape
-Rubber Safe (In this cape, e-tape safe) lubricant
That should be all...let's get started. First, buy a LBB. This is the best stock picture I can get you, since I took all of these pictures after modification.
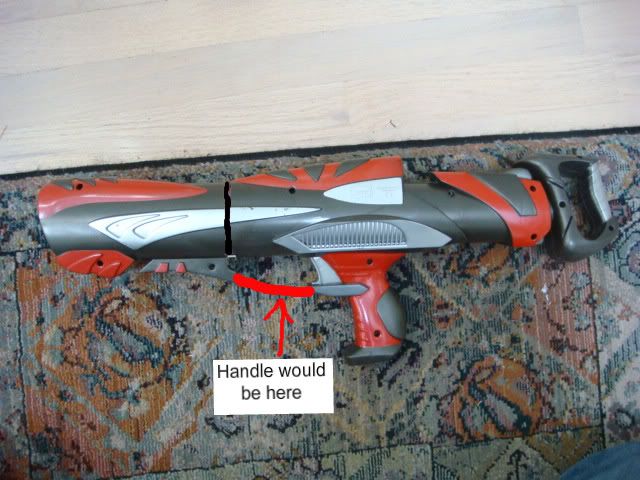
Now I do not have a picture for the next step, but the next step is to open up the gun, and cut off the stock orange barrel about 1/3in away from the lip of the air tank. Now, lets assume that you did this step, and then closed your gun back up.
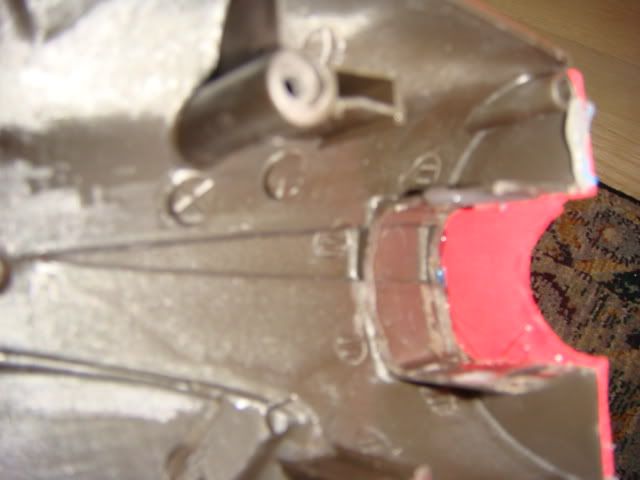
Now, Cut where the line is shown. If you are looking at your gun from the inside, your cut should line up with the wall separating the front empty shell piece, from the section with the internals.
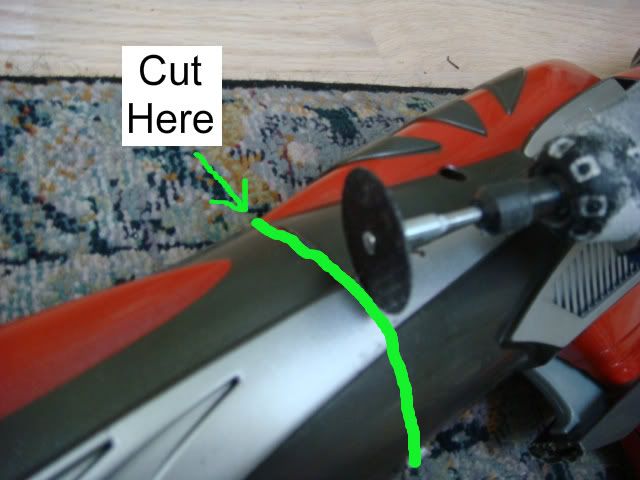
Now, your gun should look like this. (this picture was taken without the internals inside, so don't mind the absence of the pump and the trigger.)
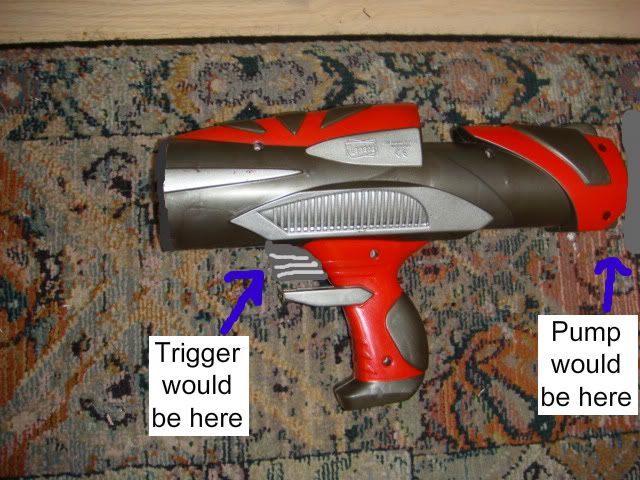
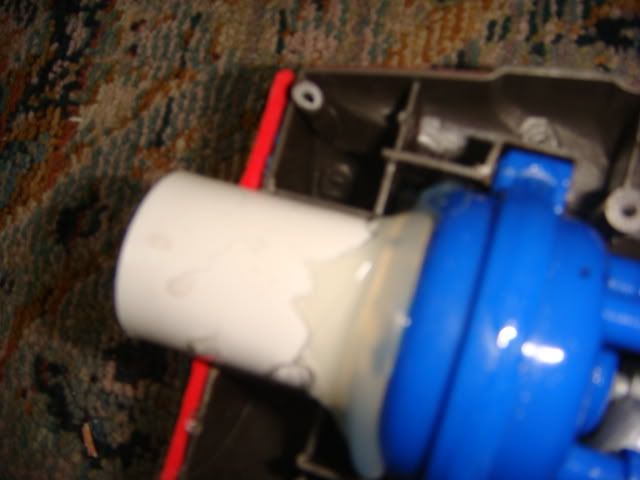
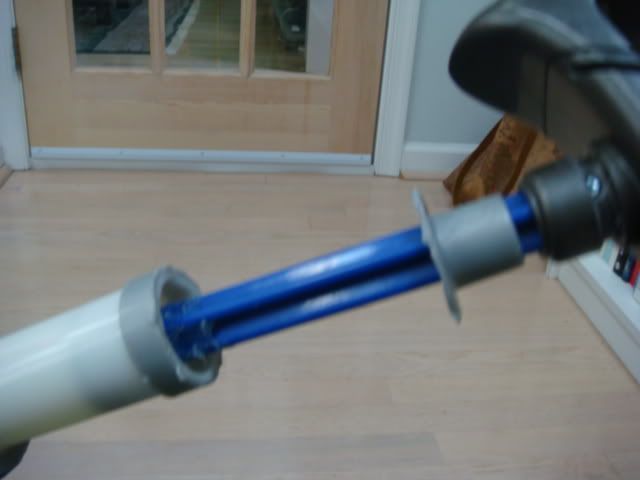
Open your gun back up (if not already opened) and pull out the air tank. It should come out as one piece with the pump and the trigger. Once you have your tank out of the shell, glue a 1/2in PVC coupler to the tank. Center it as best as you can, so that the stub from where you cut off the original barrel, is seen down the center of the coupler. Use hot glue and super glue or whatever the hell you want, until your satisfied that the coupler ain't coming off.
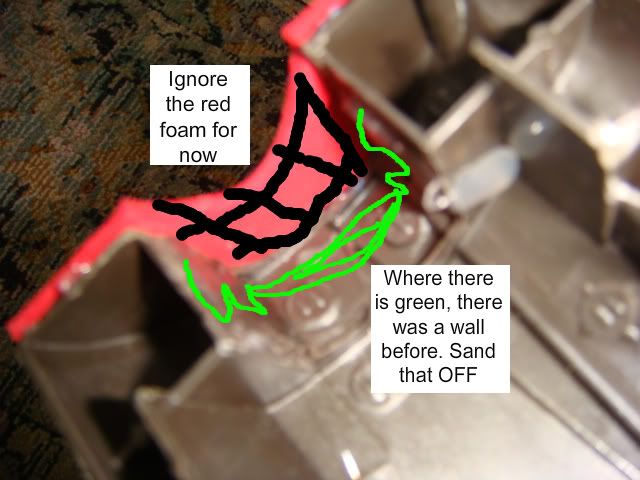
In order to get the internals to fit back into the gun, you have to sand out the center wall on the inside, that used to surround the stock barrel. Do this to both sides.
First half (Ignore the red foam for now)
Second Half (Once again, ignore the red foam for now)
Now, your internals should fit perfectly, and the coupler should sit nice and happy inside the are where you just sanded off the wall.
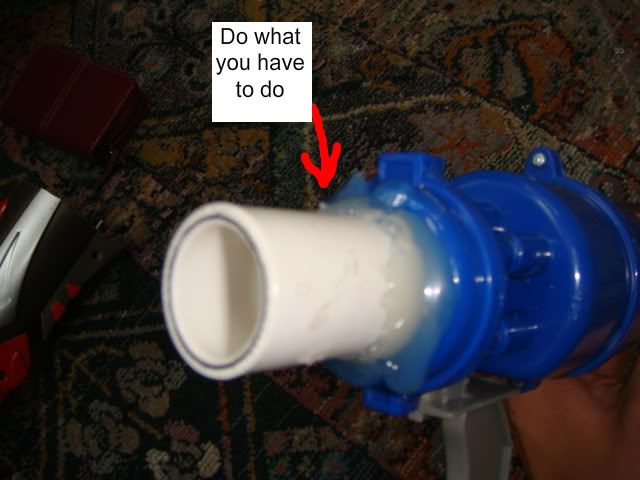
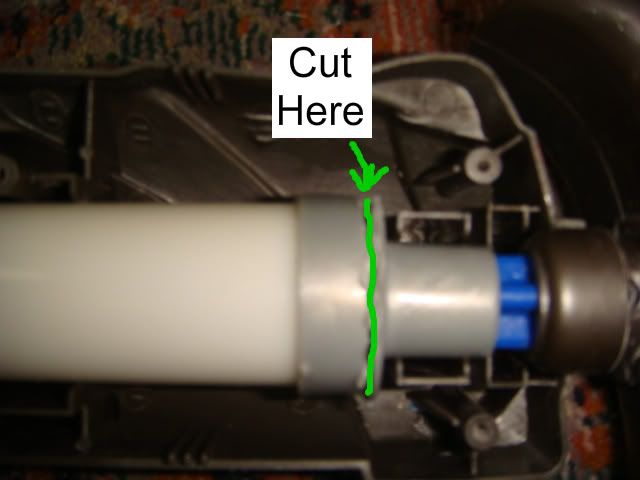
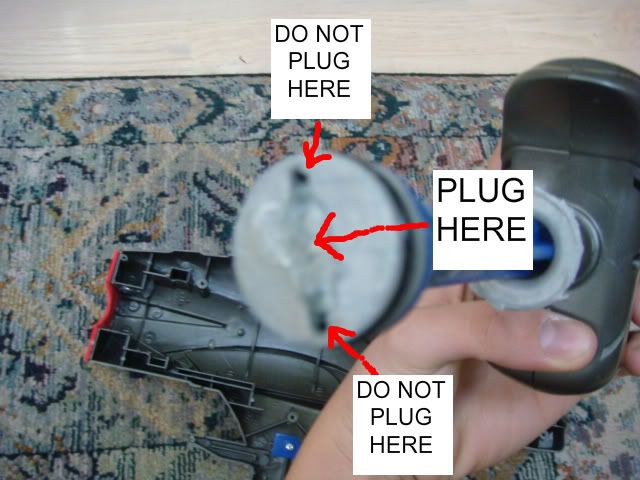
Now, we move on to plugging the pump. To do this, you must carefully use your dremel to cut off the end of the gray piece that holds the pump in the plunger tube. When you make this cut, make sure that the plunger head is pushed all the way into the plunger tube so that you don't risk cutting into it. This picture should help.
After you make that cut, you should be able to pull the pump all the way out, and get access to the over pressure release valve.
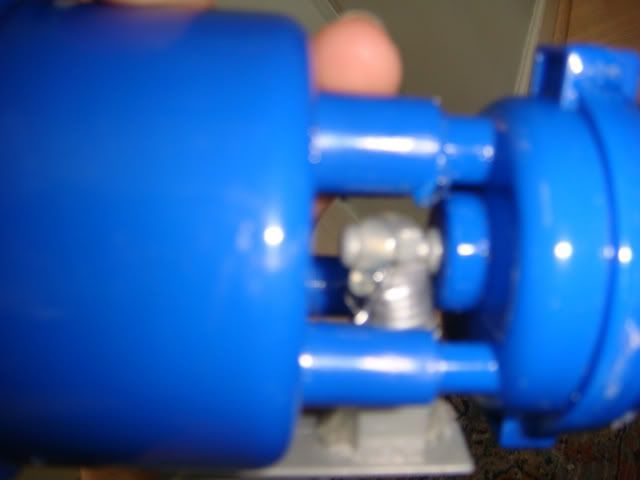
Now, plug the OVP with hotglue. To do this, you must fill the CENTER hole on the plunger head (NOT THE TWO SIDE ONES), and the 4 holes on the side of the shaft.
Front:
Side:

The last internal step, is to glue the trigger to the air tank pin. The lbb is known for its weak trigger, and glueing the trigger to the pin reduces stress on the part of the trigger that frequently breaks, and balances the stress on the entire trigger. MAKE SURE NOT TO GLUE THE PIN OR THE TRIGGER TO THE TANK
Now your internals should fit nice and cleanly back into place. We are now done with internal mods.
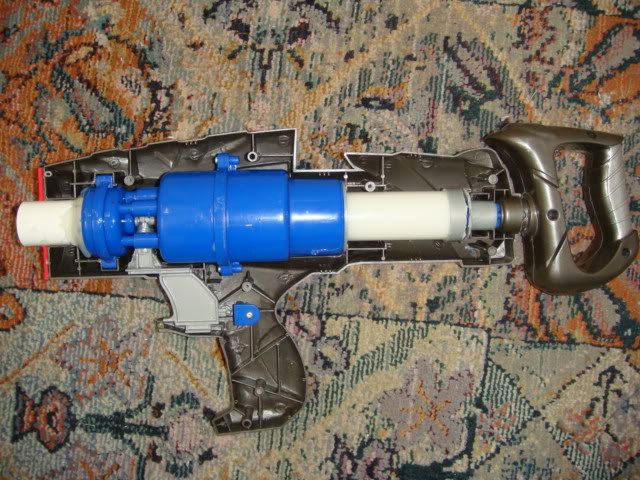
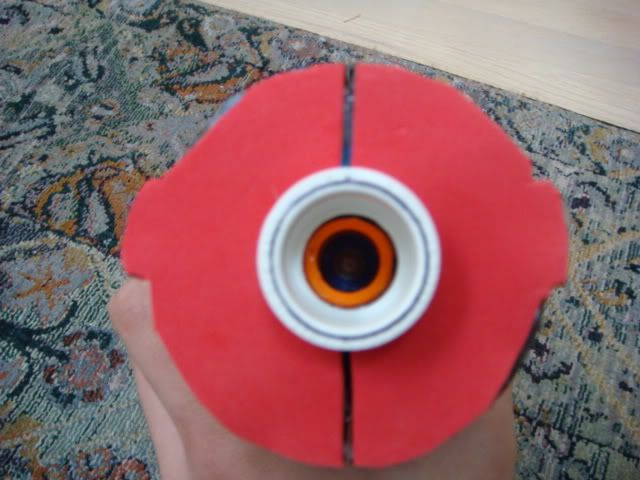
After you close the gun up, their will be a rectangular hole left from where you sanded down the internal wall to fit the coupler in place. To cover up this hole. I cut a piece of 1/8in foam sheet to the shape of the front of the lbb, and simply glued it onto the outer ring of the shell. Then, I cut a slit down the center with an exacto knife so that the gun could be opened without tearing the foam. This picture should explain.
BREECH HALF COMING-----DO NOT POST
This will be a full instructional guide on how to do the following mods to your LBB.
Materials needed:
-Aprox. 15in of 1/2in PVC
-(2) 1/2 in PVC coupler
-1/2in of 1/2in CPVC
-12 in of brass (or any barrel material that can easily fit inside of 1/2 PVC)
-Hot Glue
-Super Glue
-Any other preferred adhesives
-1/16in foam sheet
-Dremel
-Dremel: Sanding Bit
-Dremel: Cutting wheel bit
-Lanard Blast Bazooka
-Screwdriver
-Electrical Tape
-Rubber Safe (In this cape, e-tape safe) lubricant
That should be all...let's get started. First, buy a LBB. This is the best stock picture I can get you, since I took all of these pictures after modification.
Now I do not have a picture for the next step, but the next step is to open up the gun, and cut off the stock orange barrel about 1/3in away from the lip of the air tank. Now, lets assume that you did this step, and then closed your gun back up.
Now, Cut where the line is shown. If you are looking at your gun from the inside, your cut should line up with the wall separating the front empty shell piece, from the section with the internals.
Now, your gun should look like this. (this picture was taken without the internals inside, so don't mind the absence of the pump and the trigger.)
Open your gun back up (if not already opened) and pull out the air tank. It should come out as one piece with the pump and the trigger. Once you have your tank out of the shell, glue a 1/2in PVC coupler to the tank. Center it as best as you can, so that the stub from where you cut off the original barrel, is seen down the center of the coupler. Use hot glue and super glue or whatever the hell you want, until your satisfied that the coupler ain't coming off.
In order to get the internals to fit back into the gun, you have to sand out the center wall on the inside, that used to surround the stock barrel. Do this to both sides.
First half (Ignore the red foam for now)
Second Half (Once again, ignore the red foam for now)
Now, your internals should fit perfectly, and the coupler should sit nice and happy inside the are where you just sanded off the wall.
Now, we move on to plugging the pump. To do this, you must carefully use your dremel to cut off the end of the gray piece that holds the pump in the plunger tube. When you make this cut, make sure that the plunger head is pushed all the way into the plunger tube so that you don't risk cutting into it. This picture should help.
After you make that cut, you should be able to pull the pump all the way out, and get access to the over pressure release valve.
Now, plug the OVP with hotglue. To do this, you must fill the CENTER hole on the plunger head (NOT THE TWO SIDE ONES), and the 4 holes on the side of the shaft.
Front:
Side:
The last internal step, is to glue the trigger to the air tank pin. The lbb is known for its weak trigger, and glueing the trigger to the pin reduces stress on the part of the trigger that frequently breaks, and balances the stress on the entire trigger. MAKE SURE NOT TO GLUE THE PIN OR THE TRIGGER TO THE TANK
Now your internals should fit nice and cleanly back into place. We are now done with internal mods.
After you close the gun up, their will be a rectangular hole left from where you sanded down the internal wall to fit the coupler in place. To cover up this hole. I cut a piece of 1/8in foam sheet to the shape of the front of the lbb, and simply glued it onto the outer ring of the shell. Then, I cut a slit down the center with an exacto knife so that the gun could be opened without tearing the foam. This picture should explain.
BREECH HALF COMING-----DO NOT POST
Dtg Titan Integration
19 September 2008 - 05:35 PM
Pretty good integration dude, now integrate the red DTB with something red... like the Titan

I didn't even see this post by b00m13 while reading OfAllTheNerf's longshot Dtg integration thread until after I did this mod. I don't know if it's been done before, but if not, hoorah.
So lying around I had a screwed up red Dtg, and a boring old Pvc Titan. The Dtg had an old rotten rubber band inside it, and I had to open up the gun to get it out. After I opened it up, I looked at the empty spaces inside of it, and than at my Titan (Ahh Hah!). I decided to integrate the Dtg into the Titan where the hornet is supposed to go, since I destroyed all the shit that lets you fire the hornet anyway. I cut off the front handle of the Dtg completely, and the back handle until I hit the trigger. Than, it was just a matter of some adhesive.
The Dtg has standard mods, Ar removal, slight spring replacement. The Titan has a 1/2 inch Pvc coupler inside the original orange barrel, obviously allowing any 1/2 inch Pvc attachment to be used. Since the coupler is all the way down the orange barrel, right next to the air tank, the big black missle can still be fired. Just for the sphincter of it, I wrote "The Man" on the side with hotglue, than coloured it in with good ol' sharpie. On top of the gun is a gay little piece of Pvc my brother wanted to glue on as a scope, but it works worse than the original "scope" that the Titan had stock. Now, pictures with my new camera, I think they came out pretty well.
Here is the gun without the Pvc barrel-

The Dtg close-up-

The trigger of the Dtg-

The full gun, barrel attached-

1st personish view-
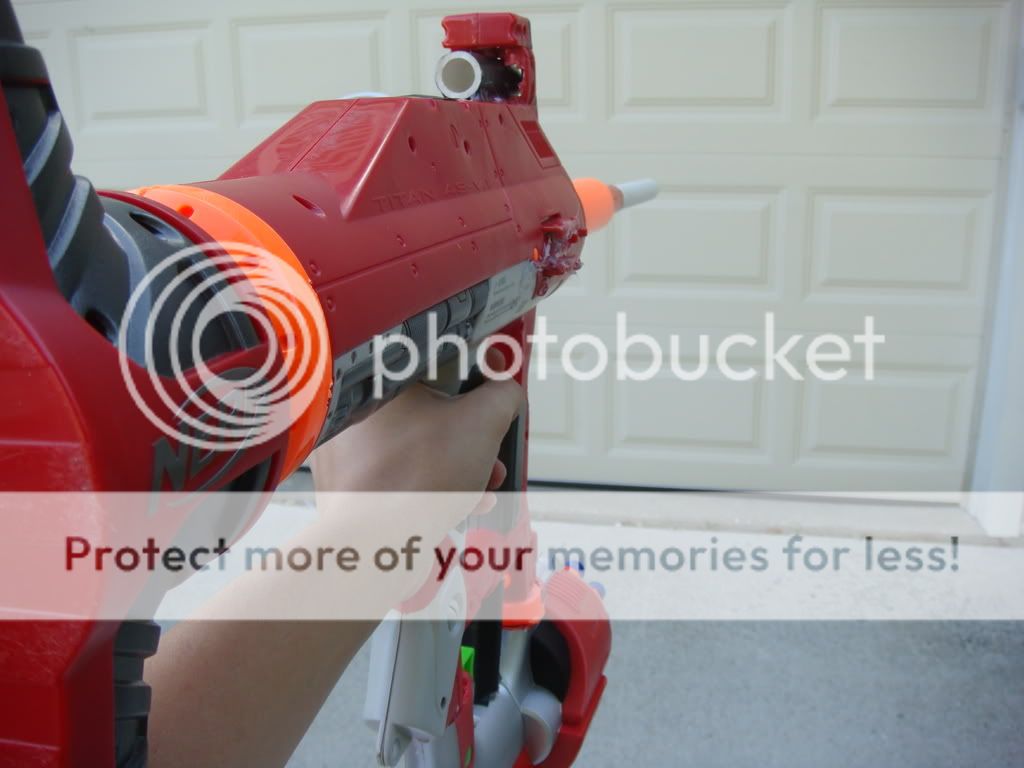
My aunt holding the gun-

A close-up on "The Man"

And lastly, a view down the barrel at the coupler-

The ranges for the Titan with stock micro darts (I dont really use stefans) are about 100-120 ft.
The Dtg with stock micro darts gets about 40-45 ft.
This gun is officially my new primary, I hoped you like it.
Questions? Comments?

