What did you use for a lock to keep the barrels erect? And please don't sig me on that.

Hinged Double Barrel Pump Action Shotgun
Started by THIRST, May 19 2009 05:55 PM
43 replies to this topic
#26

X RUSHED X
-

- Members
- 32 posts
Member
Posted 19 May 2009 - 10:55 PM
QUOTE(Hipponater @ Oct 7 2009, 05:34 PM) 
If it feels hard to pump, stop.


#27
THIRST
-
- Members
- 1,099 posts
Member
Posted 19 May 2009 - 11:02 PM
What did you use for a lock to keep the barrels erect? And please don't sig me on that.
14 lb. pull and 25 lb. pull grade 42 and 45 neodynium magnets. Not hard, and thanks.Magnets right? How hard was it to make it seal? Also, your handle is very nice looking as well.
ko
#28
SweetVengence
-

- Members
- 6 posts
Member
Posted 19 May 2009 - 11:02 PM
What did you use for a lock to keep the barrels erect? And please don't sig me on that.
He used magnets. They are the little things on top of where the hinge pivots.
#29
lantus nova
-

- Members
- 4 posts
Member
Posted 19 May 2009 - 11:44 PM
Very, very nice mod, I about crapped when I watched the videos.
Pss: What does PAS stand for?
Pss: What does PAS stand for?
If you try to kill me. . . you will kill me.
-Kasey
-Kasey
#30
Blue
-

- Members
- 2,222 posts
Member
Posted 19 May 2009 - 11:47 PM
Very, very nice mod, I about crapped when I watched the videos.
Pss: What does PAS stand for?
Pump Action Shotgun
Anyways, does the PVC fit so that it's perfectly aligned so that each barrel gets equal airflow, or did you just glue them as best you could? Does one barrel fire better in general?
#31
THIRST
-
- Members
- 1,099 posts
Member
Posted 19 May 2009 - 11:54 PM
They are aligned with equal airflow, and no barrel fires better than the other. Thats just a case of measuring out where you want to drill the holes.Anyways, does the PVC fit so that it's perfectly aligned so that each barrel gets equal airflow, or did you just glue them as best you could? Does one barrel fire better in general?
Edited by THIRST, 19 May 2009 - 11:54 PM.
ko
#32
TED
-

- Administrators
- 1,339 posts
In Brightest Prawn, in Darkest Shrimp...
Posted 20 May 2009 - 01:02 PM
Look at those biceps!
Star Wars can go fuck itself.
#33
Soothsayer
-

- Members
- 663 posts
Member
Posted 21 May 2009 - 12:04 AM
Double barrel aside, this is a brilliant idea for coupler'd guns all around. Definitely gonna have to make my own design...
yeah I'm that guy who made that cool thing with the cool paint.
#34
Crankymonky
-

- Members
- 687 posts
It's The Dean!
Posted 21 May 2009 - 02:25 AM
Double barrel aside, this is a brilliant idea for coupler'd guns all around. Definitely gonna have to make my own design...
The fact that the barrel stays attached to the gun makes loading easier, since you have one hand totally free (not holding your coupler'd barrel). However, one thing you do have to get use to is that when running, if shaking the gun too much and the barrel comes partially up, it can lock into place. That is, the magnets are strong enough to close the hinge if you bring barrel part of the way up. Using weaker magnets might still allow it to be airtight while pulling the barrel in until it the hinge is fully closed.
Tyranny Response Team
#35
THIRST
-
- Members
- 1,099 posts
Member
Posted 21 May 2009 - 12:28 PM
Double barrel aside, this is a brilliant idea for coupler'd guns all around. Definitely gonna have to make my own design...
The fact that the barrel stays attached to the gun makes loading easier, since you have one hand totally free (not holding your coupler'd barrel). However, one thing you do have to get use to is that when running, if shaking the gun too much and the barrel comes partially up, it can lock into place. That is, the magnets are strong enough to close the hinge if you bring barrel part of the way up. Using weaker magnets might still allow it to be airtight while pulling the barrel in until it the hinge is fully closed.
Putting a small peice of ducktape on the underside of the hinge reduces movement, making it easier to load, while still being able to flip it up. I could use another magnet setup to make the barrel stay down in the loading position, but then I wouldn't be able to flip it up. Anyways the ducktape is an easy solution.
ko
#36
Ambience 327
-

- Members
- 561 posts
Member
Posted 21 May 2009 - 01:06 PM
You could try a set of weaker magnets to make it stay down - but getting the right strength to hold it steady but still allow it to be flipped up easily would be a balancing act. Might be worth the effort, might not. The fact that the entire barrel assembly is on a coupler makes expirimentation a lot easier though - just build another break-action breech with magnets at both ends and see if you can make it work - if not, you just go back to this model.
Foam in the Fort IV
The fourth exciting Nerf War in Fort Wayne, IN.
The fourth exciting Nerf War in Fort Wayne, IN.
#37
THIRST
-
- Members
- 1,099 posts
Member
Posted 24 July 2009 - 05:27 PM
This is a writeup for a break action barrel system. I have it attached to a PAS and with two barrels, but it can easily be adapted for a single barrel and any other gun. I have used CPVC, but as always, any barrel material will work.

Action
2 Darts
4 Darts
6 Darts
8 Darts
2 Darts: 90 feet
4 Darts: 80 feet
6 Darts: 70 feet
8 Darts: 60 feet.
Theres variation among the dart ranges within each set, (ex. 6 darts: 1 got 93, 2 got 60ish, etc), but those are the averages. Every 2 darts added decreases range by 10 feet approxamately.
Action
2 Darts
4 Darts
6 Darts
8 Darts
2 Darts: 90 feet
4 Darts: 80 feet
6 Darts: 70 feet
8 Darts: 60 feet.
Theres variation among the dart ranges within each set, (ex. 6 darts: 1 got 93, 2 got 60ish, etc), but those are the averages. Every 2 darts added decreases range by 10 feet approxamately.
Edited by THIRST, 25 July 2009 - 01:04 AM.
ko
#38
THIRST
-
- Members
- 1,099 posts
Member
Posted 24 July 2009 - 05:29 PM
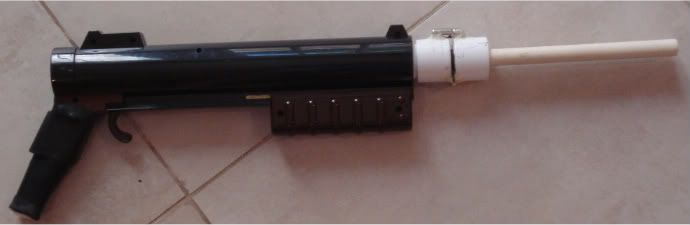
This will be a writeup for the double barrel, break action Pump Action Shotgun. The bulk of the mod writeup will consist of the barrel assembly, but for the sake of completeness, I will include information on how to attach it to a Pump Action Shotgun and how to mod one.
First, we will cut the stock off the PAS and then shorten the handle, in the manner shown below. This was done merely for the sake of comfort, as we will be extending the handle.
I used a piece of 1/2” PVC as the center of my handle, the pieces surrounding it are 3/4”. You should make it long enough so it is comfortable for you.
You will need to drill two 1” PVC endcaps in this manner. These should be centered as your barrels will attach to this. I used a 1/2” drill bit to drill the holes, they should be the same size as your barrel’s inner diameter. Make sure the distance between them will match the distance between your two barrels. The spacing will differ for each barrel material. How far apart they should be will become apparent once we glue the barrels together.
Now you will epoxy one half of the hinge to this end cap, in the manner shown below. Make sure you make it so the hinge goes the correct way. When the hinge is closed, both halves will rest on top of this end cap.
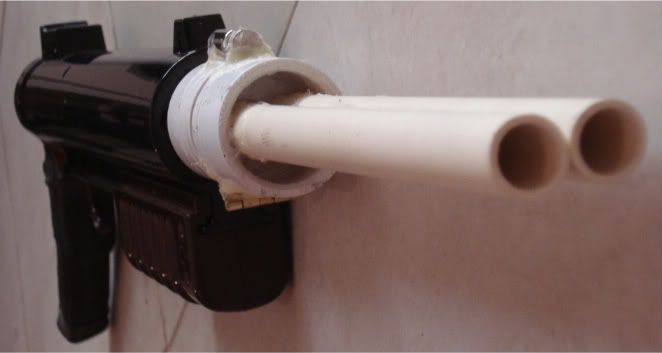
Take your two barrels and epoxy them together. I placed tape around them only to make sure they dry properly, in-place, and flush. The tape will be removed once the epoxy is completely dry. I have drilled out one end of the barrels so it is slightly easier to fit darts in.
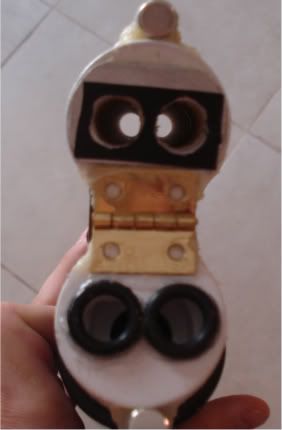
On the end cap you haven’t glued the hinge to, you should use Plumber’s Goop to connect two o-rings to the hole. I used 1/2” o-rings, the thickness should match the distance between the two endcaps, when they are both attached to the hinge. The end-caps must be completely straight when the hinge is closed.

Epoxy the barrels into the end cap that is glued to the hinge as shown, make sure the barrels overlap the holes you drilled. Use plumber’s goop to at the base. The end you drilled out slightly will be closer to the end cap.
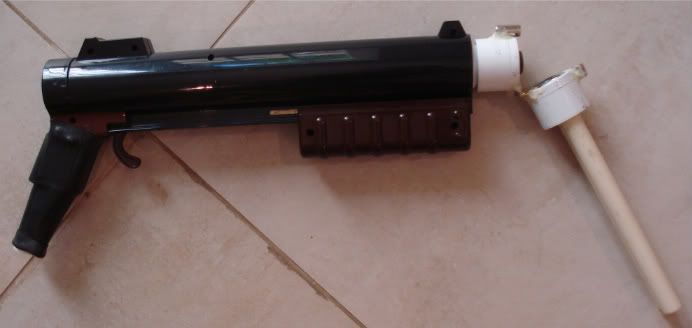
We will now attach the two end caps via the hinge. Use epoxy to connect the hinge to the other end cap.
It will close in the manner shown below.
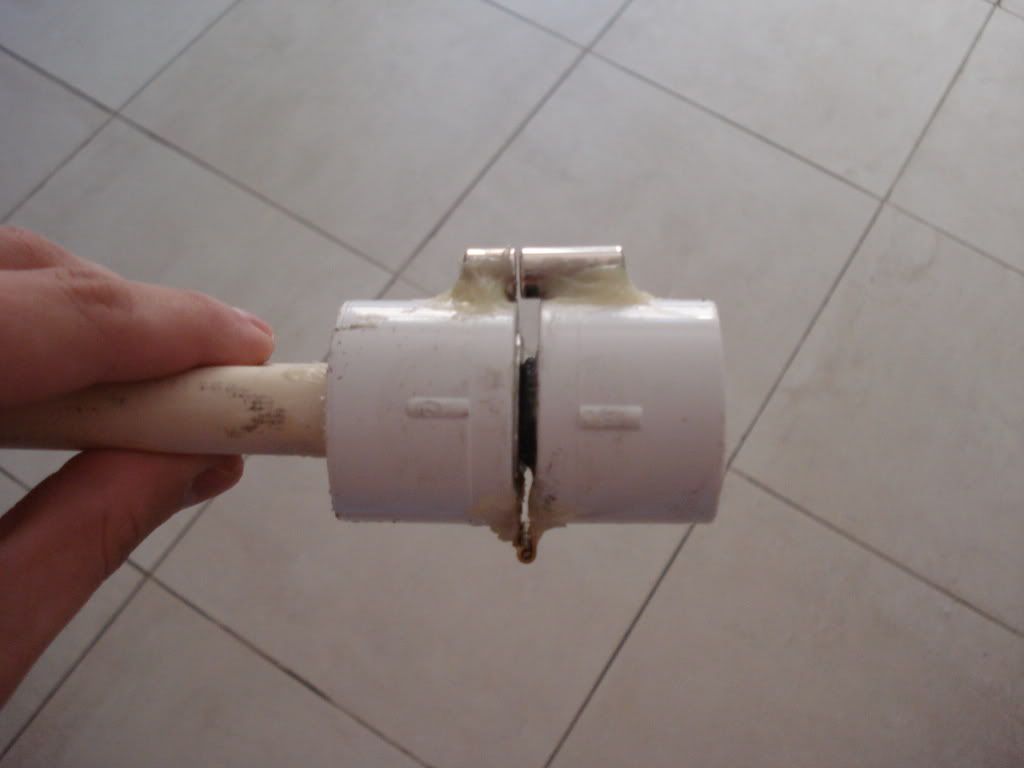
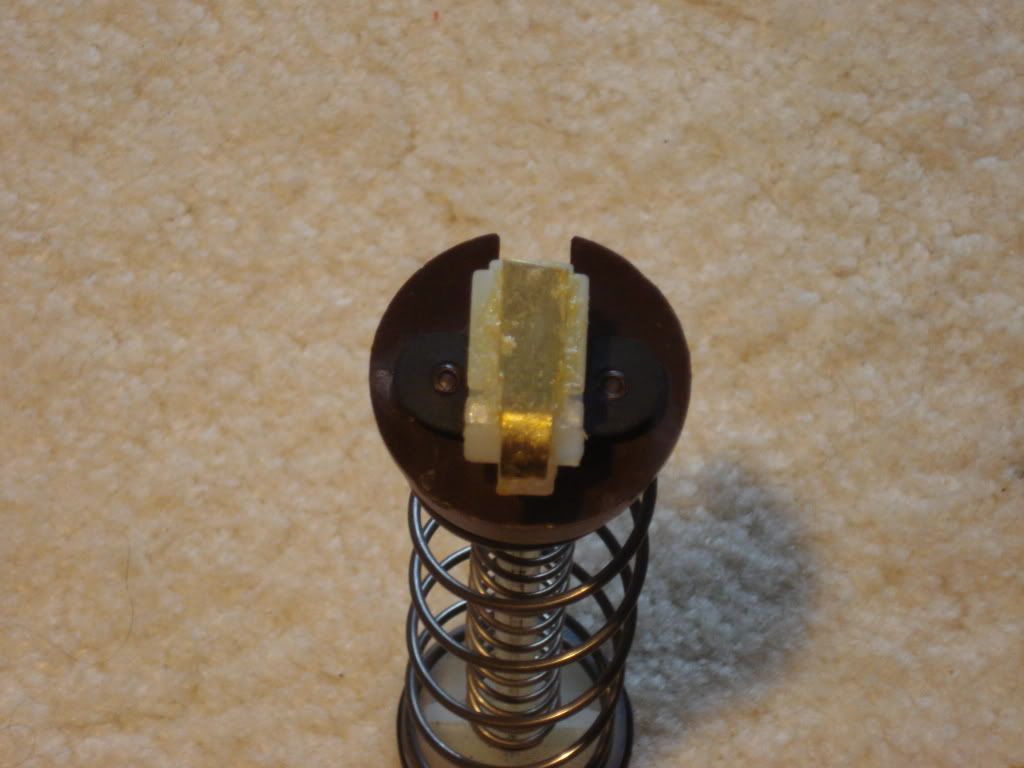
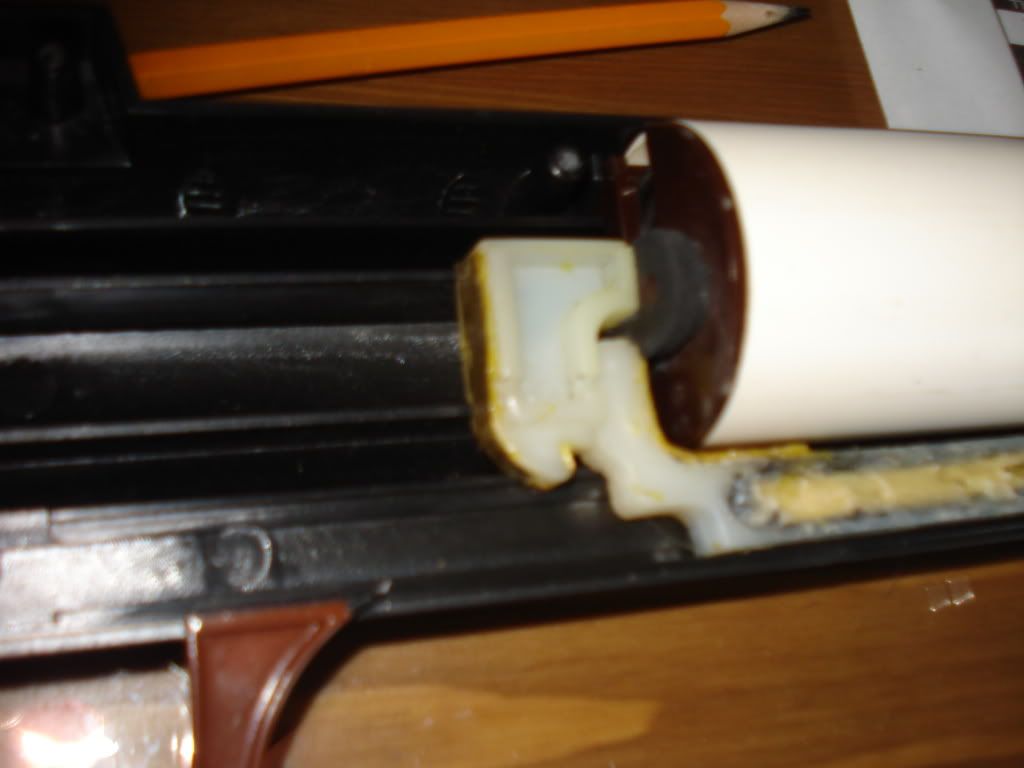
We will attach a 1/2” to 3/4” PVC bushing to the PAS’ plunger cap. The OD of this top of the bushing is 1”, the ID is 3/4”. On the bottom, the ID is 1/2” and fits perfectly over the PAS’ brown plunger cap. Once again, we will use a combination of epoxy and plumber’s goop. The epoxy will hold the piece on, the goop will be used to make sure there no air leaks.

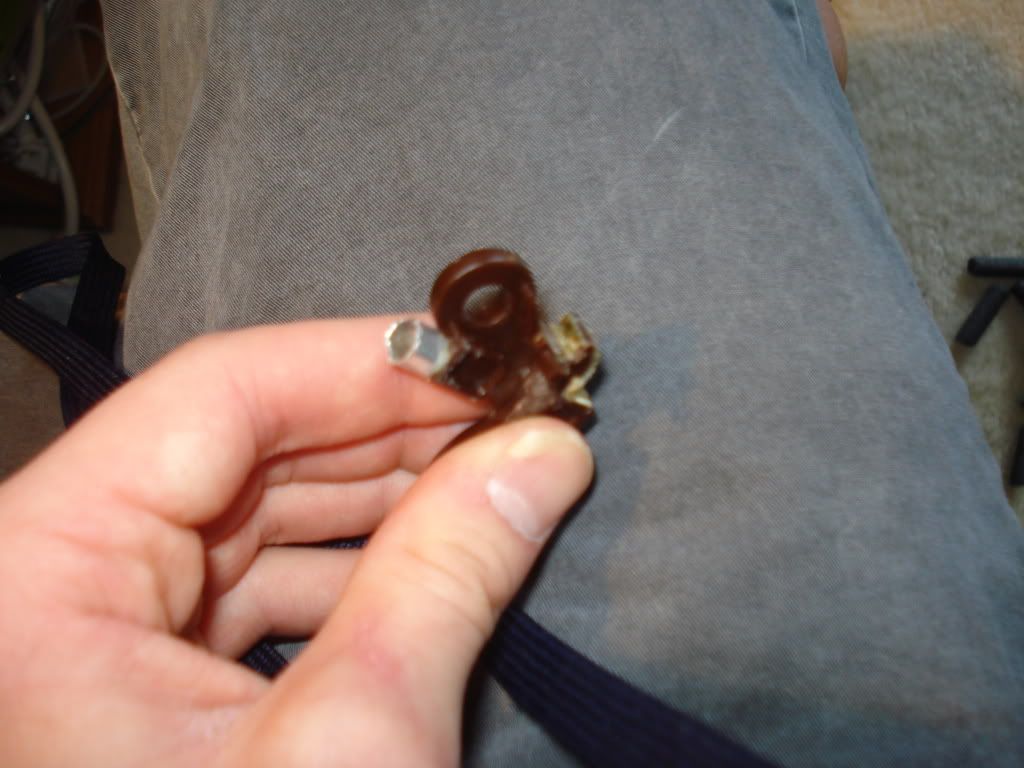
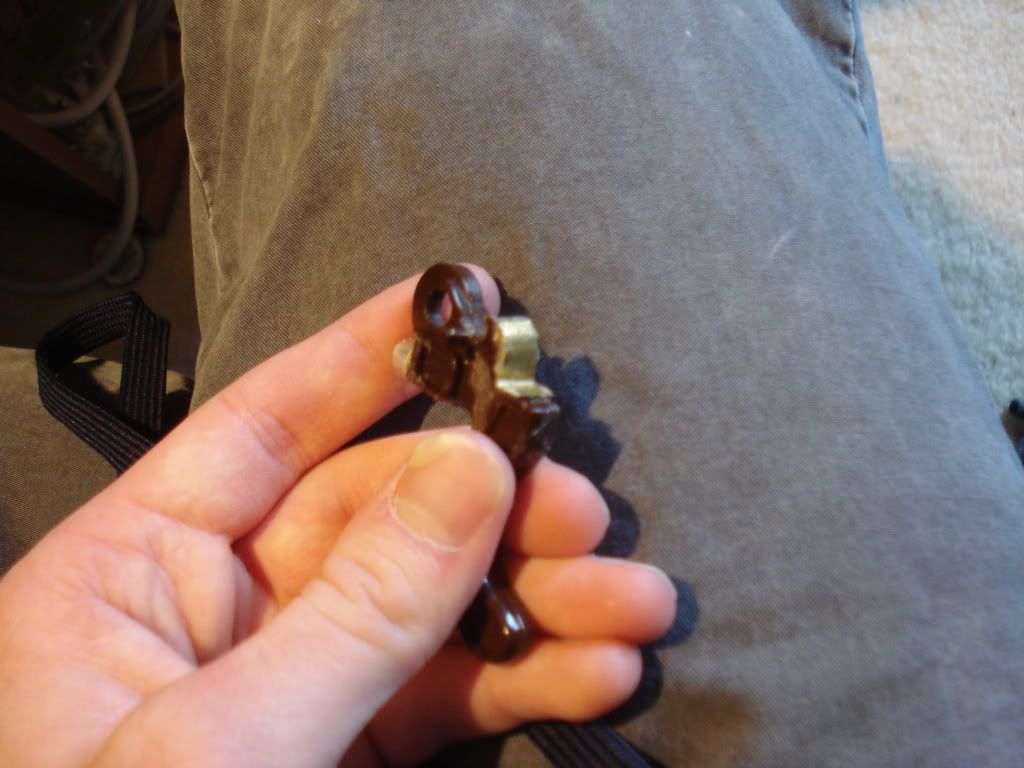
You will now cut a space for the hexagonal base of the bushing. You can use a dremel or metal file to make the bushing fit. Then place the PAS’ plunger cap back in the gun.
It’s important you have let the hinge set and cure for the full length before doing this step. On the end cap without the o-rings, epoxy on a piece of aluminum sheet metal, make sure to drill it out where the holes for the barrel are. I used 0.1” sheet metal, but what you use may differ based on the size of your hinge and o-rings. Once again, we are doing this to create a perfect seal between the two end caps. I have also placed a single layer of e-tape with circles cut out for the barrel.
It’s very important that this seal is air tight. Attach neodynium magnets to the top of the end caps with epoxy, making sure opposite poles face eachother. I used a 14 lb and a 22 lb magnet. What strength you use is a matter of personal opinion. I imagine anything over 10 lb will be strong enough to seal the hinges. You can see that my magnets are not flush, this will prevent the magnets from slamming together and breaking the epoxy’s bond.
Your barrel is now complete.
First, we will cut the stock off the PAS and then shorten the handle, in the manner shown below. This was done merely for the sake of comfort, as we will be extending the handle.
I used a piece of 1/2” PVC as the center of my handle, the pieces surrounding it are 3/4”. You should make it long enough so it is comfortable for you.
You will need to drill two 1” PVC endcaps in this manner. These should be centered as your barrels will attach to this. I used a 1/2” drill bit to drill the holes, they should be the same size as your barrel’s inner diameter. Make sure the distance between them will match the distance between your two barrels. The spacing will differ for each barrel material. How far apart they should be will become apparent once we glue the barrels together.
Now you will epoxy one half of the hinge to this end cap, in the manner shown below. Make sure you make it so the hinge goes the correct way. When the hinge is closed, both halves will rest on top of this end cap.
Take your two barrels and epoxy them together. I placed tape around them only to make sure they dry properly, in-place, and flush. The tape will be removed once the epoxy is completely dry. I have drilled out one end of the barrels so it is slightly easier to fit darts in.
On the end cap you haven’t glued the hinge to, you should use Plumber’s Goop to connect two o-rings to the hole. I used 1/2” o-rings, the thickness should match the distance between the two endcaps, when they are both attached to the hinge. The end-caps must be completely straight when the hinge is closed.
Epoxy the barrels into the end cap that is glued to the hinge as shown, make sure the barrels overlap the holes you drilled. Use plumber’s goop to at the base. The end you drilled out slightly will be closer to the end cap.
We will now attach the two end caps via the hinge. Use epoxy to connect the hinge to the other end cap.
It will close in the manner shown below.
We will attach a 1/2” to 3/4” PVC bushing to the PAS’ plunger cap. The OD of this top of the bushing is 1”, the ID is 3/4”. On the bottom, the ID is 1/2” and fits perfectly over the PAS’ brown plunger cap. Once again, we will use a combination of epoxy and plumber’s goop. The epoxy will hold the piece on, the goop will be used to make sure there no air leaks.
You will now cut a space for the hexagonal base of the bushing. You can use a dremel or metal file to make the bushing fit. Then place the PAS’ plunger cap back in the gun.
It’s important you have let the hinge set and cure for the full length before doing this step. On the end cap without the o-rings, epoxy on a piece of aluminum sheet metal, make sure to drill it out where the holes for the barrel are. I used 0.1” sheet metal, but what you use may differ based on the size of your hinge and o-rings. Once again, we are doing this to create a perfect seal between the two end caps. I have also placed a single layer of e-tape with circles cut out for the barrel.
It’s very important that this seal is air tight. Attach neodynium magnets to the top of the end caps with epoxy, making sure opposite poles face eachother. I used a 14 lb and a 22 lb magnet. What strength you use is a matter of personal opinion. I imagine anything over 10 lb will be strong enough to seal the hinges. You can see that my magnets are not flush, this will prevent the magnets from slamming together and breaking the epoxy’s bond.
Your barrel is now complete.
Edited by THIRST, 25 July 2009 - 12:36 AM.
ko
#39
THIRST
-
- Members
- 1,099 posts
Member
Posted 24 July 2009 - 05:30 PM
Now we will modify the gun.
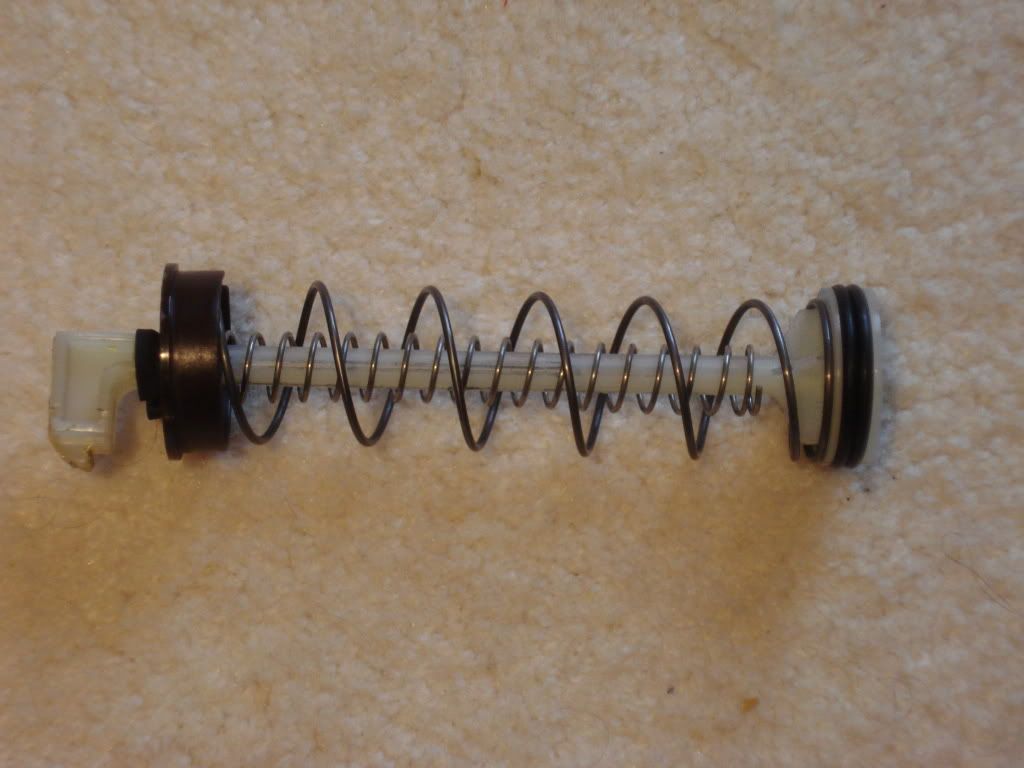
The spring addition we will be using is the Ace hardware #115. You can see it below, inside the stock spring.
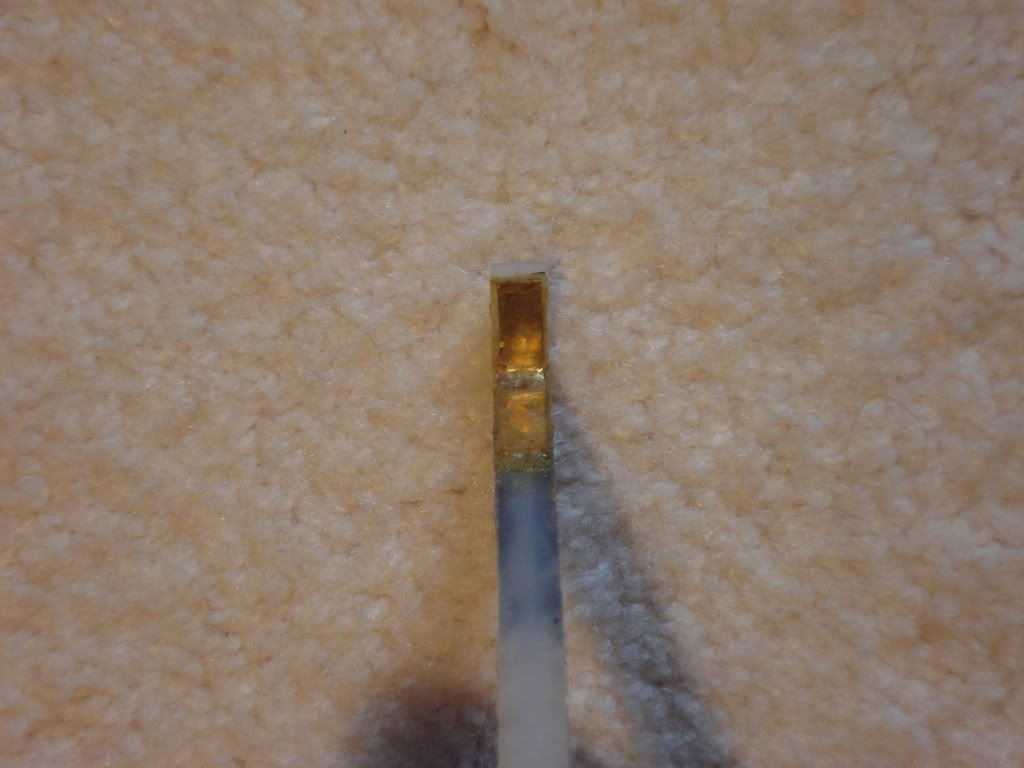
First we will reinforce the priming bar. Cut pieces of 0.15” brass and place them as shown. Glue epoxy below and above the pieces.
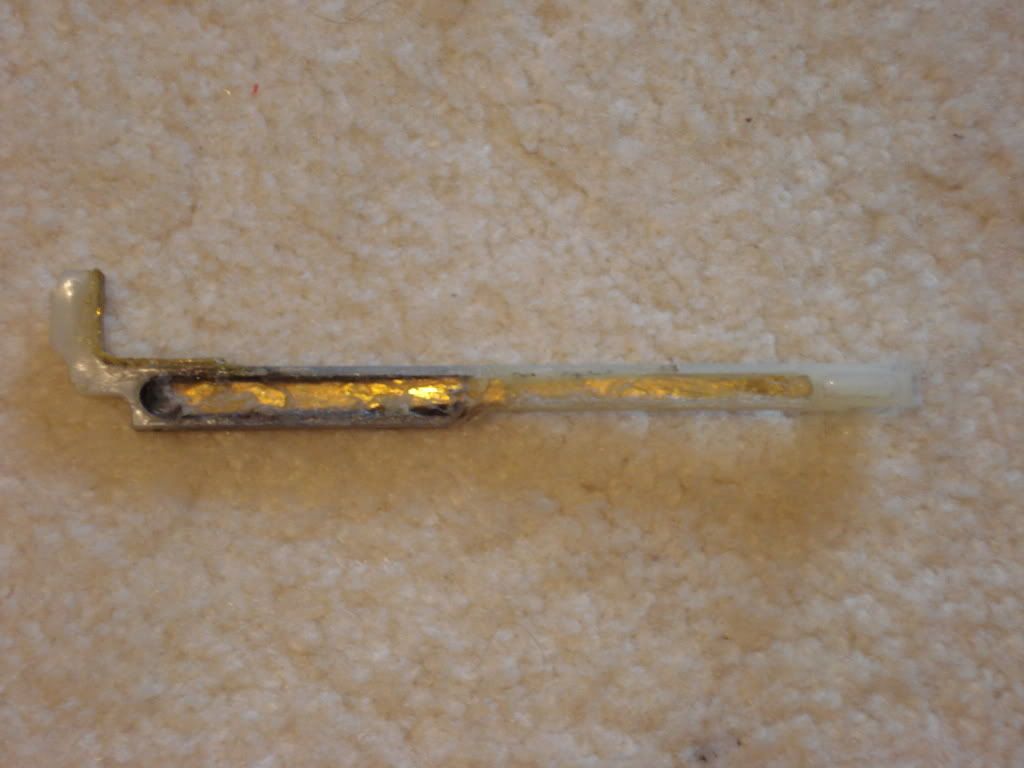
Then use 0.05” brass to reinforce the “L” shape of the priming bar. I used a combination of epoxy and another metal-plastic adhesive that has some flex.
Reinforce the end of the Plunger rod as shown below. Use a 0.05” brass One again, a combination of epoxy and another adhesive.
Now we will do the same thing the the reverse side, the tip of this end of the plunger rod.
Now reinforce both sides of where the trigger catches the plunger rod. Once again, 0.05” brass with epoxy and another adhesive.
Now we will reinforce the catch spring. First we cut a small section of K&S stock #106, 1/4 x 0.014 “ Rd Aluminum Tube. Epoxy this onto the trigger as shown. Our catch springs will line go inside this.
Cut a piece of sheet metal and epoxy it to the spring hole as shown. Then cut another piece of the aluminum tube that is slightly longer, and epoxy it to the sheet metal. Then place two new catch springs inside the tube. I used two springs that nested inside each other, each from a different “clicky-pen.”
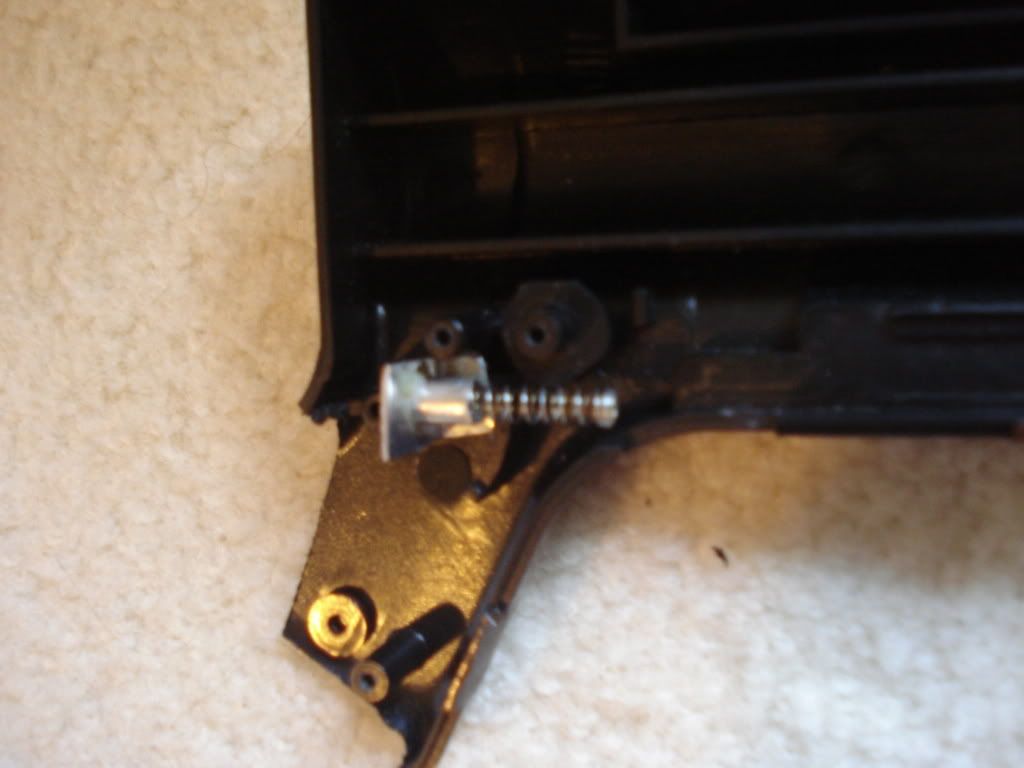
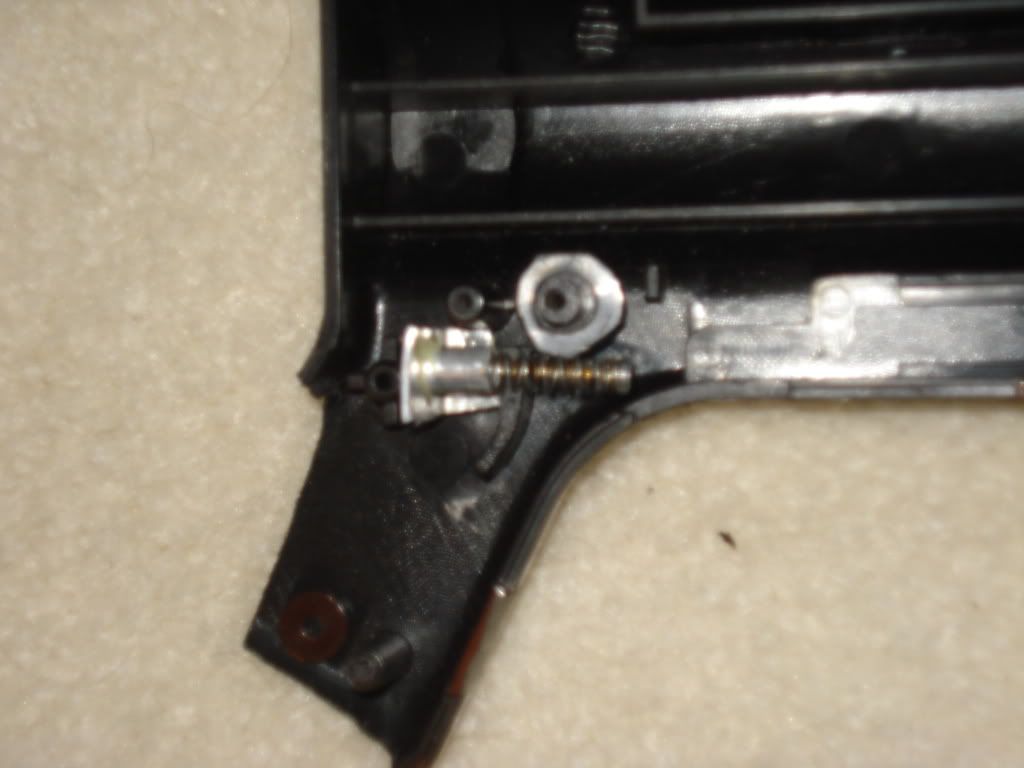

When reassembling the trigger system, place the new catch spring inside the aluminum tubing on both the trigger and the aluminum tubing on the sheet metal. Keep the stock torsion spring in as an additional catch spring.
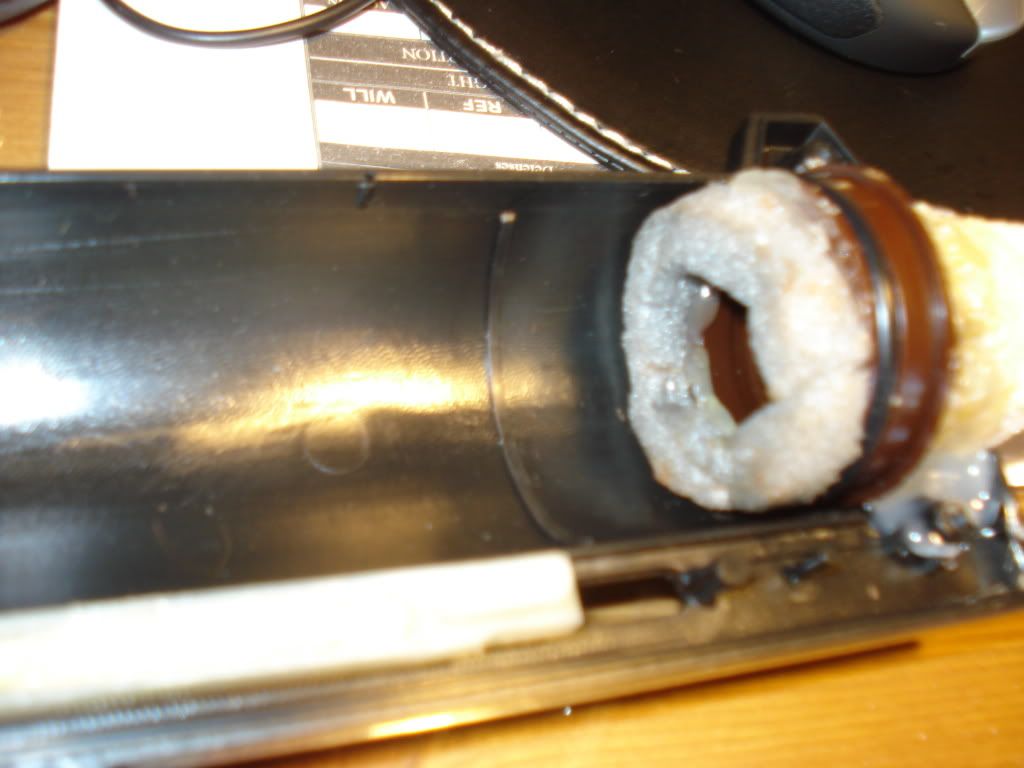
Now we will place some foam padding on the plunger cap. I used FBR and cut it down to fit. You don’t want it to reduce the overall draw though!
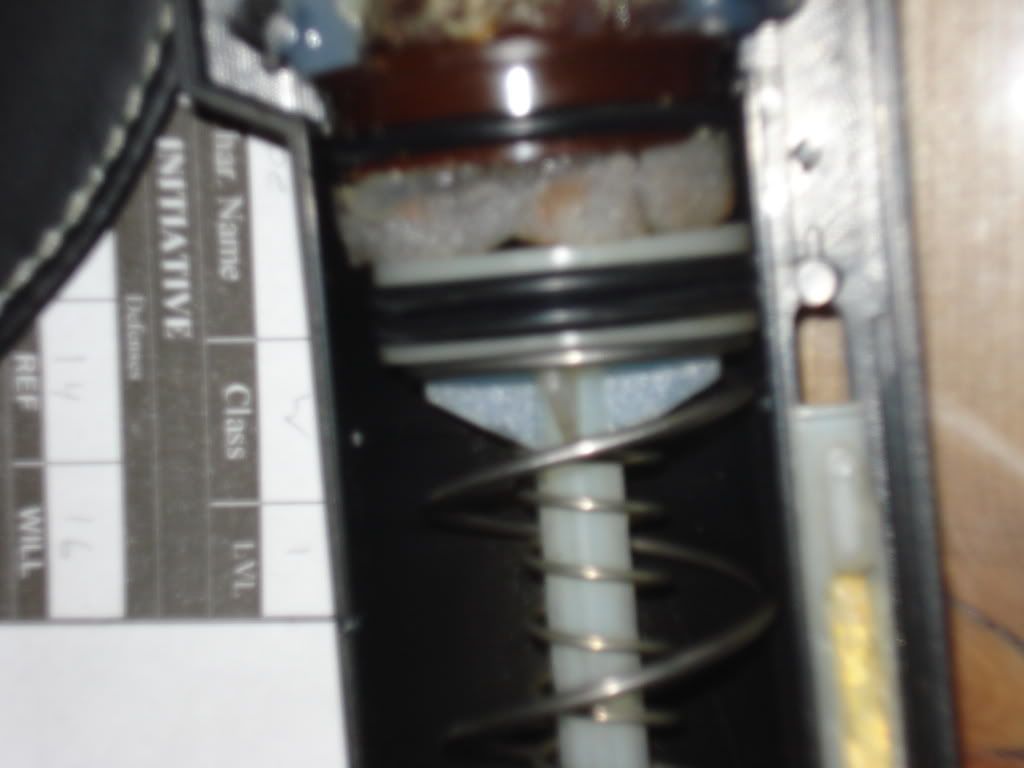
When everything is put back inside the gun, the plunger rod and priming bar will align as shown.
I placed some bike inner tube over my handle now to make it slightly more comfortable. Also, I made a single barrel, PETG inside 3/4” PVC. Goop to make it airtight.
The spring addition we will be using is the Ace hardware #115. You can see it below, inside the stock spring.
First we will reinforce the priming bar. Cut pieces of 0.15” brass and place them as shown. Glue epoxy below and above the pieces.
Then use 0.05” brass to reinforce the “L” shape of the priming bar. I used a combination of epoxy and another metal-plastic adhesive that has some flex.
Reinforce the end of the Plunger rod as shown below. Use a 0.05” brass One again, a combination of epoxy and another adhesive.
Now we will do the same thing the the reverse side, the tip of this end of the plunger rod.
Now reinforce both sides of where the trigger catches the plunger rod. Once again, 0.05” brass with epoxy and another adhesive.
Now we will reinforce the catch spring. First we cut a small section of K&S stock #106, 1/4 x 0.014 “ Rd Aluminum Tube. Epoxy this onto the trigger as shown. Our catch springs will line go inside this.
Cut a piece of sheet metal and epoxy it to the spring hole as shown. Then cut another piece of the aluminum tube that is slightly longer, and epoxy it to the sheet metal. Then place two new catch springs inside the tube. I used two springs that nested inside each other, each from a different “clicky-pen.”
When reassembling the trigger system, place the new catch spring inside the aluminum tubing on both the trigger and the aluminum tubing on the sheet metal. Keep the stock torsion spring in as an additional catch spring.
Now we will place some foam padding on the plunger cap. I used FBR and cut it down to fit. You don’t want it to reduce the overall draw though!
When everything is put back inside the gun, the plunger rod and priming bar will align as shown.
I placed some bike inner tube over my handle now to make it slightly more comfortable. Also, I made a single barrel, PETG inside 3/4” PVC. Goop to make it airtight.
Edited by THIRST, 26 July 2009 - 01:21 AM.
ko
#40
THIRST
-
- Members
- 1,099 posts
Member
Posted 24 July 2009 - 05:31 PM
Action
2 Darts
4 Darts
6 Darts
8 Darts
2 Darts: 90 feet
4 Darts: 80 feet
6 Darts: 70 feet
8 Darts: 60 feet.
Theres variation among the dart ranges within each set, (ex. 6 darts: 1 got 93, 2 got 60ish, etc), but those are the averages. Every 2 darts added decreases range by 10 feet approxamately.
Edited by THIRST, 25 July 2009 - 12:55 AM.
ko
#42
TantumBull
-

- Moderators
- 1,929 posts
Member
Posted 25 July 2009 - 01:07 AM
Nice, I really liked this mod from the first time you posted it. I may have to make a similar attachment for my big blast... but with 4 barrels.
#43
PointBlank
-

- Members
- 528 posts
Member
Posted 25 July 2009 - 11:44 AM
Really great mod, it's to bad you missed the mod contest entry window, this would have done very well.
#44
HOTH
-

- DO NOT TRADE
- 557 posts
Member
Posted 26 July 2009 - 01:28 AM
That is pure sex. Keep up the good work man
My YouTube
Solved the Rubik's Cube in 46 seconds
"Nobody understands quantum mechanics" - Richard Feynman
Solved the Rubik's Cube in 46 seconds
"Nobody understands quantum mechanics" - Richard Feynman
0 user(s) are reading this topic
0 members, 0 guests, 0 anonymous users

