Jump to content


skullface44's Content

There have been 120 items by skullface44 (Search limited from 03-December 96)


By content type

See this member's


Sort by                Order  

#353694 Homemades Picture Thread

Posted by skullface44 on 23 May 2016 - 02:52 PM in Homemades

Never really posted any of my work but here is everything that i have left, I sold most of it  
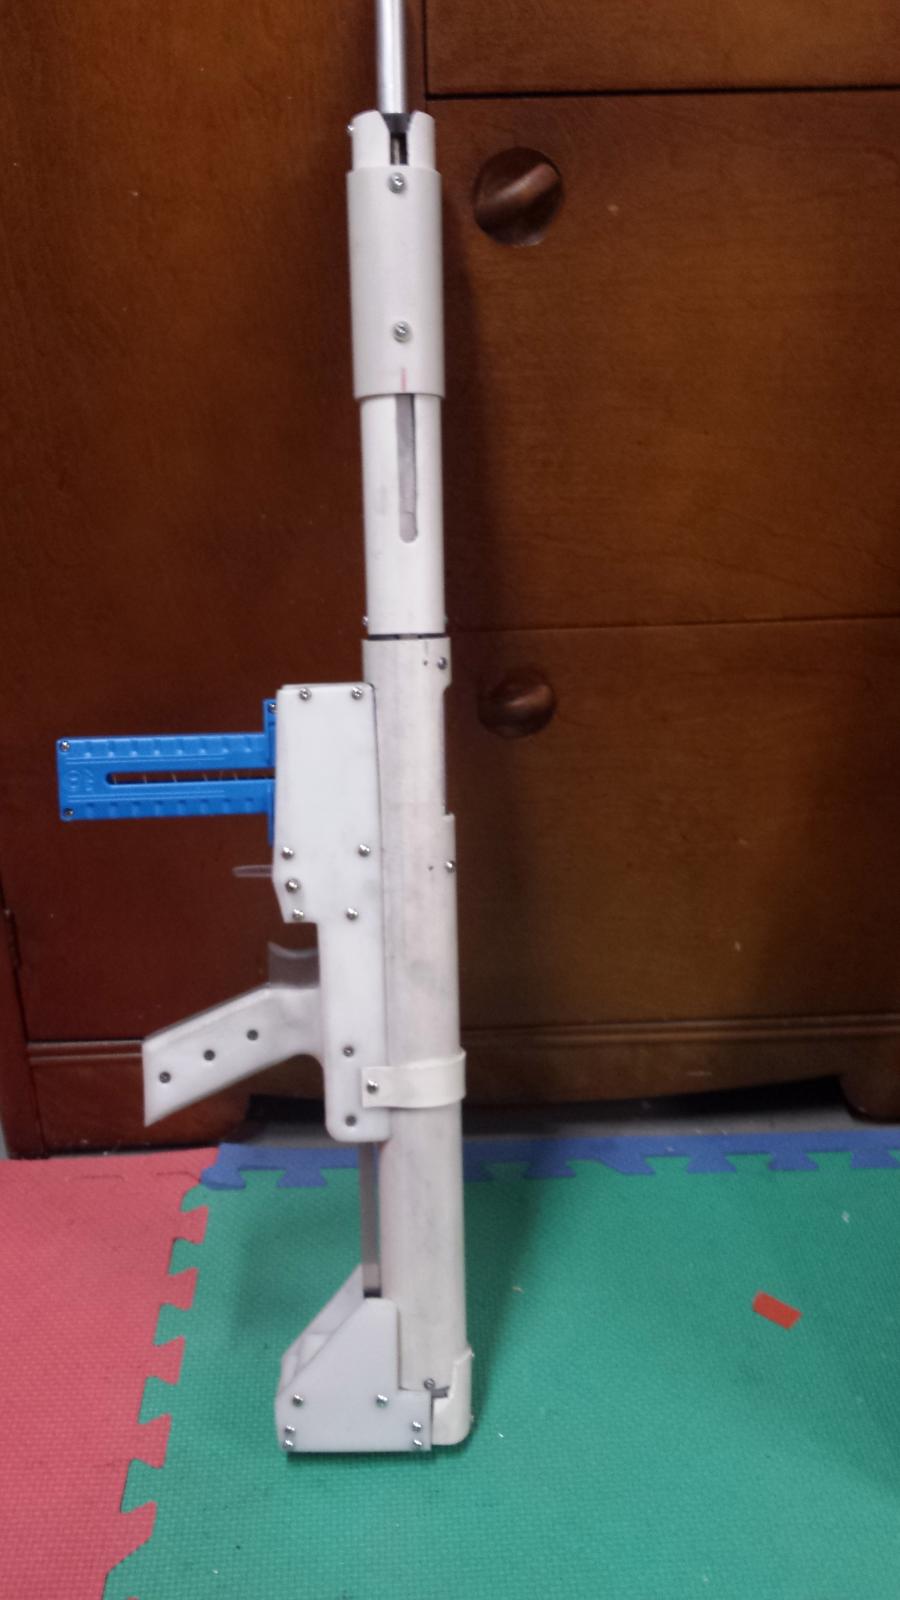
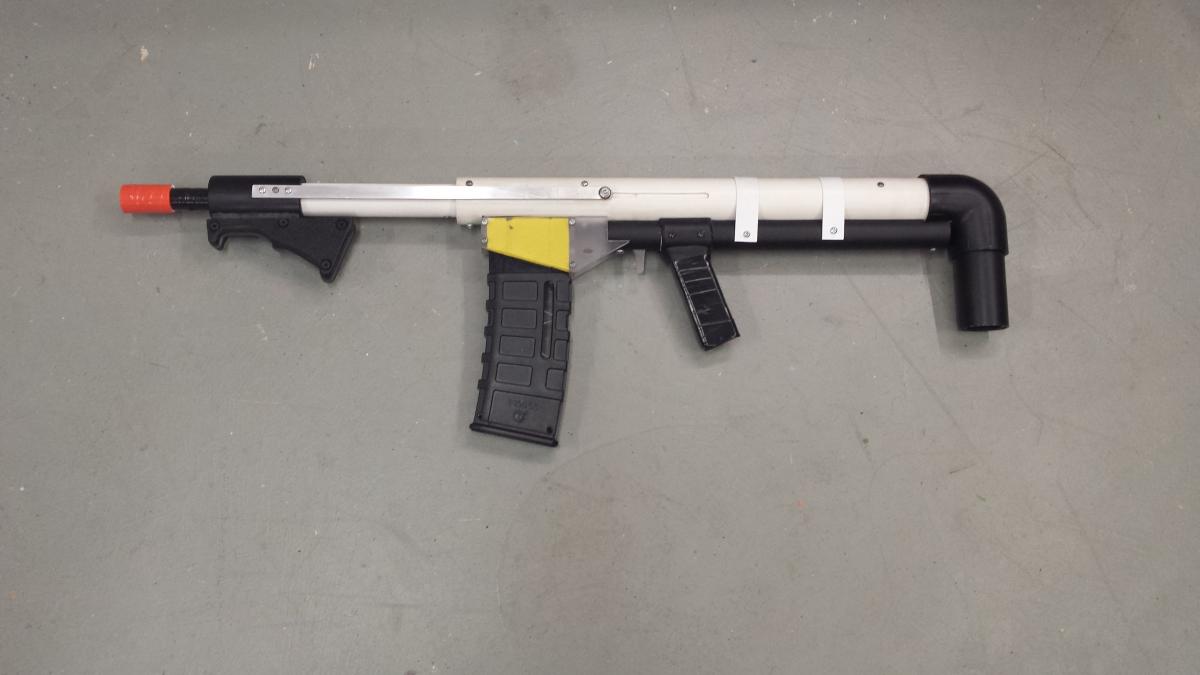
 

Rev shot 


Rev shot .jpg


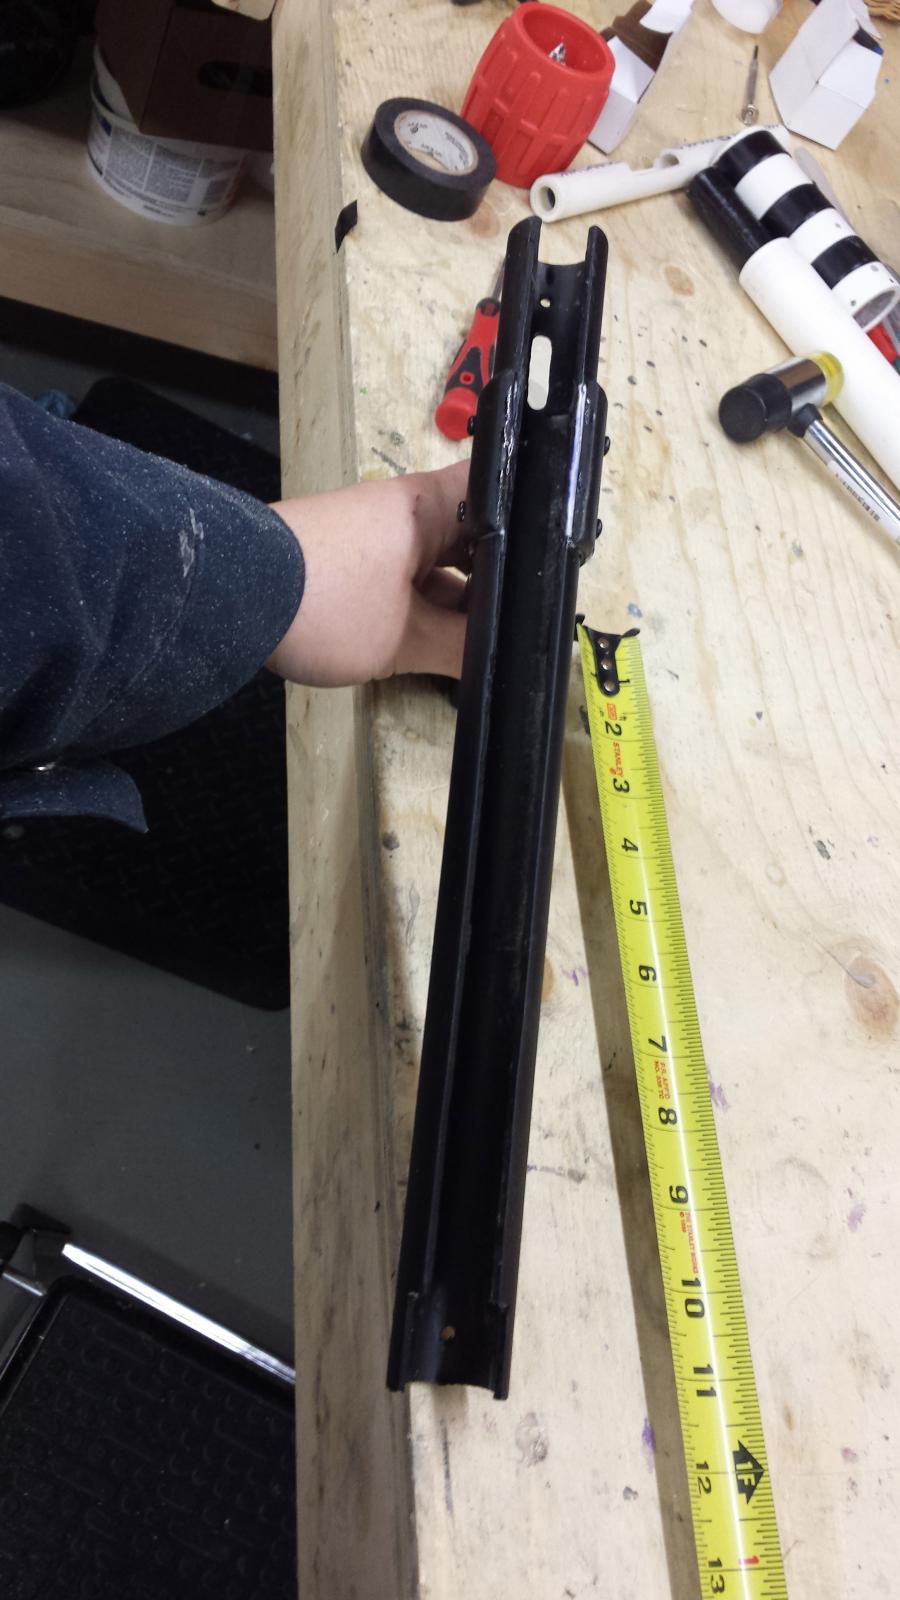
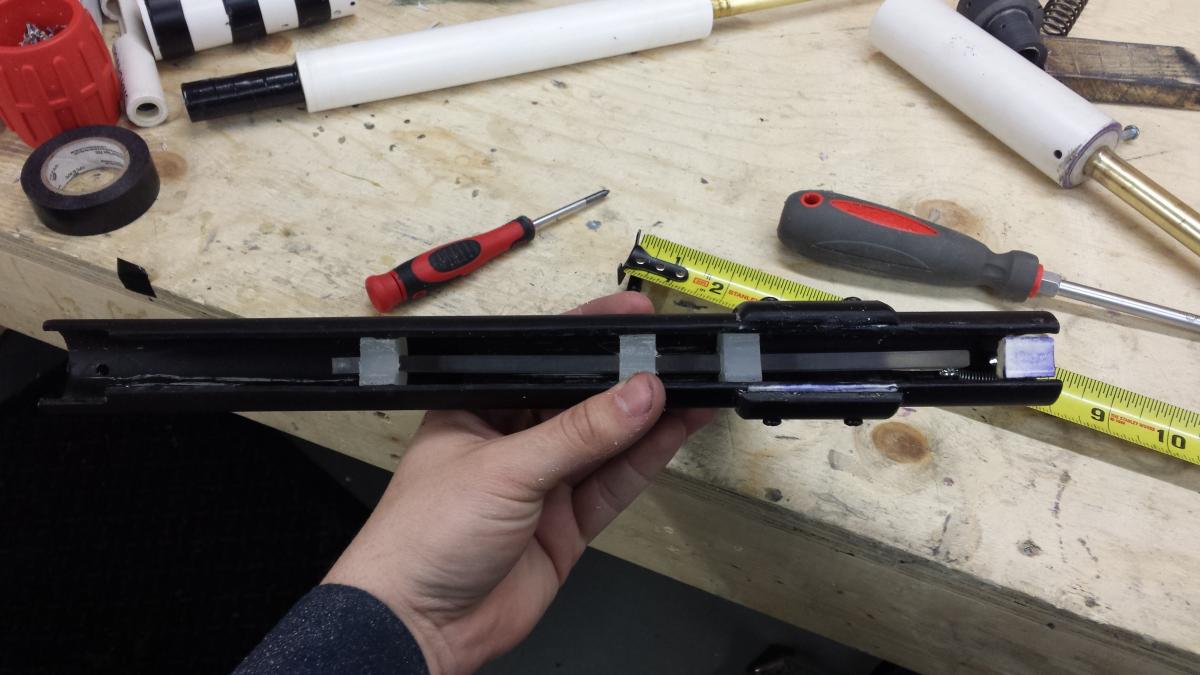
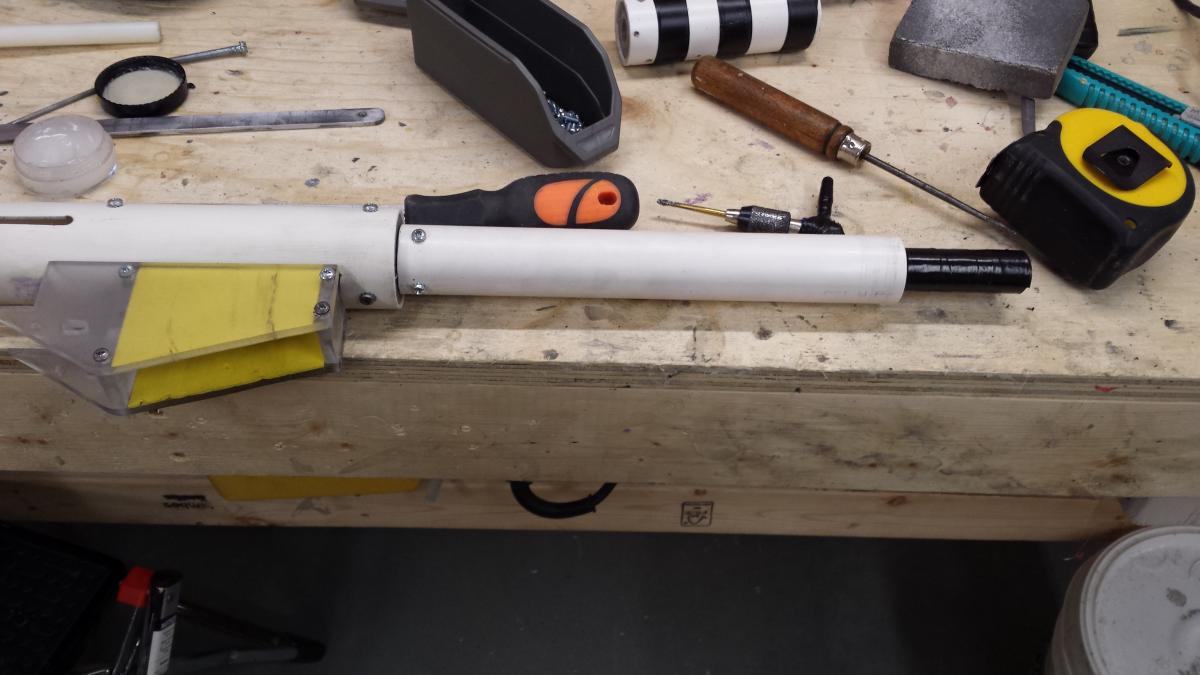
Top one is a makeitgo M.O with a few changes such as using normal materials and it has been simplified. The bottom one is a scaled down multiple orgazem made to look like Xellahs v2 bullpup

bull pups .png  


A few snaps. From top to bottom there is a pump snap 3.0. tommygun style snap carbine and 2 snapbow mk5s 


Snaps .jpg


The top one is a rainbow pump made to look like dracs blood born. The wood is oak and apple wood that i milled out of a old tree in my backyard, you dont want to know how i stained it. The bottom one is a standard double rainbow 


rainbows .jpg


#358381 Homemades Picture Thread

Posted by skullface44 on 04 March 2017 - 08:15 PM in Homemades

I didn't think this deserved a new thread yet since its just the first prototype so ill post it on here for now. This is a magfed homamde I have been tinkering with for a little wile. The project started out at a V2 revshot but turned into this. I think it deserves its own name since it shares very little with the revshot. 


Improvements/differences


- one peace grip/magwell

- o ring style breach with a plunger cup similar to a longshot 

- nylon dart gate with feed ramp 

- 1.45" ID plunger tube 

- fixed plunger tube ( opposed to the moving plunger tube/bolt sled the rev shot uses)

- plate catch simular to a +bow 

- .520" ID aluminum barrel 

- internal priming bars

-full [k26] + longshot ish  spring 


 20170304_163817.jpg


20170304_183901.jpg


The next version(s) will have the following updates/ changes 


- Stock, trigger and mag release will be printed 

- Printed top rail 

- proper pump grip handle 

- single top slot for prime instead of the normal slot on each side


For anyone that may be interested templates, STL files and drawings for the lathed parts will be available as soon as im happy with the blaster and I know it all works properly 


#356699 Where To Buy Modding Materials

Posted by skullface44 on 09 November 2016 - 07:42 PM in Modifications

Hi,  My son tells me that he somehow lost ALL the shell screws for his "Magnus".  Does anyone know where I can buy a replacement set, or if not, what size and type of screws are used by the magnus, please?


He has a learning disability and is quite upset.  Any help would be most appreciated.


Thanks,

Brsd1961


#4 sheet metal screws fit in some blasters. Iv never used them on a magnus but its worth a try if you cant find any. 


#356711 2016 Nerf War Schedule

Posted by skullface44 on 12 November 2016 - 05:14 PM in Nerf Wars

December 


http://nerfhaven.com...ump-indoor-war/


#342840 new style RainbowPump Writeup

Posted by skullface44 on 12 November 2014 - 05:41 PM in Homemades

Ok thanks. I ended up ordering the petg for it


#342616 new style RainbowPump Writeup

Posted by skullface44 on 31 October 2014 - 05:20 PM in Homemades

can clear pvc be used for the pump section instead of the petg tube?


#342617 new style RainbowPump Writeup

Posted by skullface44 on 31 October 2014 - 05:39 PM in Homemades

sorry, double post


#347091 Apocalypse 2015 - Recapping on page 5

Posted by skullface44 on 09 June 2015 - 11:53 AM in Nerf Wars

If anyone from Ontario Canada is thinking of going let me know, I will most likely be driving there the day before.


#349213 I'm making foam

Posted by skullface44 on 20 October 2015 - 06:42 PM in Darts and Barrels

Look here is the deal. If everyone has not quit nerf by this summer I will have foam for sale and go more indepth on my manufacturing proses.


Summer has come and gone, how about seeing that extrusion processes now?


LANGLEY EDIT: DO NOT BUMP THIS THREAD AGAIN UNLESS YOU HAVE NEW INFORMATION.


#343021 I'm making foam

Posted by skullface44 on 23 November 2014 - 04:34 PM in Darts and Barrels

The closest thing I have found to the blue foam is the black buzz bee foam, and like I stated in our last pm "as for the foam this summer when I am out of school and there is less swim practice and if every one hasnt quite nerf by then I will tell all my secrets and have lots of foam for sale".

Can't you tell all your secrets now? :D


#347709 The Mississauga Massacre

Posted by skullface44 on 06 July 2015 - 01:49 AM in Nerf Wars

Just to be clear, slugs sili tips, xplorer darts, with #6 or #8 washers, 3/0 fishing weights?
Glue domes are a no no (in all fair understanding, just wanted to make sure)


3/0 glue domes are fine, as long as they are made properly and out of decent foam. If they are made poorly to the point that they are flying apart in the air or the foam is so bad that the 3/0 wight flys out I will as the person to put them away. 3/0s inside of a dart are pretty harmless but when they leave the dart in mid flight they can do serious damage. I have shot a 3/0 weight out of a big blast and it went though 1/4 inch wood

Glue domes are allowed just no slingshot weights.


Yes, that is correct


#347412 The Mississauga Massacre

Posted by skullface44 on 24 June 2015 - 01:35 PM in Nerf Wars

I went to go see the section I rented for us today and I could not be happier. The area is more then big enough, is totally separate from the rest of the park,has a big area with tables for getting ready or what ever and it has a separate washroom. The area is separated from the rest of the park by a big wall and a lot of trees, there will be no non nerfers there to complain and try to get us kicked out.


#347732 The Mississauga Massacre

Posted by skullface44 on 06 July 2015 - 08:44 PM in Nerf Wars

I just started making and testing darts this weekend. 100 so far, just while I'm watching things on TV.

Expect some money on Paypal to help cover the permit this week, after my next paycheck.


Sounds good, thank you.

I recently renewed my passport, and if this wasn't on the 15th I would be down to clown. Unfortunately, I'll be in the Grand Cayman Islands that weekend. I've been looking forward to Canukistan nerfing for a few years now.

If the Canadian war scene is really back, you may consider trying to revive Hell Before Halloween. I have a 90% of the plans laid for another Hell After Halloween this year (probably in Columbus) but if you guys want to host something later in the fall, count me in.


If this goes well and I get a good turn out I will host wars on a regular basis in Canada. Assuming everything works out I will be hosting a war around Halloween, a bunch of the old Canadian vets on Canadian nerfers facebook group want to do a Hell Before Halloween in Ontario and I would love to see some Americans come. Hopefully no one gets too butt hurt about there being two Hell before Halloweens. The only resin I would host one In Ontario as well is because I doubt all the nerfers in my area would drive to Columbus. I will try my best to come to your Hell before Halloween though. I was thinking I would do the Hb4h war in my area two weeks before or after your hb4h (probably before) and call it Hb4H round one or somthing along those lines.


#348299 The Mississauga Massacre

Posted by skullface44 on 08 August 2015 - 11:44 PM in Nerf Wars

So this event is for homemades?


If you read the posts you would know the answer to your own question. Your in Mississauga, you should come. If you don't have a blaster you can use one of mine.


#347399 The Mississauga Massacre

Posted by skullface44 on 23 June 2015 - 06:03 PM in Nerf Wars

I'll see if I can talk the and only MIG into coming :)


That would be great, I inboxed him on youtube but he didn't answer

Is there anyone in the Toronto area I can carpool with to get to the war? I'm in the midtown area but I would be fine with going to any subway station to meet up on the way.


If you aren't able to find a ride let me know, I can pick you up if need be. Just let me know a day or two before the war so I can plan for it


#347918 The Mississauga Massacre

Posted by skullface44 on 18 July 2015 - 05:32 PM in Nerf Wars

could I come? I might bring one or two friends we got tons of blasters and tons of darts. im curios, are modded blasters aloud?


of course you can come, bring as many people as you want.


#347736 The Mississauga Massacre

Posted by skullface44 on 07 July 2015 - 12:55 AM in Nerf Wars

The only reason I've done Hell After Halloween for the past two years was because HBH died. I'll gladly attend if HBH is hosted in Canada and I could host a different war in Columbus at a different date. I don't have any qualms about who hosts or where; I'm game for a good war regardless of location.


Okay, sounds good. I will know if it will happen or not after this war on the 15th. I'll send you a message with the results and what I plan to do. I will still try to come to Columbus if you host a different war after HB4B, hopefully some people from my area will come up with me too. Im going to try to get 3 other people


#347496 The Mississauga Massacre

Posted by skullface44 on 28 June 2015 - 11:38 PM in Nerf Wars

I am 100% bringing a +2 however they will need loaners and will use the community darts since I don't have enough dart making materials to make more than enough for me.


Great! Not a problem, I will be bringing at least 6 blasters to lend out to who ever needs one


#347252 The Mississauga Massacre

Posted by skullface44 on 17 June 2015 - 11:40 AM in Nerf Wars

As long as it does not look like paintball gun or a real gun Its all good.

I just called about renting the park. It will be $87-$100 to rent the park all day. I am willing to put up all of the money as long as people pitch in what they can. My pay pal address is danny931202@gmail.com send what ever you feel like giving. A minimum of $5 cnd would be grate. Any local guys that want to give me cash when they see me at the war or ti buy foam let me know. The sooner I rent the park the better.

For anyone that needs foam, I have been selling hot rod xl and Sera rod beige. If you want to go straight to the source Bernardi building supply in Mississauga carry hot rod xl. It's fat foam but can be stretched to fit cpvc and 17/32 brass. I have the auto blanker so anyone that wants pre cut blacks of stretched hot rod xl let me know. The Sera rod is springer fit in 17/32 and cpvc. Airgun fit in petg, it is slightly flat on one side but 15 minuets in the dryer takes care of that.


#347237 The Mississauga Massacre

Posted by skullface44 on 16 June 2015 - 07:34 PM in Nerf Wars

Haha, you do realize Canuckstan ran slingshot darts for the longest time, right? So the old guys probably have those in stock.

Totally understand moving away from those, and you're hosting so it's your call. But since it's the first war in forever, it might be good to be lenient about them. A transition type deal. Although if someone shows up with lots of fresh slingshot darts, we reserve the right to use them on the offender with a Big Blast :P

3/16'' bearings work perfectly. Since McMaster doesn't do Canada I could bring some up if needed.

How much are the permits?


You have a point, I will although sling shot darts for this war but we need to start to get rid of them if we continue to do this. Definitely no fresh ones. 3/16 ball bearings are great, iv been using those for a wile and I love them. If everyone used those that would be perfect but most people in Canada cant get stuff from mc master. 3/0s should be fine for everyone, thank your for the generous offer though


Absolutely. I'll have to get the day off work but I'll sell a kidney to Nerf again. If the permits aren't hilariously expensive it's a good idea. Enough of us can Paypal you the money in advance to cover most of the cost. I have plenty of loaner blasters, and a few NIB UMBs if needed. I need foam, barrel material, and your motorcycle.


I actually do have a large amount of slingshot weights... are those still the state of the art in Canuck dartsmithing? I just emailed McMaster and they said they ship to Canadian businesses, but weren't specific on what type of business. I'll see what they say if I try to ship stuff to work and let everybody know. I wouldn't be upset if I couldn't use my slingshot darts, but the next cheap alternative I'm aware of is copper BBs which are hard to center. Slugs should be faster to make if you don't have to carefully make a glue dome, if they're not double the cost I'll switch to those permanently. If McMaster checks out anybody at an independent business should be able to get McMaster goodies.


Grate idea, ill look into in tomorrow morning and post how much it will cost as soon as I find out even if I can get a few people to pitch and I end up paying the most I am totally fine with that.


I don't think the care what type of business, my family owns a small construction business and I have had no trouble ordering stuff from mc master. Switching to slugs would be cheaper I think, #6 washers can be bought locally and the felt pads are around $5usd for 500.


#347221 The Mississauga Massacre

Posted by skullface44 on 15 June 2015 - 10:23 PM in Nerf Wars

Sorry I didn't get back to you earlier. I have the date marked!


Grate,see you then !


#347351 The Mississauga Massacre

Posted by skullface44 on 22 June 2015 - 02:11 PM in Nerf Wars

I may be bringing a +1 or 2 (strong maybe for the +1, not so sure on the +2)


Okay, sounds good. I will bring lots of extra blasters for people

I'll be willing to pitch in to cover a possible permit!


Great, thanks!

put me down for a maybe


Okay, will do


I spent about 3 hours last Saturday walking through the park. The area I rented had a lot of people in it so I didn't go in but the rest of the park has lots of great spots to play if we get bored of our spot. I will be going back to the park this week to take a closer look at the spot I rented though.


#347257 The Mississauga Massacre

Posted by skullface44 on 17 June 2015 - 04:46 PM in Nerf Wars

Do it. Even if I can't get the day off I'll make sure you break even on the permit and other expenses (within reason).


Okay, I will be booking it tomorrow. The office is closed now


#347220 The Mississauga Massacre

Posted by skullface44 on 15 June 2015 - 10:19 PM in Nerf Wars

I'm a maybe.
Do you have a permit?
How firm are you on slingshot darts?


I was looking into that and apparently we don't need one unless there is 20 people. I would buy one if I knew people would come and pitch in to help cover the cost but since this is the first war in a long time im worried about spending bunch of money to get a permit and loosing it all because not enough people show up. If there is a good turn out and we can turn this into a regular thing I would be more then happy to get a permit or rent out a airsoft place. Wost case we get kicked out of the park we can just move to another location, I know of a few other good spots close by.

No sling shot darts man, they are just dangerous. Getting shot with those out of pretty much any airgun or homemade is not fun. I think I can speak for most people when I say no one whats to be shot with slingshot darts.


#347281 The Mississauga Massacre

Posted by skullface44 on 18 June 2015 - 03:15 PM in Nerf Wars

No turning back now, I just payed for the permit, it was $106. We have section A from 10 to 6, this section has a BBQ so we can cook up a nice lunch. Please don't make me regret this guys, if we have a good turn out and I don't have to eat the inter cost of the permit I will be doing this as regular as possible. Anyone that wishes to help out with the cost please send money to danny931202@gmail.com via paypal.


#347267 The Mississauga Massacre

Posted by skullface44 on 17 June 2015 - 09:47 PM in Nerf Wars

A permit will go a long way to get more vets. Many of us are still bitter about being kicked out of the park Vengeance used to be held at.
Also, if the permit allows sticking things in the ground I have many obstacles I can bring and would really like to pass onto somebody else after the war.


That would be grate, I will tomorrow after I get the permit. If for some resin we get kicked out of the park (very very unlikely) I have a back up spot that is close by, it is a industrial lot that no one really goes to. I don't know who owns it but I have talked to every one that backs onto it and they don't care what I do there. I used to play airsoft there with my friends when I was in high school with loud full auto AEGs and GBBs, no one ever came or said anything. So no matter what we are having a war, the relocation spot is 5 mins away at most. If I am the only one with a car I will make as many trips as I need to to get everyone from one spot to another if I have to.


#347206 The Mississauga Massacre

Posted by skullface44 on 15 June 2015 - 12:22 PM in Nerf Wars

Location: Erindale Park 1695 Dundas St W Mississauga, ON L5L 1C6 Canada I have a permit for section A 10:00am - 6:00

When: August 15th, I will be at the park at 9:30AM to set up but the war starts at 10:00 AM.

What to bring:
- One or more good primary blasters as well as a secondary blaster. If your blaster brakes I will most likely be able let you use one of mine
- A springer pistol for pistol rounds
- As many darts as you see fit, I am bringing 500 for my self as well as what ever is in my dart bin for anyone that did not bring enough darts
- Water, there will not be any places to get water close to the field so please bring your own. I will be bringing a cooler with a case of water in it for my self and any idiots that forget to bring some
- A good mood, no one wants to war with a jerk. If you are causing problems with other players I will ask you to leave
- Bring a lunch, there will not be anywhere to go eat that is close by. The park has a few BBQs, if one is available I would pitch on a box of burgers or something if anyone else wants any
- Eye protection. Your eyes are pretty much the only part of your body that can be seriously hurt by a nerf dart, I really would like to see everyone with some kind of eye protection but I wont make you if you don't want to.

What not to bring:
- Water guns
- Alcohol or drugs, I would be the first to want to go get a beer with everyone (that is legal) after the war but the park is not place for that. We will get kicked out if people see that.
- Homemade airguns
- singled titans

Blaster restrictions:
- This will mostly be done on a case by case basis, if you are not sure about a blaster show it to me.If you would not want to be shot with your own blaster there is a good chance no one else wants to be shot with it either.

Darts:
- #6 or #8 slugs as well as 3/0 or lighter glue domes will be aloud. If your darts are made so poorly that they are unsafe I will not let you use them, you are more then welcome to use some of mine though.
- No exposed metal or slingshot weighted darts
- Silicone domes and x darts are fine too

Who will be there:
- Me + 3
- Condorboy +1
- The2ndbluesbro +1-2(maybe)
- Buffdaddy
- cheyner (maybe)
- charlie156 (maybe)
- Lpat +1 or 2 (maybe)

I know I already posted this but I though I would put it up here so no one will miss it. The park will cost $87-$100ish for the day for 120 people. I know we wont have that many so there will be no problems with that. I told the lady pretty much what we were doing and she seemed to not care. My pay pal address is danny931202@gmail.com, I am going to pay for the rental and what ever money you guys can pitch in would be grate.


#347828 Alternate Tornadobow Design

Posted by skullface44 on 13 July 2015 - 10:22 PM in Homemades

I know this a dead thread, however does anyone still have the template files? They are not hosted anymore and having them will be much appreciative and helpful to finish a project tornado bow I have! Thankyou :).


I was looking for those templates a wile ago and I did not find them, however these templates are still available


#342136 Hell After Halloween II

Posted by skullface44 on 24 September 2014 - 02:54 PM in Nerf Wars

If anyone from ontario is thinking of going inbox me, I'm thinking about doing a road trip. would be nice to get a war in before winter comes. Since the ontario nerf sean seams to have died this might be the one to go to.


#350894 Canadain Winter War (Ontario)

Posted by skullface44 on 18 January 2016 - 11:45 PM in Nerf Wars

https://www.wetransf...04234434/ceea39


here is a link to a download for 81 pics from this war that my father took near the end. i sereously suggest taking a look at them because they are pretty cool

p.s any one wanna get into contact with me im dexter. contact me through block0king@gmail.com

the link says "download is no longer available"


#349887 Canadain Winter War (Ontario)

Posted by skullface44 on 07 December 2015 - 06:06 PM in Nerf Wars

Cant belive I spelt Canadian wrong lol, I guess thats what I get for being on nerfhaven instead of studying.


#350451 Canadain Winter War (Ontario)

Posted by skullface44 on 03 January 2016 - 11:03 PM in Nerf Wars

Thank you to everyone that came out to the war and to everyone that contributed to the war fund. The was was amazing, all you guys are amazing. Thanks again, means the world to me 


#349881 Canadain Winter War (Ontario)

Posted by skullface44 on 07 December 2015 - 05:43 PM in Nerf Wars

Location:

Vaughan sportsplex 8301 Keele st, Vaughan Ontario    https://www.google.c...1e8e23f3d331d8e


When: January  3rd 10:00am-4:00pm


What to bring:
- One or more good primary blasters as well as a secondary blaster. If your blaster brakes I will most likely be able let you use one of mine
- A springer pistol for pistol rounds
- As many darts as you see fit, I am bringing 500 for my self as well as what ever is in my dart bin for anyone that did not bring enough darts
- Water
- A good mood, no one wants to war with a jerk. If you are causing problems with other players I will ask you to leave
- Bring a lunch, we will probabaly order a pizza like ususal.
- Eye protection. Your eyes are pretty much the only part of your body that can be seriously hurt by a nerf dart, I really would like to see everyone with some kind of eye protection but I wont make you if you don't want to.

What not to bring:
- Water guns
- Alcohol or drugs
- Homemade airguns
- singled titans

Blaster restrictions:
- This will mostly be done on a case by case basis, if you are not sure about a blaster show it to me.If you would not want to be shot with your own blaster there is a good chance no one else wants to be shot with it either.

-Since we are inside this time I would not like to see any really powerfull airguns

Darts:
- #6 or #8 slugs as well as 3/0 or lighter glue domes will be aloud. If your darts are made so poorly that they are unsafe I will not let you use them, you are more then welcome to use some of mine though.
- No exposed metal
- Silicone domes and x darts are fine too


Tips:

- This is a indoor war, range isnt as important as when we play outside. Rate of fire is more important when at a indoor war (IMO).

Game types:
- 3:15
- defend the core
- slaughter
- VIP


Who will be there:

- Me

- 2ndbluesbro

- Cheyne

- deaddumpster

- grey

- charlie

- buffydaddy

- bookworm

- Tankrat

- Brayden

- Pearson

- Josh (maybe)


#344806 Best Stefan Foam

Posted by skullface44 on 05 February 2015 - 08:54 PM in Darts and Barrels

I use an RSBC clip with a cpvc barrel. Will the hot rod still work? I make #6 slug darts by the way because they are safer than glue domes. Thanks


If you use a RSCB with a cpvc barrel you may have some problems if you don't stretch the hot rod xl foam. Hopefully not though


#344784 Best Stefan Foam

Posted by skullface44 on 04 February 2015 - 04:39 PM in Darts and Barrels

In my experience Hot rod xl is grate foam but it is too fat to fit in cpvc, it will work fine in a hopper with a cpvc barrel but if you are breach loading or using speed loaders you may have a hard time, it fits perfectly into petg though . If you want to use it with cpvc stretching it slightly will make it a perfect push fit into cpvc, this foam is very easy to stench and it handles the process very well. You can make it very thin if you want ( like air gun fit in cpvc ). It also is very heat resistant and durable. If you want beige foam this is your best choice, it is much better then Seara rod.

The white log home FBR is expensive but it is also grate foam, I have ordered it many times and it is very consistent. It is a nice push fit in cpvc for spring powered basters and has a nice are gun fit in petg. This foam is also very heat resistant and can be stretched if you need to do so, however it is not as good of a candidate for stretching as the beige hot rod foam.

The foam from amazon that spiderbite suggested is not as good as log home white or beige hot rod xl but it is much better then the fbr found in hardware stores and the foam from Mc Master-carr (mc master foam is terrible in my opinion )

The best foam i have ever used came from this company, you can get in any colour and size and it is amazing, they are very hard to get in contact with and to buy from though and someone i know got scammed using that site.

The foam from MHA is proabaly the second best foam I have used, grate fit in cpvc for spring blasters, it is very durable in my opinion and it is very easy to find because it is pink. Might be a litre hard to get from MHA and they will only sell it to people who make safe metal free darts. That is not a con for me because i really like silicon domes and have made a nice dart tip mold that makes xplorer sized silicon domes, but if you don't make metal free darts it might be a con for you.

Keep in mind that this is all just my opinion and experiences with the specific foam I have in my weather conditions with my brand/ batch of cpvc and petg


#352588 Oznerfnerd Longshot kit

Posted by skullface44 on 03 April 2016 - 12:08 AM in Modifications

Personally I like it, its a good addition to a OMW kit , artifact kit or a brass breach. 


pros:

-very nice 3d printing quality

- the metal reinforcement peaces make the stock parts very strong when glued properly 

- dead space reduction peace is a nice clean alternative to using hot glue 

- very nice 14kg spring with ground ends (best on the market in my opinion) 

-plunger reinforcement centres  the spring and really supports the weak part of the plunger rod 

- the lube it comes with is very good 


Cons:

- you must use very strong epoxy to glue the bolt sled reinforcement parts. super glue will not work, jb weld broke on me, lepage epoxy broke as well, the only one that worked was aroldite and i had to import it from australia 

- the bolts that are ment to go though the plunger cap (micky mouse peace) are a pain to get on and the nuts did not fit unless i bent the bolt quite a bit. The bent bolt would not go though the screw ports unless i used alot of force. 

- its expensive to ship from Australia to canada or the US 


#352605 Oznerfnerd Longshot kit

Posted by skullface44 on 03 April 2016 - 07:17 PM in Modifications

What should I get then OMW, Artifact, or Oznerfnerd?

well if you have to just pick one I would get the artifact kit. But if you have the money to get a few kits I would get all three. the big hammer kit seems cool too 


#351084 Parasite Blaster/Mounting Technique

Posted by skullface44 on 24 January 2016 - 10:30 AM in Homemades

Good work. So simple I don't know why no one has done it before. I would've underslung an airgun, but there's no nothing wrong with a RBPistol. Only issue I can see is sourcing the thinwall pipe, which from what I remember is difficult to find.


Thin wall is pretty easy to get, garden stores sell it sometimes, jjdowns has it and flex pvc ships to canada 


#353396 Rev-shot Write up

Posted by skullface44 on 11 May 2016 - 09:40 AM in Homemades

Thanks for posting this, I know that my badgering must have been annoying.

Could you post a picture of the finished blaster? I don't see one on here and there aren't that many pictures of the revshot on NH anyway.

Also, what material are the "straps" that hold the plunger assembly to the lower receiver? I don't see them listed. 

You can use any 1/16" plastic for the straps as long as its flexible or can be bent with heat . Ill put a pic up later today. 


#353377 Rev-shot Write up

Posted by skullface44 on 09 May 2016 - 08:33 PM in Homemades

Introduction:


Fist off I would like to say that I am doing this wright up because I have had quite a few people ask me to do it and since there isn't a lot of revshots around and the original wright up is not available anymore  I thought  it would be a good thing to have around. Especially since there is a lot of cheap, safe and good darts that dont hopper that well coming out of china lately i figured a few people might want to build a mag fed homemade again. Secondly  I have to mention that I did not design this blaster, from what I have seen luiec3 is responsible for this blaster . This blaster was purchased from a nerfhaven user (luckydude), although most of the blaster has been re built some of the credit goes to him for building the blaster because it aloud me to study the blaster inside and out,make the changes I thought where necessary and eventually do this wright up. SInce I dont have anything else to reference im going to assume the way I received this blaster was the way they were intended to be. Here is a list the "stock" features and a list of the changes i made. I perceive  them as upgrades but that is just my opinion. The 1.25" Thin wall plunger tube can be substituted with a ERTL PAS plunger tube( witch is even bigger), if you do this use the stock pas plunger head. 


Specs of blaster when recived:


- 1 1/4" pvc plunger tube

- 5" of draw

- brass and cpvc breach going into a  12"petg barrel

- 1 1/2" thinwall pvc pump grip 

- #6-32 hardware 

- rainbow catch 

- omni directional catch 

- U cup+rubber washer seal 

- [k26] spring 


Changes made:


- expanded plunger tube using  1-1/4 thin wall pvc (for a even bigger plunger tube a pas PT can be used) 

- 9/16 brass breach with tightening rings ( 14" barrel ) 

- [k26]+ arrow storm spring 

- spring spacer for more compression 

- stronger catch spring 

- #10-32 bolt for the priming rod 

- Polycarb and delrin angled fore grip added to the pump 

- air release hole in breach for smooth loading 


Matierals needed:


- 1' of 1/2" nylon rod

- 2' of 1.5" thinwallpvc 

- 3' of 1' pvc 

- 5/8" clear thinwall pvc 

- 1"- 1/2" pvc bushing 

- 2' of 1/2 pvc

- 12" of 1 1/4 pvc 

- 3/4" of 1 1/2 sink drain extension pipe 

- #6 1/4" nylon spacers 

- 3' of 1/4"x  1/2" aluminum bar 

- 12x6 1/4" polycarb sheet 

- Any 1/2" thick plastic (i used hdpe )

-  3/8 #6-32 set screws x 4 

- 3/4 #6-32 pan head screws x3

- 1/2" #6-32 pan head screws x 17

- 3/8 #6-32 pan head screws x 8

- #6 washers x7

- 2" #10-32  bolt with matching lock nut

- 6" of 2" Dia. plastic rod ( nylon,delrin or pvc can be used) 

- 1/4" aluminum rod 

- tuck tape

- 6x6 3/4" thick peace of hard wood 

- U cup seal 9691k57

- 1.5" rubber washer 

- 1/2" of 17/32" brass 

- 18" of 9/16" brass 

- 5 3/8"  19/32" brass

- 5 1/8" of 1/2" brass

- 6x12 sheet 1/16" plastic ( I used styrene) 


Tools

- #6-32 and #10-32 tap

- drill press

- scrollsaw

- bandsaw

- holesaw

- 7/64" dril bit 

- lathe

- tools for lathe I ground my own out of H.H.S blanks because its cheaper but you can buy them if you want  (boring tool, standard bit,grooving bit)

- vernier calipers 

- screw driver 

- marker 

Adhesives


- pvc primer 

- solvent weld

- epoxy 

- epoxy putty

- hot glue

- super glue 

- goop

- lepage 100% glue or Go2glue


Step 1: The Magewell 


- Here are drawings of the mag well,trigger and support  bar for the mag well. You will need to make 2 of the side plates. These are not templates but you could probably get away with cutting them out. Just measure the drawing when you print it and see if its close to the dimensions.   These parts are made of 1/4" polycarb


magwell drawing .jpg


trigger and mag side .jpg


It will look like this when its done 


mag well .jpg


 make the aluminium  bar before you put the mag well together.  it will help you line everything up correctly. 


Step 2 : Body 


- Cut 20 1/4" of 1 1/2" thinwall pvc. divide the pvc into 8 sections. I like to use one colour for the 1/4s and another for the 1/8ths. mark out the mag well slot by  starting at 7/8" from one side of the pvc and ending at 4 5/8", make it 1" wide and cut with a dremel this will now be the front of the blaster. 


body .jpg


Step 3 : Slots 


- place the body with the mag well facing towards you and mark out the slots. They start at 5 3/4" and end at 10 1/4", make them wide enough so a #10-32 bolt slides freely. Sorry for the bad picture. 


slots .jpg


Step 4 : The breach support  


This is the part you need a lathe for. Get your 2" rod and cut it 1/2 longer then you need it to be, that will give you lots of room to face off the part on both sides and make both faces square. When you are making these parts make sure to have a scrap peace of the 1 1/2" thinwall pvc with you to check the fit of your parts.adjust  the size of these two parts to what ever you need, they should be able to fit into your pvc easily but not be able to slide too much. Wile your at the lathe go ahead and make the aluminum support  bar for the mag well too.  Im sure there are other ways to do this though. I drew a quick sketch of the parts 


magwell lathed parts drawing .jpg


They will look like this when you are done 


brach support (back).jpg


front support.jpg


Step 5 : The catch 


Make a standard rainbow catch. Templates can be found here: http://nerfhaven.com.../20330-rainbow/


now cut a  5" peace of 1 1/4" pvc and screw the rainbow catch in place using set screws. it should look like this when you are done 


catch.jpg


Rap e tap around the tube until it fits in the 1 1/2" thinwall pvc 


Now line up the catch tube so its flush with the back of the 1 1/2" pvc body and mark where the catch hole need to be. Now drill a hole where your mark lines up with the the next 1/4 line over from the line you make one of the slots on. This will now be the bottom of the blaster.


catch alingment .jpg


The hole will need to be big enough to let the catch screw slide freely but small enough so the spring has something to rest on. If you mess up and make it too big its not a problem the spring will rest on the 1 1/4" pvc that is nested inside the blaster.  After you have done this put the catch tube in the blaster and screw in the catch screw, this will hold the tube in place for now.


catch spring .jpg


put  3 or 4 screw though the 1 1/2" and 1 1/4" pvc to hold the catch tube in place, make sure to not hit the catch with these screws. The placement of the screws  does not matter but make it look nice 


step 6 : The plunger tube 


Get your 1 1/4" thin wall pvc and cut it to 6". Now get your 1 1/2" sink drain extension pipe and cut a 1/2 peace. Take your 1" to 1/2" pvc bushing and tap with tape until its snug in the drain pipe. Solvent weld the peaces together so the front of the bushing is flush with the 1 1/2" drain pipe. Now get a stub of 1/2 pvc and solvent weld it into the bushing.  Next measure 3/4" from the front of the part and cut( make sure its dry first). It should look like this when you are done 


catch.jpg


Now that you have your 3/4" long plunger cap  solvent weld it into the 1 1/4 thin wall plunger tube so it is flush with the front. After it is cured drill a 5//32" hole 3/8"from the front of the plunger tube, make sure its going straight through.  It should look like this when you are done. 


plunger tube .jpg


Step 7 : The breach 


The sized of brass used will depend on if you make a 17/32" barrel or a 9/16" barrel. I used 9/16". First measure out 17" of  your barrel material ( i used 9/16"). next measure 4 1/4" from one end of the brass and mark with a sharpie. Now draw a line around half of the brass then draw two straight lines to the end of the brass. Shade in the area and cut it out, i Used a band saw with a metal blade but a dremel  works just as well.  It will look like this when you are done 


brass.jpg


I lost the pictures for this part but its very easy. Cut 10 1/2" of 1/2" pvc and 1" pvc then glue the 1/2" pvc into the 1" pvc so 2 1/2" of the 1/2" pvc is sticking out of one end of the 1" pvc. You may need to sand don the 1/2" pvc. Once it has cured take your brass barrel and glue it into the 1/2" pvc so that the end of the barrel is flush with the 1/2" pvc sticking out of the 1" pvc. Make sure to add tightening rings to the brass (if you want to ) before you glue it in. It should look like this when you are done. 


barrel .jpg


Next we are going to make the bolt and pusher, if you are using a 9/16 barrel like me you will need 19/32" brass and 1/2 brass.  Cut 5 3/8" of your 19/32" brass and 5 1/8" of your 1/2 brass. now cut 1/2" of your 17/32" brass and  9/16" brass. Now super glue the 17/32" brass into the 9/16" brass then super glue that onto one end of the 1/2" brass this is now your pusher . after you have done this carefull drill a 2 7/64" holes anywhere in the 1/2 pusher, make sure to debur the holes. These holes will prevents a vacuum forming  behind the dart then it is being loaded. Next take your 19/32 brass and super glue it onto the pusher. Your bolt is now done. I used a peace of 5/8" brass to bridge the gap between the 19/32" and the 1/2 pvc but you can use e-tap if you dont have any. It will look something like this


Now that you have this peace you can glue it into the plunger tube. Make sure none of it sticks out on the inside of the plunger tube. I used Lepage 100% glue for this because its strong but flexible, if your in the states this is called go2glue. Once it is cured you can carefully drill though the brass using the holes that you already drilled in the pvc plunger tube. To make sure everything is air tight put a ring of glue (goop or Lepage 100% glue/go2glue) around the bottom of the brass and let it cure, next put a layer of glue all over the front of the plunger tube. I dont have a pic of this sorry. 


Step 8: The pump grip 


Take your aluminum bar and cut two 14 1/4" peaces. Make sure one end is nice and square and round off one end.  Now cut a 3 1/3" peace of 1 1/4" pvc and 1 1/2" pvc and nest them together, you will need to rap the smaller size with e-tape. Now  on the rounded side of the bars drill a 3/16" hole though both bars, to make sure the hole is in the same spot on both bars i like to tape them together with some packing tape.  next drill 3 --- holes on the square side of the bars, i drilled them 1/4" apart.  Now that you have done that put everything aside, the holes that will allow the bars to be attached to the pvc are drilled later.  This would be a good time to make a grip for your pump if you want to. Mine looked like this when i was done 


Step 9: the plunger 


Get your 1/2" nylon rod and cut it to 10 1/2" next make your catch notch 5 1/4" back from one end of the rod (it must be omni directional). This one was cut on a lathe.  If you do use a lathe, center drill one end and then drill a 17/64" hole about 3/4" deep then tap with a 6-32 tap.


plunger catch .jpg


Now get your 1/4 polycarb( 1/4" hdpe works too) and cut 3 disks, two disks using a 1 3/8" hole saw and the other with a 1 1/8" hole saw. Once you have that done get your u cup and put the small disk in the center of it then the two other ones sandwiching it the screw it onto your plunger rod.I have a 1 1/2" rubber washer under my u-cup but its not necessary.   I padded mine with some craft foam and a rubber washer.


plunger head.jpg


I made a spacer for more spring compression out of 1/2" pvc and cpvc and come 3/4" pvc but its not necessary. It helps performance quite a bit in my opinion though. 


Step 10: handel 


Cut 2 1/4" of 1 1/4" pvc, chamfer both ends then cut the top off. This cut does not need to be perfect it will be cleaned up later. Do not take a lot off though, just enough to give you room to screw in the handle. You can make the handle any shape you want, I made a simple one out of oak. Attach the handle using 3 drywall or wood screws, i like to us 1/2 screws on the outside holes and a 1" screw in the middle. I also put some epoxy around the joint between the wood and pvd to smooth it out but its not necessary. Stain or paint the handle how ever you want, I just rapped e tape around mine. It will look something like this when you are done 


handel .jpg


Step 11: The stock 


Cut a peace of 1 1/2" pvc how ever long you want then cut a peace of 1 1/4" pvc the same size. Glue the 1 1/4" into the 1 1/2 then glue that into the elbow. It will look like this when its done 

stock.jpg


Step 12: trigger housing


 Cut three disks that will fit snugly in 1" pvc  from you 1/2" plastic , I used a small peace of 1" pvc to trace the inside of the pipe onto the plastic.  Next cut a 14" peace of 1" pvc. Cut the top off of the 1' pvc your taking about a little bit more then 1/4 of the pipe off. The goal of this is to have it sit nicely onto the 1 1/2" pvc body. Now put your disks indie the 1" and mark how much need to be taken off of them for everything to sit nicely onto the 1 1/2 pvc. After you have done that cut a slot on the bottom of the pvc, it will start 1" from the end and finish 2 1/2" from the end,this will allow the trigger to slide.  Now take the disks out of the 1" pvc and cut groves in the bottom of them big enough to let the trigger slide though them. Next cut a small triangle out of polycarbonate, this may take few tries to get right, I dont have measurements for you sorry. Secure the triangle into one of the disks using a small pin, the triangle  must be able to move, it will be what pushes on the catch screw. Here a some pictures of mine, if this does not make sense watch the video that is linked at the end of the wright up. 


cut trigger houseing .jpg


trigger brakets .jpg


Step 13: assembly 


Get your front magwell and insert it into the blaster, next get your front breach support peace and insert it into the front of the blaster, it should be pretty much flush with the pvc. Secure the front breach support with 3/8" 6/32 screws, i used 4. Next get your back breach support and slide it in the back of the blaster until it fits into the other side of the magwell. Next you slide your plunger tube with the plunger and springs in it into the back of the blaster, make sure you lube the plunger up well.  Next screw in your catch tube into the back of the blaster, you want your plunger rod to be sicking out of the catch by at least a 1/4" but no more then 1". Your should have something that looks like this now. 


plunger rod in catch.jpg


here is a pic of how the internals are in the blaster 


guts .jpg


Now screw on the trigger housing and stock. The trigger housing is supported by the magwell and the straps. Screw on the stock using one long screw at the bottom of the stock, you want the screw you go though the trigger housing, this will make sure it does not move backwards.  


back end .jpg


The last thing to do it to put the pump on, get your 2" 10-32 bolt and screw on the aluminum bars with it and secure with a lock nut on the other side, you do not want to over tighten this. Next slide the pump onto the front of the blaster and screw it to the aluminum bars. You can play around with the location a bit but make sure you can prime the blaster. 


NOW YOUR FINALLY DONE!! GO SHOOT SOME FOAM! 


 Here is a pic of what mine looks like 


Rev shot .jpg


A link to a video with a fireing test, range test, trigger demo and some ideas on how to now use a lathe will be up shortly. Thank you for reading, hope this helps. Questions are welcome 


Link: https://www.youtube....h?v=35TzVKIyOp0

Attached Thumbnails

  • pump grip .jpg
  • trigger houseing done .jpg
  • brass barrel .jpg
  • asembled mag well .jpg
  • assebled barrel.jpg
  • trigger.jpg
  • recever notch.jpg