roboman's Content
There have been 414 items by roboman (Search limited from 03-December 96)
#323989 Y.U.L.E.T.I.D.E.
 Posted by
on 28 November 2012 - 12:47 AM
in
Nerf Wars
Posted by
on 28 November 2012 - 12:47 AM
in
Nerf Wars
#246407 Working Semi-automatic Homemade
Posted by
on 10 August 2009 - 11:01 AM
in
Homemades
However, I think it could be simplified by using a design like this. All you would need to do is switch around a few tubing sizes, to make it nerf-sized, and hook that up to your valve, in place of your existing mechanism.
EDIT: I noticed that air is being released as long as the trigger is held down. Adding a semi-auto valve, like Zero's could lead to greater efficiency.
#303631 WNTS
Posted by
on 20 August 2011 - 11:26 PM
in
Homemades
Anyways, I like it. It kinda reminds me of a giraffe...
#303703 WNTS
Posted by
on 21 August 2011 - 11:26 PM
in
Homemades
UPDATE
Upon further testing I realized sometimes the balster wouldn't fire and the problem was the O-ring got stuck in the PVC and was just sliding around on the well nut. The solution to this is to superglue your o-ring on.
I really don't suggest using super glue on an O-ring, it tends to shorten the life of the rubber. I'd suggest something more rubbery, like silicone, or even hot glue. I'm sure Goop/E-6000 would work just as well.
#303636 WNTS
Posted by
on 21 August 2011 - 12:30 AM
in
Homemades
You should do an animal poll.
#303708 WNTS
Posted by
on 22 August 2011 - 02:44 AM
in
Homemades
Back on topic, I'd really like to see some pictures of a completed blaster with a pump...
#346055 Why is xplorer so expensive!?!
Posted by
on 08 April 2015 - 01:18 PM
in
General Nerf
I do not agree with all of the production methods they use, because there are definitely more efficient and less expensive ways to produce higher quality parts on the scale that they're currently doing. They are still pretty much the only mod kit supplier that is capable of doing all of their production in-house, and they're one of the only ones that offers machined metal parts. OMW's metal parts are die cast, which significantly reduces the overall strength due to the materials available for the process and an inconsistent grain structure as a result of multiple production factors. Mine are currently outsourced to a machine shop in China because I'm too busy with school to do the machining myself (but they have faster machines than I do anyway).
I've heard their shotgun grips have been dropping in quality because their molds are wearing out, causing flashing and poor finish on the parts. You'd think they'd just make another mold set, but I guess Heng doesn't want to do that...
#194189 Why Hasn't Somebody Thought Of This Before?
Posted by
on 05 December 2008 - 10:29 PM
in
Homemades
I don't mean to hijack the thread, but since the Big Salvo was mentioned from the start, I'd like to know if there is any significant body of work here on NH on the topic of piston type homemade valves. Like the valves used in SSPB, TS, Hornet, BigSalvo, SMDTG, etc., etc.
I'd really appreciate a few links or even suggestions what to search for, rather than to divert this thread away from sleeved-pin valves. I too was unable to solve the sleeve sealing problem in a way suitable for regular folks to make copies. But I still hope someone can.
By the way, I did build one where the sleeve was eliminated by using a solenoid to pull the valve open. Really cool, very effective, and at that time, the parts could easily be bought mail-order. Anyone who likes spending $50 and carrying around six D-cells (e.g., a Vulcan) might like my idea ... yeah, exactly my conclusion -- maybe for spudguns, but not practical for nerf.
I think this might be what you're looking for. The inline valve could probably be built for $20-30, and it would have a much better flow rate than a QEV. I think there was a thread on spudfiles about making an inline piston valve from an empty deodorant can. While that may be a little big for nerf guns, it could certainly be scaled down to the size you need.
#306962 Where To Buy Modding Materials
Posted by
on 04 November 2011 - 11:04 PM
in
Modifications
It's part number 2044T43, and is slightly less expensive per foot than it is from members of the NIC. The 4' length is useful for applications where barrels greater than 12" long are necessary.
#304047 What kind of valve would this be called?
Posted by
on 29 August 2011 - 08:03 PM
in
Homemades
I know the Marshmallow Blaster is like that, but I thought the Mazooka was an inverted swing check valve. There's only a little plastic nub sticking off the trigger in front of the chamber, and when you pull that, the pressure beats the small torsion spring and forces it open.
That's still the same concept; it just uses a flap instead of a piston.
#304038 What kind of valve would this be called?
Posted by
on 29 August 2011 - 12:59 PM
in
Homemades
I like the way it seals. I might have to alter my design, since it seems that a sealing face like that would be easier to make.
EDIT: Of course, if you really wanted one like that, I could definitely make you something out of aluminum or Delrin. The main advantage of a SCUNBAG is that it can be made without a lathe. I only used mine when I made it to clean up some faces, just so it would look slightly nicer.
#304058 What kind of valve would this be called?
Posted by
on 30 August 2011 - 12:05 AM
in
Homemades
Well then I need to re-read is a few more times, because I still don't get it.
You don't get how to assemble it, or you don't get how it works? The CAD model at the bottom shows a cutaway of all the parts installed.
#304051 What kind of valve would this be called?
Posted by
on 29 August 2011 - 08:40 PM
in
Homemades
I like how the scunbag can be made without a lathe, but it seems alot more complex than this in terms of number of steps to build it.
No, it's really not - I just broke it down into many steps, so that people could better understand how to put it together, since it's something that hasn't really been done in the homemade world before.
#181429 What Is A Silencer? And A Breach Idea.
Posted by
on 04 October 2008 - 08:55 AM
in
Modifications
EDIT: You might want to fix your spelling and grammar before the mods get here.
#244601 What I've Been Working On
Posted by
on 29 July 2009 - 06:34 PM
in
Off Topic
#328182 W.H.O.O.P.S.
Posted by
on 18 March 2013 - 11:30 PM
in
Nerf Wars
#330502 W.A.R.M.U.P.
Posted by
on 02 June 2013 - 06:51 PM
in
Nerf Wars
#330511 W.A.R.M.U.P.
Posted by
on 02 June 2013 - 10:46 PM
in
Nerf Wars
Oh if you bring the tanks we talked about, I can buy them there. If I can convince my buddy to come with, that is haha.
I'll see if I can have them ready by then.
#299939 W.A.A.G.O.B. (SCUN June War)
Posted by
on 16 June 2011 - 12:16 AM
in
Nerf Wars
Should be there, and ready to unveil a new game type that Mr.Apollo and I have been working on.
Ooh, sounds fun!
#171983 Vulcan With Roto Track Spring?
Posted by
on 24 August 2008 - 09:14 AM
in
Modifications
this may be because i've only moded my scout
If you've only modded your Scout, then it probably isn't a good idea to jump in and mod your Vulcan.
I was hopeing to increase some range because im only getting some were around 15'' (eye balled it so it may be more or less) with stock.
15" doesn't sound right for a Vulcan. Mine gets around 35 ft right out of the box!
#184035 Vulcan Safety Removal
Posted by
on 15 October 2008 - 10:03 PM
in
Modifications
#310136 Vulcan "Voltage", a 440 Volt Chain-Fed Coil Gun
Posted by
on 25 January 2012 - 11:57 PM
in
Off Topic
EDIT: Just noticed the "100% Portable" note at the top.
#304333 Valve Help
Posted by
on 05 September 2011 - 11:24 AM
in
Homemades
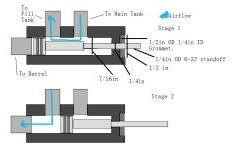
It would really help me if the image was bigger - I can't read the text around it.
From what you've said, your problem could stem from the grommet not being tight enough around the pin. You probably need to make the counterbore where the grommet goes slightly smaller, which means that you'll most likely have to re-make the entire thing. A lathe would be quite helpful.
I guess that as long as you can see the picture, I can fill you in on the problem area (the rest doesn't matter.) Basically the main valve ID is 7/16in then it tapers to 1/4in and then it expands to 1/2in to fit in the grommet. It has friction between the firing pin and the grommet already, and the surface area of the ID of the grommet is about an 1/8in deep. I don't have access to a lathe, and I don't really want to have to spend alot of money to get it custom made. I know you do custom work for a relatively cheap price, but it's still an expense I'd like to avoid.
I see. If I correctly understand what Ricochet is saying, he's suggesting a second set of o-rings on the stem. This a a really good idea, as it is easier to implement, especially if you've used a bolt and standoff as your pin. All you'd need to do is make another o-ring "sandwich," like you did before, and install it on the other end of the rod. This would necessitate the removal of the area that normally holds the grommet in place, but should make the valve much easier to produce, should you ever need to make another.
#304291 Valve Help
Posted by
on 04 September 2011 - 05:34 PM
in
Homemades
(I hope I put up the image the right way.)(why is this so hard?)
I'm having trouble with the grommet's seal on the valve I'm making. I epoxied it into place and the seal will hold up to 20 psi. After that, it leaks from the area between the standoff and the ID of the grommet. How can I fix this? I'm out of delrin so I hope to fix this without having to remachine the whole thing. Perhaps the trouble is because I made this on a drill press instead of a lathe, possibly causing a slight misalignment.
[IMG]http://i1208.photobucket.com/albums/cc374/lighthawk2/ValveDiagram.jpg[/IMG]Copy/paste that in place of the broken image code in your post.
It would really help me if the image was bigger - I can't read the text around it.
From what you've said, your problem could stem from the grommet not being tight enough around the pin. You probably need to make the counterbore where the grommet goes slightly smaller, which means that you'll most likely have to re-make the entire thing. A lathe would be quite helpful.
#334306 Ultrafire 14500 protected issues
Posted by
on 28 September 2013 - 02:42 PM
in
General Nerf
#335649 U.G.L.Y. S.W.E.A.T.E.R. Jan 25th
Posted by
on 26 November 2013 - 07:14 PM
in
Nerf Wars
#300467 Turtle Wax + Brass
Posted by
on 24 June 2011 - 03:01 PM
in
Modifications
#300452 Turtle Wax + Brass
Posted by
on 24 June 2011 - 12:01 PM
in
Modifications
#202201 Turret Spacer Templates
Posted by
on 09 January 2009 - 09:57 PM
in
Modifications
#338982 TR-27 GRYPHON - CR-18 Rapidstrike Mod
Posted by
on 16 May 2014 - 04:54 PM
in
Modifications
Wow, I'm glad you all liked it so much. It really has been a very fun project to work on.
roboman
The piston motor must have a motor brake in order to stop fast enough that you only fire 1 dart. I did some testing to see just how effective the brake was. I ran the motor at full speed for 1 revolution, and then let it coast. After that single revolution, it coasted 2 and a half more without power.
So far I have been using a micro relay to engage the motor brake, and a MOSFETT to control the speed of the motor. I'm going to experiment with an H-Bridge for two reasons. First, it has a built in braking system that unlike the micro relay, will not interfere with communications between the Arduino and the Max7219 LED controller. Second, I am considering using reverse to stop the motor even faster than the motor brake could. (Yes, I know this will put a lot of stress on the motor.)
Both Bee-Ri & roboman
Code code code... I'm really thinking about it guys. On the one hand, I love to help others and explain everything away. But on the other, I'm hoping to sell this, and hopefully pay for my Nerf/electrical hobby. If I can bring in enough income, I'll keep modding more blasters.
I'll let you guys know what I decide on. As an alternative, I might make an in-depth article about programming though.
Good news though, my H-Bridges came in today, so I'll be experimenting with them shortly! Thank you all for your compliments and input. Like I said, I think Nerf and I will have a bright and fun future together.
I guess that makes sense. I was planning on retaining the original piston reset switch so I don't have to worry about braking or anything, since it shorts the motor contacts and does the same thing that you're doing with an H-bridge. The reverse is an interesting idea, though it will be interesting to see how you wind up applying it during the firing cycle, because if it's wrong, it obviously just won't work right.
As for the code, I understand where you're coming from, but keep in mind that your code will only work on your setup unless someone manages to exactly copy what you did, and the people who are willing to put the time and effort into building one of these or even something similar generally aren't going to be interested in paying you to do it, so releasing your code just helps the community build cooler stuff and improve on what you did. Besides, you're gonna have competition from me in about a month or so in the form of drop-in modular kits, regardless of whether your code is public or not, since I don't even work in the same language that you used; I'm just interested in seeing what you did because I like reading through that kind of thing.
#338914 TR-27 GRYPHON - CR-18 Rapidstrike Mod
Posted by
on 13 May 2014 - 12:33 PM
in
Modifications
Would you mind posting your code or a link to Github or something? I'm interested to see how you did it.
#180942 The Official Snapbow Writeup
Posted by
on 01 October 2008 - 09:49 PM
in
Homemades
#202203 The Foundational At2k Airflow And Much More Modification
Posted by
on 09 January 2009 - 10:05 PM
in
Modifications
#241548 The Fomebow - Extensive Bow And Arrow Makeover.
Posted by
on 11 July 2009 - 10:07 PM
in
Modifications
[ If you decide to use the bow arms , you must reinforce the part where they go into the main body of the gun.
Why would you need to do that? They're not load-bearing structures... They're only there for aesthetics.
#272742 The At2k Turret "gear"
Posted by
on 20 April 2010 - 12:10 AM
in
Modifications
Basically, you can't buy that part. If you own or have access to a decent lathe, you could make your own with a knurling tool. Seeing as most people don't, I'm going to make the assumption that you can be lumped into the "lathe-less" category, as well.
Also, that shaft appears to be made of stainless steel, which is very difficult to machine without proper tooling. I highly doubt you could find/make a replacement part for less than the cost of a new turret.
#306914 Tetra Strike Re-barrel, Pump replacement
Posted by
on 03 November 2011 - 11:53 PM
in
Modifications
I like the cleanliness of the mod quite a bit.
#330908 Tactical Rail Dimensions
Posted by
on 15 June 2013 - 03:10 PM
in
Homemades
#338883 T.U.R.N.U.P.
Posted by
on 12 May 2014 - 12:12 AM
in
Nerf Wars
#331065 [WIP] Stampede ACB, the Arduino-powered Stampede ECS
Posted by
on 19 June 2013 - 11:16 PM
in
Modifications
You might also want to consider a switch to detect the position of the plunger at the extremes of its travel, so you don't have to rely on timing to get the cycle correct.
#331145 [WIP] Stampede ACB, the Arduino-powered Stampede ECS
Posted by
on 22 June 2013 - 01:17 PM
in
Modifications

