Thanks. I use the camera mode on my Canon HF200 camcorder. Its a decent camera, not great, but the trick to a nice looking picture is lighting. I use a huge work lamp straight above the gun for those last few shots. It looks really good that way.An amazing guide, out of curiosity, what kinds of camera do you use, it has amazing quality, or maybe my camera just sucks.
Banshee's Content
There have been 572 items by Banshee (Search limited from 03-December 96)
#316533 Banshee's Guide to Painting: Part 2
 Posted by
on 05 June 2012 - 12:37 AM
in
Modifications
Posted by
on 05 June 2012 - 12:37 AM
in
Modifications
#316373 Modification and Paintjob Pictures
Posted by
on 31 May 2012 - 06:59 PM
in
Modifications
Just when you thought my Defender overhaul couldn't get any more badass, it DID.
That's two SSPB's with CPVC barrels on each side where the original ammo holder was.
I had the idea to do this before I ever posted the original writeup, but unfortunately I only had one SSPB and all the nearby stores were out of stock. So I finally got one and slapped it on!
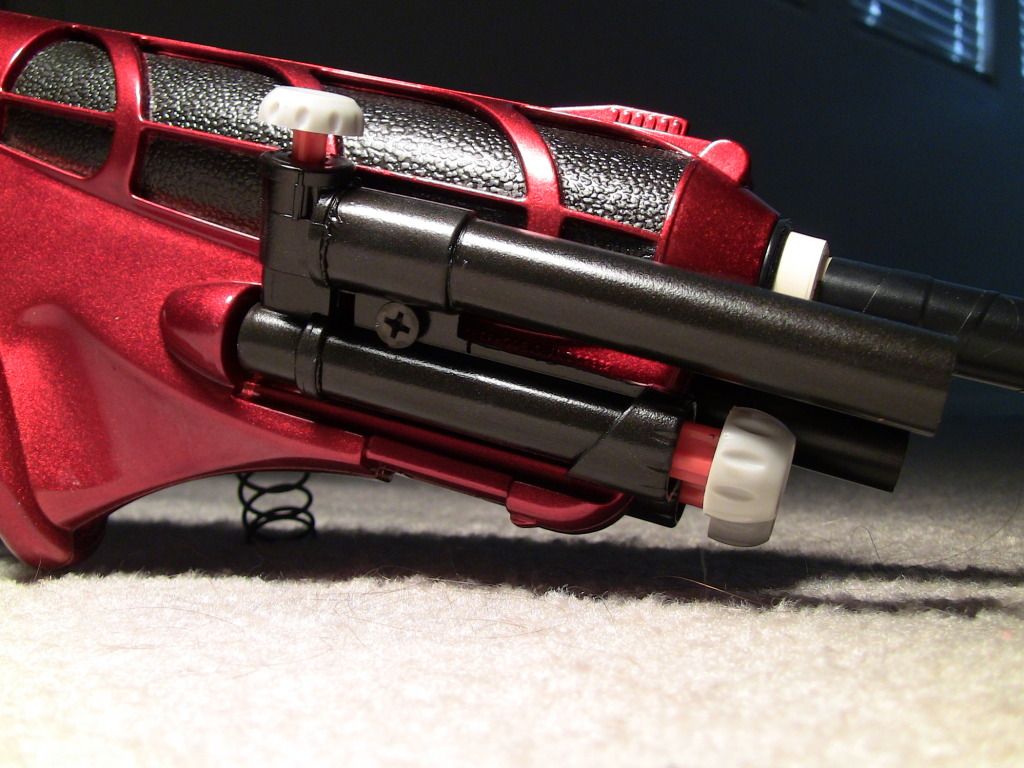
Its like the gun was made for them! In case you were wondering what screws those are mounting them on, its a 1" coarse thread drywall screw on each side. It only takes one and its rock solid. Three shots out of one gun!
That's two SSPB's with CPVC barrels on each side where the original ammo holder was.
I had the idea to do this before I ever posted the original writeup, but unfortunately I only had one SSPB and all the nearby stores were out of stock. So I finally got one and slapped it on!
Its like the gun was made for them! In case you were wondering what screws those are mounting them on, its a 1" coarse thread drywall screw on each side. It only takes one and its rock solid. Three shots out of one gun!
#316334 Banshee's Guide to Painting: Part 2
Posted by
on 30 May 2012 - 06:41 PM
in
Modifications
A quick tip, that bondo is going to crack and fall out. Spot putty is used for what it says in the name, filling spots or small air bubbles in primer coats and things like that. When used thickly it doesnt cure correctly. The whole process was well done though, just use real bondo and you're good to go. You can get a reasonable size thing for cheap at harbor freight.
This isn't the first time I've used spot putty. I've done 5 AT3K's using that exact method, I filled a dent the size of a quarter on a motorcycle tank, and I've refinished half a dozen guitars all using spot putty. You're right that it cracks when you put it on thick, but that's why I put in my post that you need to use thin layers for that exact reason. I use tons of Bondo as well, but the purpose of this write-up was to show how a person can do this cheap, and with little experience. Spot putty is very simple, and very cheap.
Also if you carried the curve of the bottom over where the slots were it would look real nice.
And I have no idea what you're talking about... Haha
#316150 Banshee's Guide to Painting: Part 2
Posted by
on 25 May 2012 - 08:17 PM
in
Modifications
Well, what grit of sandpaper would you say your handle is comparable to? I would say mine feels like 350 grit, so that's pretty fine grit, its certainly not rough on the hands. But yes, I do have very calloused hands, I work as an auto mechanic. No I didn't use a sealer on the handle, though that would help, I just laid it on really thick, which might have an effect on the texture, though I'm not positive. Did you use the same Rustoleum brand that I used? Because Duplicolor's version is considerably rougher.So I tried your recommendation for using Truck-Bed Liner for handles...and you're right, "it’s like liquid sand paper," and it feels like sandpaper on my hands too. To say that this increased the feel of my handle was an understatement. Maybe my hands aren't as calloused as yours, but after spraying it on a test handle it felt like I was holding fine grit sandpaper. Which was uncomfortable. I was wondering if you coat the Truck-Bed Liner with sealer afterwards, and maybe that's why it feels rough to me. The rest of your painting advice is great, I'm just not sure that Truck-Bed Liner is for everyone.
#316114 Adhesive recommendation - Nerf plastic to epoxy putty
Posted by
on 25 May 2012 - 12:40 AM
in
Modifications
I've had the exact same issue you're having. I fixed it by taking a few small screws and screwing them half way into the surface of the orange part around where the coupler will go, then I put the epoxy putty on. That gives the epoxy putty a 3 dimensional shape to mold around, and you will never get the coupler back off.
#315964 McMaster-Carr PETG Tubing
Posted by
on 21 May 2012 - 07:17 PM
in
Modifications
Yes, the PETG I bought measures at .528. I just got home and I've been sticking darts in it to see the fit. Now keep in mind, I use primarily modified Streamline darts, but the PETG has a pretty good air gun fit. Just barely snug enough so the dart wont fall out of the barrel. And you can shake it a bit and it wont fall out. In comparison to the PETG I used to get, its identicle. Good stuff, I recommend getting PETG from McMaster, but like Naturalman said, I would order large quantities. I ordered 40 feet, which to me isn't a large amount. Next time I order, I will probably get at least 100 feet.I, too, have bought some of this tubing before and can add my opinion. In regards to shipping, buying in larger quantities at a time seems like a better idea to me because of the oversized box they shipped mine in. I measured it with my digital caliber and its ID was .535 and OD was .565. I've been reading various other threads about PETG in the past and read that "the good stuff" is .528 ID and .573 OD. I think McMaster tubing is pretty good stuff.
#315946 McMaster-Carr PETG Tubing
Posted by
on 21 May 2012 - 03:04 PM
in
Modifications
That's a neat idea, I might try that, seeing as I have a lot of cutting to do. Haha.If I may make a suggestion, as long as you can find piping/rod that will fit inside your PETG (1/2" dowel rod works great), you can still use your pipe cutters and do a clean cut. I've done this with both barrel material and 1" PETG. It's ok if it's not a snug fit, the main idea is stopping the PETG from flexing so that you can make a clean cut.
#315943 McMaster-Carr PETG Tubing
Posted by
on 21 May 2012 - 02:23 PM
in
Modifications
Well I had the order sent to work where I am now, and I wont be able to let you know until I get home, so I will be sure to do that as soon as I can. But as far as I can tell, its identical to the stuff I used to buy from taerKitty.Glad to hear it worked out. How does the dart fit compare to the PETG you've gotten from elsewhere?
#315941 McMaster-Carr PETG Tubing
Posted by
on 21 May 2012 - 02:04 PM
in
Modifications
I know this thread a couple weeks old, but I figured I would finish it off by mentioning that I decided to take a gamble and order the PETG from McMaster. I ordered ten, 4' sections that cost me a little over $13, and it took 2 days to get to Phoenix from their warehouse in CA via UPS. The total for shipping ended up being only $6. They shipped it in a large box that could've fit 10x what I ordered, but it was still only $6. So overall it ended up being less than $20 for 40 feet which is a smoking deal at less than $.50 a foot.
So if you're going to order from McMaster, its a good idea to find out how far from the nearest warehouse you are before ordering. Also, don't waste you time with the "special instructions" box, they completely ignore your requests to cut the tubing down, and now I have to sit down with a hack saw and do it myself. So now you know what to expect when ordering PETG from McMaster!
So if you're going to order from McMaster, its a good idea to find out how far from the nearest warehouse you are before ordering. Also, don't waste you time with the "special instructions" box, they completely ignore your requests to cut the tubing down, and now I have to sit down with a hack saw and do it myself. So now you know what to expect when ordering PETG from McMaster!
#315902 Longshot air seal problem
Posted by
on 20 May 2012 - 01:19 AM
in
Modifications
Yeah, I would say 60 feet is probably accurate. I don't know how strong your spring is, but when I add a NF spring with the stock spring along with basic mods, I get around 70-75 feet. But that's with a good NF spring, like one of the older ones. The new ones are almost useless because they're so weak.Thank you for the picture, Hammy. Indeed, the bolt does leak air very fast if the bolt is not securely fashioned. Banshee, it may very well be that the bolt is not locked forward, despite outwardly appearing to be in the forwardmost position. I'll look into putting back in some locks. The blaster still gets identical ranges to my Longstrike with its AR removed and re-lubricated internals, which is about 50ft parallel to ground. Was it just a myth perhaps that basic mods on a Longshot get 60ft+ ranges because of its huge plunger tube, stronger spring, and direct plunger setup? Anyhow I will open up the blaster tomorrow and check the air seal when I push the bolt forward with the priming handle.
Thank you all for the helpful suggestions.
#315896 Longshot air seal problem
Posted by
on 19 May 2012 - 06:49 PM
in
Modifications
It kind of sounds like the bolt isn't being returned completely forward. That means the plunger will hit the part you showed in the picture harder than normal, and because that piece isn't pushed all the way forward for the o-ring to seal, air escapes around it giving you poor performance and virtually no air seal. And because you took all the locking mechanisms out, you don't even have to return the bolt to the forward position to fire. You don't have to have the bar very far back at all to have this problem, maybe 1/8" to a few millimeters. You might not even notice it.
That's just a theory, but if that is whats happening, you need to open up the gun and manually operate it and see whats not working perfectly. Usually its just a misaligned part inside the gun.
That's just a theory, but if that is whats happening, you need to open up the gun and manually operate it and see whats not working perfectly. Usually its just a misaligned part inside the gun.
#315625 Banshee's Guide to Painting: Part 2
Posted by
on 13 May 2012 - 01:17 AM
in
Modifications
Thank you, I didn't know if anyone would notice that. HahaSolid guide; I really like how you used springs to pose the blaster. Quite clever.
#315614 Banshee's Guide to Painting: Part 2
Posted by
on 12 May 2012 - 09:27 PM
in
Modifications
How is the fit of the aluminium rings on the PETG? Is it 'snug' or loose?
It's an interesting find. If you knew where it's from that would really help. I can see a potential for breeches with this.
Your ranges aren't too surprising but streamlines (unmodded) always explode coming out of my higher powered blasters. I'd be interested to know your ranges with slugs and or domes to compare with my own.
My theory is, if the paint job is cool it will shoot farther.
It's actually not aluminum, it's stainless steel. I had an old towel rod lying around, and I used that. It was a pretty snug fit, I don't even think its glued on. But yeah, streamlines do explode, that's why mine have a layer of packing tape around them to protect them. That might have something to do with the ranges too, but I didn't think it would help ranges, if anything, I thought it would hurt them.
#315586 Banshee's Guide to Painting: Part 2
Posted by
on 12 May 2012 - 01:23 PM
in
Modifications
Yes, you don't have to make it actually run or drip, but it needs to be a heavy thick coat done very quickly. I usually hold the can about 2 inches away when I do this. You can get a good idea of what it should look like in the picture before I put the Saran wrap on. The thick coat helps slow down the drying time which gives you a few more seconds to work, and it exaggerates the effect a bit more.Great guide, just one question, when you apply the paint to create the marble effect do you have to put on enough to make a 'runny' coat before you add the cling film? And is it easy to recoat?
Also props to getting those mad ranges out of a 3k. No sneaky tank expansions?
As for recoating, I'm not sure what you mean. If you layer the effect on top of more effect, you're going to have too much silver and not enough black and it wont look as good. But adding new sections of the effect to the rest of the gun is very easy. Its one of those things that are better explained if you try it yourself. And no, no tank expansion on the AT3K, just confusingly high ranges. Haha.
#315581 Banshee's Guide to Painting: Part 2
Posted by
on 12 May 2012 - 08:14 AM
in
Modifications
Yeah, I've painted 3 or 4 guitars with the marbling technique, all with high gloss clear. But I've been wanting to do this flat paint job for a while now.I like how you treated the slots on the side with Bondo. Something I will have to do to my latest (and future) AT3K's.
I've seen this technique done on Motorcycle gas tanks and helmets. I would suggest top coating with high gloss clear coat, wet sanding smooth, buff and polish. The end result is a really cool 3D type effect. I know you said you didn't want a clear coat but a high gloss one as opposed to the normal flat would add to this effect.
example
Nice work. I thought I'd be the first to do this to a blaster but you beat me to it.

#315574 Banshee's Guide to Painting: Part 2
Posted by
on 12 May 2012 - 01:31 AM
in
Modifications
Yes, its just like paint, re-coat at anytime. It seems to develop the same texture whether you put it on thick or thin, as well.This is really interesting stuff. Very cool! So use it like spray paint? Does this mean multiple coats?
I love your painting write-ups! Thank you very much for sharing!
#315569 Banshee's Guide to Painting: Part 2
Posted by
on 11 May 2012 - 10:38 PM
in
Modifications
Step 2: Marble Painting
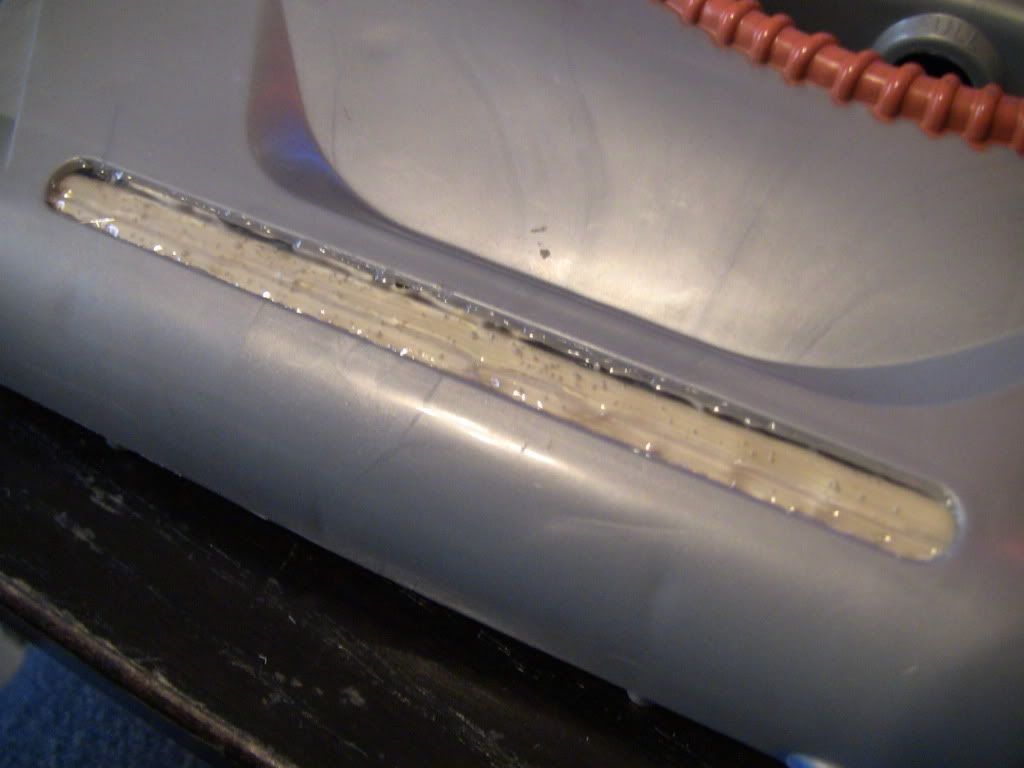
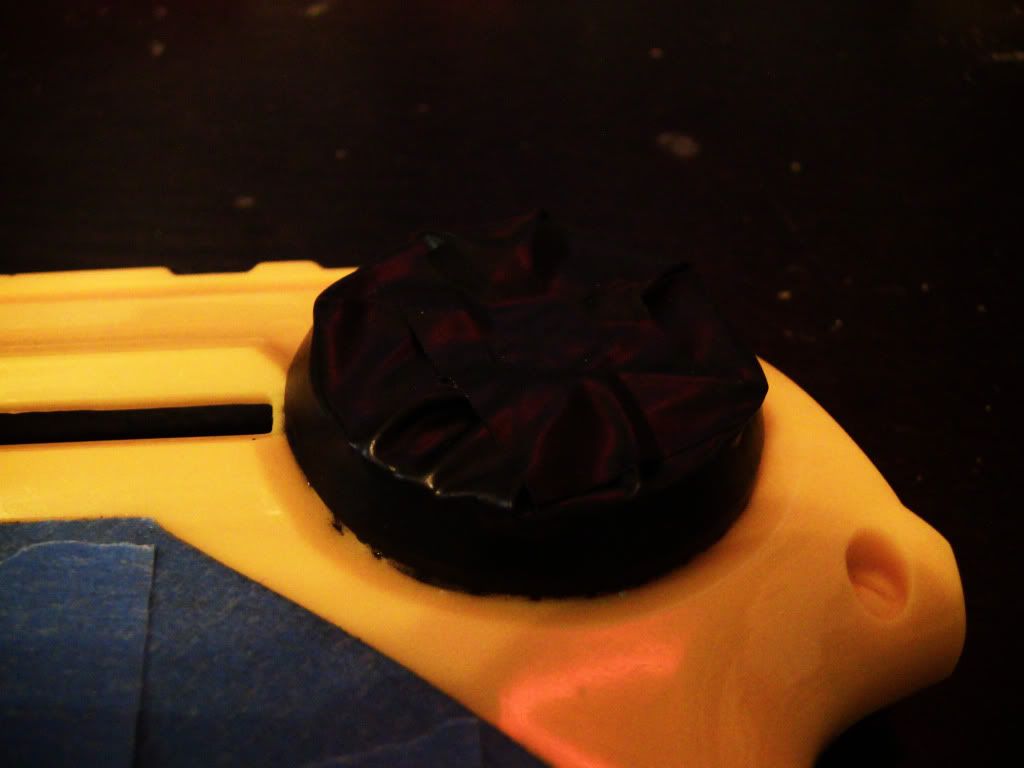
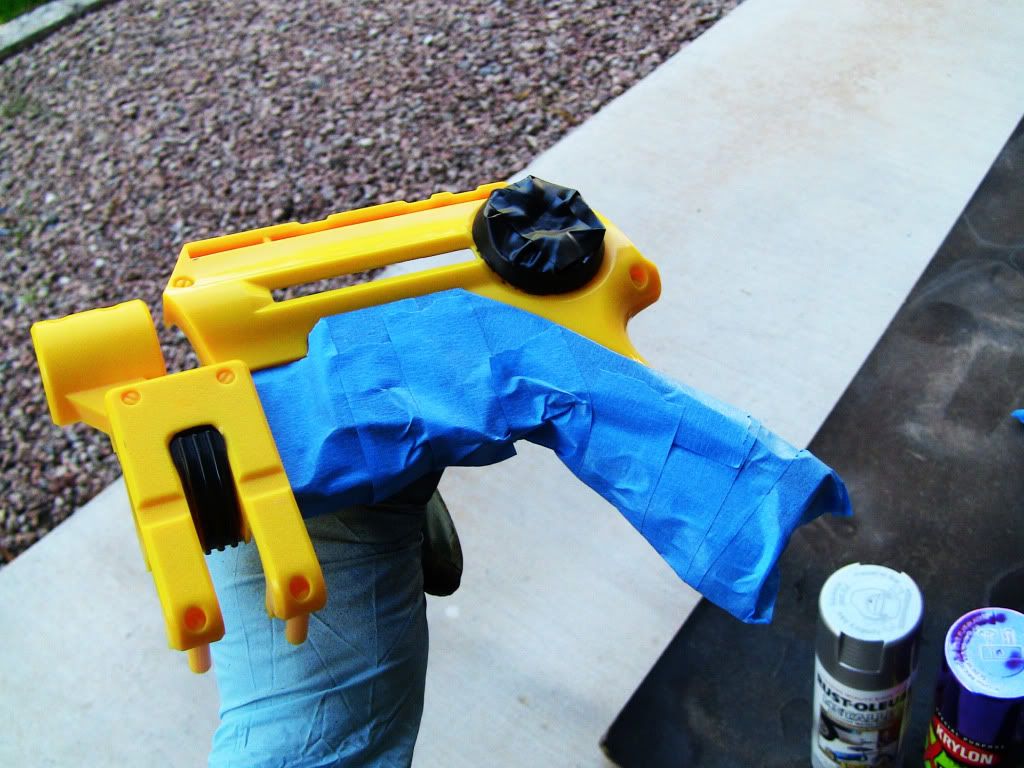
This next step is where we begin our “marble” painting. Marbling is a very simple technique that will give you one of the most visually intriguing finishes you will ever get from a rattlecan. And once you do it, you will laugh at how easy it was, and how awesome it looks! But before I get into that, you need to paint your gun with a flat black base coat or primer. And as you can see in this picture, my pump handle slots are completely gone, and that’s what yours should look like after the base coat.
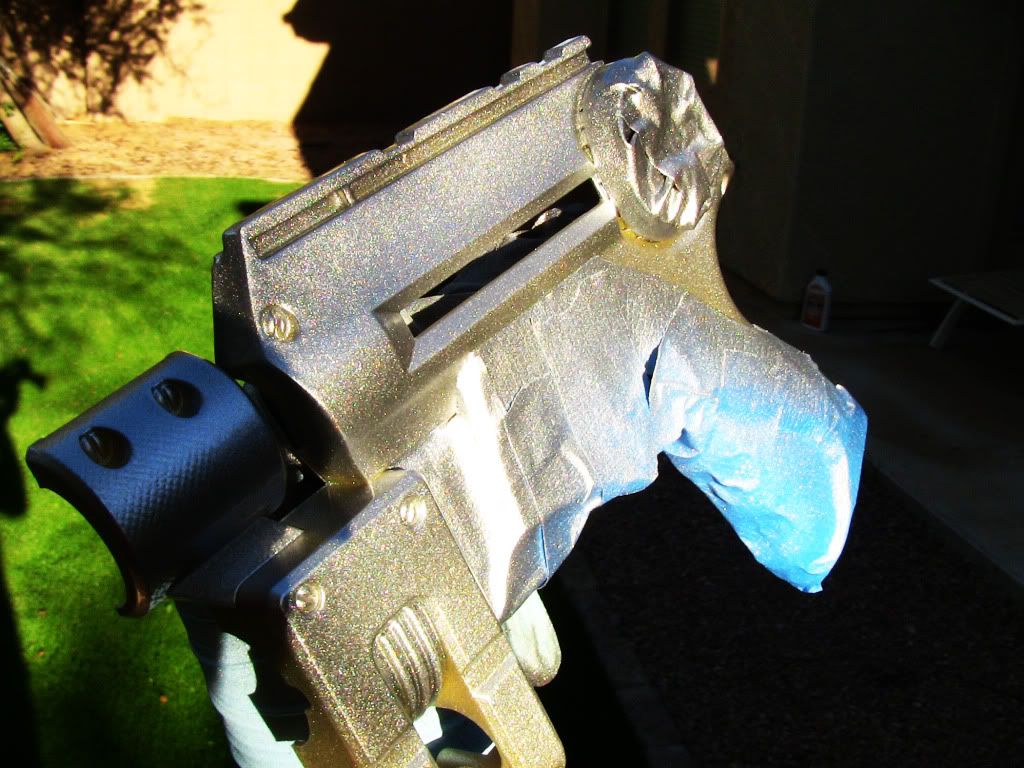
You’re going to need Saran wrap, and a silver metallic paint. This part helps if you have two people. One person to hold the shell, the other person to spray the paint and work the saran wrap. If you don’t have two people, then good luck! I’ve done it before by myself, but it ain’t easy! You’re going to need to tear off a square of Saran wrap, spread it out and place it in your hand.
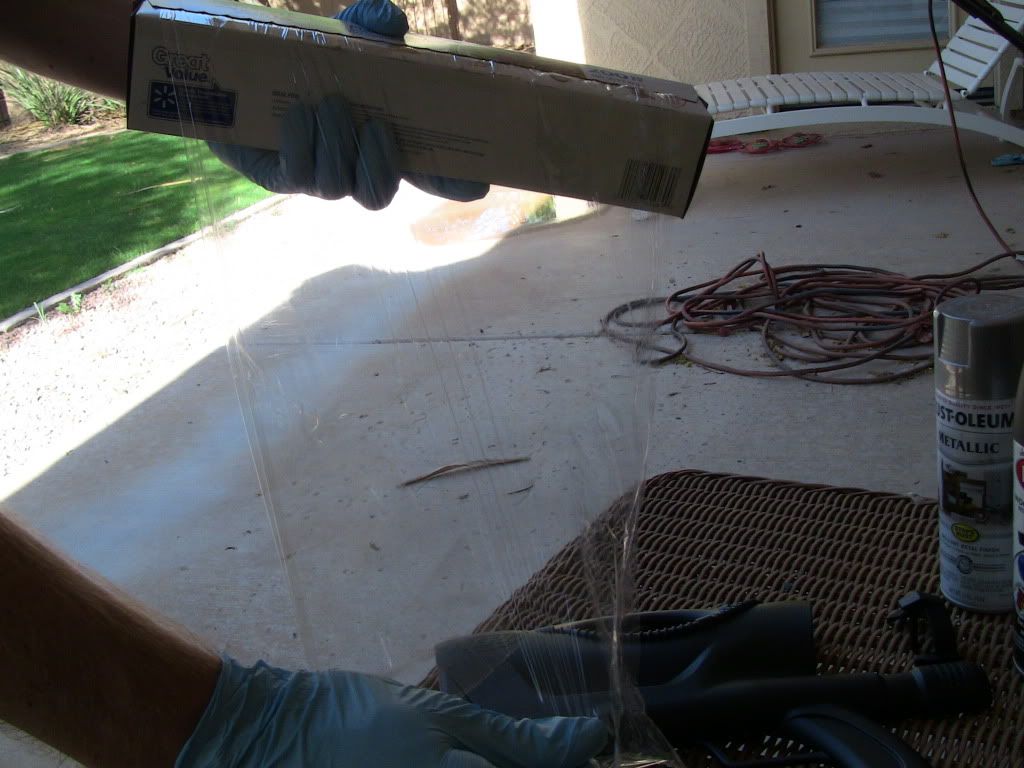
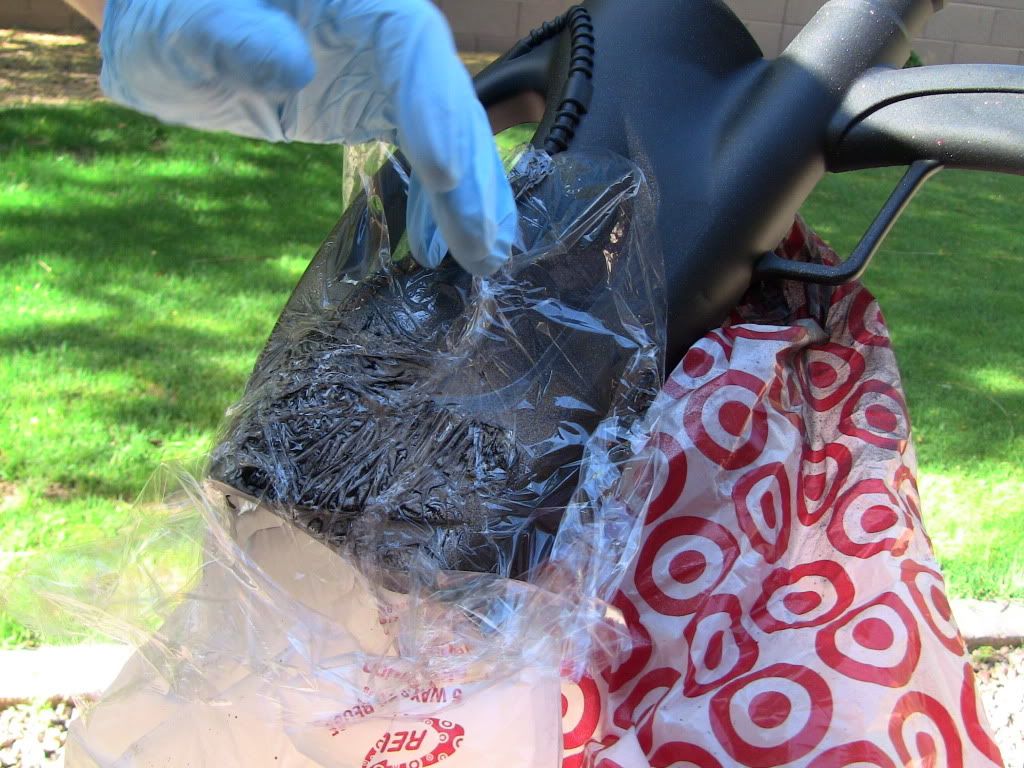
This part needs to be done very quickly and it’s why you should have another person help you. You need to spray a very thick, wet, and runny coat of paint on one part of the gun. I generally try and do it in sections the size of my hand, so when I place the Saran wrap on it, it does its job the first time.
Immediately after you spray the paint, and I do mean IMMEDIATELY, you need to place the Saran wrap on top of the wet paint. And make sure you paint is thick and runny. That may seem counterproductive, but for this paint job, it’s exactly what you need. You can crumple, stretch or twist your Saran wrap however you want at this point for whatever effect you want, feel free to experiment. But you only have about 2 or 3 seconds to do it before you need to take the Saran wrap back off.
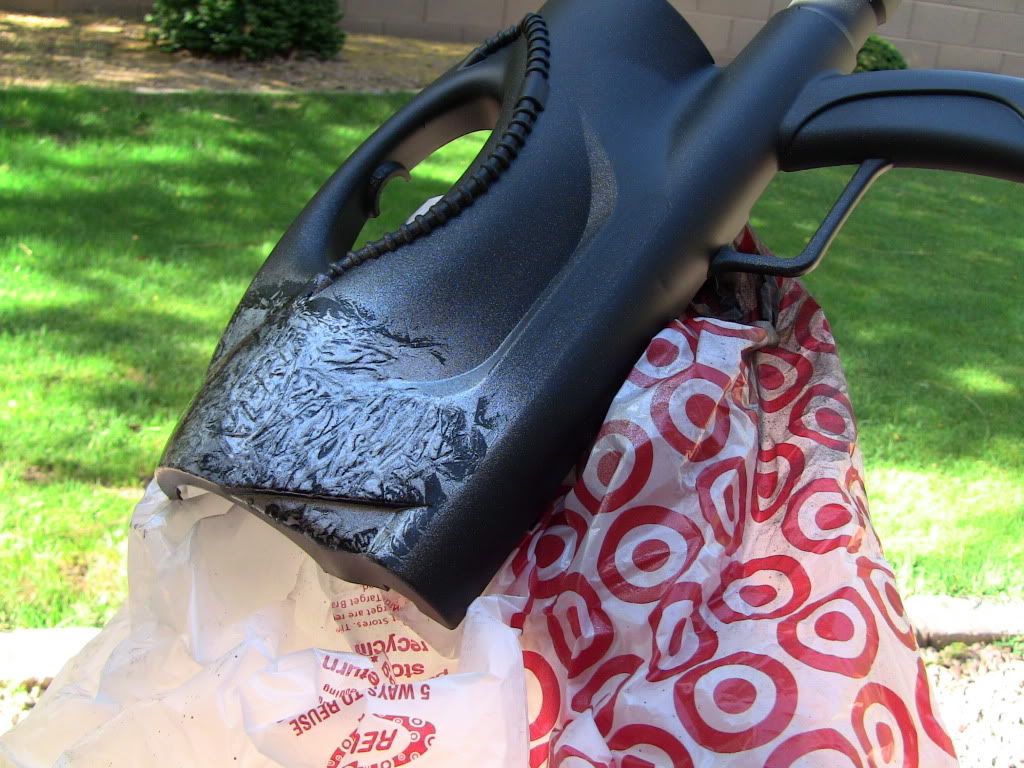
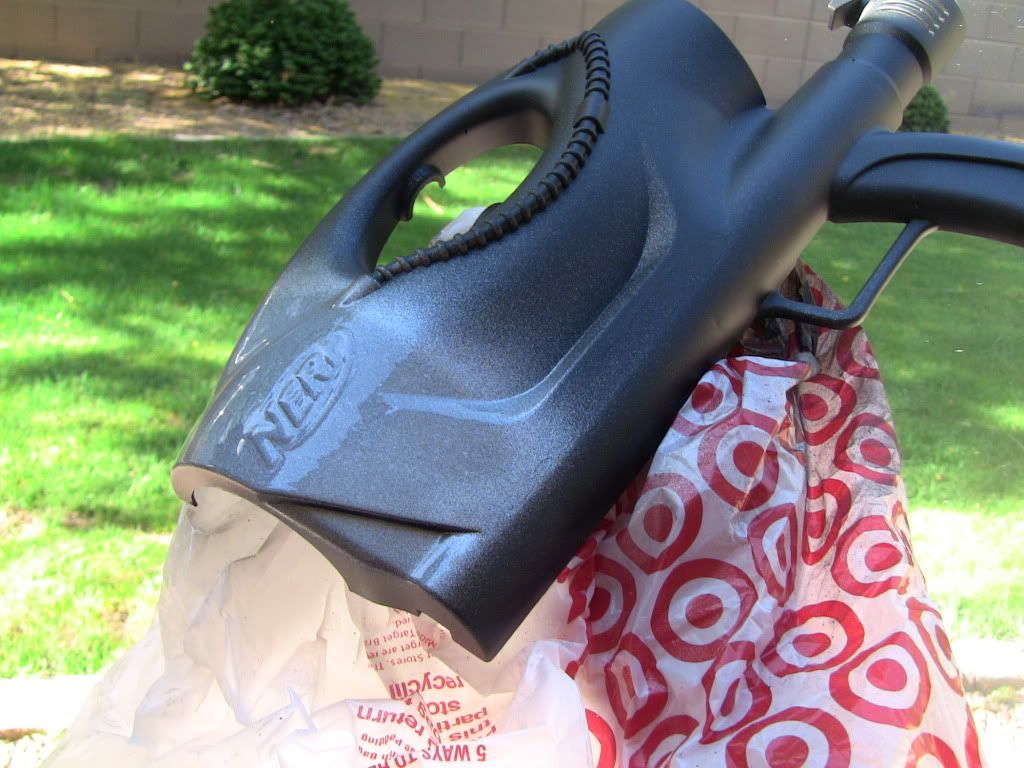
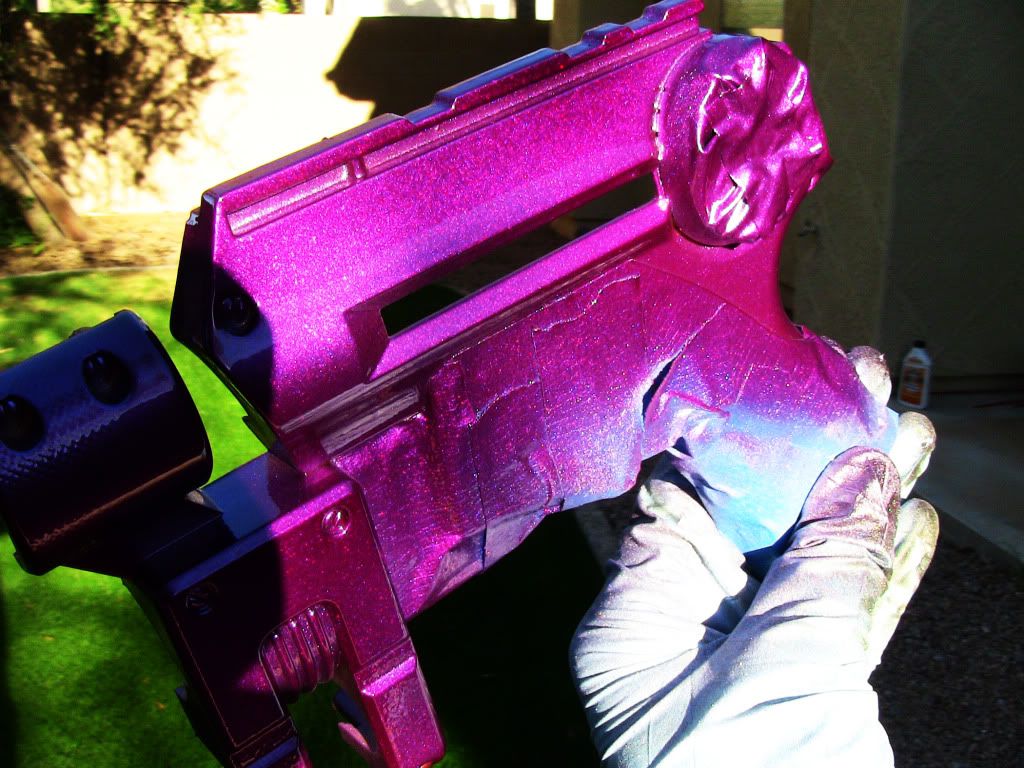
But that’s what it should look like! If it looks too light and too silver still, you either took too long to get the Saran wrap on, or you didn’t use enough paint. If you took up too much of the black paint and you can see the original plastic underneath, you need to start over and make sure your paint sticks this time. But just continue that process over the entire gun, don’t worry about overlapping sections, you will never see the difference. Just be quick about it and consistent.
Now is the time to candy coat it if you want another color other than silver. You can use Krylon X-Metals as mentioned in Part: 1 or Duplicolor Metalcast. For mine, I wanted a flat silver with no clear coat.
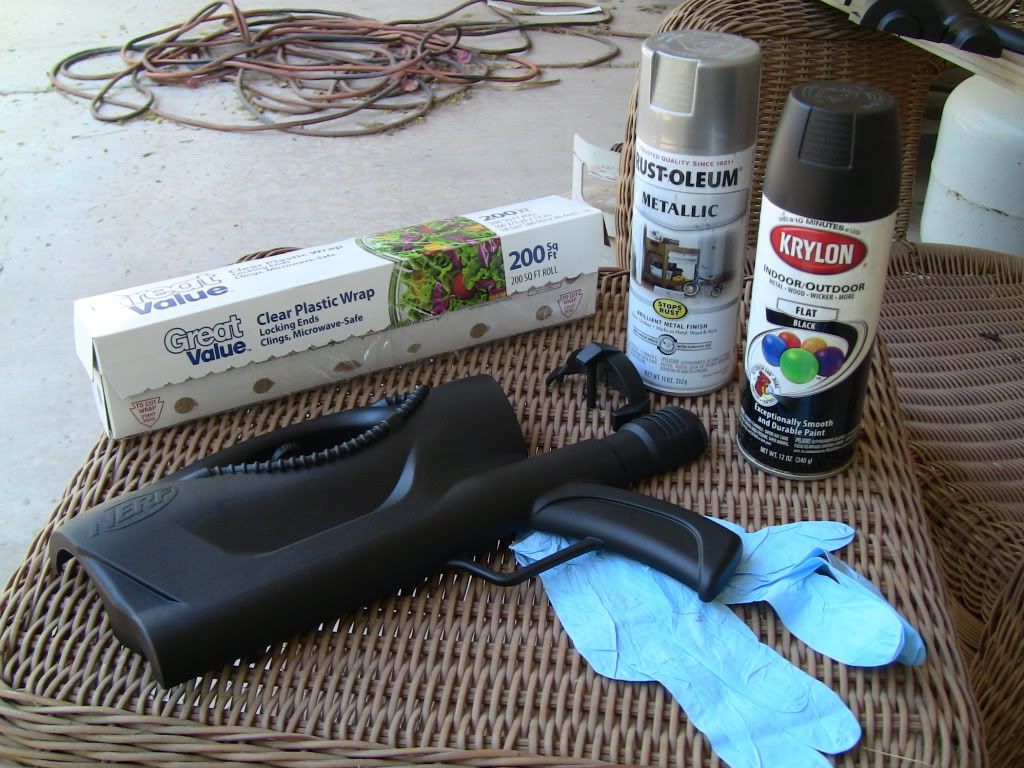
Step 3: Bedliner
Bedliner isn’t something I ever see anyone else use of their guns, but they should! You can buy it in a spray can at Wal-mart for like $8, and it goes on like any other spray paint, but it’s like liquid sand paper and it’s hard as nails. It really increases the feel of your handle, it takes it from feeling wimpy to feeling like you’re holding a power tool. I highly recommend you give it a try. Hell, paint your whole gun with it if you want! But the stuffs not cheap and it doesn’t go very far at all. Haha. Just tape off the area you want to spray, and then cover the rest of the gun. It’s really easy, just like paint.
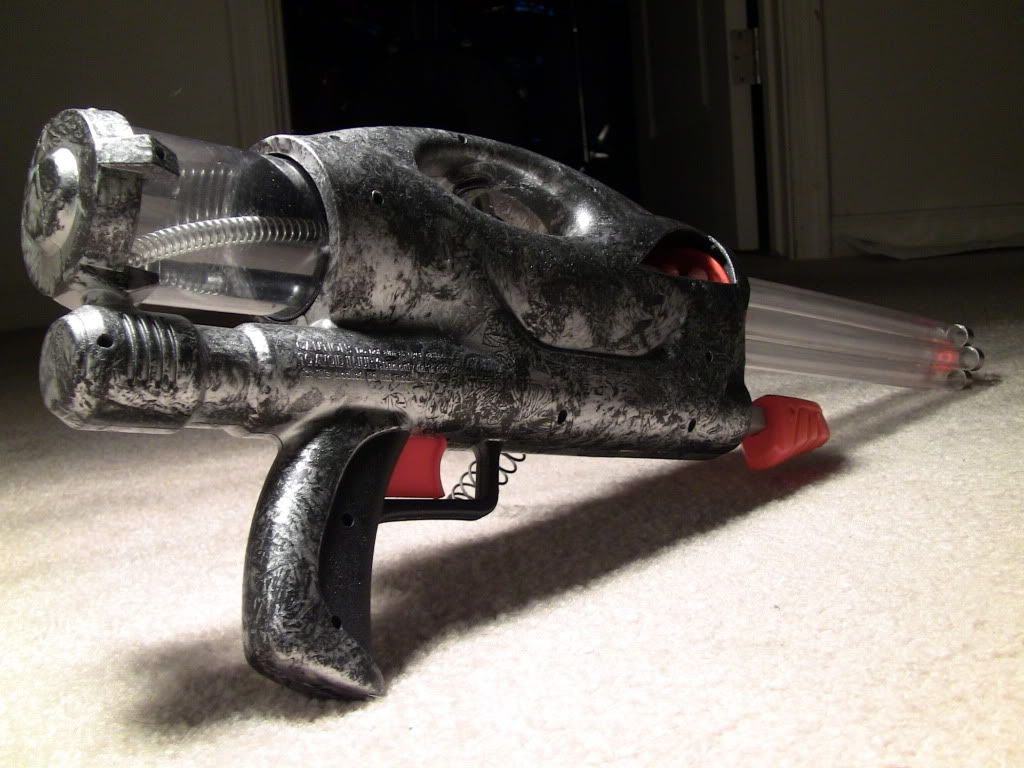
And now you’re done! You can spend hours looking at the detail in the paint, it looks so deep and three dimensional.
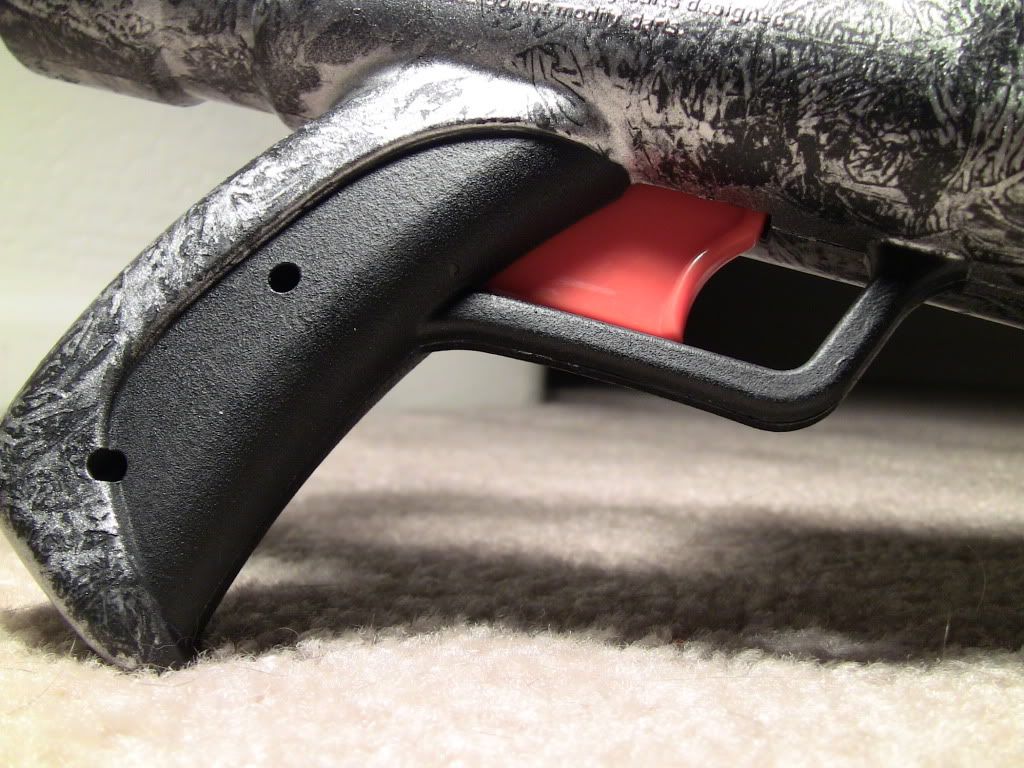
Here’s a shot of the bedliner grip. It’s subtle texture, but it feels really nice.
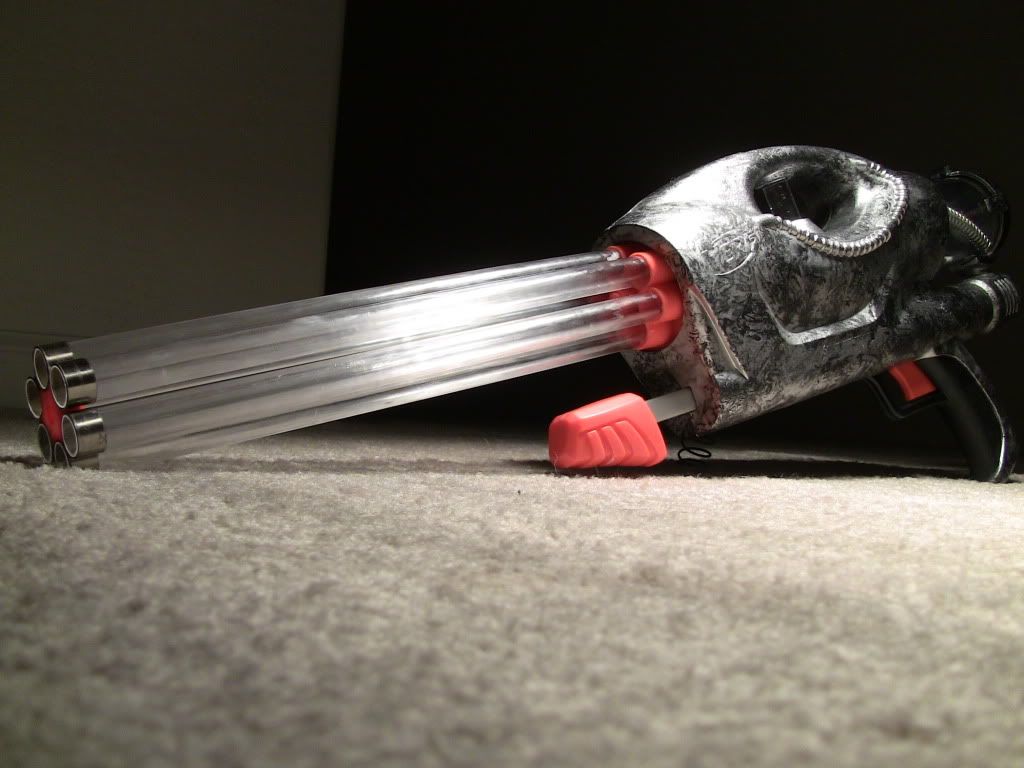
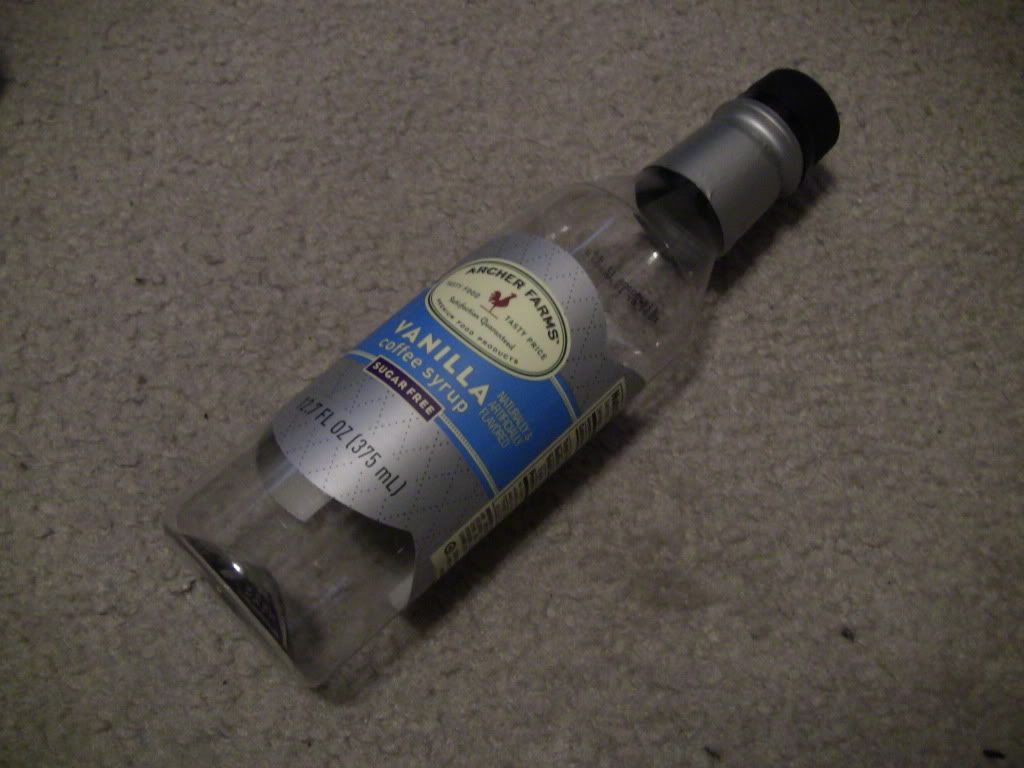
Now I know you’re probably all wondering where on earth I got a clear tube on the back of my AT3K.
It’s actually a bottle for vanilla coffee syrup that my mom uses, I found it in the trash and it’s a pretty close diameter. Anything roughly 2.25” in diameter will work.
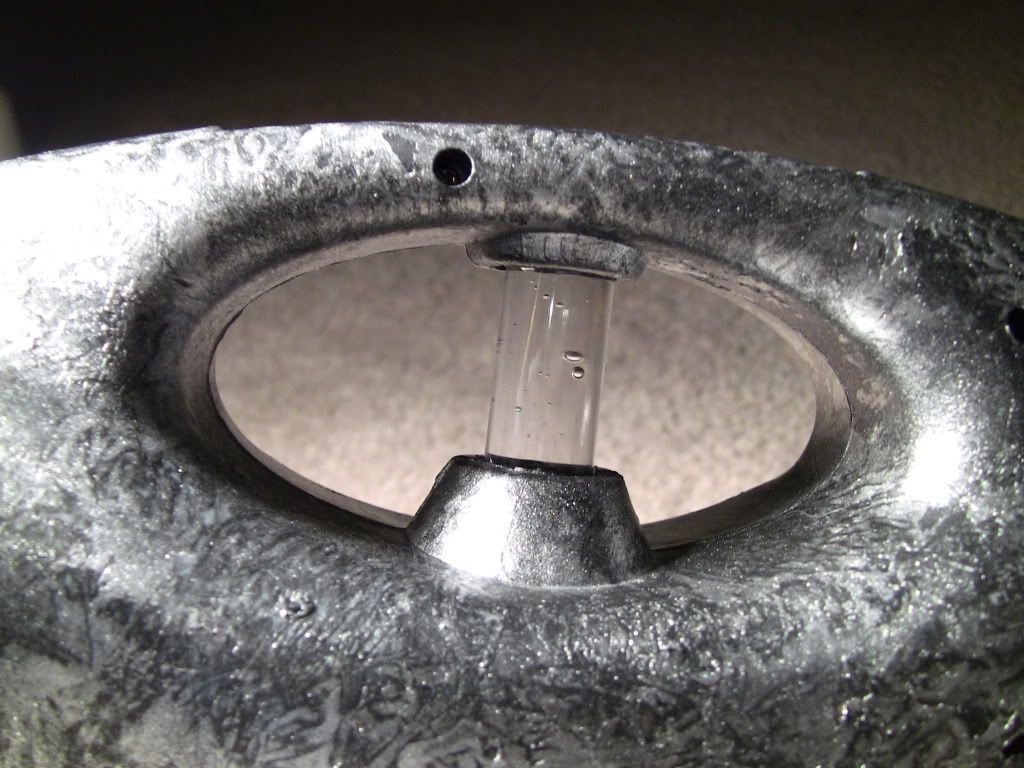
Its looks AWESOME clear though, doesn’t it!? A few other things I did was replaced the goo gauge with a ½” section of PETG filled with glycerin because of its high optical clarity. If you don’t have glycerin, as I doubt you will, hand sanitizer is usually part glycerin and looks just as good.
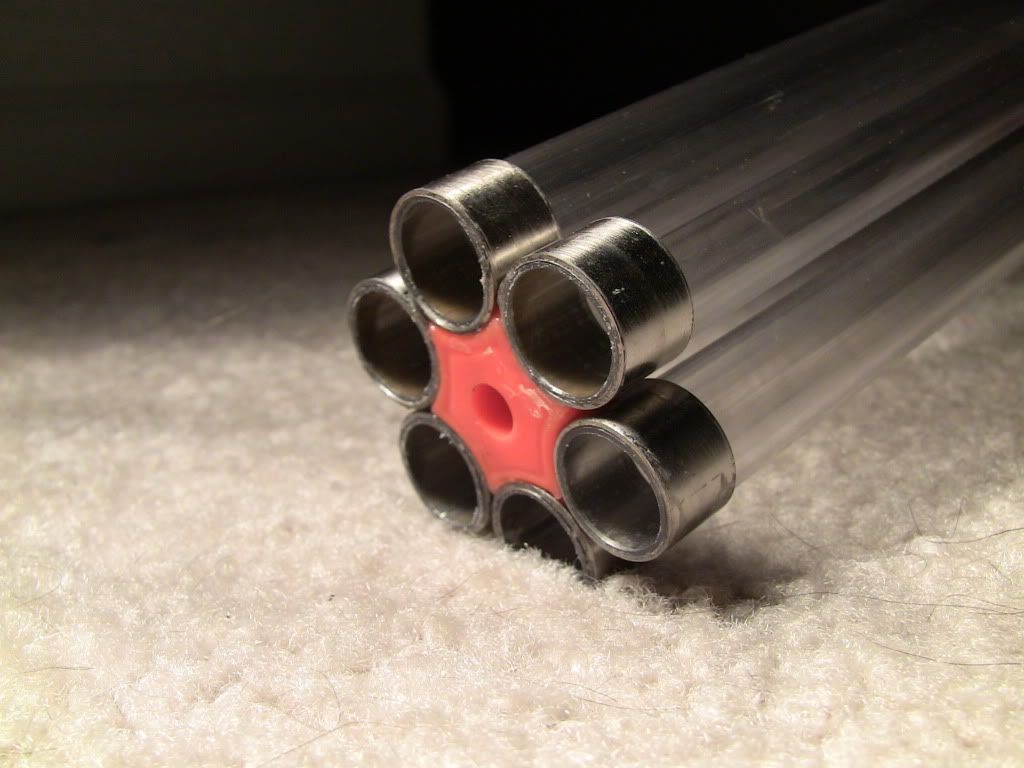
I also put some stainless steel rings from an old curtain rod on the ends of the barrels. It matches the rest of the gun, I like it.
Now I know I’m starting to stray away from the initial point of this thread with all the little ornaments on my gun, but I just wanted to follow up the post with a performance review for any of you guys who were wondering.
This gun is basically a freak of nature. It has a 100% air seal, I used a ½” rubber grommet from Ace Hardware between the tank and the turret, no cutting required. I just super glue it son the tank, lubed it up and I was done. I can plug the barrel with my finger and pull the trigger, and hold the pressure there all day. I can fill the tank with the Magstrike pump with 5 pumps.
I did a range test outside, and I was kind of baffled by what was happening. There was no wind at all, I was firing perfectly level to the ground, and I was using the same weighted streamline darts that I normally use, yet my ranges far exceeded any of my other overhauled AT3K’s with the same mods.
The gun averages out at 180 feet, with about 4 or 5 rounds out of the 30 that I shot landing at 250 feet. That’s not a joke… There must have been some kind of strange updraft coming from down the street where I couldn’t feel it, but the darts would just sail perfectly straight until I couldn’t see them anymore. When I finally found them, they were roughly 250 feet from where I shot them. I’m completely convinced it was a freak occurrence, but even so, the gun averages out at 180 feet, and even that is a little ridiculous sounding to me. So I’m going to test again tomorrow with the same darts and see what’s going on, because if someone told me their AT3K hit 250 feet, I would slap them for trolling…
Any question, comments?
This next step is where we begin our “marble” painting. Marbling is a very simple technique that will give you one of the most visually intriguing finishes you will ever get from a rattlecan. And once you do it, you will laugh at how easy it was, and how awesome it looks! But before I get into that, you need to paint your gun with a flat black base coat or primer. And as you can see in this picture, my pump handle slots are completely gone, and that’s what yours should look like after the base coat.
You’re going to need Saran wrap, and a silver metallic paint. This part helps if you have two people. One person to hold the shell, the other person to spray the paint and work the saran wrap. If you don’t have two people, then good luck! I’ve done it before by myself, but it ain’t easy! You’re going to need to tear off a square of Saran wrap, spread it out and place it in your hand.
This part needs to be done very quickly and it’s why you should have another person help you. You need to spray a very thick, wet, and runny coat of paint on one part of the gun. I generally try and do it in sections the size of my hand, so when I place the Saran wrap on it, it does its job the first time.
Immediately after you spray the paint, and I do mean IMMEDIATELY, you need to place the Saran wrap on top of the wet paint. And make sure you paint is thick and runny. That may seem counterproductive, but for this paint job, it’s exactly what you need. You can crumple, stretch or twist your Saran wrap however you want at this point for whatever effect you want, feel free to experiment. But you only have about 2 or 3 seconds to do it before you need to take the Saran wrap back off.
But that’s what it should look like! If it looks too light and too silver still, you either took too long to get the Saran wrap on, or you didn’t use enough paint. If you took up too much of the black paint and you can see the original plastic underneath, you need to start over and make sure your paint sticks this time. But just continue that process over the entire gun, don’t worry about overlapping sections, you will never see the difference. Just be quick about it and consistent.
Now is the time to candy coat it if you want another color other than silver. You can use Krylon X-Metals as mentioned in Part: 1 or Duplicolor Metalcast. For mine, I wanted a flat silver with no clear coat.
Step 3: Bedliner
Bedliner isn’t something I ever see anyone else use of their guns, but they should! You can buy it in a spray can at Wal-mart for like $8, and it goes on like any other spray paint, but it’s like liquid sand paper and it’s hard as nails. It really increases the feel of your handle, it takes it from feeling wimpy to feeling like you’re holding a power tool. I highly recommend you give it a try. Hell, paint your whole gun with it if you want! But the stuffs not cheap and it doesn’t go very far at all. Haha. Just tape off the area you want to spray, and then cover the rest of the gun. It’s really easy, just like paint.
And now you’re done! You can spend hours looking at the detail in the paint, it looks so deep and three dimensional.
Here’s a shot of the bedliner grip. It’s subtle texture, but it feels really nice.
Now I know you’re probably all wondering where on earth I got a clear tube on the back of my AT3K.
It’s actually a bottle for vanilla coffee syrup that my mom uses, I found it in the trash and it’s a pretty close diameter. Anything roughly 2.25” in diameter will work.
Its looks AWESOME clear though, doesn’t it!? A few other things I did was replaced the goo gauge with a ½” section of PETG filled with glycerin because of its high optical clarity. If you don’t have glycerin, as I doubt you will, hand sanitizer is usually part glycerin and looks just as good.
I also put some stainless steel rings from an old curtain rod on the ends of the barrels. It matches the rest of the gun, I like it.
Now I know I’m starting to stray away from the initial point of this thread with all the little ornaments on my gun, but I just wanted to follow up the post with a performance review for any of you guys who were wondering.
This gun is basically a freak of nature. It has a 100% air seal, I used a ½” rubber grommet from Ace Hardware between the tank and the turret, no cutting required. I just super glue it son the tank, lubed it up and I was done. I can plug the barrel with my finger and pull the trigger, and hold the pressure there all day. I can fill the tank with the Magstrike pump with 5 pumps.
I did a range test outside, and I was kind of baffled by what was happening. There was no wind at all, I was firing perfectly level to the ground, and I was using the same weighted streamline darts that I normally use, yet my ranges far exceeded any of my other overhauled AT3K’s with the same mods.
The gun averages out at 180 feet, with about 4 or 5 rounds out of the 30 that I shot landing at 250 feet. That’s not a joke… There must have been some kind of strange updraft coming from down the street where I couldn’t feel it, but the darts would just sail perfectly straight until I couldn’t see them anymore. When I finally found them, they were roughly 250 feet from where I shot them. I’m completely convinced it was a freak occurrence, but even so, the gun averages out at 180 feet, and even that is a little ridiculous sounding to me. So I’m going to test again tomorrow with the same darts and see what’s going on, because if someone told me their AT3K hit 250 feet, I would slap them for trolling…
Any question, comments?
#315568 Banshee's Guide to Painting: Part 2
Posted by
on 11 May 2012 - 10:37 PM
in
Modifications
This will be the second part of my painting tutorial where I will show you a few basic things like filling holes, marbling paint, and using bedliner paint. I suggest that before you read this, you familiarize yourself with what I said in Part: 1so I don't have to repeat anything that was said before about prep-work and taping. Once you've done that, we'll move right into body work.
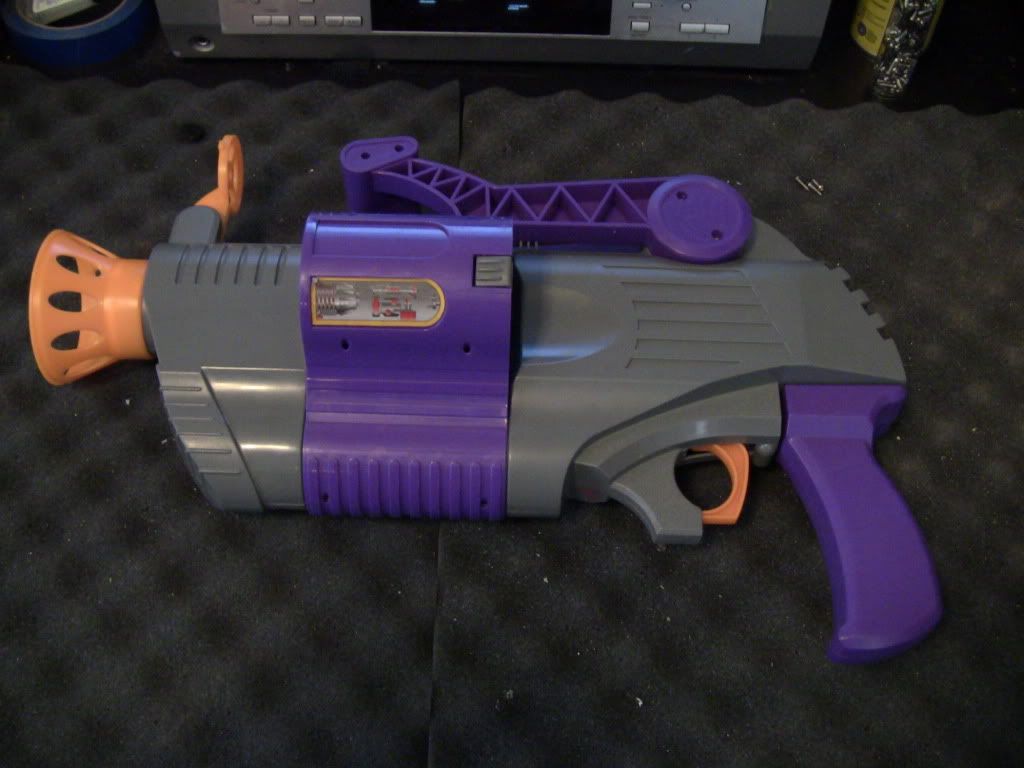
Step 1: Body Work
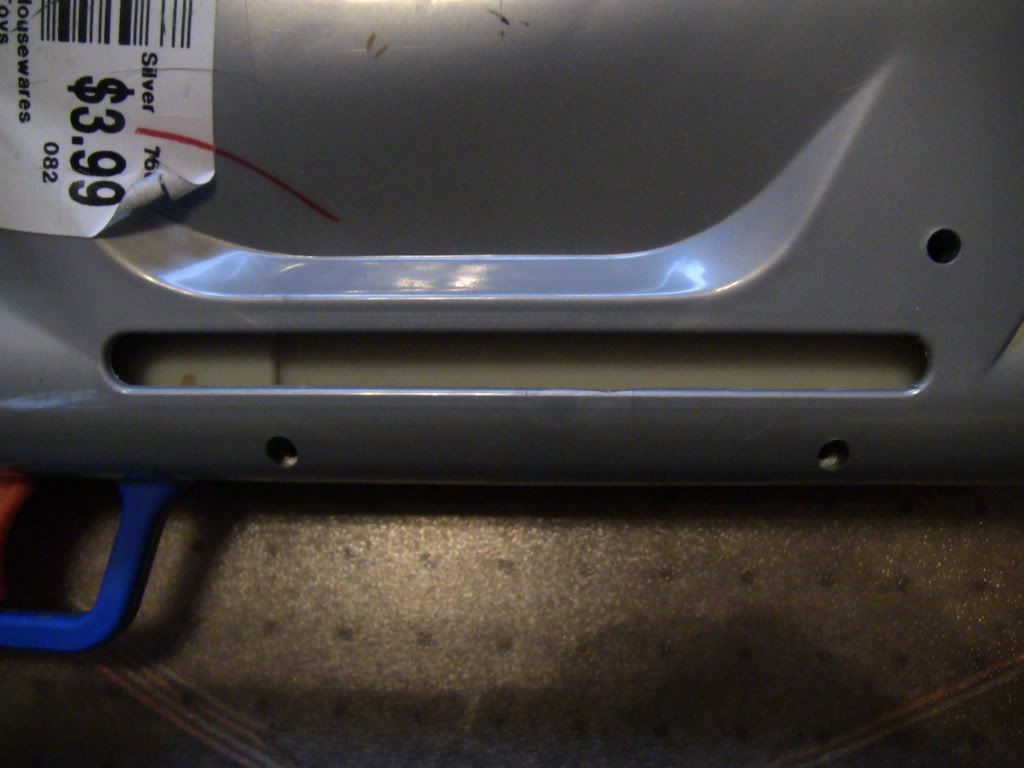
In this segment, my test subject will be an overhauled AT3K. This particular AT3k has had its pump replaced with a Magstrike Pump, and I no longer use the slots on the sides where the shotgun style pump used to be. How tacky does it look with these huge gaping holes in the side that do nothing? Let cover them up!
Before we start filling the hole, we need to seal it off from the backside so the filler can stick to something. There are several ways to do this, but I've done this to at least half a dozen AT3K's, and this is how I do it. I take two shish kabob skewers, one for each side.
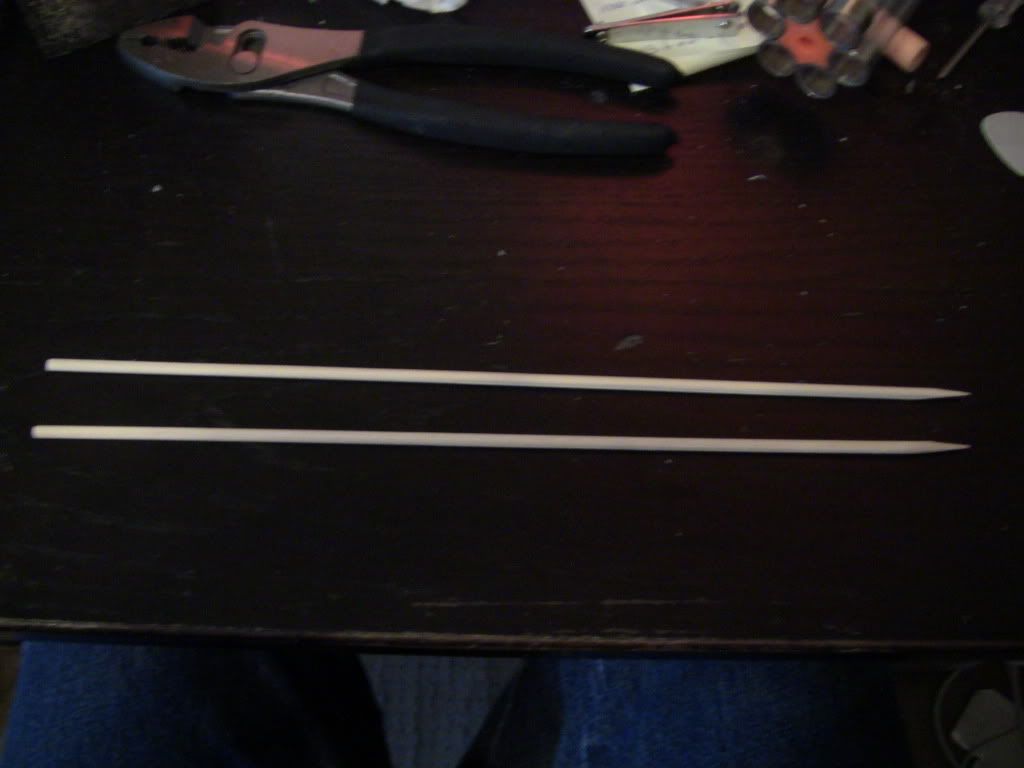
Then I measure them to the length on the inner channel and break them to the right length. You can this with your hands. Then place them into the channel and glue them in place with hot glue. The picture is pretty explanatory:
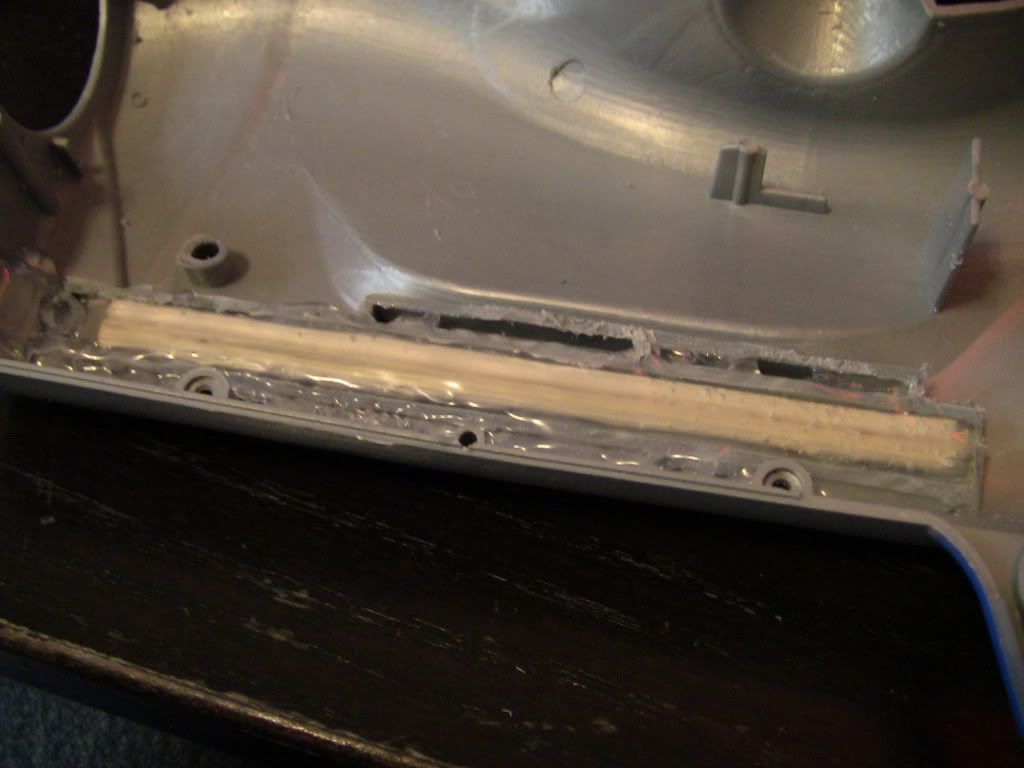
Next you're going to want to fill the outer side with a thin layer of hot glue. You want to make sure that you keep the glue below the edge of the gun. This step isn't completely necessary, but we will be using Bondo later, and the thinner the layers of Bondo you can use, the better. This part takes up some of that room.
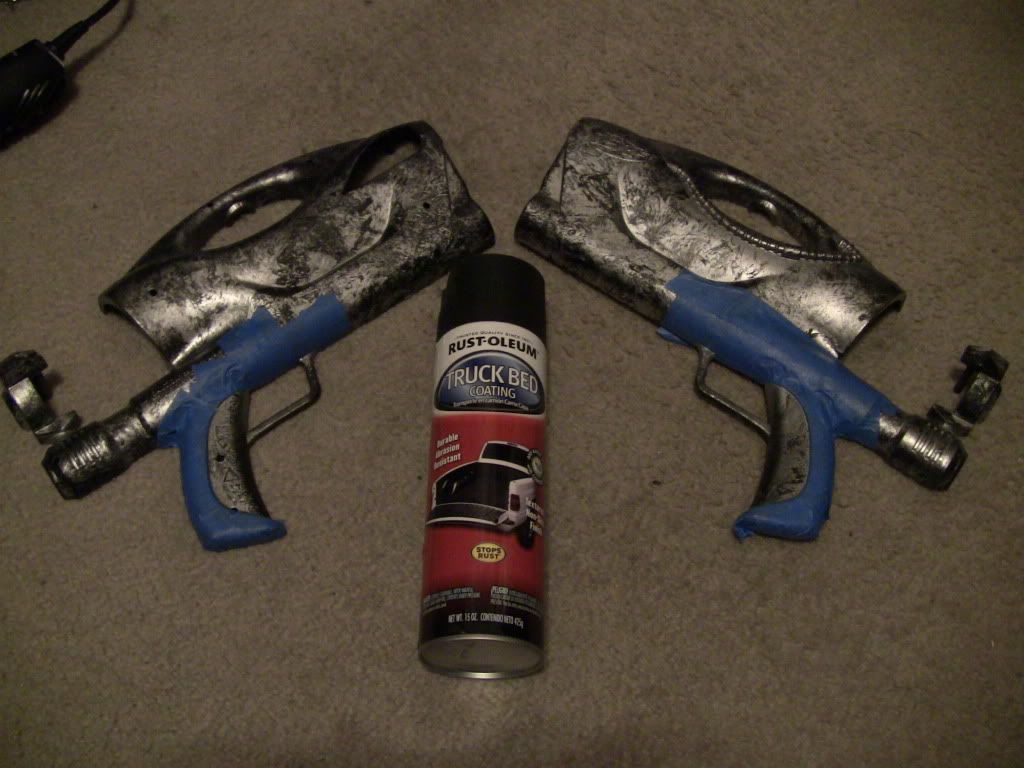
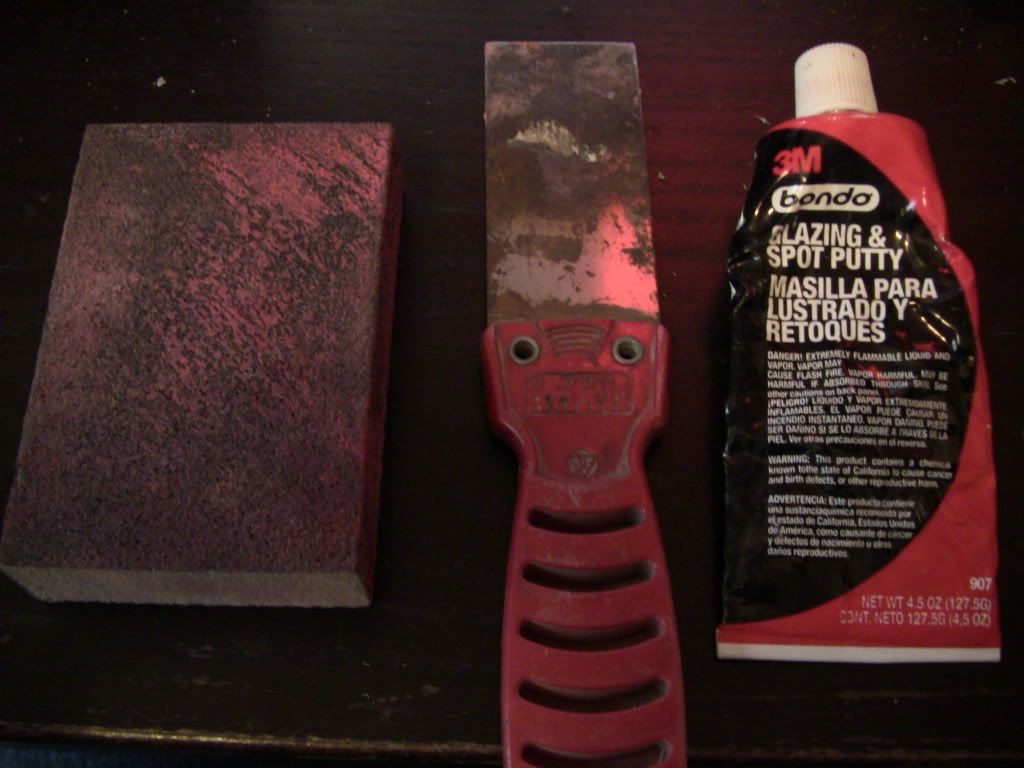
This is what we're going to need for this part, a sanding block, a putty knife, and Bondo Glazing Spot Putty. For those of you who have never used Bondo because they only sell it in huge containers at high prices, and you have to mix it all together to use it, and it’s just so overwhelming for such a small project like a Nerf gun, this is for you! Spot putty is pre-mixed, ready to use Bondo in a tube! It’s as easy to use as tooth paste. You can even buy it at Wal-mart, it’s like $4 in the automotive section.
Bondo is something that takes a little practice to get good at using, and a lot of patience. But some tips when using it, the thinner layers you can use, the better. Even a millimeter thin layer will form cracks as it dries. If it does, that’s not a big deal, you can put another layer over it, but thicker layers also take an exponentially longer time to dry. A paper thin layer may take 10 minutes, but a 2 paper thick layer could take an hour. But just remember, one or two layers will NEVER be enough. By the end, I believe I ended up doing about 8 layers on each side with sanding in between each one. Bondo isn’t an easy thing to work with, but it’s the best way to get good results.

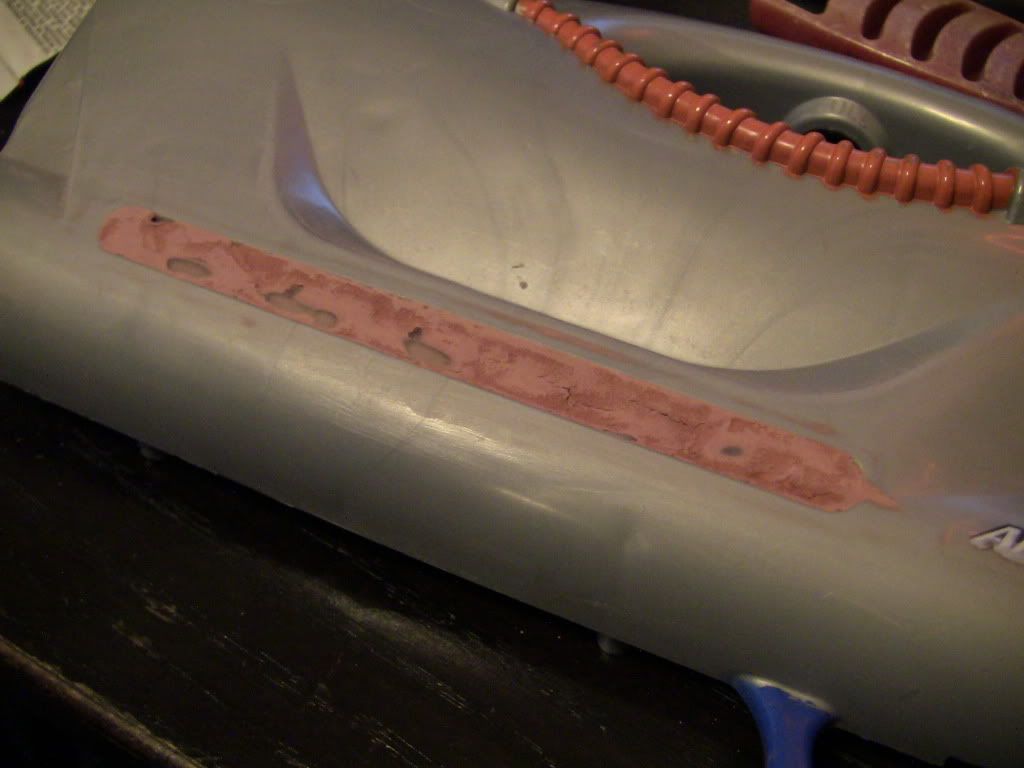
After you smear the first layer in, let it dry completely. DO NOT rush this part or you could ruin everything you’ve done. You’ll know its dry when all the dark spots are gone and it’s a flat redish orange color. Then take your sanding block and sand it smooth and continue applying layers until you’re satisfied. Generally speaking, the more time you put into it, the better it will look.
Step 1: Body Work
In this segment, my test subject will be an overhauled AT3K. This particular AT3k has had its pump replaced with a Magstrike Pump, and I no longer use the slots on the sides where the shotgun style pump used to be. How tacky does it look with these huge gaping holes in the side that do nothing? Let cover them up!
Before we start filling the hole, we need to seal it off from the backside so the filler can stick to something. There are several ways to do this, but I've done this to at least half a dozen AT3K's, and this is how I do it. I take two shish kabob skewers, one for each side.
Then I measure them to the length on the inner channel and break them to the right length. You can this with your hands. Then place them into the channel and glue them in place with hot glue. The picture is pretty explanatory:
Next you're going to want to fill the outer side with a thin layer of hot glue. You want to make sure that you keep the glue below the edge of the gun. This step isn't completely necessary, but we will be using Bondo later, and the thinner the layers of Bondo you can use, the better. This part takes up some of that room.
This is what we're going to need for this part, a sanding block, a putty knife, and Bondo Glazing Spot Putty. For those of you who have never used Bondo because they only sell it in huge containers at high prices, and you have to mix it all together to use it, and it’s just so overwhelming for such a small project like a Nerf gun, this is for you! Spot putty is pre-mixed, ready to use Bondo in a tube! It’s as easy to use as tooth paste. You can even buy it at Wal-mart, it’s like $4 in the automotive section.
Bondo is something that takes a little practice to get good at using, and a lot of patience. But some tips when using it, the thinner layers you can use, the better. Even a millimeter thin layer will form cracks as it dries. If it does, that’s not a big deal, you can put another layer over it, but thicker layers also take an exponentially longer time to dry. A paper thin layer may take 10 minutes, but a 2 paper thick layer could take an hour. But just remember, one or two layers will NEVER be enough. By the end, I believe I ended up doing about 8 layers on each side with sanding in between each one. Bondo isn’t an easy thing to work with, but it’s the best way to get good results.
After you smear the first layer in, let it dry completely. DO NOT rush this part or you could ruin everything you’ve done. You’ll know its dry when all the dark spots are gone and it’s a flat redish orange color. Then take your sanding block and sand it smooth and continue applying layers until you’re satisfied. Generally speaking, the more time you put into it, the better it will look.
#315509 The AS-4: BBUMB/Rapidfire integration
Posted by
on 10 May 2012 - 01:12 PM
in
Modifications
If I had a nickel for every time I've seen a revision of my original Magstrike mod pop up somewhere on another forum, I could build 5 more semi-auto Magstrikes. Haha. You're the first to do it in a RF20 though, so props for that. It makes me proud to see that someone actually likes the things I do, so keep them coming! I'm still trying to find a way to make it true semi-auto. Not that it would fire any faster anyways. In the time it takes you to drop another round in the RSCB into the barrel, you can easily hit the fill button, so it really doesn't matter. Unless you're using a hopper... which I don't.
#315157 McMaster-Carr PETG Tubing
Posted by
on 03 May 2012 - 07:03 PM
in
Modifications
Okay, I wasn't aware of the "special instructions" option, so thanks. But that still doesn't really help me figure out how much it will cost. I mean if its still going to cost me $15 in shipping, that's too much and I can get it cheaper somewhere else.
#315153 McMaster-Carr PETG Tubing
Posted by
on 03 May 2012 - 05:29 PM
in
Modifications
I really hate having to post a new thread to ask this, but I've messaged a few people, did a search, did a google search, and still found nothing. Anyways, I need to order some PETG, and the place I used to get it from no longer sells it, and I hear a lot of people talking about McMaster's PETG. The problem is that McMasters wont tell me what the shipping is going to cost until I've already payed for it. I hate when sites do that and I've been screwed on it way to many times to do it again. So have any of you ordered PETG from McMasters in 4 foot sections? How much did it cost for shipping? I'm thinking at minimum 10 tubes, so 40 feet of it.
#313835 Supermaxx 500 Leak
Posted by
on 01 April 2012 - 03:23 PM
in
Modifications
I've been messing with this one for a few weeks now and I'm stumped. I bought it at a thrift store, and I was pretty thrilled about it, but later I found that it doesn't hold pressure. You pump it up and it leaks right out of the barrel end of the tank. I opened it up and put it under water, and it leaks from the front of the tank and nowhere else. The check valve is fine, the hole for the firing pin is fine, its just the rubber seal in the tank that leaks. I was really disappointed because the only way to get to the seal was to cut the barrel off. And that means the gun will never be in original condition which is what I wanted, but I'd rather have a working modded gun than a broken stock gun, so I cut the barrel off.
Once I could get to the seal, I used a little oil on it, that didn't do anything. So then I put a little lithium grease on it. That helped a tiny bit, but it still wont hold pressure. Its not an instant leak, I'd say it takes about a second to leak out 2 pumps. When I push the firing pin into the tank and pump it, it makes no difference, so I don't think a stronger spring would fix it. It seems that higher pressure seems to help seal it, so plugging the pump might work, but not only is the pump glued in and I can't get it out, but I hear that plugging the pump on a SM500 can blow the tank, so I really don't know what to do. I would like to be able to soften the glue on the tank and open it up. I don't want to cut it because I've never been able to successfully glue tanks back together, and since this tank is attached to the pump as one big piece, I'm not even going to try.
I've done everything I know how to do to fix this thing, and I haven't gotten very far. Does anyone have any ideas on what I could do?
#313546 Banshee's Guide to Painting: Part 1
Posted by
on 25 March 2012 - 08:49 PM
in
Modifications
Yeah, that would work just fine. Anything will work, it just depends on what you use to get the desired result.Amazing tutorial! Would it be possible to use a silver vinyl dye as a metallic base coat?
#313508 Banshee's Guide to Painting: Part 1
Posted by
on 24 March 2012 - 11:44 PM
in
Modifications
I'm not sure what texture you're referring to, but the texture you get from spray paint is referred to as "orange peel" for obvious reasons. You get orange peel whether the paint is flat or high gloss, but its easier to see on glossy finishes. On most things that get painted, the orange peel is wet sanded off so you have a smooth surface, and then its polished to a mirror finish. You can't do that with Nerf guns, they're too small, so the best we can do is lay a really thick, wet coat of clear on it and let it dry.Very clear, easy to read, and full of information, nice work! One question though, I've used acrylic paint (multiple coats) and then a Krylon Flat Clear Coat and it turned out fine with a nice texture, Is your's the gloss or flat? I like how flat looks better, but it could be something to do with the "shinyness" of the coat causing the strange texture.
#313500 Banshee's Guide to Painting: Part 1
Posted by
on 24 March 2012 - 09:58 PM
in
Modifications
So over the past few mod write-ups that I've done, I've been getting numerous PM's and comments about people wanting to learn how to do some of the paint jobs that I've done. So I'm going to write a detailed guide for people of any experience level. So if you know a thing or two about painting, don't be insulted by how dumbed down this tutorial will be, its meant for beginners. Most of us could've already figured out how to do simple paint jobs like this, but I plan on doing multiple painting tutorials in the future. I plan to cover everything from simple two-tone to wood-graining and marbling. I've painted cars, trucks, guitars, motorcycles, ATV's, etc. and I'm going to try and explain this in the simplest, most cost effective way I can.
The first thing you need to do is disassemble the gun. I've seen a ton of paint jobs done from various people where they painted the gun while it was still together. This is a huge NO-NO. The paint can jam up things like slides, triggers, and other moving parts, not to mention is just looks terrible when you're done! ALWAYS take apart your guns before painting them. If you're too inexperienced to remove every part from your gun and get it put back together right, consider painting something simpler.
Step 1: TAPING
Taping is generally the first step to painting if you don't have any kind of serious prep work to be done. Prep work would go first, which includes sanding, priming, body filling, etc. and we might get into that on another day. But in this tutorial, we're using some of the original colors from the factory on our test subject. Now the more perceptive of you may have noticed, our test subject is a Nite Finder.
We want to keep the original handle, light, and logo colors from the factory. I do this to most of my Nite Finders to keep a more "stock" type of look, because I'm only changing the yellow color of the gun. That way it looks like it could've come from the factory that way. It's just a personal preference and its also the simplest and quickest way to paint most Nerf guns.
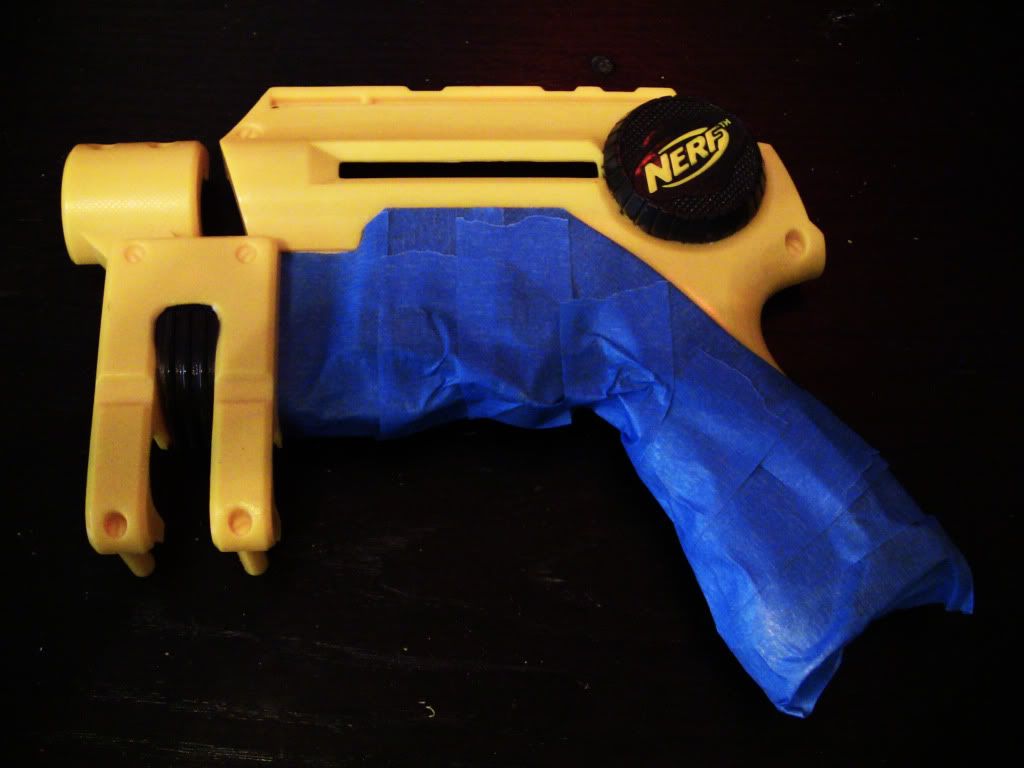
Now go ahead and begin taping off your gun. I taped off the black and grey areas. The best tape I've found for painting is Scotch 3M blue painters tape. There are a few types of 3M painters tape, the light blue is the best. The darker blue "Safe-Release" tape is absolute crap, DON'T use it. I haven't had any luck with frog tape either because both of them have very little "stick" to them and they peel up after a few minutes. Frog Tape is great for cars and such, but for small items with tight curves, you're going to want a stronger stick tape.
When taping, put tape on the area you want to cover and go over the edges of the area. Then once all the tape is covering your area, go over it with a hobby knife and trim the tape off the areas you want to paint. This takes a little practice, and if you use a sharp blade, you don't need very much pressure, so don't dig into your gun with the knife.
For taping the logo, you're going to want to use a tape that is flexible. Painters tape is not flexible at all, so I use electrical tape. E-Tape makes a great painters tape, it sticks well, comes off clean, and its flexible, which makes it great for certain applications. However its not as cheap and not as wide as painters tape, so I don't suggest you use it for everything.
Before we move on to the next step, you need to take some rubbing alcohol or wax remover to the surface of your gun and make sure that you get all the dust and finger oils off. Acetone is generally not a good idea because it eats the plastic away. It makes for a good painting surface though, but I don't advise using it unless you really know what you're doing. If you have sticker residue or some other kind of adhesive that alcohol wont take off, I use a chemical called "Xylene". You can get it at paint shops, and maybe your local hardware store if you're lucky. It takes almost any adhesive off without hurting the surface underneath and works MUCH better than Goo-Gone in just about every situation. I use it for everything, its a must-have for any serious painter. (But I will warn you, it takes most of the Nerf ink off the guns, like the grey and black area's of the Nite Finder.)
A lot of people feel a primer, sanding, or both is necessary for the paint to adhere. This is an option, but as far as spray paint goes, some primers just don't work. Krylon primer is basically useless. It doesn't stick to any surface any better than the actual paint itself, and it leaves a much worse texture behind than the paint would which requires sanding. If you think you need a primer, shell out the extra cash for some more expensive primer like Duplicolor or some automotive primer. Plastic primer works too, but I've had plastic primer that peeled off in sheets once it was dry. I just skip the confusion and go straight to painting. If you have a good clean surface and you paint it right, the paint should stick just fine. Besides, most of the durability comes from the clear coat.
Step 2: BASE COAT

For this demonstration, we're using a metallic silver base coat, a candy color coat, and a clear top coat. This is a common procedure used my paint profession all over. The base coat can be silver or white, as long as its metallic. Try experimenting with both colors to get your desired result, but for this we're using silver. I'm using Rustoleum metallic Silver as opposed to Krylon or Duplicolor because it has a much larger metal flake in the paint which makes the gun really pop in the sunlight. Use the same metallic I did. Rustoleum sells a few kinds of metallic paint including a "chrome" paint, and the others are garbage, don't use them.
When you paint, I find the best way is to hold the part in your hand. Wear a glove or put your arm in a trash bag so you don't paint yourself. Lying the part on a flat surface makes it difficult to see all the parts of the gun while you paint it, so I advise holding it like so:
Now proceed to the painting. Start painting in the hardest to reach places to avoid paint runs. I usually put an extremely light coat on first, almost impossible to see. Its more of an overspray than a coat. This acts sort of like a primer and helps the next coat stick a little better. If you go in for a thick coat right from the beginning, it can potentially bead, and the metal flakes can sometime cluster and look really bad. After about 5 coats, it should look like this:
Step 3: CANDY COAT
Now the color comes from the candy coat. Candy is a transparent paint that adds color to whatever is underneath it. In this case, it's a silver base coat, and we're using a purple candy, so it will turn into a metallic purple. Which I don't know if any of you have every looked at your local Home Depot, but they don't exactly have metallic purple in spray cans (at least not where I live) so this is a great way to get the color you want. There are a few kinds of candy paints that I've used. The best is the kind you use in an airbrush, but we're using rattle can's, so your easiest to find options will be Krylon X-Metals, and Duplicolor Metalcast. The Metalcast is a much better candy. Its bright, goes on very smooth and even, strong as nails, and takes clear coat nicely. The X-metals is pretty crappy. It goes on thicker and its hard to get an even coverage. But what really gets me, is that the clear coat I use sucks the candy coat into it which reveals the base coat in places, so you have to be careful to avoid it. Make sure the candy is dry first if you use X-Metals. But it you use the Metalcast, you can recoat and clear coat at any time you want. But I will say this, the Metalcast costs twice as much. It's about $10 a can found at most auto-parts stores.
But regardless, the X-metals that I used turned out quite nice:
Step 4: CLEAR COAT
The clear I used is Deft. It's meant for furniture, but I find that it sticks really well to just about everything. Its about $5-$6 a can at Home Depot and it goes a really long ways. I used to use Kyrlon Crystal Clear which is about $3, but it never dries as hard as Deft, doesn't go on as smooth, and it's nowhere near as shiny. I recommend that you give Deft a try if your other clear coats have let you down.
The process that I use to get such a high level of shine is what I call "flooding". Which is just as it sounds, you flood the gun with so much clear so fast that it eliminates the orange peel texture that leads to a dull surface. Now you can't do flooding with all kinds of clear. Krylon Crystal Clear is thick and it runs easily, and it doesn't spray out smooth at all. Deft comes out in a very fine mist, its thinner than Krylon, and you can get a very thick coat of it on without it running. This takes some practice and your first few tries will probably have some runs in it.
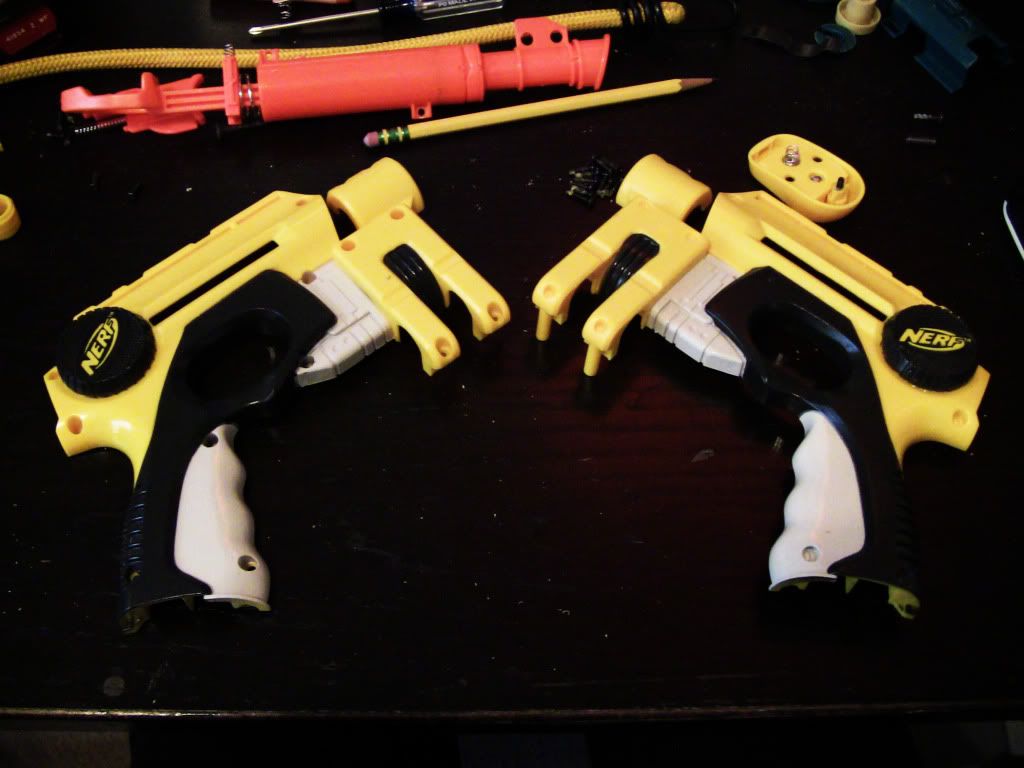
This picture shows one half with clear coat, which is on the left, and the other half without clear coat on the right. So can see that added benefits of a clear coat cosmetically, aside from the fact that it makes your paint much more durable. I tried to get a good picture of the difference but the sun was behind my fence so I didn't have much light anymore.
Now you can let it dry for a day or so and put it back together! Mine turned out pretty good overall. I've done better, and shinier. The shine can't be properly be represented in a photo, I promise you it's much more impressive in person, but none the less, thats how you do a candy coat paint job.
Does anyone have any questions?
The first thing you need to do is disassemble the gun. I've seen a ton of paint jobs done from various people where they painted the gun while it was still together. This is a huge NO-NO. The paint can jam up things like slides, triggers, and other moving parts, not to mention is just looks terrible when you're done! ALWAYS take apart your guns before painting them. If you're too inexperienced to remove every part from your gun and get it put back together right, consider painting something simpler.
Step 1: TAPING
Taping is generally the first step to painting if you don't have any kind of serious prep work to be done. Prep work would go first, which includes sanding, priming, body filling, etc. and we might get into that on another day. But in this tutorial, we're using some of the original colors from the factory on our test subject. Now the more perceptive of you may have noticed, our test subject is a Nite Finder.
We want to keep the original handle, light, and logo colors from the factory. I do this to most of my Nite Finders to keep a more "stock" type of look, because I'm only changing the yellow color of the gun. That way it looks like it could've come from the factory that way. It's just a personal preference and its also the simplest and quickest way to paint most Nerf guns.
Now go ahead and begin taping off your gun. I taped off the black and grey areas. The best tape I've found for painting is Scotch 3M blue painters tape. There are a few types of 3M painters tape, the light blue is the best. The darker blue "Safe-Release" tape is absolute crap, DON'T use it. I haven't had any luck with frog tape either because both of them have very little "stick" to them and they peel up after a few minutes. Frog Tape is great for cars and such, but for small items with tight curves, you're going to want a stronger stick tape.
When taping, put tape on the area you want to cover and go over the edges of the area. Then once all the tape is covering your area, go over it with a hobby knife and trim the tape off the areas you want to paint. This takes a little practice, and if you use a sharp blade, you don't need very much pressure, so don't dig into your gun with the knife.
For taping the logo, you're going to want to use a tape that is flexible. Painters tape is not flexible at all, so I use electrical tape. E-Tape makes a great painters tape, it sticks well, comes off clean, and its flexible, which makes it great for certain applications. However its not as cheap and not as wide as painters tape, so I don't suggest you use it for everything.
Before we move on to the next step, you need to take some rubbing alcohol or wax remover to the surface of your gun and make sure that you get all the dust and finger oils off. Acetone is generally not a good idea because it eats the plastic away. It makes for a good painting surface though, but I don't advise using it unless you really know what you're doing. If you have sticker residue or some other kind of adhesive that alcohol wont take off, I use a chemical called "Xylene". You can get it at paint shops, and maybe your local hardware store if you're lucky. It takes almost any adhesive off without hurting the surface underneath and works MUCH better than Goo-Gone in just about every situation. I use it for everything, its a must-have for any serious painter. (But I will warn you, it takes most of the Nerf ink off the guns, like the grey and black area's of the Nite Finder.)
A lot of people feel a primer, sanding, or both is necessary for the paint to adhere. This is an option, but as far as spray paint goes, some primers just don't work. Krylon primer is basically useless. It doesn't stick to any surface any better than the actual paint itself, and it leaves a much worse texture behind than the paint would which requires sanding. If you think you need a primer, shell out the extra cash for some more expensive primer like Duplicolor or some automotive primer. Plastic primer works too, but I've had plastic primer that peeled off in sheets once it was dry. I just skip the confusion and go straight to painting. If you have a good clean surface and you paint it right, the paint should stick just fine. Besides, most of the durability comes from the clear coat.
Step 2: BASE COAT
For this demonstration, we're using a metallic silver base coat, a candy color coat, and a clear top coat. This is a common procedure used my paint profession all over. The base coat can be silver or white, as long as its metallic. Try experimenting with both colors to get your desired result, but for this we're using silver. I'm using Rustoleum metallic Silver as opposed to Krylon or Duplicolor because it has a much larger metal flake in the paint which makes the gun really pop in the sunlight. Use the same metallic I did. Rustoleum sells a few kinds of metallic paint including a "chrome" paint, and the others are garbage, don't use them.
When you paint, I find the best way is to hold the part in your hand. Wear a glove or put your arm in a trash bag so you don't paint yourself. Lying the part on a flat surface makes it difficult to see all the parts of the gun while you paint it, so I advise holding it like so:
Now proceed to the painting. Start painting in the hardest to reach places to avoid paint runs. I usually put an extremely light coat on first, almost impossible to see. Its more of an overspray than a coat. This acts sort of like a primer and helps the next coat stick a little better. If you go in for a thick coat right from the beginning, it can potentially bead, and the metal flakes can sometime cluster and look really bad. After about 5 coats, it should look like this:
Step 3: CANDY COAT
Now the color comes from the candy coat. Candy is a transparent paint that adds color to whatever is underneath it. In this case, it's a silver base coat, and we're using a purple candy, so it will turn into a metallic purple. Which I don't know if any of you have every looked at your local Home Depot, but they don't exactly have metallic purple in spray cans (at least not where I live) so this is a great way to get the color you want. There are a few kinds of candy paints that I've used. The best is the kind you use in an airbrush, but we're using rattle can's, so your easiest to find options will be Krylon X-Metals, and Duplicolor Metalcast. The Metalcast is a much better candy. Its bright, goes on very smooth and even, strong as nails, and takes clear coat nicely. The X-metals is pretty crappy. It goes on thicker and its hard to get an even coverage. But what really gets me, is that the clear coat I use sucks the candy coat into it which reveals the base coat in places, so you have to be careful to avoid it. Make sure the candy is dry first if you use X-Metals. But it you use the Metalcast, you can recoat and clear coat at any time you want. But I will say this, the Metalcast costs twice as much. It's about $10 a can found at most auto-parts stores.
But regardless, the X-metals that I used turned out quite nice:
Step 4: CLEAR COAT
The clear I used is Deft. It's meant for furniture, but I find that it sticks really well to just about everything. Its about $5-$6 a can at Home Depot and it goes a really long ways. I used to use Kyrlon Crystal Clear which is about $3, but it never dries as hard as Deft, doesn't go on as smooth, and it's nowhere near as shiny. I recommend that you give Deft a try if your other clear coats have let you down.
The process that I use to get such a high level of shine is what I call "flooding". Which is just as it sounds, you flood the gun with so much clear so fast that it eliminates the orange peel texture that leads to a dull surface. Now you can't do flooding with all kinds of clear. Krylon Crystal Clear is thick and it runs easily, and it doesn't spray out smooth at all. Deft comes out in a very fine mist, its thinner than Krylon, and you can get a very thick coat of it on without it running. This takes some practice and your first few tries will probably have some runs in it.
This picture shows one half with clear coat, which is on the left, and the other half without clear coat on the right. So can see that added benefits of a clear coat cosmetically, aside from the fact that it makes your paint much more durable. I tried to get a good picture of the difference but the sun was behind my fence so I didn't have much light anymore.
Now you can let it dry for a day or so and put it back together! Mine turned out pretty good overall. I've done better, and shinier. The shine can't be properly be represented in a photo, I promise you it's much more impressive in person, but none the less, thats how you do a candy coat paint job.
Does anyone have any questions?
#313492 Defender T3 Overhaul
Posted by
on 24 March 2012 - 08:28 PM
in
Modifications
I did reinforce the catch and most of the screw posts inside the gun as well as sound dampening. And I mentioned in the writeup that I replaced the catch spring, I just didn't mention the reinforcements.First of all, I would like to say good job on the write-up, and very nice job on the painting (and subsequent explanation).
However, I would like to caution that it would be a good idea, in fact, to re-enforce the catch, and potentially add a new catch spring. Why?
No, its not as pretty, but its just as functional. After about a year of use, it is now inoperable due to the catch being mangled. Now, its a years use, and you can replace that. I totally agree. However, it started mis-firing at about 4 months, and rapidly degraded from there, and it is a phenomenal blaster to use. It would just be a shame for it to go to crap before its time, and NF catches do NOT work well as substitutions (They become dookie even quicker).
Either way, have fun with it, and nice job
#313345 Defender T3 Overhaul
Posted by
on 22 March 2012 - 05:38 PM
in
Modifications
The concept is still the same, but that was hardly a write-up, it's 6 years old, there was only one picture, and my results look better if you ask me. I'm not the first person to use this method of painting, lots of people one here have done it, but no one has gone in depth and explained how to do it.I don't mean to discourage you, but Anima already wrote a guide for anodized painting here.
There is one difference, which is Anima used the groundcoat specific to the paint he was using, rather than a chrome spray paint. The results of both methods are probably pretty similar.
I'll have to try that Deft gloss spray. I've always used Krylon Triple Thick Glaze for shiny clear coats, but the Deft appears to be shinier.
#313120 Defender T3 Overhaul
Posted by
on 18 March 2012 - 09:36 PM
in
Modifications
Haha, thank you. I'm getting the feeling that some of you guys would like a tutorial on painting. Give me week or so to get some test subjects and I'll whip out a very nice, long, in-depth painting tutorial for you guys.Okay, you win, I will stop asking questions. Anyway, that has got to be one of the best/cleanest paint-jobs I have ever seen on this forum. Not to mention the ranges of this thing, wow. Altogether a very good mod/overhaul.

#313094 Defender T3 Overhaul
Posted by
on 18 March 2012 - 05:40 PM
in
Modifications
Because they're readily accessible to me?? I don't care if they break. I got a dozen of them. So if I get 50 shots out of one, I'll just replace it. But I'm willing to bet money that the stock catch wont break, so I have no worries.If the stock catch is stronger than a NF catch, and it were to break, why would you replace it with a NF catch?
#313087 Defender T3 Overhaul
Posted by
on 18 March 2012 - 03:23 PM
in
Modifications
I didn't do anything to the trigger. The arrow part just unhooks from the main trigger. There's nothing to explain.Just a note, you may want to explain what you did to the trigger. I see you cut the top part that fires the arrow shooter off, but kept the front ring on to fit around the new PT. But is that all?
I already explained the process in one of the earlier posts.That paintjob is real nice, what paint did you use to paint it?
The stock catch is surprisingly beefy. Its thicker than a NF catch, and it it were to break, I have a feeling that a NF catch will fit in its place. So I'm not worried about it.I suppose you are right, I only have one crossbow, and treasure it. So using a crossbow plunger tube for this seemed like a sin, at least to me. Anyway, how is the stock catch holding up?
#313074 Defender T3 Overhaul
Posted by
on 18 March 2012 - 10:57 AM
in
Modifications
How is it wasting? There really is no market for a Crossbow plungertube, it's not worth anything. It's very rare, but no one wants them. I put mine to GREAT use, so who's wasting?Why would you waste a crossbow plunger tube on this? You could just as easily make it with thin-wall pvc and a few couplers
#313063 Defender T3 Overhaul
Posted by
on 18 March 2012 - 01:14 AM
in
Modifications
No, the plunger tube does not rotate. I wrapped the coupler in e-tape so that when they shell is screwed together, it clamps down on the couple holding it in place. And the catch notch is a little less than 2 inches I believe. It would be less if I used a looser wound spring.Wow that really looks amazing! This makes me want to get a DT3.
Two questions, does the plunger tube rotate when you're taking out the barrel, and how far back, from the front of the plunger rod head, is catch notch that reaches full compression?
Initially I thought the same thing, so I propped the gun against a tree and used two hands so it wouldn't move. Trust me, it just gets ridiculous ranges level shot. I believe there was a slight head breeze too. But I've found that my weighted streamline darts out-range most stefans by about 50-60 feet. I don't know why, I just haven't used any stefans that went as far.Slick. I have the materials sitting around for just this type of mod - this ought to motivate me. I do suspect that your gun is kicking upwards somewhat when you fire, which is artificially inflating ranges. Nevertheless, springers of this side are capable of extreme ranges - I don't doubt that this is in the upper power tier of blasters.
I wonder if this will still work with the arrow shooter attachment...
#313051 Defender T3 Overhaul
Posted by
on 17 March 2012 - 09:44 PM
in
Modifications
Haha, thanks. The paint is not one kind of paint. It's a trick I've learned over the past few years painting motorcycles and guitars and stuff. Basically, you take Rustoleum metallic silver and use it as a base coat. Then you go over it with a candy coat. Candy coats are transparent color paints and will turn whatever your base coat is into that color. The thicker you put it on, the deeper and darker it will get. Usually I would use an automotive candy color and an airbrush, but for this I decided to experiment with rattle can candy. This happened to be Duplicolor chrome metals paint. I understand its basically the same thing as Krylon X-Metals though, which is cheaper. I then put a super thick coat of clear coat on it to give it shine and to really set the metal flake deep in there. I used Deft clear coat. It's meant for furniture, but its what I use on guitars, and now I use it on everything.That is one sick paint job and modification. Just... If a Nerf Hall of Fame is ever made, please donate that. That paint job is just absolutely fantastic. What brand of paint is it?
I painted this gun with leftover paint from restoring a 1973 Roadmaster tricycle for my cousin, here's a picture of that if you wanted to see the process applied to something else:
http://i273.photobuc...ss/IMG_0753.jpg
#313048 Defender T3 Overhaul
Posted by
on 17 March 2012 - 09:30 PM
in
Modifications
Haha, like I said in the writeup, there are several alternatives you can buy just about anywhere.Great writeup, if you're willing to supply everyone that has a DT3 w/ a crossbow plungertube

#313044 Defender T3 Overhaul
Posted by
on 17 March 2012 - 09:03 PM
in
Modifications
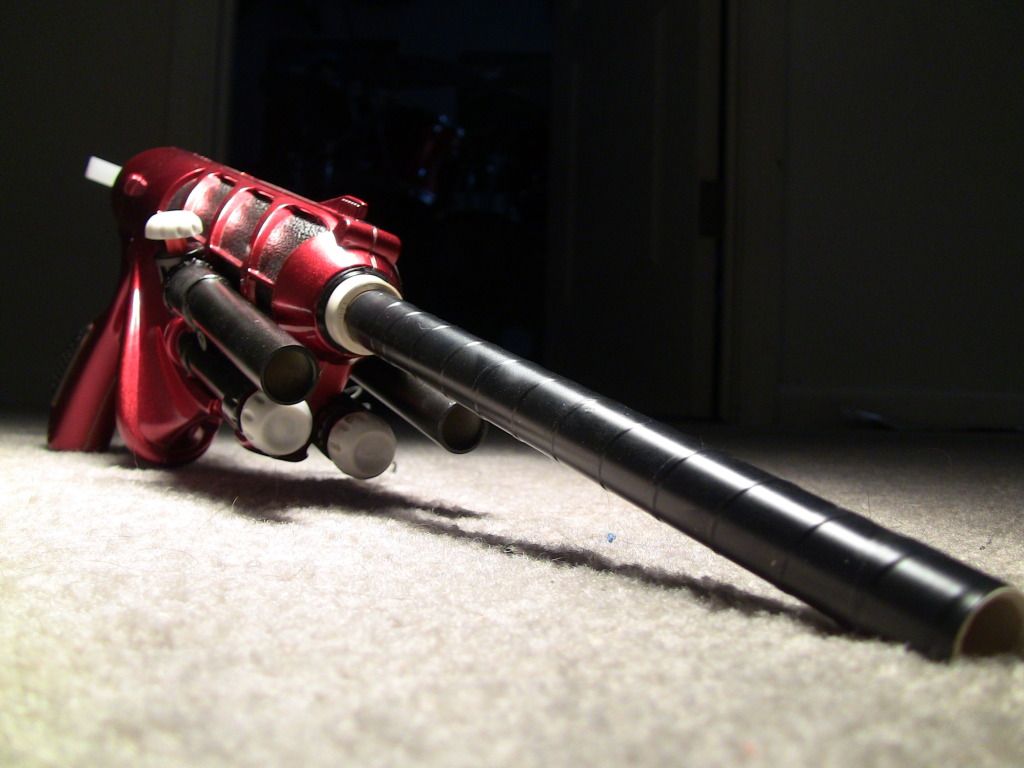
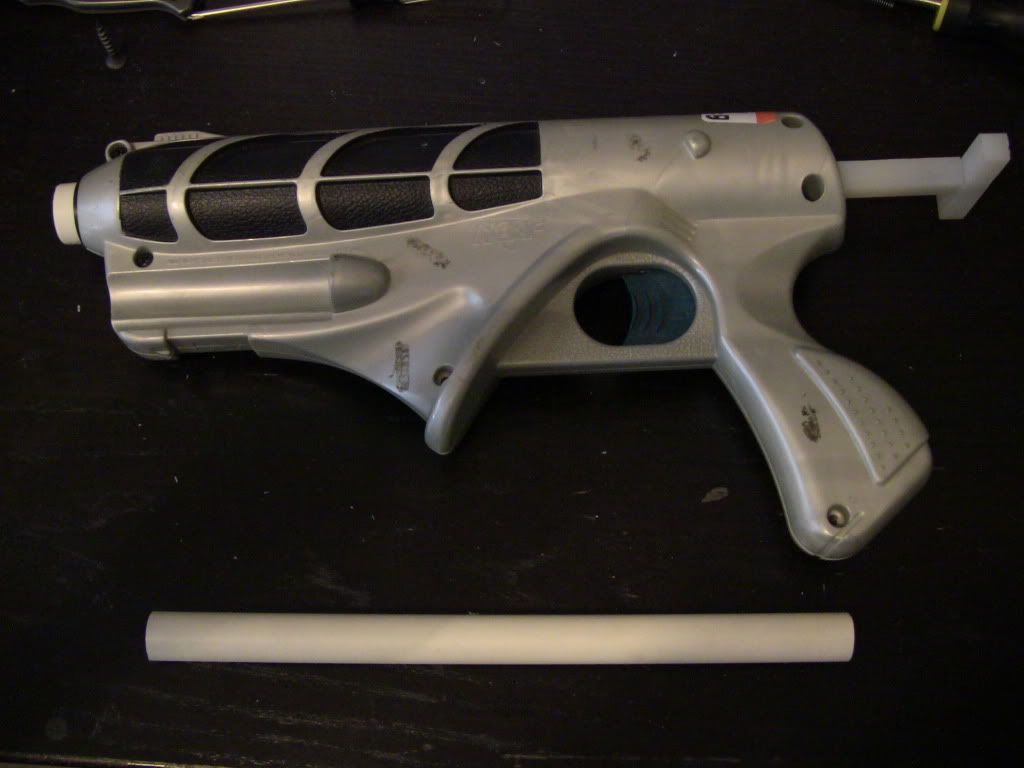
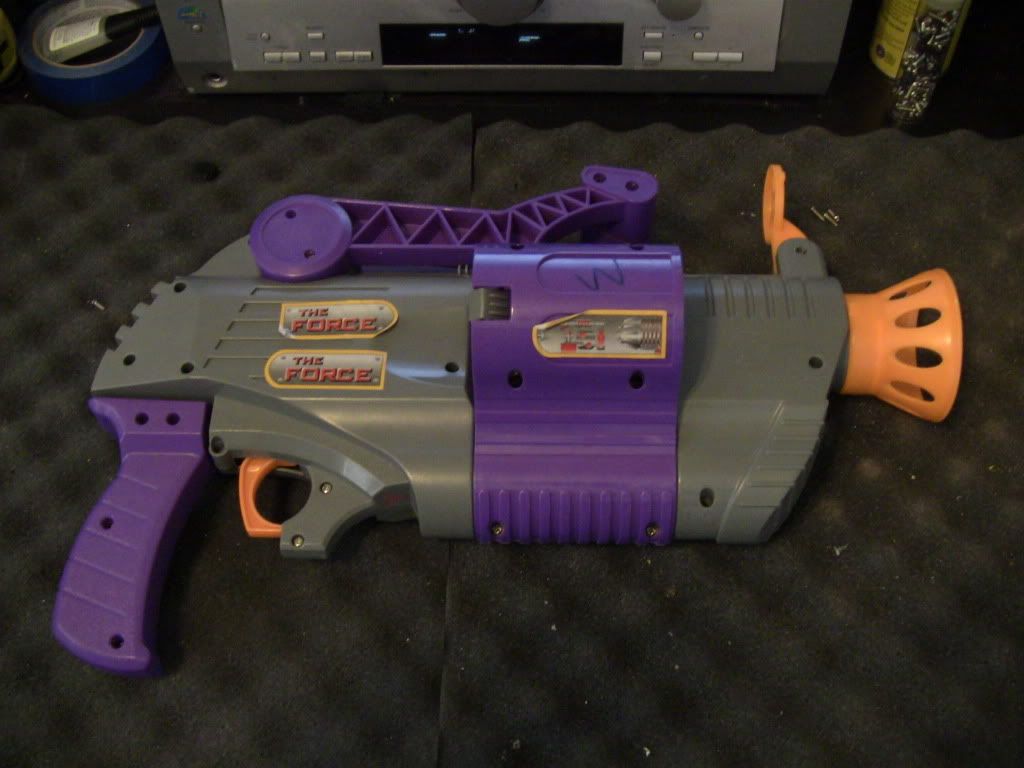
'THE OFFENDER'
It's been a while since I posted any legit writeup, but you know me, I don't like to post pointless junk, I like to post badass new modifications!
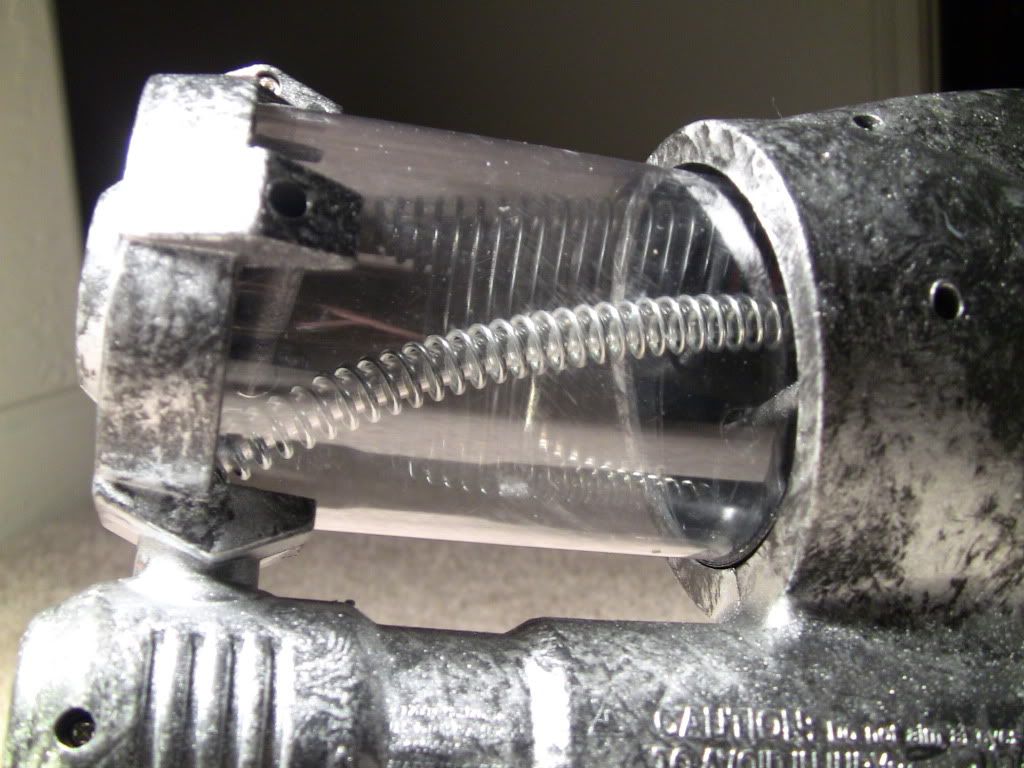
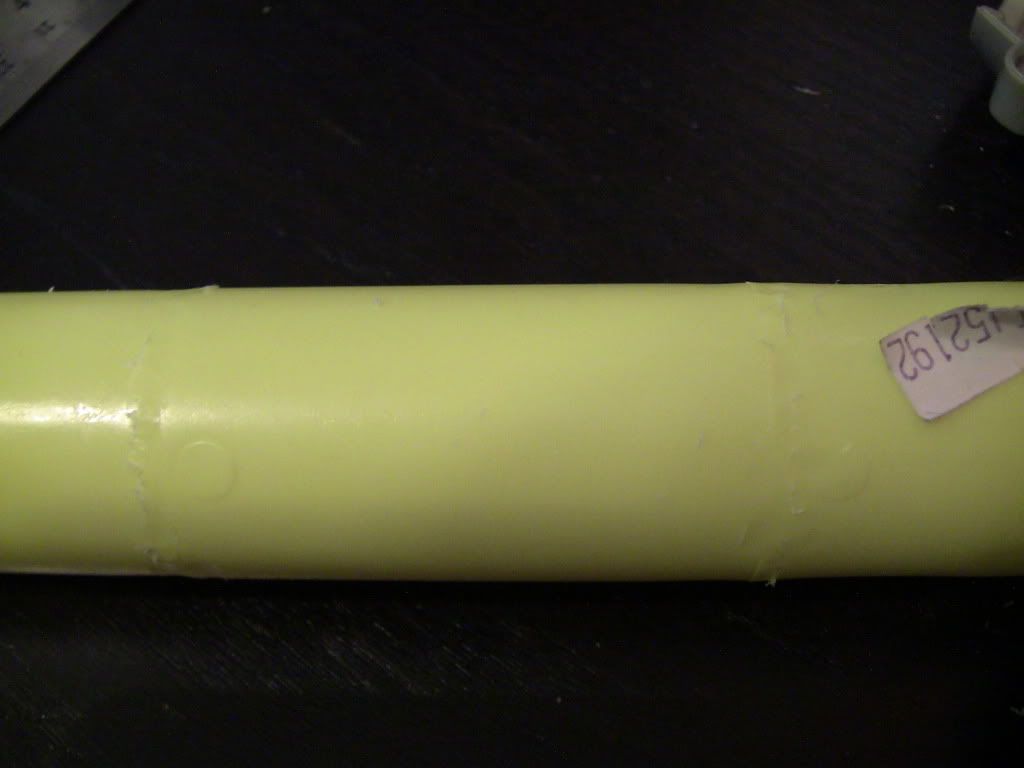
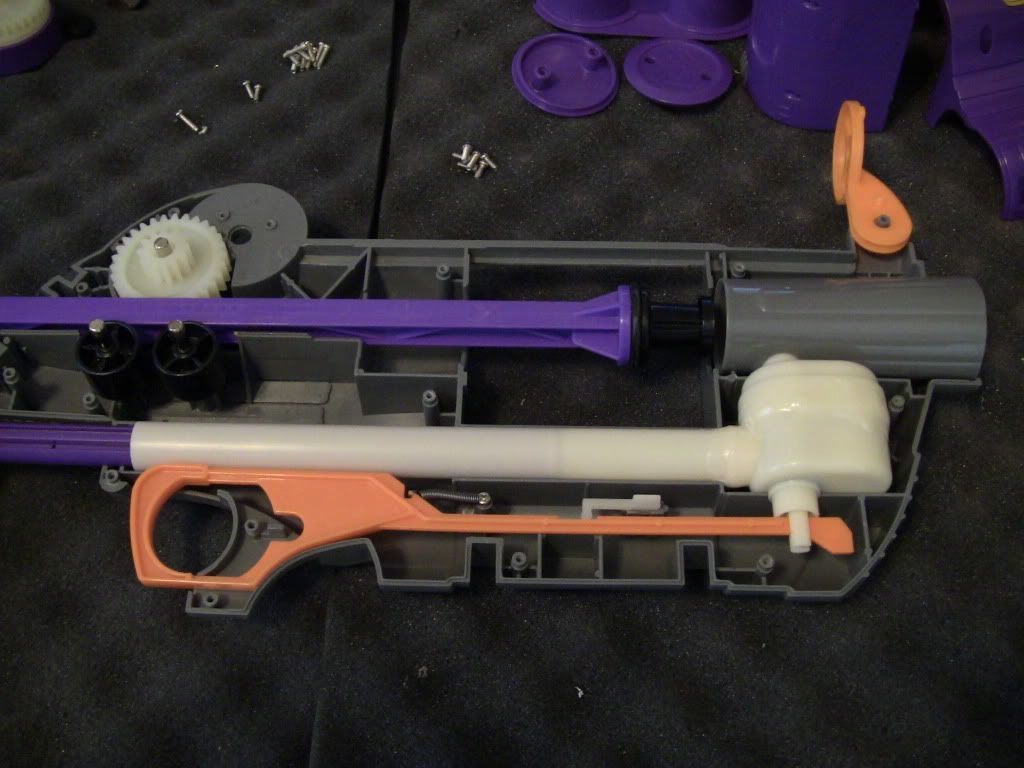
So I found this little beast at a Goodwill for $2. It was missing the arrow part of the gun, which is the best part, so I was kind of bummed. But I've been wanting one of these for a long time for one reason that a lot of people seem to have overlooked on this gun. Its very large and cylindrical shaped where the plunger tube is. Do you know what that means? It means it can hold a MUCH larger plungertube than the stock one, all you have to do is make it fit.
So lets start with the gun...
Open it up, and its stupid simple inside. Much like the Nite Finder internals, though the plunger tube is a little bit smaller. The stock seal is better and the spring is stronger than a NF, so the stock ranges are better. And even with basic mods, it gets 70' ranges. But we're not going to accept 70' ranges, not in this write-up!
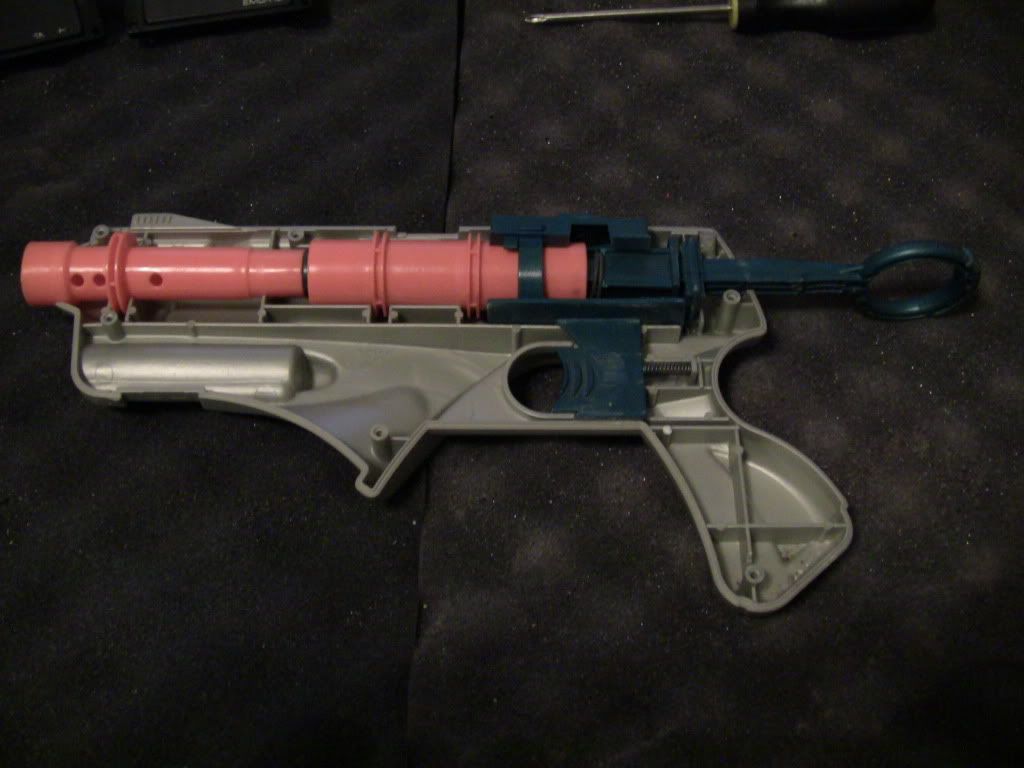
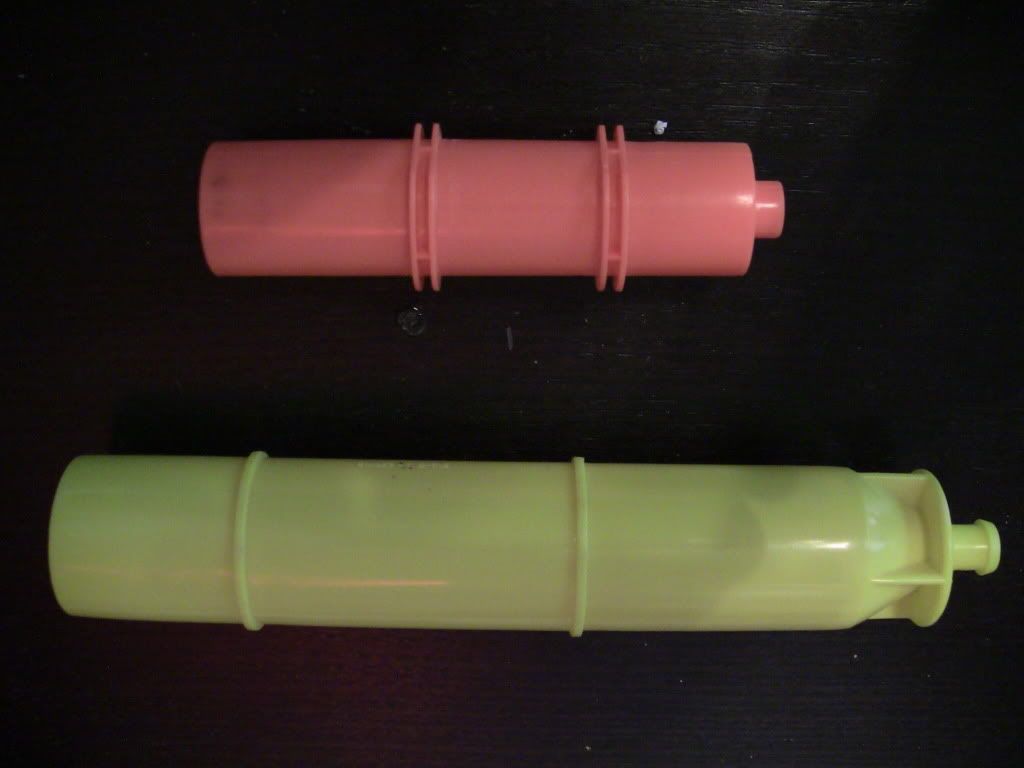
We're gona put a darn tootin' Crossbow plungertube in this sucker!!! You heard me right! I got a spare plunger tube from a crossbow when I rebuilt the internals, and its a perfect fit inside the gun, all I have to do is grind out all the interior walls. If you don't have a xbow plungertube, as a doubt the vast majority of you will, you can use 1.25" PETG tubing, or one of those sink drain couplers that are commonly used as replacement plungertubes for xbow's. Either way, just make sure its 1.25" in diameter and about 7 inches long.
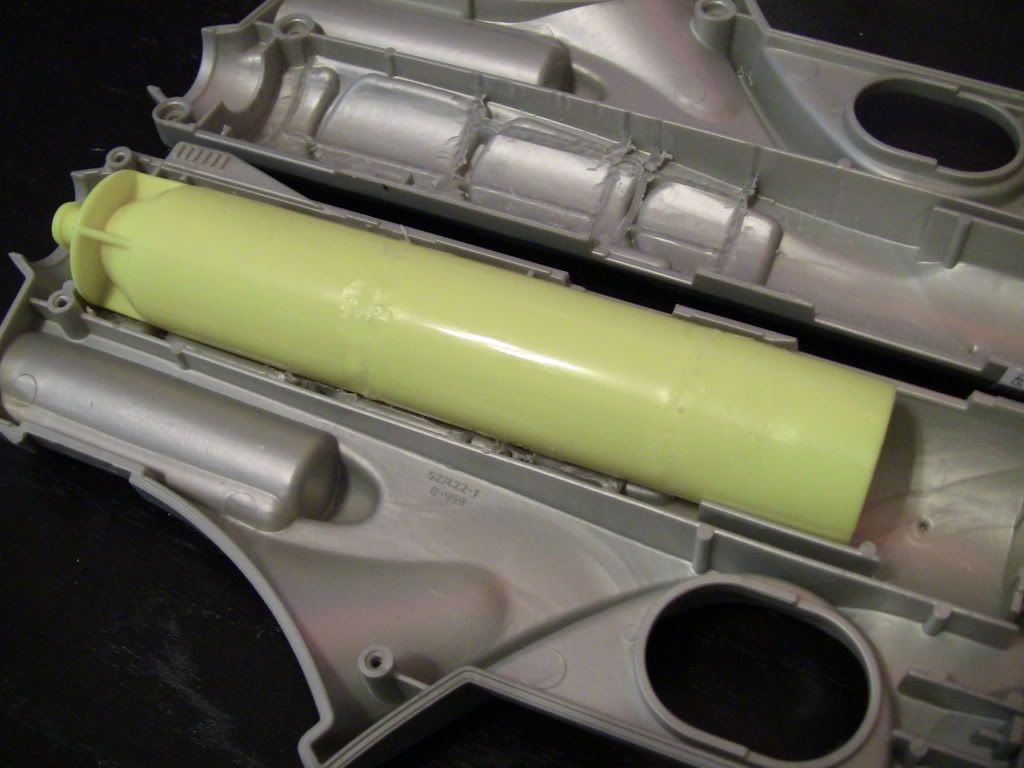
Now look at the difference in plunger tube sizes! I measured the interior volume and the crossbow is 2.5X the size of the Defender plungertube!
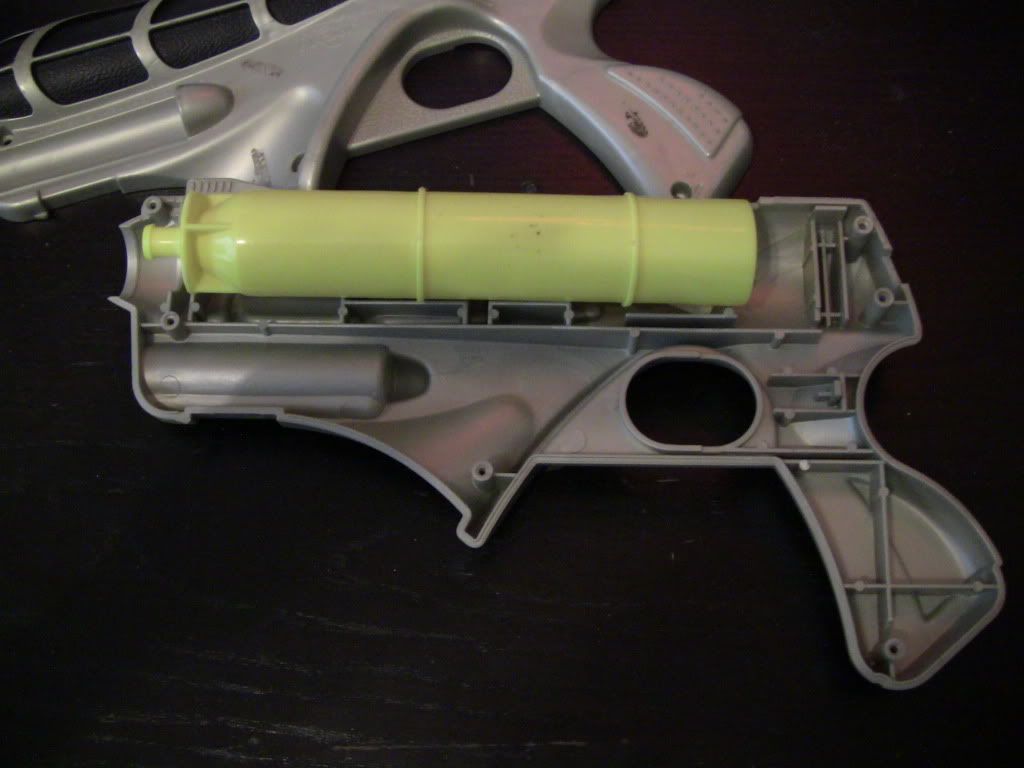
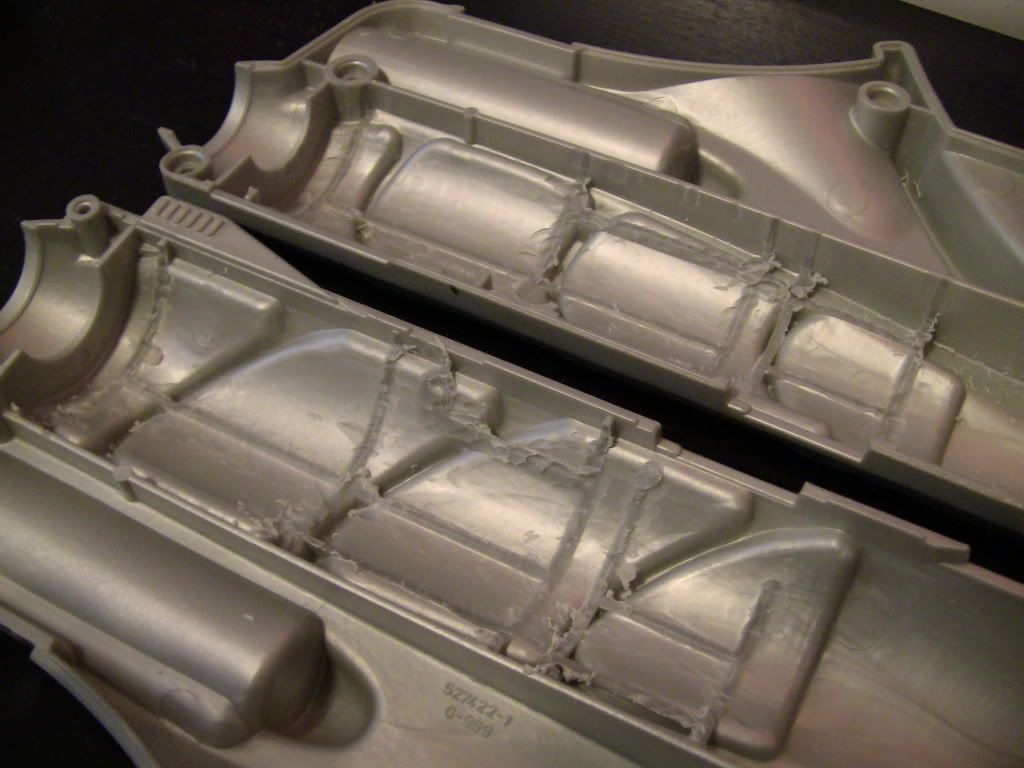
The first thing you need to do is grind down all the interior walls with your Dremel tool. (If you don't have a Dremel tool, you need to get one, or find a new hobby. Haha!) However, leave the very last one towards the end of the barrel. The plunger needs something to rest against.
You're also going to need to grind down the ribs on the crossbow plunger. You're going to need to be a total boss with a Dremel tool for this, or you'll grind right through the tube. The plastic is thin, so be careful.
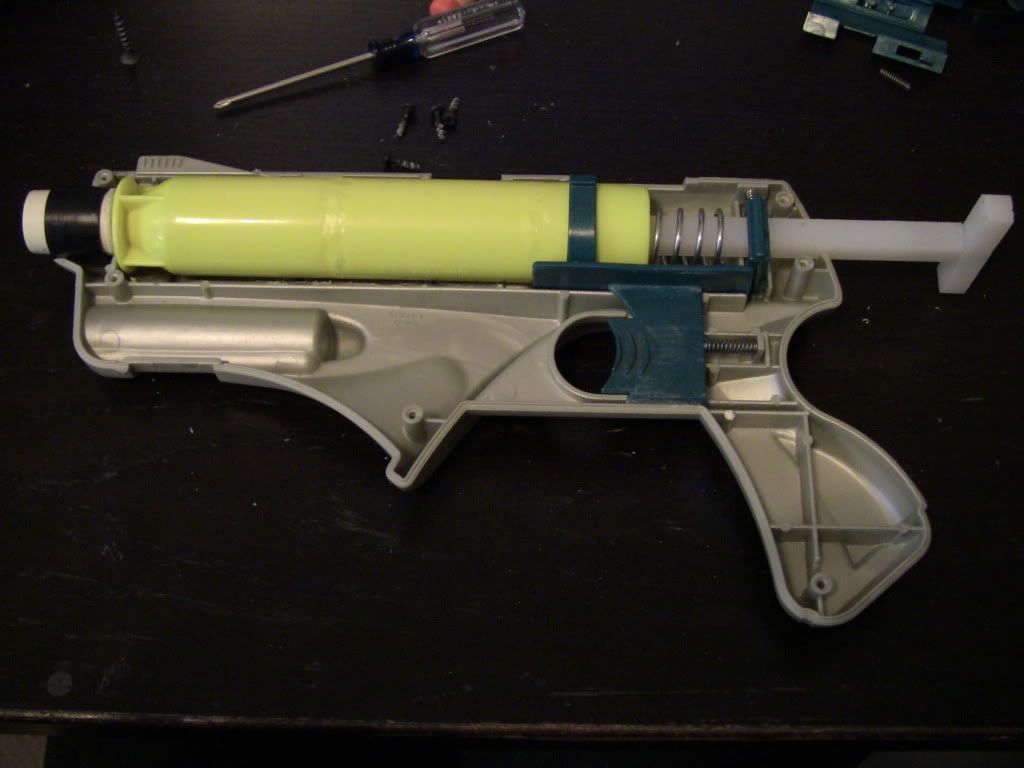
Now it should fit in your gun like so! You're going to want to keep the tube towards the front of your gun.
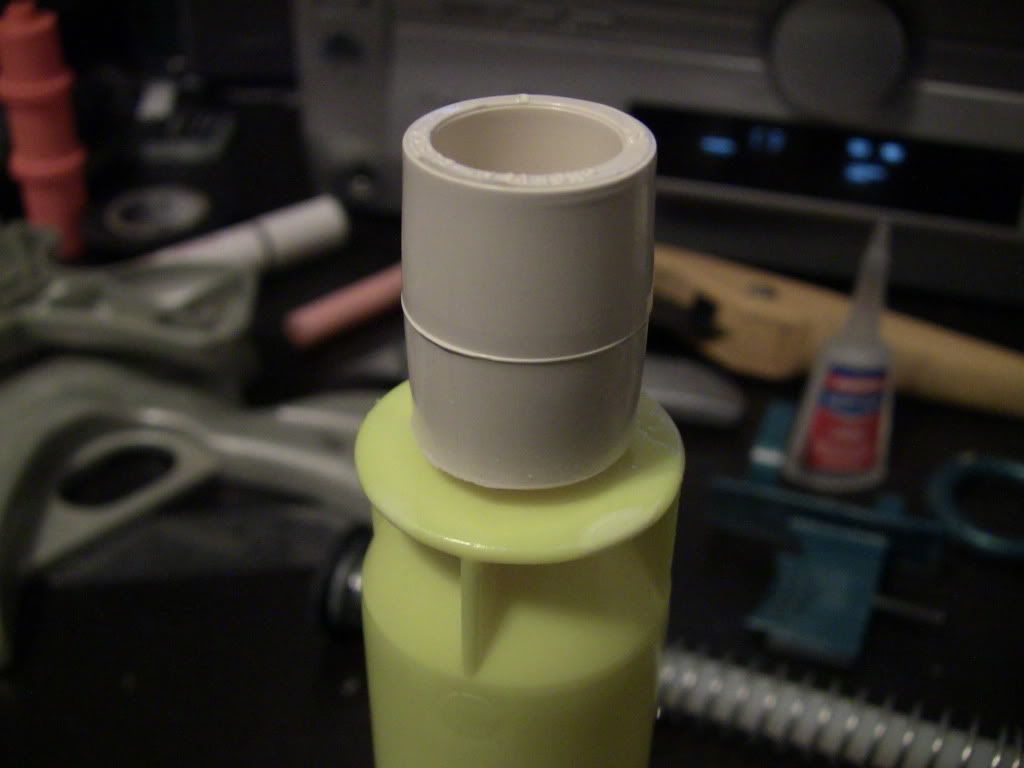
Now make your plunger rod. You should be able to figure this out for yourself because it will depend on what spring/s you use and what rod material you use. You can use the stock plunger rod, but I don't suspect you'll get results half as good as mine with the stock rod. Mine is made of 3/8" nylon. It has a 1.25" neoprene washer as a plunger head, which creates a 100% air seal. And I got TWO Ace #49 springs for power. Yeah... I got two of them... They reach full compression too. They completely bottom out by the time it catches for maximum power! It gives me a draw of nearly 6 inches which is almost the entire plunger tube!!!

Now glue your couple of choice on the end of the plunger tube. I put a piece of CPVC in the end of the coupler to create a bit of a gap between the coupler and the end of the plungertube. I use this gap to hook the the plungertube onto that last wall at the end of the gun that we didn't grind down. That way the plunger tube wont slide back when you prime the gun.
Now put it all back in and you're done! I would also replace the catch spring if I were you.
And it should like like this...
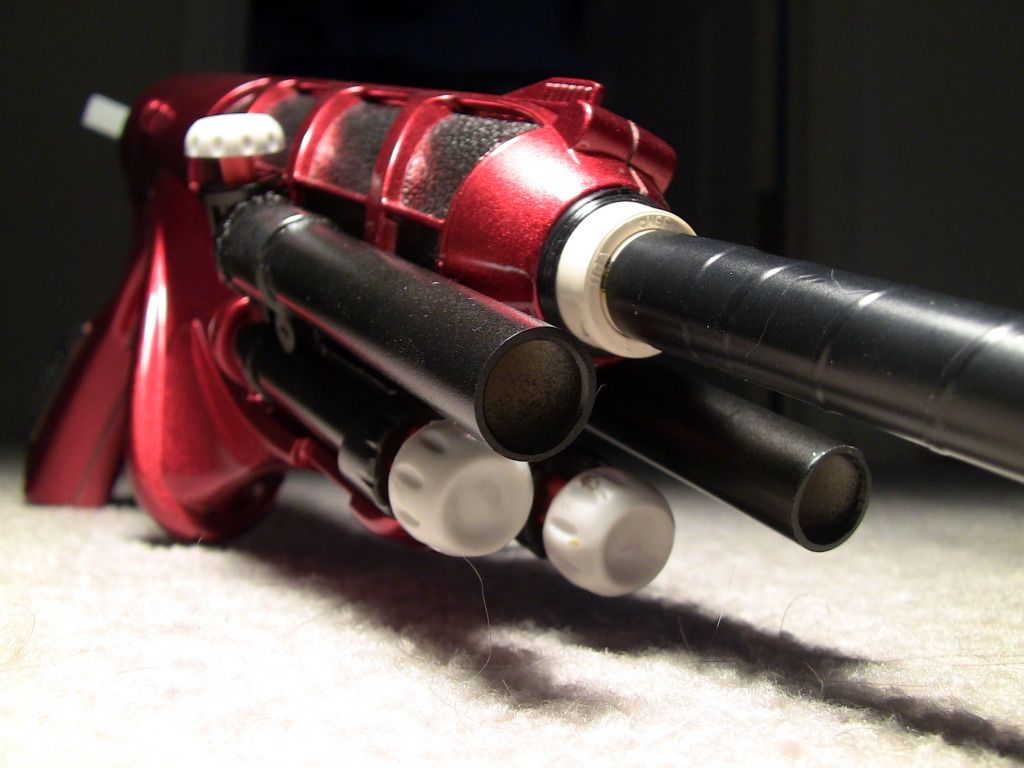
IF you're totally lame... You're going to want to make it look like this!!!
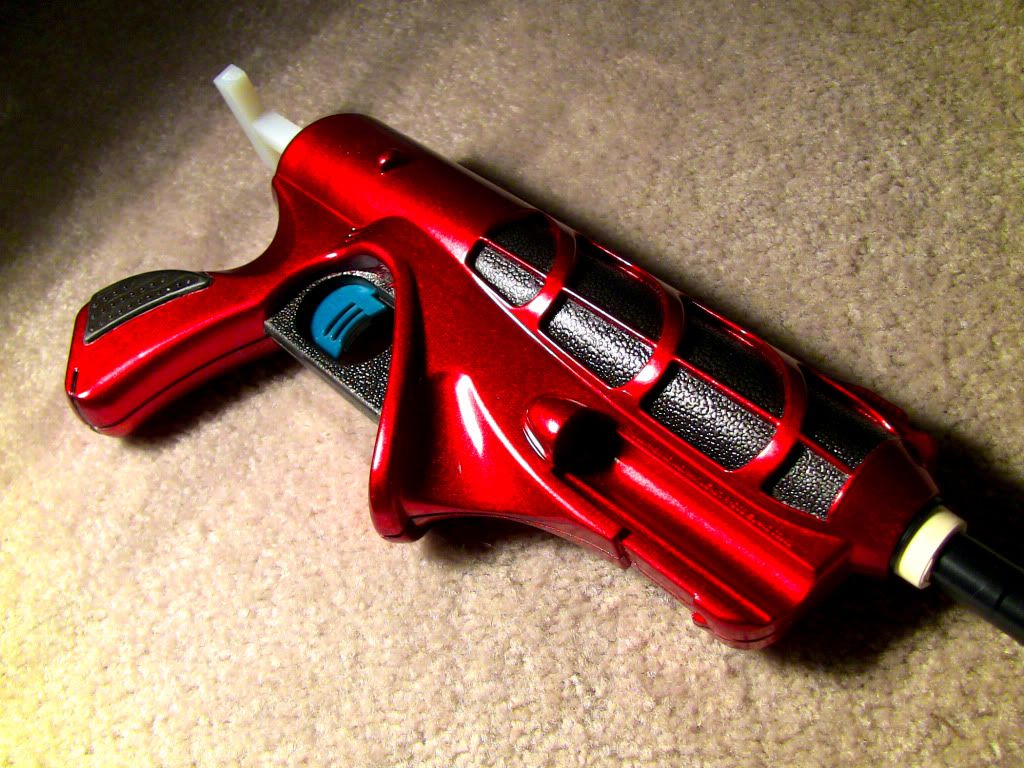
That's right, candy apple red, and super high gloss clear coat! This thing was a royal pain in my ass to tape off. Getting tape into the vent looking parts was not easy, it took me 2 hours. But it was SO worth it... It turned out completely ridiculous! I'm going to have to do a whole writeup just for the painting process alone!
The barrel is about 9" of CPVC. It could use a whole foot or more, but that's just unwieldy.
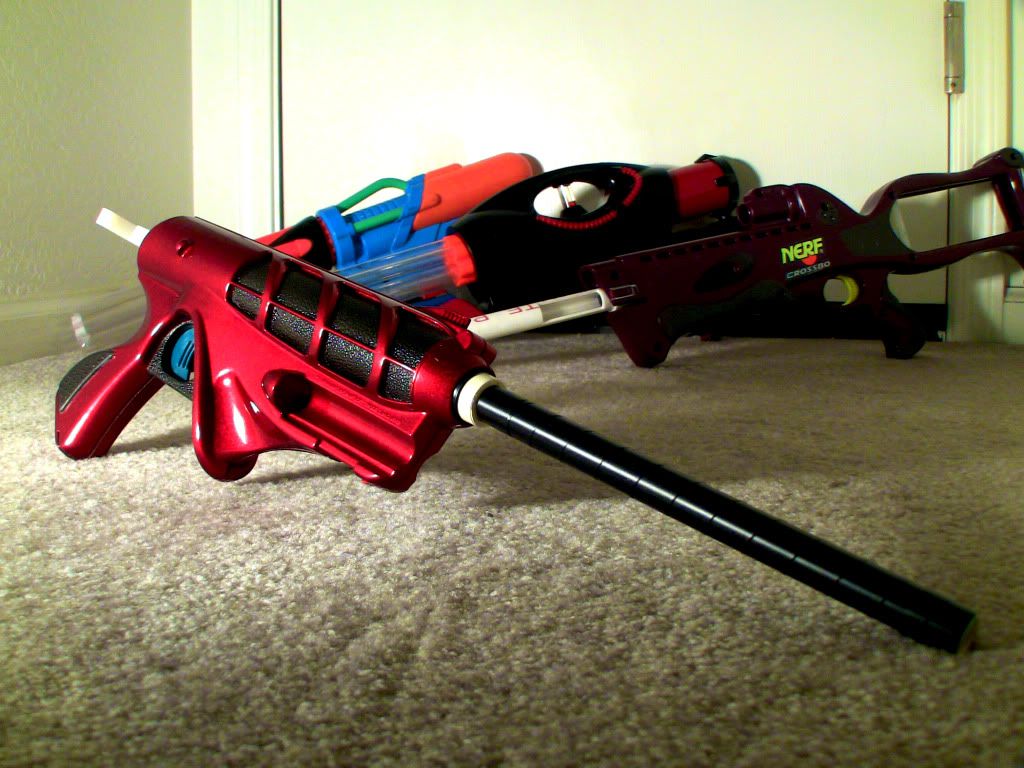
Now last but not least, I know you're all wondering about ranges. I can tell you right now, it outranges my Crossbow, overhauled AT3K, and my SM1500 that you see behind it. I was completely floored the first time I fired it. I used weighted streamline darts firing level shot, and it would repeatedly fire over 150 feet with stupid accuracy! Crossbow ranges in the size of a pistol. Throw a hopper on this bad bow and you're basically unstoppable...
A few sidenotes, this thing is pretty touch to cock. I have no issues, but some of you younger kids might. It also has a bit of a recoil. It tends to want to jump out of your hand when you fire it, so that takes a bit of getting use to. But it sounds amazing. It has that glorious *thump* sound you get from a high powered spring gun. This is probably my new favorite gun. I call it "The Offender"
Question's, comment's, jealousy?
It's been a while since I posted any legit writeup, but you know me, I don't like to post pointless junk, I like to post badass new modifications!
So I found this little beast at a Goodwill for $2. It was missing the arrow part of the gun, which is the best part, so I was kind of bummed. But I've been wanting one of these for a long time for one reason that a lot of people seem to have overlooked on this gun. Its very large and cylindrical shaped where the plunger tube is. Do you know what that means? It means it can hold a MUCH larger plungertube than the stock one, all you have to do is make it fit.
So lets start with the gun...
Open it up, and its stupid simple inside. Much like the Nite Finder internals, though the plunger tube is a little bit smaller. The stock seal is better and the spring is stronger than a NF, so the stock ranges are better. And even with basic mods, it gets 70' ranges. But we're not going to accept 70' ranges, not in this write-up!
We're gona put a darn tootin' Crossbow plungertube in this sucker!!! You heard me right! I got a spare plunger tube from a crossbow when I rebuilt the internals, and its a perfect fit inside the gun, all I have to do is grind out all the interior walls. If you don't have a xbow plungertube, as a doubt the vast majority of you will, you can use 1.25" PETG tubing, or one of those sink drain couplers that are commonly used as replacement plungertubes for xbow's. Either way, just make sure its 1.25" in diameter and about 7 inches long.
Now look at the difference in plunger tube sizes! I measured the interior volume and the crossbow is 2.5X the size of the Defender plungertube!
The first thing you need to do is grind down all the interior walls with your Dremel tool. (If you don't have a Dremel tool, you need to get one, or find a new hobby. Haha!) However, leave the very last one towards the end of the barrel. The plunger needs something to rest against.
You're also going to need to grind down the ribs on the crossbow plunger. You're going to need to be a total boss with a Dremel tool for this, or you'll grind right through the tube. The plastic is thin, so be careful.
Now it should fit in your gun like so! You're going to want to keep the tube towards the front of your gun.
Now make your plunger rod. You should be able to figure this out for yourself because it will depend on what spring/s you use and what rod material you use. You can use the stock plunger rod, but I don't suspect you'll get results half as good as mine with the stock rod. Mine is made of 3/8" nylon. It has a 1.25" neoprene washer as a plunger head, which creates a 100% air seal. And I got TWO Ace #49 springs for power. Yeah... I got two of them... They reach full compression too. They completely bottom out by the time it catches for maximum power! It gives me a draw of nearly 6 inches which is almost the entire plunger tube!!!
Now glue your couple of choice on the end of the plunger tube. I put a piece of CPVC in the end of the coupler to create a bit of a gap between the coupler and the end of the plungertube. I use this gap to hook the the plungertube onto that last wall at the end of the gun that we didn't grind down. That way the plunger tube wont slide back when you prime the gun.
Now put it all back in and you're done! I would also replace the catch spring if I were you.
And it should like like this...
IF you're totally lame... You're going to want to make it look like this!!!
That's right, candy apple red, and super high gloss clear coat! This thing was a royal pain in my ass to tape off. Getting tape into the vent looking parts was not easy, it took me 2 hours. But it was SO worth it... It turned out completely ridiculous! I'm going to have to do a whole writeup just for the painting process alone!
The barrel is about 9" of CPVC. It could use a whole foot or more, but that's just unwieldy.
Now last but not least, I know you're all wondering about ranges. I can tell you right now, it outranges my Crossbow, overhauled AT3K, and my SM1500 that you see behind it. I was completely floored the first time I fired it. I used weighted streamline darts firing level shot, and it would repeatedly fire over 150 feet with stupid accuracy! Crossbow ranges in the size of a pistol. Throw a hopper on this bad bow and you're basically unstoppable...
A few sidenotes, this thing is pretty touch to cock. I have no issues, but some of you younger kids might. It also has a bit of a recoil. It tends to want to jump out of your hand when you fire it, so that takes a bit of getting use to. But it sounds amazing. It has that glorious *thump* sound you get from a high powered spring gun. This is probably my new favorite gun. I call it "The Offender"
Question's, comment's, jealousy?
#312435 Help Identifying Nerf Type Blaster
Posted by
on 04 March 2012 - 07:28 PM
in
General Nerf
Thanks for your help guys! Between the 2 guns, I have 3 of the shells, so I bet that raises any resale value a bit. Does anyone have a ballpark of what these things are worth?
#312428 Help Identifying Nerf Type Blaster
Posted by
on 04 March 2012 - 05:14 PM
in
General Nerf
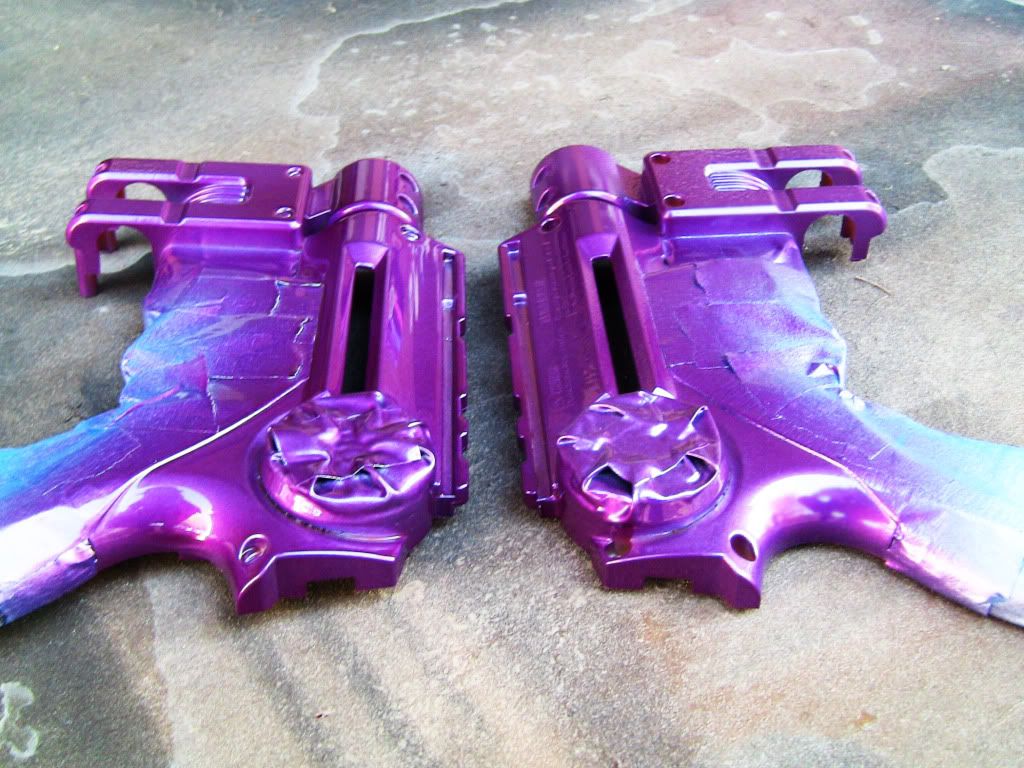
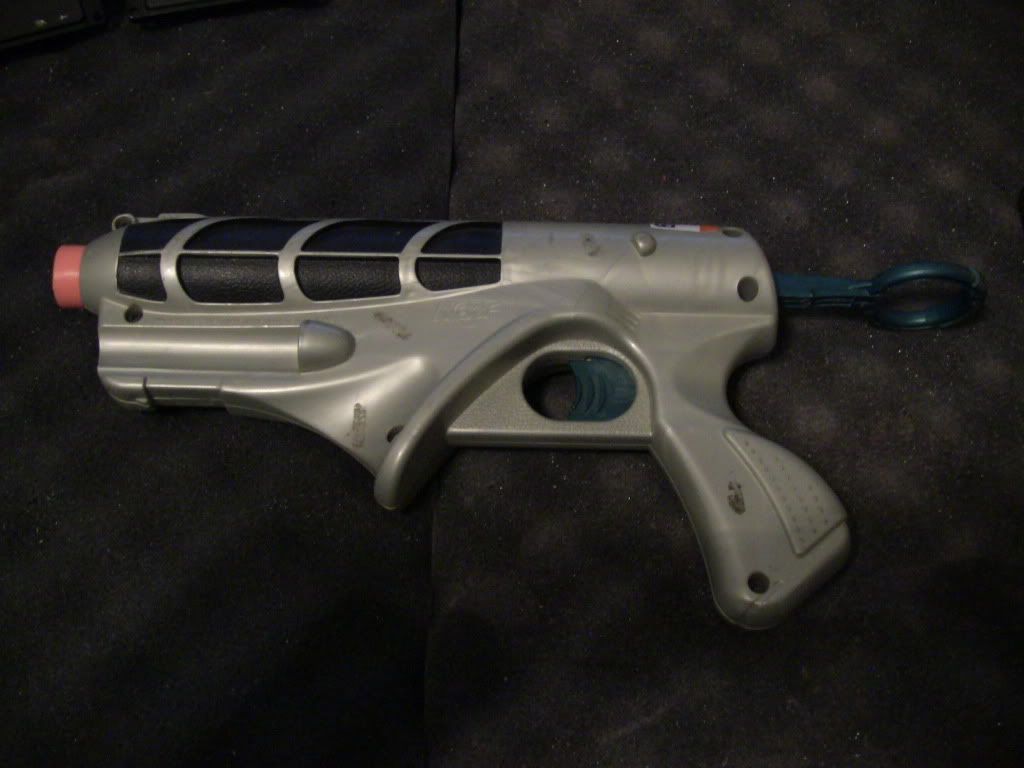
Okay, so I picked up a pair of these at a Goodwill this morning. They were in great shape, and I could tell they were powered off an air tank. But I have no idea what they are and I've never seen them before in my life. I got home and Googled everything that's printed on the gun with no luck at all. They're made by a company called Yes! Entertainment Corporation. I did a little research on them and found that they were only in business from 1992 to 1998, and they were pretty low key. They shut their doors in 98' and this gun was made in 97'. So I have a feeling that there are not very many of these guns out there. And I have two!
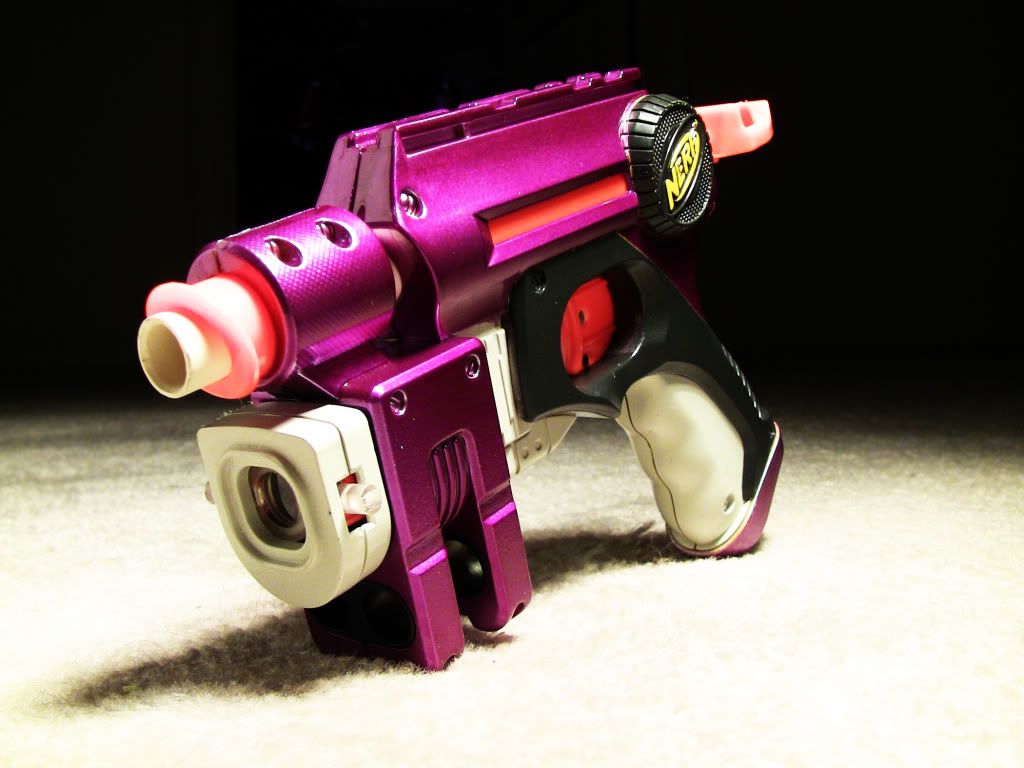
It appears to fire some sort of ball, maybe about the size of a ping-pong ball. It operates by loading a ball into the 2-round pivoting cylinder, then you crank the ratchet on top which drives a rod forward pushing the ball into the barrel. For the next shot, you just push the cylinder over and do it again. Pretty neat.
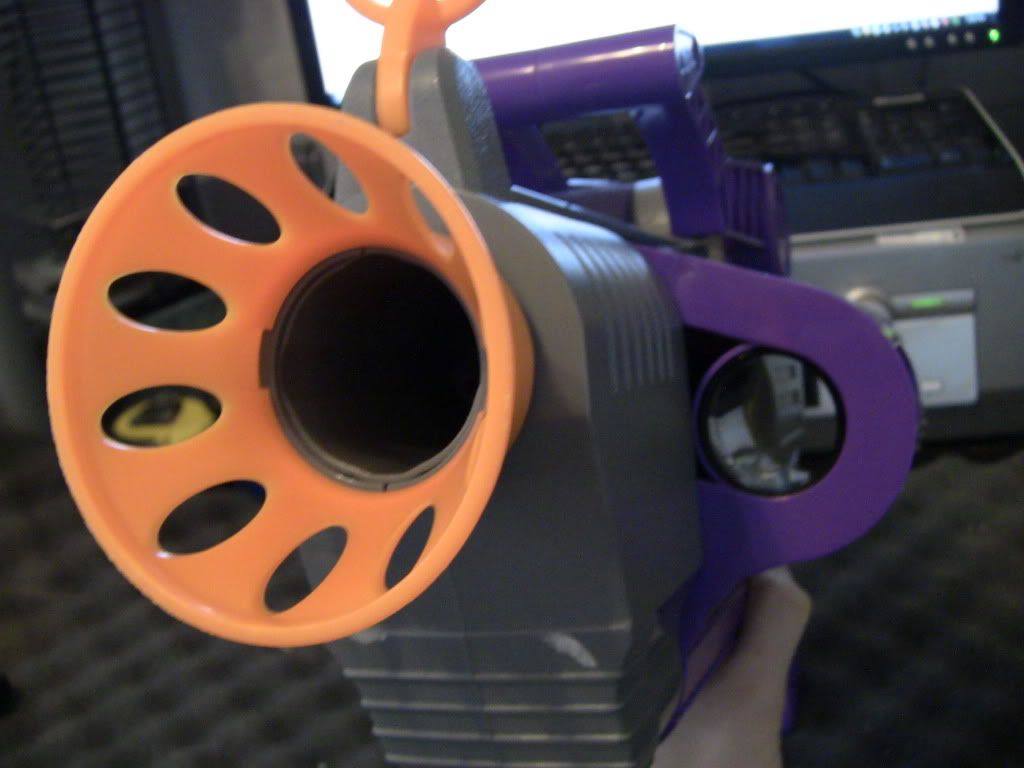
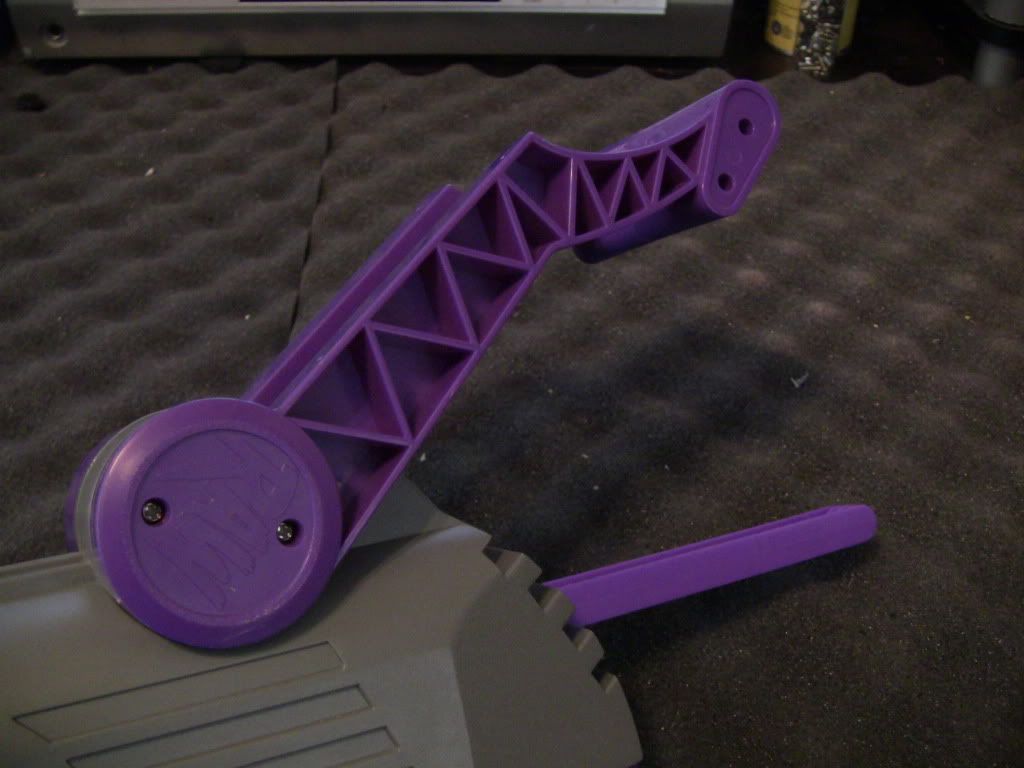
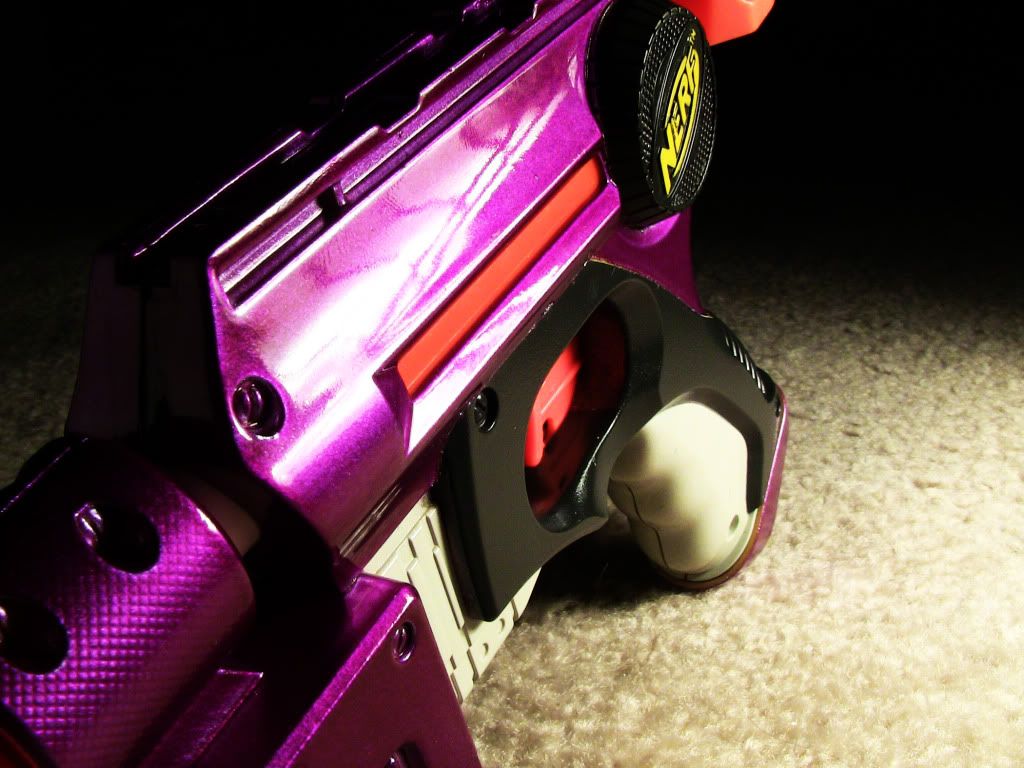
But the neatest part it how it pumps! The handle comes out the back with a pretty long draw, and you push it forward. The trigger is super beefy too!
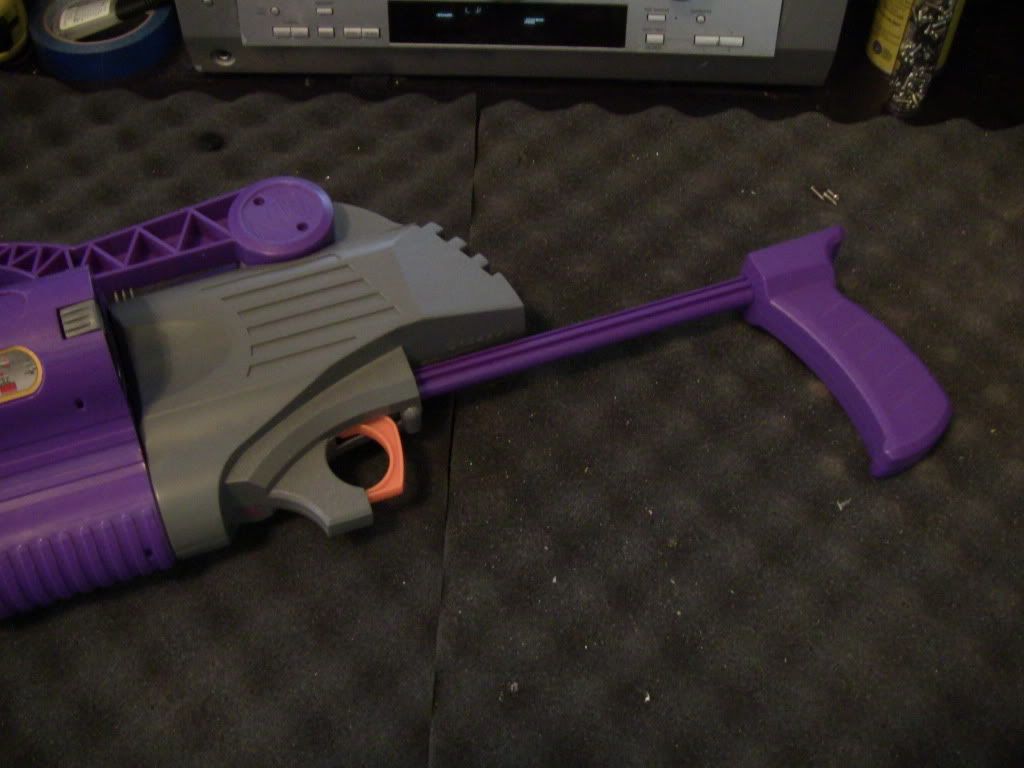
I opened it up to see whats inside, and its pretty simple. It looks like the air tank is about the size of a mega missile tank, probably bigger. But the hole where the air come out is nearly 1/2 an inch in diameter!!! Its the largest hole in any air tank I've seen! With a pump as long and skinny as this one with a hole that large, I imagine this gun could get scary ranges with an RSCB or a hopper. Combined with its unique pump location, it could fire off round pretty fast too!
Now my question is, because to my knowledge, this gun is so rare, is it worth anything? I would hate to go ahead and modify one or both of these to find out that they're the last of their kind. Has anyone seen these before? Does anyone know if they're collectible? If not, they're going to make awesome primaries! And if any of you are interested in these before I go and mod them, just PM me, this isn't the sales thread.
It appears to fire some sort of ball, maybe about the size of a ping-pong ball. It operates by loading a ball into the 2-round pivoting cylinder, then you crank the ratchet on top which drives a rod forward pushing the ball into the barrel. For the next shot, you just push the cylinder over and do it again. Pretty neat.
But the neatest part it how it pumps! The handle comes out the back with a pretty long draw, and you push it forward. The trigger is super beefy too!
I opened it up to see whats inside, and its pretty simple. It looks like the air tank is about the size of a mega missile tank, probably bigger. But the hole where the air come out is nearly 1/2 an inch in diameter!!! Its the largest hole in any air tank I've seen! With a pump as long and skinny as this one with a hole that large, I imagine this gun could get scary ranges with an RSCB or a hopper. Combined with its unique pump location, it could fire off round pretty fast too!
Now my question is, because to my knowledge, this gun is so rare, is it worth anything? I would hate to go ahead and modify one or both of these to find out that they're the last of their kind. Has anyone seen these before? Does anyone know if they're collectible? If not, they're going to make awesome primaries! And if any of you are interested in these before I go and mod them, just PM me, this isn't the sales thread.
#308905 Modification and Paintjob Pictures
Posted by
on 30 December 2011 - 12:55 AM
in
Modifications
Okay, so I got another contract up, this one is for Jonrd, who by the way is a fantastic guy to work for. He likes to push my modding skills further with every build, this being one of the trickiest builds to date. It is NOT a LSFG integrated into the LS like usual, it's in fact an internal shotgun pump. I remember seeing something similar years ago, but have never found it since. So unless someone can bring it, or something better to my attention, I'm going to go ahead and dub this "The Cleanest Pump Action Longshot Ever Made".
It doesn't have much for power mods do to the nature of his game-play, so it only hits a good 50 feet, but I've had this same breech design send weighted streamlines 140 feet, level shot. But it has the same streamline/Stefan accepting brass breech I put in all my LS's, full reinforcements, sound dampening, and a single color base coat upon his request. I do accept any and all contracts, no matter how big or small, preferably big, so if you're interested in something, PM me. I'm especially good at Longshots, Nite Finders, AT2K's, and clean integration's.
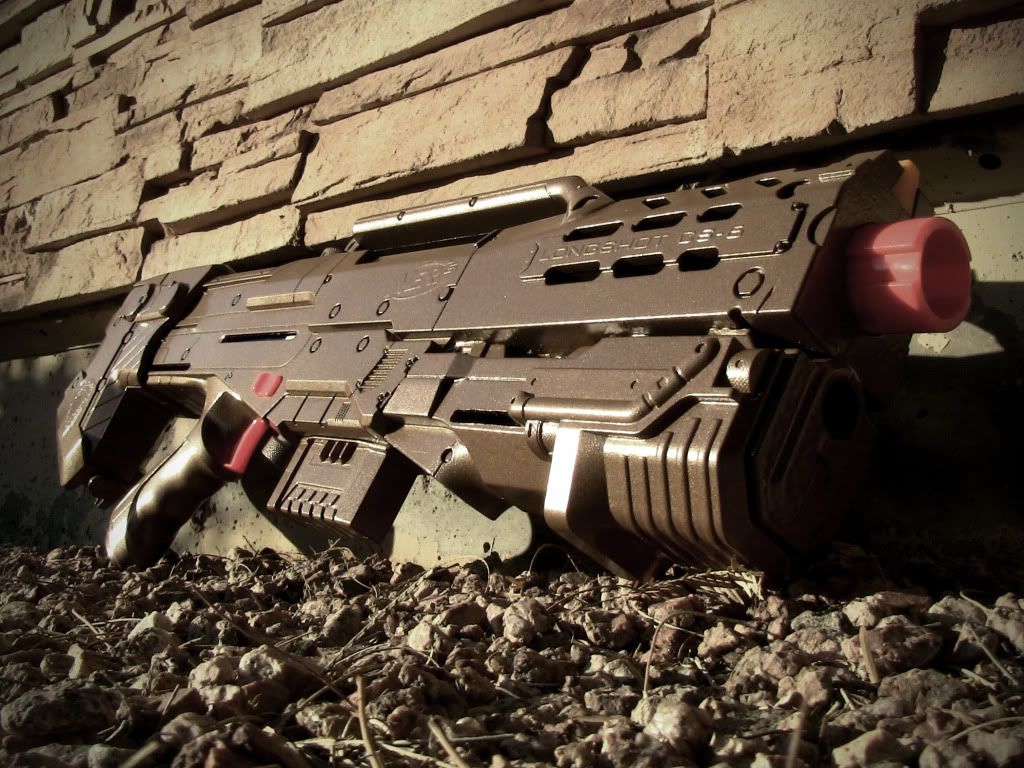
It doesn't have much for power mods do to the nature of his game-play, so it only hits a good 50 feet, but I've had this same breech design send weighted streamlines 140 feet, level shot. But it has the same streamline/Stefan accepting brass breech I put in all my LS's, full reinforcements, sound dampening, and a single color base coat upon his request. I do accept any and all contracts, no matter how big or small, preferably big, so if you're interested in something, PM me. I'm especially good at Longshots, Nite Finders, AT2K's, and clean integration's.
#305738 Need help locating where I can get a spring for the Bullet Guard for t
Posted by
on 11 October 2011 - 08:16 PM
in
Modifications
Why don't you just get rid of it all together and brass breech the darn thing? Its not hard to do.
#304923 Modification and Paintjob Pictures
Posted by
on 22 September 2011 - 02:04 PM
in
Modifications
Sorry, accidental double post.


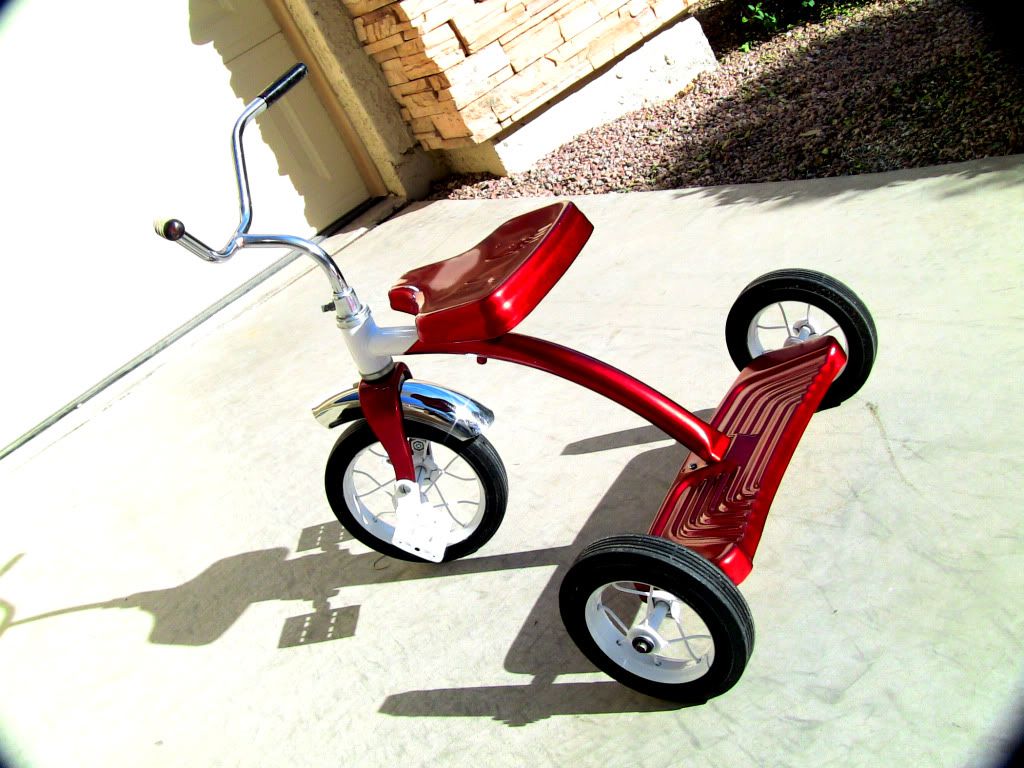