Jump to content


cheesypiza001's Content

There have been 541 items by cheesypiza001 (Search limited from 03-December 96)


By content type

See this member's


Sort by                Order  

#276955 Drain Blaster Pump Relocation?

Posted by cheesypiza001 on 06 June 2010 - 09:11 AM in Modifications

I cut the pump off of mine a while ago because it had an uncontrollable leak. I'll post some internals pictures soon.


Posted Image

Posted Image

Posted Image

Posted Image

Posted Image

Posted Image

Posted Image

Posted Image


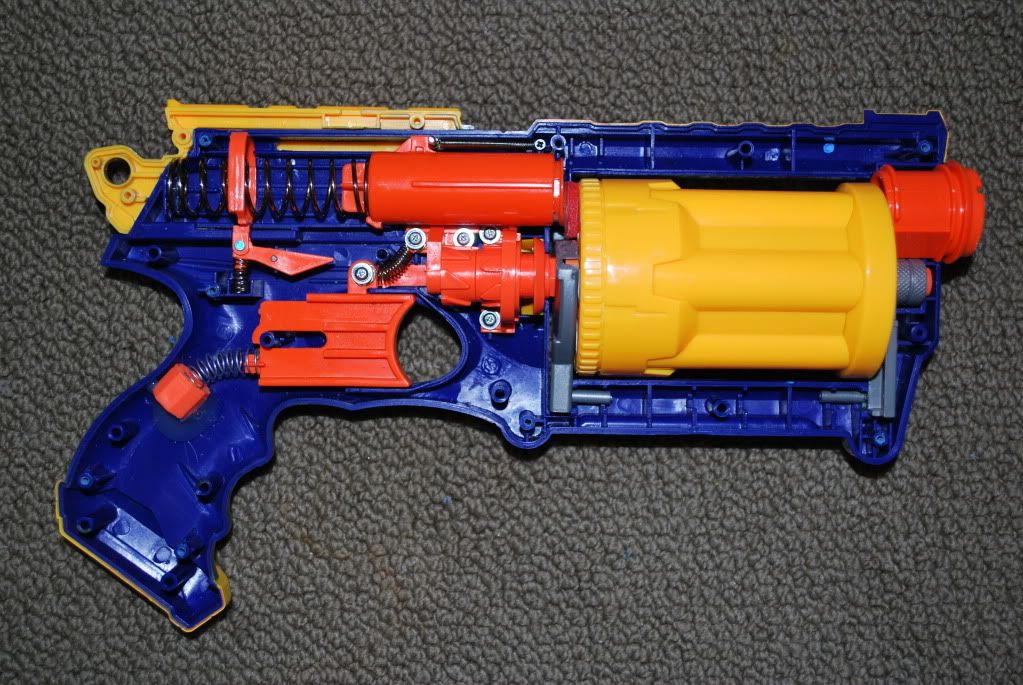
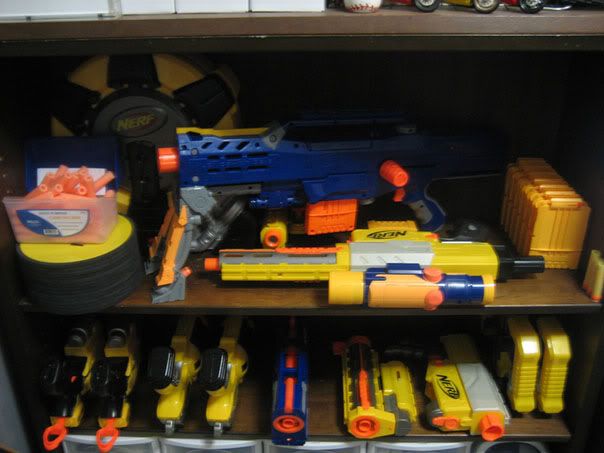
If I get enough time later, I'll post some better pictures.


#275346 Modification and Paintjob Pictures

Posted by cheesypiza001 on 19 May 2010 - 06:16 PM in Modifications

I finally finished making a video about my Rear-Loading Maverick...


VIDEO


Posted Image


#274477 Wax + Molten Bronze = Huge Fire

Posted by cheesypiza001 on 10 May 2010 - 09:10 PM in Off Topic

So do you just get the bronze to a good heat and drop it in?


The bronze was already in the crucible and was molten when we dropped the wax in.


That video is odd. Why would they waste the wax? It is used to make molds for casting the bronze and its not cheap. I do a bit of metal casting in my backyard frequently. Are there any other metal casters on this forum?

I have some pictures of what I do on my website
La tomatina mt laurel

Yes the site has a lot of randomness, just go to the casting section.


We had a bunch of left over wax and seeing that happen was definitely worth it. I cast my whole arm in alginate last summer (the time this video was taken), filled the mold with wax, took the wax out, sprued it, covered it in plaster, and put it through the burnout kiln. But then, the thermocouples on the kiln broke so the firing was cut off and the sudden temperature change screwed up all of the plaster molds. I had planned to cast my arm in alternating layers of aluminum and bronze, though when the molten metal was poured in, it seeped through the cracks in the plaster made by the sudden temperature changes which pretty much ruined the whole thing.


#274336 Externally Singled Hornet (for Power)

Posted by cheesypiza001 on 08 May 2010 - 10:21 PM in Modifications

Okay, im the noobiest person on this forum and have a hornet that id like to single. So at the part in where you make the breech, could you lighten that up for me or someone help me on how to do that exactly.

Any help appreciated.

Ty.


Here's a good video on how to make a breech.


#274306 Wax + Molten Bronze = Huge Fire

Posted by cheesypiza001 on 08 May 2010 - 03:55 PM in Off Topic

I just recently found a video that I filmed about a year ago and I thought I'd post it.

VIDEO


Let me know what you think of it. Thanks


WARNING: Please don't try this at home without adult supervision.


#273631 Firefly Modding Problem

Posted by cheesypiza001 on 28 April 2010 - 07:47 PM in Modifications

The plunger head may just need to be lubricated (with a silicone based lubricant).


#273628 Homemades Picture Thread

Posted by cheesypiza001 on 28 April 2010 - 07:18 PM in Homemades

I used MAPP gas to heat up the PVC so that I could bend it to the desired angle and then I just attached an elbow for the vertical shoulder support (stock). The bent PVC is bolted to the bottom of the handle.

Posted Image

Posted Image

Posted Image


#273232 Dart Door V2

Posted by cheesypiza001 on 24 April 2010 - 08:57 PM in Darts and Barrels

VIDEO


UPDATE: Check first post for details.


#272583 Turrets Info

Posted by cheesypiza001 on 18 April 2010 - 02:34 PM in Homemades

Here's a link to a great modification/homeade that encompasses a writeup on a homeade turret.


#272436 Dart Door V2

Posted by cheesypiza001 on 16 April 2010 - 09:34 PM in Darts and Barrels

I know this may start to sound redundant, but have you placed your hand over the barrel to see if the plunger head still traveled?


I don't mean to sound like a jerk, but the seal of the device has been questioned 5 times in this thread and I have responded each and every time by assuring the inquirer that it does not in fact leak out air when the blaster is fired. It's very frustrating when I have said it so many times and people just keep asking the same questions over and over. I apologize for ranting on and on, but I hope you see where I'm coming from.

I have actually plugged the barrel with my finger and put the whole top of the blaster underwater and shot it. My L+L doesn't have a perfect seal so most if not all of the air that does escape does so by getting around the plunger head.


#272403 Dart Door V2

Posted by cheesypiza001 on 16 April 2010 - 06:08 PM in Darts and Barrels

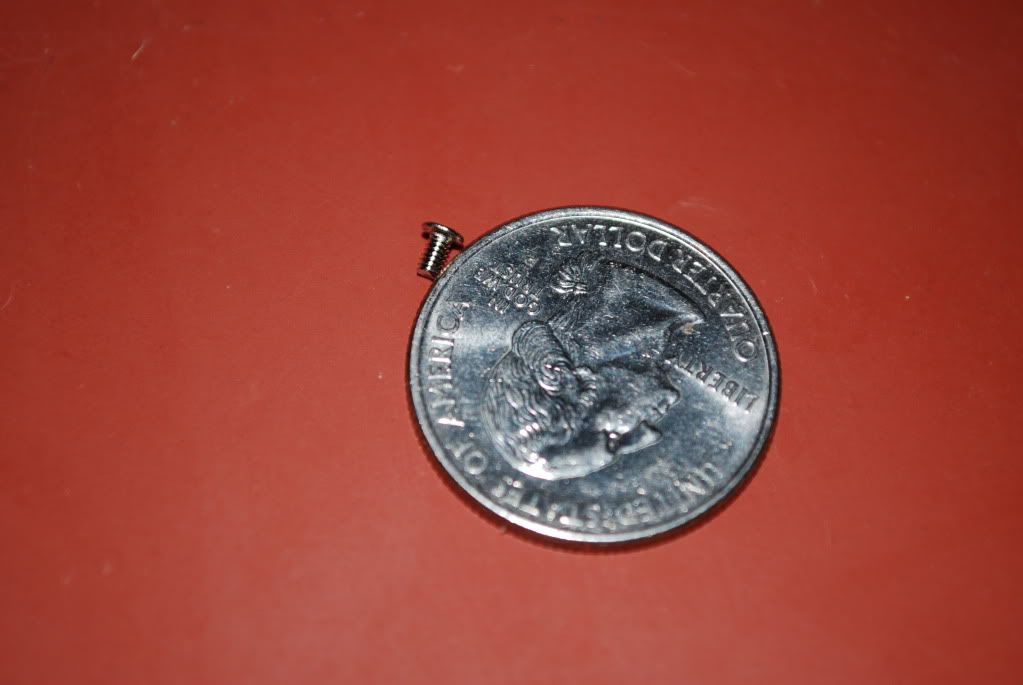
Does the gasket around the screw show any signs of wear? After a while, I feel like it might break at this point, and a small washer would be a easy fix, unless there isnt room for a washer without impeding the dart's movement.


Everything is in fine working condition and there is no sign of any leakage or wear throughout the whole thing.


#272350 Dart Door V2

Posted by cheesypiza001 on 15 April 2010 - 09:00 PM in Darts and Barrels

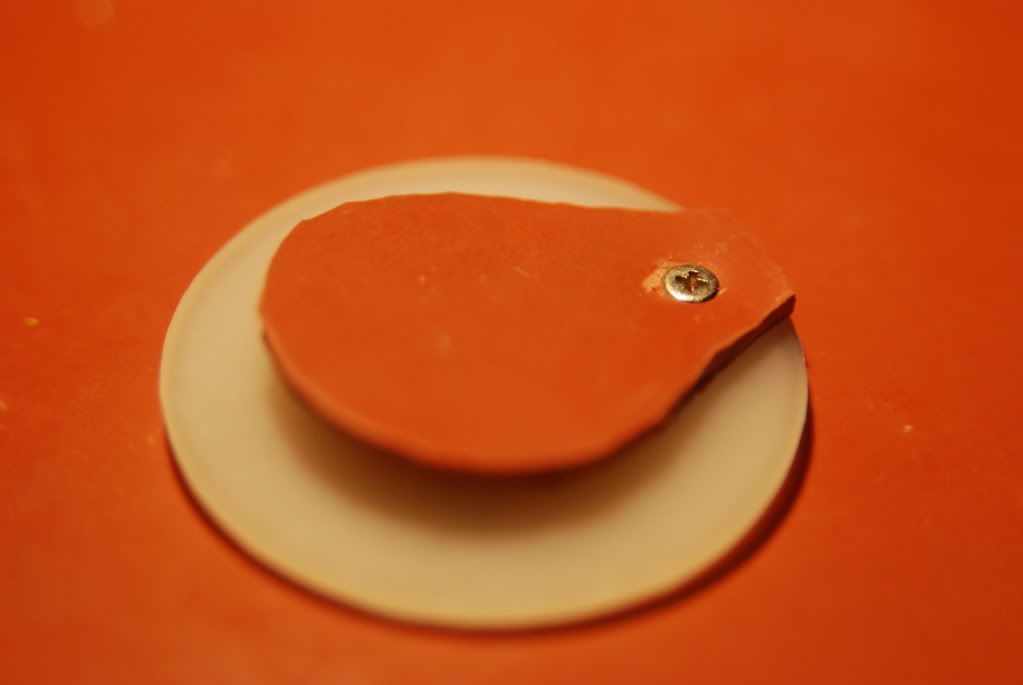
Does the flap feel like it would warp enough to be unusable?


Not at all. It is very flexible.


You should up all your sizes in the flap valve to 3/4" nominal and thus put less stress on the hinge. The easiest way to do it would just be by replacing the 1/2" coupler with a 1/2" to 3/4" reducing slip->slip coupler (or even reducing male->slip or expanding slip->female, if those are more easily found since threads on the end bit won't matter). The other way would be to get a 1/2" to 3/4" reducing bushing and 3/4" coupler.


I really don't think that's all necessary. From the looks of it thus far, I highly doubt that the flap will break. In addition, I wanted to create something that was not very big or bulky and was just as small as the usual end cap on the back is. However, if this design does not live up to my expectations, I will be sure to take what you have said into consideration.


#272299 Dart Door V2

Posted by cheesypiza001 on 15 April 2010 - 12:06 PM in Darts and Barrels

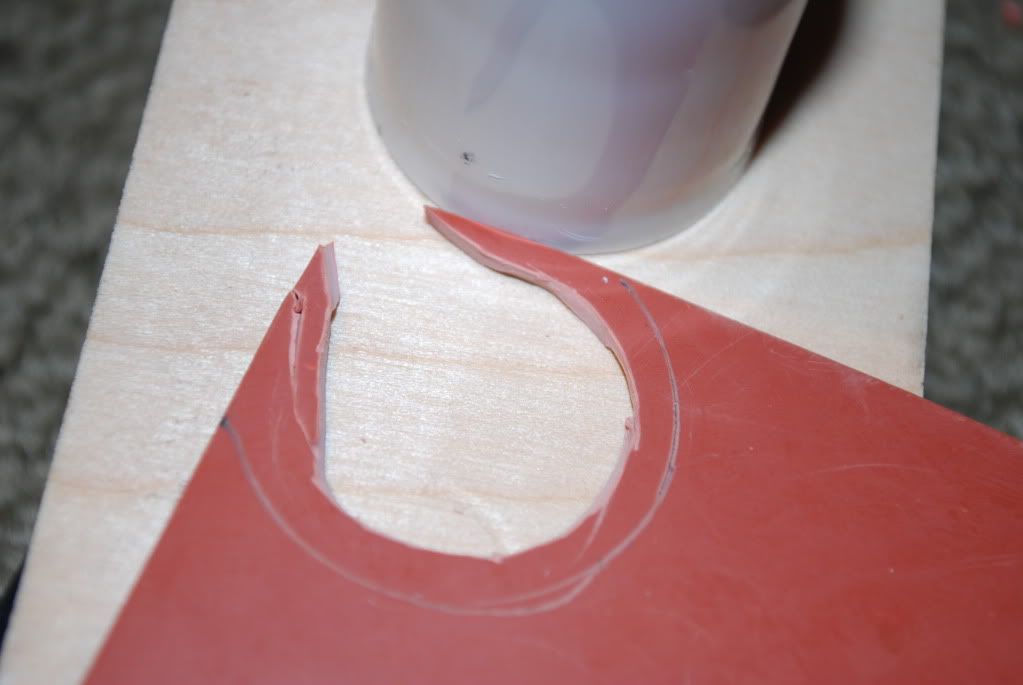
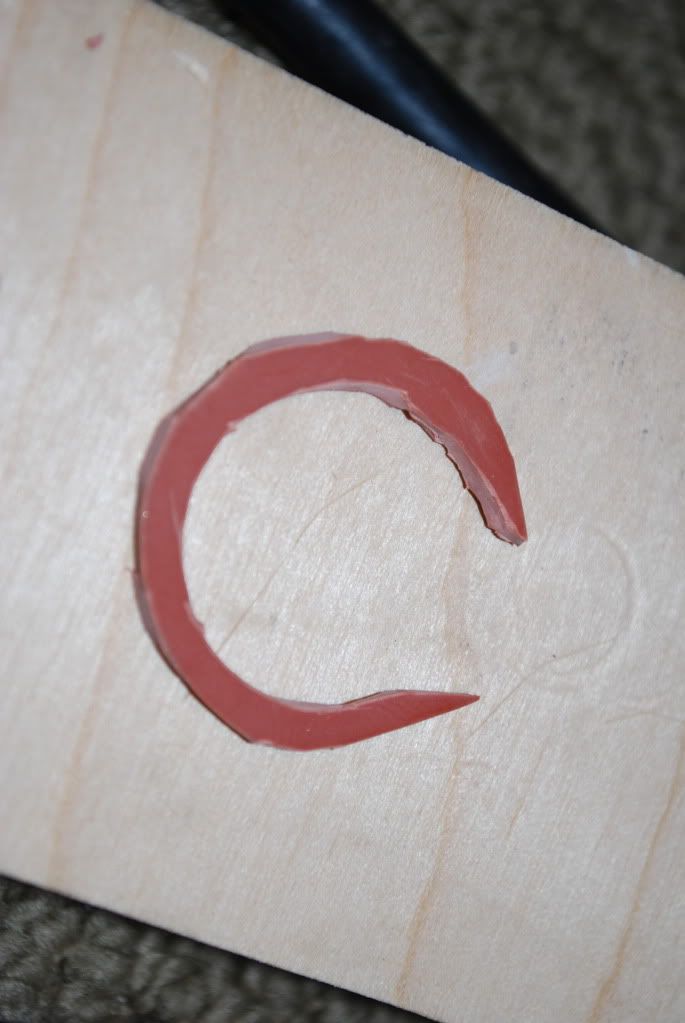
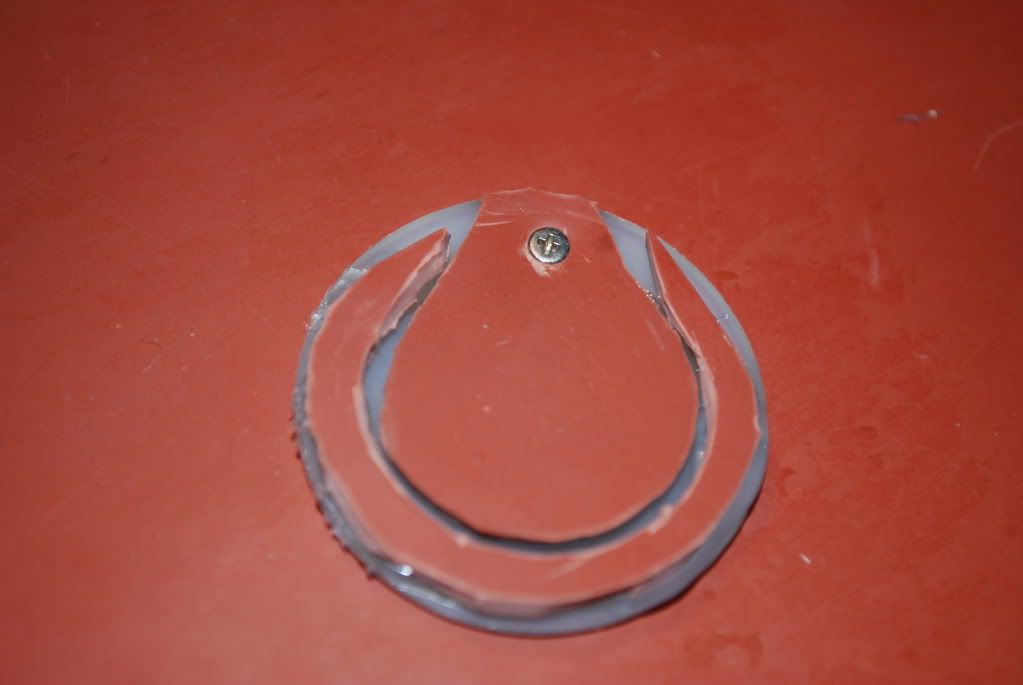
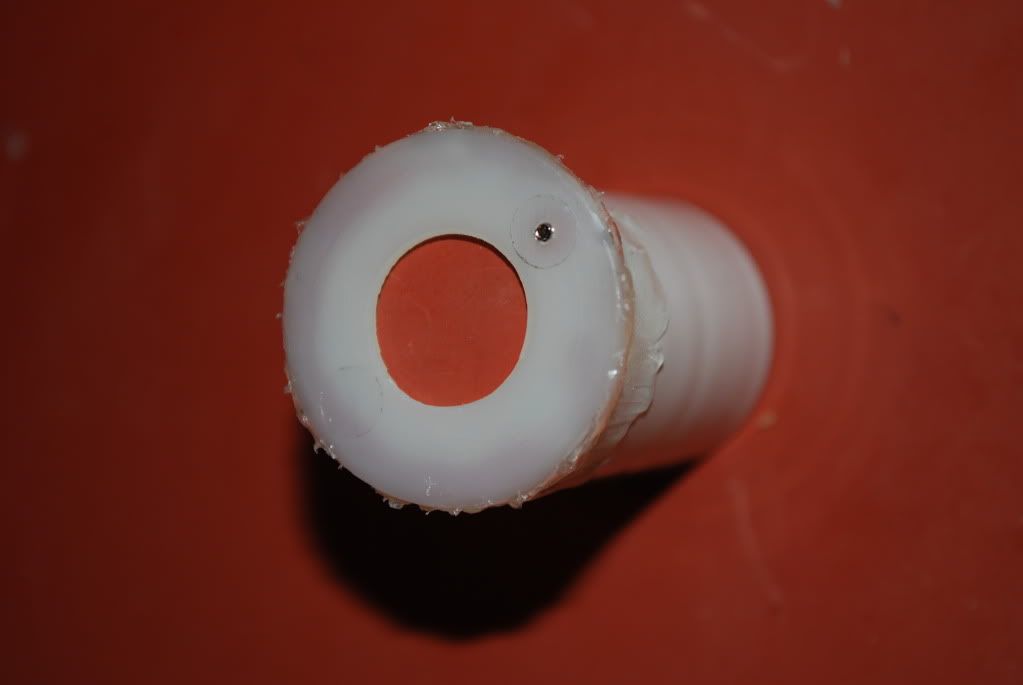
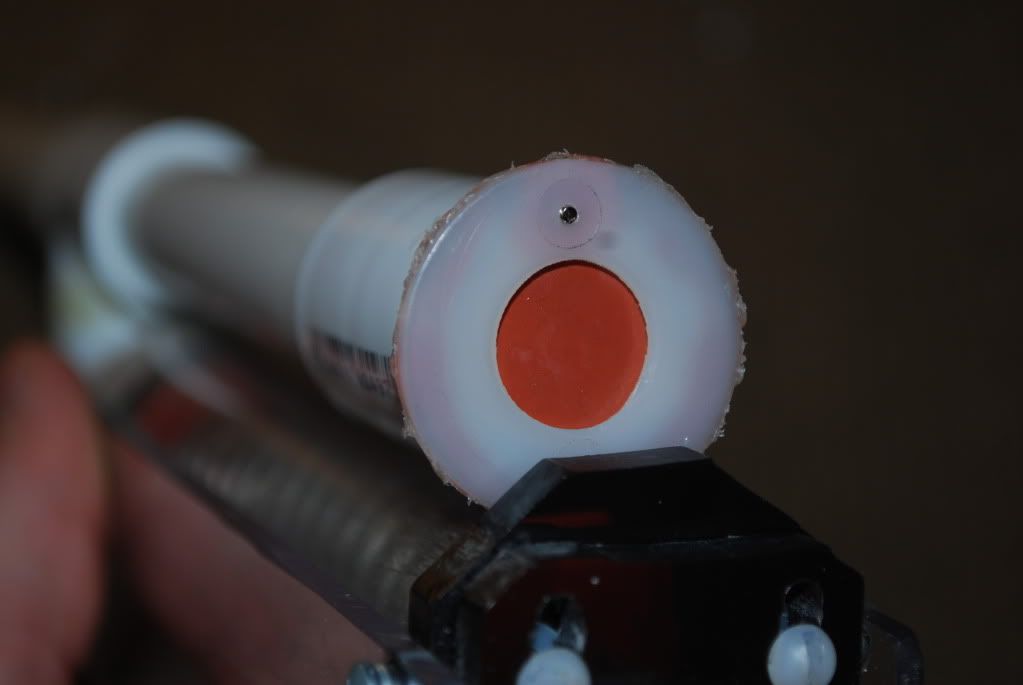
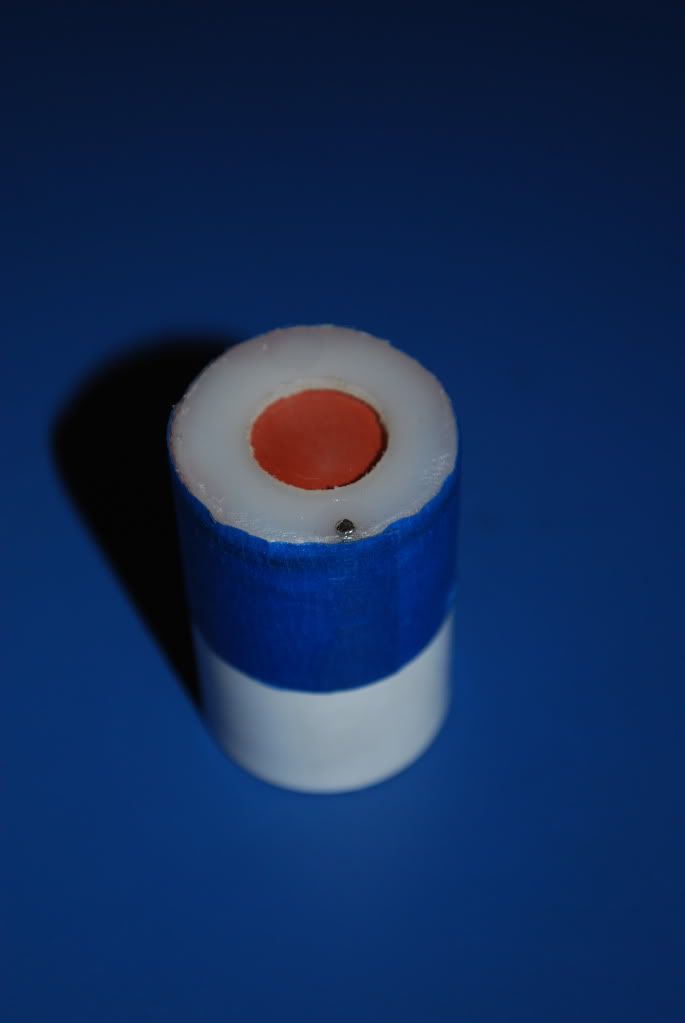
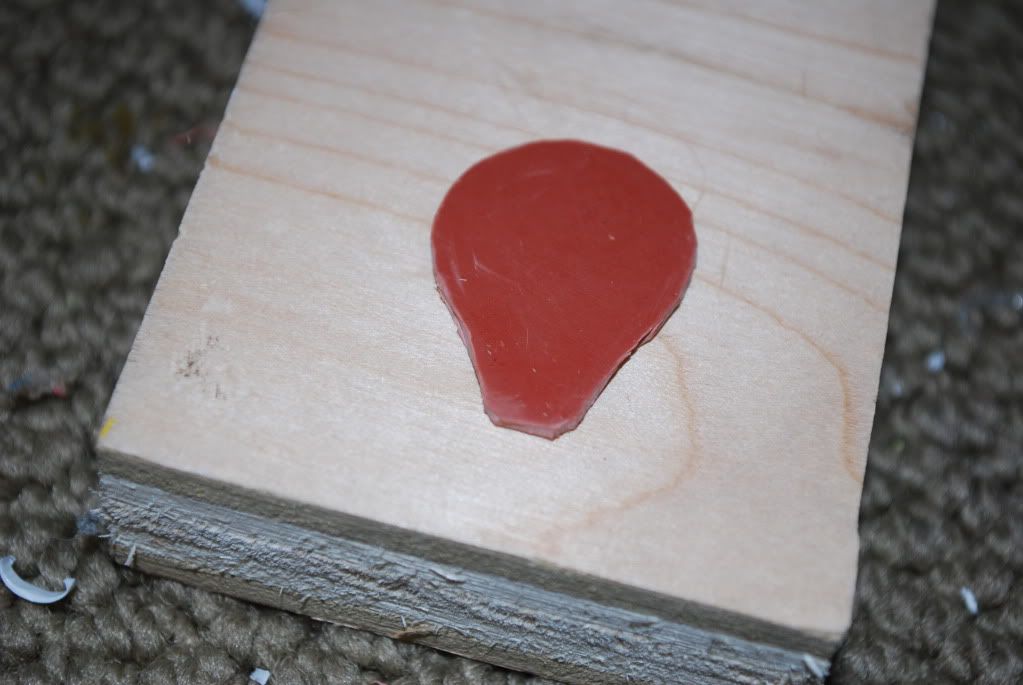
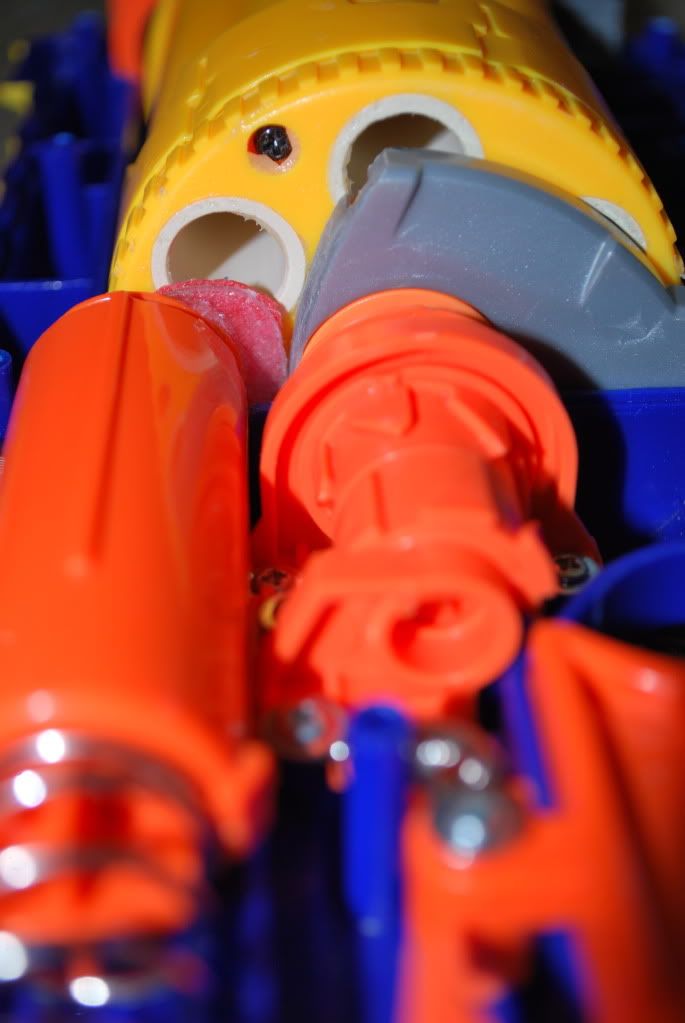
This is super innovative.

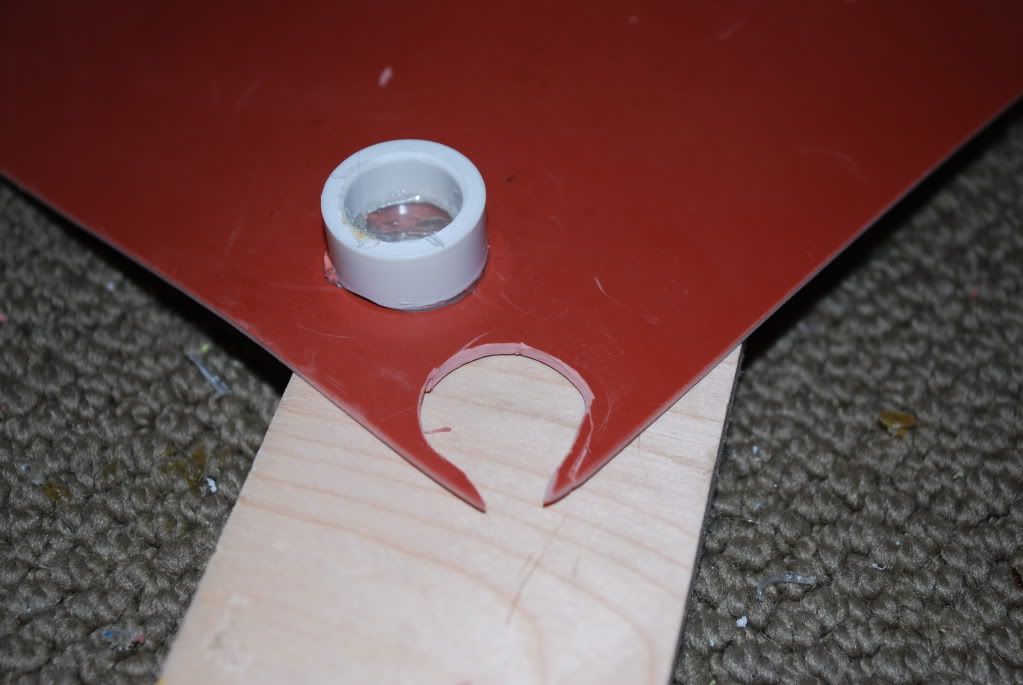
I'm curious though, is the rubber "C" really necessary?


Yes. Without it, the washer would be tiled outwards. The top of the flap is screwed in at the top of the washer. Because of this, the "C" must be added to make everything come to the same level. I hope this explains it.


Yessss.... someone finally did this. I've been using a swing-valve on my clips for awhile, but this is a much more elegant solution. Swing valves squish darts, since they have overly-strong springs.

I assume you could just replace the spring used in the other valves (is it a torsion spring?) with a weaker one, but I may be wrong because I have never seen one in person.


These are the swing valves I'm talking about.

You could replace the torsion spring, but you would have to cut the valve housing in half to get at it. The valve doors themselves are fairly heavy, so I think the spring is about as strong as it needs to be for the valve to function. They also aren't very airtight; they're meant to stop water backflow, and in practice are only so-so for this application. Methinks your solution is more practical.
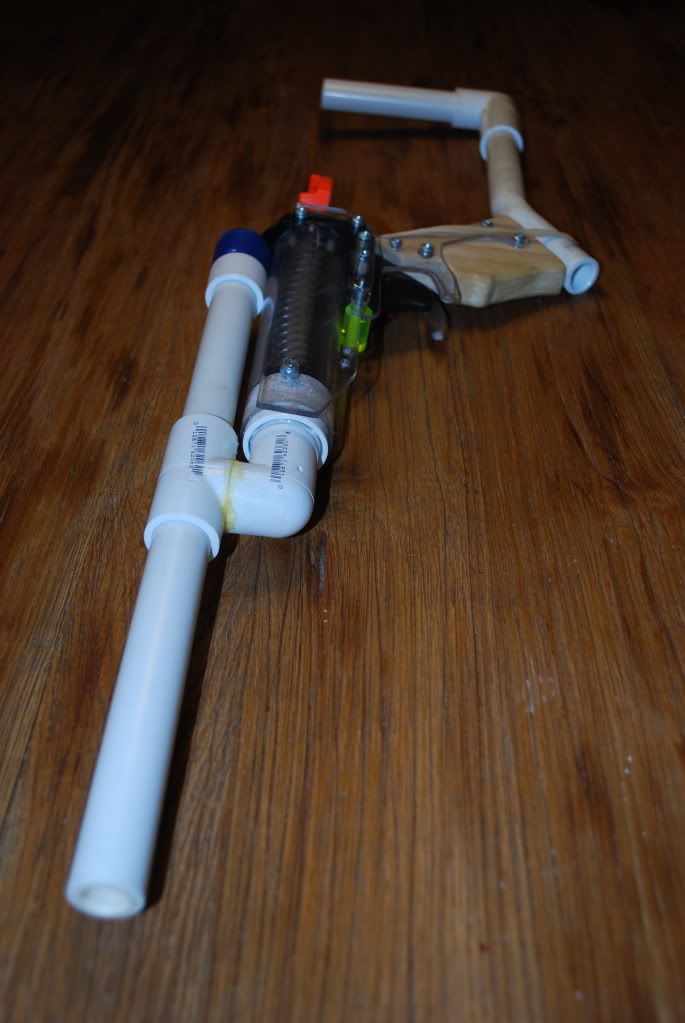
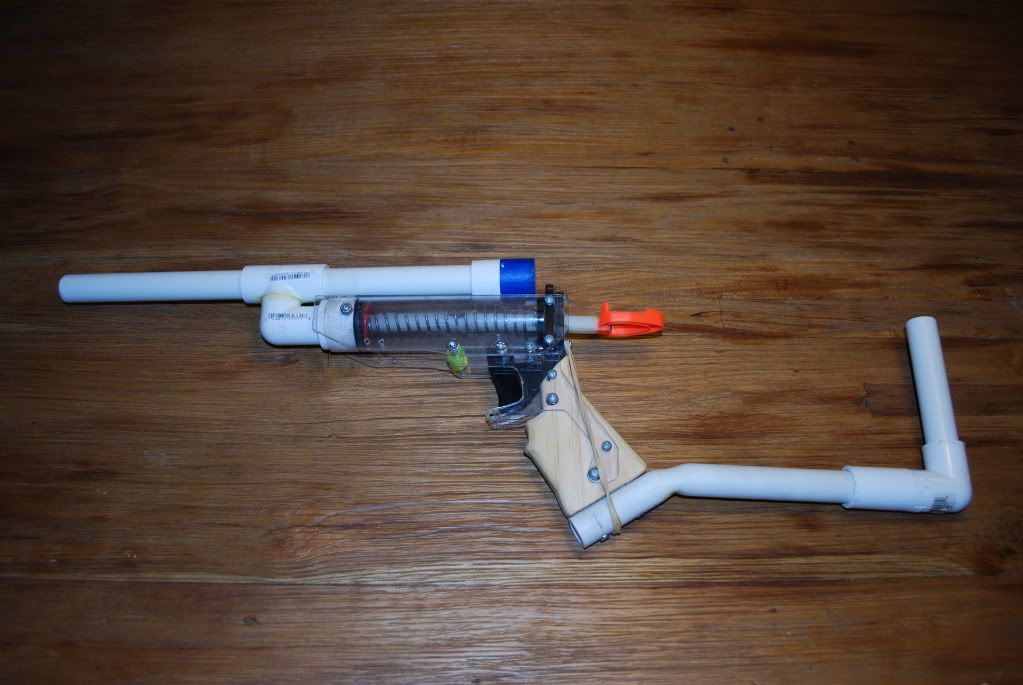
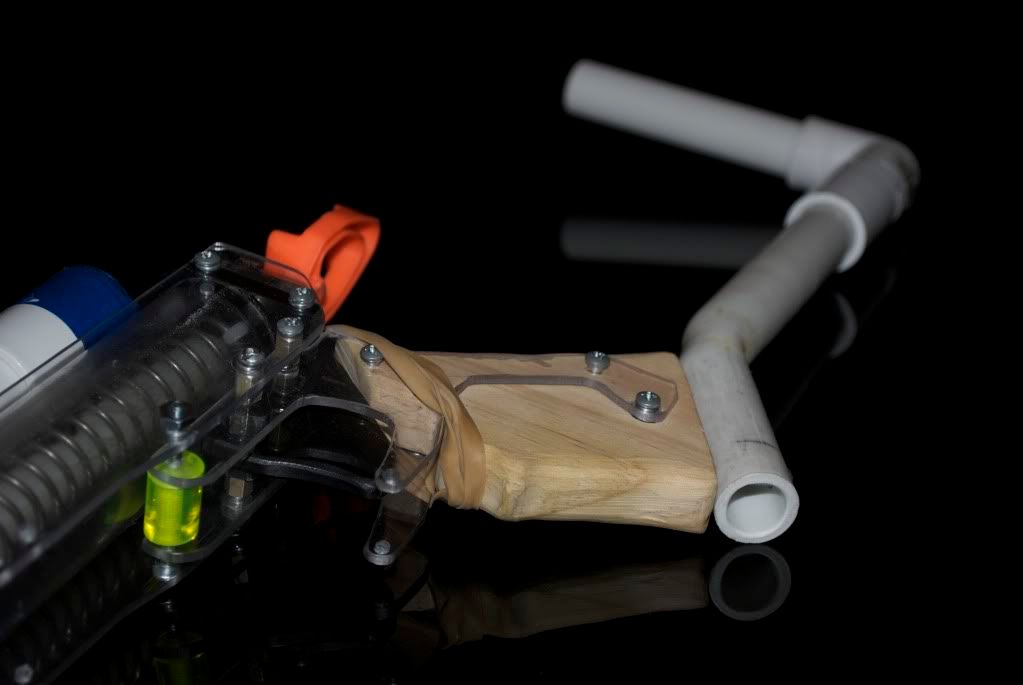

Thanks for clearing that up. The Dart Door seems to be more efficient and economic.


On another note, if anyone happens to have any transparent 1/2" PVC "Ts", elbows, and PVC, please PM me. And no...I don't want to buy them.


#272295 Dart Door V2

Posted by cheesypiza001 on 15 April 2010 - 11:33 AM in Darts and Barrels

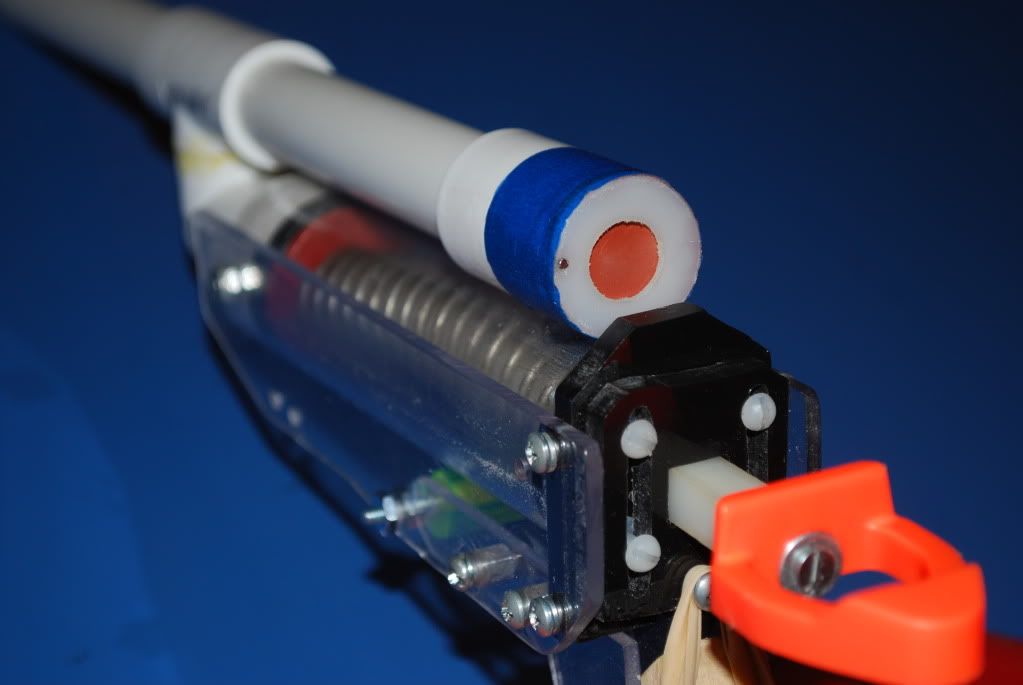
This looks like it works great, nice idea. Also, if someone fears air escaping, they could make a double flap, so if the first flap lets air escape, the second won't.


The air doesn't escape at all really so I don't think they would have to worry about it.

This is a fucking fantastic idea, the sort of thinking that really moves the hobby forward. I really hope this gets the recognition it deserves.

Thanks.

Yessss.... someone finally did this. I've been using a swing-valve on my clips for awhile, but this is a much more elegant solution. Swing valves squish darts, since they have overly-strong springs.

I assume you could just replace the spring used in the other valves (is it a torsion spring?) with a weaker one, but I may be wrong because I have never seen one in person.

Good work as usual, Cheesy. My only concern would be air escaping on a rscb'd air gun using a tight barrel. I think the next step here is to make the valve open inward, which would prevent pressure differences from opening it and would also lead to a more natural load. I actually may do that with your design, just inverted.


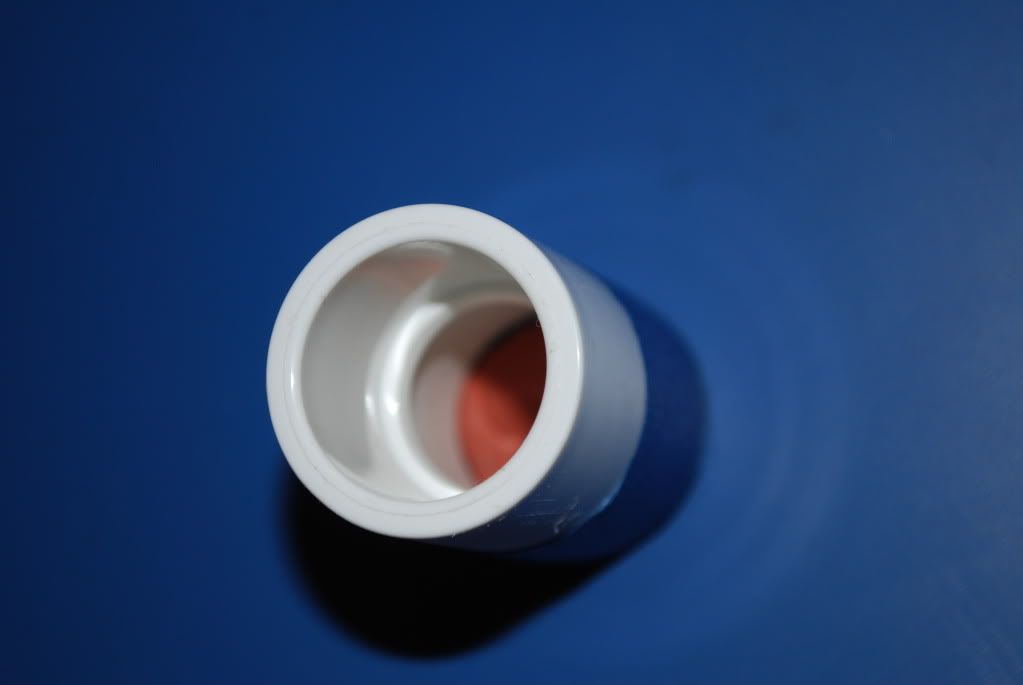
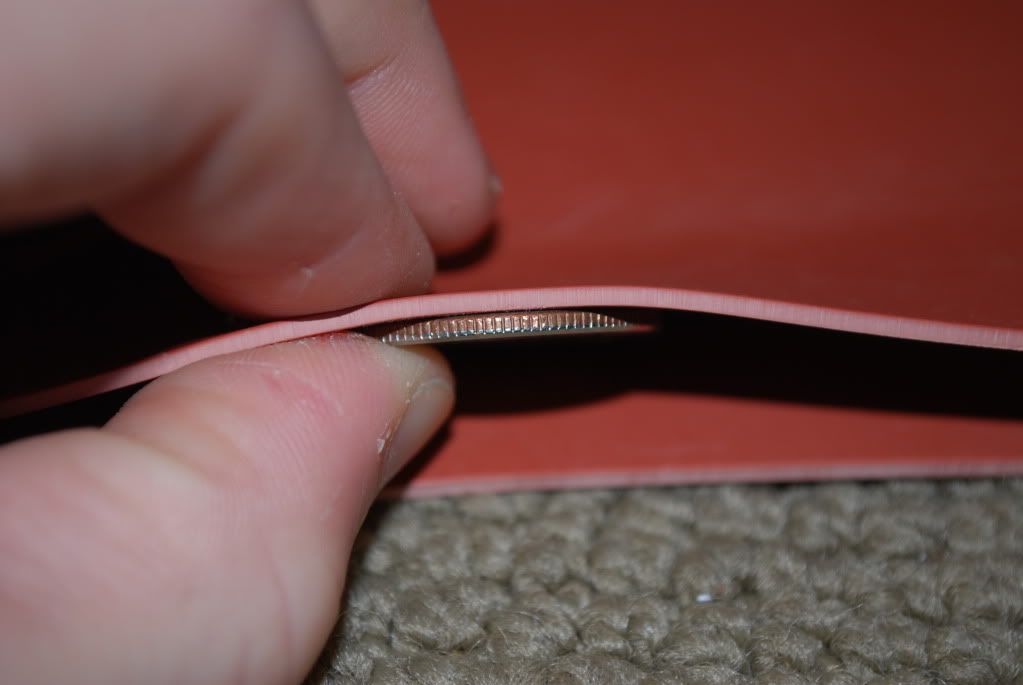
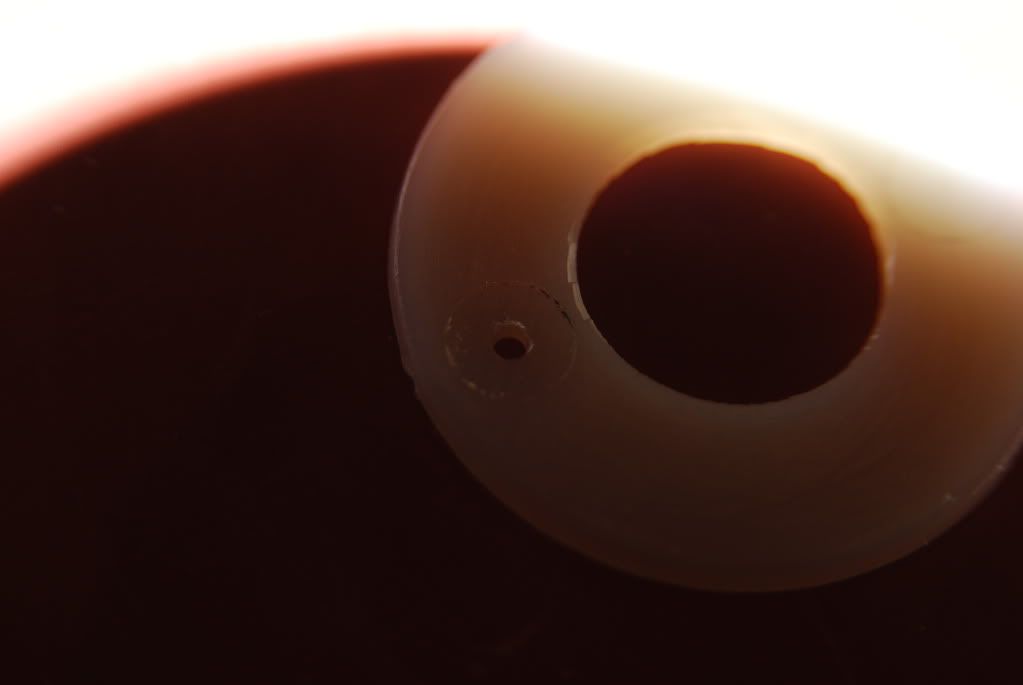
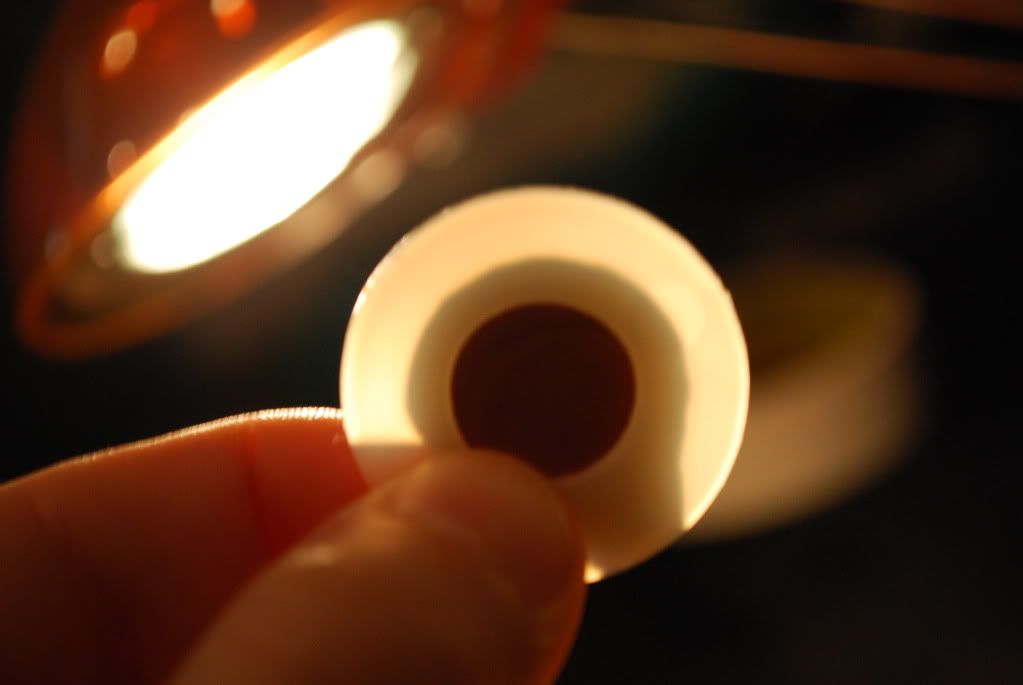
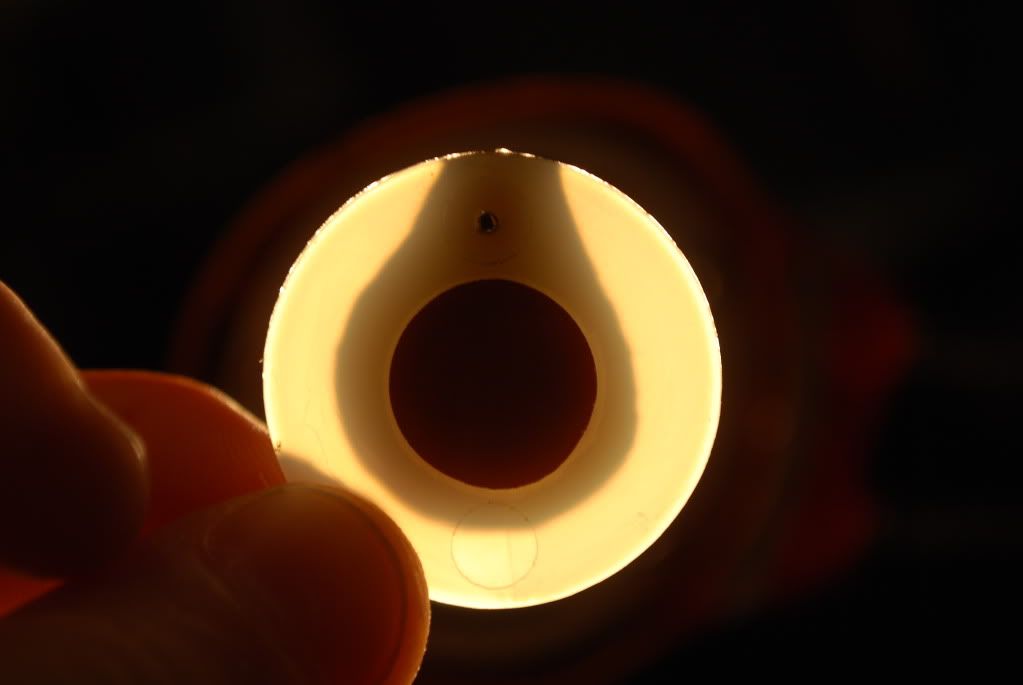
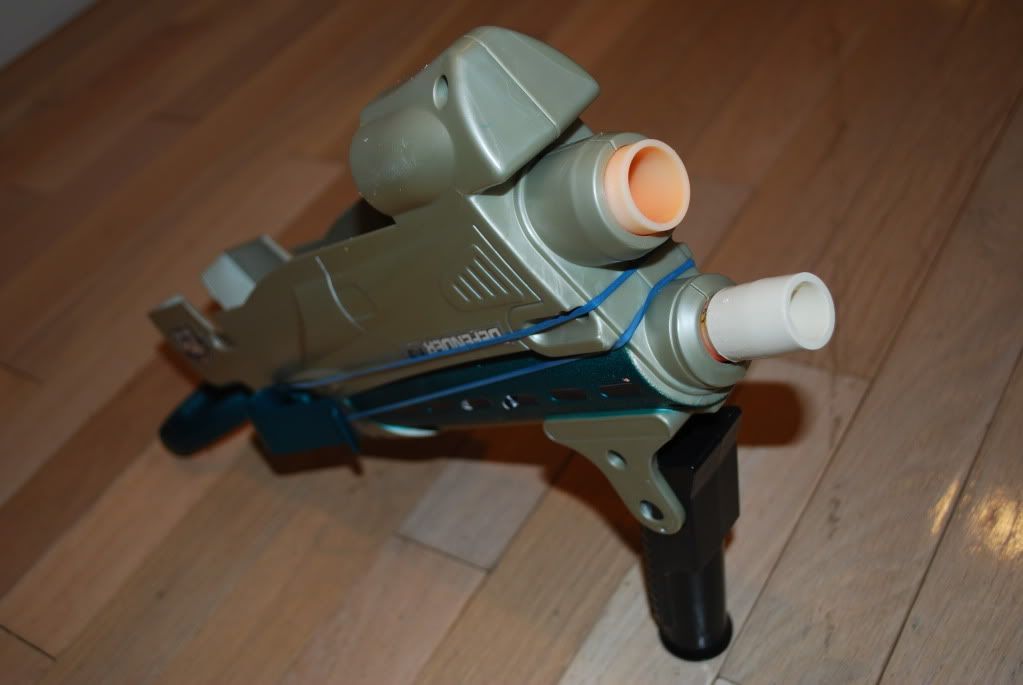
Unless I am completely misreading the pictures, it does open in to the RSCB so it seals from the air entering the clip. The Rubber "C" is glued to the coupler, while the flap is not. Gasket flap can move when you force a dart through the hole in the washer.

This is really great and makes RSCB clipped blasters even more dangerous as they can now be reloaded on the fly with basically no fear of being caught during loading.

Thanks for explaining it nisaburo.


Good work as usual, Cheesy. My only concern would be air escaping on a rscb'd air gun using a tight barrel. I think the next step here is to make the valve open inward, which would prevent pressure differences from opening it and would also lead to a more natural load. I actually may do that with your design, just inverted.


Like nisaburo said, I think you misunderstood the design. I'm pretty sure the dart door is exactly what you're describing. I am currently using a 6 inch barrel with frost king darts which have a somewhat tight fit in the barrel. In addition, a higher pressure would seal off the opening even more than a lower pressure would.


Damn, I can't wait to try

Thanks.


#272256 Dart Door V2

Posted by cheesypiza001 on 14 April 2010 - 10:00 PM in Darts and Barrels

Right as I'm about to go outside and finish up an RSCB'd 3k I see this... haha. This is really inventive though, it seems like it'd work just fine; To be honest, I doubt that there would be much air escape. My only question is how much force do you need to put on the flap to get it to lift up enough to slide the darts in? I'm just asking to see if your darts bend at all when entering, since my foam is a lot less dense than most and bends quite easily.
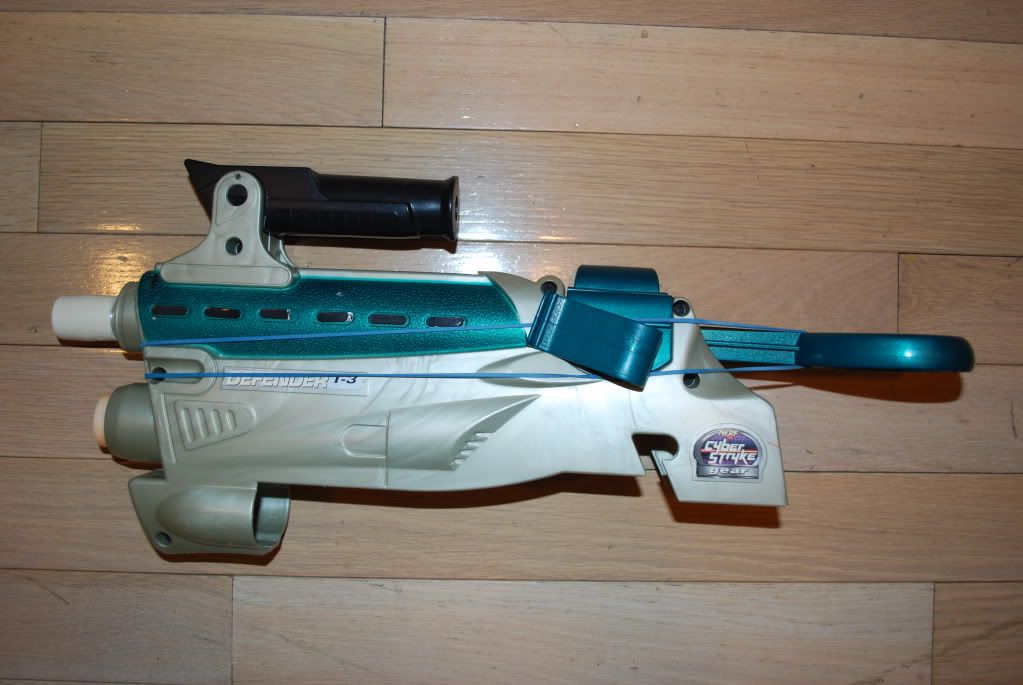
Edit: Nice L+L by the way... I like the wooden grip and the nitefinder pull handle. :D


Thanks for the compliments. I use 1.5" frost king darts with this blaster and they don't bend at all. Unless you were using 2.5" darts, I don't think the darts would bend at all really even if the foam is not very dense. Very little force is needed to move the flap.


#272227 Dart Door V2

Posted by cheesypiza001 on 14 April 2010 - 06:05 PM in Darts and Barrels

:D
This makes me happy. And chance you could help me make one?

But seriously, this is really cool. Your L+L is going to diddle. The reload time is now like +5 and the accuracy is like 14 and the range is like 17!!1!!!1!!


I have a few more improvements to make to my L+L, each of which should hopefully kick those numbers up a bit. :D


#272221 Dart Door V2

Posted by cheesypiza001 on 14 April 2010 - 05:28 PM in Darts and Barrels

I'm going to have to make one of these. They are so efficient in the way that you just have to pop darts in them, without having to take anything off or twisting a ball valve. Keep up the work Cheezy!

-Lotus


Thanks.


Wow, very clever.

I like the idea, and since it's on a coupler, you can just take it off and switch it to any RSCB or even a hopper clip. I'm totally going to have my brother make a few of these. Great write up and an excellent idea.

Edit: Any issues with it sealing? It looks to be open toward the inside slightly, not sure if it's just the angle though. It shouldn't be much of an issue, just curious if could get 'worn out' or anything


Like I said a few posts up, no air escapes through the flap. There is a slight inward angle to the flap, though it get pushed right back up against the washer upon firing.


#272218 Dart Door V2

Posted by cheesypiza001 on 14 April 2010 - 04:48 PM in Darts and Barrels

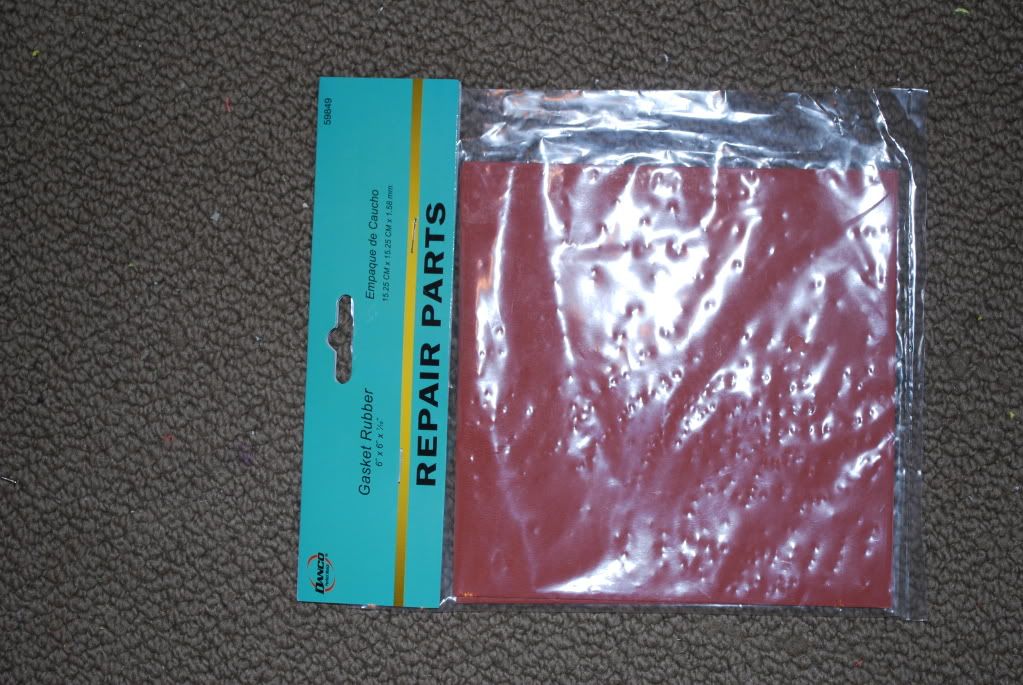
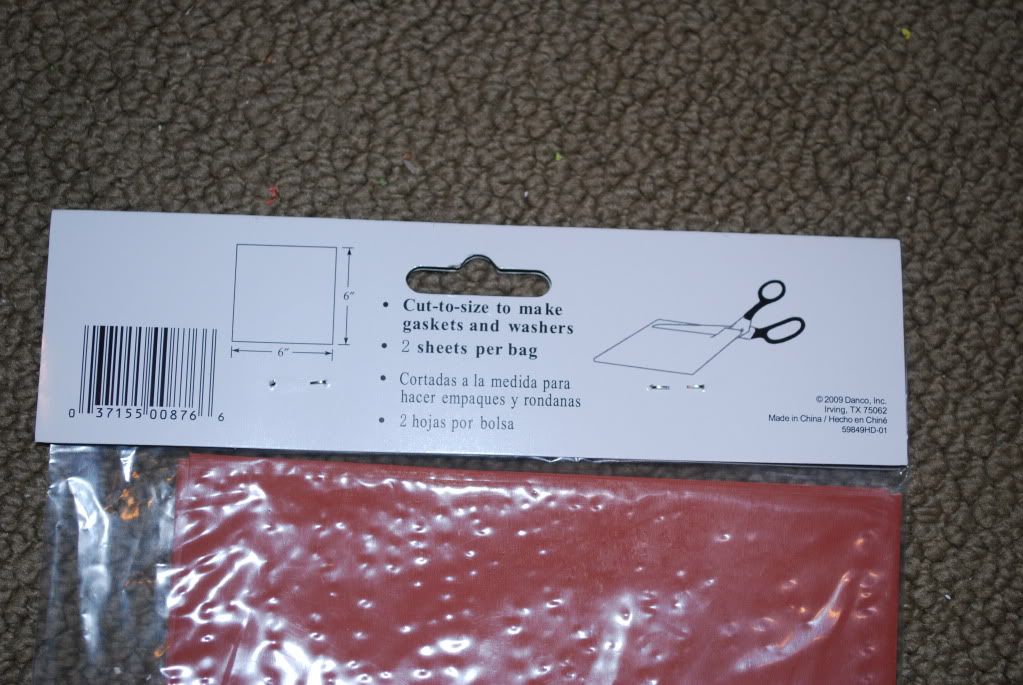
I'm pretty sure Zorn mentioned using flap-type check valves on hopper clips and such in some other thread, but this looks to be just as effective and is more readily available (possibly cheaper too?). I need to pick up some rubber sheets the next time I stop at a hardware store.


Like you said, I wanted to build something that was cheap and easy to replicate.


So, basically it's a doggie door for darts? Nice job.


Haha, yep.


That's awesome. Are you having any air escaping through the flap though?


Surprisingly not.


#272217 Spring Bcno

Posted by cheesypiza001 on 14 April 2010 - 04:44 PM in Nerf Wars

Please put me down as a maybe. Also, for those who might need a bit of help finding the area...

Posted Image


#272209 Dart and Barrels pictures thread

Posted by cheesypiza001 on 14 April 2010 - 03:54 PM in Darts and Barrels

Dart Door mounted on an RSCB clip which is mounted on my L+L.

Posted Image

Posted Image


Check thisthread for more details.


#272208 Dart Door V2

Posted by cheesypiza001 on 14 April 2010 - 03:48 PM in Darts and Barrels

So it is like one of the swinging check valve things?


Yep. Like you put it, it's essentially just a check valve that allows darts to pass through one end.


#272206 Dart Door V2

Posted by cheesypiza001 on 14 April 2010 - 03:42 PM in Darts and Barrels

9. Go back to the original cutout and trace around the plastic washer with a pencil. Then cut it out with an Exacto knife. Remember to clean it up after with a pair of scissors. This piece will be known as the "C" from this point on.

Posted Image

Posted Image


10. Hot glue the "C" onto the washer and around the flap. Make sure to leave a tiny bit of space though so that the flap can move easily.

Posted Image


11. Apply hot glue to the "C" and then put that onto the back of the 1/2" PVC coupler. Make sure to then apply hot glue all the way around the outside of the surrounding rubber to seal it off against the coupler.

Posted Image


12. Spray some silicone lubricant on the flap.


Here are some pictures of it mounted on my L+L:

Posted Image

Posted Image


Feel free to post any questions, comments, or suggestions. Thanks for looking.


If anyone happens to have any transparent 1/2" PVC "Ts", elbows, and PVC, please PM me. And no...I don't want to buy them.


#272205 Dart Door V2

Posted by cheesypiza001 on 14 April 2010 - 03:41 PM in Darts and Barrels

The "Dart Door" allows darts to be fed into the back of the RSCB clip without opening and closing something, or taking off and putting on an endcap. This greatly decreases reload time.

(Note: There are a LOT of pictures)


UPDATE:

VIDEO


The V2 is basically the same but it's less bulky and much cleaner. I dremeled off the ugly outer lip of the washer that can be seen in the last 3 pictures.


Posted Image

Posted Image

Posted Image


1. Get this stuff. I got mine at Home Depot. It's basically just a neoprene sheet (1/16").

Posted Image

Posted Image

(Size comparison with a quarter)

Posted Image


2. Cut a small piece of 1/2" PVC and hot glue it to the rubber sheet. Then trace around it with a sharp Exacto knife. However, leave a bit of space on one side so that there is room to screw it in place later on.

Posted Image


3. Take some scissors and clean it up a bit.

Posted Image


4. Take a plastic washer that has an ID of a bit more than 1/2" and an OD of a bit more than the OD of a 1/2" coupler. Drill a hole through the side with a 1/16" bit.

Posted Image

5. Hold the washer with the flap placed on it up to a light and center the flap. Then take a sharp pencil, and mark on the flap where the hole is.

Posted Image


6. Drill a hole through the flap with the same 1/16" bit.

Posted Image


7. Find yourself a really small screw (size comparison:)

Posted Image

...and screw it through both the flap and the washer. It shouldn't penetrate past the end of the washer.

Posted Image


8. Make sure it's centered then move onto the next step.

Posted Image


#272070 +bow: Diy Thread

Posted by cheesypiza001 on 13 April 2010 - 11:44 AM in Homemades

I thought I would share a pretty cool discovery I made....

The plunger head from a Marshmallow Shooter...
Posted Image


fits perfectly in the plunger tube of both the +bow and the L+L.

I will soon be updating this with a picture and a followup on the improvement of the seal.


#271285 Modification and Paintjob Pictures

Posted by cheesypiza001 on 04 April 2010 - 12:56 PM in Modifications

I just finished up a Maverick. Mods include: Rear loading, CPVC barrels, straw mod [dead space removal], spring replacement, "Roulette mod", plunger tube - turret seal improvement, plunger tube seal improvement, catch spring addition, and trigger spring addition.

Posted Image

Posted Image

Posted Image

Posted Image

Posted Image


#271102 Homemades Picture Thread

Posted by cheesypiza001 on 02 April 2010 - 02:46 PM in Homemades

WIP:

Posted Image


#269970 Nerf In Popular Culture

Posted by cheesypiza001 on 22 March 2010 - 07:03 PM in General Nerf

I'm currently watching Chuck and two people just had a nerf fight right at the beginning of the episode.


#267599 Connecticut April Madness!

Posted by cheesypiza001 on 02 March 2010 - 03:39 PM in Nerf Wars

I'm might be able to attend. It mostly depends on where the war will take place.


#267025 Pvc Nerf Gun Rack I Made

Posted by cheesypiza001 on 26 February 2010 - 01:32 PM in General Nerf

Wow, great creation. One improvement that I think could be made would be to put a thin tubing, such as vinyl tubing, onto the coat hanger wire so that you don't scratch any of the blasters. Great job.

On another note, over time I have collected pictures of arsenals organized in different ways. I saw that you wanted to see someone's peg board and so I thought I would post some pictures of other people's arsenals.


NOTE: None of these pictures are mine.


Posted Image

Posted Image

Posted Image

Posted Image

Posted Image

Posted Image

Posted Image


These are just some different types of arsenal organization.


#266291 The Official Internals Directory

Posted by cheesypiza001 on 21 February 2010 - 09:18 AM in Modifications

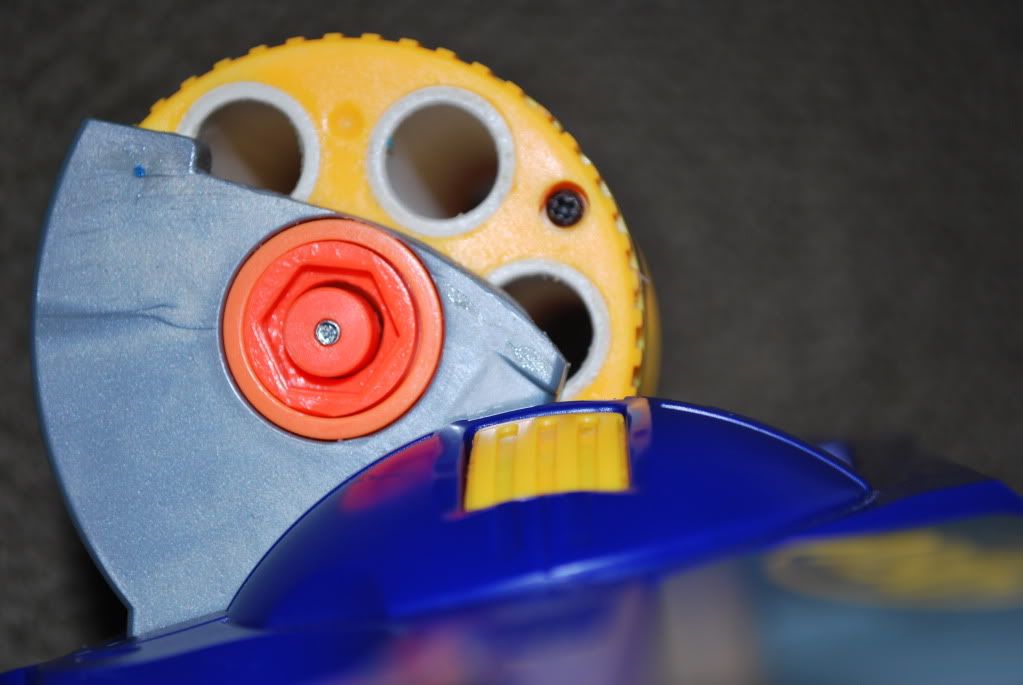
Cheesy-here is a internal pic of the furyfire from NerfRogue83 Furyfire pic


Thank you, but finding the picture for the Furyfire is not the problem. Here's an even better picture from jerm78's blog. Every so often when I feel that there have been a decent amount of internals pictures posted throughout the internet, I save them all to my computer, note where they came from, rename the files, alphabetize them, upload them, and post the picture links with their corresponding sources. It is much more practical to process all of the internals pictures in batches, so that's what I do. I will be updating the directory shortly, so don't worry.


#266287 The Official Internals Directory

Posted by cheesypiza001 on 21 February 2010 - 08:14 AM in Modifications

Slight problem my friend...
Where is the Furyfire?


I just got back from vacation so I will hopefully be able to update this soon. As for the Furyfire, I guess I missed it during the last update. It will be added shortly.


#265025 Home-rigged Vertical Lathe

Posted by cheesypiza001 on 10 February 2010 - 11:22 PM in Off Topic

I think this is awesome but for all those who want a cheap drill powered horizontal lathe check this out.
http://grizzly.com/products/H2669


Nice find.


#264946 Tetra Strike Barrel Replacement

Posted by cheesypiza001 on 10 February 2010 - 05:11 PM in Modifications

Whenever cutting near the end of an airtank, always make sure to pressurize the tank prior to cutting. Doing this will make sure that no large dust particles or small bits of plastic get in the way of the sealer piston and therefore cause a leak.

Also, like others have suggested, I would recommend that you use PVC on the base so that your barrels are straight.


#264918 Re-barreled Lightning Blitz

Posted by cheesypiza001 on 10 February 2010 - 11:21 AM in Modifications

I'm not sure if this is anything like the ss2, but maybe adding a check valve between the pump and the tanks would allow for greater pressure. Not sure though. Also, make sure you aren't messy with the plugging, that will dislodge the check valve if there is one down there.


I know for a fact that there is no check valve in the LB's pump system, so you don't have to worry about messing it up.


#264770 Home-rigged Vertical Lathe

Posted by cheesypiza001 on 09 February 2010 - 12:16 AM in Off Topic

I'm talking 'bout the ones that have the same torque as pneumatic wrenches. Also you should rig it horizontally, and find some skateboard bearings for the other side of the chuck. I remember I made one of these with some bolted together angle iron, but I couldn't get it up high enough for woodturning.

If you need something better, try finding an electric motor from a washer/ dryer at a local surplus shop. Those things are fucking cake.


The drill I am currently using has more than enough power to run this "lathe"...trust me. As for your other suggestion, I had already thought of creating a chuck like this (I'm pretty sure this is what you're describing):

Posted Image
(Not my photo)

However, I realized that it might be difficult to get the pipe perfectly centered when each of the 4 (or possibly 3) jaw bolts has to be tightened simultaneously. If they are not, then the pipe will be off center and even if it is only by 1/16", it will not be properly balanced resulting in inaccurate carving/grinding.


#264732 Home-rigged Vertical Lathe

Posted by cheesypiza001 on 08 February 2010 - 06:08 PM in Off Topic

Ah, I thought the rubber band was holding up the drill, which would be pretty dangerous. Seeing as how it's based off of a real drill press, it's much more legit than a drill rubber banded onto a rod.

I'd recommend trying a chisel (if you have one) in place of the pliers. The sharper edge should give you a better edge than the roughness the pliers seemed to give you. Just be careful though.


The problem with doing something of that sort (using a blade of some type, a chisel, ect.) is that doing so will cause the CPVC to bend and become off center which will screw the whole thing up. The reason I used pliers was that I could grind away at the CPVC while stabilizing it with the pliers. However, I suppose I could mount a tool rest onto the side. I might be able to then use a chisel. I'll try that out.


#264665 Home-rigged Vertical Lathe

Posted by cheesypiza001 on 07 February 2010 - 10:49 PM in Off Topic

I have a feeling people think it is dangerous by the look of the giant rubber band on the top of the drill. Now that you say it is a drill press, it seems a alot safer. At first glance it just looks like you whipped it up in a few seconds.


Yeah, I think you're right. The rubber band is only there to keep the drill at a certain angle and I don't know if you can tell from the picture, but the rubber band is extraordinarily strong. Even if the rubber band snapped (which it wouldn't), the drill would still not move to the weight of itself pushing it into the loop. Basically, the drill cannot turn or come out of the loop without me taking it out or turning it.

Dude, it works better on the old oversized portable drills.


This is an old oversized and extremely heavy drill. Like I said, it's from around the 80's.


#264610 Glo-laser + Drain-blaster

Posted by cheesypiza001 on 07 February 2010 - 01:20 PM in Modifications

Strictly speaking he didn't relocate the trigger, but installed a linkage to operate the trigger remotely. However I suppose I wasn't concise enough.

Has anyone disassembled a drain blaster into it's component parts?


Yes. I have also cut apart a leaky one. I will post pictures soon.


#264609 Home-rigged Vertical Lathe

Posted by cheesypiza001 on 07 February 2010 - 01:12 PM in Off Topic

This is real neat, great work. I guess my only question is what are you trying to achieve by being able to shave rings into CPVC? Is this for a specific project, or more of just a proof of concept sort of deal?


This technique can be used if the CPVC cannot fit into a barrel or other pipe because its OD is too large. In such a situation, one could simply decrease the outer diameter of the CPVC.

I do just that with a dremel, patience, and a good eye, but I think that's honestly just as dangerous as this homebrew lathe; I've breathed in more dust than I've needed to in the course of Nerf modifications.
My only concern with this would be firstly the CPVC wobbling and you injuring youself, but that was before I watched the video and saw you have a piece of PVC to act as a stablizer. But, after seeing how tight the fit looks* in the video, how hot does that piece get? It seems if you go too much without letting it cool down, that would melt, then the CPVC would become unstable.
Either way though, it's still pretty badass, and seems like it would have a lot of use, especially for making clean cuts. Everyone hates de-burring and sanding flush...


Yeah, I can see how people might think it's dangerous, but I don't see that anything that could go wrong. Every part of the setup is very stable. Also, this technique produces almost no dust whatsoever, just shrivels of CPVC. As for your dust problem, I highly suggest getting a respirator, as they are definitely worth the 40 or so dollars in the long run in terms of health. Lastly, I already mentioned that the melting was a small problem here.


#264557 Modification and Paintjob Pictures

Posted by cheesypiza001 on 06 February 2010 - 11:03 PM in Modifications

Posted Image

Posted Image

CPVC'd DT3 Pistol + seal improvement.


Posted Image

Posted Image

CPVC couplered DT3 Arrow Shooter + seal improvement.


Both of these guns are a WIP for a contract I am currently working on.