Hey everyone, sorry this took forever, but the parts and BOM are finally posted.
http://www.thingiverse.com/thing:16726
Landru's Content
There have been 24 items by Landru (Search limited from 03-December 96)
#315414 Another Simple 3D Printed Blaster
 Posted by
on 08 May 2012 - 05:22 PM
in
Homemades
Posted by
on 08 May 2012 - 05:22 PM
in
Homemades
#311609 Another Simple 3D Printed Blaster
Posted by
on 21 February 2012 - 08:57 PM
in
Homemades
Langley, I replied to your pm a bunch of times but kept getting errors. Hopefully one made it through.
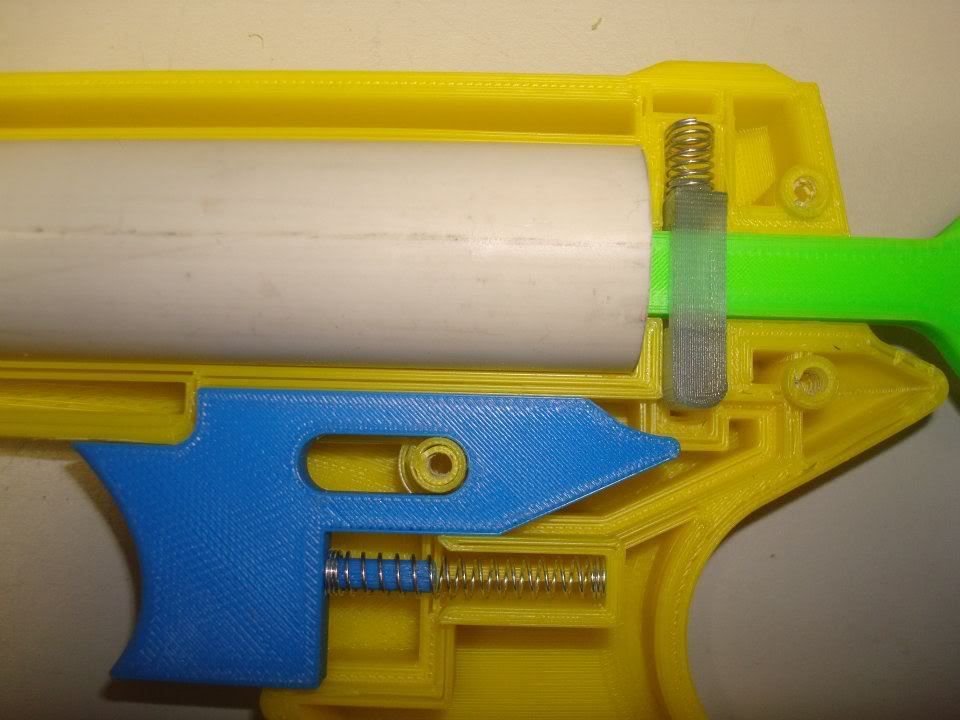
I used PLA for the catch since it is a lower friction material and a a bit stiffer than abs for better wear.
I got a few hundred hits to my website from the hack a day feature just from Google searches so I'm assuming NH got a fairly high load of traffic.
I swear I'll post the files asap. They are all done, just have been forgetful
#311305 Another Simple 3D Printed Blaster
Posted by
on 16 February 2012 - 11:41 AM
in
Homemades
This is really a very cool design, and just looking at the PT I imagine it could be a pretty badass blaster with a proper barrel.
However, if you have the time, I'd like to ask a few more questions about the actual printout. I understand if you can't answer some of these questions because of your business model, but I'm gonna ask them anyway:
-What size filament did you use for this print?
-What do you estimate your printer's resolution to be, for this print?
-Did this print require alot of support material?
-What software are you using for slicing and g-code generation?
-If you are using Skeinforge, what settings did you use?
And then a couple purely nerd-driven questions about the Fablicator:
-How are you driving the axes on your printer? Steppers and lead screws? Linear actuators?
-How much power does it consume?
-How often do you have to change that cool borosilicate build bed?
-Is the build platform heated?
-The printer uses 1.75mm filament.
-The 'resolution'for this print is .25mm layer height, .4mm extrusion width.
-This print required a moderate amount of support, but only for the curves on the exterior of the case. Anything less than a 45deg angle does not require support. I could have designed it so no support was necessary, but it would make the blaster far less comfortable to hold.
-I used skeinforge, Pronterface, Marlin for the tool-chain that made the blaster in the photo, but are moving to kisslicer/pronterface/marlin as it is way faster.
-Oh god, there are too many skeinforge settings to list. If you really want to know I'll pm you my config file. There is nothing particularly unique about it.
-Axes are driven by Nema 17 stepper motors with 1/4in mxl belts.
-The printer uses about 400W. Most of that is to heat the bed.
-The bed never needs to be changed unless you drop something on it....
-The build platform is heated to 110C for ABS and 70C for PLA. It can get hotter, but we limit it because at higher temps the ABS can actually stick so well the bed will chip when you try to get it off.
#311060 Another Simple 3D Printed Blaster
Posted by
on 11 February 2012 - 02:22 PM
in
Homemades
The Makerbot Thing-o-Matic (http://www.makerbot.com/) goes for about $1000, if I recall. I don't know how much a RepRap (http://reprap.org/wiki/Main_Page) goes for, since it is a diy sort of thing, but I would guess possibly as low as half that if you are resourceful.
I personally want a CNC mill. It's like a 3d printer, but it carves material away instead of slowly adding it (think glorified robot dremel instead of glorified robot hot glue gun). Mainly, I want to be able to machine parts out of aluminum. I've priced having a few custom blaster parts built locally, and, uh, they didn't get past the quote stage. I'm thinking about getting crafty and making my own though: http://www.instructa...com/id/DIY-CNC/
The neat thing is, the only difference between the two is that a 3D printer has an extruding tool head, and a CNC mill has a cutting tool head. The rest of them work the same.
The Makerbot Thing-o-Matics are fun kits, but they do have their drawbacks (print size, part quality). They usually run for about 1300 and I believe they are begin discontinued for a new printer costing 1750 (but I don't know for sure)
You can certainly make your own printer from scratch, but it takes a looooong time and a lot of knowledge to get it working well. That's how I started, actually (www.reprap.org)
A cnc mill and 3d printer share a common principle, but things purpose built for either are not ideal for conversion. CNC mills generally are pretty slow for 3d printing, as rigidity is far more important than speed when cutting aluminum. Also, 3d printers require a heated printing surface and temperature control for the extruder which makes CNC conversions a little tricky.
As for support material, my printer can auto generate sparse support with the same material it prints the object with, which just gets broken off after the print is done. It takes some effort and leaves less than ideal surface finish, but it works for most things.
I make all my models in Solidworks.
#310881 Another Simple 3D Printed Blaster
Posted by
on 07 February 2012 - 10:49 PM
in
Homemades
I think there is something to the idea of having printed lower and upper receivers. You don't even need to print them as functional blasters. you can just print shells that join in the middle via pins (like an AR15). The lower could just be a trigger and or a stock, and the upper can just be a plunger tube and a catch. How they are customized could be left up to the end user. You can make uppers with plunger tubes just large enough for pistol rounds, or ones large enough to be considered primaries. I guess the advantage to the system would be you have a dedicated lower with features you are already used to, with interchangeable uppers you can use to adjust to different scenarios. That way you are used to the ergonomics of the blaster regardless of the round. This should help with your aim. But I guess this doesn't matter too much since we are dealing with nerf darts here.
Definitely something to consider.
I just ordered a pile of springs and other parts so I can start playing and get some better ideas about what size/power I need.
Maybe I'll take commissions in the fairly distant future, but they would be pretty expensive. I'm going to try and do a bunch of open source blaster designs right now for advertising purposes (to show off the printer) and I'll be investing a lot of time into those. Hopefully something there will meet your needs.
Since it was asked, the Fablicator will be selling in the $2500-$3000 range.
#310711 Another Simple 3D Printed Blaster
Posted by
on 05 February 2012 - 12:43 AM
in
Homemades
If this guy were to make crossbow shells they wouldn't be that sturdy due to layering
We might as well factory mold them for stability, (cough orangemodworks ,cough).

That's not entirely accurate for the process this printer uses. Some 3d printer technology makes parts only suited for non-functional models , but FDM (aka FFF) is not one of those.
The parts aren't quite as strong as injection molded parts, and it's true that the parts are weaker in the Z axis. However, they are still very sturdy. The parts can also be made to whatever thickness you want, so could easily be designed to be have more strength than a 1:1 crossbow copy. Also,for what it's worth, all the major loads in a crossbow would be distributed along the strong directions of the print (not that I want to print crossbows)
Really, the thing preventing me from running out and designing a pile of stuff to sell, is the time it takes to print things. To make a reasonable rate given the cost of the printers, it's still $10/hr to make parts. That is still a bit out of reach for many hobbyists.
If you have got/bought one to play with and don't have to support yourself making money off it, that is an entirely different story.
But as I said before, once these become more popular all the costs will decrease further and within 5 years they will probably be as common as band saws and drill presses
#310546 Another Simple 3D Printed Blaster
Posted by
on 01 February 2012 - 07:44 PM
in
Homemades
Not necessary, perhaps, but I feel it could be beneficial if a part breaks to pop it open, swap the part out, close it up and reinsert the pin.
Also, I have a couple of ideas that a clamshell wouldn't be as good for, but those are just concepts at the moment. Hopefully a write-up on them, if they succeed, but until then...
And thanks, for clearing that up. I'm a little new to a lot of things.
As an addendum to that, you can always design the part to be a clam-shell case, and also have a pin to remove any particular part that may need replacing. Neither has to be exclusive.
#310544 Another Simple 3D Printed Blaster
Posted by
on 01 February 2012 - 07:20 PM
in
Homemades
Forgive my ignorance of 3d printers...but would it be possible to make a design that wasn't a clamshell design? It would increase what the blaster can handle (without separating at the seams), and, if designed right, could provide easier access to the internals (think M16/AR15 pin system/upper and lower receivers).
Again, pardon any ignorance I have on this topic, just trying to help.
You could certainly do this. The design does become somewhat more complicated due to the increase in support material it would require, though.
I've even seen an AR-15 lower 3d Printed by a few different people (though not with a low cost printer, yet)
I really don't think it would be necessary for springers though, as you can just add material to the critical clam-shell parts to reinforce any weak points (and add more screws if necessary)
#310542 Another Simple 3D Printed Blaster
Posted by
on 01 February 2012 - 06:20 PM
in
Homemades
That spring looks perfect. Are people using the full length or cutting it down? I could see using a 6" piece for a 'smaller' pistol and full length for a rifle.
The plastic is quite strong, and the filament paths can be 'aligned' with he direction of the force if carefully done. Since the length is limited I assume some other material is necessary for the plunger rod anyway. No sense wasting print time on something easily acquired elsewhere.
The plastic is quite strong, and the filament paths can be 'aligned' with he direction of the force if carefully done. Since the length is limited I assume some other material is necessary for the plunger rod anyway. No sense wasting print time on something easily acquired elsewhere.
Cool, I'll try printing this out once I get my printer built. I have a couple recommendations and questions:
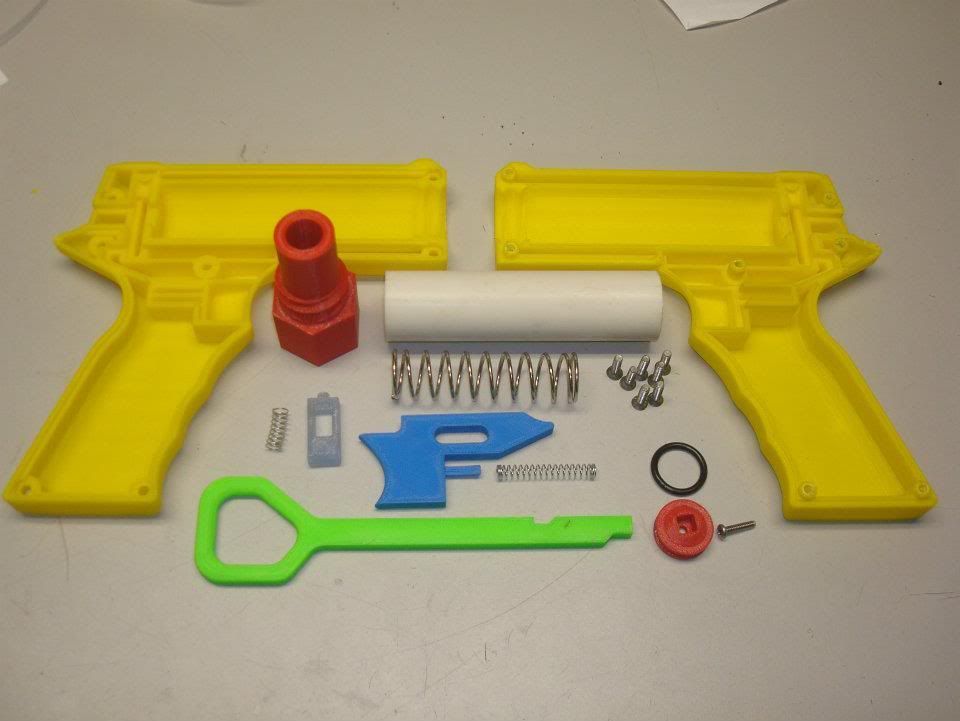
1) Use a [k26] spring. You'll get the most out of your blaster.
2) How strong to you think the plunger rod is? It might be worth using square nylon rod for that piece, and then print out a plunger head and priming handle to screw onto the nylon
#310535 Another Simple 3D Printed Blaster
Posted by
on 01 February 2012 - 03:50 PM
in
Homemades
Wow, lots of comments. Lets see if I can cover everything...
1) I don't think i'll be selling any 'complete' pistols like this as it just won't be cost effective for me. I've been printing a lot of prototypes @ $10/hr and that keeps me pretty busy. I'd have to charge those rates to make up for lost business so a 14hr gun may only cost $12 in material, but $140 in machine time. That will come down in the future somewhat if business slows and/or I get more printers up and running.
2) I'll be uploading the files within a week or two once I'm done perfecting them. After that anyone with a 3d printer can make as many as they like (it will be an open source design)
3) Clips are on my to-do list, but it's a long list.
4) So far this is my only nerf print, but I've made a ton of other stuff for various hobbies (rocketry in particular)
5) I guess I'm starting to seriously consider designing simple fast to make parts that would interface with standard PVC and hardware store things. It's not a practical process for producing full guns, but key components might be a good starting place. What is the standard spring and piston diameter most people are using these days?
6) The range is 35ft flat with taggers.
#310477 Another Simple 3D Printed Blaster
Posted by
on 01 February 2012 - 02:16 AM
in
Homemades
As patents keep running out 3d printing will keep become cheaper and more capable. It's always possible to make multiple pieces and glue/screw/clip them together to make larger parts.
I'm not sure 'vintage' shells would be a good idea though; companies take their copyrights very seriously (even if they currently are not making money off them)
I'm not sure 'vintage' shells would be a good idea though; companies take their copyrights very seriously (even if they currently are not making money off them)
I looked at his website. Sadly it looks like its Printing bed is only 7x7. I await the day when we all can have access to wonderful machines like this, It would change our hobby forever. I mean c'mon being able to print %90+ of your blasters components in your house!
Somebody could make a killing selling 'Vintage' Nerf shells if they had the tooling.
#310471 Another Simple 3D Printed Blaster
Posted by
on 01 February 2012 - 01:38 AM
in
Homemades
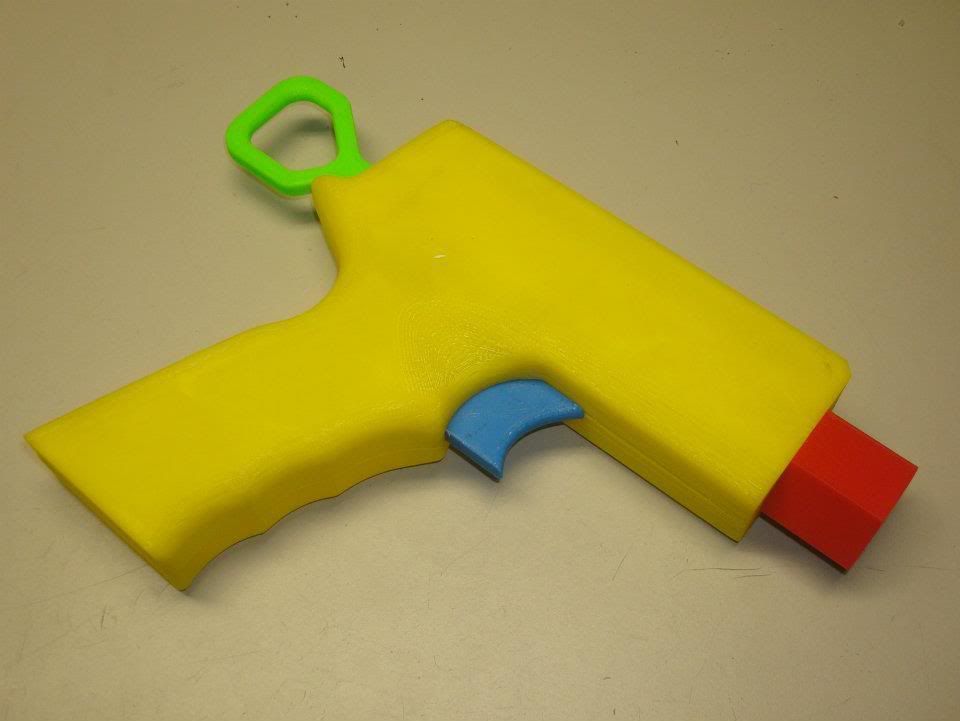
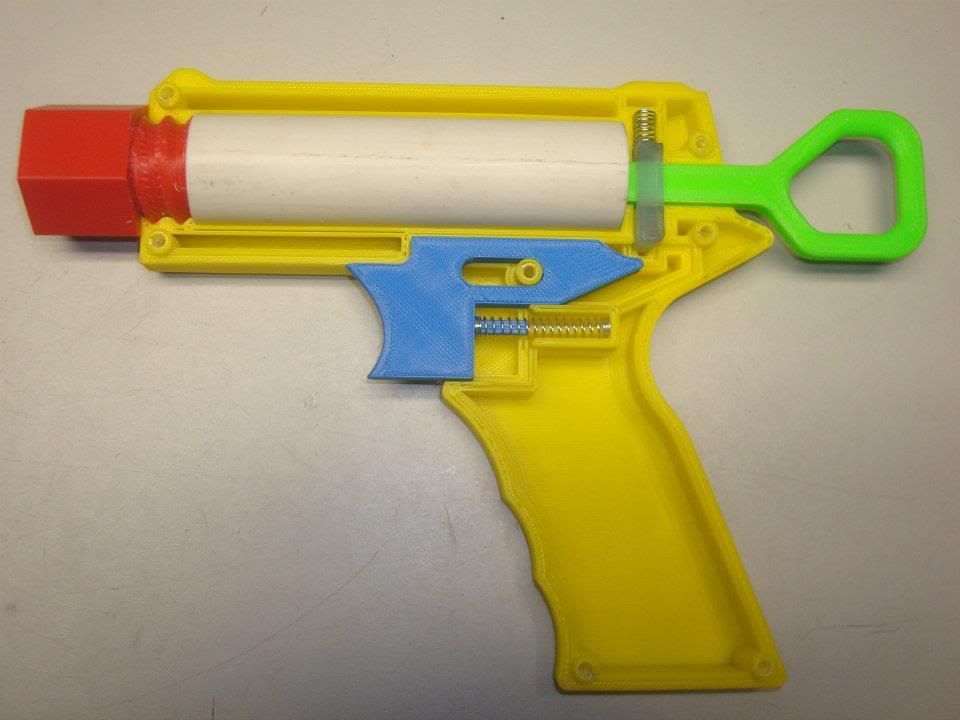
The red piece is the barrel. It's made for stock DTs so it only has to be 2.5in long. it threads into the front of the gun so it can be replaced with something more interesting in the future.
Props and shizz!
I really like this. Is the red thing at the front like a bushing or coupler?
#310468 Another Simple 3D Printed Blaster
Posted by
on 01 February 2012 - 01:17 AM
in
Homemades
Just in case anybody hasn't been following hobby/low end industrial 3d printing recently; it's come a long way.
I've been lucky enough to start a company making (and soon to be selling) 3d printers, and as such, get to make/print a pile of stuff for testing and for fun.
I used to do a lot of Nerf stuff with HvZ, so I decided to design a printable blaster from scratch for funzies. It just happens to be a good example of what a 3D printer that costs under 3K can do. The material is around $1 per in^3 so making custom parts is a lot more feasible than it once was.
The whole gun took about 13hrs of print time, but only $10 in plastic. The springs I had laying around the house. I think the primary spring is from an old night-finder but I'm really not sure. It gets about 1.5x the distance of a lightly modded maverick. It was designed for a fun proof of concept to be built upon upon, not for performance.
Everything plastic was printed on a Fablicator except for the PVC cylinder. It is all ABS except for the catch, which is PLA. The designs will be uploaded to thingiverse once some last minute changes are finalized.
The whole thing is every bit as rigid as an off the shelf Nerf blaster, if not more so.
Shameless plug; The website for the 3d printer I designed is www.fablicator.com (still under light construction)
~Andrew Diehl
#249022 Dart Spinning (rifling) Test Rig
Posted by
on 29 August 2009 - 06:46 PM
in
Darts and Barrels
From the comments, two future tests are planned.
1) My 'molded' darts, 50' range, 80 firings. No and Med RPM as the two groups.
2) Standard stefans with bb in tip, 1.5" length, 50' range, 80 firings. No and Med RPM.
From just playing around with the gun, it is appears the difference between spinning and not is more pronounced at further distances, so I'm upping the range of the test to 50ft.
Also, I'll put my spreadsheet with the values in the next post. And I'll calculate R instead of X,Y for convenience. I just thought it was interesting the Y spread was so much greater than the X.
#248991 Dart Spinning (rifling) Test Rig
Posted by
on 29 August 2009 - 11:42 AM
in
Darts and Barrels
Well I guess additional data is in order.
And what do you mean by the darts people actually use?
And what do you mean by the darts people actually use?
#248974 Dart Spinning (rifling) Test Rig
Posted by
on 29 August 2009 - 01:28 AM
in
Darts and Barrels
After clamping the rig to an adjustable drill press table. I did some low pressure indoor tests.
Procedure:
Load a 1" stefan with molded hemispherical tip 7" into 17/32 brass barrel. Pressure set to 10psi on regulator, and not changed over the course of all tests. (actual pressure is questionable, but it is assumed to remain constant throughout experiment). Hold down firing switch until dart hits target 20ft away. Repeat ~20 times. Mark each impact on the Styrofoam target. Repeat for ~400rpm and ~2000rpm. (tachometer is not currently available, so just rough guesswork on actual rpm based on motor pitch) The same dart is used for every shot.
Averages and standard deviations for each 'X' and 'Y' set of values was obtained
No rotation
3.42, 4.53 (average)
1.45, 5.93 (standard deviation)
400RPM
3.53, 5.86 (average)
1.22, 4.14 (standard deviation)
2000RPM
3.54, 5.91 (average)
.99, 3.99 (standard deviation)
Improvement from 0 to 2000RPM
X Axis 31.7%
Y Axis 32%
The data shows that spinning darts at 2000 RPM improves precision by 32%.
If you have really really perfectly balanced and formed darts, you will see less improvement from a spinning dart, which most of us don't.
My professional opinion (Yes I can say that, I'm actually an engineer) is that the rotating of the dart corrects for aerodynamic imperfections. In a normal firing, if the dart has a defect causing aerodynamic forces on one side, as it travels the force will cause it to travel to that side more and more. If the dart is spinning, that force starts on one side. As it spins, the force is moved to the opposite side, counteracting the initial force. The dart will technically travel in a circle on the X Y plane as it travels as opposed to veering way off to one side. The faster the rotation, the tighter the circle and more precision.
In conclusion, spinning your darts will help you hit your opponents, assuming you are aiming at them.
Myth Confirmed.
#248953 Dart Spinning (rifling) Test Rig
Posted by
on 28 August 2009 - 09:04 PM
in
Darts and Barrels
well, the solenoid valve is on. Now it has enough power to put 3/4" dents in foam insulation. at 15ft. If it wasn't dark and raining I'd find some actual ranges outside. At high pressure it fishtails most everything out of the barrel. I suppose I need to make some very heavily weighted stefans now too. First real data set to be taken tomorrow if the weather improves.
#248858 Dart Spinning (rifling) Test Rig
Posted by
on 27 August 2009 - 11:04 PM
in
Darts and Barrels
...and already have a backpack with power and air.
?!?!?!?
A pic please. Just one?
I was joking with my last comment but you have put some serious brainpower into this.
http://nerfhaven.com...=15747&hl=caedo
#248848 Dart Spinning (rifling) Test Rig
Posted by
on 27 August 2009 - 10:05 PM
in
Darts and Barrels
I think it would be reasonable to make an actual gun with a modified setup. I have a bunch of smaller powerful motors to spin the barrel and already have a backpack with power and air. Also could replace the air with a spring/piston setup. Half cocking the trigger spins the barrel, full pull fires. This is a topic for a future thread. Back to testing.
I'm not real familiar with the high power long range guns. I primarily do indoor nerf. What s the typical 'accurate' range for the +bow or BBB? What distance are they usually used at? Right now I'm thinking big target at 70ft, with 'precision' measured by the standard deviation from the geometric center of the spread pattern.
I'm going to try and use a dishwasher valve so I can automate the firing to make the results more accurate and squeeze some more power out of the tester.
#248795 Dart Spinning (rifling) Test Rig
Posted by
on 27 August 2009 - 04:54 PM
in
Darts and Barrels
There is an ongoing debate on whether spinning darts as they leave the barrel will improve stability. I have devised and constructed (still being greatly improved) a rig which allows darts to be fired from a brass barrel rotating at various RPM's (from 180 up to about 600RPM). I intend to show the ACTUAL effects of rotating a variety of types of stock darts as well as Stefans of different weight distributions.
First, here is the basic setup: 17/32" brass barrel, 10" long. Powered by 60psi run through an air nozzle. An old sewing machine motor is belted to the barrel, which is nested in the next size up brass tube, which acts as a cheap bearing.
Results so far: (Keep in mind this is the beta tester, and real data will be obtained after all the bugs are worked out)
At low RPMs (600 or so), there didn't seem to be much effect on stock darts or stefans. At about triple that most stock darts catostrophically fail, the plastic tip bends over and flops around and occasionally rips off. Streamlines cartwheel right out of the barrel.
At max rpm, crappily made stefans appear to have MUCH better accuracy than their non-rotating counterparts. I will make up a batch of identical weight perfectly made stefans to test soon.
Eye Candy:
If you have any thoughts/suggestions let me know. Just remember, i will have actual numbers soon and more info about the actual firing rpm, muzzle velocity, weight distribution of the darts etc.
#219095 Rf20 Mod - Caedo
Posted by
on 21 March 2009 - 12:11 PM
in
Modifications
The range is not flat. it is the max range. Video to come soon.
I have a few different guns and this one just happens to work at the increased speed, but just barely. Maybe just random luck.
I have a few different guns and this one just happens to work at the increased speed, but just barely. Maybe just random luck.
#218811 Rf20 Mod - Caedo
Posted by
on 19 March 2009 - 05:01 PM
in
Modifications
In the final version I plan to use mountain dew bottles. While you can probably fit more air at higher pressure in a hard PVC tank, the external soda bottle tank is extremely robust and will take large mounts of abuse. Also there were no leaks, first time. It is also easily replaceable if it were to leak.
I usually use it in a semi-auto style of fighting with 1-2dart bursts so as not to rapidly deplete the ammo. Full auto is only ever useful in assassins or other 1v1 style games.
As for the hemispherical dart molds, I'd be willing to sell an aluminum 5 dart mold for 10$. PM me. There wasn't much interest for them over on the HQ and then my account crashed so nothing ever came of it before. The dart basically looks like this: http://i211.photobuc...13/NewDarts.jpg
#218600 Rf20 Mod - Caedo
Posted by
on 18 March 2009 - 10:34 AM
in
Modifications
It is set up for replaceable clips, just need to work on the seals.
It has been through quite a few battles with most of the modifications. it's always a work in progress.
It has been through quite a few battles with most of the modifications. it's always a work in progress.
#218575 Rf20 Mod - Caedo
Posted by
on 18 March 2009 - 12:28 AM
in
Modifications
I play Humans v Zombies at Penn State and decided I needed more firepower this semester. I subsequently modified a RapidFire 20 to be charged with an air compressor in my backpack, as well as greatly improve range and accuracy.
With all modifications, I can:
Average 70ft with stock taggers
Average 105ft with my hemispherical tipped Stefans.
Charge the air tank 10times to 100psi before recharging the battery
Fire about 100 darts per charge
Fire 20darts/s

Details:
The backpack containing a compressor, batteries, and air tank was the most significant improvement from the stock gun.
Two 7.2v NiMH remote control car batteries power the compressor. The batteries are wired in series for a total of 14.4v at 3000mAh of capacity. An easy to reach push button switch on the gun is wired to a BNC cable which connects to the batteries and compressor. There is also a ‘stealth’ switch on the gun which prevents the compressor from turning on by accident.
The compressor was purchased years ago for water bottle rockets, but similar ones can now be found at Harbor Freight for under $20.
The air tank used is a 2L soda bottle. They are durable, reliable, do not leak, and are dirt cheap. A custom brass fitting attaches to the bottle cap and connects the bottle to a standard 1/8in NPT fitting. There are a variety of fittings used on the system, but the push to connect is my favorite. The only reason others were ever used was local availability. The bottle connector leads to a ‘T’ which connects a bicycle valve and the tube to the gun. The compressor attaches to the bicycle valve. The air tube attaches to the gun through a quick disconnect fitting which I found at a local scrap yard. Standard compressor quick disconnects will work also, but tend to leak. Once the air hose is inside the gun, another ‘T’ connects a pressure gauge to the air line. The commercial home depot tubing is connected to the stock RF20 tubing by a barb fitting AND small hose clamps.
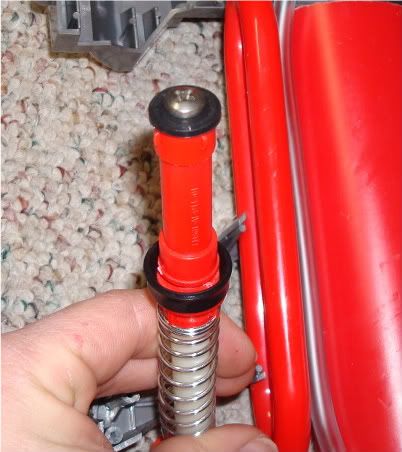
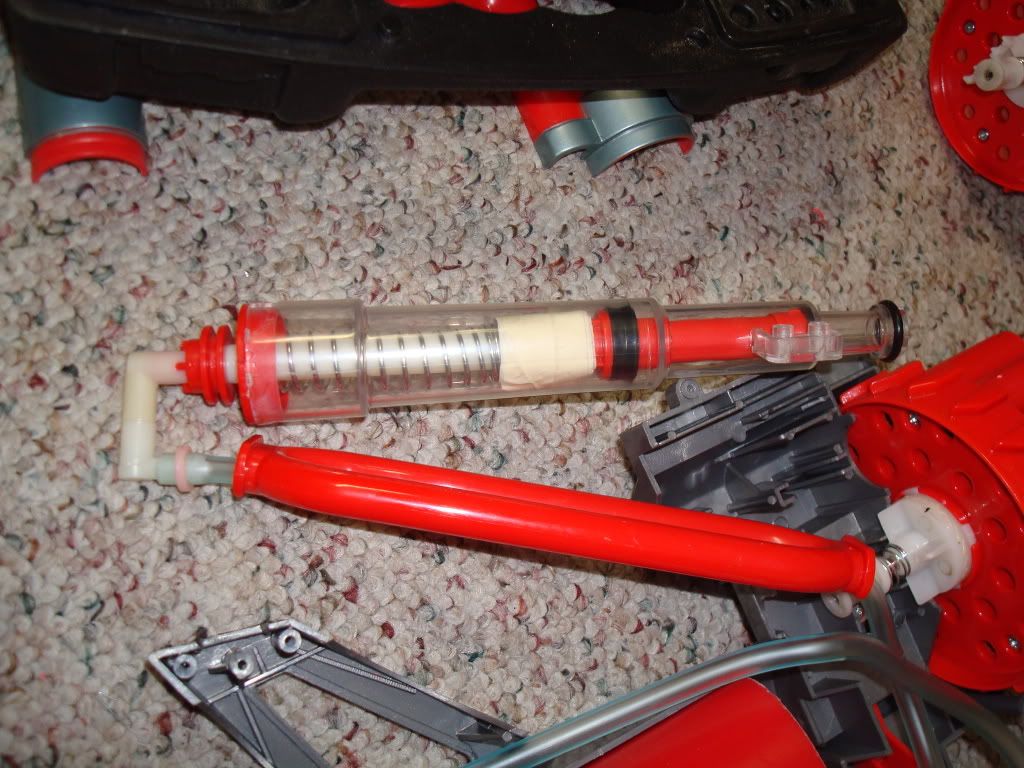
The next gun modification is of the firing mechanism. I carefully pried the clear plastic from the red piece at the base of the piston tube and opened the mechanism. I then compressed the spring back about 1in and put a large quantity of masking tape above it to pre-compress the spring and raise the minimum firing pressure to about 40psi. As a result of the higher firing pressure, the cone shaped red piece at the tip of the mechanism also needs to be replaced with something slightly wider. If it is not, the black rubber piece fails to make a reasonable seal. To replace the red cone, cut it off, careful not to damage the black gasket. Remove the rivet, and drill out the hole to 5/32 and replace the entire cone with a single 12-whatever machine screw. The head of the screw should be slightly wider than the base of the red cone for it to work correctly. The screw will self tap into the hole with some minor effort. Do not tighten the screw onto the gasket; only make it very close to touching. If the gasket is compressed it will expand outward and get stuck in the clear tube.
The next modification is simply cutting 20 pieces of 17/32 brass and press fitting them into the barrels. Removing the turret and using a large clamp to press fit the barrels can make things easier.
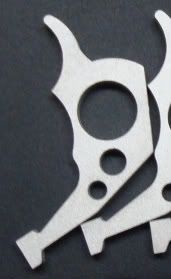
The final functional modification is replacing the trigger with something sturdier. Because the gun runs up to 100psi the trigger will fatigue and break within the first hr of use from the increased force needed to push down the firing pin. I made a paintball style aluminum trigger; reinforcing the existing trigger with embedded paperclips or dremeling a new one from polycarbonate may work too…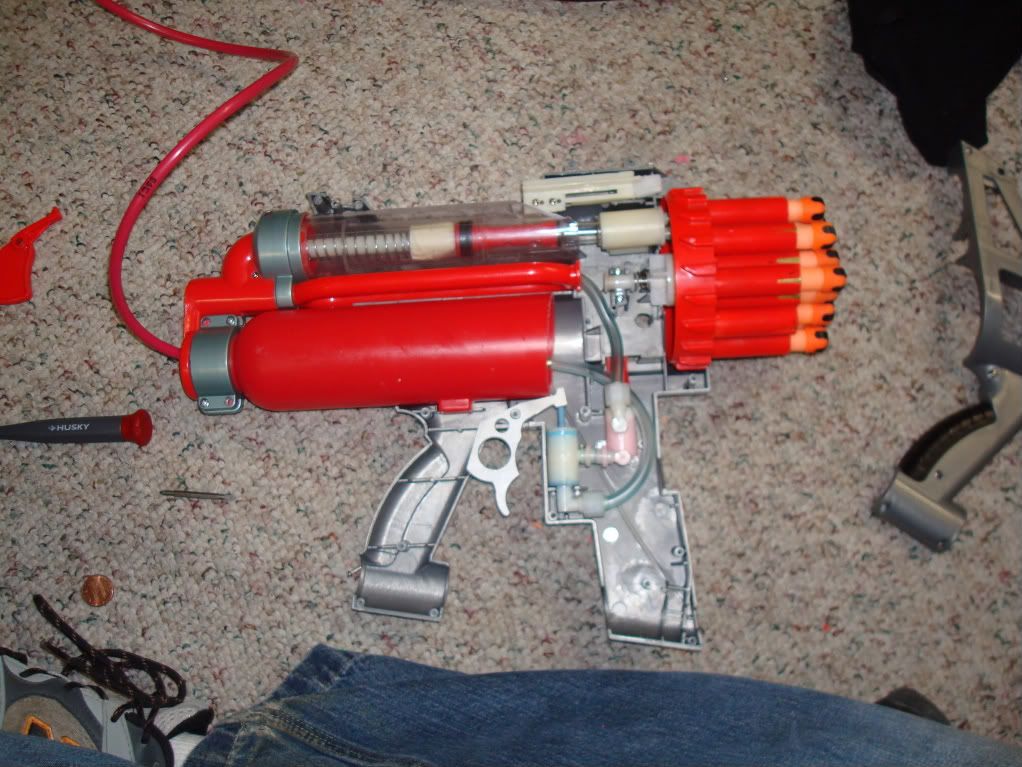
Finally I removed the black shell and cut off any excess parts to make it more manageable.
Feel free to ask questions, but I don't get on too often between dodging zombies and finishing a degree in mechanical engineering.
With all modifications, I can:
Average 70ft with stock taggers
Average 105ft with my hemispherical tipped Stefans.
Charge the air tank 10times to 100psi before recharging the battery
Fire about 100 darts per charge
Fire 20darts/s
Details:
The backpack containing a compressor, batteries, and air tank was the most significant improvement from the stock gun.
Two 7.2v NiMH remote control car batteries power the compressor. The batteries are wired in series for a total of 14.4v at 3000mAh of capacity. An easy to reach push button switch on the gun is wired to a BNC cable which connects to the batteries and compressor. There is also a ‘stealth’ switch on the gun which prevents the compressor from turning on by accident.
The compressor was purchased years ago for water bottle rockets, but similar ones can now be found at Harbor Freight for under $20.
The air tank used is a 2L soda bottle. They are durable, reliable, do not leak, and are dirt cheap. A custom brass fitting attaches to the bottle cap and connects the bottle to a standard 1/8in NPT fitting. There are a variety of fittings used on the system, but the push to connect is my favorite. The only reason others were ever used was local availability. The bottle connector leads to a ‘T’ which connects a bicycle valve and the tube to the gun. The compressor attaches to the bicycle valve. The air tube attaches to the gun through a quick disconnect fitting which I found at a local scrap yard. Standard compressor quick disconnects will work also, but tend to leak. Once the air hose is inside the gun, another ‘T’ connects a pressure gauge to the air line. The commercial home depot tubing is connected to the stock RF20 tubing by a barb fitting AND small hose clamps.
The next gun modification is of the firing mechanism. I carefully pried the clear plastic from the red piece at the base of the piston tube and opened the mechanism. I then compressed the spring back about 1in and put a large quantity of masking tape above it to pre-compress the spring and raise the minimum firing pressure to about 40psi. As a result of the higher firing pressure, the cone shaped red piece at the tip of the mechanism also needs to be replaced with something slightly wider. If it is not, the black rubber piece fails to make a reasonable seal. To replace the red cone, cut it off, careful not to damage the black gasket. Remove the rivet, and drill out the hole to 5/32 and replace the entire cone with a single 12-whatever machine screw. The head of the screw should be slightly wider than the base of the red cone for it to work correctly. The screw will self tap into the hole with some minor effort. Do not tighten the screw onto the gasket; only make it very close to touching. If the gasket is compressed it will expand outward and get stuck in the clear tube.
The next modification is simply cutting 20 pieces of 17/32 brass and press fitting them into the barrels. Removing the turret and using a large clamp to press fit the barrels can make things easier.
The final functional modification is replacing the trigger with something sturdier. Because the gun runs up to 100psi the trigger will fatigue and break within the first hr of use from the increased force needed to push down the firing pin. I made a paintball style aluminum trigger; reinforcing the existing trigger with embedded paperclips or dremeling a new one from polycarbonate may work too…
Finally I removed the black shell and cut off any excess parts to make it more manageable.
Feel free to ask questions, but I don't get on too often between dodging zombies and finishing a degree in mechanical engineering.

