Use a 1 1/2" hole saw, yo. Seriously, a serviceable set costs like $3 at Harbor Freight. The only real reason to cut out a wooden circle with a scroll saw is to show off your scroll sawing skills.
Also, stick that sumbitch in a vice and go to town on it with a 60 grit sanding drum. It's faster than mixing epoxy by a good bit.
rork's Content
There have been 899 items by rork (Search limited from 03-December 96)
#289272 Pumpsnap A La Rork
 Posted by
on 28 November 2010 - 06:00 PM
in
Homemades
Posted by
on 28 November 2010 - 06:00 PM
in
Homemades
#288760 Primary And Secondary?
Posted by
on 22 November 2010 - 11:23 PM
in
General Nerf
The idea of a "secondary" is total bullshit. The closest thing is a spare gun that you like slightly less than your main gun.
#288515 Pumpsnap A La Rork
Posted by
on 17 November 2010 - 11:54 AM
in
Homemades
The only strain the plunger shaft needs to stand up to is the force of priming, which isn't a problem if your screws have sufficient bite.
This is neither quicker nor easier than the superlative plunger head; however, it's not that much more annoying to make, it uses fewer, cheaper parts, is lighter, and centers around the plunger rod, which is quite a useful attribute that my next build will depend heavily upon. Also, not all epoxy putty is created equal, and some people have trouble working it into a good catch ramp.
EDIT for DB: It's wicked strong. I used a big ol' chunk of oak, and really overbuilt the whole thing. That stress point is no problem at all, as long as you throw sufficient mass at it.
#288087 Community Snap Thread
Posted by
on 07 November 2010 - 04:04 PM
in
Homemades
They look sweet. And using a solid plunger rod eliminates the need for endcaps, bolts, nuts, etc. Much simpler.
#288069 Community Snap Thread
Posted by
on 07 November 2010 - 12:58 AM
in
Homemades
Got-dangit, Bobbeh.
Let's try again: A SNAP is a blaster whose catch relies upon a clothespin (pivoting) trigger, the pin of which retains the plunger via a plate or other surface raised above the level of the plunger rod, whereas a Rainbow utilizes an internal catchplate assembly that retains the plunger rod via a notch or depression cut therein.
This definition STILL leaves the CPT Mk. 2 out in the cold a bit, but it really has more in common with the Rainbow.I suggest that we regard it as a SNAP/Rainbow hybrid, at least until Carbon comes up with an alternate pseudo-acronym.
CRACKLE? POP? WANG?
#288065 Community Snap Thread
Posted by
on 06 November 2010 - 10:51 PM
in
Homemades
^Truth. If it has a Rainbow catch, it's a Rainbow. If it has a SNAP (clothespin) catch, it's a SNAP. If it uses Carbon's clothespin plate trigger, it's an unholy hybrid of the 2, invented solely to make categorization like this difficult. The fact that Rainbows look like SNAPs, and will undoubtedly partially replace SNAPs as the go-to homemade for the poor and lazy, doesn't make them SNAPs, since the only consistent thing shared by all SNAPs is a clothespin trigger and a catch on the plunger head.
#287966 Pumpsnap A La Rork
Posted by
on 05 November 2010 - 12:06 PM
in
Homemades
I used a sophisticated, expensive, hard to find...dremel with a sanding drum. A router would be prime, though. And yeah, the wood plunger rod works great. You just have to center the hole for the plunger head, and be sure to use enough screw. I use 1" #8 sheet metal screws, and they're treating me well so far. However, I wouldn't be comfortable using a less-burly wood for a plunger.
#287959 Pumpsnap A La Rork
Posted by
on 05 November 2010 - 10:39 AM
in
Homemades
Soccerbeast, it's really smooth. You just have to pull it back naturally, and the handle finds the optimum position. Try to straighten it, and it will bind. The back of the T is ground down to a smooth curve for this very reason.
Carbon: Yeah, it actually works about as well as the epoxy putty. It's more consistent, due to being cut rather than molded. I'd say it's a bit more durable over all; if you cut your pin too long, it will dent it, but it doesn't really seem as prone to gouging as either pvc or epoxy putty. Of course, as I noted in my writeup, if you're worried, you can easily substitute a bit of 1/4" polycarb sheeting--or hell, a circle cut from a large PVC plug or flat endcap. Even if the material isn't to your liking, the method works great.
PVC and Oak go together like 2 super compatible things.
#287948 Pumpsnap A La Rork
Posted by
on 05 November 2010 - 12:36 AM
in
Homemades
Based heavily on Split's SlamBow, among others. Also, props to Dizzy for the plunger design.
The plunger shafts consists of a length of 1/2" oak dowel. You could use drilled and tapped nylon as well. The plunger head is Dizzy's version of the standard Superlative, with a 1 1/2" disc of wood which has one edge beveled acting as the catch ramp.


You could substitute 1/4" plastic sheeting, if you liked. It has a 1/2" hole in the center, so it fits around the plunger rod and auto-centers. The sled is a 3/4" T fitting, which has a 5/8"-wide section cut out at the top. 2 5/8"x16" dowels are attached via 3/4" #6 bolts, the heads of which are countersunk into the wood. The bolts fit flush with the inside of the T, eliminating the need for any slots, etc. The push plate at the rear is a 2 1/2" section of 3x1 oak, with a 3'4" hole drilled in it, the midpoint of which is 1/2" from the upper edge.


The blaster body is a standard SNAPbow, with a few modifications. The plunger tube is cut to 13", with the bushing nested completely inside the front of the gun. The bottom rail is extended by 3" or so, to accommodate the foregrip.

The pump sled fits on thusly, with the back of the plunger getting topped off with a screw, a washer, and an "I fucked up the length of my plunger rod" spacer.
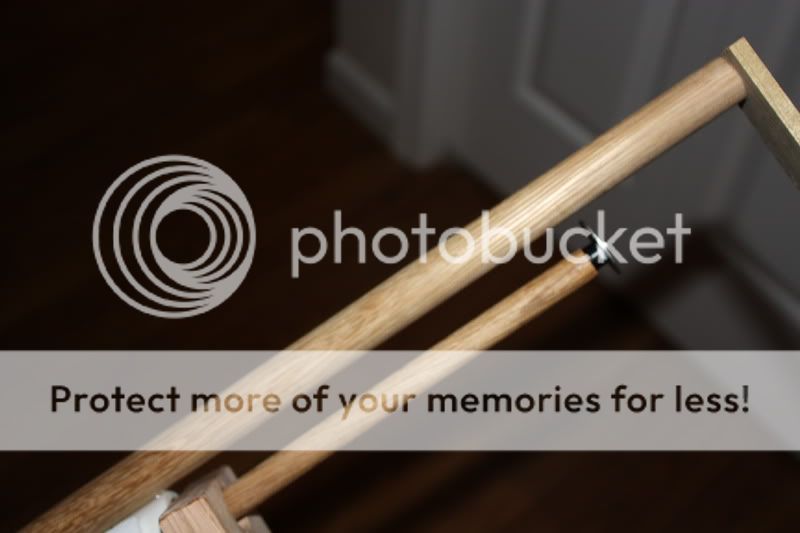
The stock is very wooden.

You can also field strip it with the sled on.

The spring rest is held in by 2 screws behind the rest.

Here's the complete gun, yo. It's super badass.

The plunger shafts consists of a length of 1/2" oak dowel. You could use drilled and tapped nylon as well. The plunger head is Dizzy's version of the standard Superlative, with a 1 1/2" disc of wood which has one edge beveled acting as the catch ramp.
You could substitute 1/4" plastic sheeting, if you liked. It has a 1/2" hole in the center, so it fits around the plunger rod and auto-centers. The sled is a 3/4" T fitting, which has a 5/8"-wide section cut out at the top. 2 5/8"x16" dowels are attached via 3/4" #6 bolts, the heads of which are countersunk into the wood. The bolts fit flush with the inside of the T, eliminating the need for any slots, etc. The push plate at the rear is a 2 1/2" section of 3x1 oak, with a 3'4" hole drilled in it, the midpoint of which is 1/2" from the upper edge.
The blaster body is a standard SNAPbow, with a few modifications. The plunger tube is cut to 13", with the bushing nested completely inside the front of the gun. The bottom rail is extended by 3" or so, to accommodate the foregrip.
The pump sled fits on thusly, with the back of the plunger getting topped off with a screw, a washer, and an "I fucked up the length of my plunger rod" spacer.
The stock is very wooden.
You can also field strip it with the sled on.
The spring rest is held in by 2 screws behind the rest.
Here's the complete gun, yo. It's super badass.
#287947 Homemades Picture Thread
Posted by
on 05 November 2010 - 12:29 AM
in
Homemades

999th post. Gee, I wonder if I'll be posting something awesome soon...
#287697 Wincno 2
Posted by
on 30 October 2010 - 04:16 PM
in
Nerf Wars
I'll edit in my recap later, but the guys that didn't come to this missed out big time. Probably the best Southern war ever.
EDIT: TEH RECAP
+This war rocked. Majorly.
+Flash's crew was fantastic. Thanks for coming out, dudes.
+Woods rounds
+Good field
+CARPE!
+Man, chain leveled up big time. Little people are wicked hard to hit.
+HOPPERS ALL OVER THE DAMN PLACE
+Guns were awesome. They consisted of hoppered SNAPs, hoppered BBBBs, and an RSCB'd Lanard shotgun that worked surprisingly well. Props.
+Freeze tag is the new Deathmatch. Seriously, there's no reason to play 3/15 in a world that has freeze tag in it.
+Carpe was awesome, with primaries. SCORE.
+Gunslinger is surprisingly easy to adapt to a 2-team format.
+Super sportsmanship. Not one real issue all day. This war set a pretty high bar in that regard.
+Civvies thought our shenanigans were cool.
+Did I mention that EVERY GUN HAD A HOPPER ON IT?
+^Seriously, that's like 20 times more fun than whatever else you might be using. we're talking a full foot of clip, with another foot of extension. Absolutely no issue.
+Swappable hoppers actually working
+Getting taken out by a shotgun for the first time ever
+Getting some sweet kills, along with pretty much everyone.
-Commies.
#287674 Wincno 2
Posted by
on 29 October 2010 - 10:32 PM
in
Nerf Wars
SUPER LAST MINUTE BUMP!
I'll see you fellas on the field. If anyone has any last-minute news/suggestions/outbackery, lay it on me.
EDIT: I'll be on the field a bit before 10, and we'll start when we have enough people for it to be interesting. Safe travels.
I'll see you fellas on the field. If anyone has any last-minute news/suggestions/outbackery, lay it on me.
EDIT: I'll be on the field a bit before 10, and we'll start when we have enough people for it to be interesting. Safe travels.
#287383 Wincno 2
Posted by
on 23 October 2010 - 11:46 AM
in
Nerf Wars
Sorry to hear it. Right now, we're looking at 12 definite attendees, with a possible attendance of up to 19. One week to go. Gentlemen, start your glue guns!
#287355 Wincno 2
Posted by
on 22 October 2010 - 03:25 PM
in
Nerf Wars
Tentative round stuff:
We'll start out with a FFA, to get everybody moving.
Carpe! While we're fresh!
Gunslinger.
2-Team Gunslinger.
Freeze Tag.
Defend the Core, maybe.
Pistols Deathmatch.
Dart Sweep.
We'll play a few rounds, see what works, and play more of what people like.
As for lunch, there are plentiful fast food options and grocery stores nearby, or you could just pack a delicious sammich. I would prefer to avoid the whole "people leaving for 45 minutes" thing, because lunch is gonna be short, and you should be thinking light, anyway.
Bring moneys, y'all. I'm liquidating a bunch of my collection, so look forward to a Yaris packed with goodies. That is all.
EDIT: Locations are up.
#287348 The Clothespin Trigger Mk2
Posted by
on 22 October 2010 - 11:49 AM
in
Homemades
^Yes. That.
Unless I am misreading this thing pretty badly, one should be able to use a +bow style, notched, single-piece plunger rod with this, and align it with the priming handle position, no?
Also, Carbon, you've obviously missed the memo: when you design a homemade, you're personally responsible for anything that goes wrong with anyone else's rendition of that design, however shitty it may be. It's a lot of responsibility, but someone's got to shoulder it.
#287333 The Clothespin Trigger Mk2
Posted by
on 22 October 2010 - 01:28 AM
in
Homemades
Catching on a notch in the plunger rod has significant advantages over catching on the plunger head (plunger weight/complexity, catch placement). A lot of the issues with clothespins you mention can be minimized by using good ones (like I do).
That being said, I do have a significant degree of faith in a steel-on-steel catch that I'm not sure I'd ever have in anything else. The thing is sturdy.
That being said, I do have a significant degree of faith in a steel-on-steel catch that I'm not sure I'd ever have in anything else. The thing is sturdy.
#287056 Wincno 2
Posted by
on 17 October 2010 - 12:20 AM
in
Nerf Wars
Oh, man, that sucks. Hope you get to feeling better soon.
#286977 Homemades Picture Thread
Posted by
on 15 October 2010 - 01:06 AM
in
Homemades

It's super classy! It's bigger than a tree!
#286891 Wincno 2
Posted by
on 12 October 2010 - 08:57 PM
in
Nerf Wars
Attendance updated. We're looking at a pretty good-sized war here, guys. October 30th is the date. Be there or be no better than a communist.
#286767 Community Snap Thread
Posted by
on 10 October 2010 - 07:02 PM
in
Homemades
All those 110'+ ranges that I measured a while back were with K25s. I've since switched back, since Umpa's [k26] sprung SNAPbow was scaring people at SeptembWAR. A [k25] is nice, insofar as you can easily get a 7.5" stroke out of it and it primes really smoothly--IF you get your pin just right. They cause a ton of catch issues. For SNAPs, you really want something that's as narrow as is practically possible. A [k26] is great, especially if you're using a cpvc plunger shaft. For the kinds of ranges you describe, I recommend the following: cut a [k26] in half, and make a 1/2-length SNAPbow. They're pretty sweet, and they shoot up to about 85', while being scary compact.
#286764 Snapbow Mk. V, Revised
Posted by
on 10 October 2010 - 06:46 PM
in
Homemades
Hokay:
If you're having catch tangling problems with a [k26], then yes; your pin is too long to a significant degree. You can use a [k25], but it requires the trigger setup to be made very precisely, and normal wear can cause catch issues. Silicon grease>everything else. Spray is utter shit, and it will fuck up your washers over time if you use a significant amount. My clothespins come from WalMart. If anyone just wants a couple, I'll offer them for sale on a per-each basis in my next thread.
Difficulty is tricky. I find these easy, but I have lots of practice, and the dearth of well-made SNAPs tells me that people tend to find them a little bit hard to make. Just take your time, and pay attention. Measure twice, cut once, all of that. Be especially careful when you make your handle, as that's where a lot of SNAPs go wrong.
Time is also tricky. There's a few hours in the total process for me, but I build in subassemblies, usually over the course of a week or more (working full time sucks, kids--I encourage you to find some rich parents), and I rigorously test each gun before I consider it to be "done."
#286711 Wincno 2
Posted by
on 09 October 2010 - 12:00 AM
in
Nerf Wars
For anyone's parental/transportative units who have better things to than sit around in the parking lot: both locations are on the Swannanoa River, which is a hatchery-supported trout stream, and daily licenses are cheap. Black Mountain (3 minutes away) offers great shopping/wandering around opportunities, as does Asheville (15-20 minutes).
For lunch, there are fast food places within a few minutes, and the backup location is immediately adjacent to a Super Wal-Mart, which has a deli and a McDonald's. If we use the Rec. Park, however, I strongly suggest packing a cooler with water and sammiches, since i plan on taking a decidedly minimal lunch break. The weather will be MUCH cooler than has been the case for Augusta wars. Bring a jacket.
For lunch, there are fast food places within a few minutes, and the backup location is immediately adjacent to a Super Wal-Mart, which has a deli and a McDonald's. If we use the Rec. Park, however, I strongly suggest packing a cooler with water and sammiches, since i plan on taking a decidedly minimal lunch break. The weather will be MUCH cooler than has been the case for Augusta wars. Bring a jacket.
#286709 Snapbow Mk. V, Revised
Posted by
on 08 October 2010 - 11:13 PM
in
Homemades
It all depends on your darts. With really, really good slingshots, 150 would be well within the realm of possibility, at least now and then; mine break 120 with slugs, upon occasion, and never really throw one to less than the century mark.
#286696 Wincno 2
Posted by
on 08 October 2010 - 05:24 PM
in
Nerf Wars
Alright, looks like the 30th it is. You guys should definitely come on out, soccerbeast.
#286693 Wincno 2
Posted by
on 08 October 2010 - 05:04 PM
in
Nerf Wars
Onoez! What are you guys' chances of making the 30th?
#286691 Snapbow Mk. V, Revised
Posted by
on 08 October 2010 - 05:02 PM
in
Homemades
I use a foot of cpvc for the plunger rod. I cut the pin to length each time, but I recommend a hair over 1/8" sticking up inside the PC. The hole for the pin is a touch over 1/8"; I use a 1/8" bit and wiggle it around a little.
#286689 Wincno 2
Posted by
on 08 October 2010 - 04:57 PM
in
Nerf Wars
I think I'm gonna go ahead and say the 6th is it. If anyone needs to protest, do so immediately.
#286667 Snapbow Mk. V, Revised
Posted by
on 07 October 2010 - 08:06 PM
in
Homemades
Loc-Tite, generally.
#286666 Wincno 2
Posted by
on 07 October 2010 - 07:57 PM
in
Nerf Wars
Goddammit, you can't do anything these days without oppressing some sort of minoritah. I suppose I could institute a Beard Rule, to avoid discriminating against Nerf Dwarves. No one under 3 1/2' tall, unless they're sporting a lush facial accessory, and maybe an axe. No melee, though. On that I shall remain firm!
#286644 Wincno 2
Posted by
on 06 October 2010 - 10:55 PM
in
Nerf Wars
I'm having another sweet NC war, y'all.
DATE: Oct. 30th
PLACE: Black Mountain Rec. Park. There will be a primary location and a backup, just in case The Man takes offense to our shenanigans.
DIRECTIONS: Recreation Park Drive, Black Mountain, NC. Google Maps should take you right to it.
THE BACKUP: 125 Bleachery Blvd., Asheville, NC. This will take you to a Super Wal-Mart. The park is directly adjacent to the lower edge of the parking lot.
GUN BANS: Fuck 'em. Don't bother bringing singled air howitzers, but I won't be banning anything on the basis of effectiveness.
DARTS: Slugs strongly preferred. If anyone fails too hard to use them, I'll tolerate single BBs.
AGE: I'm cool with people 14 or older. The one exception I'll make is for an older player who brings a younger sibling. This thing is going to be run a lot tighter than we're used to, and I don't want to have to run dwarf patrol all afternoon, especially since people's parents would be quite a ways away from the main site.
GAMES: We're gonna do very little standard stuff. I'm taking this war as an opportunity to play using different scoring systems, so expect freeze tag, gunslinger variants, and Carpe, among others. And no, that doesn't mean CtF or zombies.
Depending on the location, we may be moving around between fields quite a bit (one loc. has like 4-6 fields we could use), so don't bring every damn gun you own. Stick to a reliable primary, a pistol with a holster, and a sackful of darts, with spare guns left in the car. This isn't going to be a gunshow type war, anyway, since the rounds we will be playing will tend to put everyone out of commission at the same time, instead of spreading the process out over 30 minutes. And make sure you have about twice as many darts as you think you'll need. we'll be playing very fast-paced rounds, and some of them may be in areas that are not conducive to 100% dart recovery.
I won't have darts for people, but I will try to make up a handful of loaner spring cannons, so don't let your crappy guns keep you from attending.
ATTENDANCE:
Rork+2-3
Soccerbeast
KrazyKade+2
Chain
flash-gordon (validating)+4-7
Asideofnerf+1
BLACKLISTED:
FlyingChicken
The Old Guy
Nerkum
Nerfomania
Umpa
ZAX
#286435 Snapbow Mk. V, Revised
Posted by
on 02 October 2010 - 03:50 PM
in
Homemades
The problem has nothing to do with hurt feelings (mine) and everything to do with the fact that you're a nitpicking jackass. And since my current SNAPbow has my FIRST superlative plunger head in it, It's pretty obvious that it has lasted just fine, and you're full of shit.
Also, I use a tiny little lock washer between the wingnut and the finishing washer, and will edit that into the relevant writeups--even though the issue that seems to have become so all-fired imporant is not the choice of nut (a locknut would be fine--just make sure you have a wrench) but rather the choice of bolt. Just in case any of the bamboozled SNAP builders Fome is so nobly concerned about couldn't figure that one out on their own.
Also, I use a tiny little lock washer between the wingnut and the finishing washer, and will edit that into the relevant writeups--even though the issue that seems to have become so all-fired imporant is not the choice of nut (a locknut would be fine--just make sure you have a wrench) but rather the choice of bolt. Just in case any of the bamboozled SNAP builders Fome is so nobly concerned about couldn't figure that one out on their own.
#286381 Snapbow Mk. V, Revised
Posted by
on 01 October 2010 - 07:48 PM
in
Homemades
I was honestly surprised, but the plastic ramp, even when centered, did not prime nearly as smoothly as the epoxy version, and the seal was probably 30% less efficient. On my latest SNAPistola, I tried one, and gained a big power boost when I went to the superlative. I suspect that with extremely careful fabrication, it would work about as well, but it does bear mentioning that the endcap fits fairly closely within the PC, whereas with the superlative, only the rubber ever touches. This is one of those things that really comes down to personal preference and how much time and effort you want to put into fabrication.
#286375 Snapbow Mk. V, Revised
Posted by
on 01 October 2010 - 06:56 PM
in
Homemades
Essentially everything you said is incorrect. Firstly, the picture limit necessitated a new writeup. I simply wanted to get the best quality writeup I could up here, since I finally had time to complete it. I wasn't really looking for feedback from the likes of you. Now for the technical bits.
If you have problems with the wingnut hitting the front bushing, it's because you used the wrong part entirely. The wingnut allows me to fix anything that might go wrong with the plunger head with my fingers. All you have to do to hold your plunger head in place is to tack it together with super glue/hot glue/goop/Elmer's paste, tighten it down, and glue the wingnut in place to keep it from loosening One drop of CA glue on your screw threads to create friction and you're golden.. The epoxy putty holds the back rigidly in place, and the front does not suffer from any of the theoretical traveling problems that you describe, since the rubber washer keeps it spaced away from the walls of the PC. Oh, they could happen--if you dry-fired it a few dozen times. In which case, you'll have to take 30 seconds out of your busy day and re-align it.
7 inches of plunger stroke is not excessive, nor is it the most that can be squeezed out of a [k26]. The spring starts out slightly compressed, and does not reach full compression. Once again, you're talking out your ass.
What you seem unable or unwilling to comprehend is that this design has imprecision built in; I deliberately avoid anything that requires very precise measuring or cutting. In order for my plunger head to work, any hole that's within an eighth of where you want it to be will do just fine. eliminate that wiggle room, and you have to drill your holes much more carefully. Do I center my holes? Sure. but it isn't completely necessary to have a precisely centered assembly.
Before you get too smug over your "improvements," I'd urge you to do as I have and build several of these; then, instead of gluing shit to them, or curbstomping them, take them to wars and torture test them. Loan them out to people that can break a gun by looking at it. Drop 'em in the dirt. see how long they last, and see what breaks first. Then fix it, make it better--and engineer in ways to fix it more easily, in the field.
#286364 Snapbow Mk. V, Revised
Posted by
on 01 October 2010 - 05:35 PM
in
Homemades
Wes: hacking out the center ring of the coupler takes all of 15 seconds using a dremel with a sanding drum, with NO precision required, leaving me with a perfectly clean, even handle clamp. This fits perfectly with the idea of a SNAP as a gun you assemble, rather than fabricate.
I actually like a bit of wiggle room in the design, so I don't have to worry about drilling perfectly centered holes and whatnot. Plus, smaller bolts are cheaper and lighter. But in both these instances, do what you want.
I cut the stock retaining tube at an angle because it looks good. No other reason.
#286351 Snapbow Mk. V, Revised
Posted by
on 01 October 2010 - 04:17 PM
in
Homemades
A coupler fits and works perfectly, and for 50 cents, I eliminate 2 annoying mitered cuts, plus a measurement. Well worth it.
#286320 Snapbow Mk. V, Revised
Posted by
on 01 October 2010 - 12:30 AM
in
Homemades
Handle:
Start with a 1 1/4" coupler. Grind out the center ring, then cut 1/4 of the coupler away.

Cut your handle at a slight angle, making sure the top is flat (or concave to match the coupler section) and all sharp edges are nice and comfy. Tack on the handle. Make sure it's straight. Drill pilot holes (1/8" or a bit less), then add your screws.


Snap it on the PC, butt it up against the trigger, and wiggle it side-to-side. This creates a couple of marks where the screw heads need to go.

If you love the taste of PVC dust, feel free to dremel out a groove, but I just drill a couple of 7/16" holes, like so.

Now's a fine time to add your vent hole as well.

The handle should be butted against the back of the trigger, holding the trigger in place and preventing overtravel. Solvent weld the handle in place, making sure the entire internal surface of the coupler is coated with solvent weld.
Plunger Assembly:
Make your superlative plunger head. Mount on your plunger shaft, using 2 screws or a pin. Add your spring, drill out your ¾” endcap, and add your handle.

Lubricate with silicone grease, and nothing but silicone grease. Insert into the PC, make sure the endcap is flush with the end of the PC, and drill a hole all the way through the handle, PC, and endcap on each side. Screw it down. To disassemble, you need only to undo these screws. Add a barrel and shoot people.

Optional Stock: Cut a 6" piece of 3/4" PVC at an angle. Nest a 3/4" dowel inside it with e-tape. Add a buttplate (I just use a couple of fitings and a bit of 1/2" PVC). Dremel out a groove to fit the trigger's zip tie. Glue the whole assembly on. It should be offset toward you slightly to prevent cheek diddle (a righty's stock should be cocked 1/2" or so to the left).

Optional Rail: Cut a piece of 1/2" PVC to fit under the PC, in front of the trigger. Glue it on. Now, things can snap on and off your gun.

Maintenance: Re-lube infrequently. Pull the plunger and wipe it down occasionally, to remove any accumulated grime. I recommend priming by holding the foregrip in your non-dominant hand, and pulling back with your dominant hand. Use a long, tight barrel--I use 16” of cpvc, lubricated with silicone spray.
Inevitable Questions:
Q: Rork, why did you not use TantumBull's Pre-eminent plunger head?
A: I tried. It sealed less well, caught less reliably, and created more friction. It sure does look pretty, though.
Q: How good IS the seal on these things? Those washers sure are primitive.
A: Generally, if you make it properly, you can fire it with your hand pressed tightly over the output, and the plunger will stop.
Q: One more plunger head question: How well do those things last? Does the epoxy putty wear down?
A: Hell of a long time, and no, respectively. To put it in perspective, my current SNAPbow is the third gun to be wrapped around my FIRST superlative plunger head. Thousands and thousands of rounds later, it catches and seals perfectly.
Q: How solid is this thing? [insert quibble about part] looks wobbly/flimsy to me.
A: It's a rock. I've messed with +bows, including some pretty nice ones, and I can confidently say that durability-wise, this is far superior to those or any other nerf gun I've seen. The only parts that could possibly get knocked loose are in no way essential to the working of the gun, as well (no, I've never lost a stock or an accessory rail, including those held by hot glue alone). If you somehow suffer a trigger or plunger malfunction (those are the only moving parts), a spare can be installed in less than 2 minutes.
Q: Is it comfy?
A: Yes. Of course, you can make the handle any shape you want, or modify the simple design I use by sanding it down, and/or adding a shaped piece of wood to the back.
Q: Raaanges. Tell me about the raaaaanges.
A: An elegant sufficiency. With the right darts and barrels, it should easily pass the 100' mark with slugs.
Also, you can cover them with tape and shit.

Start with a 1 1/4" coupler. Grind out the center ring, then cut 1/4 of the coupler away.
Cut your handle at a slight angle, making sure the top is flat (or concave to match the coupler section) and all sharp edges are nice and comfy. Tack on the handle. Make sure it's straight. Drill pilot holes (1/8" or a bit less), then add your screws.
Snap it on the PC, butt it up against the trigger, and wiggle it side-to-side. This creates a couple of marks where the screw heads need to go.
If you love the taste of PVC dust, feel free to dremel out a groove, but I just drill a couple of 7/16" holes, like so.
Now's a fine time to add your vent hole as well.
The handle should be butted against the back of the trigger, holding the trigger in place and preventing overtravel. Solvent weld the handle in place, making sure the entire internal surface of the coupler is coated with solvent weld.
Plunger Assembly:
Make your superlative plunger head. Mount on your plunger shaft, using 2 screws or a pin. Add your spring, drill out your ¾” endcap, and add your handle.
Lubricate with silicone grease, and nothing but silicone grease. Insert into the PC, make sure the endcap is flush with the end of the PC, and drill a hole all the way through the handle, PC, and endcap on each side. Screw it down. To disassemble, you need only to undo these screws. Add a barrel and shoot people.
Optional Stock: Cut a 6" piece of 3/4" PVC at an angle. Nest a 3/4" dowel inside it with e-tape. Add a buttplate (I just use a couple of fitings and a bit of 1/2" PVC). Dremel out a groove to fit the trigger's zip tie. Glue the whole assembly on. It should be offset toward you slightly to prevent cheek diddle (a righty's stock should be cocked 1/2" or so to the left).
Optional Rail: Cut a piece of 1/2" PVC to fit under the PC, in front of the trigger. Glue it on. Now, things can snap on and off your gun.
Maintenance: Re-lube infrequently. Pull the plunger and wipe it down occasionally, to remove any accumulated grime. I recommend priming by holding the foregrip in your non-dominant hand, and pulling back with your dominant hand. Use a long, tight barrel--I use 16” of cpvc, lubricated with silicone spray.
Inevitable Questions:
Q: Rork, why did you not use TantumBull's Pre-eminent plunger head?
A: I tried. It sealed less well, caught less reliably, and created more friction. It sure does look pretty, though.
Q: How good IS the seal on these things? Those washers sure are primitive.
A: Generally, if you make it properly, you can fire it with your hand pressed tightly over the output, and the plunger will stop.
Q: One more plunger head question: How well do those things last? Does the epoxy putty wear down?
A: Hell of a long time, and no, respectively. To put it in perspective, my current SNAPbow is the third gun to be wrapped around my FIRST superlative plunger head. Thousands and thousands of rounds later, it catches and seals perfectly.
Q: How solid is this thing? [insert quibble about part] looks wobbly/flimsy to me.
A: It's a rock. I've messed with +bows, including some pretty nice ones, and I can confidently say that durability-wise, this is far superior to those or any other nerf gun I've seen. The only parts that could possibly get knocked loose are in no way essential to the working of the gun, as well (no, I've never lost a stock or an accessory rail, including those held by hot glue alone). If you somehow suffer a trigger or plunger malfunction (those are the only moving parts), a spare can be installed in less than 2 minutes.
Q: Is it comfy?
A: Yes. Of course, you can make the handle any shape you want, or modify the simple design I use by sanding it down, and/or adding a shaped piece of wood to the back.
Q: Raaanges. Tell me about the raaaaanges.
A: An elegant sufficiency. With the right darts and barrels, it should easily pass the 100' mark with slugs.
Also, you can cover them with tape and shit.
#286319 Snapbow Mk. V, Revised
Posted by
on 01 October 2010 - 12:29 AM
in
Homemades
I have revised a few things in regard to this gun, and took some good photos that should make the writeup easier to follow.
SNAPbow Mk. V.
Materials Needed:
Main Blaster Body:
12 1/2" 1 ¼” sched. 40 pvc
1”x½” bushing
Handle/Stock:
#8x1 ½” screws (2)
1 1/4" PVC coupler
1x2 Poplar board (or the handle material of your choice)
6” ¾” sched. 40 pvc
¾” hardwood dowel (I prefer poplar, to match the handle)
½” pvc tee OR elbow
½” pvc 45 OR elbow
Trigger:
Industrial-strength clothespin
Roofing nail
4” zip ties (2)
8” zip tie
1 ½ “ angle bracket
Plunger Assembly:
Superlative plunger head
1 1/2" cpvc endcap
2 11/4" OD steel fender washers
1 appropriately sized nylon spacer (look at the photo)
1 #6 11/4" bolt
1 11/4" rubber fender washer
1 11/2" rubber fender washer
1 #8 finishing washer
1 #6 wing nut
12" of ½” cpvc
½” cpvc T
¾” pvc endcap
[k26] spring
Adhesives, screws, and so on:
Epoxy Putty
CA glue/Solvent weld
Goop
Hot glue
#6 ½” pan head sheet metal screws.
Tools:
You have to have a hacksaw and a drill. A dremel, a pair of PVC shears, a sturdy pair of pliers with a wire cutter, and a hobby knife are all highly recommended.
Main Body:
Cut your pressure chamber to length: 12 1/2". Wrap your 1” bushing in etape until it fits reasonably snugly in the pressure chamber (PC hereafter). Slather it with goop and seat it. Anchor it with 3 screws. Measure 8 1/2" from the front of the PC (NOT the front of the bushing) and drill the hole for your trigger pin.
Trigger Assembly:
Cut your clothespin down, fill with epoxy putty, drill, and assemble--pretty basic stuff.


Make sure the pin is cut long enough; the superlative head fits the PC more loosely than does a traditionally made SNAP head, and a too-short pin is an invitation to catch slippage. Zip-tie the trigger on. No glue is necessary, although gooping it on is fine too.
DON'T POST YET FOR CHRISSAKES
#286297 Homemades Picture Thread
Posted by
on 30 September 2010 - 03:17 PM
in
Homemades


I should do a write-up for these...
#286102 Etno (east Tennessee Nerf Dealio)
Posted by
on 26 September 2010 - 06:53 PM
in
Nerf Wars
MAJOR UPDATE: Chain's got a location nailed down, so this thing is on.

