I definitely agree that the FAR (and the SCAR for that matter) are not very practical at all. No argument there. I tried to fix a lot of the deficiencies in my last rifle.
I definitely wasn't trying to shoot holes in your judging methodology. It's your contest so you are free to run it however you please, and I do think it's setup quite well as is. I was just making some observations and offering some experience. I deal with specifications and requirements provided by the military which in turn we use to develop concepts and downselect. Being the military, the requirements are very specific and mostly quantitative, but even so, there is always subjectiveness and personal bias that has to be dealt with when selecting the true superior design.
I think this could simply be handled by including an example of the judges definition of an "ideal" blaster in the contest definition
boltsniper's Content
There have been 576 items by boltsniper (Search limited from 03-December 96)
#298156 NIC Homemades Creation Contest
 Posted by
on 15 May 2011 - 07:19 PM
in
News
Posted by
on 15 May 2011 - 07:19 PM
in
News
#298078 NIC Homemades Creation Contest
Posted by
on 14 May 2011 - 04:06 PM
in
News
I think this a great idea.
It is going to be tough to remain objective while judging the entries. The categories have the potential to be vary subjective and personal biases could creep in very easily. You have multiple judges which is great to reduce that effect. I'm slightly worried though because a lot of the comments to this thread have a lot of personal bias associated with them. I work in R&D and conept design for a living and you really have to distance your personal opinions from the facts when deciding on a superior design. It is hard sometimes. I would suggest developing as many quantitative ways to judge the categories as possible.
"War effectiveness" is almost purely subjective and will vary widely from person to person based on their style of play. The types of play can be so different and something that is effective in one is not in another.
I'm surprised to see no stand alone "performance" category. I see that you have rolled that into "war effectiveness" but to me they can be two independent entities. IT can surely be accomplished the way you have it setup though.
I built the FAR and GNS (and SCAR-N and NTS minus the SLA parts) on top of my dryer in my apartment with nothing more than a dremel and other extremely cheap, available, and [i]non-kickass tools. And I wouldn't call PVC and balsa kickass materials either. They are mechancically complex and not quickly reproducible, but they don't take anything more than skill and dedication to pull off.
I did some relatively extensive plans for the FAR, but no step-by-step instruction manual. Do people really need something so detailed that it tells them to pick up the knife with their right hand or to stop at certain points and take shits? Come on...
I personally don't see the desire in replicating someone else's work to a tee. To me it seems much more desirable to take the design elements of something and implement it in a way that you personally are able to and want to. Because I am using an SLA machine or a lathe to make parts doesn't mean they couldn't be accomplished to the same effect through different means. Too many people have the mindset that if they don't have access to those same tools so there is no way I could attempt that. I claim complete bullshit on that.
I look forward to seeing what comes of this. Should be interesting.
It is going to be tough to remain objective while judging the entries. The categories have the potential to be vary subjective and personal biases could creep in very easily. You have multiple judges which is great to reduce that effect. I'm slightly worried though because a lot of the comments to this thread have a lot of personal bias associated with them. I work in R&D and conept design for a living and you really have to distance your personal opinions from the facts when deciding on a superior design. It is hard sometimes. I would suggest developing as many quantitative ways to judge the categories as possible.
"War effectiveness" is almost purely subjective and will vary widely from person to person based on their style of play. The types of play can be so different and something that is effective in one is not in another.
I'm surprised to see no stand alone "performance" category. I see that you have rolled that into "war effectiveness" but to me they can be two independent entities. IT can surely be accomplished the way you have it setup though.
The FAR and Abp5k were awesome sights to behold. And they had about zero practical impact on the Nerf scene.
The +bow and SNAP were not nearly as "awesome" in comparison. But they revolutionized Nerf. Because they were simple enough that people could fucking replicate them.
If you remove the Difficulty/Repeatablity and Cost/Labor incentives of the contest, you effectively shit all over amateur homemade builders who don't have access to kickass tools and materials.
I built the FAR and GNS (and SCAR-N and NTS minus the SLA parts) on top of my dryer in my apartment with nothing more than a dremel and other extremely cheap, available, and [i]non-kickass tools. And I wouldn't call PVC and balsa kickass materials either. They are mechancically complex and not quickly reproducible, but they don't take anything more than skill and dedication to pull off.
But you're making a write-up on how to make the blaster. The Abp5k, FAR, and all of the blasters of the like had no impact because they had no write-up
I did some relatively extensive plans for the FAR, but no step-by-step instruction manual. Do people really need something so detailed that it tells them to pick up the knife with their right hand or to stop at certain points and take shits? Come on...
I personally don't see the desire in replicating someone else's work to a tee. To me it seems much more desirable to take the design elements of something and implement it in a way that you personally are able to and want to. Because I am using an SLA machine or a lathe to make parts doesn't mean they couldn't be accomplished to the same effect through different means. Too many people have the mindset that if they don't have access to those same tools so there is no way I could attempt that. I claim complete bullshit on that.
I look forward to seeing what comes of this. Should be interesting.
#296268 Bs-12 Advanced Tactical Nerf Rifle
Posted by
on 19 March 2011 - 03:30 PM
in
Homemades
I for one have pushed a nerf dart past mach 1. The result is a shower of nerf dart confetti after about 10 feet.
This was accomplished by using a lighter than air gas, at around 2500 psi. The sound was insane.
Yeah, I wouldn't really expect a dart to survive it.
#295976 Rpmbnb! Updated With More Goodies!
Posted by
on 13 March 2011 - 09:24 PM
in
Homemades
Just noticed this thread. Nicely designed and prototyped gun there.
It's pretty awesome you are allowed to churn out kits at what seems like a reasonable price.
The stereolithography machine I used to manufacture the BS-8 and BS-9 magwells ran about $100 per hour of build time. Those 2 parts took about 8-10 hours a piece to complete so if I didn't have unlimited access to the machine then they would have cost around $1000 each. Far out of the question for a Nerf gun.
My experience with FDM never created parts that were worthy of actual use. The SLA and SLS methods both produced parts that were much more homogeneous and fit for actual use....but they cost much more mainly due to laser time rather than material cost.
#295836 Bs-12 Advanced Tactical Nerf Rifle
Posted by
on 11 March 2011 - 08:51 PM
in
Homemades
Anyways, are the ranges given using a setscrew in the dart boltsniper?
No, range is with a stock dart. Range with a weighted dart is not that much different though.
#295755 Bs-12 Advanced Tactical Nerf Rifle
Posted by
on 10 March 2011 - 11:13 PM
in
Homemades
The code does assume a ballistic trajectory...one without swerving and spiraling, etc. You just have to choose your darts carefully. Straight stiff uniform darts will give a pretty good ballistic trajectory.
I agree about the mass. What I like doing is take a 6-32 1/4" setscrew and shoving it through the hole in the tip of a streamline into the cavity in the dark orange rubber tip. You can fit 2 in there but 1 does a world of good and doesn't add a huge amount of weight .
The gun delivers the same amount of energy to the dart regardless. So if the dart weighs more... than the muzzle velocity drops. What's interesting is seeing this when you punch the dart weights and velocities into the codes and the muzzle energy never changes. Impact energy changes though as the momentum does increase with dart mass.
#295671 Bs-12 Advanced Tactical Nerf Rifle
Posted by
on 09 March 2011 - 05:34 PM
in
Homemades
Is the FPS constant? How much does it vary from shot to shot?
It's dependent on the dart diameter. Good new fat darts get in the 190's pretty consistently. In general it varies from 175 to 195.
What psi does this take (from the compressor)?
It runs great at anything above 90#. The higher it is the faster it cycles. Under 90 it starts cycling slowly and if it gets too low it will not retract far enough to trip the valve off so it will just sit there and vent.
If you had to give an educated guess, what is the cost of materials for your final version?
Hard to say an exact figure. I keep a lot of raw materials on hand so I didnt procure much for this
Estimates
Aluminum: ~$120
PVC: ~$5 (negligible amount)
Polycarbonate: ~$40 (I did buy a square foot of 1/2" polycarbonate for use on this, which isn't cheap)
Teflon: $30 (had to buy a square foot of this too)
Valve: $40 (yeah, expensive ass valve)
Screws: $15
Steel: ~10 (negligible amount)
Other Random parts: ~50
So that's $310. But considering the cost of the teflon and polycarbonate is non recurring and that I could feasibly build more without making those expenses again, The actual cost per rifle in materials is probably around $200
Is there any chance of getting detailed plans on this or the CAD files perhaps?
Yeah I can upload and IGS or STP file of the model probably. The model is 95% accurate to the real thing. I didnt bother running tubing lines or springs or a few other details.
Would you have/will you have design plans for people who do have the machining capabilities to make this?
I doubt I will ever do detailed drawings for the machined parts, but I can make the model available
Although I may be missing something, when the plunger is pressurized, where does that pressure escape? A interesting project would be to retain that pressure until firing, thus turning the system into a sort of pressurized springer, actuating the breech while having all the benefits of a air pressure blaster.
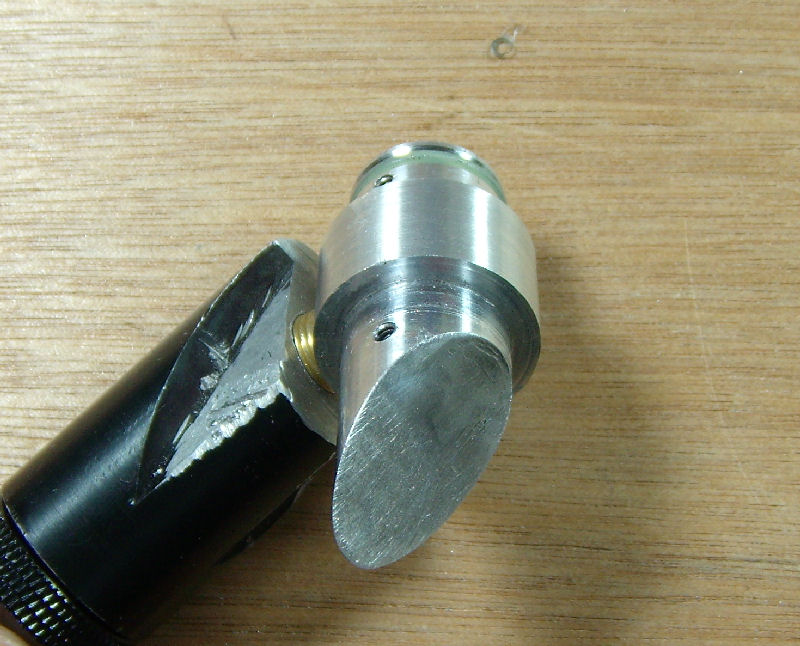
That's what the 3-way valve is for. A standard open-close 2-way would trap the air behind the bolt preventing it from being returned to battery. The 3-way vents the trapped air to atmosphere when it is not activated. SO valve activated the bolt cavity is connected to the air line. Valve deactivated the bolt cavity is vented to atmosphere It makes an audible *PSSH* sound when it vents. You can probably hear it in the videos. I kicked around a few passive venting ideas but all would have reduced effective plunger volume so I dismissed them.
#295608 Bs-12 Advanced Tactical Nerf Rifle
Posted by
on 08 March 2011 - 09:49 PM
in
Homemades
I meant more that there is no use in the hobby for darts over about Mach 0.3, unless someone is out to cause harm.
Totally agree. I was just having some fun with the chrono a while back to see how fast I COULD get one.
Dart Wt: 0.045 oz
Cd is around 0.5
#295605 Bs-12 Advanced Tactical Nerf Rifle
Posted by
on 08 March 2011 - 09:19 PM
in
Homemades
Extremely impressive work, as always. You've been very comprehensive so far, so I don't really have many questions about the gun, but I do still have a few questions.
I'd be interested in seeing your ballistics code as I'm pretty interested in that aspect of Nerf gun design. I'm under the impression that you only analyzed the exterior ballistics. Is that correct?
Also, why did you bother factoring in compressibility? No Nerf dart should be fired over about Mach 0.3. Assumption of incompressibility are perfectly accurate in my experience for exterior ballistics. Interior ballistics is a different story, however; the wave propagation process can be ignored for most Nerf guns but the compressibility effects on the properties of the gas can not be. (For some details of that, I have a very simplified non-dimensionalized model of the interior ballistics of a pneumatic gun described here. The springer model and any of my exterior ballistics stuff have not yet been posted.)Three….it is impossible for a spring-plunger type gun to even fire a dart above Mach 1.0.
No, it's possible and it has been done before. A number of spring-plunger pellet guns fire in the supersonic range. Spring-plunger guns are actually a rather decent design for high speed ballistics because the adiabatic compression of the gas increases its temperature, which in turn increases the speed of sound, which in turn allows the gas to expand to refill the space behind the projectile faster, etc.
Yes, the ballistics of the dart after it has left the barrel.
I did it just for completeness. Six years of fluid dynamics told me to... Needed an upper bound and Mach 1.0 is a round number. Also did it to show what the asymptotic limit in range is for a nerf dart.
I have gotten a nerf dart to Mach 0.52 before....
Yes, if you are talking pellet guns etc, it is possible to get an air based gun to fire greater than Mach 1.0. And you are right, it is because of adiabatic heating and other compressible properties that you alluded to. I was referring to a nerf dart specifically. You could probably get a dart over 1.0 due to the same reasons but it isn't going to be by much.
#295593 Bs-12 Advanced Tactical Nerf Rifle
Posted by
on 08 March 2011 - 08:07 PM
in
Homemades
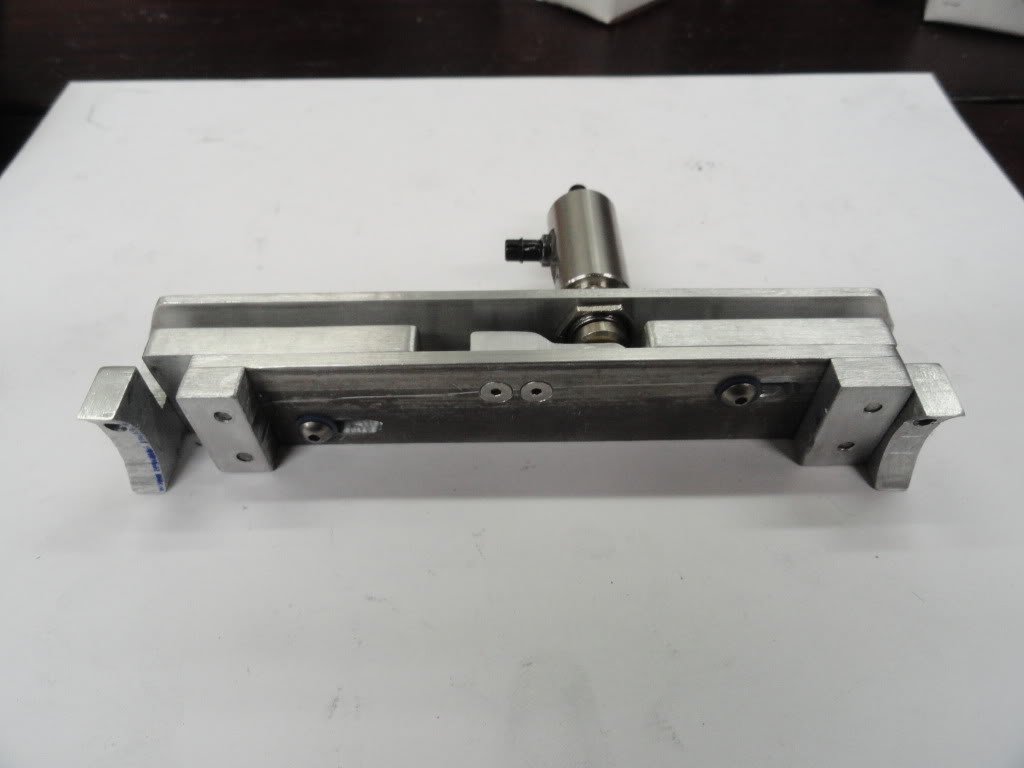
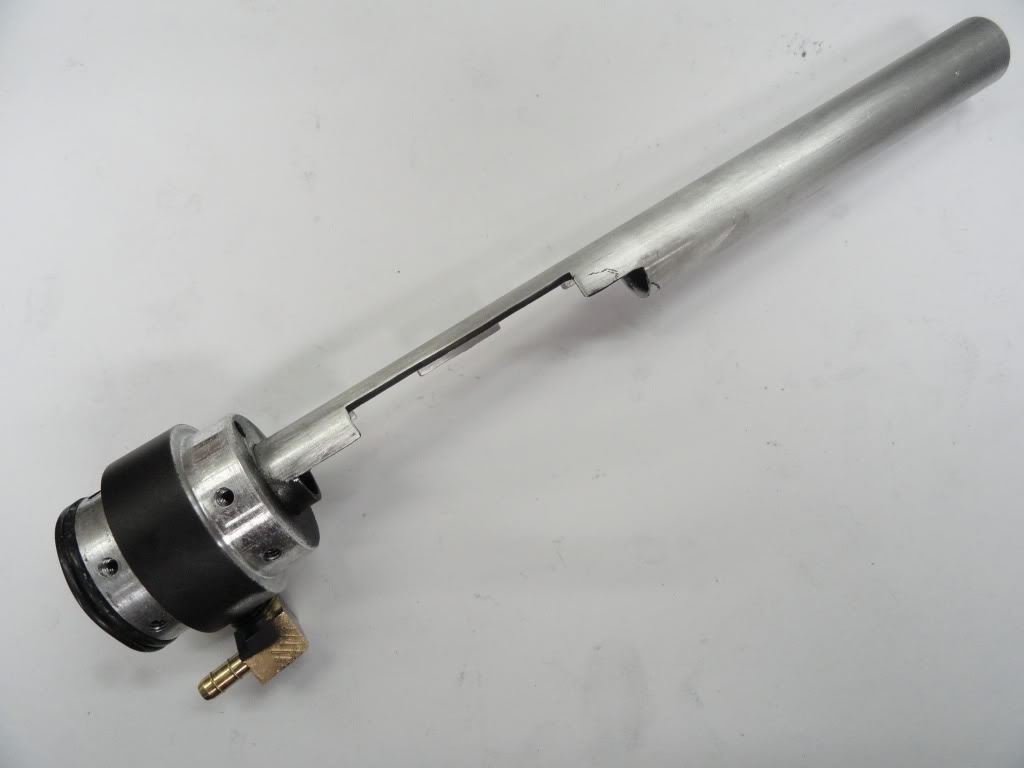
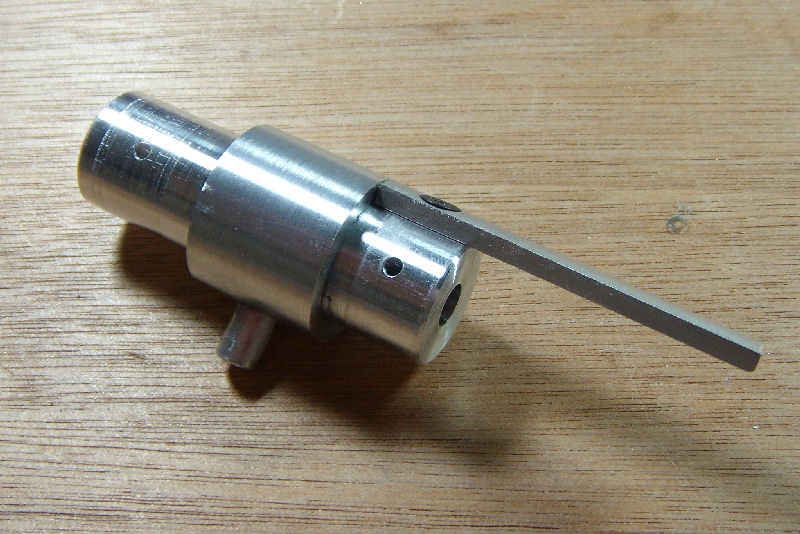
AUTO VALVE
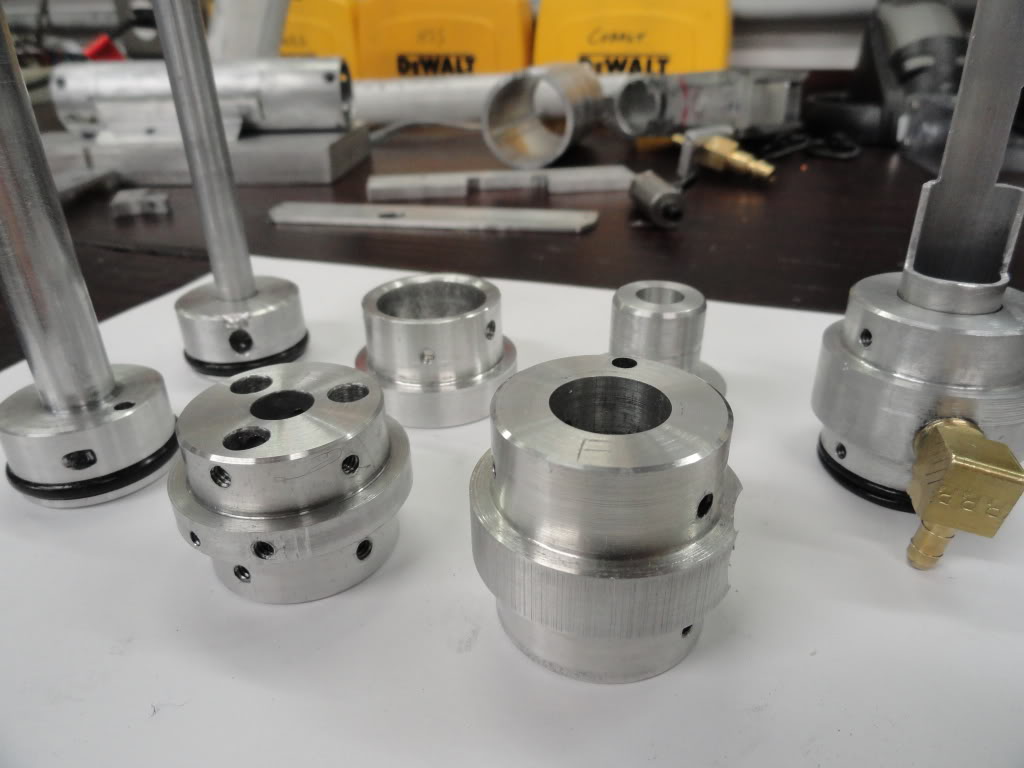
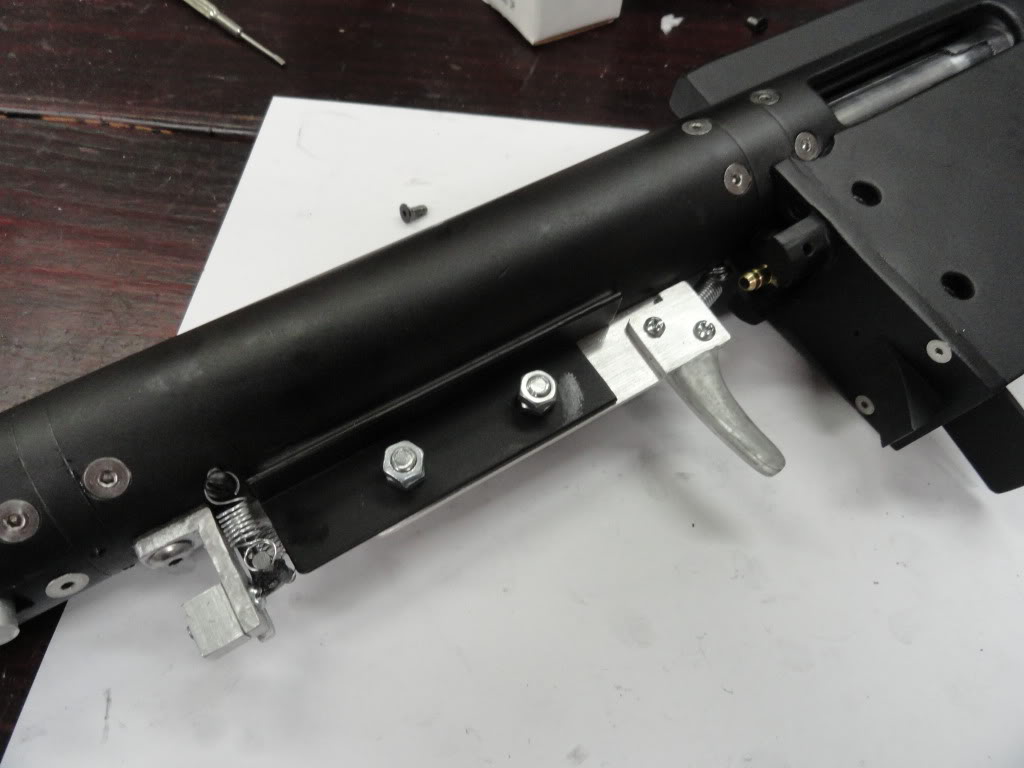
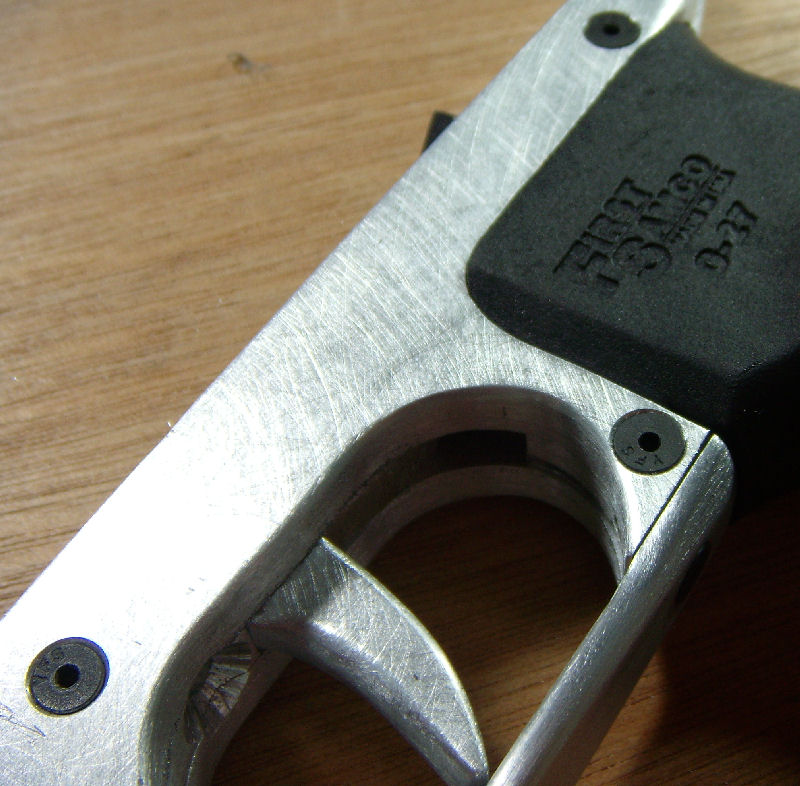
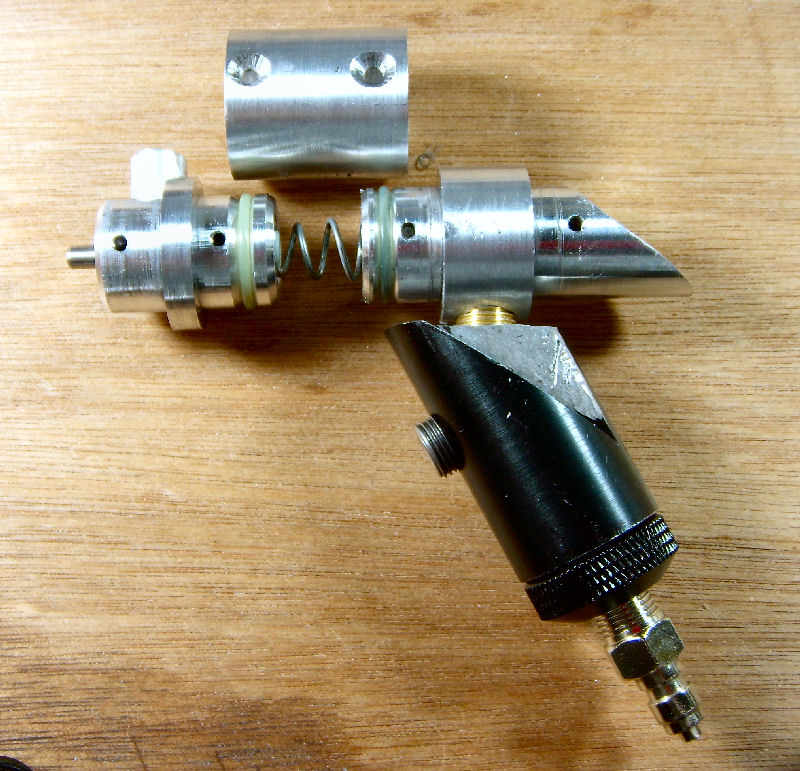
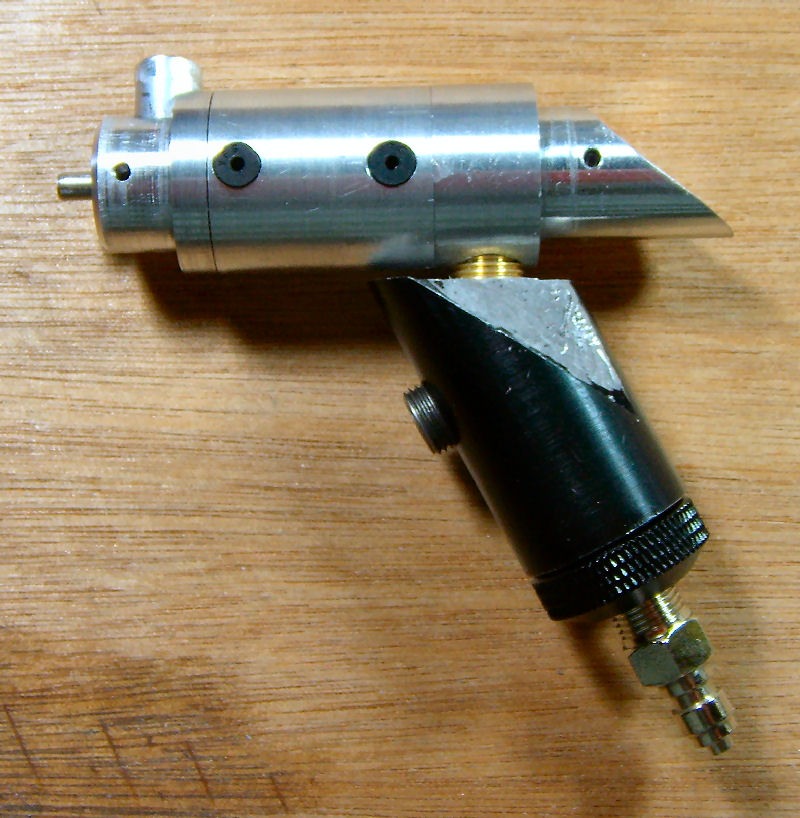
The auto-valve assembly sits at the back of the rifle on the underside of the receiver inside the stock. The actual air valve is a 3-way push-button valve that allows the bolt cavity to be open to atmosphere while the bolt is cycled forward to vent the trapped air. When activated compressed air is forced into the bolt cavity to retract the bolt and cycle the action. The heart of the auto-valve is the slide which activates the 3-way valve. The pin that protrudes from the rear section of the plunger interfaces with the slide.
Auto sequence
1. The rifle is fired and the plunger pin impacts the front of the autovalve slide and pushes it forward opening the air valve.
2. The bolt is retracted under air pressure
3. When the bolt (and plunger) reach full retraction the plunger pin hits the back side of the auto-valve slide and shuts the air valve off. The plunger is now cocked
4. The action spring (surgical tubing) pulls the bolt back into battery cycling a dart into the chamber
5. Ready to fire
Air is supplied to the rifle through a retractable air line connection. When not needed it can be folded back up into the stock so as to not get caught on anything. From the air line connection air flows to the 3-way valve through ¼” vinyl tubing. The same size tubing carries the air from the 3-way up through the pistol grip and into a fitting in the bottom of the bolt/barrel interstage.

VIDEOS
Demoing the Pump-action function
http://www.youtube.c...h?v=PecpzdBJPKM
Details of the fire control system
http://www.youtube.c...h?v=NUbjqgbV2TY
Testing/Demoing the Semi-auto function
http://www.youtube.c...h?v=eVNfWWy7_e8
Firing in semi-auto mode
http://www.youtube.c...h?v=TSEx7DPkQ7g
Firing some more in semi-auto mode
http://www.youtube.c...h?v=iY779Do6I_U
Walk around the rifle
http://www.youtube.c...h?v=AFtXuOr9APk
Semi-auto detail
http://www.youtube.c...h?v=-zuEMfpNvqY
Chrono shot clocked at 191.8 ft/s
http://www.youtube.c...h?v=-Uwl-zRl8vM
4 cups with 4 shots semi-auto (forgot to disconnect the pump handle so it moves with the bolt. )
http://www.youtube.c...h?v=1ZnwDtJ_llQ
5 cups with 4 shots semi-auto
http://www.youtube.c...h?v=3d0p3gubOHk
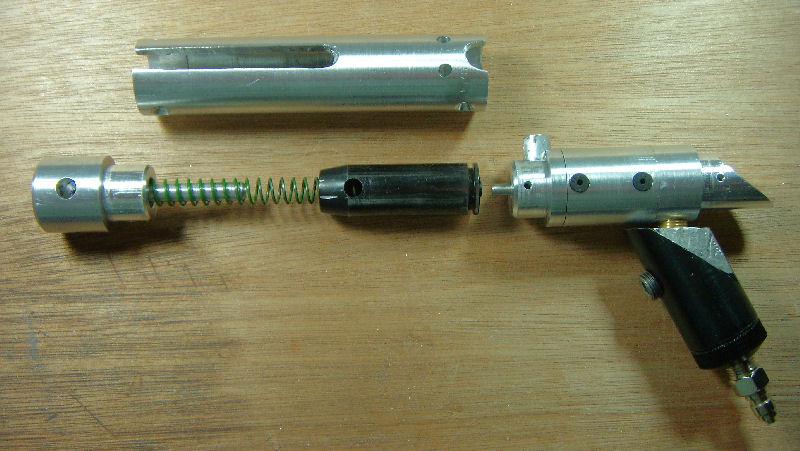
MORE PICTURES


I’ve left a ton out so feel free to ask questions. I can also post any specific pictures and videos if anyone wants more.
A few more pictures can be found in the photobucket album
http://s681.photobuc.../eneblett/BS12/
The auto-valve assembly sits at the back of the rifle on the underside of the receiver inside the stock. The actual air valve is a 3-way push-button valve that allows the bolt cavity to be open to atmosphere while the bolt is cycled forward to vent the trapped air. When activated compressed air is forced into the bolt cavity to retract the bolt and cycle the action. The heart of the auto-valve is the slide which activates the 3-way valve. The pin that protrudes from the rear section of the plunger interfaces with the slide.
Auto sequence
1. The rifle is fired and the plunger pin impacts the front of the autovalve slide and pushes it forward opening the air valve.
2. The bolt is retracted under air pressure
3. When the bolt (and plunger) reach full retraction the plunger pin hits the back side of the auto-valve slide and shuts the air valve off. The plunger is now cocked
4. The action spring (surgical tubing) pulls the bolt back into battery cycling a dart into the chamber
5. Ready to fire
Air is supplied to the rifle through a retractable air line connection. When not needed it can be folded back up into the stock so as to not get caught on anything. From the air line connection air flows to the 3-way valve through ¼” vinyl tubing. The same size tubing carries the air from the 3-way up through the pistol grip and into a fitting in the bottom of the bolt/barrel interstage.
VIDEOS
Demoing the Pump-action function
http://www.youtube.c...h?v=PecpzdBJPKM
Details of the fire control system
http://www.youtube.c...h?v=NUbjqgbV2TY
Testing/Demoing the Semi-auto function
http://www.youtube.c...h?v=eVNfWWy7_e8
Firing in semi-auto mode
http://www.youtube.c...h?v=TSEx7DPkQ7g
Firing some more in semi-auto mode
http://www.youtube.c...h?v=iY779Do6I_U
Walk around the rifle
http://www.youtube.c...h?v=AFtXuOr9APk
Semi-auto detail
http://www.youtube.c...h?v=-zuEMfpNvqY
Chrono shot clocked at 191.8 ft/s
http://www.youtube.c...h?v=-Uwl-zRl8vM
4 cups with 4 shots semi-auto (forgot to disconnect the pump handle so it moves with the bolt. )
http://www.youtube.c...h?v=1ZnwDtJ_llQ
5 cups with 4 shots semi-auto
http://www.youtube.c...h?v=3d0p3gubOHk
MORE PICTURES
I’ve left a ton out so feel free to ask questions. I can also post any specific pictures and videos if anyone wants more.
A few more pictures can be found in the photobucket album
http://s681.photobuc.../eneblett/BS12/
#295592 Bs-12 Advanced Tactical Nerf Rifle
Posted by
on 08 March 2011 - 08:05 PM
in
Homemades
Almost a year ago myself and three other guys from work started a competition to build nerf guns. The goals were simple and as follows:
- Must fire standard streamline nerf darts
- Shoot 10 rounds in 10 seconds.
- Hit the back of a car from 80 feet
These goals were intentionally vague so that we the objectives could be approached from many angles. For instance you could shoot 10 darts at once to meet the ROF goal, etc
The actual contest kind of fell through but myself and one other guy continued building. This is my result and he should be finishing his soon and I’m sure he’ll stick it up here as well.
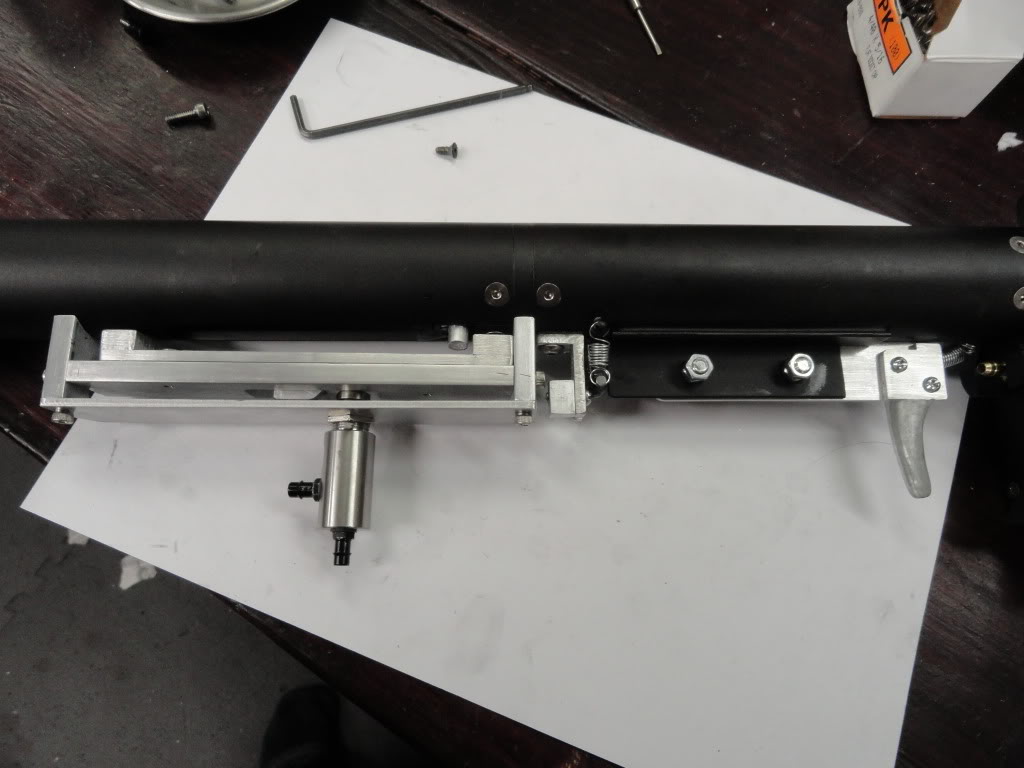
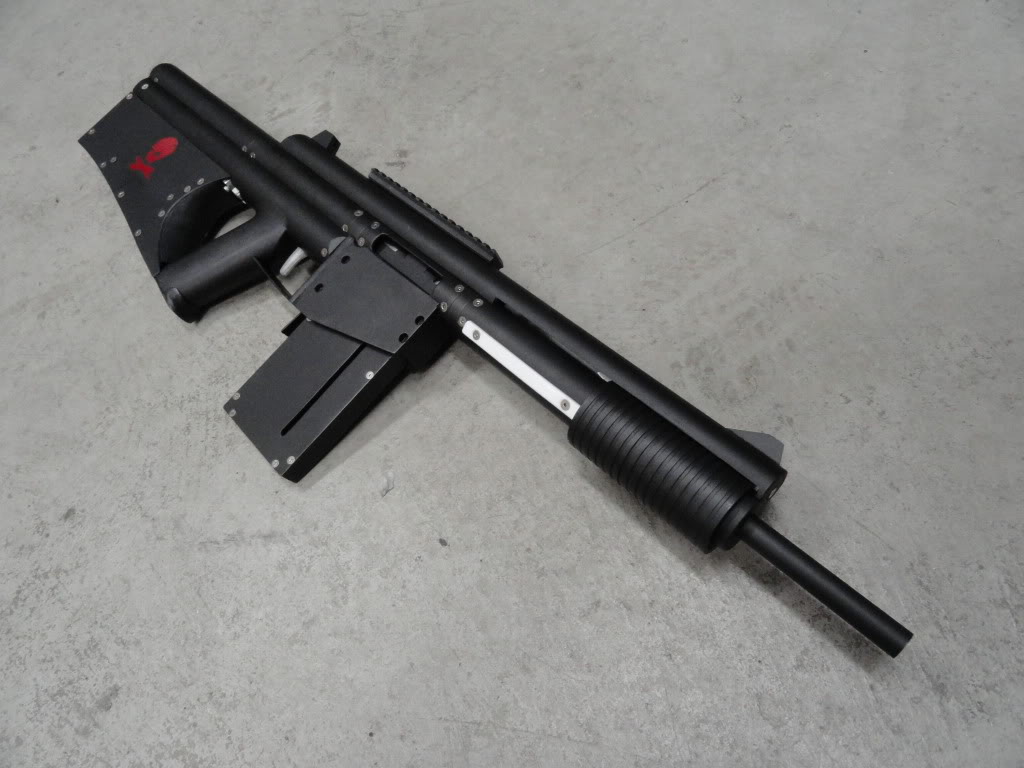
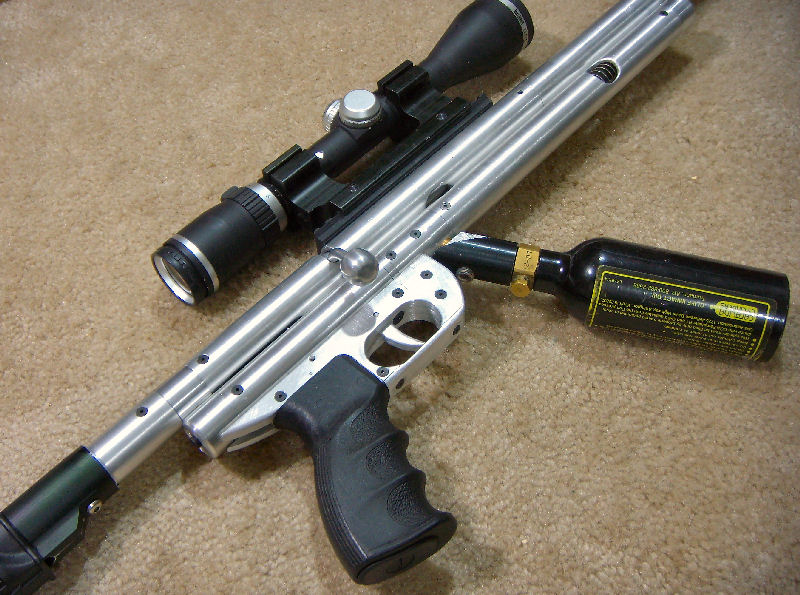
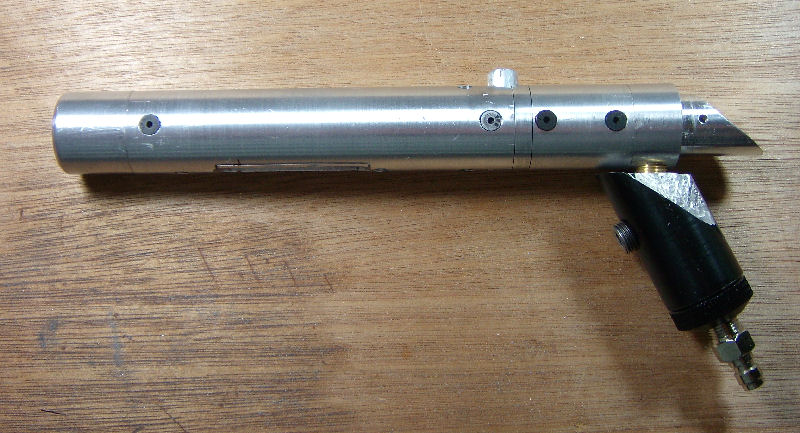
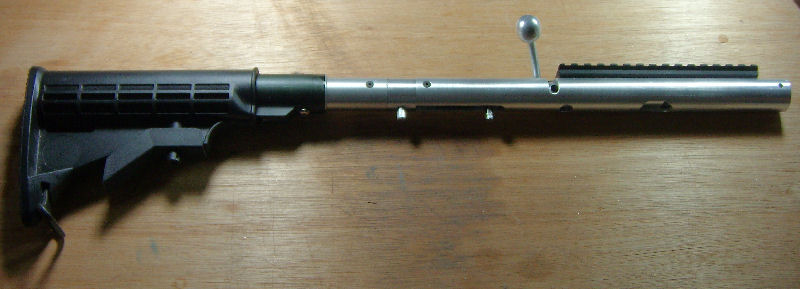
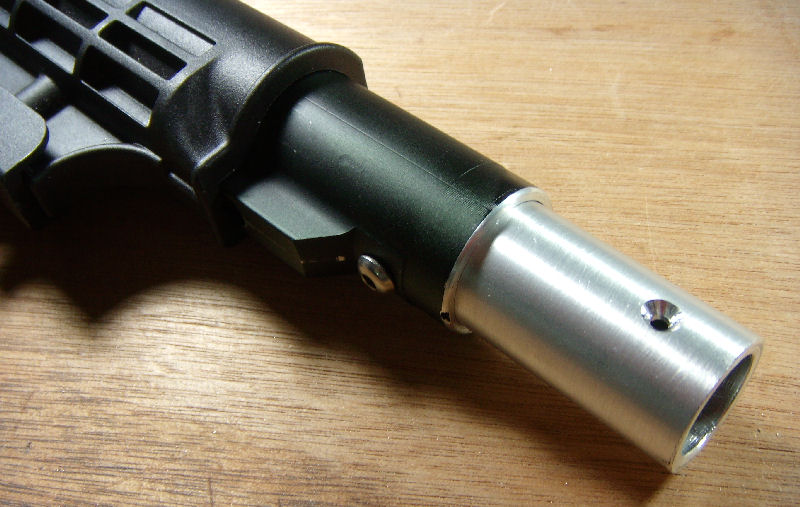
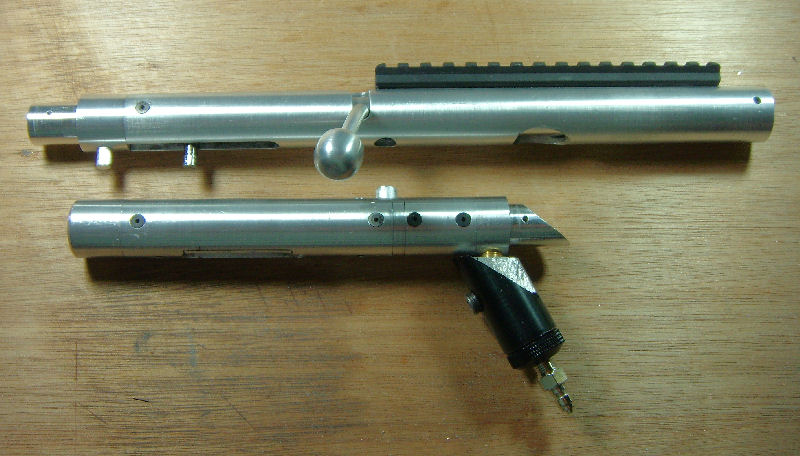
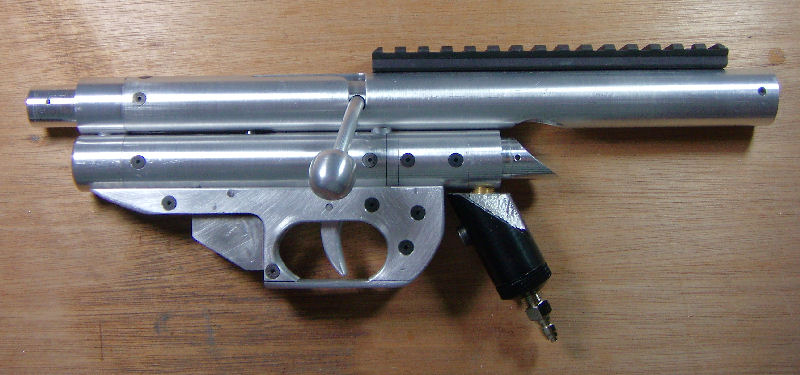
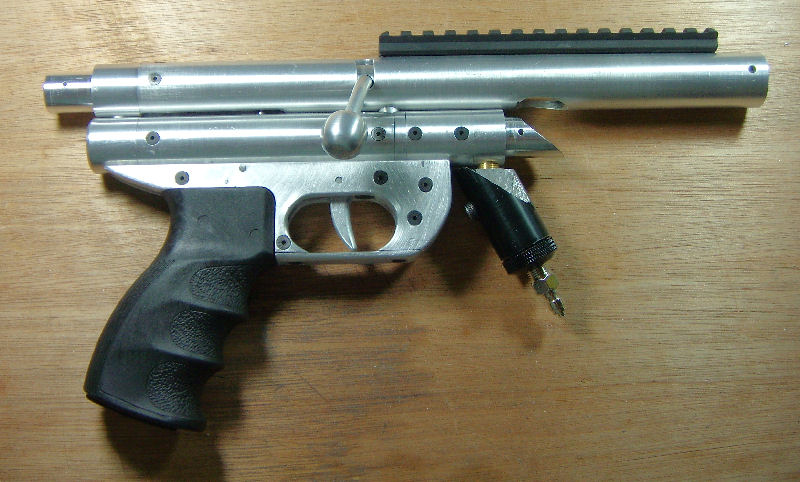
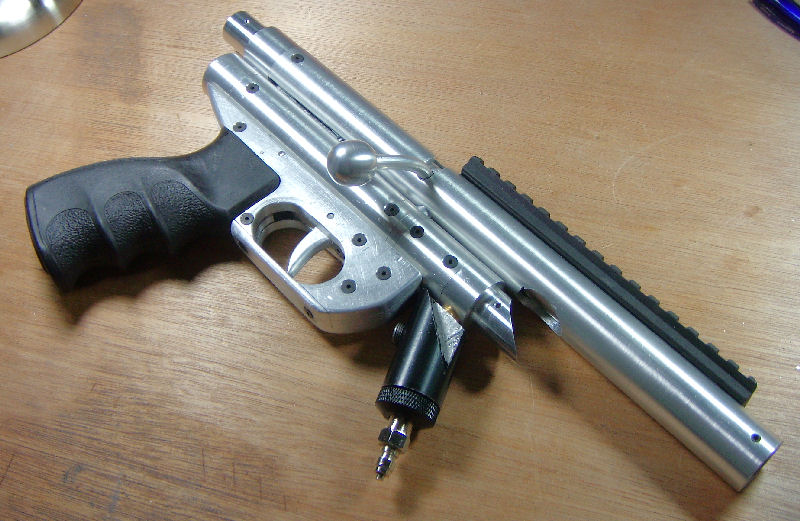
This rifle is the 12th gun I have made, hence BS-12, and I am dubbing it the Advanced Tactical Rifle, or ATR. It’s essentially the same type of rifle as the BS-8 with improvements in design, materials and the addition of semi-automatic cycling.
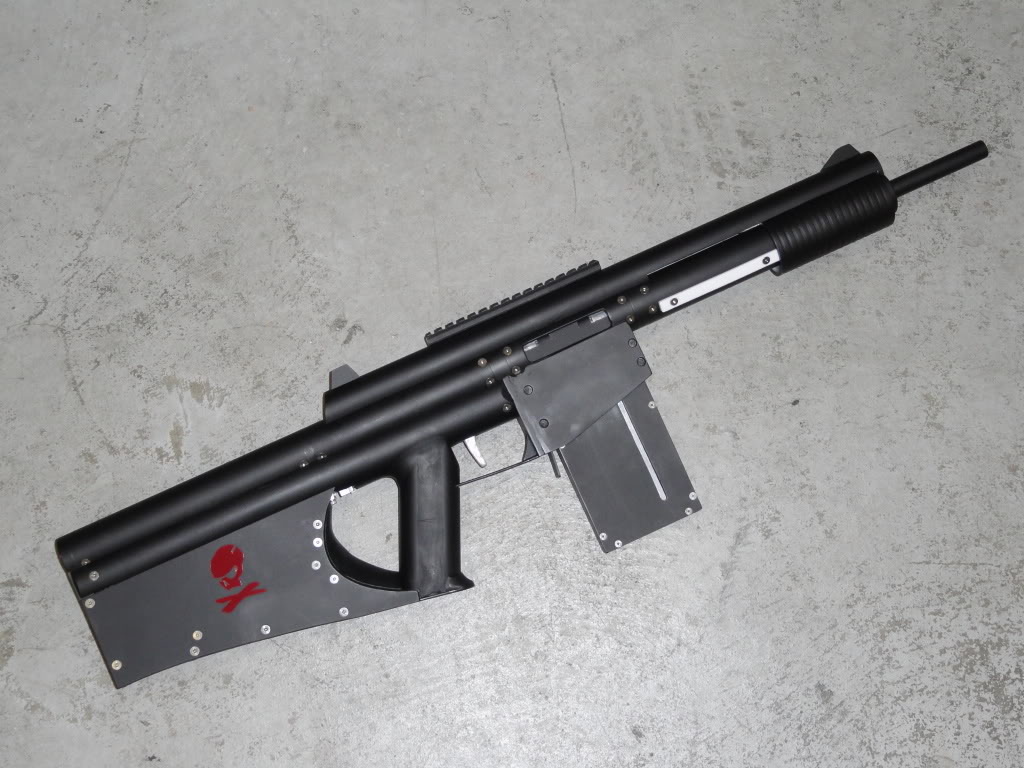
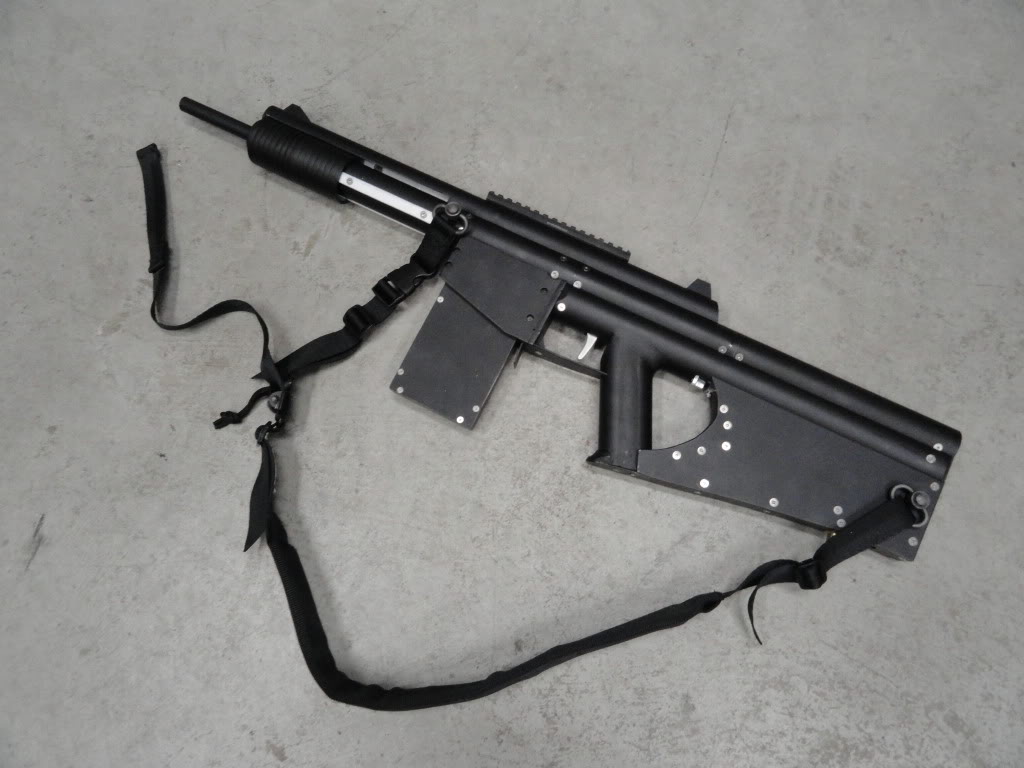
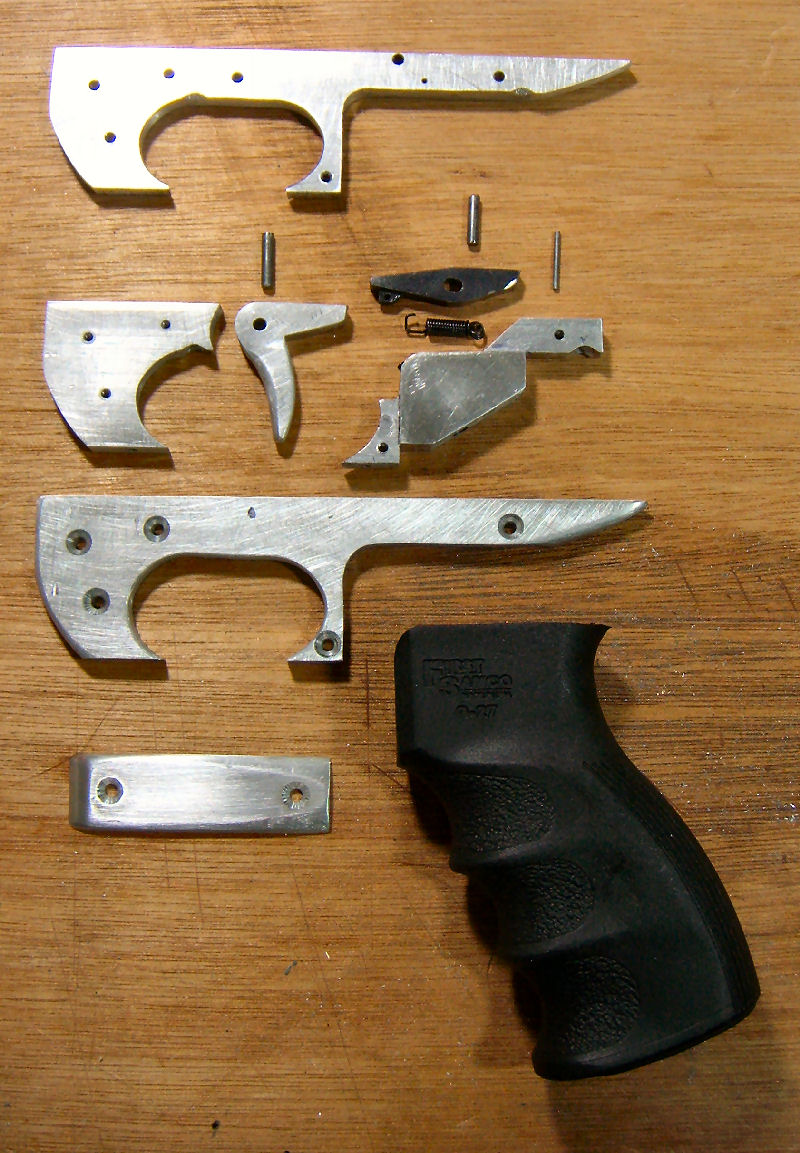
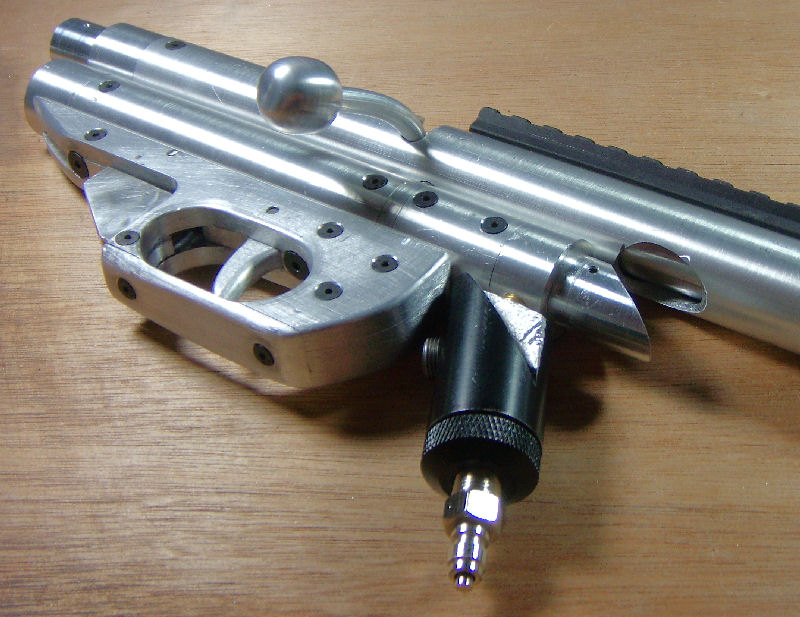
From the start I intended to make this rifle semi-automatic capable. I say capable because I never intended for it to be solely automatic. My vision was for a pump-action rifle with a semi-automatic mode available. Since the semi-automatic action would run off of compressed gas of some sort, I didn’t want it to be solely dependent on an energy supply that may run out, so I wanted it to be manually operable as well. I also wanted this rifle to be much more durable. This meant utilizing tougher materials than PVC and polycarbonate. While I still used both of those materials, the bulk of the rifle is aluminum 6061. Being able to machine the parts to very tight tolerances also lead to better seals which made it perform better and also enabled the auto-cocking function.
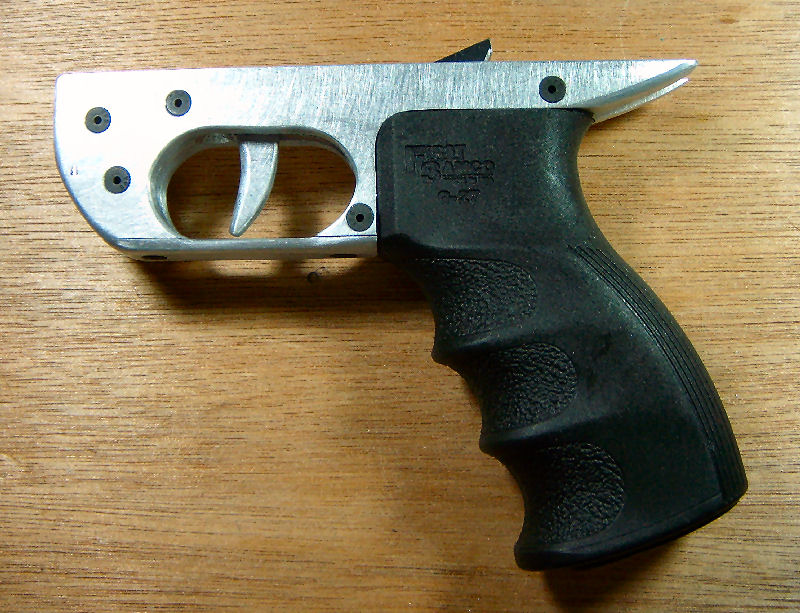
The whole thing is screwed together and with most of them being countersunk. There are over 120 fasteners in the whole rifle. Only a few parts are bonded together…mainly the pistol grip.
It fires streamline clip-system standard nerf darts WITHOUT shells making this rifle much much more practical to use.
What resulted is a detachable magazine-fed, pump-action, spring-plunger rifle which is auto-loading when attached to an external gas supply.
Specs:
Caliber 0.5 in
Plunger Volume 4.91 in3
Plunger Stroke 4 in
Muzzle Velocity 190 ft/s
Overall Length 33 in
Magazine Capacity 12
Rate of Fire
Pump-Action 80 RPM
Semi-Automatic 120 RPM
Range 165 ft
Barrel Length 12 in
Propulsion Hybrid Impulse/Acceleration
Magazine Detachable Bottom Feed
Using a standard chronograph I was able to clock the muzzle velocity. The max I have seen has been 194ft/s but it varies based on the dart. The lowest I have seen is around 170ft/s. In comparison any stock nerf gun will shoot at 45-50 ft/s. Standard mods will get them to around 60ft/s.
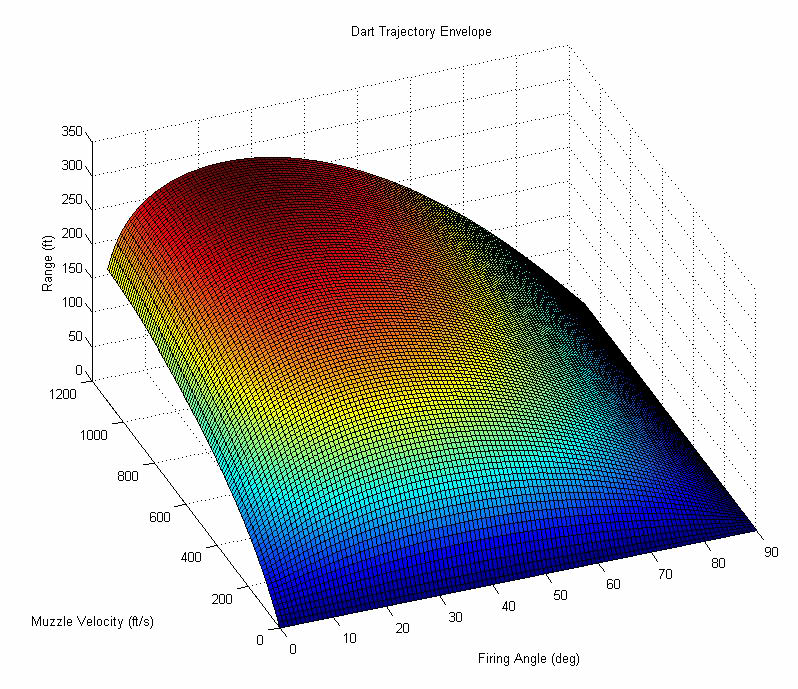
BALLISTICS
During the design of this rifle, I decided to write some programs to simulate the firing of a dart. By doing this and knowing the muzzle velocity of the gun, I can accurately predict the range. In order to compute the drag on the dart from the air I did a combination of simple computational fluid dynamics (CFD) models and empirical tests. I found a good value for the drag coefficient of a streamline dart. Knowing this value the subsonic drag can be computed and ultimately the trajectory. At transonic speeds the drag increases greatly due to shock wave formation. To account for this I applied an exponential increase in the drag from 0.8 Mach up to 1.0 Mach. I did not bother to go above Mach 1.0 for numerous reasons. For one….let’s be serious…no one is firing a nerf dart at the speed of sound. Two…I doubt a nerf dart would survive that velocity. Three….it is impossible for a spring-plunger type gun to even fire a dart above Mach 1.0.
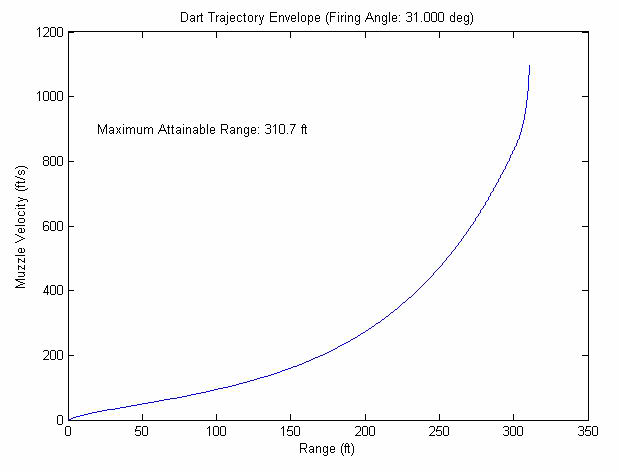
Anyways, the figure below shows the full range envelope for a streamline dart. From 0-90 degrees firing angle and 0-1100 ft/s muzzle velocity.
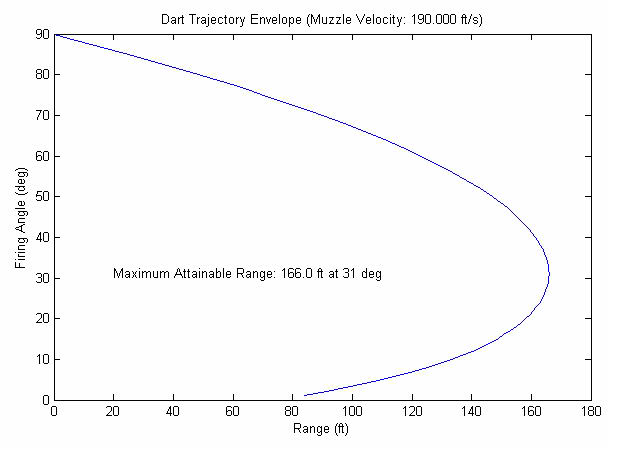
Knowing the muzzle velocity is 190ft/s for the ATR, the range vs firing angle can be plotted to determine the optimal firing angle.
For completion, the plot of range vs muzzle velocity can be made as well. Notice the knuckle in the curve near the end as the transonic wave drag kicks in.
Finally, the actual dart trajectory can be plotted.
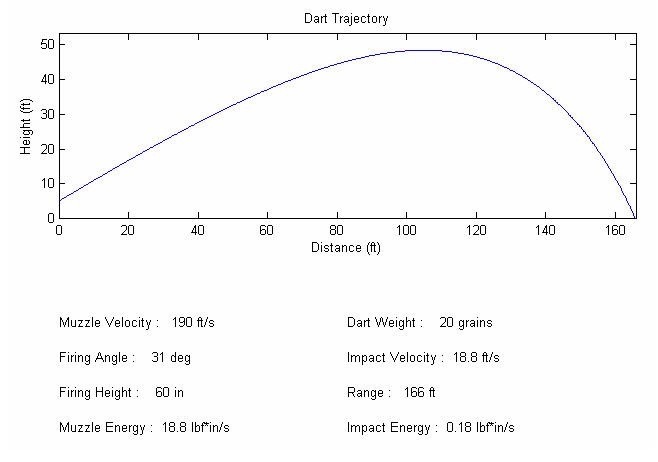
Maximum attainable range for the ATR is 166 feet. This calculated value correlates well with actual shot data.
On a side note, notice the maximum range from the full envelope of just over 300ft. It is physically impossible to fire a stock nerf dart any farther than that.
These scripts were written in MatLab and I am thinking about porting them to Java to make an interactive applet.
TECHNICAL
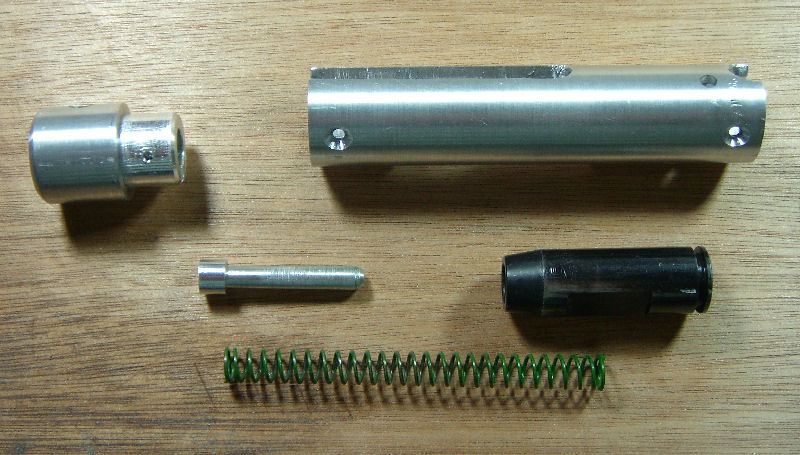
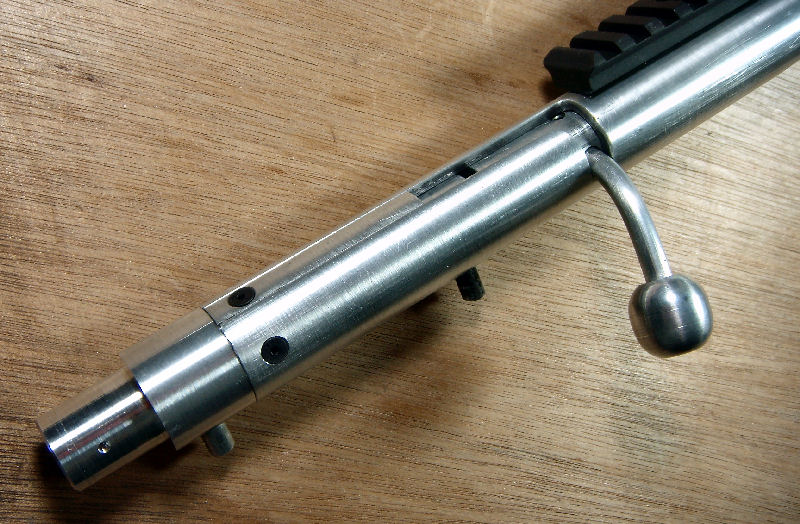
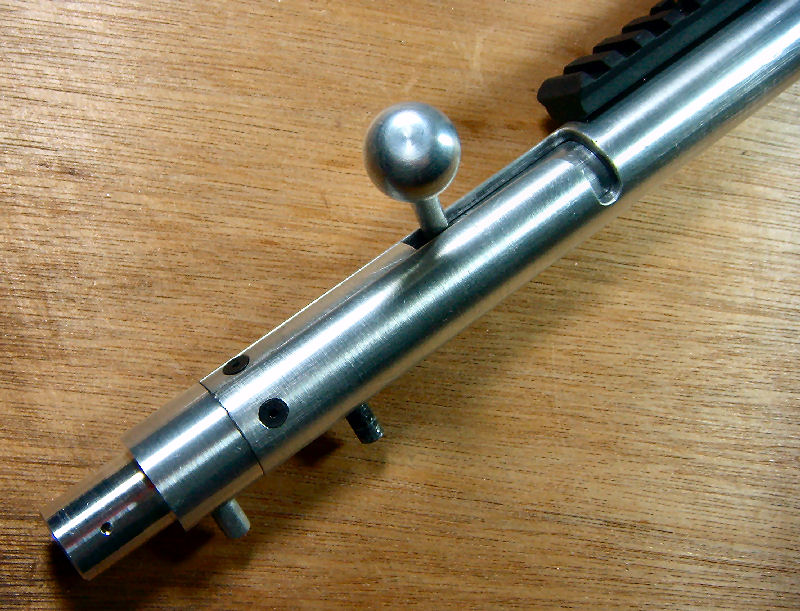
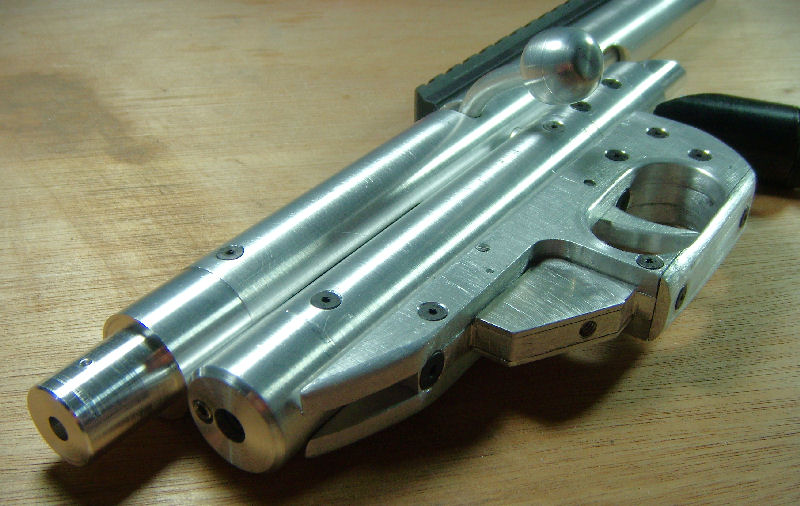
As is typical, this project started with a solid model to layout the major components and determine the primary dimensions. The main portion of the rifle consists of sections of 1.5” OD aluminum 6061 tubing with a wall thickness of 0.125”. The sections are connected together with what I call “interstages”. These are machined from 1.5” 6061 stock. There are four major sections that make up the rifle. Starting from the aft: Main Spring and Auto-valve, Plunger, Bolt/Breach, and Barrel. There are respective interstages between theses four sections.
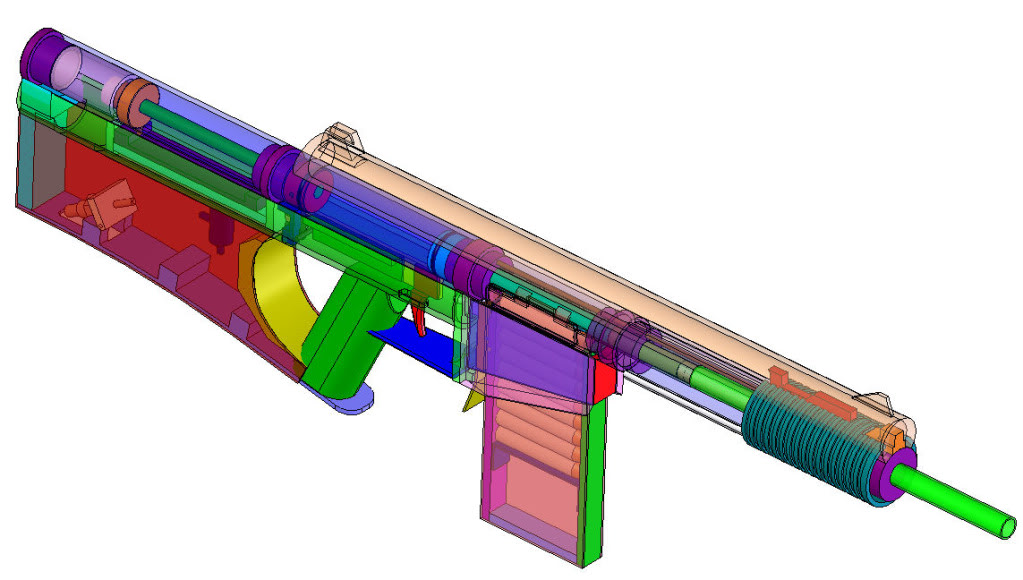

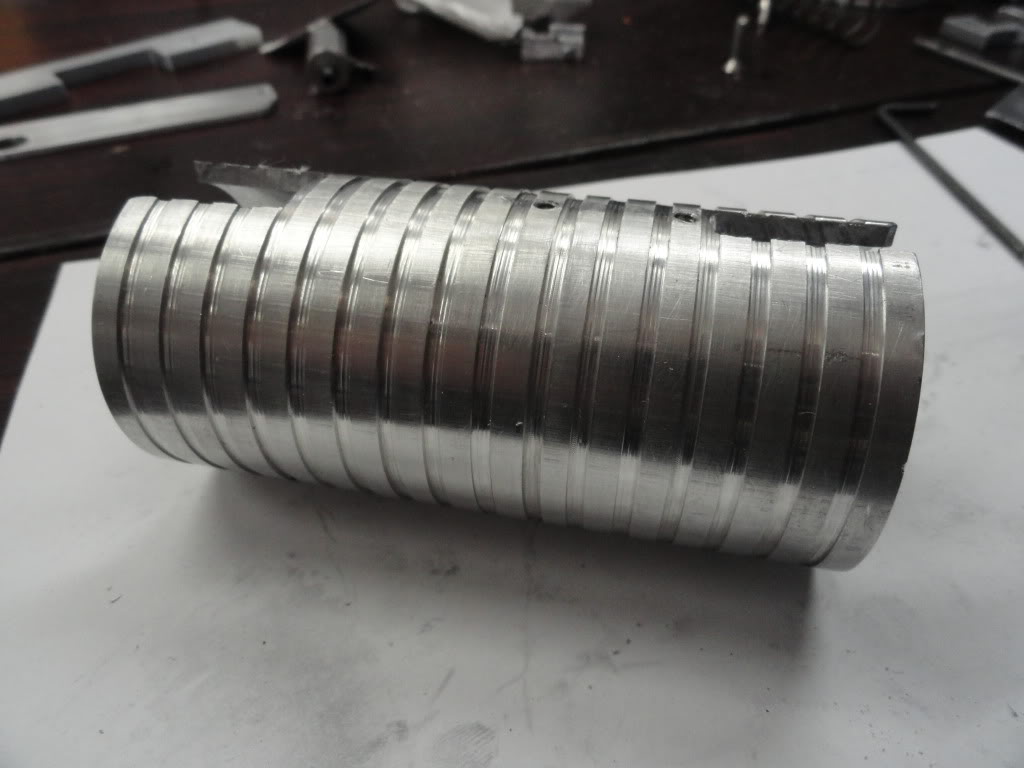
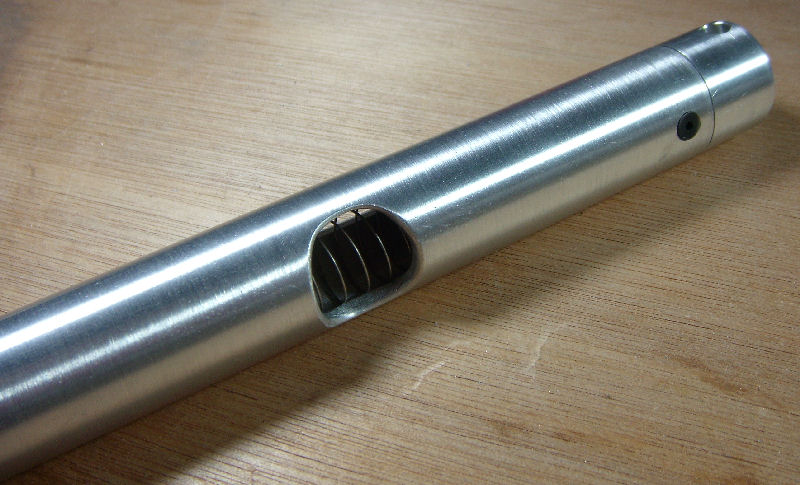
BARREL
The barrel is 6061 aluminum tubing with an inner diameter of 0.53” and a wall thickness of 0.04”. This ID is perfect for near-frictionless acceleration of a streamline dart with a nominal diameter of 0.5”. A 4” section of 17/32” brass was turned down slightly to fit into the aluminum barrel at the breach end and acts as a constriction for an initial impulse to the dart.
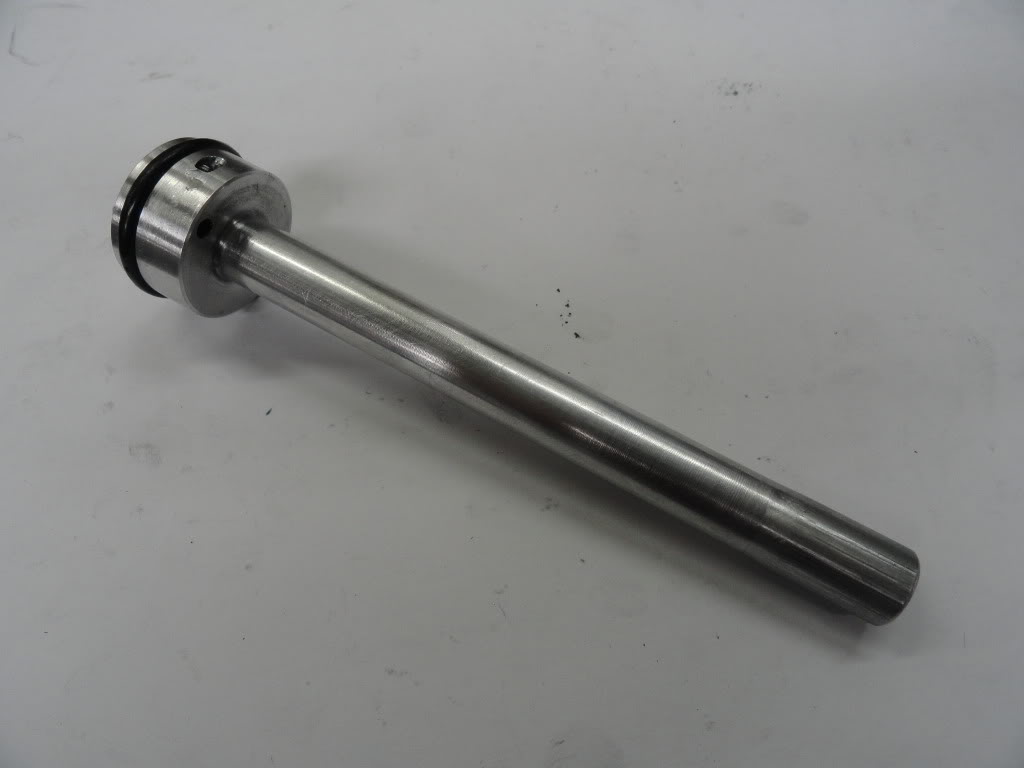
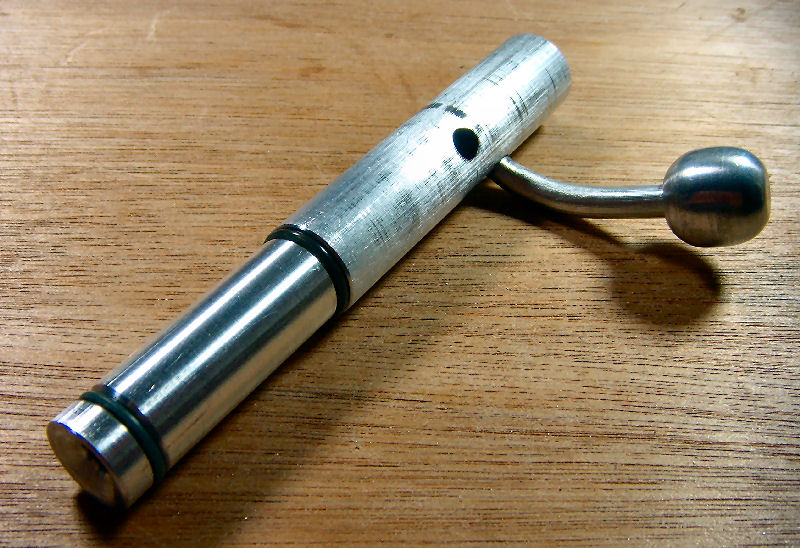
PLUNGER
The plunger is pretty standard. The plunger head is machined from 1.25” 6061 stock and has an O-ring around it for sealing. The plunger shaft is 0.375” aluminum bar stock. The shaft goes through the plunger head and a steel pin goes through both to secure them together.
The main spring is a McMaster 9637K21 with a constant of 146.3. The length used in the rifle is a 11” so the resulting stiffness is 3.75 lbs/in, giving a full draw compression of 33 lbs. The spring interfaces the plunger through a perch attached to the back of the plunger shaft. The perch also mounts the auto-valve activating pin.
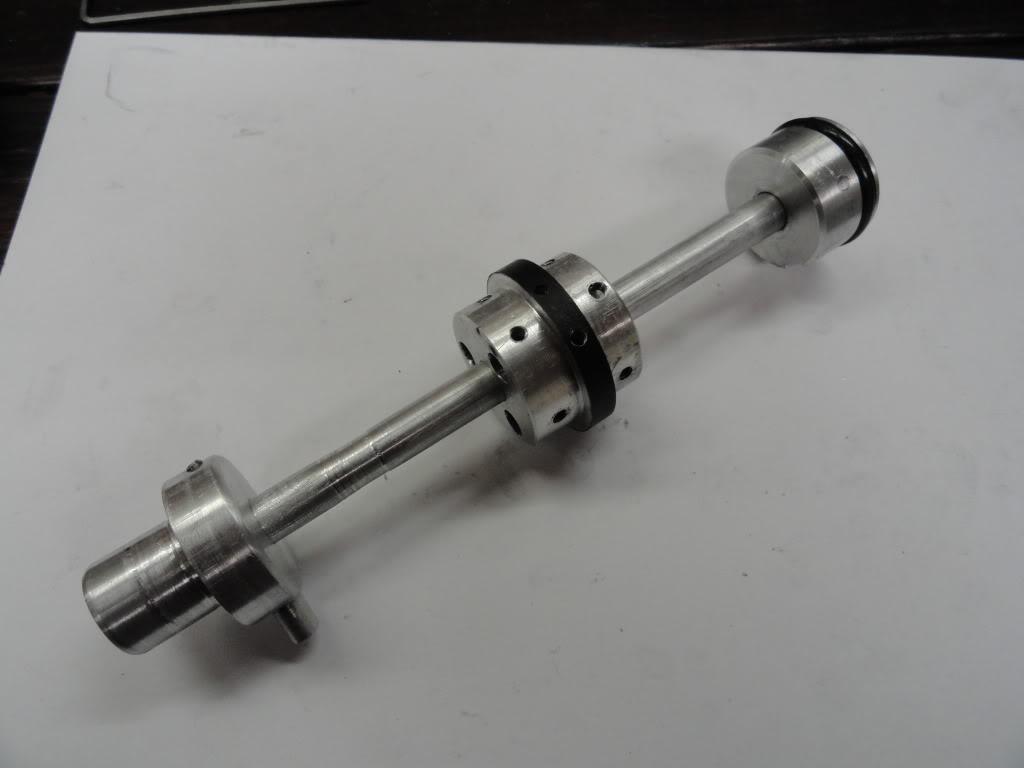
BOLT
The bolt is unique to this design. It is machined from a solid piece of 1.25” 6061 stock and the forward end of the bolt matches the ID of the barrel. So a near perfect seal is made here without the use of an O-ring. About 0.75” back from the forward end of the bolt, the diameter necks down slightly to reduce friction when cycling. The aft end of the bolt forms a plunger head looking area with another O-ring. This head is what pushes the plunger back when the action is cycled. The O-ring is needed here because the chamber forward of the bolt head is where pressure is built to cycle the action in automatic mode. Corresponding O-rings are also found at the aft end of the barrel, where the bolt enters the barrel, and in the through holes for the operating rod above the barrel. A notch is cut in the front of the bolt at the bottom to let air in between the bolt and into the plunger cavity as the action cycles forward and the plunger cavity is opened up.
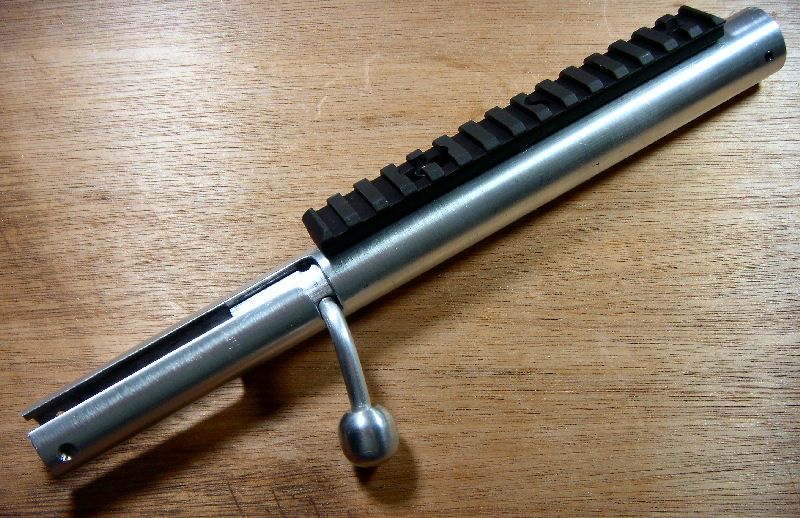
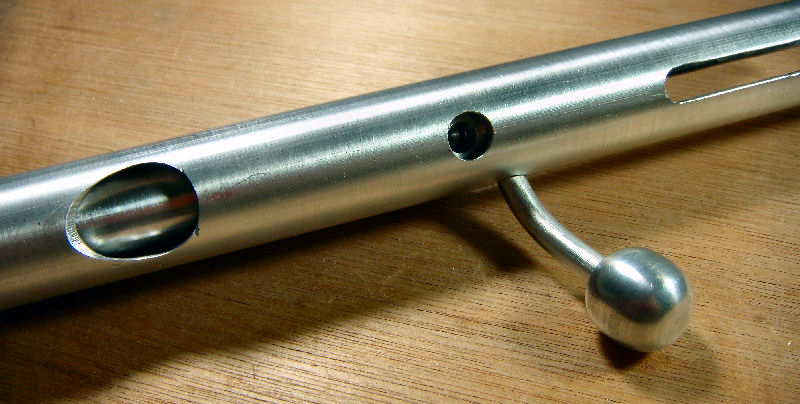
The operating rod rides in through holes in the interstages above the barrel and connects to the bolt head. An adapter connects to the operating rod at the forward end and either connects it directly to the pump handle or connects it to the action spring, which is a section of surgical tubing. Surgical tubing offered the right amount of stiffness and stretch.
The pump handle is a section of 2” 6061 tubing. I turned some slots into it to offer some positive grip and it works quite well. TO keep the pump handle from sliding on the receiver and scuffing the paint it rides on two Teflon runners attached to the fore-end.
MAGAZINE
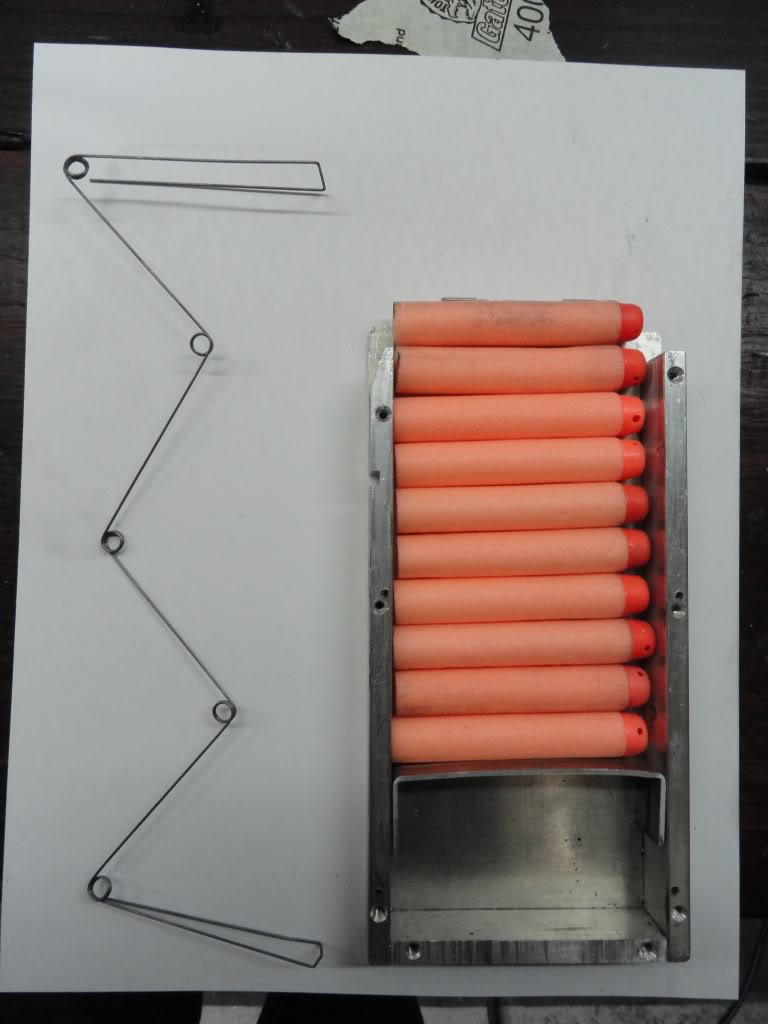
The magazine is similar to the Nerf clip system mag except it is built up with aluminum. The spring is bent from 0.03” music wire
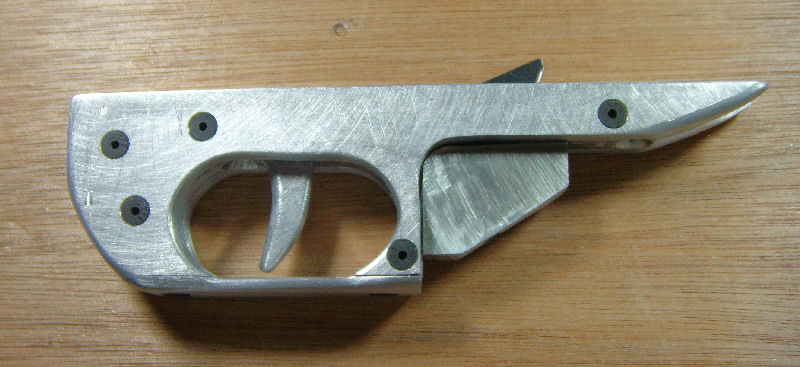
FIRE CONTROL
The trigger is pretty standard. It consists of an aluminum plate with a ramp at the aft end. The catch is made from 0.125” steel rod and is welded together for strength.
- Must fire standard streamline nerf darts
- Shoot 10 rounds in 10 seconds.
- Hit the back of a car from 80 feet
These goals were intentionally vague so that we the objectives could be approached from many angles. For instance you could shoot 10 darts at once to meet the ROF goal, etc
The actual contest kind of fell through but myself and one other guy continued building. This is my result and he should be finishing his soon and I’m sure he’ll stick it up here as well.
This rifle is the 12th gun I have made, hence BS-12, and I am dubbing it the Advanced Tactical Rifle, or ATR. It’s essentially the same type of rifle as the BS-8 with improvements in design, materials and the addition of semi-automatic cycling.
From the start I intended to make this rifle semi-automatic capable. I say capable because I never intended for it to be solely automatic. My vision was for a pump-action rifle with a semi-automatic mode available. Since the semi-automatic action would run off of compressed gas of some sort, I didn’t want it to be solely dependent on an energy supply that may run out, so I wanted it to be manually operable as well. I also wanted this rifle to be much more durable. This meant utilizing tougher materials than PVC and polycarbonate. While I still used both of those materials, the bulk of the rifle is aluminum 6061. Being able to machine the parts to very tight tolerances also lead to better seals which made it perform better and also enabled the auto-cocking function.
The whole thing is screwed together and with most of them being countersunk. There are over 120 fasteners in the whole rifle. Only a few parts are bonded together…mainly the pistol grip.
It fires streamline clip-system standard nerf darts WITHOUT shells making this rifle much much more practical to use.
What resulted is a detachable magazine-fed, pump-action, spring-plunger rifle which is auto-loading when attached to an external gas supply.
Specs:
Caliber 0.5 in
Plunger Volume 4.91 in3
Plunger Stroke 4 in
Muzzle Velocity 190 ft/s
Overall Length 33 in
Magazine Capacity 12
Rate of Fire
Pump-Action 80 RPM
Semi-Automatic 120 RPM
Range 165 ft
Barrel Length 12 in
Propulsion Hybrid Impulse/Acceleration
Magazine Detachable Bottom Feed
Using a standard chronograph I was able to clock the muzzle velocity. The max I have seen has been 194ft/s but it varies based on the dart. The lowest I have seen is around 170ft/s. In comparison any stock nerf gun will shoot at 45-50 ft/s. Standard mods will get them to around 60ft/s.
BALLISTICS
During the design of this rifle, I decided to write some programs to simulate the firing of a dart. By doing this and knowing the muzzle velocity of the gun, I can accurately predict the range. In order to compute the drag on the dart from the air I did a combination of simple computational fluid dynamics (CFD) models and empirical tests. I found a good value for the drag coefficient of a streamline dart. Knowing this value the subsonic drag can be computed and ultimately the trajectory. At transonic speeds the drag increases greatly due to shock wave formation. To account for this I applied an exponential increase in the drag from 0.8 Mach up to 1.0 Mach. I did not bother to go above Mach 1.0 for numerous reasons. For one….let’s be serious…no one is firing a nerf dart at the speed of sound. Two…I doubt a nerf dart would survive that velocity. Three….it is impossible for a spring-plunger type gun to even fire a dart above Mach 1.0.
Anyways, the figure below shows the full range envelope for a streamline dart. From 0-90 degrees firing angle and 0-1100 ft/s muzzle velocity.
Knowing the muzzle velocity is 190ft/s for the ATR, the range vs firing angle can be plotted to determine the optimal firing angle.
For completion, the plot of range vs muzzle velocity can be made as well. Notice the knuckle in the curve near the end as the transonic wave drag kicks in.
Finally, the actual dart trajectory can be plotted.
Maximum attainable range for the ATR is 166 feet. This calculated value correlates well with actual shot data.
On a side note, notice the maximum range from the full envelope of just over 300ft. It is physically impossible to fire a stock nerf dart any farther than that.
These scripts were written in MatLab and I am thinking about porting them to Java to make an interactive applet.
TECHNICAL
As is typical, this project started with a solid model to layout the major components and determine the primary dimensions. The main portion of the rifle consists of sections of 1.5” OD aluminum 6061 tubing with a wall thickness of 0.125”. The sections are connected together with what I call “interstages”. These are machined from 1.5” 6061 stock. There are four major sections that make up the rifle. Starting from the aft: Main Spring and Auto-valve, Plunger, Bolt/Breach, and Barrel. There are respective interstages between theses four sections.
BARREL
The barrel is 6061 aluminum tubing with an inner diameter of 0.53” and a wall thickness of 0.04”. This ID is perfect for near-frictionless acceleration of a streamline dart with a nominal diameter of 0.5”. A 4” section of 17/32” brass was turned down slightly to fit into the aluminum barrel at the breach end and acts as a constriction for an initial impulse to the dart.
PLUNGER
The plunger is pretty standard. The plunger head is machined from 1.25” 6061 stock and has an O-ring around it for sealing. The plunger shaft is 0.375” aluminum bar stock. The shaft goes through the plunger head and a steel pin goes through both to secure them together.
The main spring is a McMaster 9637K21 with a constant of 146.3. The length used in the rifle is a 11” so the resulting stiffness is 3.75 lbs/in, giving a full draw compression of 33 lbs. The spring interfaces the plunger through a perch attached to the back of the plunger shaft. The perch also mounts the auto-valve activating pin.
BOLT
The bolt is unique to this design. It is machined from a solid piece of 1.25” 6061 stock and the forward end of the bolt matches the ID of the barrel. So a near perfect seal is made here without the use of an O-ring. About 0.75” back from the forward end of the bolt, the diameter necks down slightly to reduce friction when cycling. The aft end of the bolt forms a plunger head looking area with another O-ring. This head is what pushes the plunger back when the action is cycled. The O-ring is needed here because the chamber forward of the bolt head is where pressure is built to cycle the action in automatic mode. Corresponding O-rings are also found at the aft end of the barrel, where the bolt enters the barrel, and in the through holes for the operating rod above the barrel. A notch is cut in the front of the bolt at the bottom to let air in between the bolt and into the plunger cavity as the action cycles forward and the plunger cavity is opened up.
The operating rod rides in through holes in the interstages above the barrel and connects to the bolt head. An adapter connects to the operating rod at the forward end and either connects it directly to the pump handle or connects it to the action spring, which is a section of surgical tubing. Surgical tubing offered the right amount of stiffness and stretch.
The pump handle is a section of 2” 6061 tubing. I turned some slots into it to offer some positive grip and it works quite well. TO keep the pump handle from sliding on the receiver and scuffing the paint it rides on two Teflon runners attached to the fore-end.
MAGAZINE
The magazine is similar to the Nerf clip system mag except it is built up with aluminum. The spring is bent from 0.03” music wire
FIRE CONTROL
The trigger is pretty standard. It consists of an aluminum plate with a ramp at the aft end. The catch is made from 0.125” steel rod and is welded together for strength.
#130602 Music Wire
Posted by
on 24 November 2007 - 11:43 PM
in
Homemades
This trick is to bend it before you cut it. Use the wire itself for leverage. Cut it to length after you've bent it to the desired shape. You don`t have to worry about it snapping.
If you have a vice at your disposal than use it.
I typically use 1/16" for most stuff with the occasional 3/32 and 1/32 thrown in.
If you have a vice at your disposal than use it.
I typically use 1/16" for most stuff with the occasional 3/32 and 1/32 thrown in.
#129754 All Aluminum Paintball (and Nerf) Bolt-action Rifle
Posted by
on 15 November 2007 - 12:23 AM
in
Homemades
No it's not airsoft. Currently, it's a menagerie of parts from different makers now. Bushmaster lower receiver, Colt upper receiver and barrel, JP carrier, LMT bolt, Vltor stock, miscellaneous other parts. I`ve almost got enough spare parts to build another rifle. I want to build an 18" SPR style rifle. Need the spare money.... The optic is an Aimpoint CompML3. It's a 4 MOA red dot. I had 4X illuminated crosshair on there before but I wasn`t too fond of it. The red dot is fantastic.
Yeah, this was intended from the start to be a paintball rifle and that is what it is. It serves that purpose quite well. I`ve actually been experimenting with short stubby nerf "bullets" in the tube mag. Like 3/4" lengths of 5/8" FBR with the standard BB weight. I think with some tweaking it might actually work with the magazine, which would be freaking awesome.
Yeah, this was intended from the start to be a paintball rifle and that is what it is. It serves that purpose quite well. I`ve actually been experimenting with short stubby nerf "bullets" in the tube mag. Like 3/4" lengths of 5/8" FBR with the standard BB weight. I think with some tweaking it might actually work with the magazine, which would be freaking awesome.
#129360 All Aluminum Paintball (and Nerf) Bolt-action Rifle
Posted by
on 10 November 2007 - 06:16 PM
in
Homemades
The ball fit in the barrel is quite tight so you get a lot more power than your typcial PB gun. About 100yds max. I've played with it twice so far and had it turned down pretty far. The longest shot I took was probably 30-40 yads.
BS-11 Loading and Cycling Video
Above is a video of loading 10 balls in the magazine and then cycling them through. I apologize for the large file size (67MB). Hopefulyl everyone has at least DSL now....
The balls I used in the video are rubber practice balls. They are about 0.66" diameter so they will roll down the barrel. You can see em popping out of the end of teh barrel. Actual Paintballs will not do this. I can`t cycle real balls without firing them cause they would all get backed up in the barrel. Ive tried it...
The maga follower stops when it hits the end of the ramp. The last ball in the mag will not make it into the breach. That is why I rock the gun over for the last ball to roll it into the breach.
#129235 All Aluminum Paintball (and Nerf) Bolt-action Rifle
Posted by
on 09 November 2007 - 05:18 PM
in
Homemades
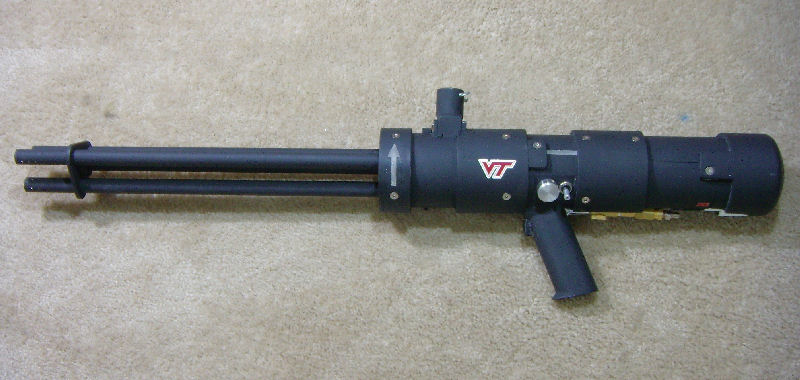
I guess technically this is BS-11. The eleventh gun I have designed and at least started building. The bottom picture of the initial post would be BS-10 and yes it is a Minigun (paintball minigun). I`ll leave the nerf minigun to Captain Slug. I`ll try and put a post together of that one as well in the not to distant future.
Aluminum stock is cheap. I picked up a crap load of random stock sizes from onlinemetals.com. Depends on the alloy you get as to the price. 6061 is very cheap. 7075 is not bad. 2024 is the priciest but still isn`t too bad. 7075 is the strongest of the 3 alloys. Pipe and tubing are only available in 6061 and 2024. I splurged for the 2024 tubeing for the for strength. I got 6061 barrel tubing for the minigun and it is quite ductile. THe 2024 is substially stronger. The round bar stock is 7075 which is plety strong. All the alloys are very workable.
3 foot 2024 0.68 ID tube for the barrel : $16.00
2 X 1 foot 7075 1" round stock : $12.00 each
5 X 1 foot 1" OD 0.75" ID 6061 Pipe : $7.50 each
3 X 1.5 X 12" 0.25" 6061 flat bar : $2.50 each
I used a few other random sizes here and there too. 1/4" rod for the bolt handle. Tubing for the flashhider. So about $80 worth of aluminum. Sounds like a lot and I guess it is but it is aircraft grade aluminum and you end up with a lot of scrap you could use for other things later on. Altogether it's probably $100 worth of materials and components.
It is pretty light. Just under 4 pounds with tank and scope.
The tube mag and ramp works great. BUt yeah, it is much easier with balls than soft foam cylinders.
Good luck with your trigger valve CS. It was pretty simple to build but tricky to get balanced. I incorporated a large thow adjustment screw to adjust the spring tension on the striker. You can see it protruding just below the stock. It gives about an inch of adjustment. I also had a set of 5 different pwer springs to swap in and out. Initially I ran an inline regulator on the CO2 to control the pressure into the valve. I didn`t use it for long as it was able to handle the full tank pressure with no problem. WIth the masses and throws I have, the medium power striker spring seems to work best. It gives a pretty range of velocity adjustments with the tension adjustment screw. There is a fine line to balance the force the striker exerts on the valve stem at rest and the force the valve spring and gas pressure exerts to close the valve. To large a striker spring will hold the valve open after it drops. Gotta get just below this region. I also had a slight probelm with double stroking. The striker would bounce off the valve and restrike the valve stem releasing another smalller burst of air. Adjusting the tension spring and the striker stroke fixed this problem.
All my tanks are empty right now but I`ll try and get some video of the rifle cycling and what not tomorrow.
#129177 All Aluminum Paintball (and Nerf) Bolt-action Rifle
Posted by
on 09 November 2007 - 12:25 AM
in
Homemades
It's been a damn while since I`ve posted anything on here. I thought I would have more time when I started working a normal job and have the weekends free. Well, I guess I have but there always seems to be something going on. I’ve been doing a lot of building as you`ll soon see. I do still intend to get Boltsniper.com put back together and updated. I would like to get the forums back up. I haven’t messed with it much at all in a while. I`ll probably just start the forums over from scratch when I do that.
Anyway,
I work with a bunch of people who like to Nerf and paintball. We do a fair share or both. I still get a lot of use out of the BS line of Nerf Guns. I mainly use the SCAR and the NTS. I lend the GNS out to whoever wants it. The FARihas been pretty much retired. It has taken a beating through the years. Still works, but has developed some cracks in places and I retired it to the wall. The SCAR is much more durable. I`ve actually dropped it on concrete a few times.
For a change of pace I decided to take a crack at building a paintball gun. If this is not fit for the homemade section because of the word "paintball" then feel free to kick it to Off topic or delete it altogether. I built this gun with the idea in mind of being able to breach load nerf darts for indoor nerf battle use, which works quite well by just taking the paintball magazine off.
SO, what we have is a magazine-fed bolt-action CO2-powered paintball rifle with the ability to single shot nerf darts. I`ll be honest, this is a paintball gun first, but I figured you guys would still be interested as a lot of it could be carried over to a primarily nerf rifle.
Excluding the obvious exceptions, the entire rifle is fabricated from aluminum stock. The barrel is 2024 T3 tubing with an inner diameter of 0.68 inches. Convenient for paintballs of 68 caliber. Is also a hell of a fit for mega stefans. The upper receiver, forend, stock tube, magazine, valve, and striker tube are all fabricated from 7075 T6 1" OD (0.125" wall thickness) pipe and 1" round stock. The lower receiver and FCG are cut from 1/4" 7075 T6 plate. I turned all of the round bar parts on a small lathe (Sherline 9" bed). Most of the turned pieces are 1" round bar of no more than 3 inches long. The largest piece I turned was the outside of the barrel for insertion into the receiver. Heavy use of the bandsaw, drill press, and dremel did the rest. The lathe will convert to a vertical mill and I made some use of this, but mounting parts on the cross slide is difficult and not accurate. I need a multi axis cross slide for milling. The rifle is assembled with countersunk socket head screws. They look awesome flush with the surface.
The rifle works much like any other paintball or CO2 gun. A striker is propelled via spring and impacts a valve stem that very briefly opens and releases some propellant gas. One of the images below shows the component break down of the rifle. The valve is positioned in the center of the rifle with the striker behind it. The trigger releases the striker and the bolt pulls it back when you retract the bolt to chamber a new round. It all works pretty fluidly. The magazine is a fixed tube magazine that will hold 10 paintballs. It is positioned ahead of the valve and under the barrel. Very shotgun-esque. When the bolt is retracted a ramp guides the next ball up through a hole in the receiver and into the chamber. Closing the bolt pushes the ball forward and seals the port. The magazine is loaded by retracting the follower all the way and inserting balls through a port in the right hand side.
The rifle works better than I had ever thought. The cycling works great. Have yet to chop a ball. Ranges are around 100 yards. Accurate out to 40-50 yards. I had some initial trouble with leakage around the valve seals, but a little RTV fixed that problem quickly. The little 2.5 ounce tank will last for 50-60 rounds or so with large time intervals between shots.
The next course of action is to touch up the blemishes and hard coat it flat black
Pictures ensue:

Major Components

All 51 pieces plus screws

Fire Control Group. The sear is a modified T68 sear. The rest is hand made.


CO2 Valve. The valve body was the most complex piece to fabricate. The tolerances has to be incredibly tight on the valve seat in order to insure a good seal. Plus the gas port had to make a 90 degree turn to re route the gas into the upper receiver.


Striker. I copped out and used a pre-made striker from a T68. Mainly because I didn`t have the steel stock to cut one. The striker tube was too large for the striker. It fit too loosely in the tube. I inset a piece of tubing in the striker tube to bring the ID down so the striker had better guidance. The striker tube itself required a lot of cuts and opening to allow the follower pin and sear to engage the striker from top and bottom. Pressure release holes are drilled in the forward end of the striker tube to release pressure ahead of the stiker when it is released.
Upper Receiver. The upper receiver contatins the bolt and the barrel. It is also what the stock attaches to. the bolt was the first component I fabricatied back in April sometime.
Barrel. The flash hider was cut free hand. Would have been a great project for the mill but I need a better cross slide to be able to do the operation.


Magazine


Coming Together


I`ve got many more pictures and I can always take more. I`ll try to get some video of it cycling and firing.
I`ve also got this baby...
I need to work on a topic for her too.
I`ve got another strictly nerf rifle in the works. Similar to this one in construction.
Anyway,
I work with a bunch of people who like to Nerf and paintball. We do a fair share or both. I still get a lot of use out of the BS line of Nerf Guns. I mainly use the SCAR and the NTS. I lend the GNS out to whoever wants it. The FARihas been pretty much retired. It has taken a beating through the years. Still works, but has developed some cracks in places and I retired it to the wall. The SCAR is much more durable. I`ve actually dropped it on concrete a few times.
For a change of pace I decided to take a crack at building a paintball gun. If this is not fit for the homemade section because of the word "paintball" then feel free to kick it to Off topic or delete it altogether. I built this gun with the idea in mind of being able to breach load nerf darts for indoor nerf battle use, which works quite well by just taking the paintball magazine off.
SO, what we have is a magazine-fed bolt-action CO2-powered paintball rifle with the ability to single shot nerf darts. I`ll be honest, this is a paintball gun first, but I figured you guys would still be interested as a lot of it could be carried over to a primarily nerf rifle.
Excluding the obvious exceptions, the entire rifle is fabricated from aluminum stock. The barrel is 2024 T3 tubing with an inner diameter of 0.68 inches. Convenient for paintballs of 68 caliber. Is also a hell of a fit for mega stefans. The upper receiver, forend, stock tube, magazine, valve, and striker tube are all fabricated from 7075 T6 1" OD (0.125" wall thickness) pipe and 1" round stock. The lower receiver and FCG are cut from 1/4" 7075 T6 plate. I turned all of the round bar parts on a small lathe (Sherline 9" bed). Most of the turned pieces are 1" round bar of no more than 3 inches long. The largest piece I turned was the outside of the barrel for insertion into the receiver. Heavy use of the bandsaw, drill press, and dremel did the rest. The lathe will convert to a vertical mill and I made some use of this, but mounting parts on the cross slide is difficult and not accurate. I need a multi axis cross slide for milling. The rifle is assembled with countersunk socket head screws. They look awesome flush with the surface.
The rifle works much like any other paintball or CO2 gun. A striker is propelled via spring and impacts a valve stem that very briefly opens and releases some propellant gas. One of the images below shows the component break down of the rifle. The valve is positioned in the center of the rifle with the striker behind it. The trigger releases the striker and the bolt pulls it back when you retract the bolt to chamber a new round. It all works pretty fluidly. The magazine is a fixed tube magazine that will hold 10 paintballs. It is positioned ahead of the valve and under the barrel. Very shotgun-esque. When the bolt is retracted a ramp guides the next ball up through a hole in the receiver and into the chamber. Closing the bolt pushes the ball forward and seals the port. The magazine is loaded by retracting the follower all the way and inserting balls through a port in the right hand side.
The rifle works better than I had ever thought. The cycling works great. Have yet to chop a ball. Ranges are around 100 yards. Accurate out to 40-50 yards. I had some initial trouble with leakage around the valve seals, but a little RTV fixed that problem quickly. The little 2.5 ounce tank will last for 50-60 rounds or so with large time intervals between shots.
The next course of action is to touch up the blemishes and hard coat it flat black
Pictures ensue:
Major Components
All 51 pieces plus screws
Fire Control Group. The sear is a modified T68 sear. The rest is hand made.
CO2 Valve. The valve body was the most complex piece to fabricate. The tolerances has to be incredibly tight on the valve seat in order to insure a good seal. Plus the gas port had to make a 90 degree turn to re route the gas into the upper receiver.
Striker. I copped out and used a pre-made striker from a T68. Mainly because I didn`t have the steel stock to cut one. The striker tube was too large for the striker. It fit too loosely in the tube. I inset a piece of tubing in the striker tube to bring the ID down so the striker had better guidance. The striker tube itself required a lot of cuts and opening to allow the follower pin and sear to engage the striker from top and bottom. Pressure release holes are drilled in the forward end of the striker tube to release pressure ahead of the stiker when it is released.
Upper Receiver. The upper receiver contatins the bolt and the barrel. It is also what the stock attaches to. the bolt was the first component I fabricatied back in April sometime.
Barrel. The flash hider was cut free hand. Would have been a great project for the mill but I need a better cross slide to be able to do the operation.
Magazine
Coming Together
I`ve got many more pictures and I can always take more. I`ll try to get some video of it cycling and firing.
I`ve also got this baby...
I need to work on a topic for her too.
I`ve got another strictly nerf rifle in the works. Similar to this one in construction.
#102335 Shooting At Virginia Tech
Posted by
on 16 April 2007 - 09:54 PM
in
Off Topic
Yeah this is seriously fucked up. I`m glad you're ok Shindig. Everyone I know that is still up there is ok. I had 3 classes in Norris. I spent a lot of time in that building on all 3 floors. The buidling is L-shaped. I can only imagine how everything played out in there. When they say the shooter killed himself in the basement I know exactly where they are talking about. Kind of creep to know that many died at some place I spent so much time. If I remember right I had statics at 9am MWF in Norris........
My thoughts go out to everyone out there.
My thoughts go out to everyone out there.
#98527 Boltsniper Scar-n Rifle Bs-8
Posted by
on 20 January 2007 - 02:00 PM
in
Homemades
There is room for a larger cartridge but they don`t make anything larger than the 50 Beowulf that would fit
#98518 Boltsniper Scar-n Rifle Bs-8
Posted by
on 20 January 2007 - 01:03 AM
in
Homemades
As long as your state allows high capacity magazines you should be able to find them at any gun shop.
1/2" FBR fits great in .50 cal shells. I actually got the idea from 50 Beowulf shells. My original idea was to use Beowulf shells but they aren`t cheap to buy so I just made the shells from scratch. Plus you would have to drill out the Beowulf shells to be able to use them. And making an extractor to work with the shells would be tough. 50 cal rifle shells would work but they are huge and you would have a lot of wasted space where the shell necks up. The Beowulf shell is the only productino cartridge I an see working. I guess you could go with the S&W 50 for a rimmed shell.
410 shells are too small at 0.41". 20 gauge is a litle too big probably. Around 0.6". 28 gauge would probably work but I have never actually seen these sold anywhere common.
#91134 Yet Another Longshot Mod...
Posted by
on 03 October 2006 - 11:34 AM
in
Modifications
If you are cutting it down to 4-5 inches it doesn`t matter which you use. Carbine or Rifle length will work.
#91129 Yet Another Longshot Mod...
Posted by
on 03 October 2006 - 10:20 AM
in
Modifications
AR short for AR-15. Yes, from the real rifle. The AR stands for Armalite actually. I use the buffer spring from the AR-15 for all my spring homemades. It also dropped very nicely in the longshot. The spring is 11-13" long depending on which you get to start with. Cut them down to the length you need.
#91122 Modification and Paintjob Pictures
Posted by
on 03 October 2006 - 12:08 AM
in
Modifications
What did you use to cover the Nerf logos when you painted your Longshot Boltsniper?
Masking tape cut with a razor blade
#91121 Yet Another Longshot Mod...
Posted by
on 03 October 2006 - 12:06 AM
in
Modifications
Ooooo. Nice! I dunno who's to choose, now. Your's or Cappin' Slugs...
Think you can get a vid up (maybe along with some NTS videos)?
I can do that. I`m in the process of moving right now so it might be a couple days before I can get them up.
#90993 Boltsniper Gets Old!
Posted by
on 01 October 2006 - 04:43 PM
in
Off Topic
Haha. Thanks everyone. We did a lot of drinking and then some shooting out in the country. Nothing too exciting but still a fun day.
#90807 Modification and Paintjob Pictures
Posted by
on 29 September 2006 - 02:50 PM
in
Modifications


#90806 Yet Another Longshot Mod...
Posted by
on 29 September 2006 - 02:39 PM
in
Modifications
I broke down and gave it a black paintjob. I cut down the stock a little too. I found it cluttered around the grip when the stock is closed.
#90573 Yet Another Longshot Mod...
Posted by
on 26 September 2006 - 10:03 PM
in
Modifications
The "silencer" attaches just like the front gun does. The organe locking ring comes out of the front gun if you take it apart. I just glued it to the back of a piece of 1/1/4" PVC. It twists and locks on the same way. You don`t get any more range with it but you get a little better accuracy. Thanks for the suggestion Captain. I might give that a shot.
I think a full paintjob is next on the list. I might cut down the stock some too so it's not so bulky. I don`t use the mag holder anyway
I think a full paintjob is next on the list. I might cut down the stock some too so it's not so bulky. I don`t use the mag holder anyway
#90293 Yet Another Longshot Mod...
Posted by
on 23 September 2006 - 08:54 PM
in
Modifications
I`ll probably break down and paint hte blue balck or gray. I don`t really like the way the gunmetal pump-action setup looks on the blue. Just doesn`t seem to fit. I liked it better unpainted. But I think if I leave all the yellow, orange, and gray and pai thte blue either black or gray it would look pretty good.
They are BSA red dots. I have two of them and I picked them up for $25 each online somewhere. One stays on the SCAR at all times and the other just floats around. I think Walmart sells them for $30.
Yeah, it's not a silencer. Its just the barrel section out of the attachable siderarm in a section of PVC. I really didn`t like the look, length, or weight of adding the siderarm to the front of the rifle.
#90220 Yet Another Longshot Mod...
Posted by
on 22 September 2006 - 10:03 PM
in
Modifications
I take no credit for the pump action idea. I first noticed it on Captain Slugs and it occurred to me how easily it could be done and how functional it is.
So here is my longshot. Inside it is bored for better airflow and has an AR spring over top of the stock spring for substantial more power.


With "silencer" barrel extension


The pump foregrip is made from two 2" couplers, balsa, and lexan for the transfer bars. The PVC is cut to form with the lines of the rifle to allow for maximum area to grab onto. Balsa rails ride against the lower side of the rifle. Lexan bars run along the side of the rifle to engage the charging handle. Very similar to Captain Slugs. Portions of lexan are bonded to the side of the rifle. These pieces engages the charging rails from the undersiade and prevent the rails from buckling and also lock the forgrip in place and prevent it from falling away from the rifle. To remove the unit you just pull the chargin pin and rotate the unit away from the rifle.


So here is my longshot. Inside it is bored for better airflow and has an AR spring over top of the stock spring for substantial more power.
With "silencer" barrel extension
The pump foregrip is made from two 2" couplers, balsa, and lexan for the transfer bars. The PVC is cut to form with the lines of the rifle to allow for maximum area to grab onto. Balsa rails ride against the lower side of the rifle. Lexan bars run along the side of the rifle to engage the charging handle. Very similar to Captain Slugs. Portions of lexan are bonded to the side of the rifle. These pieces engages the charging rails from the undersiade and prevent the rails from buckling and also lock the forgrip in place and prevent it from falling away from the rifle. To remove the unit you just pull the chargin pin and rotate the unit away from the rifle.
#90180 Modification and Paintjob Pictures
Posted by
on 22 September 2006 - 07:31 AM
in
Modifications
Hey bolt, I am confused. That black thing, it is a barrell extension, or just for looks? If it is a barrell extension I can see that working.
It is the barrel extension. I didn`t like the front siderarm attachment. I just pulled out the barrel extension tube and placed in a section of PVC with the locking ring glue to the end. I also cut it down a little bit so it wasn`t so damn long. It's not a silencer, just made to look like one.
#90167 On The Subject Of Pineapples
Posted by
on 21 September 2006 - 07:44 PM
in
Off Topic
Happy Birthday Piney!
Drink some! That will make the pain go away. Much better than Ibuprofen. Haha...
Drink some! That will make the pain go away. Much better than Ibuprofen. Haha...
#90001 Modification and Paintjob Pictures
Posted by
on 18 September 2006 - 11:33 PM
in
Modifications
Didn`t do anything special. It's just a red dot intended to mount on a mil-std-1913 rail. It just screwed right on. Pretty tight and secure too.
#89965 Modification and Paintjob Pictures
Posted by
on 18 September 2006 - 06:21 PM
in
Modifications
Well I had planned to paint the blue black, but I figured I would leave it as is.


#89095 Marching Bands
Posted by
on 05 September 2006 - 12:15 PM
in
Off Topic
I just bought a uber cheap mandolin not too long ago. They are quite fun to play and not too hard either.
#88835 Marching Bands
Posted by
on 02 September 2006 - 09:50 PM
in
Off Topic
I marched bass my freshman year and snare the last 3 years of high school. After high school I marched drum corp for one year. I didn`t march in college because tyhe Marching Virginians were not my style.
My senior year I wrote our cadence
Snare
Tenor
Bass
We won first place as a line playing that cadence
I also competed in an individual competition playing another piece I wrote on snare
Indy page 1
Indy page 2
My senior year I wrote our cadence
Snare
Tenor
Bass
We won first place as a line playing that cadence
I also competed in an individual competition playing another piece I wrote on snare
Indy page 1
Indy page 2
#88578 Dremel Nearly Killed Me
Posted by
on 30 August 2006 - 10:25 AM
in
Off Topic
I basically use two tools now. Thin cutoff wheels and sanding drums. I used to use the high speed cutters and I have every single one they make. They are good at removing material but I have found that the sanding drums will remove material jsut as fast. My big problem with the high speed bits is they are fucking loud! Me being in an apartment now...thats an issue. I do use the tool carbon is referring to when I need to get in tight spots. I use the drum cutters to cut holes and small openings.
As far as cutting wheels go. As CX said stay out of the plane of the wheel and you won`t have to worry about getting hit. But still wear some eye protection just in case. Only apply pressure in the plane of the disc as any lateral pressure will shatter it in a flash. They are fragile but they are remarkably tough too. I use the thin discs but the thicker ones are much much more forgiving. It just takes a little more cutting time cause you are removing mor material. It just takes some practice and finesse. I haven`t broken a disc in a long time. They just wear down to about a half inch and need replacing.
As far as cutting wheels go. As CX said stay out of the plane of the wheel and you won`t have to worry about getting hit. But still wear some eye protection just in case. Only apply pressure in the plane of the disc as any lateral pressure will shatter it in a flash. They are fragile but they are remarkably tough too. I use the thin discs but the thicker ones are much much more forgiving. It just takes a little more cutting time cause you are removing mor material. It just takes some practice and finesse. I haven`t broken a disc in a long time. They just wear down to about a half inch and need replacing.
#88567 Modded Razr V3 And V3x
Posted by
on 29 August 2006 - 11:09 PM
in
Off Topic
I`ve had a RAZR for almost a year now and it has always bugged me that so many damn people have them. It is a great phone. Very capable, very nice looking and is still one of the smallest you can get. A while back I started playing around with modding the firmware on the phone. It is not too hard and there is plenty of information out there about it. My RAZR started out as a black RAZR from Cingular. I liked the black but I thought blue would look good too. I installed a blue outer housing while retaining the black interior housing. I like the look of the blue on black contrast and I really like the shade of blue. I replaced the keypad with the V3i keypad which has blue division lines to add some more blue to the phone.

Thats it as far as appearance goes. As I got it the phone was branded for cingular as they all are. This kind of annoyed me cause there were some things you could not do due to the branding of the firmware. I reflashed the phone with the latest unbranded flash from Motorola which enabled all features and actually made the phone operate a little faster.
You have full access to all the files on the phone and by editting seems in the firmware you can enable/disable features and change most everything about the software. I installed my own skin and wallpapers.

I also changed the extrenal LCD image to a Ferrari logo instead of the Cingular guy

I was able to delete a bunch of the tones and images that are already on the phone to free up some room to put my own stuff on there. I made a bunch of ringtones from songs and dumped em on there instead of paying $3 a piece for em...
Last week I bought a V3x off ebay. The V3x is the latest available encarnation of the RAZR line. It is slightly larger than the normal RAZR but this is because of the fact that it is 3G capable. It's still a small phone and is absolutely packed with features. It has a 2MP camera which is insane. The screen resolution is phenomenal at 320x240.


I bought a virgin sim card for 10 bucks and programmed it to my account so I could use both phones. They both have the same number and both ring if I get a call. Kinda cool. As soon as I got the V3x I flashed it to the current formware release. When I got the phone it was branded to O2 which was annoying. The phone is 3G capable but there is no 3G service in Richmond unfortunately. The closest city with 3G coverage is DC. I might end up living up there anyway so that wil be nice. Right now the phone is operating at 2.5G. I stuck a 1 gig micro SD card in the phone and filled it with music. The phone has stereo speakers that put out surprisingly loud and clear sound. I editted the gain table to make em even louder. Now I can`t ever keep it at the highest volume cuase its that loud... But its not distorted, just loud. Pretty amazing.
Just thought I`d share. Its quite fun diving into the code of the phone software and editing to create desired effects. Most all motorola phones can be treated the same and highly modded.
Thats it as far as appearance goes. As I got it the phone was branded for cingular as they all are. This kind of annoyed me cause there were some things you could not do due to the branding of the firmware. I reflashed the phone with the latest unbranded flash from Motorola which enabled all features and actually made the phone operate a little faster.
You have full access to all the files on the phone and by editting seems in the firmware you can enable/disable features and change most everything about the software. I installed my own skin and wallpapers.
I also changed the extrenal LCD image to a Ferrari logo instead of the Cingular guy
I was able to delete a bunch of the tones and images that are already on the phone to free up some room to put my own stuff on there. I made a bunch of ringtones from songs and dumped em on there instead of paying $3 a piece for em...
Last week I bought a V3x off ebay. The V3x is the latest available encarnation of the RAZR line. It is slightly larger than the normal RAZR but this is because of the fact that it is 3G capable. It's still a small phone and is absolutely packed with features. It has a 2MP camera which is insane. The screen resolution is phenomenal at 320x240.
I bought a virgin sim card for 10 bucks and programmed it to my account so I could use both phones. They both have the same number and both ring if I get a call. Kinda cool. As soon as I got the V3x I flashed it to the current formware release. When I got the phone it was branded to O2 which was annoying. The phone is 3G capable but there is no 3G service in Richmond unfortunately. The closest city with 3G coverage is DC. I might end up living up there anyway so that wil be nice. Right now the phone is operating at 2.5G. I stuck a 1 gig micro SD card in the phone and filled it with music. The phone has stereo speakers that put out surprisingly loud and clear sound. I editted the gain table to make em even louder. Now I can`t ever keep it at the highest volume cuase its that loud... But its not distorted, just loud. Pretty amazing.
Just thought I`d share. Its quite fun diving into the code of the phone software and editing to create desired effects. Most all motorola phones can be treated the same and highly modded.
#88112 My Version Of The Scar-n
Posted by
on 23 August 2006 - 11:11 AM
in
Homemades
Its actually a pretty forgiving system. The dart does not need to be prefectly straight. But there is pressure from the darts below compresing the chambered dart a little. When the bolt is closed the brass simply slips between the 2 darts and closes the breach. I have been surprised how forgiving it is and how well it works.
#86920 Rifled Barrels
Posted by
on 09 August 2006 - 03:35 PM
in
Homemades
There is really no need for rifling with a dart. It would just be a waste of energy for no real gain. Rifling is needed for a bulet because they are inherently instable in flight. The gyro effect stabilizes the bullet. A dart is stable in flight and really doesn`t need any further stabilization. You may get a marginal increase in accuracy due to assymettric imperfections between darts.
Would still be cool to do though
Would still be cool to do though

