Jump to content


Justin Andrews's Content

There have been 21 items by Justin Andrews (Search limited from 03-December 96)


By content type

See this member's

Sort by                Order  

#362867 OpenChrony - open source, DIY chronograph

Posted by Justin Andrews on 08 April 2018 - 12:40 PM in Homemades

Hi. I noted that in your source code you are using a while loop with a digitalRead.

While this will work, you can optimise your code, as the while and especially the digitalRead are quite slow.
For a faster more accurate reading I recommend setting up Pin Interrupts, known as an ISR (Interrupt Service Requests) these interrupts can be raised internally in the Atmel AVR processor independent of code execution. On the arduino you can access these using the attachInterrupt() function.
( https://www.arduino....ttachinterrupt/ )

I have written my own chrony code in the past.
My Chrono code is below. I've bolded the interrupt parts/


#include <SPI.h>
#include <Wire.h>
#include <Adafruit_GFX.h>
#include <Adafruit_SSD1306.h>

// If using software SPI (the default case):
#define OLED_MOSI   9
#define OLED_CLK   10
#define OLED_DC    11
#define OLED_CS    12
#define OLED_RESET 13
Adafruit_SSD1306 display(OLED_MOSI, OLED_CLK, OLED_DC, OLED_RESET, OLED_CS);


// -------------------------------------------------------------------
// Interrupt Service Variables

const byte interruptPin1 = 3;
const byte interruptPin2 = 2;

volatile bool m_pin1_active = false;
volatile bool m_pin2_active = false;
volatile float m_time1 = 0;
volatile float m_time2 = 0;


// -------------------------------------------------------------------
// Variables

// distance between sensors = 170mm or 6.69291 inches
// distance between sensors 557742.5

unsigned long m_distance = 557742; // distance between sensors in inches

int m_numTimings = 0;

float m_fps[10];
float m_currentFPS = 0;
float m_avgFPS = 0;
float m_lowFPS = 99999.0;
float m_highFPS = 0;
float m_totalFPS = 0;

static String m_stringCurrent = "Current: ";
static String m_stringFPS = " FPS";
static String m_stringHi = "Hi:";
static String m_stringLow = ": Low:";
static String m_stringAvg = "Average: ";

// -------------------------------------------------------------------
// Interrupt Service Functions

void Pin1_ISR()
{
  m_pin1_active = true;
  m_time1 = micros();
}


void Pin2_ISR()
{
  m_pin2_active = true;
  m_time2 = micros();
}


// -------------------------------------------------------------------


void displayText( String string, int x, int y, int textSize = 1, int stride = 6)
{
  int textCursor = x;

  for ( int i = 0; i < string.length(); ++i)
  {
    display.drawChar(textCursor, y, string[i], WHITE, BLACK, textSize);
    textCursor += stride;
  }
}

void setup()
{

  // put your setup code here, to run once:
  Serial.begin(9600);
  // by default, we'll generate the high voltage from the 3.3v line internally! (neat!)
  display.begin(SSD1306_SWITCHCAPVCC);
 

  pinMode(interruptPin1, INPUT_PULLUP);
  pinMode(interruptPin2, INPUT_PULLUP);
  attachInterrupt( digitalPinToInterrupt(interruptPin1), Pin1_ISR, RISING );
  attachInterrupt( digitalPinToInterrupt(interruptPin2), Pin2_ISR, RISING );


  display.clearDisplay();

  pinMode(A0, INPUT);
}

void checkISRPins()
{
   if( m_pin1_active && m_pin2_active )
  {
    
    if( m_time2 > m_time1)
    {
      float timeDiff;
      timeDiff = m_time2 - m_time1;

      float fps = m_distance / timeDiff;

      m_currentFPS = fps;
      
      m_numTimings++;

      if( m_currentFPS < m_lowFPS )
      {
        m_lowFPS = m_currentFPS;
      }
      if( m_currentFPS > m_highFPS )
      {
        m_highFPS = m_currentFPS;
      }

      m_totalFPS += m_currentFPS;
 
      m_avgFPS = m_totalFPS / m_numTimings;

    }
    // reset ISR variables
    m_pin1_active = false;
    m_pin2_active = false;
    m_time1 = 0.0f;
    m_time2 = 0.0f;
  }
}

void displayResults()
{
     display.clearDisplay();
    
    String outString = "";

    outString = m_stringCurrent + m_currentFPS + m_stringFPS;   
    displayText(outString, 1, 1 );

    outString = m_stringAvg +  m_avgFPS + m_stringFPS;
    displayText(outString, 1, 11);

    outString = m_stringHi +  m_highFPS + m_stringLow + m_lowFPS;
    displayText(outString, 1, 21);
 
    display.display();  
}

void loop()
{
  checkISRPins();
  displayResults();
  delay(100);
}


#360708 Muzzle loading 17th Century Pistol

Posted by Justin Andrews on 22 June 2017 - 04:59 AM in Homemades


Ok, thats really cool, I don't get what you mean by dead space in laser printing is usually free though.


When talking about SLS 3D printing, you normally pay by the Cubic Centimeter / inch, or for a portion of the machines space. So any voids in your print you are still paying for, if you can put another object in that space, you are essentially getting that part free (or more to the point, you are already paying for that space so putting something in it is just sensible) The only condition is you need to get the part out, so it cannot be an enclosed void. 
 

That worked, thanks
 
These are the stats:
Outer Diameter (Do) (mm) ...22.00
Wire Diameter (d) (mm) ...2.01
Free Length (L) (mm) ...199.9
Solid Height, Approx (mm)... 40.9
Spring Rate (N/mm) ...0.9
Load Length (L1) (mm) ...55.6
Load at L1 (N) ...132.6
 
Fun fact: The OD and wire diameter are basically the same as a Mcmaster 9637k26 spring. It's only 8inches long ([[[[k26]]]] is 11in or ~280mm) but the spring rate syncs up with an 8inch length of [[[[k26]]]] as well.

The solid height of D22790 seems a bit shorter though. I think [[[[k26]]]] has 3.09 coils per inch; it seems your spring has more like 2.6 per inch or 1 per cm.

There is a higher rated version, try entering D12790, and looking at the Load at L1, 160N variant.
I tried using this version in my first version of the barrel. It was a touch overrated for the internals I'd made. It shattered the (high tensile) screws holding the compression chamber together and I ended up firing out both the HIR ball AND the piston down the garden!

Is the [k26] more like this D12840 spring perhaps?
If so, thats quite interesting, as thats the spring I use in my Muskets.


#360685 Muzzle loading 17th Century Pistol

Posted by Justin Andrews on 21 June 2017 - 04:40 AM in Homemades


Ah, would that be the red dot under the hammer?


Correct! :)
 

I see, thank you very much.  Is it possible to make them actuate at the same time, or would that be too much work for too little reward?


I tune the catch screw so as to get them to actuate pretty much at the same time, one of my ideas for the catch screw is to not use a single screw but to use two parts. The first part is a long 1/2 inch long grub screw, the second part is a brass hexagonal stand off. The grub screw is screwed into the catch itself, and the stand off into the other end of the grub screw. You can then alter the length of the catch screw by turning the stand off. This in effect alters the point at where the catch releases in relation to the pull of the trigger. Use a bit of threadlock paste to stop the brass stand off turning to easily.

A nylon stand off would probably work better than a brass one (as it would be harder to rotate) that's not something I've tested yet. It's something I keep meaning to drop into some dead space in the next batch of laser 3d printed parts (dead space in laser printing is usually free, so I usually fill it with something)


#360671 Muzzle loading 17th Century Pistol

Posted by Justin Andrews on 20 June 2017 - 05:27 AM in Homemades

By the way the link to your spring doesn't work.


Thanks, if I click that link, it does'nt work, if I copy it and open a new window, it does work. Clearly Voodoo at work.
Try using this link https://www.assocspring.co.uk, and then entering D22790 as the search term on the company's front page. (box titled "search our site")


Close, but no. The spark would be created when the flint strikes the steel frizzen; the pan underneath holds the powder and catches the spark.

 I don't see a flint, so I'm guessing it doesn't spark.

Indeed you are correct, no flint, no spark, instead it's adapted to fire off a toy cap instead . That way it makes a nice bang when fired.


That's awesome!  I don't quite fully understand how it primes and fires though.  I understand that it uses the ramrod to push back the piston, but does the hammer have to be cocked in order for the catch to work?  


Also, does it spark when the hammer strikes the pan(I think thats what its called)?

The hammer does not have to be cocked, in order for the catch to work. 
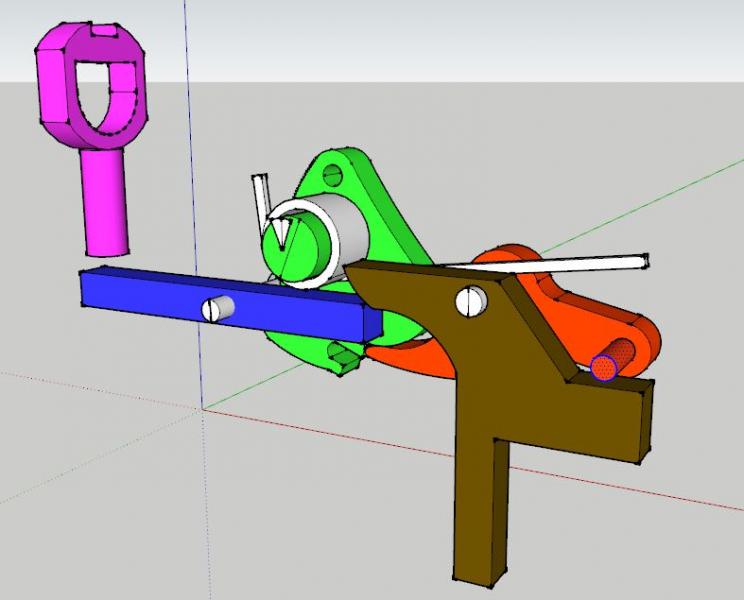
It's a little complicated to explain in words, so I'll post a CAD drawing of the internals, suffice to say, they are side by side mechanisms, in that the trigger activates both the hammer and the catch at the same time.

So in the picture the trigger (brown) is pulled, which lifts the sear (red) and pushes one end of the catch transfer bar (blue) down
The sear as it lifts disengages the tumbler (green) dropping the hammer,

at the same time the transfer bar rotates around its axle, and pushes the catch (purple) up.

So while the hammer position has not effect on the catch, this is how both are activated at (almost) the same time by the trigger.
 

Attached Thumbnails

  • lock.JPG


#360650 Muzzle loading 17th Century Pistol

Posted by Justin Andrews on 19 June 2017 - 06:51 AM in Homemades

I must make a video of it firing :)
First I'll need to make a new one, as the one above is on loan to the chap who sells my muskets.

The mechanism is pretty simple, I use this spring https://www.assocspr...und-wire/D22790
with a *tiny* metal rainbow catch (I tried plastic, but the forces are way high and not much plastic to hold them, so it wears out too quickly)
(UK nerf builders, take note, the above company is *awesome* for springs)

As the compression chamber is the same diameter as the barrel, I have to keep the barrel very short, only 50mm.

To prime it, you use a ramrod down the barrel to push down and lock the pistol (this is intentional as these are replicas of black powder muzzle loading pistol)
then you pop the HIR into the barrel which has a 21mm choke in the barrel to hold the ball. The choke also acts as the end of the compression chamber, which is why you can see the heavy duty black screws in the barrel securing the choke from being displaced when the piston hits it.


#360627 Muzzle loading 17th Century Pistol

Posted by Justin Andrews on 17 June 2017 - 04:33 PM in Homemades

I'm going to pretend you didn't say that. I will now go and cry about my inadequacy in the corner. JK but seriously, how did you do that? Does it seal well?

Very very well.
I was studying how high power air rifles work.
Although most modern air rifles use a sort of expensive silcone seal, back in our grandfathers day they used leather seals.

And it turns out that making leather seals is rather very easy.

You need natural undyed vegtan leather. This is very important as this leather can be molded by using warm, but not boiling, water. Hot tap warm I find work well enough.
The leather should be about 1.5mm to 2mm (sorry about metric measurements, I'm from the UK)

Next you need to make a mold. The sides of the mold should be the same internal diameter of your compression chamber (thats the Air rifle term for the air chamber)
Personally I just create one from a 12-15mm (or 1/2 inch) tall piece of the tube I use for the actual compression chamber.
Next you need the ram for the press, this should be around 3-4mm smaller in diameter than the ID of the compression chamber.

(don't worry I'll link to some sites about how to make these at the end of this post)

With the pieces of the mould made, you'll need a clamp, I find big woodworking hold down clamps work a treat.
Cut a piece of leather thats big enough to fit over the mold. Wet your piece of leather in the warm water until it more or less stops bubbling.
Place it rough side out, over the ring of the mold, and place the ram on top, transfer this to the clamp, and force the ram right into the mould.
Take a nice sharp knife, and trim the excess off.
Next leave it to dry for about a day. (I find overnight works)

Take it out the clamp, soak it in a couple of drops of oil (leather likes to be oiled in order to be supple, and you can get good oils for this) , and presto a cup seal that is pretty match for a rubber seal, but more interestingly is self lubricating.


This video most closely resembles how I make mine, except I don't use the screw method, and use woodworking clamps instead.

(some of these sites recommend using a socket as the ram, not tried that myself, as I made mine on my lathe, but I bet it would work)
http://www.pyramydai...er-piston-seal/
http://www.network54...er piston seals


#360592 Muzzle loading 17th Century Pistol

Posted by Justin Andrews on 15 June 2017 - 09:44 AM in Homemades

Sweet. Still primes with ramrod right? Also, what is that barreling material?

Yep loads with a ram rod.
The barrel material is stainless steel, and also forms the compression chamber.

Piston uses a leather cup seal which is custom formed for the compression chamber.


#360588 Muzzle loading 17th Century Pistol

Posted by Justin Andrews on 15 June 2017 - 03:47 AM in Homemades

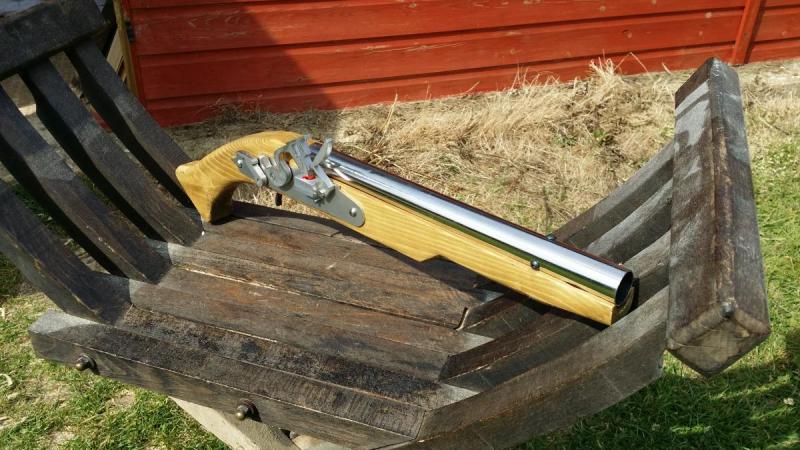
17th Century English Lock Cavalry Pistol (field test prototype).
LARP safe foam firing firelock.

Based on an existing English (or Doglock) pistol, this was a large pistol commonly used by cavalrymen.

The lock is a fully working copy of a flint lock, with both full and half cock positions, as well as a safety at half cock which makes it hard (though not impossible) to fire the pistol, in addition the external sear is movable and can be used to retain the cock.

Fires the same foam ball ammunition as the Larpquebus® with a range of around 9-10 meters, and well under the 1 joule limit (required in the UK to ensure the blaster does not fall under the legal category of lethally barrelled!)

Otherwise its the same general operation as the Muzzle loading Musket (Larpquebus) I posted here a while ago.


Attached Thumbnails

  • 1.jpg
  • 2.jpg
  • 3.jpg


#357667 3D Print Question

Posted by Justin Andrews on 24 January 2017 - 06:13 AM in Homemades

I've quite successfully used laser sintered nylon catches. However I also print prototype parts on my own filament printer, so I'd recommend using as high as an infill as you can get away with before your printer starts blobbing (or if it does just turn down your feed rate a touch)

However, if you can, I really recommend buying some time on a nylon laser sintering machine, as the quality and strength of the parts is really good.


#356856 Arquebus Rainbow Catch.

Posted by Justin Andrews on 24 November 2016 - 08:42 AM in Homemades

As a thank you for the inspiration of the Rainbow catch, I'd like to share the design for the modified version of the Rainbow catch that I used in my LARP ready Arquebus.

The first picture is of the 3D printed components (SLS printed in nylon) components and the two catches (one for the piston, the other smaller one is a safety catch for the ramrod) which are laser cut.
The catch body is on the far left. (and yes that is an SLS printed piston!)

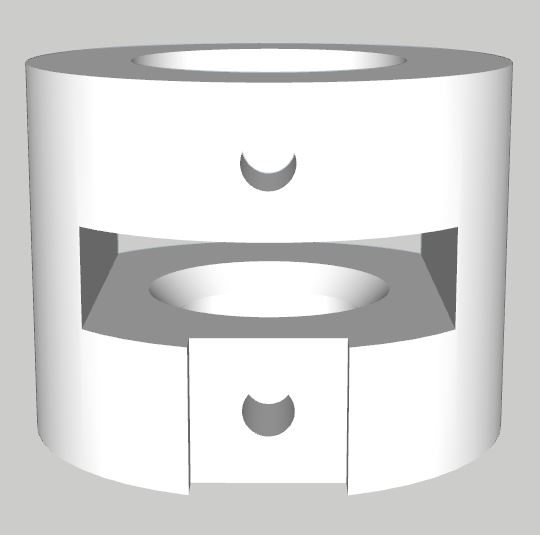
The next picture is a rendering of the catch body itself. The actual catch slides inside the catch body. The catch spring, rather than being on the pin, is hidden inside a hole drilled inside the catch itself. This allows the spring to be contained inside the pseudo barrel of the arquebus, and allows for a slightly smoother operation and less chance of trying to work its way into the barrel through the hole drilled for the pin.
Although its not visible in the photo, the catch itself is machined to have a countersunk chamfer on it. 

The little indentation at the bottom of the catch body, is for a metal lug to be screwed into it, this allows the barrel to be fixed into the stock, and is not that different to the same feature seen on barrel breech plugs seen on actual black powder guns.

Edit:

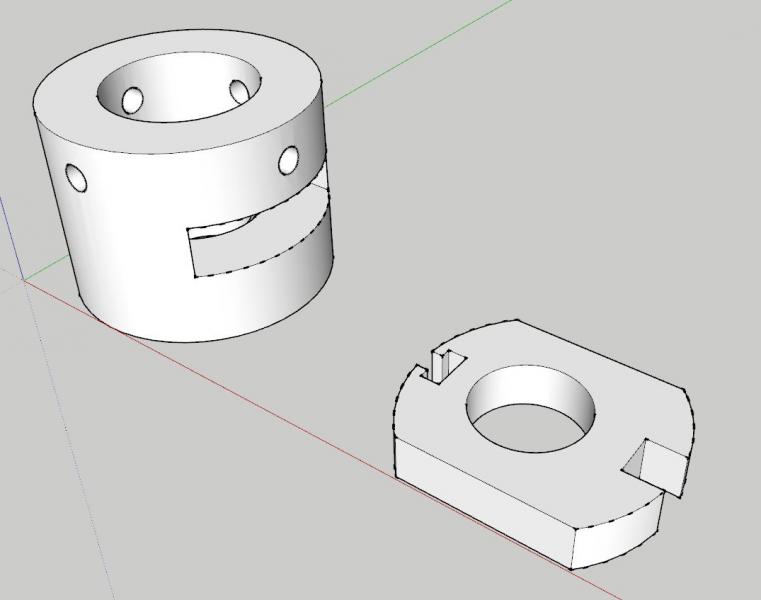
I've added a drawing of how the catch now looks.
The square recess takes the spring (5mm dia spring), while the T section is a nut capture for an M3 Nut, which saves having to drill and tap the catch.

I've also uploaded an STL of this catch, in case anyone want to have a play with it.

Attached Thumbnails

  • 14715048_10154404214730041_7507165298988620252_o.jpg
  • catchB.JPG
  • catchB2.JPG

Attached Files


#354955 FDL-1: Fully 3D Printed Robotic Blaster

Posted by Justin Andrews on 12 July 2016 - 04:09 AM in Homemades

There's a part of my head that currently imagining redesigning the cylinder away, and replacing it with a set of racked motor driven belts, that chain feeds darts into the flywheels from a hopper.
Because 6 darts is good, however with a few dozen (or more) darts, you have the sentry guns from Aliens... ;)


#354930 FDL-1: Fully 3D Printed Robotic Blaster

Posted by Justin Andrews on 10 July 2016 - 05:11 PM in Homemades

This is a very clean build, I like it a lot.

I've not got round to even thinking about home building a flywheel blaster yet, but using brushless motors is a nice idea, good spin up time and lots of torque.
I could see a blaster like that going down well at a sci-fi based LARP as well as NERF wars. I certainly know a few people who might be interested it.


#354923 Homemades Picture Thread

Posted by Justin Andrews on 10 July 2016 - 02:55 PM in Homemades

Some pictures of my home made nerf Rival firing muskets in action.
The event is Cry Havoc, a UK historical LARP. (a sort of cross between Re-enactment and LARP)

The ugly chap kneeling down is me. ;)

Attached Thumbnails

  • 13615034_1100451546667745_5913110416886191275_n.jpg
  • 13580486_10154114525475041_1253799137812042772_o.jpg
  • 13640747_10154114525555041_4286655725818635038_o.jpg


#353938 Vucan / Havokfire modification!

Posted by Justin Andrews on 03 June 2016 - 09:17 AM in General Nerf

I have a Vulcan laying around in my bits box. To be honest I quite like them, and designing and 3D printing extra cartridges/links for the chain is one of those things on my to do list.


#353913 Post your DIY/Maker/Craft/Mod hobbies

Posted by Justin Andrews on 02 June 2016 - 10:54 AM in Off Topic

I've been known to occasionally make the odd piece of armour.

This is my attempt at a copy of the Saxon Coppergate Helm.
254786_10150342346185041_767763_n.jpg?oh

Detail on the banding 

247412_10150275075745041_1758412_n.jpg?o


#353904 Musket Homebuild.

Posted by Justin Andrews on 02 June 2016 - 01:51 AM in Homemades

There is no evidence for pistols (that I've found) for the 15th Century, and precious little for the 16th, their popularity takes off in the 17th possibly due to improvements in metallurgy around that time.

However depending on the LARP, that doesn't matter.  (Cry Havoc, the game this is built for is more re-enactment LARP set in 1615 so no pistols, I wanted one for my character, but could find no evidence that they were readily available so no dice... Rifles and breach loading Arquebus had been developed by then, but no pistols! So I might get silly, if I get the time, and make a NERF Ribault instead... ;) )

Still yes I am planning on making pistols. I'd like to get the size of the lock down first.


With some luck, I'll be able to take some construction photo's for you over the weekend.


#353868 Tornadowbow help

Posted by Justin Andrews on 31 May 2016 - 04:46 AM in Homemades


Early SNAPs used wood for the plunger rods. They're fine, just use your head as far as how big of holes get drilled in them so they aren't unduly weakened.

Indeed, I can also recommend wood. My early prototypes used wooden plunger rods, and they were just 1/2 inch pine rods with a 1/8" wood screw used to attach the plunger head to the rod. (or something like that, sorry everything is metric here in the UK these days, so I'm having to convert to Imperial on the fly. ;) )

Anyway... something like nylon will always be more durable (and easier to machine), but if budget or availability is an issue, then wooden doweling / rods will work, and work well enough.


#353867 Musket Homebuild.

Posted by Justin Andrews on 31 May 2016 - 04:17 AM in Homemades

Thanks for the replies.

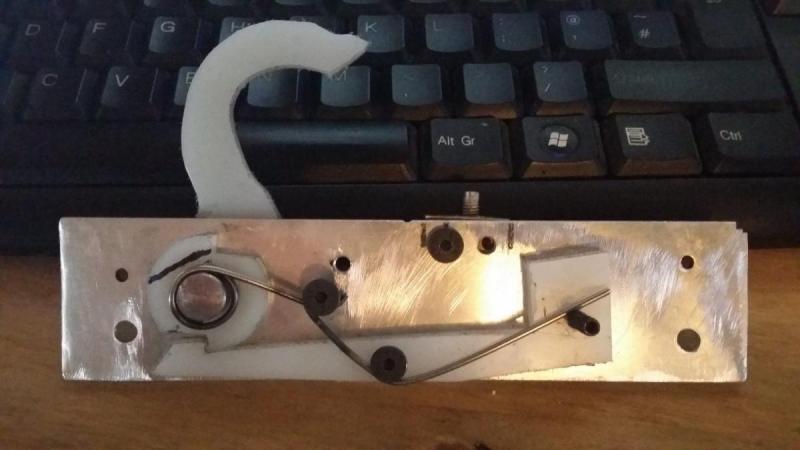
I've been away in the workshop improving the design, and while not entirely NERF related, I thought people might be interested in the working cap gun "flint" lock I've started developing for the musket above. It fires the sort of plastic caps you can easily get anywhere for toy guns. (I was not very happy with the cap firing mechanism being in the barrel)

This is the first engineering prototype, and while it fits the musket, I need to make the design a bit smaller, and look a lot nicer.

The grub screw in the sear not only holds the end of the spring but is what the trigger bar in the stock engages with to both trip the flintlock, and activate the Rainbow catch in the barrel.
The spring is made from a length of thin spring steel wire, heat treated in a couple of places to allow me to bend it (using a basic blow torch) its bend cold where I need it to still be a spring so its wrapped cold around the hammer axle, and the sear pivot.


Feel free to copy any part of this design if you want to try something similar. :)

13268277_10154022523410041_4515854446733269036_o.jpg
13320910_10154022523420041_5169603535908278595_o.jpg
13335778_10154022523400041_7557353181984340970_n.jpg


#353289 Musket Homebuild.

Posted by Justin Andrews on 06 May 2016 - 07:14 AM in Homemades

It is so refreshing to see someone build a homemade with the main focus on cosmetics and mechanics rather than performance for a change. Thank you for this, and this truly unique priming system. I may be misinterpreting this, but you use a ramrod to push the plunger back and catch it, then place the ball in the barrel with another ramrod and fire. Is where the rival ball sits, and the plunger tube two different areas of the blaster? Does the Rival ball sit on the plunger head, in the plunger tube, or does it sit right outside of it, in a pressure fitted barrel?


Again fantastic work. If you haven't already, I'd recommend you enter this into Aeromech's homemade contest here: http://nerfhaven.com...riteup-contest/


EDIT: Did you make that chair in the pictures?

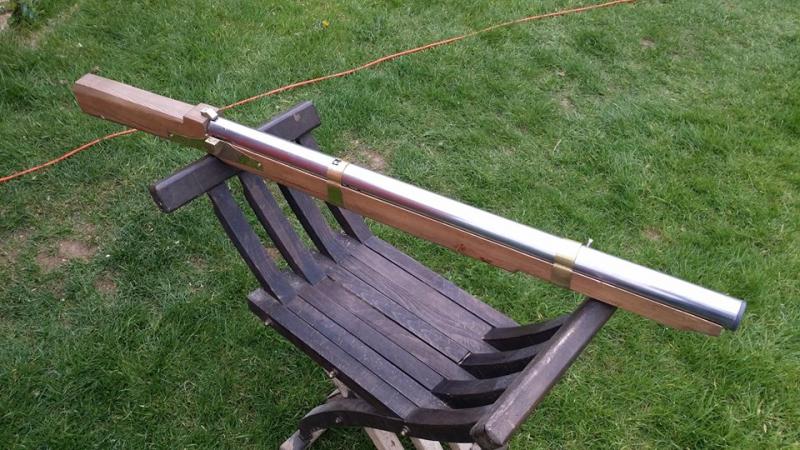
The Nerf Rival ball sits in an air tight section of the barrel, the plunger tube is its own section just behind the barrel. There is no way the ball can touch the piston, as there is a rainbow style catch between the piston and the ball. This catch is an odd one I know, but its there to stop the ramrod being accidentally fired out of the gun should something go wrong during priming the piston.

I did not make the chair, it was a gift. Though I have made medieval-esque chairs in the past.


This looks good. I am suprised this could have enough power to launch a rivals ball. What is the internal diameter of the barrel?

Some Dimensions for you.

Inner barrel for the ball is a brass tube roughly 23mm ID, with a machined 21mm airtight seat for the ball pressed into the barrel.

Air chamber - 38mm OD, 35mm ID, and is Mild Steel, I'm looking at using Stainless Steel at the moment.
Piston has a 225mm stroke, using a spring 290mm long with a minimum recommended compression of 60(ish)mm, roughly 30lbs fully compressed.
(spring is from Raymond Associated Springs, as McMaster springs are not available in the UK)

I hope that answers some of your questions Remzak.


#353266 Musket Homebuild.

Posted by Justin Andrews on 05 May 2016 - 11:59 AM in Homemades

Hi, thanks for the replies.
First off, I should have said in my original post a Thank You to Boltsniper, who's work, especially the interstage concept on some of his guns has been a real inspiration.


So I have two main questions for this design. First off where is the trigger? It looks great but isn't the trigger on 15th century muskets prominent.


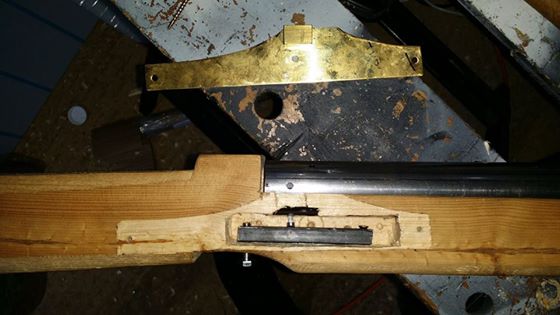
Indeed, and well spotted. The eventual plan is to bend, and tap, a steel rod, to replace the machine bolt acting as the trigger. This can be seen on picture 3.
The trigger bolt lifts up the small metal bar, which in turn presses the screw that is common to most rainbow catches. The idea is that this bar will also activate the mechanism of the match lock, but thats not finished yet.


Speaking of cosmetics to make it look more like the time try adding a fake bayonet.

This is a 1480 - 1500 Arquebus, slightly before bayonets were introduced. We have discussed fitting one for later weapons, but are unsure of the safety of using one in LARP combat. Its one of those "Nice, but... safety?" concepts.


Second of all why don't you put in a [k25]-[k26] and make it a plunger rod system instead of a direct push.

Not quite sure what you mean here. This gun is basically a simplified Rainbow, but using springs that are available here in the UK, and is why I gave them thanks in the Original post. I'll freely admit its not as powerful as many Rainbows however, I still have a lot to learn about making homemade Nerf guns.


This looks great, do you have a video of it firing?

Thanks Langley, I'll try and post one at the end of this post, but I have one post left for the day, so if I mess up embedding the video, I apologise as I won't be able to fix it till tomorrow.
(New poster rules)


Now, there are two things I think are pretty awesome here: One, that you used a wooden stock and by doing so have really made the blaster *look* authentic. More people should use wood stocks on homemades IMO. And two, that you've reverted back to the old-old days of the NIC and are using a ramrod, but you're doing it with the newest projectile they make.

Cheers Meaker VI, the Nerf Rival ammo is what got me especially interested, as its pretty much the right size for "some" historical musket balls. The organisers of the event this will be used also stipulated that it must work and act like an authentic Match Lock, so using the ram rod to prime the piston became the right choice.

Again with the wood (which is cheap construction pine wood, dyed and sealed with shellac) which helps make it look the part.

I can't attach a video, sorry to say, and I don't have them uploaded to somewhere like Youtube.
So if no one objects, I'll post the links to the ones I put up on the groups Facebook page.


This one had to be fired twice as the cap did'nt go off on the first shot... (yes they do take a long time to load!  )
https://www.facebook...53937242895041/


An earlier PVC prototype
https://www.facebook...53888302770041/


#353254 Musket Homebuild.

Posted by Justin Andrews on 05 May 2016 - 07:05 AM in Homemades

Hi.
I've been lurking here a while, and first off I'd like to thank the long time posters here, who's posts have helped me design this build. Especially the Rainbow guys for their remarkable catch mechanism.

I'd like to share a slightly different design, which is a musket style homemade designed for use in fairly authentic Medieval LARP games, rather than NERF wars and is based around the NERF Rival ammo.

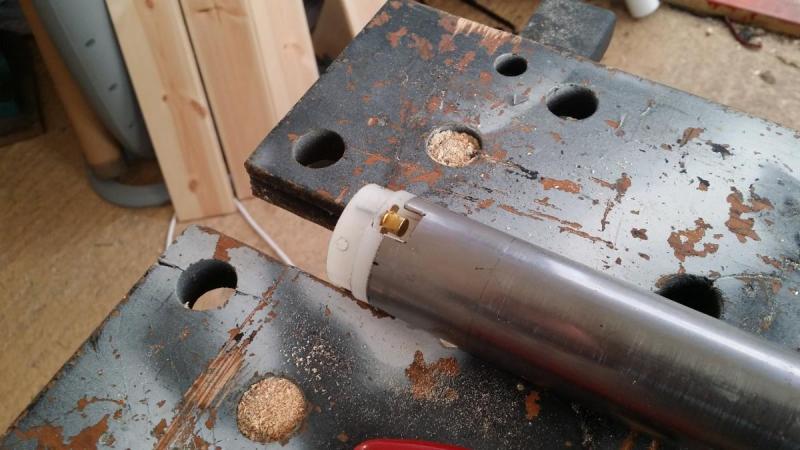
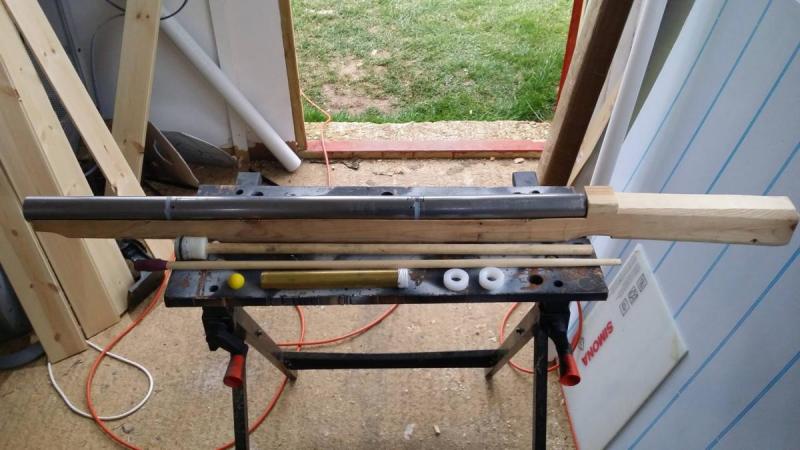
The design is based around the need to use a ramrod, which is passed down the barrel, and then used to push down and prime the piston, which uses a slightly modified rainbow style catch at the rear of the barrel. The round is then dropped down the barrel, and pushed home with the ramrod. Finally a small amount of talcum powder is poured down the barrel, and a toy cap is fitted just behind the air cylinder.

When the gun is fired, the catch in the rod leaves the rainbow catch, and is caught at the end of the piston travel on a ring, this then activates the cap (making the musket go Bang!) the ball is fired along with the talc (making a plume of smoke) 

Its neither quick to load, or very long ranged, but this is what we were aiming for, as we want them to simulate the loading and effective range of a real 15th Century Arquebus/Musket.


Anyway, if people are interested, I can post some pictures of the internals later, and perhaps a video of it working.
13151610_10153970264005041_996548031108662348_n.jpg

13124859_10153970264010041_7585388487021208168_n.jpg

Trigger mechanism
13001328_10153944539475041_872241717873425710_n.jpg

The bit what goes bang, also showing machined barrel connector
12957701_10153911449950041_3454661782550796522_o.jpg

Some of the internals on display
12909469_10153904083730041_1495342821967554247_o.jpg

Thanks 
Justin.