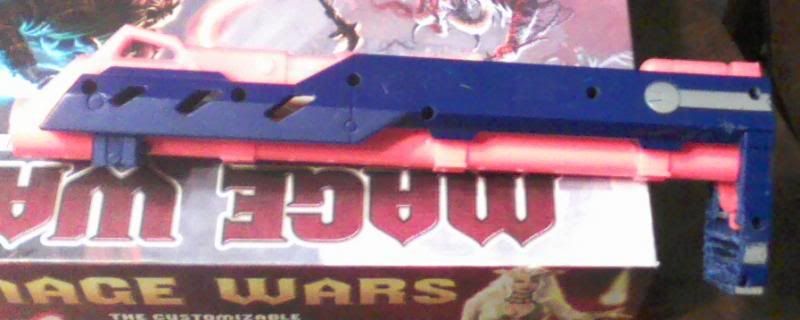
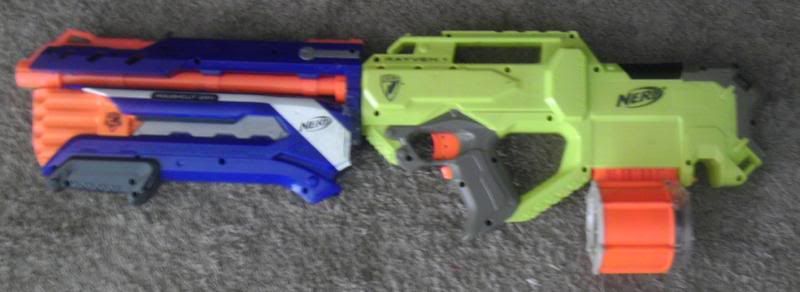
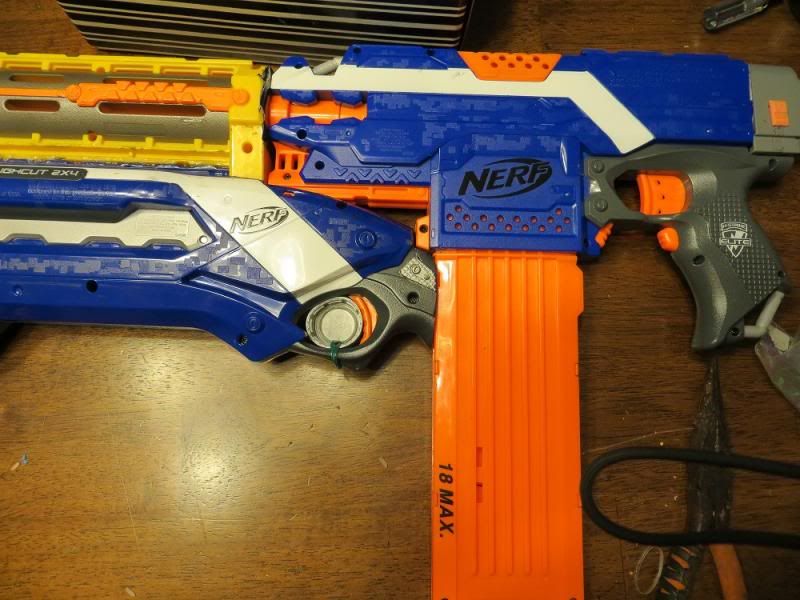
Jump to content


Ericshelpdesk's Content

There have been 4 items by Ericshelpdesk (Search limited from 03-December 96)


By content type

See this member's

Sort by                Order  

#329453 Universal Roughcut Masterkey for Rayven/Recon/Retaliator/etc

Posted by Ericshelpdesk on 07 May 2013 - 12:35 PM in Modifications

Modular. Very nice.

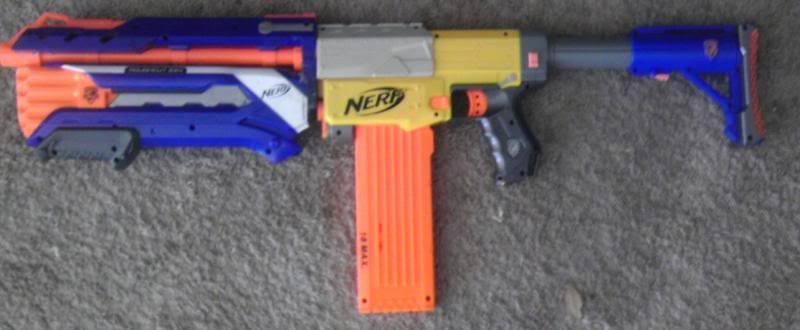
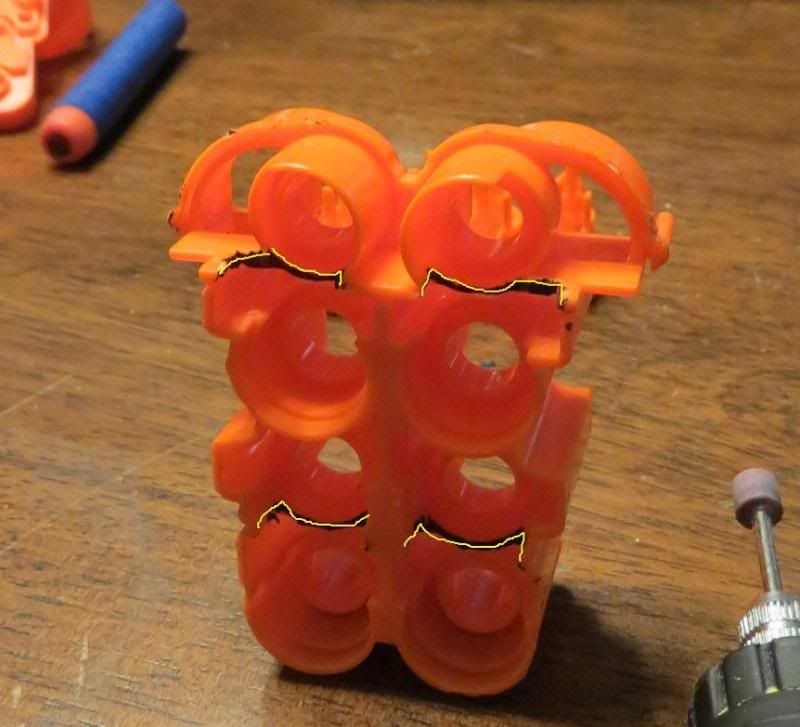
Would there be a way to use the tabs that hold the barrel in place for mechanical attachment? I would think it would be a bit more structurally sound that way.


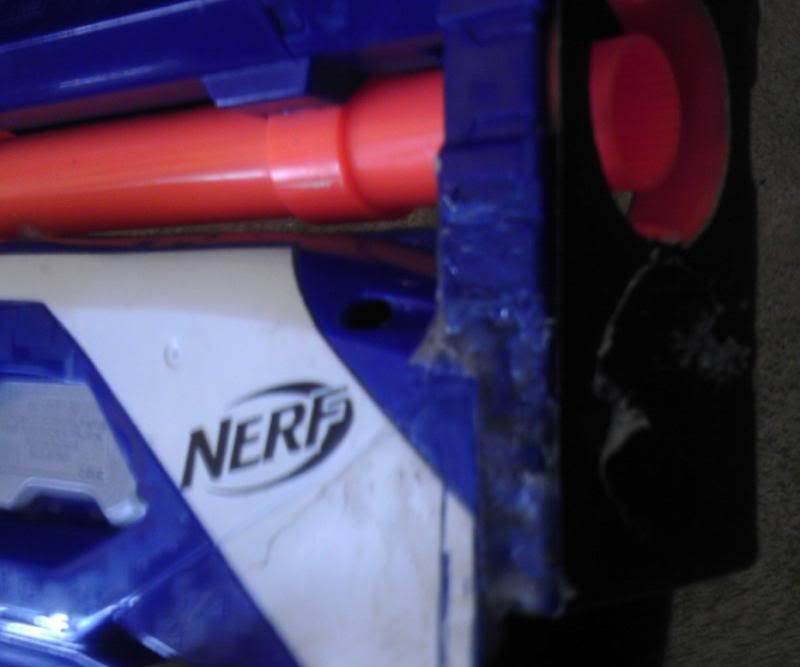
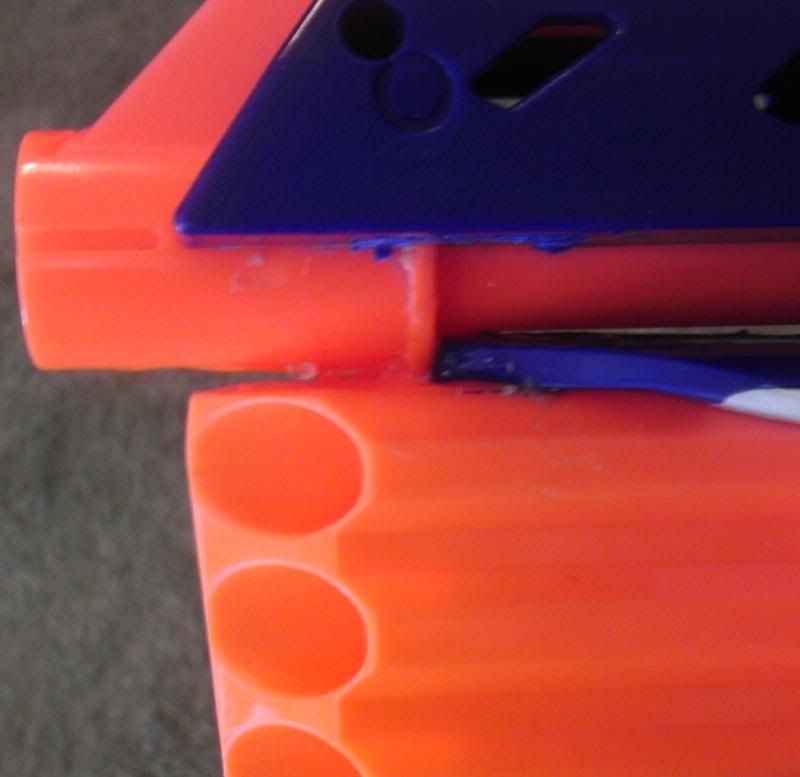
Yes, it's doable, but the spacing and shaving and fitting of the barrel holders on the bottom would be a pain, would have made for a dirtier integration, and not provide much benefit.

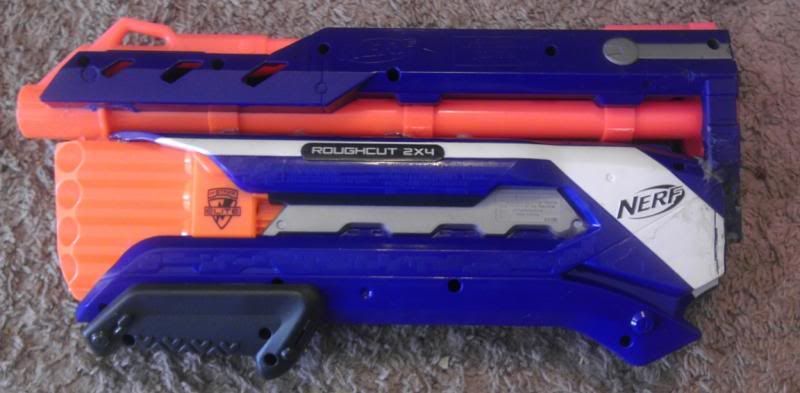
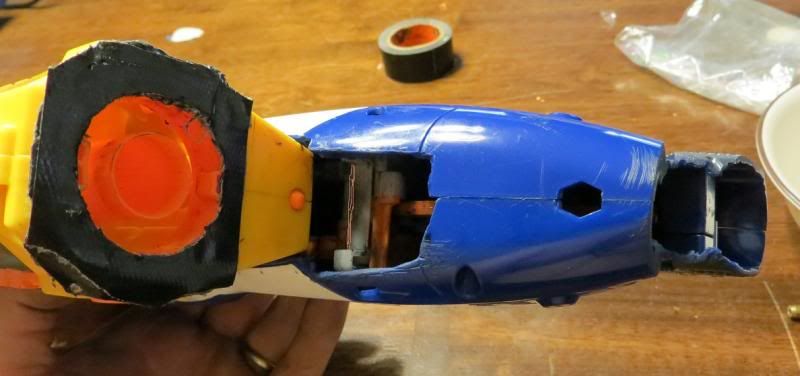
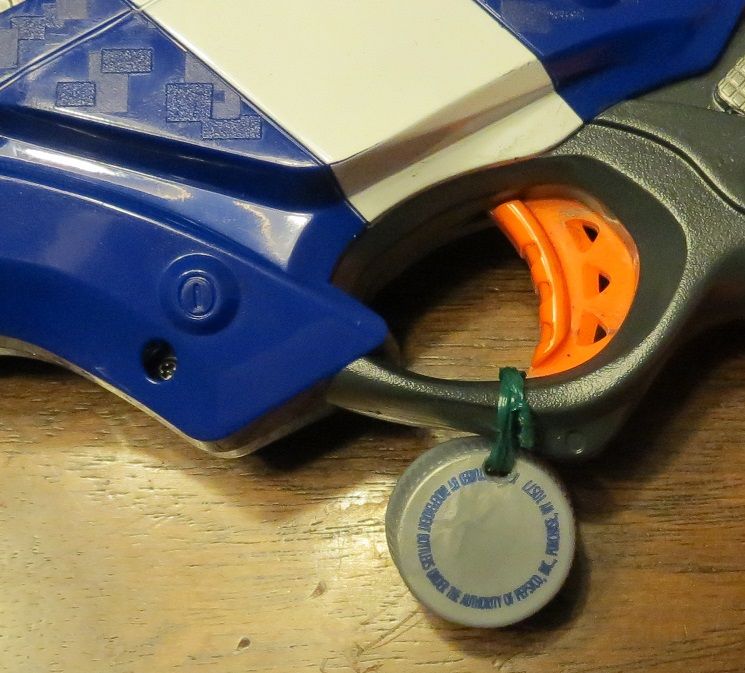
Wow, that's jus amazing, just one question; how will you able to fire the thing, since I don't see the trigger anywhere?
Thanks


As noted, I set it up to be slamfire only. It's not the most accurate, but based on spacing and distances on the rayven it seemed like the best option.

You have an excellent taste in board games


I know


#329400 Universal Roughcut Masterkey for Rayven/Recon/Retaliator/etc

Posted by Ericshelpdesk on 06 May 2013 - 12:17 AM in Modifications

Problem: My Rayven was feeling unloved since I gave my Stryfe the masterkey treatment.

Solution: A master key that can work on any gun with a barrel extension lug.

Parts: Rough Cut, Longshot front gun, glue of your choosing.

Tools: dremel cut off tool, screw driver.

Instructions:

Start by opening up the longshot gun, and cutting back to the back plate where the barrel attaches. If I were to do this over again, I would leave about another half inch of the back plate to allow the spring to stay and provide a better attachment point into the roughcut. Later you'll need to shave the sides of the back plate straight down to match the internal width of the roughcut.

Posted Image

Open up the Roughcut and set it up to do slamfire only so that it does not need the trigger.

I'm not providing a method for this, suffice to say that gluing the ramp from the trigger into the catch doesn't work, and neither were a half a dozen other things I tried. Whatever you come up with will probably be an easier or better solution. Perhaps the metal peg from the front gun could be driven through the frame of the roughcut to hold the trigger back. The method I ended up using took a piece of plastic from somewhere else and building a ramp on the bottom of the catch plate so the slide would shove it down. It took hours of screwing, unscrewing, shaving, gluing, pinning, shimming, more shaving, etc to get my method to work.

Also feel free to do the 4x2 mod.
http://nerfhaven.com...showtopic=23842
Cut apart the roughcut

Pull out the internals and chop away at the shell. If I were to do this again, I would cut the shell a little further toward the handle to better cover the sides of the back plate.
I cut the top rail completely off to make it flush with the top of the gun. If I were to do this again I would leave a little bit of the top rail as a gluing point for the barrel.

Posted Image
Posted Image

Glue everything together.

What you end up with:

Posted Image

Some recommended uses:
Posted Image
The rayven now not only looks badass, but the balance of the gun is right at the trigger guard making it extremely easy to use.

Posted Image
This works really well, although not really a good synergy since they're both pump blasters.

Some NOT recommended uses:
Posted Image
This is a NO, the front is way to heavy and way too far away.


ARE YOU PAYING ATTENTION, NERF?


#328857 Roughcut - 2x4 to 4x2 Mod + Bottle Cap Slamfire + Speed Loaders, For R

Posted by Ericshelpdesk on 18 April 2013 - 06:20 PM in Modifications

All of that work and people are more impressed that I shoved a bottle cap into the trigger.

I can tell you from experience that even banging on the gun sideways, the cap doesn't want to come out. It takes a deliberate effort (like pushing it out of the way with your finger) to remove it from the slot. The only reason I've got it attached to the trigger guard to begin with is because I didn't want it to get lost when I go to trigger mode. I use the trigger when I want to make a long distance shot quietly without revving up the motors on the stryfe and need some accuracy that the slamfire doesn't give me. I also use the trigger when I want to pop each side off individually. A permanent or semi permanent solution doesn't give me that flexibility. Also, yes, it's Murphy's law you're calling on me, and it only applies if you stop thinking about what you're doing and it either fires or doesn't fire when you expect or don't expect it to, but it has nothing to do with the mod.

If you don't believe me, try it out yourself! It's not like I'm asking you to chop open your gun or craft some special parts to make it work.

The reason the stryfe and roughcut go so well together is because their differences compliment one another. Revving up the motors takes time, so being able to pop off an instant shot while you wait that half a second gives you an edge over other flywheel guns. The ability to fire 2 (or in my case 4) shots at once to help compensate for dart drift adds a degree of accuracy. The way I currently use it is to pull the slide back on the roughcut and use that as my fore grip. In a tight situation all I need to do is slide my hand forward to fire. The ability to front load darts when magazines run low means you can scavenge darts quickly. It's like having a secondary tied straight to your primary that only requires one hand to operate. The size and shape of the two weapons together lend themselves to EASY modification that any kid with a nail file and some duct tape could pull off. What the roughcut lacks in capacity, the stryfe has going for it being mag loaded.

It also looks cool as hell.


#328847 Roughcut - 2x4 to 4x2 Mod + Bottle Cap Slamfire + Speed Loaders, For R

Posted by Ericshelpdesk on 18 April 2013 - 12:47 PM in Modifications

I was inspired by the few stryfe/master keys I've seen to do my first integration, as well as come up with a few mods of my own. Hope this makes for a good first time post.

The Master Key Itself:
My objective was the leave the stryfe completely untouched by the mod and maintain the ability to remove the master key portion without needing to disassemble anything.

Materials Needed: Your favorite nerf glue (I used epoxy).
Tools: A cheap dremel with a cutoff saw and some rough sandpaper to make the final fit perfect.

I took the barrel from my old recon because I haven't purchased a retaliator yet. The barrel itself is completely unmodified aside from being glued to the roughcut and a duct tape spacer added to the back of the barrel shroud to make the connection to the gun super tight and eliminate wobbles. It was attached to the roughcut by filling up the tac rails with epoxy and lining them up. Joining the rails like this made it easy to line it up perfectly straight and square.

Part of my design consideration was that the first finger curve on the roughcut would just kiss the magazine on the stryfe to avoid pinches and making the hand position to pull the trigger feel more natural. If you intend to use this with a drum magazine you will need to remove about another quarter inch of material from the rough cut's handle to accommodate it.


Posted Image

The cuts made to the top of the shell are larger on the left side of the gun to allow the tactical rail on the bottom of the stryfe just enough room to rotate past and sit snugly against the left side once it's seated. The stryfe's tac rail sits perfectly between the two plungers in the rough cut and doesn't impede firing at all. While you've got it this far, I suggest applying lube to the front of the plate that holds the plungers back (lightly highlighted on the picture). I had issues with the gun refusing to fire the second plunger and it's due to friction here.
Posted Image

You can see here where the master key is rotating into the stryfe and how little clearance it has.
Posted Image

The 2X4 to 4X2 mod:
My objective with this mod was to be able to dump foam downrange with a minimum of effort and sound. The gun can now empty all 8 chambers in under a second without compromising range or the integrity of the intelligent AR system.

I'll refer to the chambers as such from this point forward:
(1)(2)
(3)(4)
(5)(6)
(7)(8)

I succeeded in taking the 8 separate chambers in the AR and creating some port holes between 1/3, 2/4, 5/7, and 6/8 to make 4 separate 2 dart chambers. This means that each pull of the trigger/slamfire will fire 2 sets of 2 darts turning the roughcut into a true scatter gun.

Tools: A flat blade screwdriver to pry it apart, a dremel with a barrel shaped grinding head, and an exacto knife for the final detailing.

AR disassembly instructions can be found here: Rough Cut AR/peg removal
While you're in there, you might as well pull the pegs out as well and tape up the holes in chambers 1-4

I found it useful to push here with a screwdriver to get the parts to separate. They are not held together with glue, but are very tightly bound with an airtight tongue and groove system.
Posted Image

Once you get the AR apart, remove the material down to the yellow lines I've highlighted below. Be very careful with these cuts since making new holes anywhere else here is just going to mess up the AR system. When you're done, use the exacto knife to clean the bottom edges of the AR chambers. Put one of the AR plungers into its slot and move it around to make sure it has perfectly free movement in and out. Failure to do this will result in the ARs getting stuck down and leaving the barrel open without a dart inside it.
Posted ImagePosted Image

Some of the interesting things about the ranges with this mod:
Make sure to leave darts in chambers 3 and 4, since those are now the gate keepers of chambers 5-8.

Full of darts: Top 4 darts get 45 feet flat, bottom 4 darts get 40 feet flat.
Darts removed from chambers 3 and 4: 6 darts go a variety of short ranges. Not recommended.
Darts only in chambers 3-6: It goes back to the stock ranges of ~55 feet flat firing 2 darts per trigger pull/slamfire.

This means you can even mix and match what you want the gun to do. If you want 3 darts firing at a variety of ranges, you could leave darts out of 1 and 8 to drive those chambers back up to stock range, but still fire 2 more darts at medium range to back up the shot. The entire point of this mod is that the AR remains largely unharmed so that it behaves correctly and predictably, while allowing you to lob lots of foam in a very short period of time.

Bottle Cap Slamfire:
The objective of this mod was to allow me to either use the master key one handed with slamfire, or 2 handed with the trigger and be able to choose on the fly.

Materials needed: A 20 oz or 2 Liter bottle cap, and a twist tie or a zip tie to hold it to the trigger guard.
Tools: Something to punch a hole in the bottle cap.

As you can see below, the bottle cap takes up the whole trigger area and keeps the trigger pulled constantly. Bumping the bottle cap out of the way with your finger allows you to quickly go back to using the trigger. Every master key should have this.
Posted ImagePosted Image

Roughcut Speed Loaders:
My objective was to be able to reload my roughcut quickly since it now takes less than a second to empty it.

Materials: Foam, cardboard, something that's thin and smashable
Tools: Exacto knife.

I took the barrels of the roughcut and made a template where each barrel is and cut out holes slightly smaller than the streamlines, but slightly bigger than the dart tips. I now have an improved version that uses 2 thin layers of foam that lines up with the barrels much faster. The way this works is you line up the darts and smash the whole thing down. The foam falls away since the holes are bigger than the dart tips.

This is an idea that someone should really do on a 3D printer.

Posted ImagePosted Image