holy crap, here's one for the east coast people
https://www.shopgood.../Item/116261236
PBZ's Content
There have been 116 items by PBZ (Search limited from 03-December 96)
#364629 Sceptor... If you know, you know
 Posted by
on 25 February 2021 - 07:59 PM
in
General Nerf
Posted by
on 25 February 2021 - 07:59 PM
in
General Nerf
#364628 Sceptor... If you know, you know
Posted by
on 25 February 2021 - 07:55 PM
in
General Nerf
It's bee a while, fam. I've missed a... a few... APOCs, not all to my own volition, and things seem to be quiet around here these days. Glad to see its still active though.
I don't see a sales forum anymore, so I'll drop this here.
While things are normally overpriced and then you have to add exorbitant shipping, this is a steal for any one that lives closer or is willing to foot the shipping bill- they are fairly rare. There are several write-ups her on NH about these and they are pretty good... I also have a back burner project that I haven't worked on in about 5 years to 3d print a new "zero dead space" front end for transitioning to darts. Maybe I'll pick that back up again now that I'm far more familiar with cad and 3d printing than I was back then.
#363203 Safe way to compressor mod a Titan?
Posted by
on 22 July 2018 - 08:48 AM
in
Modifications
its been discussed. the low pressure of a pump on your leg would not pump the tank to anything usable. to actually make it usable, you would need either a lot more bending action, like jumping up and down or squats, or doing lunges, OR you would need a very small volume pump to get higher pressures which also means doing more pumping.
#363185 Safe way to compressor mod a Titan?
Posted by
on 11 July 2018 - 10:43 AM
in
Modifications
There are not many that do this because it makes them non legal for most war use- energy used must come from the person wielding.
That said... there are several examples of people reinforcing their tanks with stuff like epoxy putty or fiberglass. I saw a topic somewhere of someone that tested a titan tank to failure but I don't remember what the verdict was.
Personally, I put a low pressure cheap pump and a pressure switch on a titan tank- i have done zero reinforcement and at 35-40 psi it has held up with no issues.
#363084 General Battle Max Sceptor Reference Thread
Posted by
on 11 June 2018 - 10:52 PM
in
Modifications
So again, almost another year later. I have picked this project up as something to do in my spare time. I am sending the front bushing out to get scanned in the morning, up to some guy in MA. He says he can scan to 50 micron level, which should be close enough to get my center lines centered and my screw posts in the right place. I have also conducted some experiments with my printer and may be able to make these myself, lowering costs... But the price I stated above is way off. These would be around $25-30. I would prefer to get them done in SLA, so I might upload the file to Shapeways (which of course would cost even more). The post production work in either case would include drilling the screw post holes for accuracy and sanding to fit.
If anyone is still interested, please let me know. I had a couple people interested when I started the project, but it has been on the back burner for so long some of them have retired.
#363071 APOCALYPSE 2018 - Saturday August 4th in Ocean Township, NJ
Posted by
on 08 June 2018 - 03:34 PM
in
Nerf Wars
I'm back, after taking a year off from SSD ^
Bringing the TitanTurian.
Almost everything I have is going to be up for sale or trade, including the gear bag. Need to make an attempt to pare down what I have.
#361765 Titan-Turian Sleeper
Posted by
on 15 October 2017 - 10:38 PM
in
Modifications
UPDATE:
So the whole systems seems to work as intended, though the slop leads to needing to hold the clip in so that the dart chamber doesn't jamb on the edge of it. That slight little bit is messing with me. Not sure how I'm going to fix it yet, until I open up the blaster again.
In terms of firing power, its a lot less than I thought. On par with stefan blasters, possibly even slightly less due to the difference in less forward-weighted darts. I am going to open it all up and do some sealing work around some of the air joints that are lowering my seal- the dart chamber to pvc is a sloppy fit (getting too gungho on the lathe), and I want to look at the front of the dart chamber and see if I can add some foam or something to better seal the chamber to the barrel. I may consider removing that and custom cutting the pvc to seal to the chamber without the intermediary.
thedom21- breech works in the usual manner of a regular blaster, rather than the convoluted crap that previously filled this one. manual back and forth. because of the seriously shortened breech length, I printed a filler that fits in the slide cutout and blocks the handle from returning too far (which wasn't really a problem but in the final painted version it will help pull the blaster together as a single piece).
Silly- "two breeches"... sooooo... doubled singled titan running off one pump? Also that's definitely the same pump I used. Fits great eh? Though it looks like you moved yous up slightly to not to cut the shell?
You would be better off just installing the second trigger switch in the centurion rather than trying to franken a new handle in just for that. Mine is currently inside the thumb hole stock, but I plan on moving it when I next open the blaster to do some work, probably the same way. I will probably get rid of the auto fill feature and move to a momentary switch.
Chikun- The hose barbs are whatever size needed for the pump hose, which happens to be 3/16ths now that I looked up my order. They were ordered specifically for that hose. The price is probably more based off prices from a year ago, but: Cent= $60, pump= $15 mcmaster parts= $40+shipping, printed parts (purchase price, because not everyone owns their own printer)= $50-60 (or, that's what I would probably charge for them all, which is probably lower than others), assorted materials (duct tape, epoxy putty, 2pE, goop, sandpaper, etc)= $30. Right around 200 there.
"Completely homemade" is a different genre altogether. I wanted to put mine in a cent, and I got it in a trade at APOC.
#361739 Titan-Turian Sleeper
Posted by
on 10 October 2017 - 01:15 PM
in
Modifications
Dang it! I have a build in process with the exact same setup but with 2 titan tanks. Now im worried that I will look like im copying you!
Yep- copycat. Actually, two titan tanks would be an interesting design, since linking them through the open ports at the back of the tank wont work- not enough flow. how were you planning on doing that? One tank barely fits in the shell width wise, and it take up the entire center section. or is your pump/hand pump outside the shell?
Nerd blood is more of a chilled mug kind of beverage.
I do love my chilled mug beverages...
#361731 Titan-Turian Sleeper
Posted by
on 09 October 2017 - 04:31 PM
in
Modifications
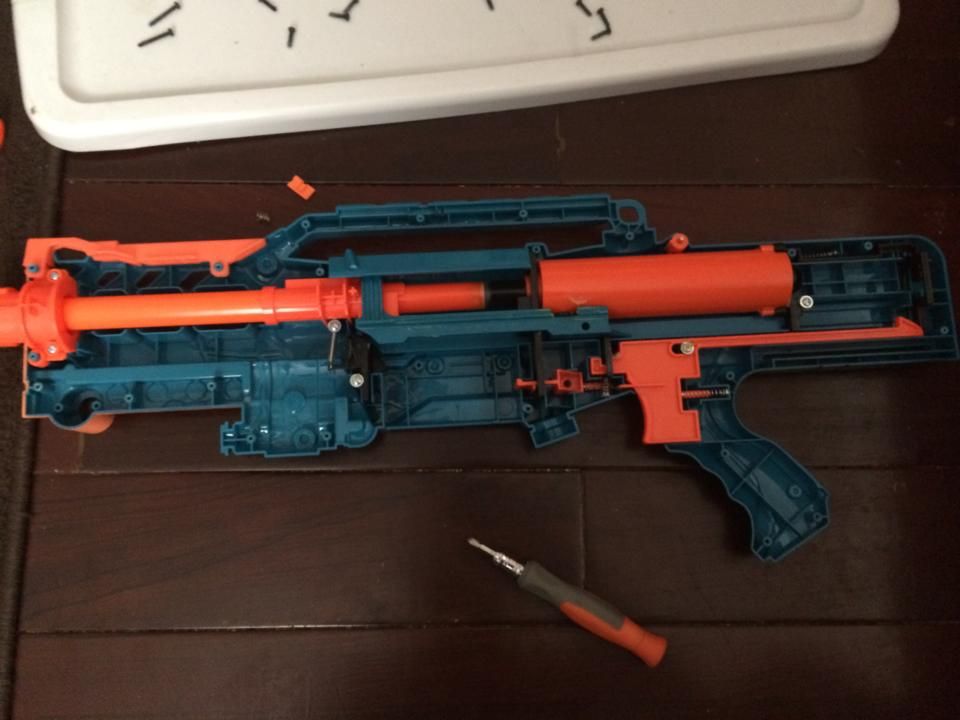
Cap'n Whitebeard, the E&C nerfer back again, showing off the project I have been working on since I traded for a Centurion at APOC... 16? Anyway, here goes. For those of you that were there, the monster we discussed has been born.I am not going to make this a tutorial Ok that was the plan but it's almost there now. BUT STILL- the total cost of parts is some where around $200, and I don't expect anyone else to make one-it requires a 3D printer and a lathe. It's also not really war legal for several reasons. If you are feeling lucky (punk), then message me and I can help out with the 3D printed files. There are 6, and they took me around 25 or 30 hours total to draw up.
The goal of this project was to create a sleeper of sorts- as stock looking as possible with ridiculous amounts of power under the hood. So forget war-legal, that always means singled titan. Which I have plenty of parts for. Don't judge, it was a phase. I bought every titan I could get my hands on.
So, listed in no particular order, with pics at the end:
BATTERIES
The batteries are in a 3D printed box (the black one in front of the trigger), installed in a battery tray I bought online. It has a clip that keeps the tray in, but bends for tray removal. There is enough wire at the top to pull it out a couple inches. The batteries are 26650's, so... 7.2v @3500 mAh? Something like that. The install of the box required a lot of cutting, and then rebuilding the interior of the shell to a shelf that i could glue the box to. Enter epoxy putty and 2 part epoxy.
In the picture below, ignore the hose, gauge, and ducttape. That all got changed in a redesign. The ducttape was wrapped around a hose clamp because it kept trying to cut me.

PUMP
This was bought at the Mart of Walls for around $15. Cheapest one on the shelf. Pulled apart, fits almost perfectly in the stock, minimal shell cutting. Made me very happy.

PRESSURE STUFF
The NC pressure switch and the new gauge were purchased from McMaster. Switch is adjustable, with lowest setting around 35 psi, which is plenty of power for drywall not expecting a shot (more on that later). Max is beyond what I would ever set it at. Most of the tubing is repurposed from the pump. The hose to the gauge is different for more flexibility. The barbed T fittings are also from McMaster, and were trimmed to the first barb because space and then hose clamped because safety and leaks.
BUSINESS MIDDLE
The connection and slide from the tank forward is 1 inch schd 40 pvc. I know this ends up killing some power, but come on, its a singled titan. The only way around this is to have the tank slide back and forth and be directly connected to the dart chamber. Too much work.
The dart chamber and sled are 3D printed, then welded together. I will probably put a pin in it at some point for piece of mind on the connection. The two parts took most of the CAD time listed above.
The new trigger pull attaches to the original trigger in the same way, then goes up to hook on the firing pin of the tank. It uses the original slide pins to operate, though the shell around them was reinforced due to twisting from forces.
BUSINESS END
The original barrel is way too big, so I simply put some 3/4 pvc down it. It has some wrapped ducttape spacers to keep it centered and is glued in place. It actually extends all the way into the blaster to sit right up against the short section that houses the dart tooth. Final length to be determined, it was just something I had laying around and I didn't feel like cutting it down at the time. I will probably cut it to match the length of the stock blaster to hide it.
SO... SPECS?
Yeah I have no idea. I don't have a chrony, but from 15 or so feet at 35psi the trigger gets pulled and there is a flash of red and then there is a dent in the drywall. It was pretty much instant. I'm betting on 250 plus/minus 10 because of my paintball experience. I have not pumped the gun any higher than the 35ish psi, I only got it done last night. I will be testing it more thoroughly at some point soon (like probably tomorrow). I expect decent ranges. AKA I'll wreck North Korea's shit from my back porch.
OTHER STUFF (and answering questions before they come up)
The stock ammo is modified so I can reuse it.
No, it's not weighted, just filled.
Yes, I will bring it to wars. Probably won't be allowed to use it.
No, I don't plan on posting the 3D printed files. I don't trust the Great American Public.
Yes, I plan on shooting more drywall and other shit laying around to measure destructive capability.
Yes, I plan on privately testing more dangerous ammo.
No, you may not come watch or take part. I mean, alright yeah. Message me if you live nearby. Don't tell anyone.
No, it's not for sale.
No, I wont make you one. See point 4.
Thanks for reading, and I'll see you all at the next E or C event I get to.
Attached Thumbnails


#361502 General Battle Max Sceptor Reference Thread
Posted by
on 03 September 2017 - 05:55 PM
in
Modifications
I was told this one was around $48k. It will be interesting to see what it does- obv like you said the scale is way different.
#361499 General Battle Max Sceptor Reference Thread
Posted by
on 03 September 2017 - 01:43 PM
in
Modifications
So it's been more than another year since I looked at this thread. I recently made contact with someone willing to let me borrow a 3d scanner at no cost- he wants to see what his building scanner will do at close range on small parts. Again, if anyone else reading this has access to a scanner and is willing to make a few scans of the piece I have modeled above, please let me know. My attempts are just ever so slightly off and do not fit into the main body section, mainly because of the screw ports. I would probably get these printed on a better printer as well, since mine is fairly entry level.
The answer is that these drop in parts would probably cost around $10. I feel that for an entry level mod almost equivalent to OMW, this is an acceptable price. No tools other than a phillips screwdriver are needed. And something I just thought of, I could modify the file to have a slidey bit that fits into the pump and keeps it from coming out, solving the second biggest problem with modifying them.
#356448 Caliburn: Mag-fed Pump-action Springer
Posted by
on 27 October 2016 - 06:04 PM
in
Homemades
I am amazed and excited to see blasters like this. It utterly blows my mind how you guys come up with this stuff... I will probably use some of this design when I get around to building my magfed Tbow.
Excellent work. I look forward to more photos and videos!
#356441 Aluminum parts
Posted by
on 27 October 2016 - 01:01 AM
in
Modifications
injection molded nylon? thats... im not even sure which i would rather have?
I don't pay a lot of attention to you at APOC, since i can hear you all day, so i wouldn't have noticed what you were carrying.
anyone have a link to the 3d printed sentinel lever? i can throw that right on the list of parts getting made- i could even modify it a little for comfort.
i found the link to the 4B trigger, i will move that to the "getting made" folder. due to the negative mold process, i will have to post cast some of the edges into them after production- the long side groove, the... pin slot? and clean up the bottom(?) slide bit. i may have to work with some who has current access to solidworks to make some quick changes in the file so that i can make a mold for the foundry.
#356410 Aluminum parts
Posted by
on 24 October 2016 - 09:21 PM
in
Modifications
I can provide a CAD file for a 4B\sonicbazooka trigger sometime this week if you need one. Or just the whole blaster since I traded for it at APOC and haven't done anything with it yet.
Roboman is selling billet longshot boltsleds, but the price is really high.
Are there any sentinel parts that would be worth casting? Either pre or post-modification? I could see the point of making less-uncomfortable levers.
If you send over the file I will add it to the folder of parts, and add it to the list of parts "being made".
I'm not trying to push anyone else out of their own sales- I'm just trying to make these parts easier to get a hold of.
Ive never... even seen a Sentinel in person? let alone used one. The lever looks like it might be a little long but if someone could send me an overall length I can check.
You can wrap the handle of a sentinel lol,
if you could I'd like to see metal plunger rod, metal catch metal plunger assembly.
Would be pretty cool lol
Some of us have large hands... wrapping small handles makes the problem worse.
For what blaster? Metal plunger rods are easier and safer made from rod stock, and soft aluminium catches would be suspect in my opinion.
#356403 Aluminum parts
Posted by
on 24 October 2016 - 06:18 PM
in
Modifications
Ok, whelp, its been a while. Between the site being down for a while (props to Langley for everything he does to keep this site up) and my own life resembling a couch fire in the off campus housing on a Saturday night, I have been super not-doing-nerf-shit. Well, other than a few minutes here and there on the 'cannon' some of you know about that were around me at APOC. Err, for those that were, yes- it fires. Videos and all coming soon to a popular Nerf site.
So here's whats up:
-I am finishing the CAD for the PAS part(s) tonight and shipping the PAS back to Slug in the morning (apologies; I swear I'm not trying to keep it).
-If there is anyone willing to loan out a LS boltsled CAD or STL, please let me know!
-I saw something recently that may have been 3d printed nylon LS boltsleds? Being tested with an absurd amount of weight hanging from it? Is that a thing?
-Updating the second post with parts I am looking to CAD, please pm me if you have one i can borrow for a few days.
-The last that I heard, Dom has not received his Maximizer back from someone, so I still do not have those parts to CAD up.
-I will be posting to r/nerf or whathaveyou in the next few minutes about this, and ask for other parts people want that are not available.
#355533 Aluminum parts
Posted by
on 15 August 2016 - 02:08 AM
in
Modifications
Thanks Slug. I'm out of town this weekend, but I will get to work on CAD when I get back, maybe even possibly during the six hour drive.
Is there anyone out there with a decent longshot sled file that I could borrow for one or two prints? I would like to make a test and have someone put it through a bunch of rounds with a modded blaster before I go saying I can make them. I can take almost any format, but as I said, stl's are easiest.
Is there anyone out there with a decent longshot sled file that I could borrow for one or two prints? I would like to make a test and have someone put it through a bunch of rounds with a modded blaster before I go saying I can make them. I can take almost any format, but as I said, stl's are easiest.
#355524 Aluminum parts
Posted by
on 13 August 2016 - 07:37 PM
in
Modifications
Yes, CAD file so that I can 3d print the parts, then use that as a mold for te metal ones.
I can work with stl's the easiest right now, since I have several programs for working on the mesh.
Please link to files if you have them available or shoot me a pm about getting me parts to do the cAD myself.
I can work with stl's the easiest right now, since I have several programs for working on the mesh.
Please link to files if you have them available or shoot me a pm about getting me parts to do the cAD myself.
#355517 Aluminum parts
Posted by
on 12 August 2016 - 04:53 PM
in
Modifications
Nope, full scale production foundry. Been in business almost 50 years. Ain't nobody got time for backyard shenanagins like that.
Air tanks aren't an option. Too much liability.
Flywheel cages are a sure thing already, just need to get the files for each blaster so that I can print the molds.
Air tanks aren't an option. Too much liability.
Flywheel cages are a sure thing already, just need to get the files for each blaster so that I can print the molds.
#355465 Aluminum parts
Posted by
on 10 August 2016 - 02:19 AM
in
Modifications
Because the foundry I would be getting parts from is making negatives.
Slug I'll take you up on your PAS whenever your ready.
Slug I'll take you up on your PAS whenever your ready.
#355450 Aluminum parts
Posted by
on 09 August 2016 - 03:08 PM
in
Modifications
I am not currently looking to make gears. The reject rate for missing teeth and the post-pour clean up work is going to be high in my opinion. Better off getting a CAD file and ordering a metal print from a website like shapeways (but try not to make it them, prices are outrageous over there), then tossing it in a rock tumbler with some decent sand to take off the edges that will eat the rest of the plastic components.
ESLT redirects are not going to be possible because of internal holes. I'm not doing lost-material, I'm making mold negatives. Solids and indents are ok, through holes will have to be machined in. Triggers and other fiddly bits are totally possible though.
Someone more knowledgable about plunger heads is going to need to weigh in on those, but I'm pretty sure the extra weight over the 3d printed ones is going to affect performance.
For PAS parts to be made, someone is going to have to send me one for a few days to tear down and measure. As I don't own one, I need to understand the whole mechanism and be able to look at all the needed grooves in parts to cut down on post process machining.
#355434 Apocalypse 2016 - August 6th in Ocean Township, NJ
Posted by
on 09 August 2016 - 03:09 AM
in
Nerf Wars
Apoc 2016 was easily the most balanced one I have been to, and probably one of the most balanced wars period. Lots of Old Blood, lots of New Blood. Lots of New Blood waving Old Blood designs around. Lots of Old Blood waving... New-Old Blood designs.
Pros? uh, probably just easier to make a short list of cons. Highlights maybe?
Highlights:
Got to see friends from near and far again ^.^, and put faces to a few names I had not yet
Gears, Langley, Miguel, Clownie, Ted, Aeromech, Chicken, and more
Traded a few blasters for an NIB CENTURION for Project Titan Rifle
Only payed (1) DT3 and $20 for travel costs
Serious rain stayed away until 5.468 minutes into cleanup
Actually playing in my Titan armor
Not destroying my Titan armor while actually playing in it
Adulted enough to put on sun block this year and only got lightly burnt
Serious discussion about aluminum parts that do not cost an arm and first born
Cons:
The Soccer Mom Van never shutting The Pie Hole (not expecting much, so low bar easily met)
SnoopyDogDouche yelling about his dick up a specific dead gorilla all day
Not enough light drizzle to cool off the day
Almost fell asleep while driving multiple times while driving home
And as someone else mentioned- sex toys not belonging to a Sex Dwarf (and only integrated with duct tape... come on pleb)
Thank you all for coming out. Thanks to Miguel for Coming Out.
I promise to try harder at not being an E&C Nerfer, so who's up for a Kline Park War?
Cap'n Greybeard
#355419 Aluminum parts
Posted by
on 08 August 2016 - 06:17 PM
in
Modifications
Thanks Slug.
As stated, the reason behind this is higher quantities of needed parts. Simple stuff like triggers I can have done immediately, as the CAD files are available and strength is not an issue. If I get to bolt sleds, I will be looking for volunteers who are actively using the blaster to give feedback on how long they last, since I traded my longshot off at Apoc.
I will use the saved post to start listing parts to take a look at, and have a list of available parts in the future.
Edit: please try to stay on topic, this thread is looking for wanted parts, not for tooting your horn about how big your machine shop dick is. If we want to go there, I have two Haz CNC's and up to a 9 axis machine almost a big as my house, if I ask nicely. Are we done? Cool. Back to parts.
#355398 Aluminum parts
Posted by
on 07 August 2016 - 11:09 PM
in
Modifications
I think that came up as well at some point. I would need a set of part to do the models.
#355395 Aluminum parts
Posted by
on 07 August 2016 - 09:53 PM
in
Modifications
Post saved.
Parts with interest:
Longshot sleds
LS catches
Retaliator sleds
Retal catches
Flywheel cages (need models, will need parts to CAD and people to test them)
Sentinal levers
Parts def. getting made:
PAS pump slide
Maximizer lever
4B triggers (need someone with access to SolidWorks to make a few changes to the file first)
#355394 Aluminum parts
Posted by
on 07 August 2016 - 09:51 PM
in
Modifications
Please bare with me I am attempting to get this posted from mobile at work. I wanted to get this posted soon after Apoc.
I had a discussion with several people about making aluminum parts. The current state of affairs is that there are a few people milling parts, and the back log is huge (as I understand, since I have unfortunately become an E and C nerfer).
Having the CAD skills, a 3D printer, and access to a foundry, this post is a "pilot program" of sorts to gauge interest on metal nerf parts.
At the moment, I have a short list of parts including two from the Maximizer (if that's wrong, correct me Dom), 4B triggers for several individuals, and even interest in the spinny bits for the strongarm for the turret upgrades (though that being a rather complicated part).
If you have an interest in metal parts- including longshot bolt sleds- please post up what part you would like to see. Even one-off parts you think you might be the only person who wants one, post it. Also, parts for homemades- full metal rainbow catches? Full metal ESLT parts? Give me your ideas!
Edit from later post:
I you have CAD files please link to them or shoot me a PM about sending me parts so I can do the CAD work.
#353611 General Battle Max Sceptor Reference Thread
Posted by
on 20 May 2016 - 02:25 AM
in
Modifications
Huh. I haven't been to these woods in a while.
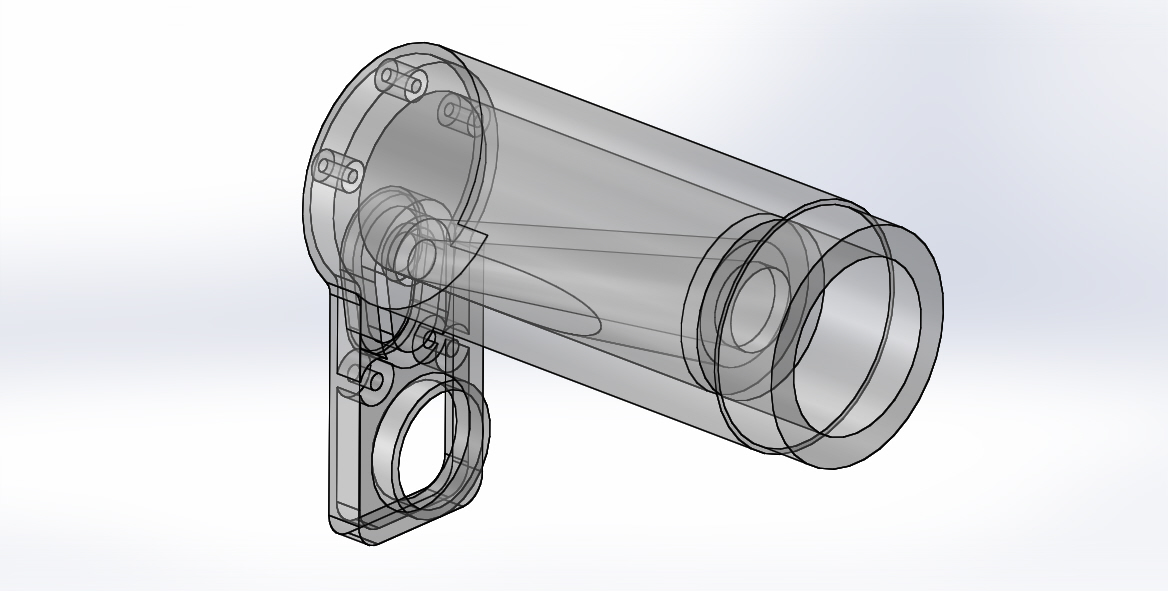
I have two sceptors, one red, one blue. The only difference I found, and it may possibly be a difference in the age of them, is that the rubber seal at the front, where it dumps air, are different shapes. One is a flat rubber puck that sits against a ring in the back of the front bushing (the piece that you glue the pvc into), and the other has a slightly longer rubber piece that has a bevel to the front edge. The corresponding ring in the bushing for that model has the same bevel. This has more sealing surface and possibly a slightly better air flow?
I have photos of this difference somewhere, I'll see if I can find them for reference material.
On the other hand, if you never take the front bushing off, and simply follow this guide, it doesn't matter. However, I do have a project sitting on the back burner for a while now for a drop in front end for the Sceptor- direct replacement straight to... either 3/4 or 1/2 inch pvc. "Zero" deadspace without cutting off the front end of the blaster. I do not have access to Solidworks anymore, but I could recreate the whole thing with Onshape if there was some interest in reviving the project. I was not able to really get it dialed in to a drop-in-fit before I had to quite. See picture. I can also share the file if anyone would like to take a look at it. Or, if any can do a 3D scan of the back side of the bushing, I would love to get my hands on the file.
Attached Thumbnails
#347393 Philly Area Help Koree Test a New Field War July 25th
Posted by
on 23 June 2015 - 02:31 PM
in
Nerf Wars
Oh, even clownie coming out of the dark places for this? I'll throw a maybe on this too, due to drive time and possibly chaperoning-AKA-being-21-to-check-into-the-hotel at the beach that weekend.
#346525 Paper Shooters
Posted by
on 03 May 2015 - 08:40 PM
in
Off Topic
couple of things i see:
"no need to buy ammo"... well, directly, anyway. you still have to make it, and the paper has to come from somewhere. and not all of us live next to a recycling plant- i certainly dont.
the paper rounds get tucked into shells? what? you only get 8 shells per blaster? what?
the plunger tube in this thing looks like the size of a maverick. no wonder its getting 65 feet, its only shooting a gram of paper.
my take on them is that even if they shoot 65 feet, i wouldnt use them for anything more than a basement fight.if im interested in spitball ammo, ill go buy the one commonly on the shelf next to the nerf stuff, that comes with a hopper like paintball. 3/10, would not back kickstarter or buy.
#346296 Apocalypse 2015 - Recapping on page 5
Posted by
on 19 April 2015 - 06:52 PM
in
Nerf Wars
Haven't missed one yet since i started attending, don't plan on starting now. +1 this year
#341517 Hell After Halloween II
Posted by
on 25 August 2014 - 02:19 PM
in
Nerf Wars
Nov 1 or 8 works for me, but Pitt would work better for me. I can probably get both VVX2 (Sam, not on NH yet) and Joe to come with, both of whom were at APOC this year. Lots of new toys to bring too.
#341172 POW! Foamcoming 2: Necrohorse of Glory Rides Again
Posted by
on 13 August 2014 - 09:19 AM
in
Nerf Wars
after being sick for the last two wars in pitt, i was going to say third time's the charm... and then i realized this is the weekend of comic con baltimore. sorry guys, wont make this one either.
#341002 Zombiestrike Long Shot - actual discussion thread
Posted by
on 05 August 2014 - 11:41 AM
in
General Nerf
I think it has something to do with a common jamming problem when loading elites into the old longshots. the dart tooth has been modified. im not really interested in the blaster, so i havent been following the conversation.Could you be a little more specific?
#340979 Zombiestrike Long Shot - actual discussion thread
Posted by
on 04 August 2014 - 03:20 PM
in
General Nerf
posted to NMW facebook page by Van James Huynh (who did end up attending APOC)
consensus seems to be a total rerelease of the longshot with a new paintjob and a few modifications to shoot elite darts
consensus seems to be a total rerelease of the longshot with a new paintjob and a few modifications to shoot elite darts
#339751 2014 Nerf War Schedule
Posted by
on 24 June 2014 - 10:15 AM
in
Nerf Wars
Month of Event: July


[url=http://nerfhaven.com/forums/index.php?showtopic=25082]July 12 [PA] SoCen PA Battle 2.0[/url]
#339732 SoCen PA Battle 2.0
Posted by
on 23 June 2014 - 02:06 PM
in
Nerf Wars
Great! The more the merrier!I might be able to make this. I also might have a few friends from college joining me. We'll see how things go...
#339600 SoCen PA Battle 2.0
Posted by
on 16 June 2014 - 11:32 AM
in
Nerf Wars
Sounds like we need to movie the location of the war or they need to move the wedding. Sorry you cant attend.For the record I use a heavy metal mesh in me masks. Its taken shots from many a nasty home-made. Got to keep my pretty face Fabio-tastic.
Sadly for all of you, I will not be attending. My brother is getting married that day. Said day will be spent testing the human limitations of blood-alcohol tolerance.
#339456 SoCen PA Battle 2.0
Posted by
on 10 June 2014 - 11:02 AM
in
Nerf Wars
War canceled due to low interest. Will try for another weekend later this summer.
Date:July 12, 2014
Time: Pirate vessel will be arriving at 9:30, and will leave when everyone quits.
Location: Kline Park, Wood Duck Lane, Wrightsville, PA 17368 (a few minutes south off Route 30, right on the west bank of the Susquehanna River)
When you get to the park, pick an entrance and drive in and around until you see us. We will probably park on the south side of the park by the restroom.
DATHAMP will be attending again this year in preparation for APOC '14.
I will offer to pick up anyone who wants to take the Amtrak in from NJ to Lancaster. It's cheaper than driving out, though you don't get to bring as much stuff.
I have new toys! Bar magnets on sticks make for easy dart sweeps (darts with ferrous content, anyway).
MAP
Thanks to Redshot for the map, though apparently it was originally made by Langley.
Some Gametypes: 3:10, 3:15, Free-for-all, Iron Man, Freeze Tag, TDM, 2 Man Team, Suicide, Sidearms, maybe some sort of accuracy contest? (prize TBD), and def some clay shooting again (possible 2nd prize).
Lunch: I will bring my small grill and burgers or something for all (it got cleaned after last year's fiasco, so it shouldn't light on fire again), or bring your own lunch. There is not a nearby place to run out and get lunch that I know of. Bring plenty of water for the day.
Attire: please dress for the weather, and don't get toooo tacticool. We had a cop check on us last year, lets not give him a reason to leave his nice air conditioned vehicle.
Ammo: Just about anything is OK, but #6 slugs encouraged. Glue domes... maybe, but mostly fuck you.
Pirates' Code:
-Don't be a rapscallion. Trolling encouraged though.
-Standard restrictions on blasters and ammo, but I am a little more lax- ex. WNTS's are allowed, singled titans we only load with hot dogs but are legal. Bring an extra cannon with you me'hearty, they do love to break.
-Anything that goes above and beyond the call of 'dangerous' will be spot banned.
-No taps, but you wont get that close anyway.
-No participants under 13, please. If you can drive yourself there, you are old enough to not need an adult present. Under 18 glasses required, over 18 glasses strongly requested. Masks are acceptable if they don't have wide open eye holes, and especially if you are Clownie.
Bunks occupied: 4
Possible Other Shipmates: 4
Date:
Time: Pirate vessel will be arriving at 9:30, and will leave when everyone quits.
Location: Kline Park, Wood Duck Lane, Wrightsville, PA 17368 (a few minutes south off Route 30, right on the west bank of the Susquehanna River)
When you get to the park, pick an entrance and drive in and around until you see us. We will probably park on the south side of the park by the restroom.
DATHAMP will be attending again this year in preparation for APOC '14.
I will offer to pick up anyone who wants to take the Amtrak in from NJ to Lancaster. It's cheaper than driving out, though you don't get to bring as much stuff.
I have new toys! Bar magnets on sticks make for easy dart sweeps (darts with ferrous content, anyway).
MAP
Thanks to Redshot for the map, though apparently it was originally made by Langley.
Some Gametypes: 3:10, 3:15, Free-for-all, Iron Man, Freeze Tag, TDM, 2 Man Team, Suicide, Sidearms, maybe some sort of accuracy contest? (prize TBD), and def some clay shooting again (possible 2nd prize).
Lunch: I will bring my small grill and burgers or something for all (it got cleaned after last year's fiasco, so it shouldn't light on fire again), or bring your own lunch. There is not a nearby place to run out and get lunch that I know of. Bring plenty of water for the day.
Attire: please dress for the weather, and don't get toooo tacticool. We had a cop check on us last year, lets not give him a reason to leave his nice air conditioned vehicle.
Ammo: Just about anything is OK, but #6 slugs encouraged. Glue domes... maybe, but mostly fuck you.
Pirates' Code:
-Don't be a rapscallion. Trolling encouraged though.
-Standard restrictions on blasters and ammo, but I am a little more lax- ex. WNTS's are allowed, singled titans we only load with hot dogs but are legal. Bring an extra cannon with you me'hearty, they do love to break.
-Anything that goes above and beyond the call of 'dangerous' will be spot banned.
-No taps, but you wont get that close anyway.
-No participants under 13, please. If you can drive yourself there, you are old enough to not need an adult present. Under 18 glasses required, over 18 glasses strongly requested. Masks are acceptable if they don't have wide open eye holes, and especially if you are Clownie.
Bunks occupied: 4
Possible Other Shipmates: 4
#339336 LAW airgun
Posted by
on 03 June 2014 - 03:49 PM
in
Homemades
I covered most of this in the write-up, but I'll reiterate. This gun draws heavily from the WNTS, it is referenced and cited. Speed is 210fps as measured by a 60 frames per second video camera. Usability is simple, just tilt, pump, aim, and fire. The opv/oprv is designed to limit FPS to a safe level, but doesn't effect usability at all.
The well nut is inverted to increase air flow out of the tank. The hex bolt has less than a third of the cross section of the well nut, so this way it restricts airflow less. You are correct, the second tee then serves to stabilize/center the well nut, which can move more without being held in place by it's end inside the bushing. It's also worth noting that the original WNTS required an o-ring for seal, probably because the wellnut wasn't held flat against the bushing by anything. An o-ring the perfect size would be hard to find at Lowes, and this build eliminates that.
What specifically makes you think someone would drop this for a loaner? It shoots as far as most springers and is easy to use, so I consider it competitive.
Please excuse my first questioning if it wasn't clear or you thought it rude.
A collection of responses and notes on your other responses:
I asked about the WNTS because it's only cited once in the write up and I missed it the first time through, so it may be heavily based off of it but it's not heavily referenced or cited (you could have put it upfront instead). Great idea on turning the well nut around, you are correct about not having to push against the pressurized tank to open the valve. The original WNTS well nut valve used an oring because the well nut did not have the surface area to seal on the face of the fitting, it sealed in the end of the pipe, and it was held shut both by the trigger spring and the pressure of the tank. Finding an o-ring that fits for the WNTS build was literally as easy as finding one that fit around the well nut, but flipping negates that completely, well done again.
I am familiar with how to use this type of blaster, I have several WNTS's. I was asking about stuff like ranges, fps, etc being affected by the OPV because even if its a super easy build, if its still outclassed by 20 feet at every turn its going to be replaced with a loaner during competitive wars. Do you have any comparison data to this blaster's stats if you do not have an OPV at the same number of pumps? I understand that would be like building a WNTS, but with the well nut turned around it
Side note, from reading through the write up a few more times- you mention not buying glue because "it requires an extra $10 dollars in chemicals that are [negated through this build]". Good job on not needing the glue, but what makes it "hard to use" for a newcomer, and what makes twist fittings any safer? I understand that if you get a bad glue joint it would leak; and with the OPV in the system, you won't reach pressures high enough to blow a joint. The only places I have ever broken my WNTS's is actually the twist in fitting, sometimes while pressurized...
#339318 GRZNTEDFEST
Posted by
on 03 June 2014 - 09:03 AM
in
Nerf Wars
Next time I should check the date before I get all excited and try to promise things. I will be in Ohio, sorry guys.
#339285 LAW airgun
Posted by
on 02 June 2014 - 12:50 PM
in
Homemades
Based off of the MadGhost, have you seen the american version, the WNTS?
Quick question to double check- is the second T in the trigger section just to stabilize the trigger bolt? By flipping the well nut I would think it wouldn't be necessary since it i think would seal a lot easier?
Ranges? FPS? Usability? You don't have any info on how the OPV affects these. Wondering if people that build this are going to drop it in favor of borrowing a blaster.
Great write up, good job on finding a way to get an OPV in there!

