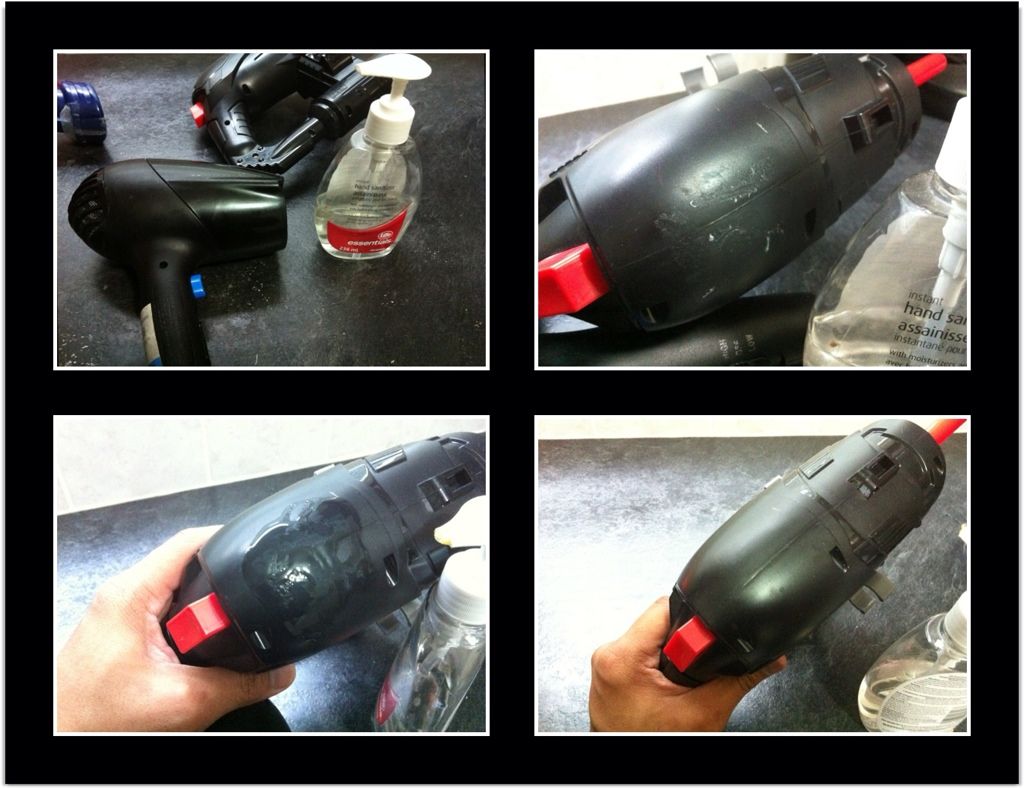
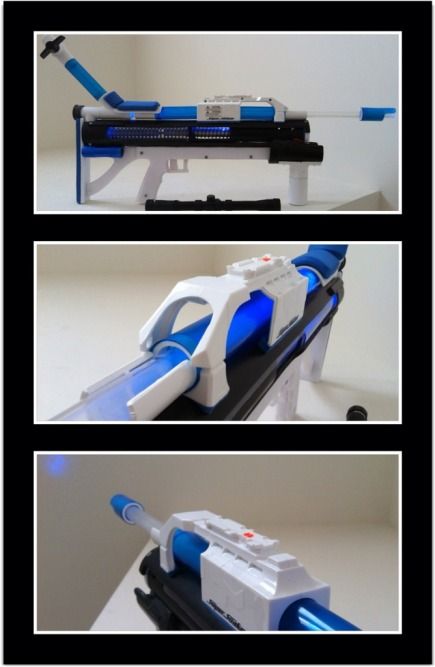
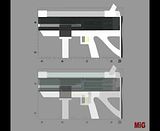
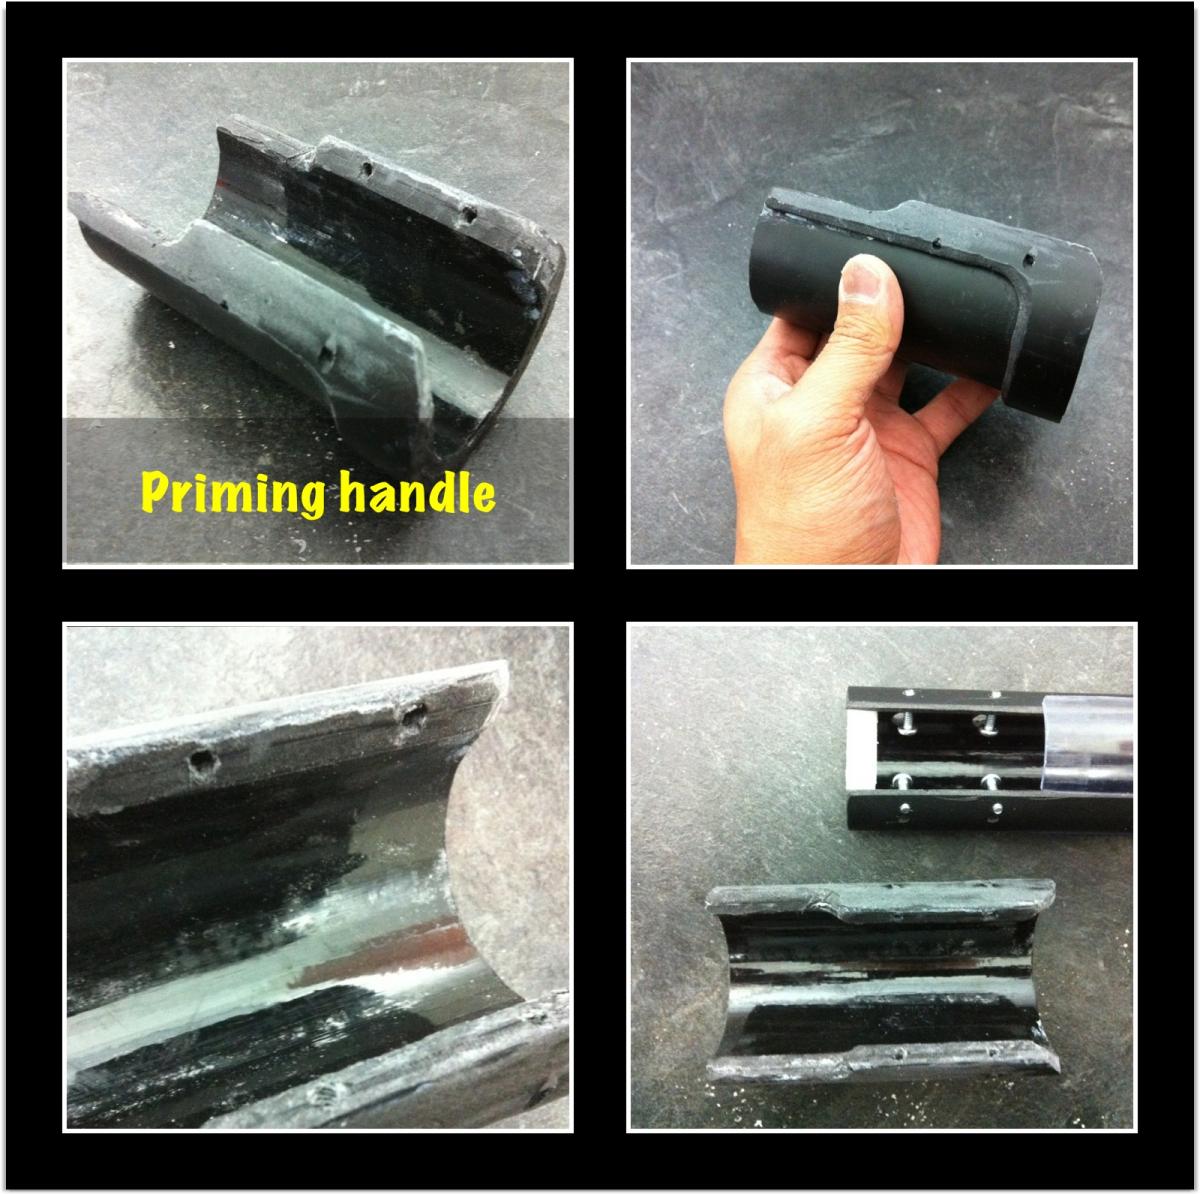
Jump to content


makeitgo's Content

There have been 182 items by makeitgo (Search limited from 03-December 96)


By content type

See this member's


Sort by                Order  

#343822 Homemades Picture Thread

Posted by makeitgo on 02 January 2015 - 11:08 AM in Homemades

The Bloodlines have been Xrossed!

Posted Image
Unprimed

Posted Image
Half prime

Posted Image

Posted Image


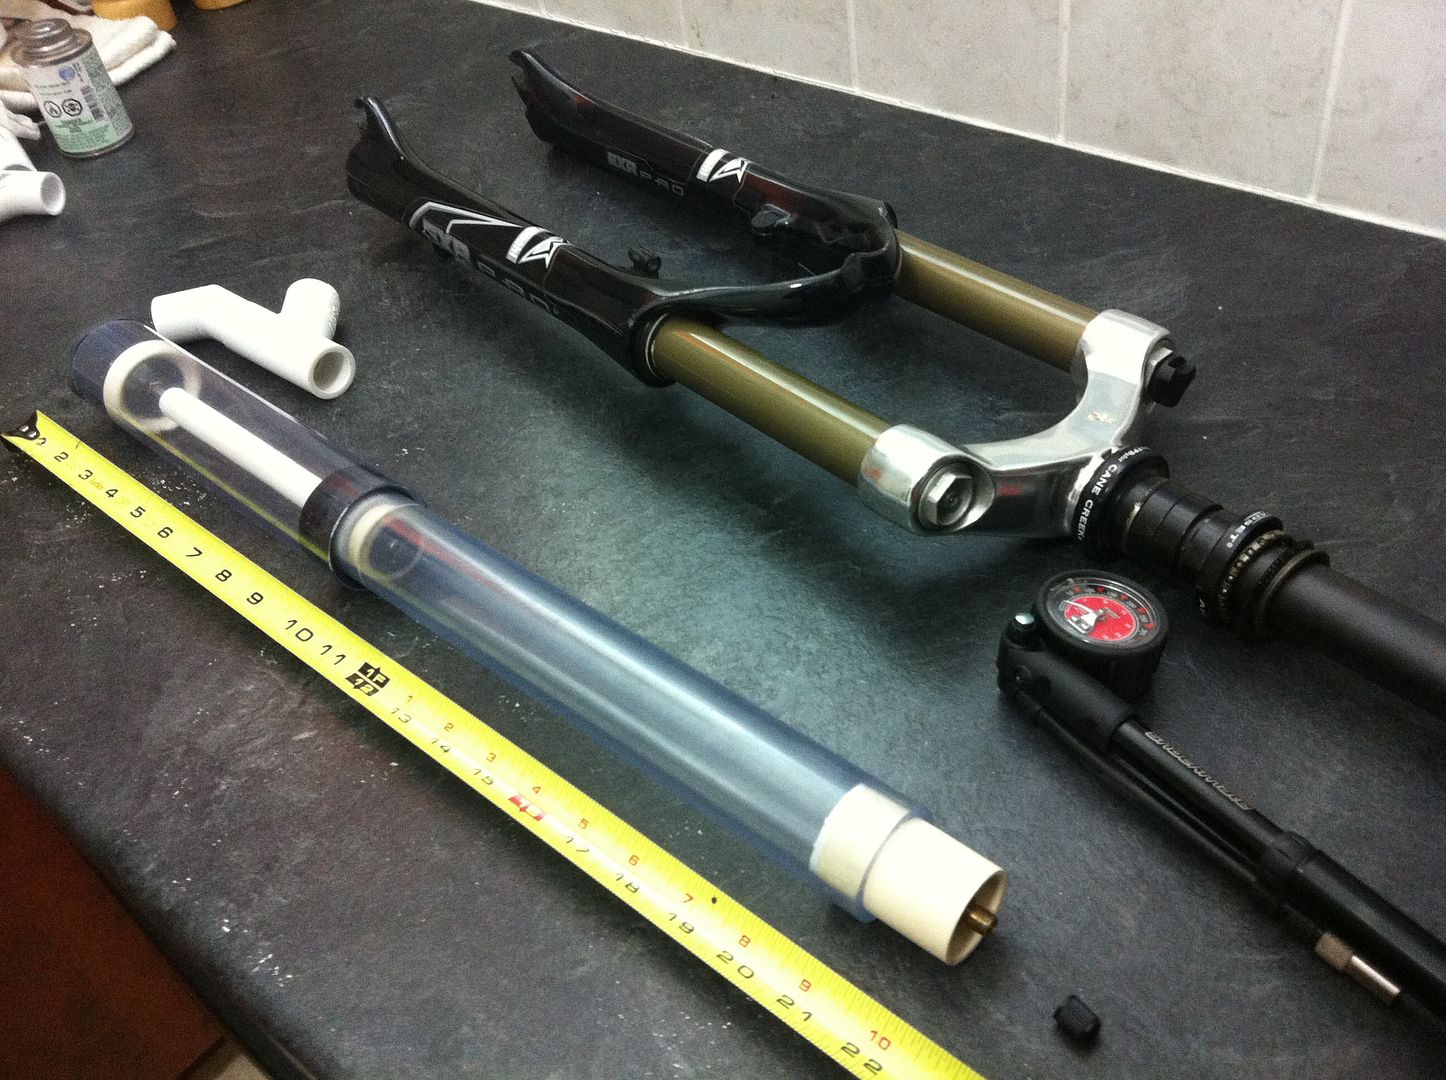
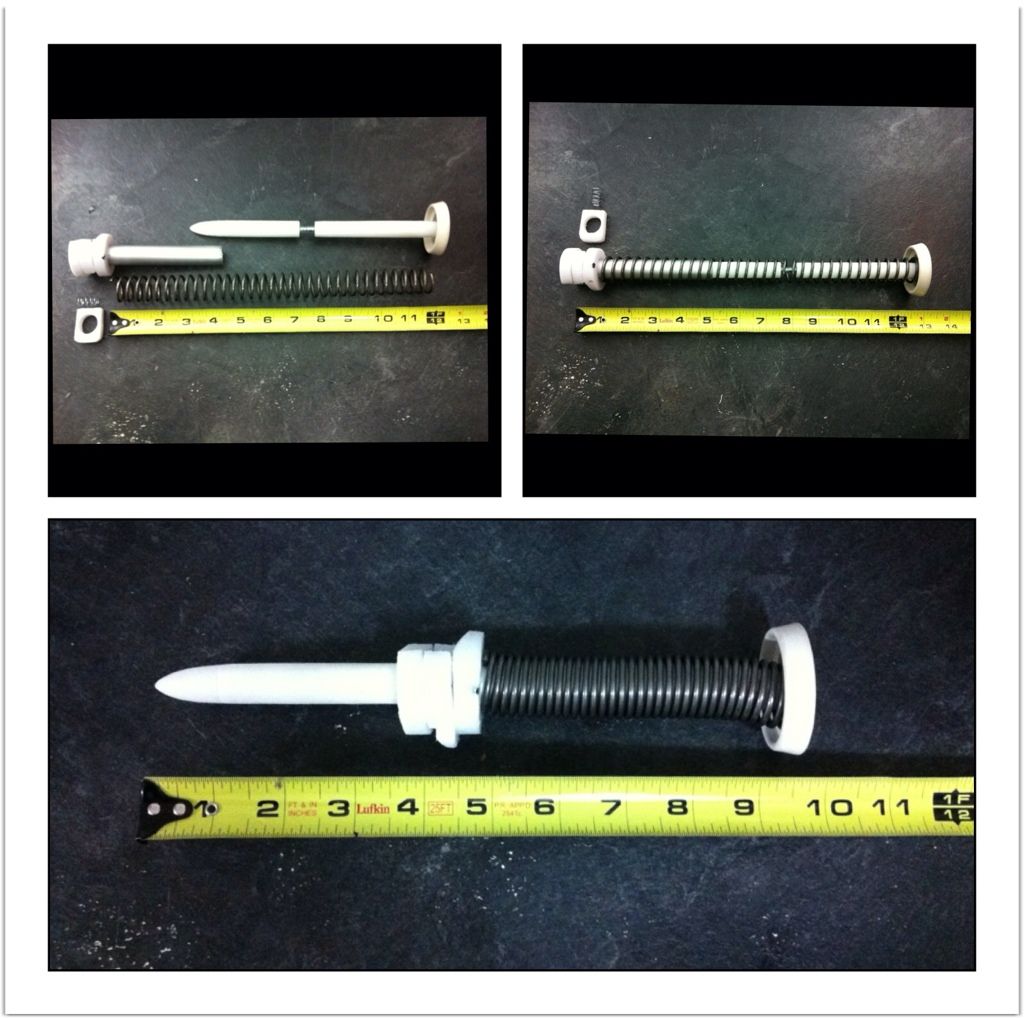
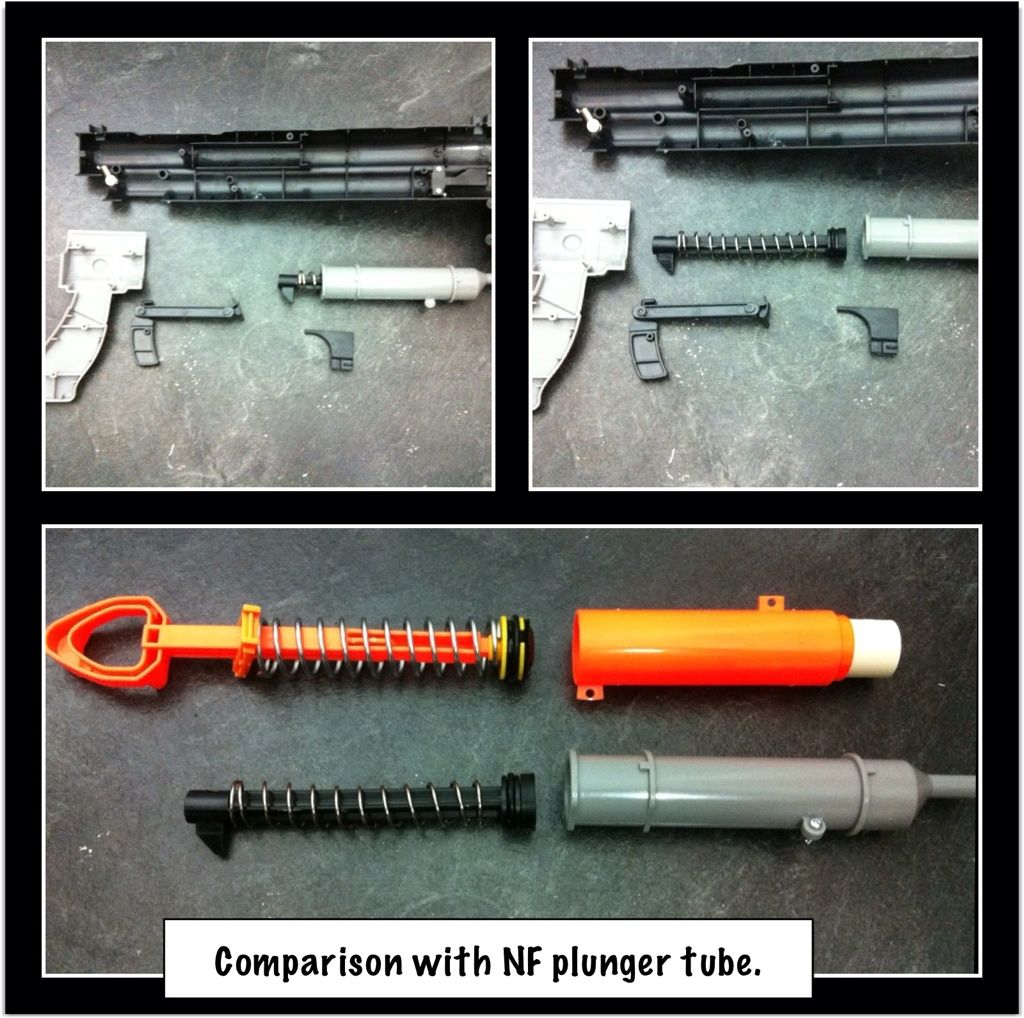
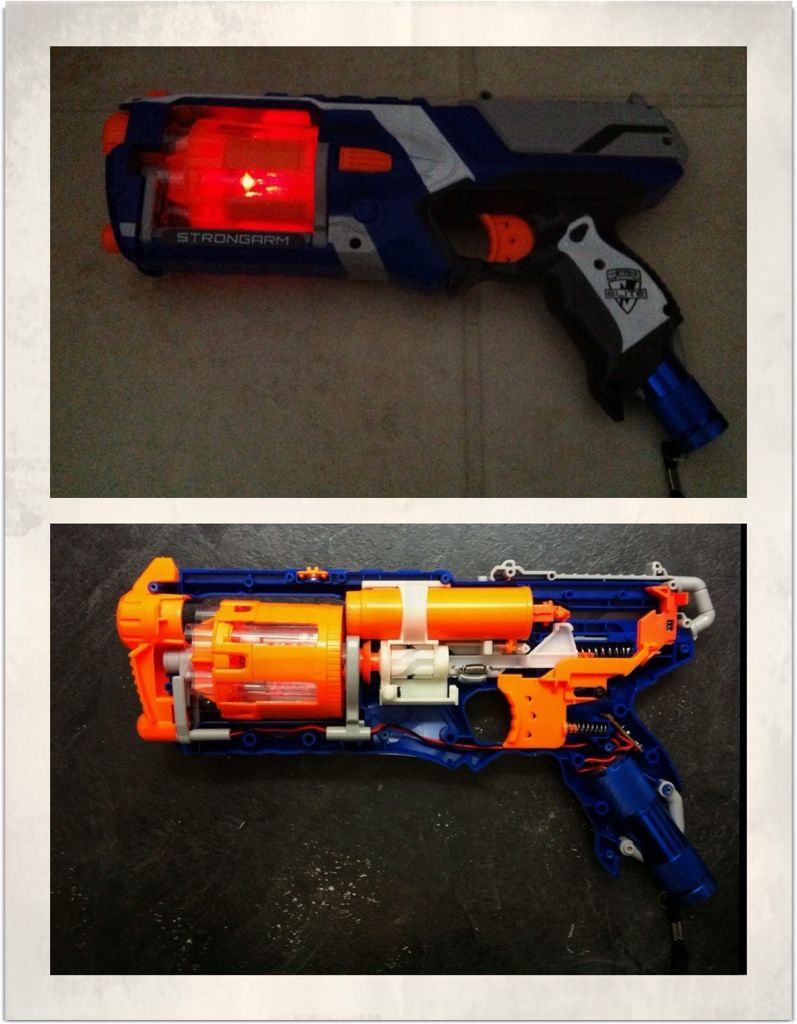
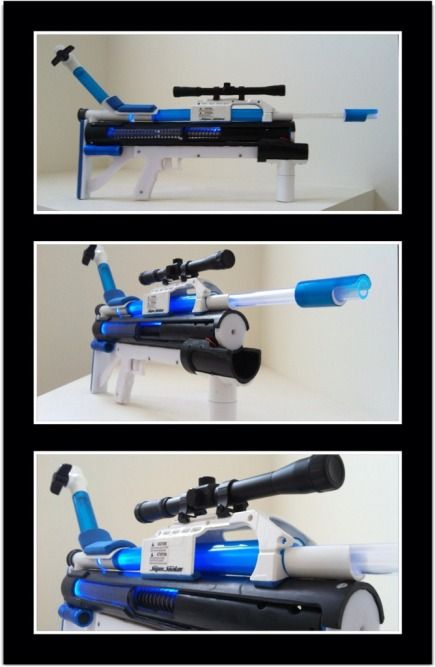
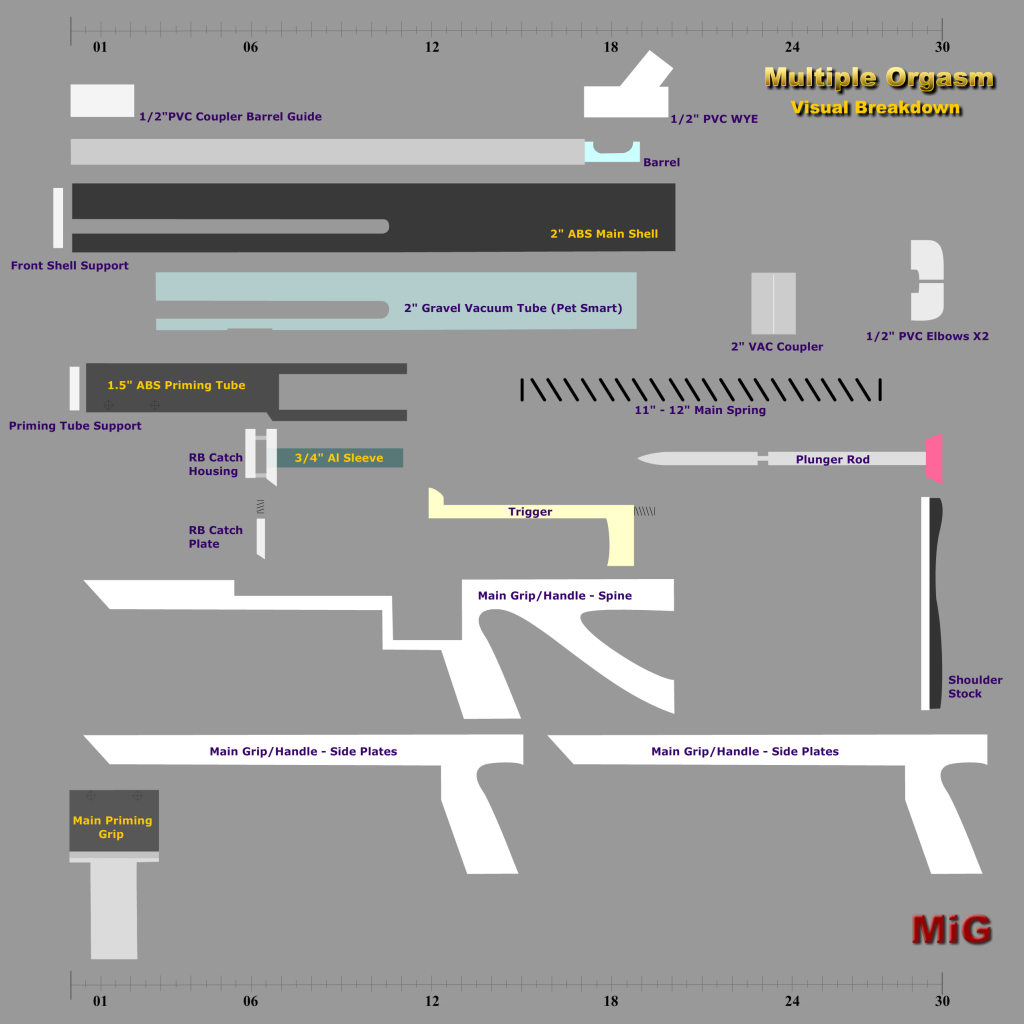
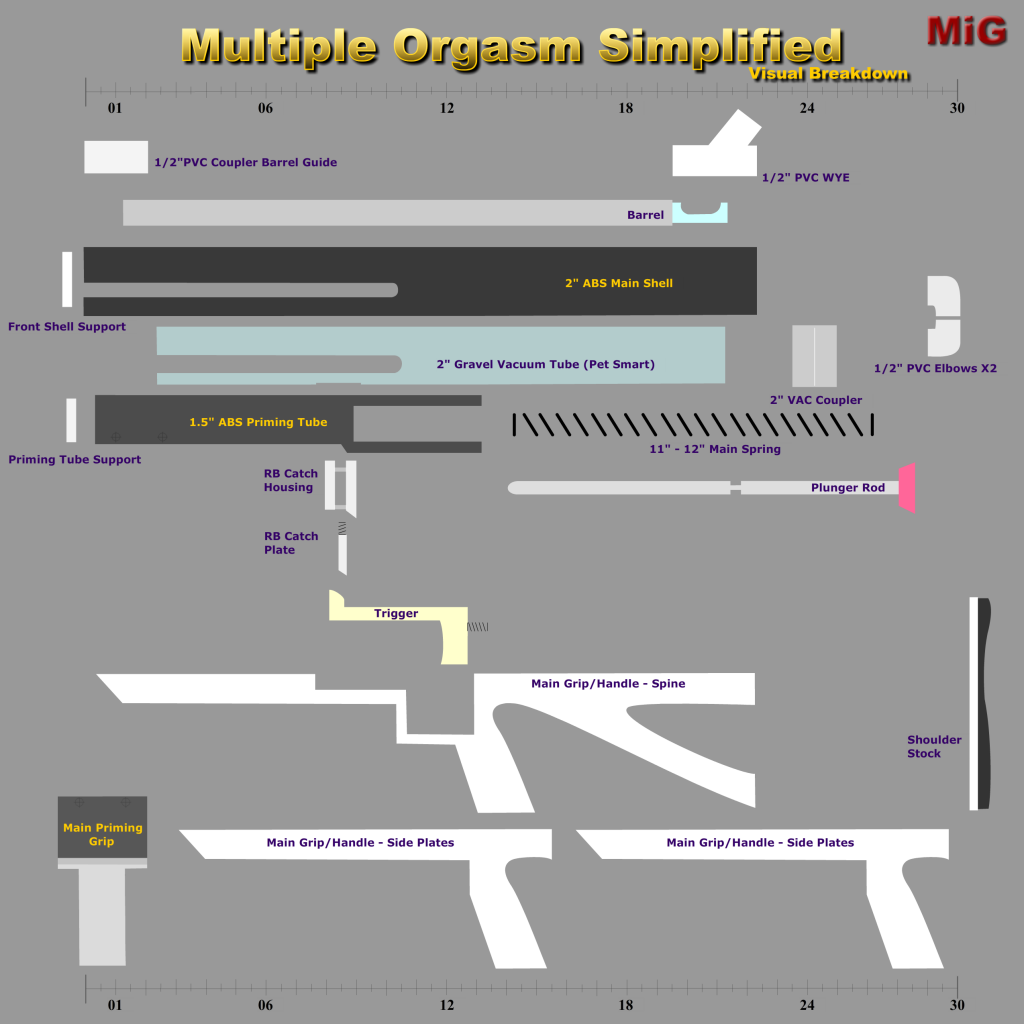
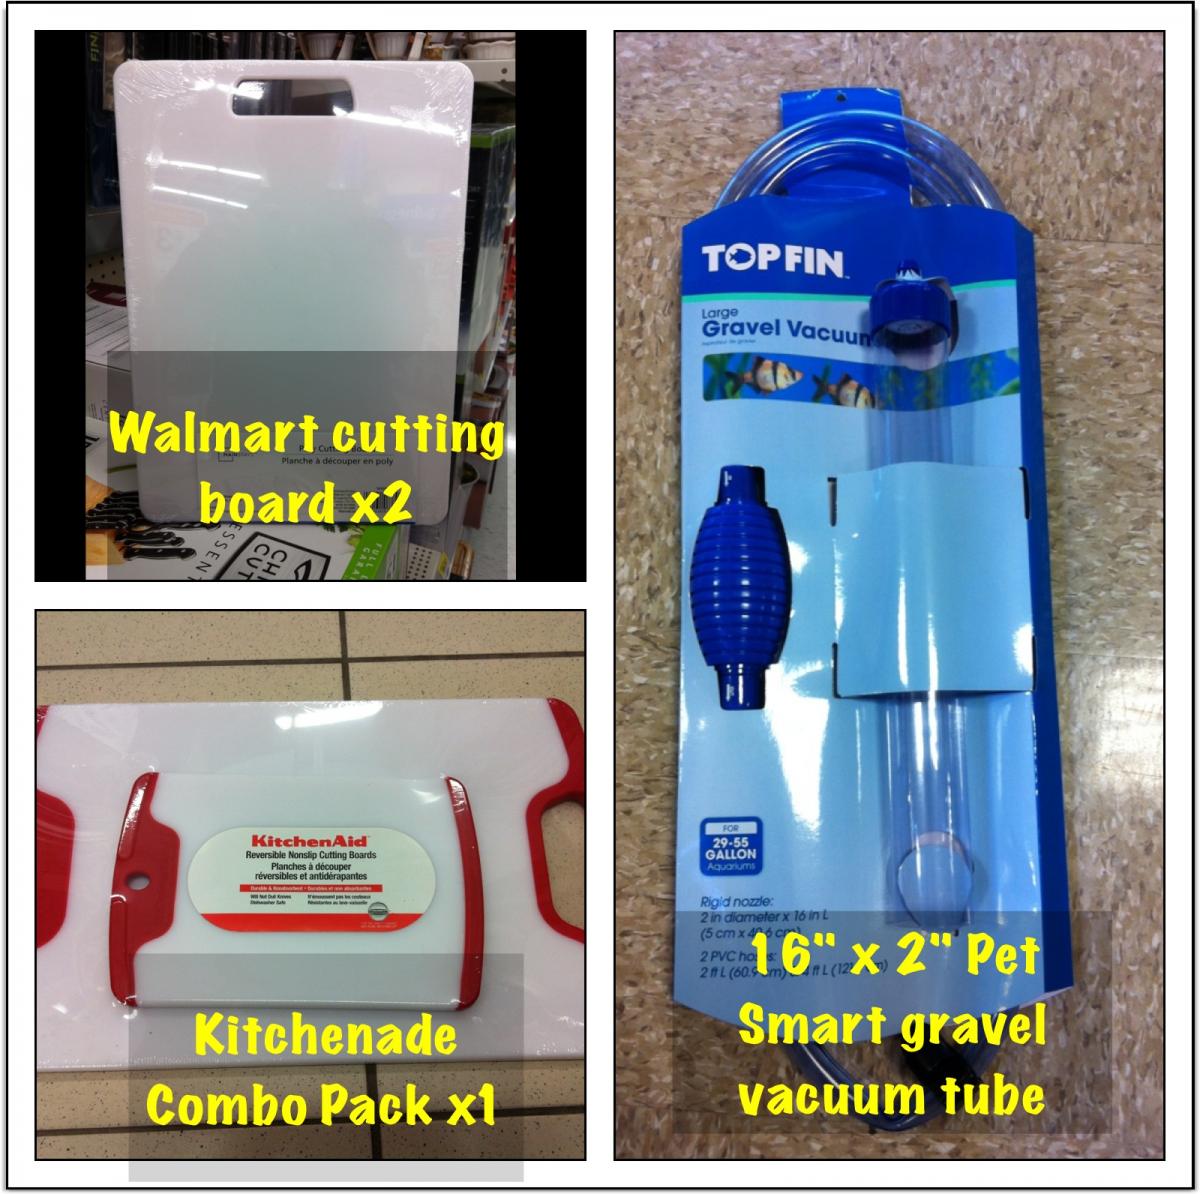
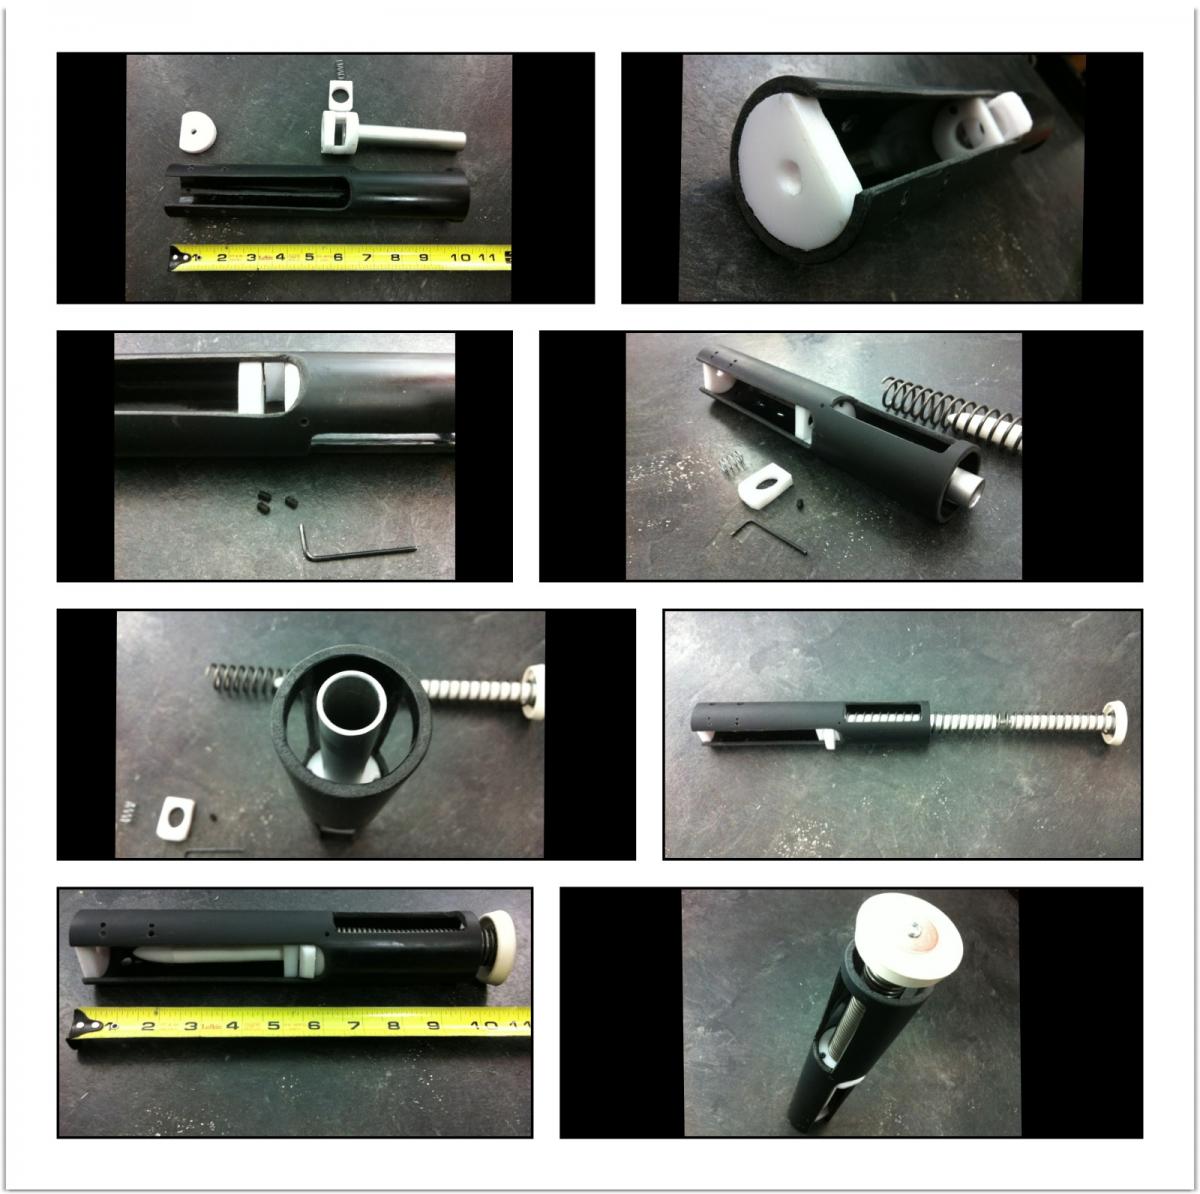
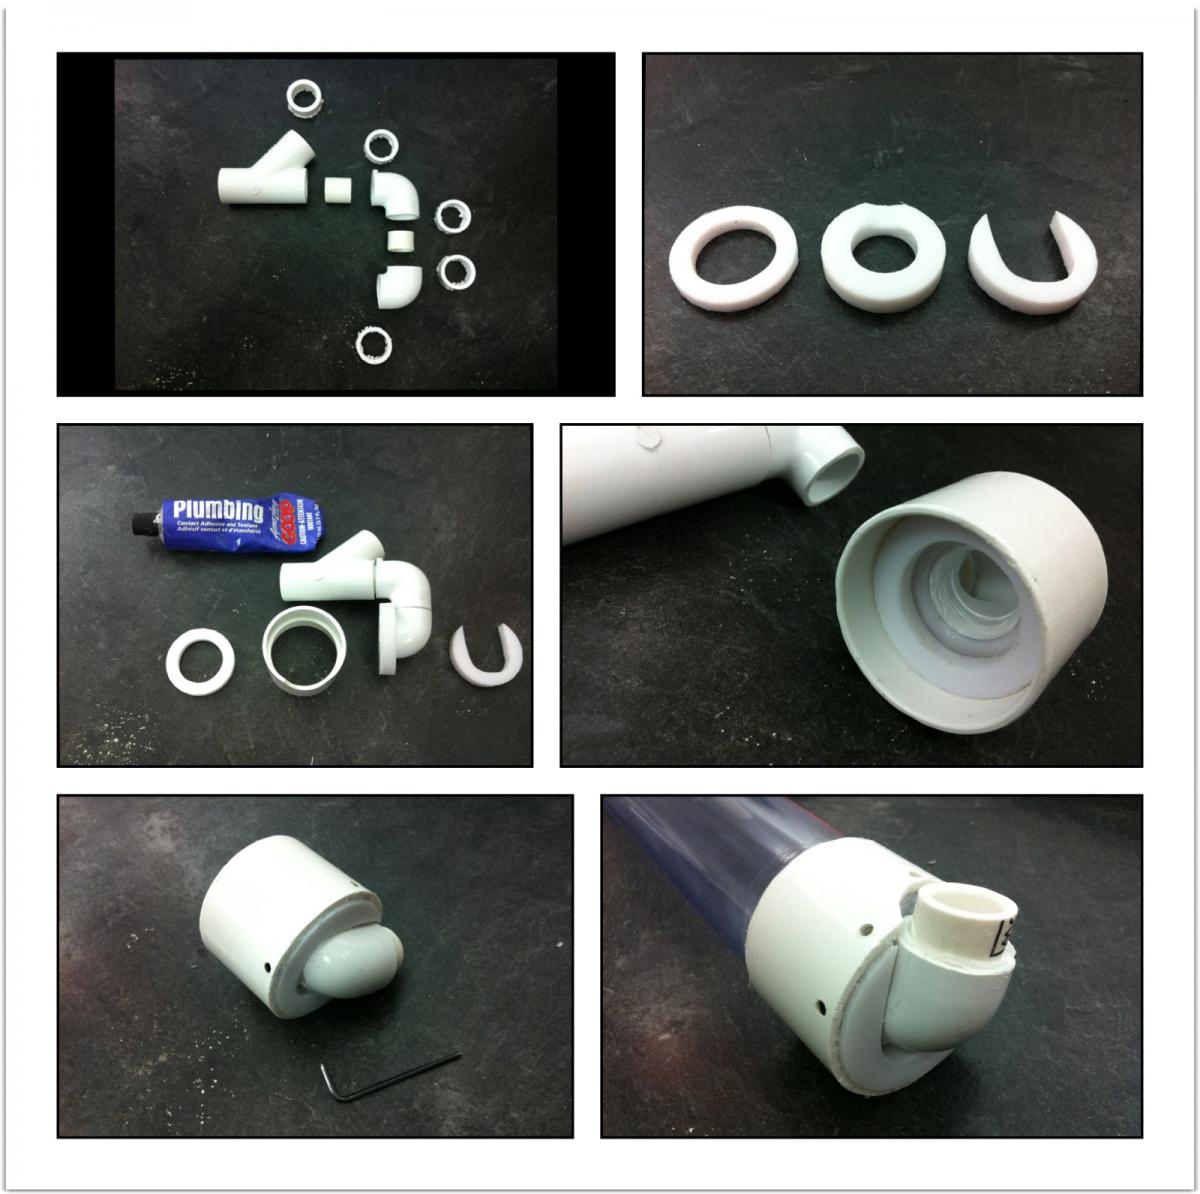
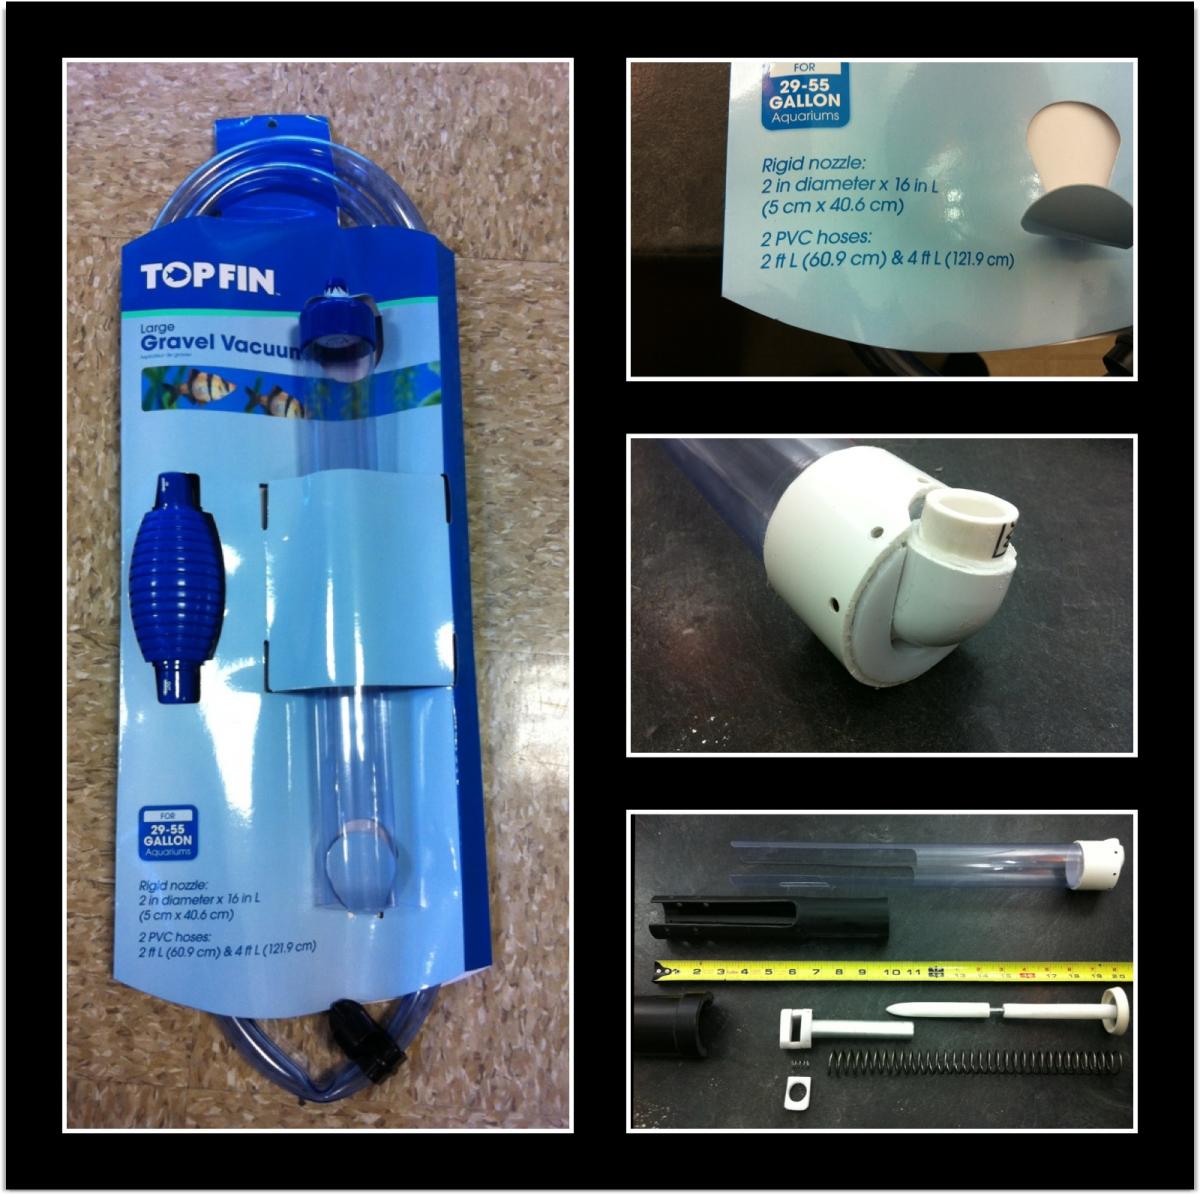
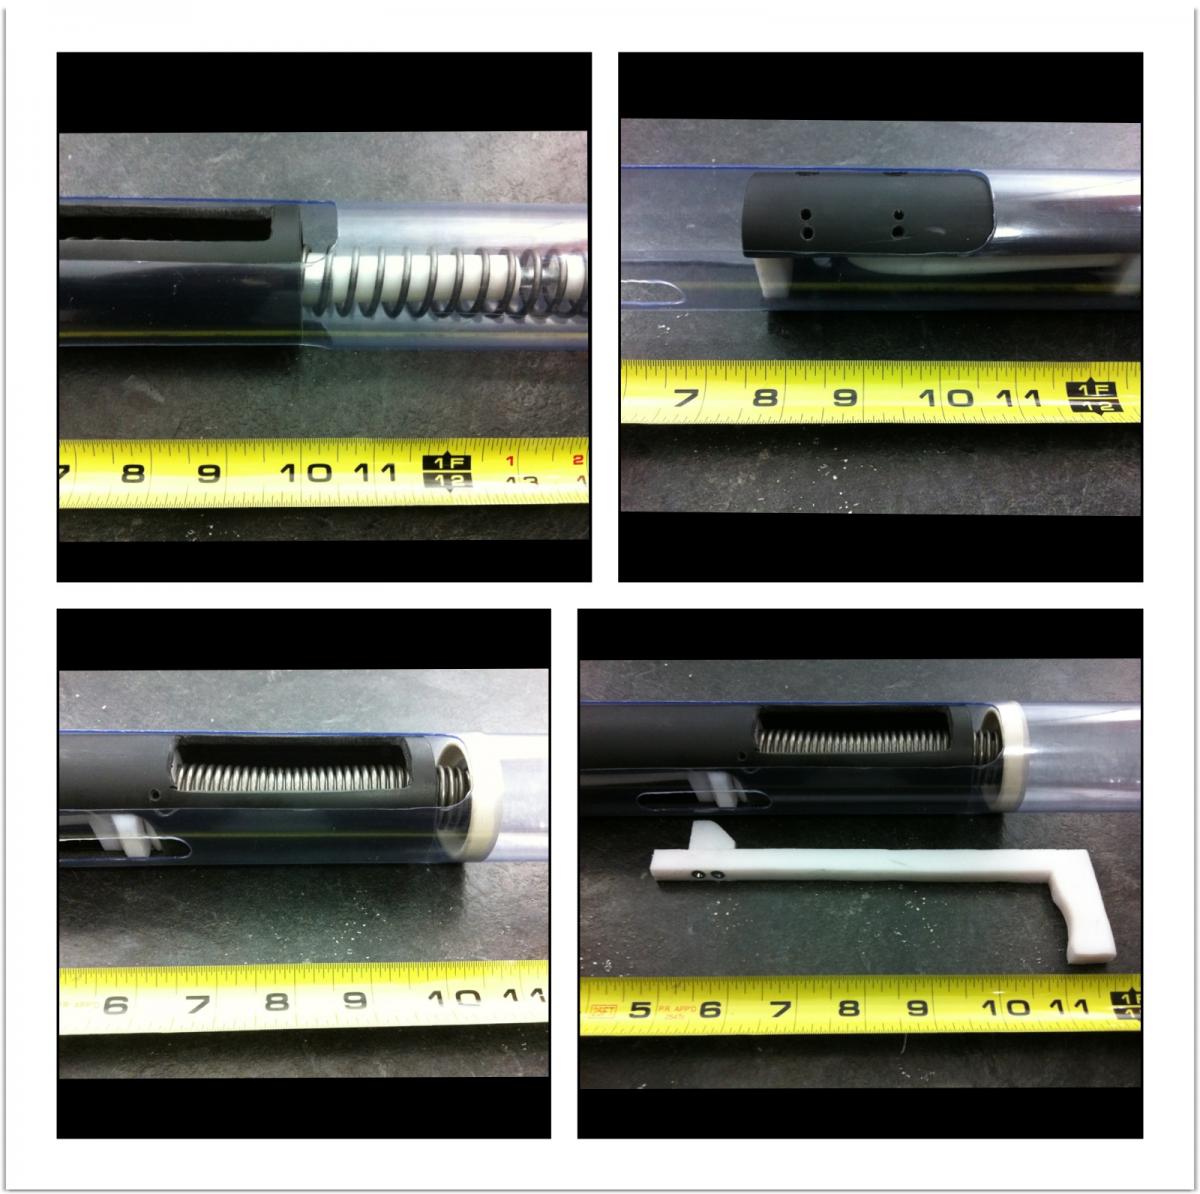
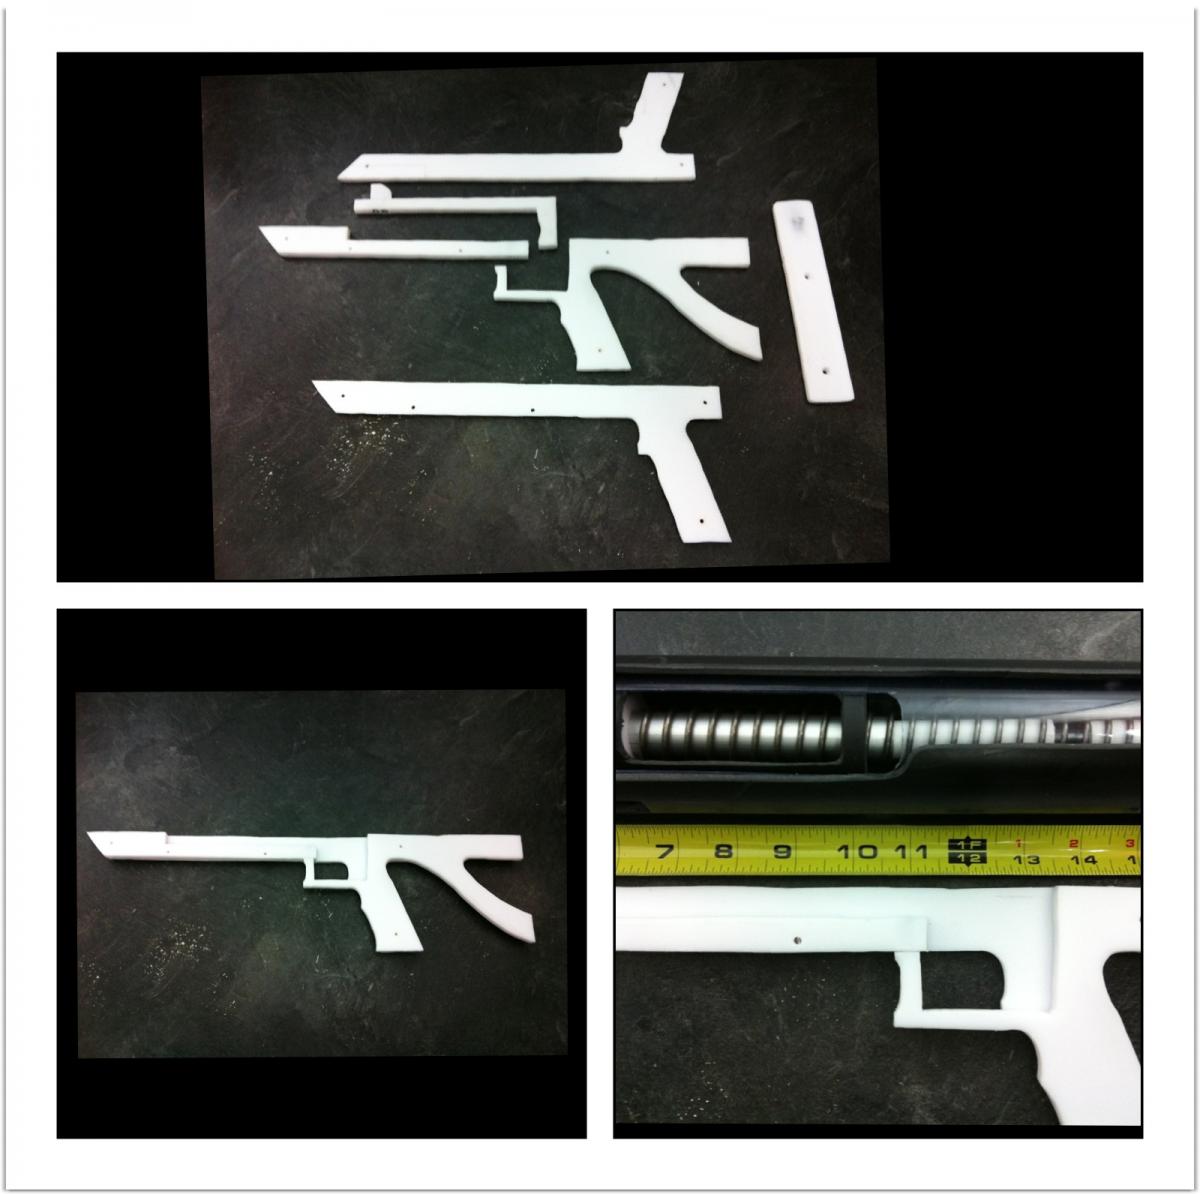
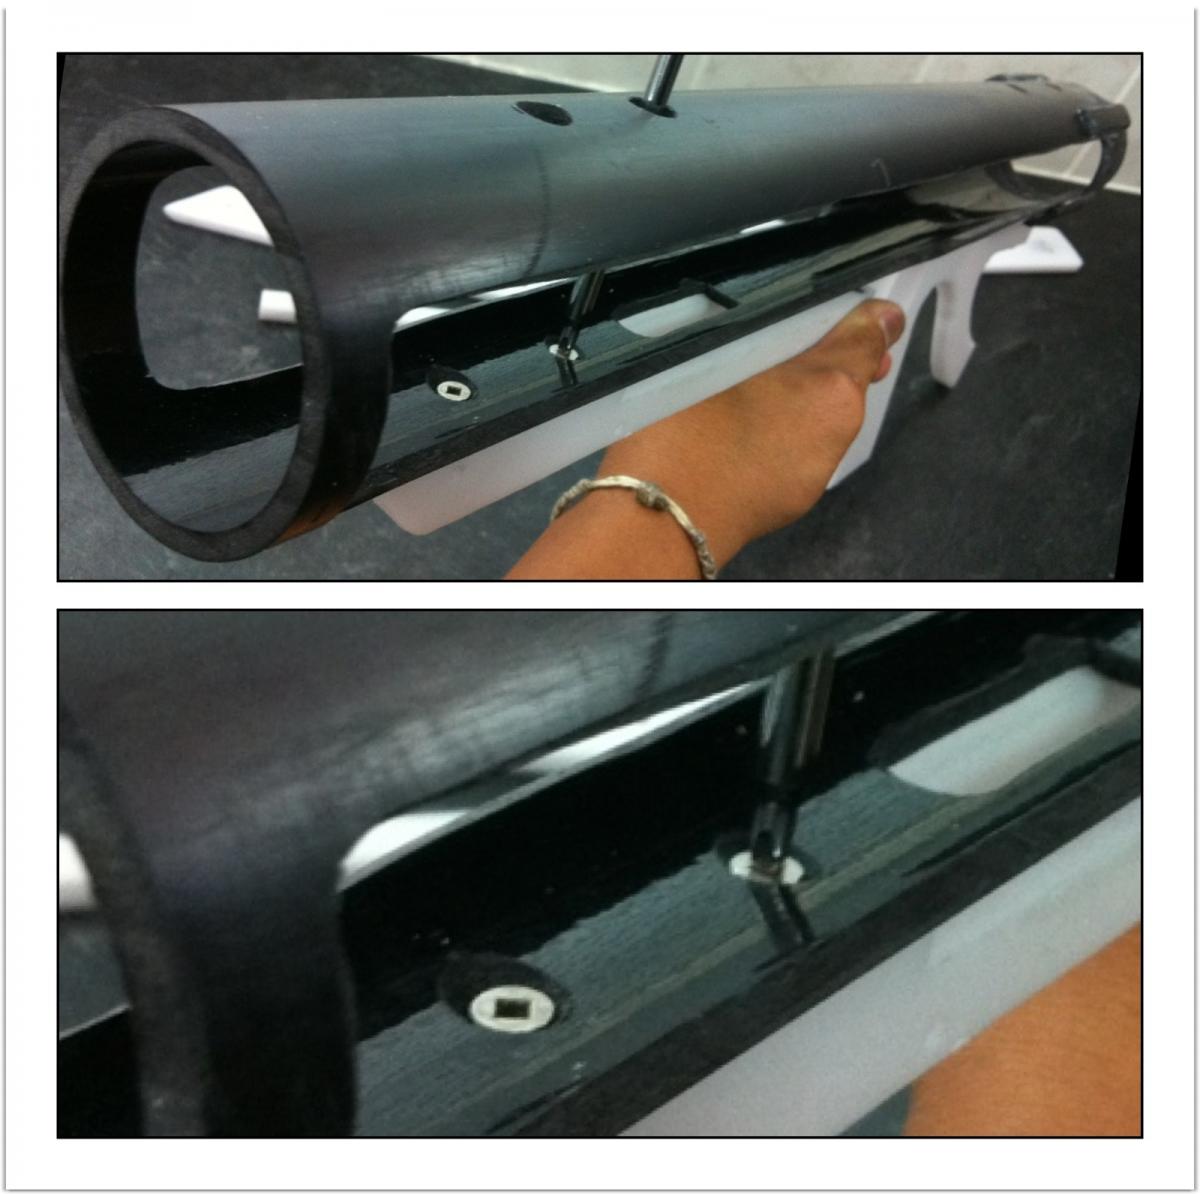
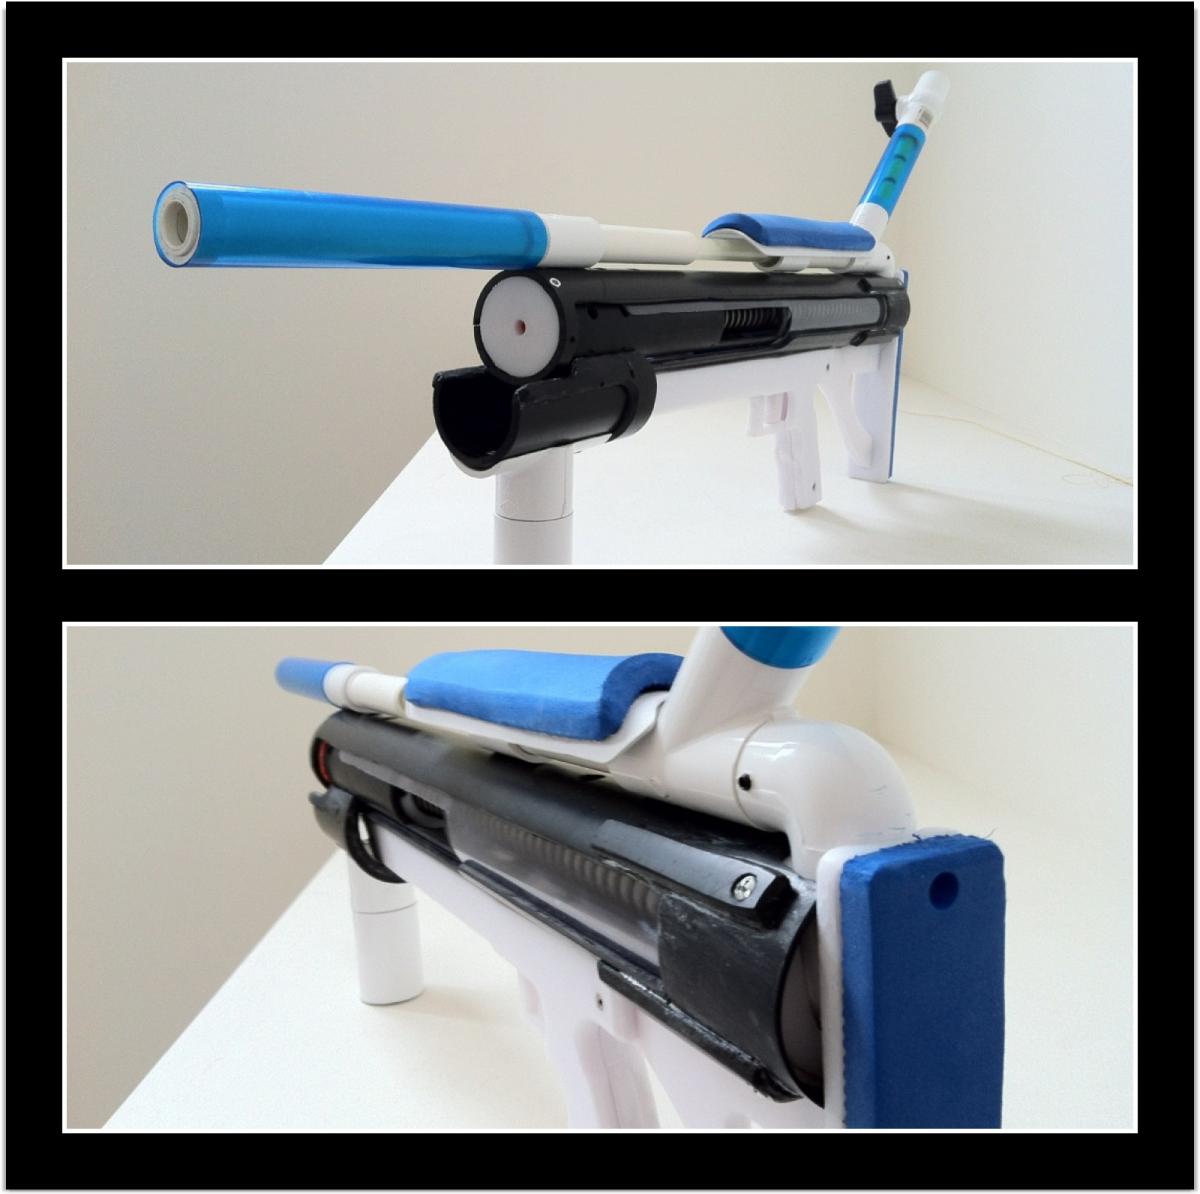
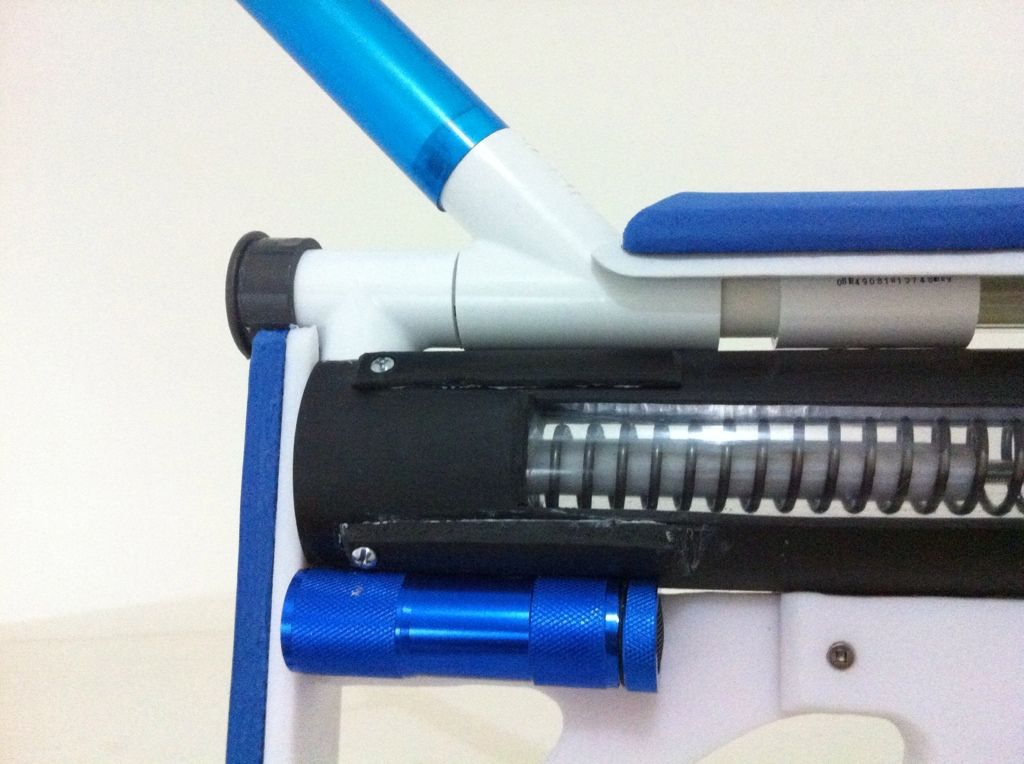
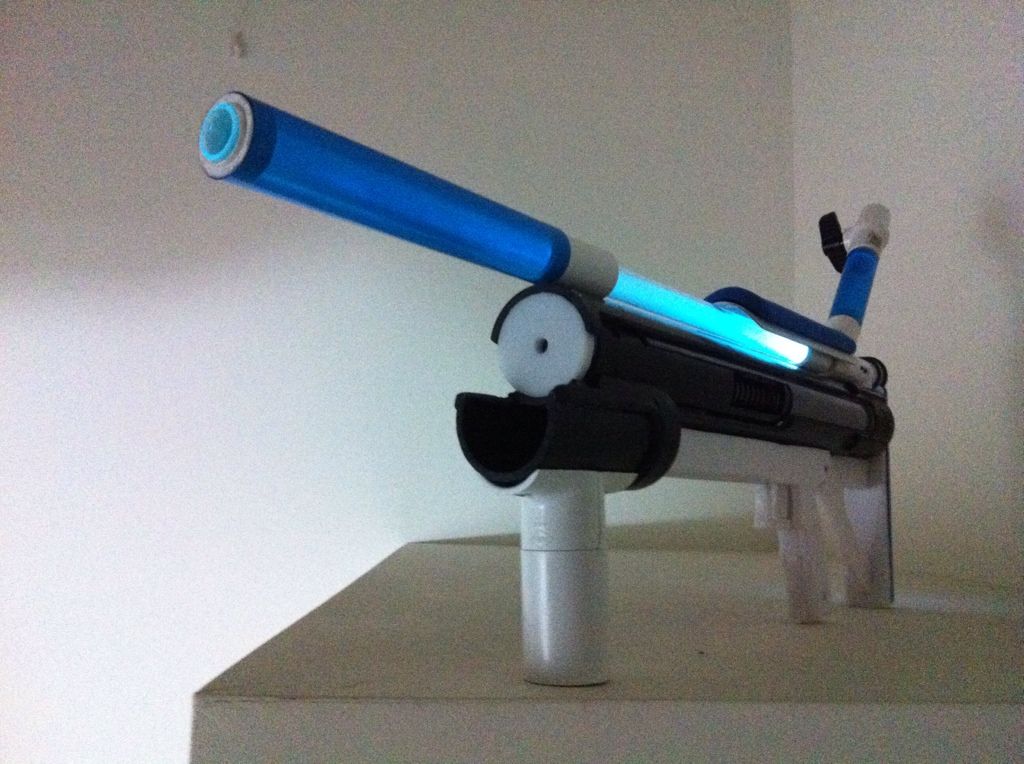
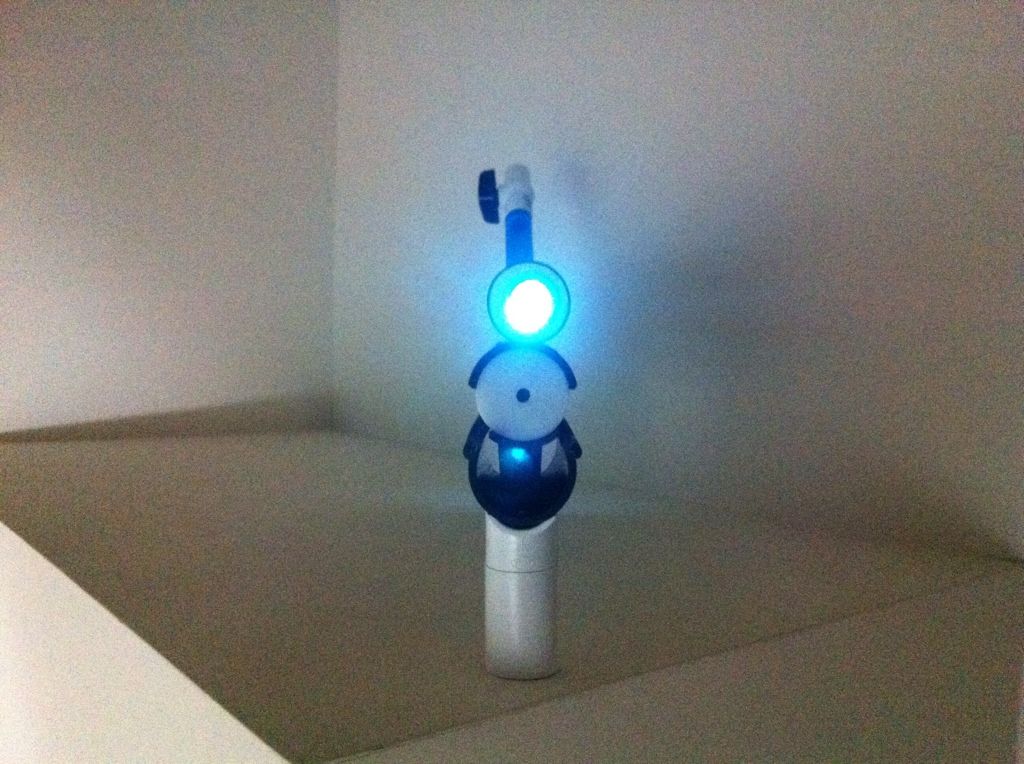
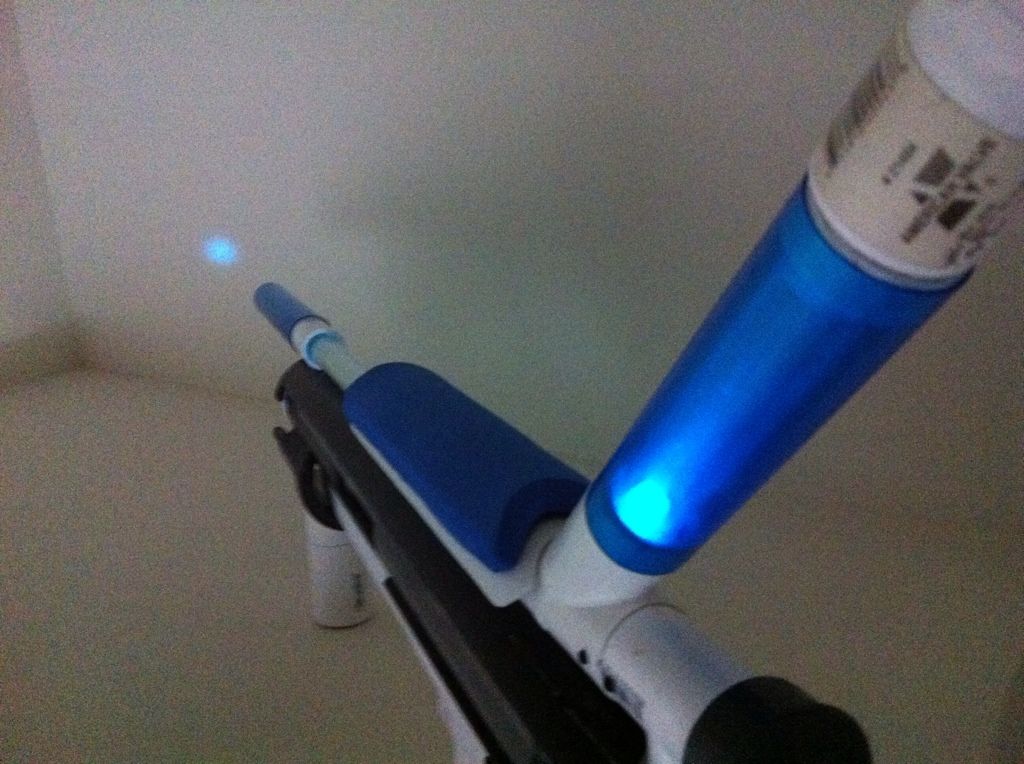
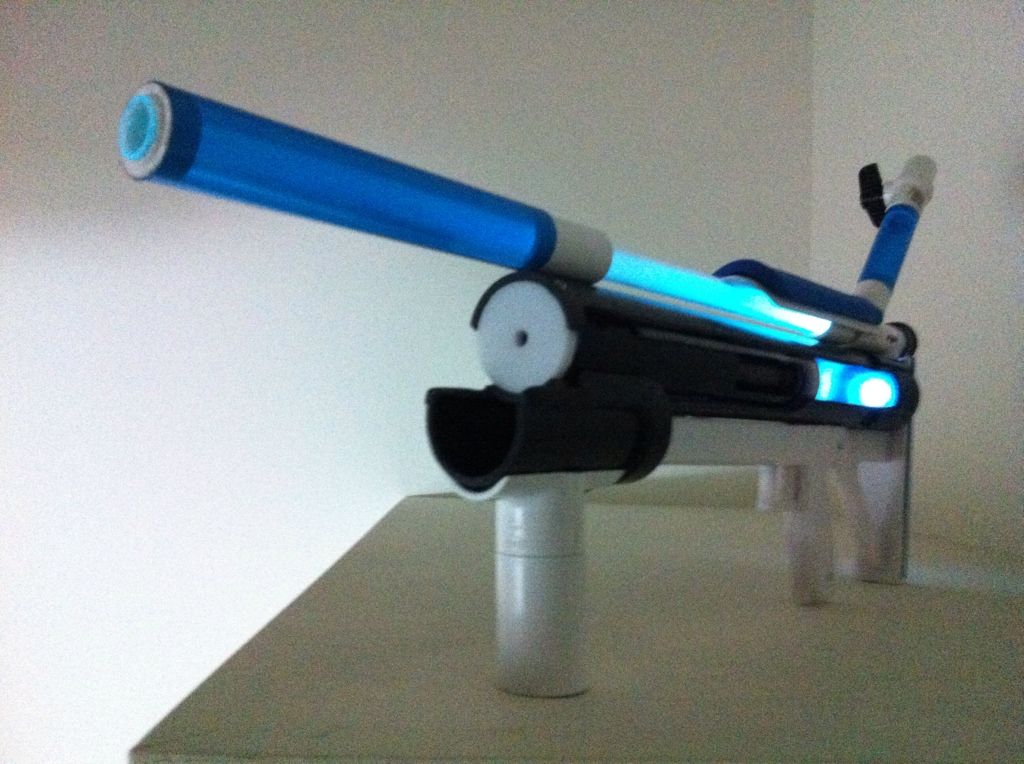
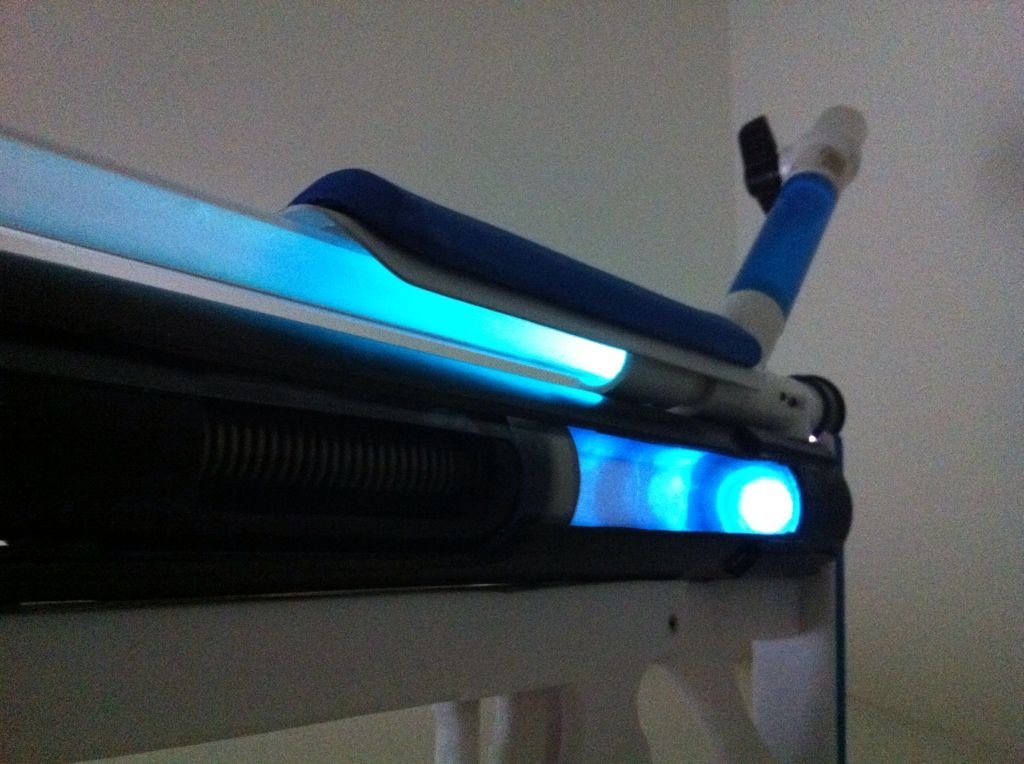
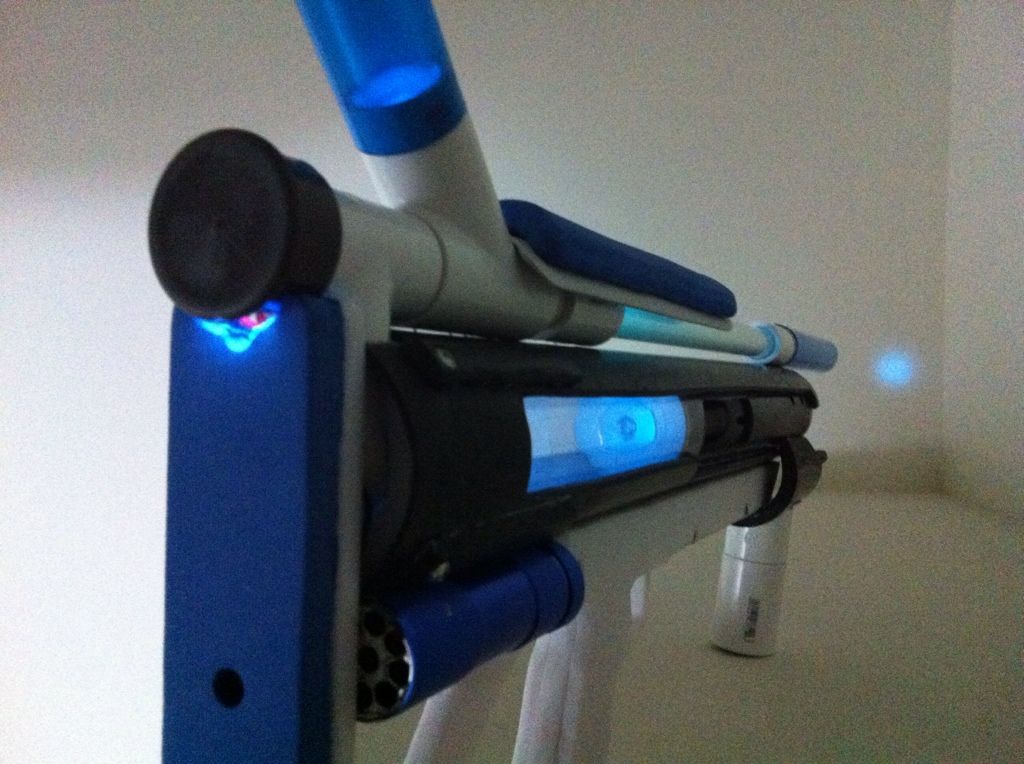
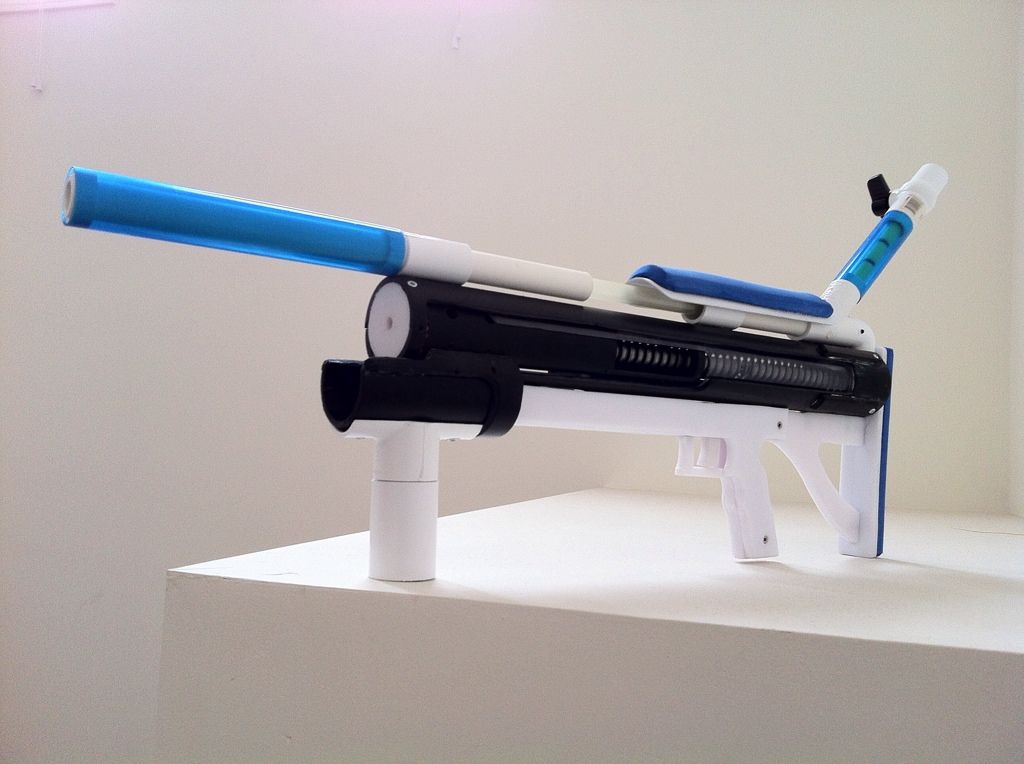
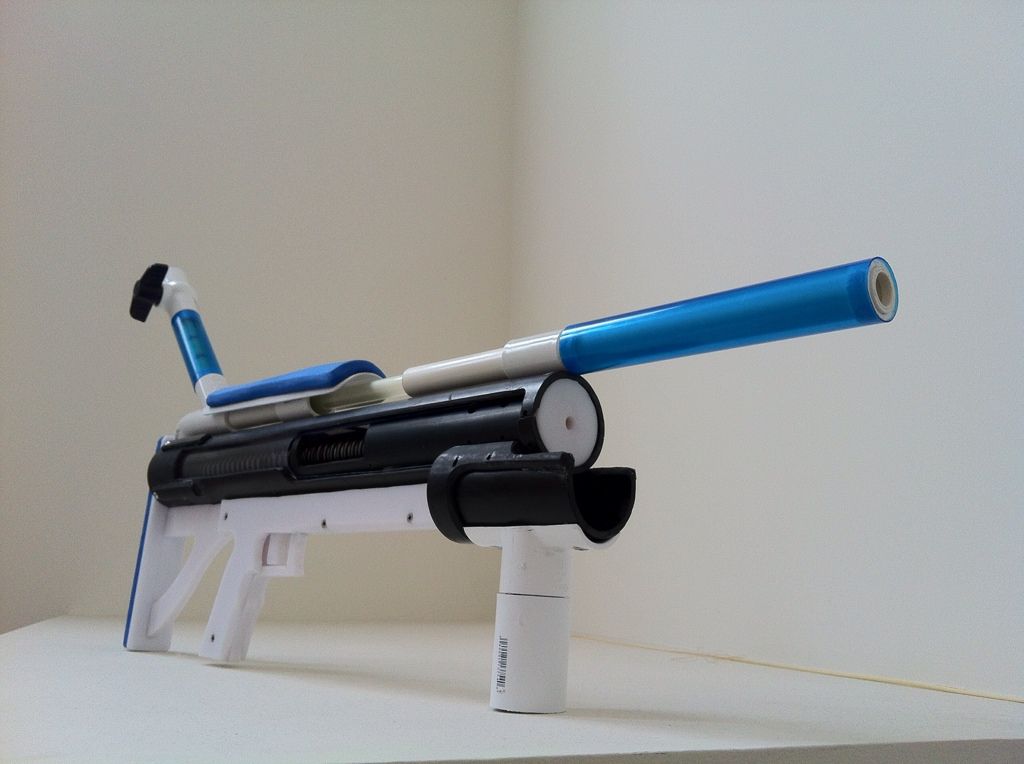
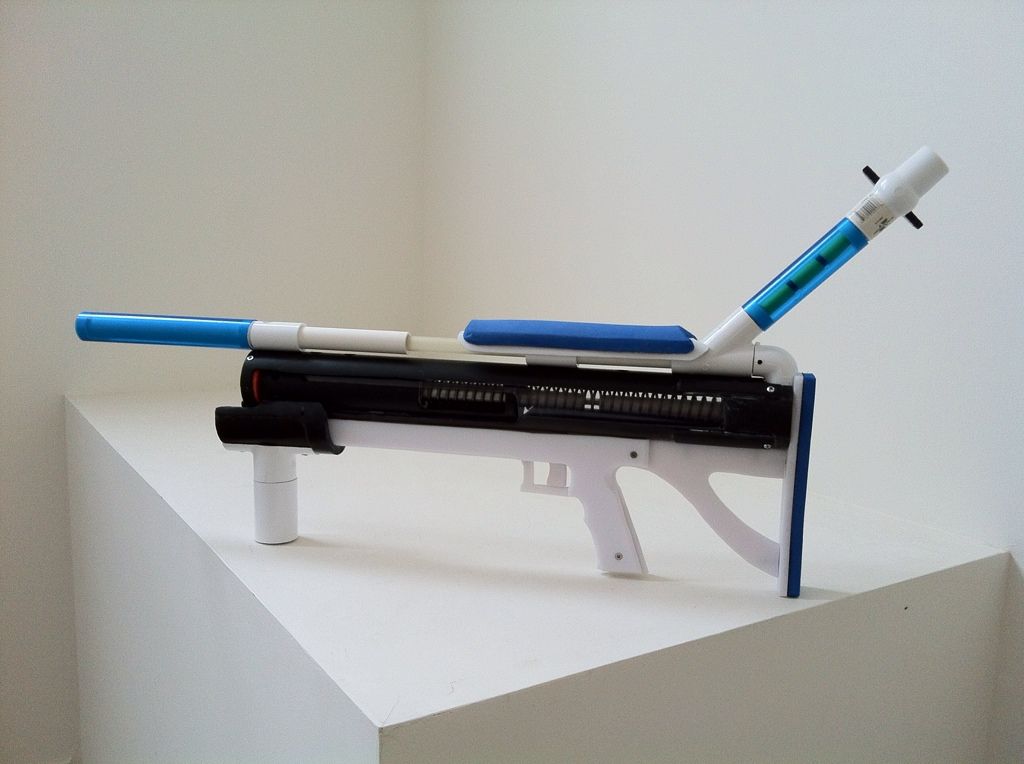
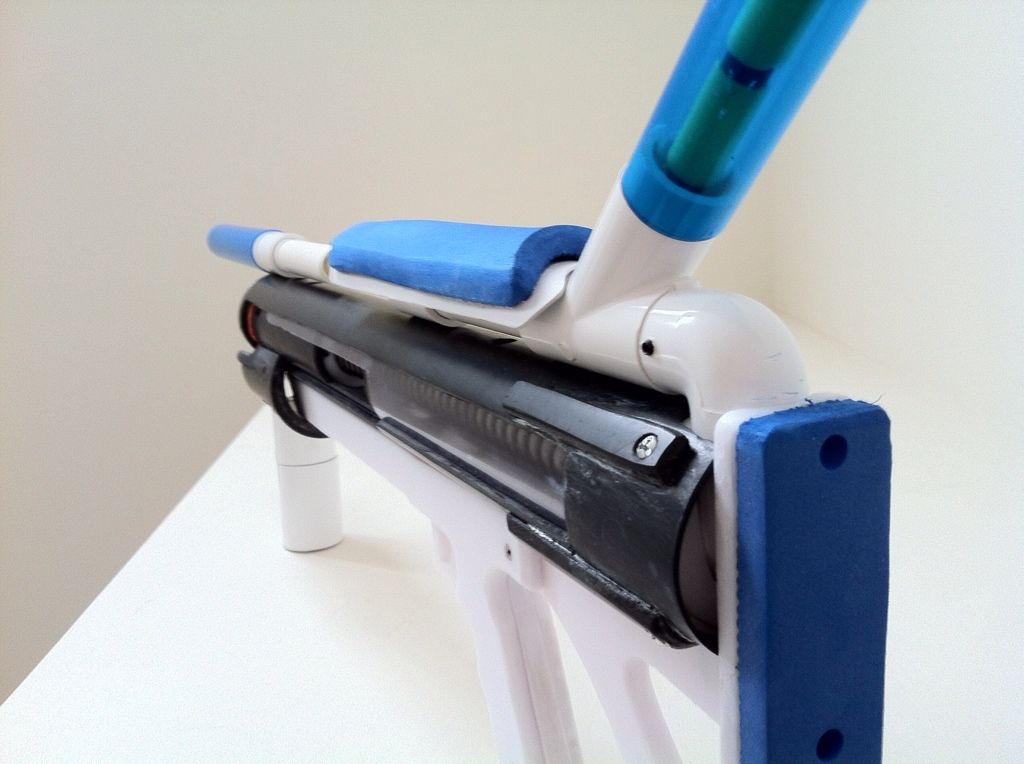
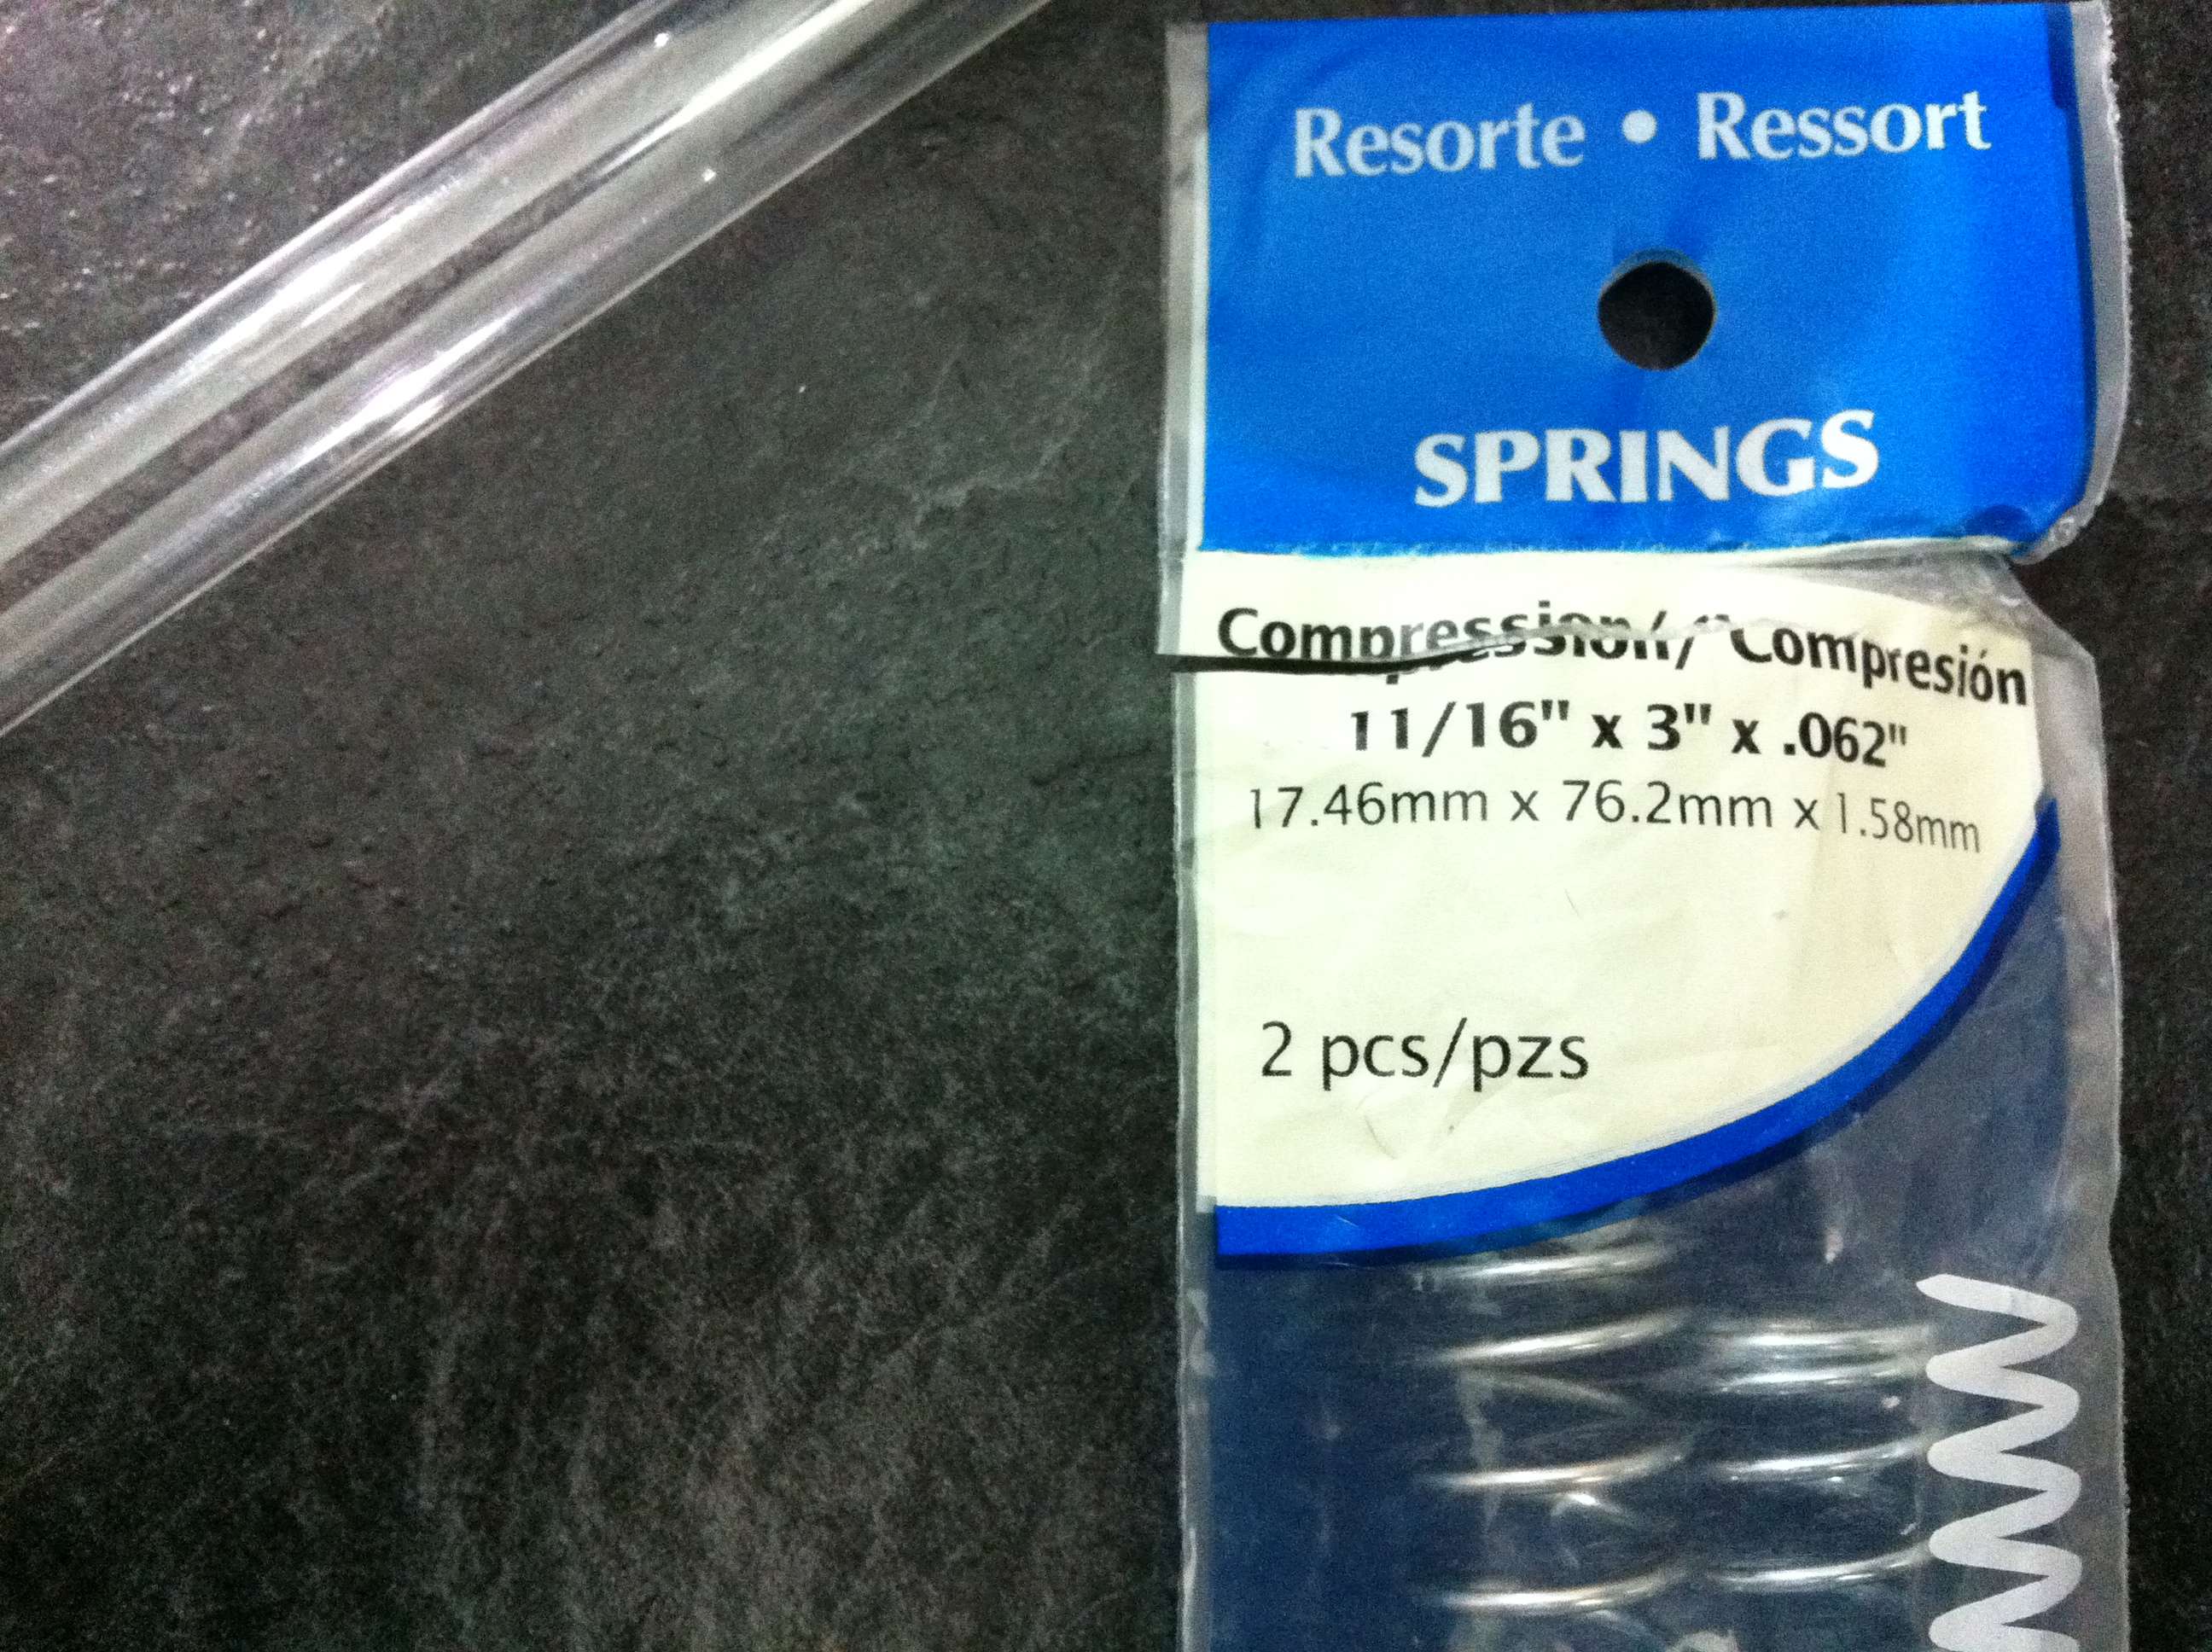
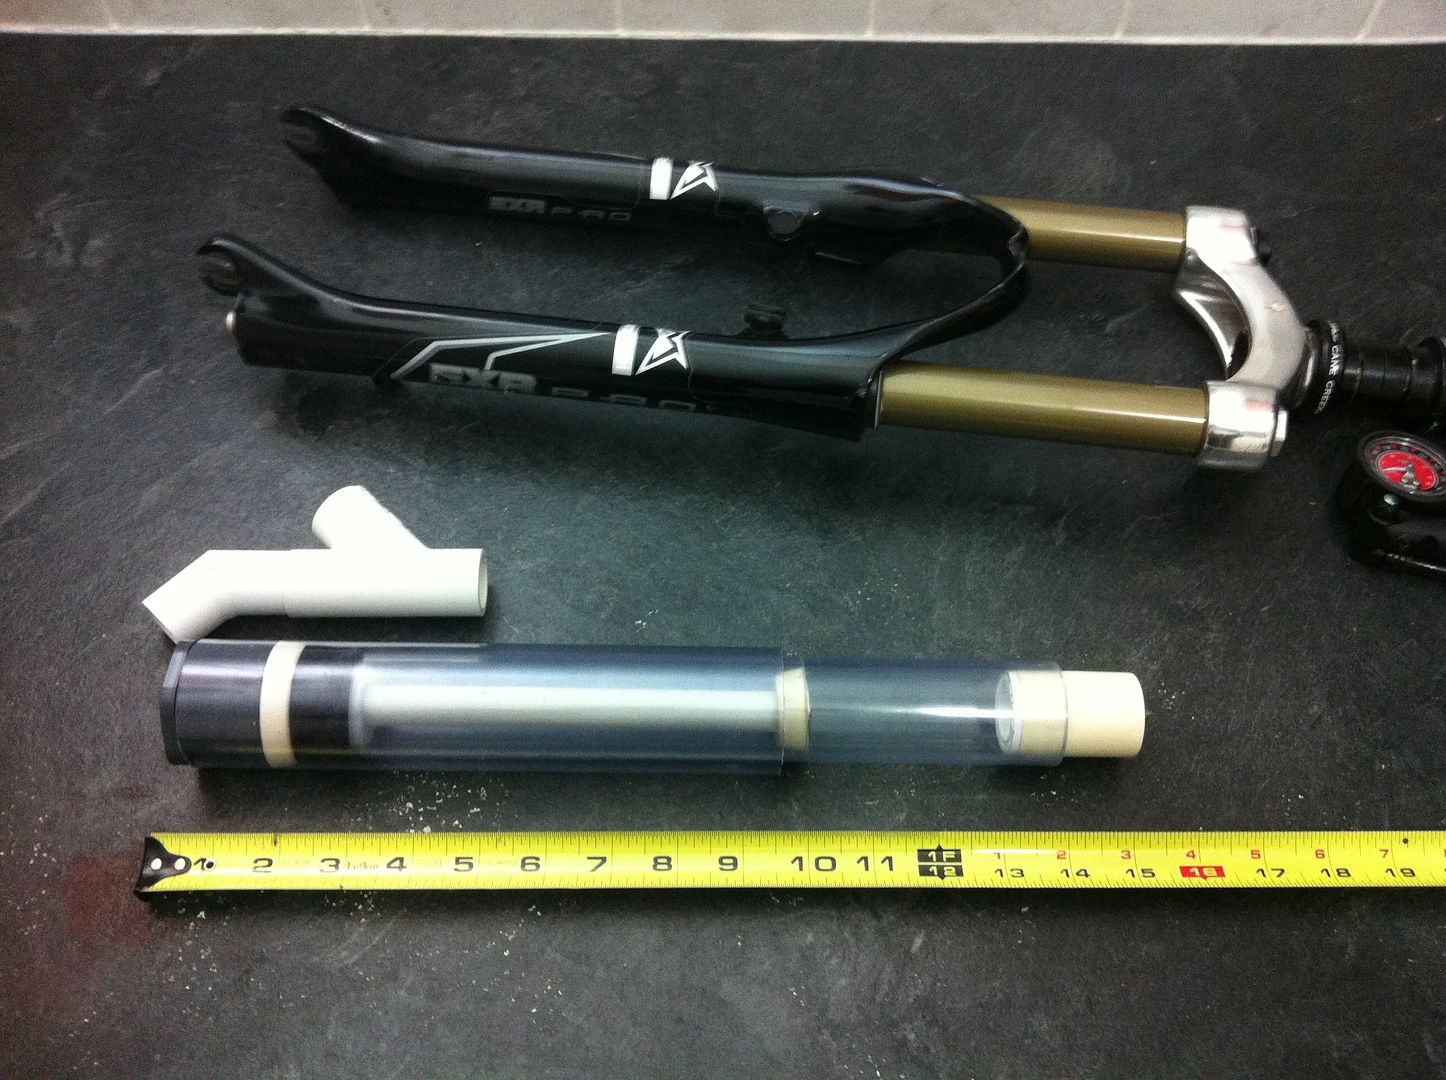
Still a WIP. My latest endeavor/prototype. Inspired by the Mountain bike forks above (I mountain bike - Downhill/Enduro). Obviously, much tweaking and testing still needs to be done. Nothing has been 'set' as I'm leaving it with the ability to dismantle it for the eventual write-up.


#343092 I'm making foam

Posted by makeitgo on 25 November 2014 - 06:01 PM in Darts and Barrels

Posted Image Yoga blocks work well.


#341705 Looking for a wood like material

Posted by makeitgo on 03 September 2014 - 09:02 AM in Homemades

If you decide to use cutting boards, use wood screws instead of machine screws. DON'T use Ikea cutting boards. Kitchenade Brand is the strongest and sturdiest but the Walmart brand is a good value for the buck at $5. You can also use it for catches.


#341430 The Official Internals Directory

Posted by makeitgo on 21 August 2014 - 10:16 PM in Modifications

Posted Image

Posted Image

Posted Image

Posted Image


#341238 An overview and mod guide for the new Buzzbee blastzooka eXtreme

Posted by makeitgo on 15 August 2014 - 08:36 PM in Modifications

...it could be entirely possible that the small trigger valve can't take the higher pressures and simply leaks at a certain point, actuating the main valve in the process.


No. That's not it. It's the weak check valve. The evidence is the pump being blown back as it 'mis-fires'.


#341109 An overview and mod guide for the new Buzzbee blastzooka eXtreme

Posted by makeitgo on 09 August 2014 - 03:46 AM in Modifications

Do you have pics of the dump valve hole? I'm curious about the size of it compared to the Panther Tank.

The 'Range Master' also had the same 'auto' fire mechanism (looks to be the same tank actually). It was due to a weak check valve and not actually a true mechanism by design.

If it is the same design as the Range Master, constant tripping of this 'mechanism' will inevitably burst the check valve. When that happens, the tank will not be able to hold pressure. At least not without some modification/fixes.


#340429 How to remove leftover stickers

Posted by makeitgo on 16 July 2014 - 10:10 AM in General Nerf

Hand sanitizer works pretty well as well.

*edit - You can also minimize and even avoid the residue if you use a hairdryer to first initially treat the sticker 'before' peeling it off.


#339628 Telescoping Plunger Tube Blaster (TPB)

Posted by makeitgo on 17 June 2014 - 11:07 AM in Homemades

Nice concept.

I've found that with larger diameter plunger tubes, in order to compensate for the increased volume being forced out, a stronger spring is needed other than a [k26]. The reason it seems to output less 'power', is because the plunger rod stops accelerating forward sooner, due to the increased volume its trying to push out of a 1/2" diameter hole. The power comes from the acceleration. In essence, the plunger rod reaches a terminal velocity sooner in a larger plunger tube than it would in a smaller diameter one when using a [k26].

As for the mass of your plunger rod assembly. The 2 polycarb disks you used are not necessary. Or at least ones that big. The drain plug is pretty sturdy and really only needs support from behind. Using a decent sized washer behind and a smaller one in front is all you need.

If you wanted or expected the overall length to be decreased by this design, the key is in the length of the plunger rod. The only way to decrease the length of a blaster (while maintaining your expected draw length) is to decrease the length of the effective plunger rod. In my MO, I did this by creating a section in the 'G-spot' that sleeved what would be the tail end of the plunger rod. Effectively decreasing the length of the plunger rod by the total length of the compressed spring length. In your case, you could shorten the plunger rod (and overall blaster length) by 5.5".

Posted Image


#339348 Bullpup Variant Writeup

Posted by makeitgo on 04 June 2014 - 12:25 PM in Homemades

If you're comfortable with the stock length, you don't need to make a sliding trigger to make it slam-fire capable.

Posted Image

Hopefully, the drawing is clear enough.

The trigger has a specific slope that allows the catch to be tripped when the trigger is in the pulled position. Plus, this design also solves the problem of not being able to fire it 'one' handed. A sliding trigger is great but you need two hands to fire it. One to pull the trigger and the other to hold the G-Spot in the forward position. The above illustration resolves that specific problem.


#339201 Bullpup Variant Writeup

Posted by makeitgo on 27 May 2014 - 12:49 PM in Homemades

...Well this looks familiar....

If you modify your trigger, make it beefier and add a slope to the part that trips the catch, it would be slam-fire capable. Do you find the stock length a little too long once you include the reach of the priming grip? Other than that, I like it.

For anyone unfamiliar with this bull-pup configuration, a big advantage is that the hopper rests behind your head. This way, it doesn't obscure your view/aim at all.

Thorn - "Ameriagasm"!


#338532 Bull Clip Level

Posted by makeitgo on 28 April 2014 - 03:14 PM in Modifications

"It hits 9000' FLAT!" - is something we've heard since the dawn of foam flinging. But does it really?

Every one has pondered a way to determine whether or not they or others are actually firing flat. Of course placing an actual level from the tool box is obvious but as we all know, impractical. Especially, if you want to do a test quickly and with various blasters. I know people have duct taped or rubber banded levels to Nerf accessories before but those don't fit well on to home mades which tend to not have Nerf tacticool rails.

Here's a cheap and practical solution: It takes all of 3 minutes (or less) to do and costs about $3.00.

The levels and bull clip were sourced from Dollorama. The levels come in a pack of 2 and the clip came in a bunch of assorted sizes. In fact, everything you see on the counter was bought at Dollarama.

Posted Image

The first thing that you need to do is separate the level from its housing. I just used a set of pliers. Next, just super glue it on to the wide part of the bull clip. There's usually a slight groove along the middle which should help to align it center. ...and you're done!

You now have a level that can be mounted and dis-mounted quickly, virtually anywhere on your blaster. It clips nicely on to the Nerf rails and on to most barrels.

Posted Image

When mounted on the rails, it can double as a pseudo scope.

Posted Image

Posted Image

If you don't like the clip arms, they can easily be removed.

Posted Image

Now, firing level and FLAT can be proved to yourself and to everyone else.

Posted Image


#337956 Why do slug darts need to be made with washers?

Posted by makeitgo on 01 April 2014 - 01:13 PM in Darts and Barrels

I've presented this style Slug before on this and other forums, along with my other style darts. I was informed that they would not be legal at Apoc (or any other East Coast war). The write up no longer exists in this forum but is up in others.

I believe they are the same bearings (Canadian variant).

In my informal tests, regardless of dart head, punching through card board boxes eventually caused the heads to separate from the foam. However, the bearings that did separate did impact and sometimes punched through the second layer of the cardboard box. The other type dart heads did not seem to have the same affect.

That being said, direct impact against my heavy bag (more similar to the human body than a concrete wall) did not cause any dart head separations by any of my dart types.

But it's the glancing hits, like those off a blaster hit, which are most prevalent here. Similar to cardboard, indirect hits or glancing hits, have the potential of torquing the foam enough to cause separation. Especially at the velocities we can generate at shorter distances.

Washers and other dart head types loose kinetic energy and momentum quickly once separated from the foam but the bearings tend to carry much of their kinetic energy after being separated.

Again, direct hits did not cause separation but glancing hits did appear to be more susceptible to breakages. I cannot give an exact percentage but it was pretty low. I don't believe it carries enough residual energy to actually hurt anyone upon regular impact (after separation) but it is small enough to sneak past some of the openings in some peoples protective eye ware. Which is a consideration for the war host.


#336810 Modification and Paintjob Pictures

Posted by makeitgo on 02 February 2014 - 10:43 AM in Modifications

XXXBowPup.

Inspired by Ryan's Rainbow Pup.

Shoots hard.

Posted Image


#335364 How to make plungers with perfect seals.

Posted by makeitgo on 12 November 2013 - 09:41 PM in Homemades

Another way to check for imperfections of your seal (although stated earlier, smooth acceleration is more important) is to use light.

Assemble your blaster without the spring or barrel. Peer down your blaster like a telescope while facing a light source. Pull and push the plunger rod back and forth looking for light around your plunger head. Much like an eclipse. If you can see light, that's where air is seeping through. Ideally you don't want to be able to see any light.

If the light seep is consistent through out the plunger draw then there is most likely a problem with your plunger head assembly. If the light seep is intermittent and random, then the problem more than likely lies on the tolerance of your PVC plunger tube.

This is of course is assuming that you're using clearish poly carb for your rainbow catch. Otherwise, take it out and keep the plunger rod centered another way.


#335343 How to make plungers with perfect seals.

Posted by makeitgo on 12 November 2013 - 03:15 AM in Homemades

Just throwing it out there since everyone else seems to be focused on plunger head seals.

It could also have to do with your plunger tube and it's inner tolerance. The PVC that I have access to (in Canada) has pretty poor tolerance. When I look inside, it's quite clear that it isn't smooth or uniform.

The other possible factor may be that your plunger head isn't sitting 'square' on the plunger rod with the spring behind it. Many of the springs I've seen people use don't have finished ends. Once the spring is compressed, it can cause the plunger head assemble to be slightly cant. Meaning, that you may have a perfect seal along 2 opposite edges but the edges perpendicular, may be just cant enough to allow air to flow through.

I use drain plugs as my plunger heads. They work great for me.


#331529 How to fix torn Magstrike air-bladder

Posted by makeitgo on 03 July 2013 - 11:52 AM in Modifications

Aside from buying a 'Magstrike' bladder. Rubber hose/tubes can be bought at some hardware stores. Usually in 4' or 5' lengths.


#330551 ESLT Blaster Build Guide

Posted by makeitgo on 04 June 2013 - 04:27 AM in Homemades

Now that you've made and used quite a few of these, how many shots (estimated) can you get out of the latex bands before having to replace them?

And considering that, which do you prefer; latex bands or extension springs for your ESTL?

Have you tried or considered using therabands? They're flat bands preferred by slingshot enthusiasts.

...what kind of knot do you have tied on the front of your tubing? As of now, I just have two granny knots but I'm sure there is a much better way of tying the latex up.


Look up 'tying slingshot bands'. They've (slingshotters) pretty much got it down.


#330119 The Official Internals Directory

Posted by makeitgo on 21 May 2013 - 10:40 PM in Modifications

Marshmallow Assault Rifle

Posted Image

Posted Image

Posted Image

Posted Image

Posted Image

Posted Image

Posted Image


#330080 Taking Off Stickers

Posted by makeitgo on 20 May 2013 - 10:16 PM in General Nerf

Are "goo be gone" products considered expensive?

And airline food, what's up with that?


It's $8 for a small jar of Goo-B-Gone where I am. Not really expensive but most households already have hand sanitizer and a hair dryer.

As for airline food, if you go to Dubai, the airline gives you these;

Posted Image

... An X-mas present from my mom.

... She brought back gold jewlery and designer purses for my sisters.


#330063 Taking Off Stickers

Posted by makeitgo on 20 May 2013 - 07:12 PM in General Nerf

Black, Dice, Hammy... But can you still reuse the sticker?


#330024 Taking Off Stickers

Posted by makeitgo on 20 May 2013 - 10:22 AM in General Nerf

Lighter fluid also works for this. That's what we use at the pharmacy to remove unwanted labels from things.


True. But most kiddies don't have much access to lighter fluid. Plus, hand sanitizer isn't as poisoness.

... Also, electric hair dryer plus lighter fluid might not be so wise.


#330022 Taking Off Stickers

Posted by makeitgo on 20 May 2013 - 08:22 AM in General Nerf

Have you ever had trouble taking pesky stickers off? Well this is a simple Nerf Hack to help.

Posted Image

Using a hair dryer, heat up the offending sticker for a minute or so. Start peeling. Apply more heat as needed. It should come off without too much fuss.


It even works with stock stickers.

*Edit - this method also allows for you to re-use the sticker. So if you're giving it a paint job, you can reapply the stickers if you so choose.

Posted Image


If you do have residue, there's no need for expensive goo-be-gone products. Just your hair dryer and some cheap hand sanitizer.

Posted Image

Apply heat to residue and apply hand sanitizer. Allow a few seconds for the hand sanitizer to react with the residue. Apply a little more and with a little finger muscle, simply rub it off.


#330005 Modification and Paintjob Pictures

Posted by makeitgo on 19 May 2013 - 08:05 PM in Modifications

Posted Image

Posted Image


#329877 Alternative Pumpsnap 3.0 Disc Method

Posted by makeitgo on 15 May 2013 - 10:24 PM in Homemades

These are from my 'HomeWrecker' and 'Multiple Orgasm' write ups. You can also use 1/2" PEX and drywall anchors. The anchors bite into the PEX extremely well. The result is a very cheap, extremely light and incredibly strong plunger rod.

Posted Image

Posted Image

Posted Image

This set up has never failed me. Even with a 28kg (~62lbs.) spring load.


#328395 F-CAG

Posted by makeitgo on 30 March 2013 - 07:33 AM in Homemades

How does this setup treat the bow? I would be concerned about it basically being like dryfiring the bow, which can cause some major facial rearrangements when your fiberglass and other plastics compound bow shatters in your face.. I've watched it happen. Does the setup you have apply enough resistance on the bow to be used safely?...


It's originally designed to shoot paintballs and perform in this manner. I don't believe it will shatter.

Blood Angel, nice conversion. You might want to add a little more toyish colors just in case. What is the ID of the main plunger tube?
I'm interested to see how it performs with Stefans. I'm surprised you haven't tried it yet.


#328298 Homemades Picture Thread

Posted by makeitgo on 24 March 2013 - 08:24 AM in Homemades

Chopped up a Super Soaker Point Break to create the Tacticool rail.

Posted Image

Posted Image


#328274 A Clip for Elite Darts?

Posted by makeitgo on 22 March 2013 - 12:59 PM in Modifications

It sounds to me it's more an issue with your chosen barreling material than the blaster(s) themselves. My Doomsayer can fire stock darts no problem. By deduction, you're using CPVC. Stock darts will always be too tight of a fit in CPVC, no matter what blaster you use (aside from over powered air blasters).


#328259 Silencing a Max Shot

Posted by makeitgo on 21 March 2013 - 01:38 PM in General Nerf

SilentScope over in Australia did a nice overhaul a while ago. He used a drain plug as a plunger head replacement and did a plunger tube replacement as well.
From what I understand, the Max Shot is very prone to breaking. The spring rest in particular is often the first thing to go. ANy hollow should be filled in and reinforced. I'm inspired to dig mine out and do my own overhaul.

SilentScopes overhaul can be found here.

The 'spring-ring' is just the vibration of the spring rattling against the plunger rod. There's nothing you can do about that other than replacing the spring with something of a different size.

Also, if it seems like the smashing of the plunger head into the end of the plunger tube is excessively loud, it's most likely that your barrel isn't long enough. ie the dart has left the barrel too early. The dart should exit the barrel juuuussssst before the plunger head hits the end of the plunger tube. Kind of like plugging the barrel with your finger to dry fire so it 'cushions' the blow.


#328075 Multiple Orgasm - A Guide

Posted by makeitgo on 16 March 2013 - 11:05 AM in Homemades

Since the blaster is so short, it can be easily de-primed by holding a thumb over the end of the barrel while firing.


Correct. I also stated this in my pros and cons segment of the write up. Towards the end before the videos.


#328066 Multiple Orgasm - A Guide

Posted by makeitgo on 16 March 2013 - 05:35 AM in Homemades

Like a said earlier (scroll up), it has to be kept pushed forward to fire properly. If it's not, it won't fire. I consider this a safety feature.

I meant the trigger not firing anything upon pull.
e.g. you push the handle not quite far enough forward and the blaster doesn't fire because the g-spot is misaligned


#327951 Multiple Orgasm - A Guide

Posted by makeitgo on 13 March 2013 - 01:09 PM in Homemades

The handle doesn't slide down because there's just enough friction to not let that happen unless you 'shake' it down. It does require that you keep your priming hand pushed forward (for now) to fire. I think of it as a safety feature. You can't accidentally fire unless you actually 'intend' to fire. I'm working on a kind of snap notch to remedy this. Only because I'd like to be able to fire with one hand. I'm thinking magnets. But all in all, it's not a hinderance as far as function is concerned. It also doesn't take much effort at all to keep it pushed forward. If you think of any other 'pump action' home made, the priming grip must also be completely pushed forward to fire properly.

If you prime the blaster, let go of the grip, and hold it vertically, does it slide down towards your shoulder?
Would sliding like this affect the reliability of the trigger system?


#327938 Multiple Orgasm - A Guide

Posted by makeitgo on 12 March 2013 - 09:38 PM in Homemades

It does, although I kind of meant an in-depth build video. Specifically, all the slots and how they fit together. I'm probably just getting mixed up over the cosmetic slots. Maybe once one or two of the USA guys have built one, they could make one start to finish and film it, and use fast-forward during basic stuff (eg: "cut this trace out" *fast forward through cutting), but show close-ups on the more complex cuts and fittings.

I definitely love this design for priming though; sliding catch-tubes, while complex, seem like the best option these days for bull-pup blasters.


***UPDATE***

Before I even put saw to pipe, I created this in Flash. I've had people request a breakdown despite this write up. So I decided to post a breakdown schematic to compliment the write-up.

Posted Image

Posted Image

***AND Now SIMPLIFIED***

In the simplified version seen below, the 'G-Spot' has been simplified to a non-collapsible plunger rod. Meaning, it's simply just a regular omni-directional plunger rod. It increases the overall length by approximately 4" but the overall length is still under 24". A small benefit with the simplified version is that the length of the stock will be more comfortable.

...Since it's not as in depth as the G-Spot and a lot easier to get at, while still retaining its function, I'll call it the 'Clitoris'.

Posted Image

Posted Image


#327936 Multiple Orgasm - A Guide

Posted by makeitgo on 12 March 2013 - 09:29 PM in Homemades

I've weighed it by stepping on my digital scale, with and without it. I did it several times to get an average and it weighs approximately 3.8 lbs.

Wow, this is really cool. I'm a little worried about the weight, would you mind weighing it when you get a chance?
I'm definitely interested in making one with smaller tubes (thanks for addressing which ones would work, Zorn) for reduced weight but still keeping around the same ranges, since it still has standard amounts of draw. The moving catch is pretty nifty and I like the smaller form. Awesome


#327906 Multiple Orgasm - A Guide

Posted by makeitgo on 11 March 2013 - 08:40 PM in Homemades

I'd imagine seeing one in person, or some in-depth video would help.


Maybe this might help:

http://i1166.photobucket.com/albums/q602/makeitgo/Test6_zpsb0b28950.mp4


#327900 Multiple Orgasm - A Guide

Posted by makeitgo on 11 March 2013 - 05:45 PM in Homemades

How heavy is the blaster?


I haven't actually weighed it but I would say it's just about as heavy as a stock Stampede with Batteries.


#327897 Multiple Orgasm - A Guide

Posted by makeitgo on 11 March 2013 - 04:49 PM in Homemades

Awesome innovation on this blaster! I have a few questions though.
Is the 2" VAC coupler that you mentioned for connecting shop vacuum hoses? And if so, where do you find them? I can only seem to find 2.5" ones for sale.

Does the 1.75" rubber stopper have a 1.75" outer diameter? Or is that a nominal size?


The 2" VAC coupler is for 'central vac' tubing. They're usually found next to the PVC fittings.

The 1 7/8" drain plug is actually 1 15/16" at its widest. It's meant for drains with a maximum of 1 7/8" opening. At first, it seems like too tight of a fit in the 2" gravel vacuum tube but with Lube, it slides just right.


#327890 Multiple Orgasm - A Guide

Posted by makeitgo on 11 March 2013 - 03:48 PM in Homemades

IMG_4187.JPG

The initial goal of this home made was to create a compact pump action blaster that retained the performance made familiar by it's popular contemporaries. It's of a Bull Pup design with a familiar 7" draw and more importantly, incorporates a unique pump action system that allows for the familiar and more ergonomic shotgun style prime, without the use of a pully. In fact the only thing different about this system from a 'RainBow Pump' is it's configuration. It is, in essence, a Reverse/Inverse RainbowFire Pup.

I'd like to begin by explaining that the materials I chose to use are what were available to me. Many of you know that I live in Canada and I don't have access to many of the popular materials commonly used for homemades or McMaster Carr. The majority of my materials were sourced from Home Depot, Lowe's, Walmart, the Dollar Store and Pet Smart. I'm sure this can be converted using the popular materials available to most of you ('Merikans).

The name, "Multiple Orgasm", was chosen mainly because it incorporates so many sexy goodies. Namely, the unique priming system configuration I deemed, the G-Spot . And like Zorn's FAL, I felt like adding some estrogen to the database.

So let's begin...

The main things you'll need are three different sized tubes/piping that sheath nicely into each other. In my case I chose:

- 1.5" ABS as my main priming bar
- a 2" gravel vacuum tube (meant for aquariums) for the main plunger tube

- 2" ABS for the shell.


You'll also need:

- 3 cutting boards for the catch, supports, trigger, grip/handle and stock. In my case I chose 2 thinner boards and one relatively thick board. - 2 1/2" elbows (I eventually swapped out one of the elbows for a T)
- 2 stubs of 1/2" PVC


IMG_4188.JPG

Since this does utilize a slightly modified Rainbow catch, a slotted omni-directional plunger rod will also be required. There are many variations on this but in my case I made mine out of PEX, nylon drywall anchors and a 2.5" 8-32 screw.
 

IMG_4191.JPG

Using the thicker of the cutting boards, I cut out the 2 main supports, my catch, and what I needed to create my bushing/coupler. I used a 2 1/8" (54mm) hole saw bit for the larger disks and a 1 3/4" (44mm) hole saw bit for the smaller disks.
 

IMG_4189.JPG


*Note that one of the bushing rings is made with the thinner cutting board.

SinceI knew I would be using PEX as my plunger rod, I cut out the appropriate sized holes using a 5/8" stepped drill bit, widening it just slightly after using a Dremel/rotary tool.

IMG_4190.JPG

You'll note that in creating the catch plate, I cut off the two sides which are used as the guide and spacers. Please notice that the entire catch assembly has been cut with a 'slope' to accommodate the triggering system.

Let's move on to the plunger rod next. We'll come back the catch assembly as the creation of the plunger rod will make the rest of the catch assembly make more sense once it's created.

IMG_4192.JPG

I used a 1 7/8" drain stopper as my plunger head as it fits perfectly into the 2" gravel vacuum tube. I cut both parts of the plunger rod out of PEX who's respective lengths were determined by my spring and it's fully compressed length. The length of the piece closest to the plunger head is 0.25" longer than the length of my spring fully compressed. The latter half is the rest of the length of the spring leading into the catch. Nylon Drywall anchors were screwed into the illustrated ends. The anchors must be new and unused as they need to 'bite' into the interior walls of the PEX. Both lengths are connected via a 2.5", 8-32 screw. Once it was screwed into one end, the head of the screw was sawed off. A 0.75" length of 1/4" vinyl tubing was slipped on to the screw as protection for the catch plate. Then the other length was manually screwed in by hand. This will actually require a bit of wrist strength to get it down so the notch is only 0.75". The pointed end at the tail of the plunger rod was made out of a scrap piece of nylon but it can be fabricated out of epoxy putty. It's secured via super glue and a set screw. It's purpose is to guide the plunger rod through the catch plate. However, this is optional. You could lengthen the end of the plunger rod to already exist through the catch plate. It will become clearer as you read on.

...Now back to the catch assembly.

Much like Zorn's Fal catch setup, I shortened the the rear end of the plunger rod by applying that length to the catch via a length of 3/4" aluminium. The length is also the approximate length of the spring fully compressed. *Again, this is optional. The purpose here is to shorten the overall length of the blaster as a whole. Otherwise, a full length plunger rod is all that's required.
I VERY carefully sized the hole in the spring rest to be a very tight friction fit with the 3/4" aluminium. Just as an extra measure, I also used Super glue.


IMG_4193.JPG

With quite a bit of sanding, I was able to get the PEX plunger rod to sheath almost frictionlessly inside the 3/4" aluminium. It's important that the spring you use fits over the plunger rod AND the plunger rod sheath. It's also important to make sure that there is very little to no 'wobble' in this set up to avoid the spring 'kinking' and causing problems with the draw.

IMG_4194.JPG

Above, you can see that this setup shortens the overall length by at least 4". The 4 extra inches that would have stuck out the other side of the catch has been integrated into the primed portion of the plunger rod.

IMG_4195.JPG

*The spring I'm using is not a [k26]. It's a spring I found locally that is 12" long, has a full compression length of 4.5" and has a max load weight of 28kg (~62lbs.)


And now we move on to the "G-Spot"!


This is where things become reversed and inverted. Normally, what would normally be used as the plunger tube, now becomes the priming bar/tube (1.5" ABS). Instead of the plunger rod facing in, it faces out. By taking the catch out of its normal position, held static inside the plunger tube, and placing it in the priming bar, it becomes mobile. Integrating the catch in this manner solves the riddle of keeping a shotgun style pump action prime with in a compact Bull Pup configuration!

I know it seems complicated, but if you have or have made a Rainbow Pump, this will be easier to understand. If you take your RBP apart, simply turn the catch and plunger rod the other way. Bingo! It's that simple. Your 1.25" plunger tube becomes the priming bar/tube and the 1.5" thin wall most of you use as the priming sheath would now become the plunger tube. The only thing you need now is the shell.... more on that later on.

IMG_4196.JPG

As you can see above, slots have been cut out of my 1.5" ABS. The main slot (the larger one) is there to allow the trigger room to travel along the priming bar without getting in the way. It's made just wide enough for the catch to 'drop'. The extra slots are purely aesthetic. The added length towards the plunger head, which is also the approximate length of the spring compressed, is not all that necessary but does offer assistance in guiding the G-Spot assembly along the plunger canal.

Below are more examples to help you understand the G-Spot better.

I used set screws to secure everything down. Since this will travel inside the plunger tube, you don't want screws protruding that can potentially scratch up the plunger tube walls. A good sanding to eliminate sharp edges and burrs is highly recommended.
The 2 most bottom pictures illustrate how the assembly looks primed.

IMG_4197.JPG


Before we can insert this into the plunger tube, we need to create the bushing/coupler.

If you're using 1.5" thin wall as your plunger tube, a 1.5" coupler would make this a lot easier. However, since I do not have access to 1.5" thin wall, I used a 2" gravel vacuum tube. Which fits very snugly into a 2" VAC coupler.

*note - Even though I'm using a 2" VAC coupler, I could not use 2" VAC tubing for my plunger tube because 1.5" ABS does not sheath into it. But 1.5" ABS does sheath perfectly into the 2" gravel vacuum tube.

Shown below, the three disks I cut earlier, form the bushing plates for my make shift coupler assembly. I cut down my PVC elbows and wye to appropriate lengths to minimize dead space and so that the barrel could rest flush with the shell, once it's all put together.
The natural lip inside the 2" VAC coupler acts the perfect separator for the plates and ensures that they remain centred and square.

The elbow nests very snugly into the centre disk (top right) and is super glued and gooped in. Goop is used in great excess here to ensure a perfect seal. Since the disks war cut with a 2 1/8" hole saw, they have a very snug fit inside the 2" VAC. Once the whole thing was goofed and sandwiched together. I use set screws to secure the last plate.

Note how I carved both the disks and the coupler to be fitted around the elbow.

IMG_4198.JPG

Now that we have the bushing/coupler assembly made, we can move on to the main plunger tube.

You've seen some of the pictures below before but here they are again because I know you don't want to scroll all the way up.
The only new picture is the one on the bottom right. It's just there to give you an idea of where we're going.

IMG_4199.JPG

Although the plunger tube has already been cut, you can see the necessary slots that need to be made to allow for the priming assembly to function.

In the first picture, you can see how the assembly sits within the plunger tube in its relaxed state.
In the second picture, you can see how the priming assembly is seated in its initial state of prime.
In the third photo, you can see how the entire primed assembly is drawn back to its initial position, ready to fire.

The larger slots are to allow for the travel of the priming handle once it's attached to the priming bar. The drilled holes illustrate the positioning of the priming handle.

Important to recognize; the positioning of the priming handle must NOT be placed too close! I placed it as close as I could to the catch without having to cut slots that would interfere with the active portion of the plunger tube. You can see in the third picture that the plunger head rests just before the slots.

IMG_4200.JPG

IMG_4201.JPG

The only other slot that needs to be made is the one for the trigger slide so it can hook up inside the plunger tube to flick the catch. The G-Spot, if you will

.... If you haven't guessed by now, holding the trigger down while priming, you rub the G-spot in rapid succession allowing for 'slam firing'!


IMG_4202.JPG

Above is just some more images of the main plunger tube with the necessary slots.


And now we move on to the shell.


For my Shell, I used 2" ABS. This is where those who are aesthetically inclined, can get as creative as they want. The main purpose of the shell is to house everything we have just created. It also gives a place to attach the main grip/handle. The only necessary slots to make in the shell are for the priming handle so it can attach to the priming bar and travel its necessary length (7"). And one for the trigger slide.
The extended slots I made are completely unnecessary and only serve to show off the internals. In fact, the priming slots don't need to be as wide as I made them. They only need to be as wide as the area that connects the priming handle to the priming bar. 1/2" at most I would say.

Your shell should be at least 1.5" longer than your internals so you can attach the 'stop' at the front of the shell that keeps the priming bar from shooting out the front. Think of it as the priming rest.

IMG_4203.JPG

In order for the 2" VAC coupler to fit inside the 2" ABS, I needed to use my 2 1/8" hole saw to bore out the business end so it would fit inside. This made that area relatively weak so I solvent welded four strips of ABS as structural support.

IMG_4204.JPG

IMG_4205.JPG


The main grip/handle, trigger and stock.


The main grip/handle, trigger and stock are made from cutting boards. The centre spine of the grip is made from the thicker cutting board (Kitchenade). While the two outer halves and shoulder plate are made from the thinner cutting boards (Walmart).

IMG_4206.JPG

I measured out the length so the stock would be flush with the back of the blaster assembly. The grip/handle was measured out so that the trigger guard met up with the priming handle. For all intents and purposes, the trigger guard only goes as far as the plunger head after it has been primed. You can see below that the trigger guard lines up with the priming slot.

IMG_4207.JPG

Here you can see how the spine is attached to the shell. Access ports were made to help secure the shell to the grip spine. *Note how the screws are counter sunk and flush so as not to injure the plunger tube. There are 2 screws in the front and 3 in the back.

IMG_4208.JPG


The priming grip/handle.

My priming grip/handle was made with 2 pieces of 2" ABS solvent welded together. I used 2 because I needed to create a wide enough surface to create screw ports so I could secure it to the main priming bar.

IMG_4209.JPG

Once you put it all together, it looks like this:

IMG_4210.JPG

Here it is against a Crossbow to show a relative size comparison.

IMG_4211.JPG


Pros: All the criteria I set out for were fulfilled.

- Compact design under 24"
- Full 7" draw
- Regular shotgun style pump action prime
- Ranges well over 100'
- Looks bad a$$
- IS bad a$$

Cons:

- It's a little heavy by Nerf standards. But I'm pretty strong so I could deal.
- It can't be de-primed as one would normally de-prime a blaster except by blocking the barrel. Not really a problem since it's so compact.
- The cost. Since this took a lot of trial and error to get it right, I must have spent over $100 to build this. But if I were to do it again, I think the hard costs would still be around $70. However, I do live in Canada so these parts may be a lot cheap for most. Especially those in 'Merika.
- It took a loooong time and a lot of patience and elbow grease. Those of you with actual workshops, I envy you. My workshop is my kitchen and I only have basic hand tools. I have a rotary tool, hack saw, a palm sander, screw drivers and an X-acto knife.... and safety glasses.


POST MORTUM

After doing a lot of testing, I found that the 16" barrel I had initially designed this for, was too short. This obviously has to do with the plunger tube volume. I'm sure if this were down sized to 1.5" PVC thin wall. A 16" barrel would be just the right length, keeping this design under 22". Theoretically, with a full length [k26], this design could be kept under 20"!

I decided to make this a vertical grip since my spring is so strong.

I also added some very tactical elements like a cheek rest and padding for the shoulder stock.
Here you can also see how the VAC assembly is bolted to the shell.

IMG_4212.JPG

...but I couldn't stop there. I also swithched out the top elbow for a T and added Blue LEDs.

IMG_4213.JPG

As you can see, it lights up internally. Both within the barrel and the plunger tube. No air leaks and no loss of range or power.

...Ohh but wait. I made the cheek rest even more ergonomic. and improved the LEDs.

IMG_4214.JPG

When the lights are off, it's even more impressive!

IMG_4215.JPG

IMG_4216.JPG


....AND


...since this is a feminine themed blaster, why not make it more pleasurable for her with the proper lube.

IMG_4217.JPG

Sploooosh!!!!

Yes. I do use this as lube.


Firing Demo


LED Demo


#327593 Homemades Picture Thread

Posted by makeitgo on 04 March 2013 - 12:43 AM in Homemades

...and now it lights up!

I replaced the 90 degree elbow with a T and added LED's that light up the barrel, hopper and plunger tube. My iPhone can't do this justice. It's sooooo Tacti-Too-Cool in real life. Multi-Orgasmic!!!

Posted Image

Unprimed.
Posted Image

Down the barrel.
Posted Image

Down the hopper.
Posted Image

Primed. Note that the plunger tube lights up.
Posted Image

Close up.
Posted Image

From the back.
Posted Image

http://www.youtube.com/watch?v=bBn98s-dKHo


#327496 Homemades Picture Thread

Posted by makeitgo on 02 March 2013 - 01:40 PM in Homemades

Now more tacticool!

Posted Image

Posted Image

Posted Image

Posted Image

Posted Image


#327132 New Method for Reducing the Internal Diameter of PETG

Posted by makeitgo on 21 February 2013 - 07:35 AM in Darts and Barrels

The 'Vulcan' spring you used is weak in comparison to the Lowe's springs I sighted:

Posted Image

The PETG is strong enough to stretch the Vulcan spring that it doesn't tighten enough.

Plus, you stated that you couldn't use your hair dryer because it's too loud. Does that mean you used your flame method to create the rings?

I haven't had a problem with them being springer or airgun fit. All I can say is it works for me, my darts and my springer and air blasters.