Jump to content


shmmee's Content

There have been 412 items by shmmee (Search limited from 03-December 96)


By content type

See this member's


Sort by                Order  

#328796 Magstrike Air Tank Mod Revisited

Posted by shmmee on 16 April 2013 - 03:10 PM in Modifications

And I do also want to figure out some sort of long range integration. Just haven't decided what exactly to go with yet for that. Any ideas?


The magstrike runs entire on air pressure, there is no spring system in it. If I wanted to increase the power and rate of fire I can just increase the air pressure from the regulator. I keep it down though so that it is reasonable enough to pass HvZ rules. =)


Actually the magstrike is a hybrid between pump and springer powered. The air reserve tank actuates a spring powered piston and the spring piston actually delivers the air to the dart. Increasing the air pressure increases ROF, increasing spring strength increases range. It's an odd relationship. With all you've invested in your setup a basic spring swap would be worth looking into.

As far as long range options:

A pin pull tank would give you the most volume and range (like a early gen BBBB or beserker ~100'-120') but you would be bleeding your reserve tank out your barrel as long as the pin remained pulled. You could overcome that with a quick trigger pull, but that may require more thought than you would like to invest while in battle.

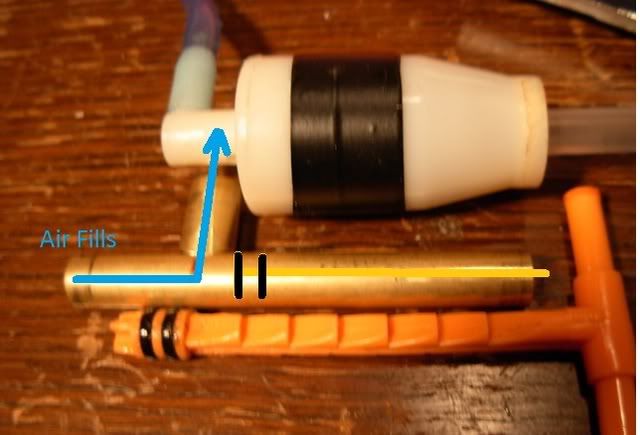
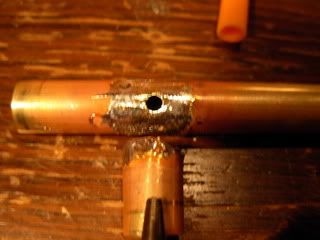
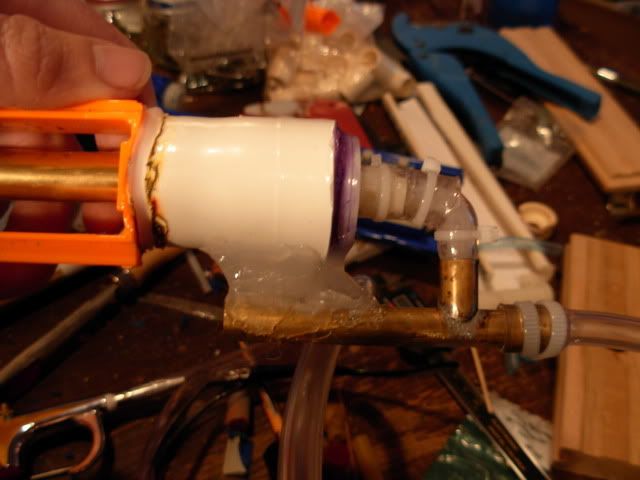
A back pressure tank would give you ~ 70'-90' & require a clippard MAVO-3 valve (buy from ebay not clippard. Clippard shipping costs are brutal)to isolate the reserve tank and fire your primary. All the current semi auto write ups are tuned to a turret which sucks for reloading. If you don't mind doing some R&D you could easily adapt it to a single shot breech loading system. If you really wanted to get crazy with it you could run with an idea I was working with but had abandoned:

it's a video - click the link.
Posted Image
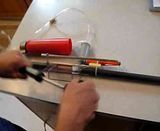
The basic concept is that a piston (in this case a pump) is attached to the side of a back pressure tank and when the tank fills the piston fills from the tank and extends loading a dart while closing the breech. When the tank fires the piston/pump also vents back through the back pressure tank opening the breech for the next dart. Semi-auto clip fed goodness. My problems - the throw of the piston was too short and the breech didn't seal. I think the breech also started opening before the dart had left the barrel. Connecting the piston via some tubing instead of directly might introduce of introduced a bit of delay as the piston vents through the tube and back into the tank. I got proof of concept, but not much else. You might have better luck. A self loading system like that might be better suited to your high capacity rig anyway.


#328759 Magstrike Air Tank Mod Revisited

Posted by shmmee on 15 April 2013 - 11:56 AM in Modifications

As I've been watching this build grow I've been impressed with your dedication to safety as well as the overall polish of the final product. It's an attitude worth emulating. This is one of the standout - above and beyond nerf mods I've seen in a while. Thanks for contributing.

I've semi-auto'd a dart tag gun, but quickly found out that clips and swappable turrets are superior. I spent far more time running away and reloading that attacking. If anything else is to be added I would suggest a simple breech load -long range integration for picking them off before they get close enough for the magstrike.
Hanging a spare clip pouch on either side of the ms will also keep a clip closer to where your hands are. And might be ergonomically faster.

Beautiful work!


#273324 'geddon 'leven Date Set July 10, 2010

Posted by shmmee on 25 April 2010 - 06:52 PM in Nerf Wars

Hey, I'm laying plans to come for Armageddon, and booking a cruse for the following week. Is the tenth a pretty solid date? It's really going to screw me if the date changes after I book. I'm really looking forward to attending my first major Nerf war.

Edit: The cruse was filling to the last 6 cabins. I had to purchase the tickets while they were still available. I'm really, really, really hoping the tenth is solid, cause i just may cry if it changes now!


#279935 'geddon 'leven Date Set July 10, 2010

Posted by shmmee on 10 July 2010 - 09:54 PM in Nerf Wars

Thanks all for an frekin' awesome war!

my recap Pros:

~Even though i was gluing it up, and had never even fired a full clip through it my PAS, not only lasted the entire war, but got some ownage in too.
~Even though my gun broke some how, some way each war, i had the tools and supplies to field repair anything that broke and get back in the game.
~My first major nerf war was a full on war, and not one of the little skirmishes like what I'd host back in Utah.
~leaving the hotel room at Glendora's garden inn and suites to see 3 others loading Nerf guns into the back of a van and asking: Geddon?
~Having my ERTL PAS examined, admired, and even feared. I had to cross a lot of design issues, and work though a lot of problems to get that thing to work like it did. Thanks for the props.


Cons:

~Rolling my ankle during the first round, hobbling through the rest of the day, and probably spending the next week on the cruse layed up (not actually a bad thing) because i kept playing on it.
~watching in absolute horror as the barrel of my gun snapped off while attempting a barrel tap on someone with a sword. (it was straight from a samuri movie)
~using # 8 washers for steffan weights when i should of been using #6 and having the hot glue jam up in my pistol splat.
~Being naive enough to think 70 Steffans would be enough.
~Probably won't be able to attend every year! Lame.


#328650 F-CAG

Posted by shmmee on 09 April 2013 - 10:57 AM in Homemades

I usually don't chime in - unless it's really cool.
I bow hunt (or at least i try 3 years and I have yet to be able to take an actual shot) but one of the bigger challenges is ranging your target. Deer never wander in at the preset pin set up (or so I'm told) they're always somewhere in between pins - and you never have time to reach for your range finder. That set up makes a great trainer for learning that skill.
I'm also glad you've opted for a factory established base. I could just imagine a homemade plunger rod coming loose, bursting through the pt and firing like an arrow from a 60 pound bow - while it's aimed at another human being. Scary stuff.


#303497 Rubber tipped darts and hoppers

Posted by shmmee on 18 August 2011 - 02:00 PM in Darts and Barrels

Reliable, safe (metal free) diy dart heads have been a project I've tried as well, and I'd like to start by saying how impressed I am with your initial results. The domes look fantastic.

I don't know if this may be any help, but here's my thread for gum drop dart heads.
gum drop dart heads

Posted Image

They share some similarities with your dart heads, and you may be able to benefit from the half-year Taerkitty and I spent developing them.

I totally share your pain on the lack of glue. I tried close to a dozen different glues trying to get something to stick to a silicone based material. None worked, but it looks like your addition of a tail and thinner - more penetrating silicone provides a good enough anchor.

I am curious to see how you not only mold the heads - but also integrate the tail as well. Is there any chance of shooting a video of your process? I molded mine in mass by using a divoted cutting board. It's a pretty effective process. I was able to fab up (with the help of my sister) about 300 darts for Armageddon. The polyethylene board does a great job of keeping a smooth texture on the formed pieces - and it's very easy to drill/machine.

After trying nearly a dozen glues - I couldn't find any that would stick to a silicone based material. But I did eventually learn that pressing a piece of felt onto un-cured silicone and working the liquid mixture into the fibers created a death-grip bond. Slipping a pre-cut disc into the bottom of the form tipped the head in felt (may not work with a domed tip) - and solved my hopper feed problem, but I don't know if that process would be possible to do while still keeping your tail. That's one fault of mine. Because they lack a tail they weigh only .5g. They can still go about 80'-100', but you'll probably need your tail to keep them heavy enough to fly any farther.

Any chance of seeing a pic of your form, or a vid of your process?


#361730 JSPB B&B mini-hopper

Posted by shmmee on 09 October 2017 - 10:47 AM in Homemades


I intend to use rubber band as a rotating power, pre-winding idea,this will be easier than pressing the trigger.


It has been released for some time and can be found in the free models

The retractable keychains (not the lanyard ones) have a decent constant force spring in them and several feet of fine chain. It should be more than adequate to index the turret.


Thank you SOOOO much for the hopper cap! I thought I'd checked your page. It looks like i simply missed that section. I'm beyond grateful! 


#361712 JSPB B&B mini-hopper

Posted by shmmee on 03 October 2017 - 11:56 AM in Homemades

As always, I'm blown away by your work! I can understand keeping the B B files for your self - you deserve to profit off of that much work. There is one aspect that i'm especially interested in - the flip top hopper feed cap. Is that one you might consider releasing the files for? I've been searching for the files for a working printable cap for ages! My RSCB'd panther would just look ridiculous with the standard 1/4 turn valves on the back so I've been using a normal PVC end cap.


#296465 Nuthead Darts

Posted by shmmee on 22 March 2011 - 10:22 PM in Darts and Barrels

I finally had some time to play with the nut head you sent me. They flew very well, they hoppered (in my homemade hopper - a 45 welded with a coupler behind it) well, and I was able to screw a #6 nut on the threads (just for giggles, and as a testament to the high fidelity of your molding skills) I didn't have time to measure ranges, or really shoot them enough for a reliable data set, but I'd certainly trust taking them into war with me.


#296096 Nuthead Darts

Posted by shmmee on 16 March 2011 - 09:36 AM in Darts and Barrels

Has using a single BB (or anything else heavy) under the countersink bit been considered? I feel as if this may solve the "too light" problem, while maintaining the aerodynamics of the molded dome.


I would be hesitant to drop any metal weights into a head. I've gone through 7 different adhesives trying to glue heads to FBR...

(tested by shooting into concrete floor with a BBBB at full power)

Sugru (headed up while still un-cured in mold) - separated while being removed from mold,
Hot glue -separated instantly,
Shoe goo - separated instantly,
"multi purpose cement" - survived 3 shots,
100% silicone - survived 10 shots,
Silicone liquid nails - pending,
Plumbers goop - pending

So far the only one to do ok, was 100% silicone, but that had a 24 hr cure time. The point I'm trying to make is that silicone doesn't like to form secure bonds with anything. Even if a suitable glue was found, heads will still separate, possibly/probably releasing any weights included. One of the primary goals of this thread was to remove hazardous metal weights from the equation.

The heads in the pic are about 1/4" high. Of the 3 i tried to range test (with a leveled BBBB - looking for the absolute max distance) 1 separated 20' from the barrel (fail) and the other two... were never recovered. I spent an hour wandering the street with my head down... I heard the things whistle as they disappeared... They looked like they were going straight till I lost them, but darn if I know how far they went. I wish I had a scale so I could weigh them.


#298585 Armageddon XII Planning Thread

Posted by shmmee on 25 May 2011 - 12:29 PM in Nerf Wars

Well the time has come to begin planning this year's largest west coast war so here goes.

Date: July 9th
Time: 9:30 am to 4:30-5ish pm


I'm making a Secret Vice Presidential decision here, and saying it's gonna be on July 2nd. Seeing as how Avatar of Woe(Brian), shmmee, and a few others stated that they can not make the 9th, it would be better to base the date around those with a longer travel distance, rather than the locals who live within 10 minutes of the location.

We'll give the thread another update this weekend after our SCUN war PAVLOV, and make the final decision on the location(s).


So DEFINITELY July 9th? :unsure: I just want to be %100 sure of the date before I tell my guys and we start planning for everything. It would kinda suck if it was a typo, I know that I can make quite a few when it's late/early.

I'de like to second that confused look, and seek clarification on the "official date" discrepancy.


#298220 Armageddon XII Planning Thread

Posted by shmmee on 16 May 2011 - 09:22 PM in Nerf Wars

soo guys are we any closer to setting a date? our FB poll's most popular date is the 9th, followed by the 23rd and the 2nd as a tie, but that's mostly the same guys who posted here. sooo Apollo, Axel, what date do we pick mentlegen?


FB poll? Isn't NerfHaven set up to do polls (a place all ready frequented by many hoping to attend) Do I need to search out the FB poll referenced to cast a vote against the 9th (obligatory family reunion), or are results from both considered?

I do of course realize that no date chosen will agree with everybody. If it does end up being the 9th, well have fun storming the castle!

Regardless, a date would be helpfull to get travel plans settled.

Oh - last year I stayed at "Glendora Inns and Suites" (along with a few other nerfer). He asked us about the toy guns, and I told him we were there for an annual convention. He seemed interested in the influx of business, and seemed interested in offering a discount to participants of this years event as an incentive to come back. - If we advertised his business online. I haven't spoken with him since last year, and who knows if he'll remember anyway. This years event is likely to be in a different zip code, but hey the rooms were nice, and so was the price so, just throwing the option out there.


#297234 Armageddon XII Planning Thread

Posted by shmmee on 17 April 2011 - 11:41 AM in Nerf Wars

Planning on making the pilgrimage from Utah again, possibly with +2 people. Still figuring out what will work for the other 2, but I'm liking June 25, and July 23.(my +1 likes June 23) I get every other Friday off, and I'll be able to avoid missing work, and using vacation days. July 9 is a family reunion, and the only weekend we can't come. If needed I can work with the other 2 options.

Are the pistol splat variations still acceptable?


#322578 Vote for NH's Next Avatar Pack

Posted by shmmee on 14 October 2012 - 09:09 AM in Off Topic

Abstract modding essentials: zip ties, e tape, e putty...and especially duct tape!


#295012 Archangel

Posted by shmmee on 23 February 2011 - 02:46 PM in Homemades

That's really impressive. What's your professional/educational background? This deffinately isn't something the un-trained idiot could create.


#302782 Nerf Bolo Rounds

Posted by shmmee on 03 August 2011 - 10:58 PM in General Nerf

I like this idea. Simmilar projectiles were used in earlier sea fairing times to bring down the masts and rigging of enemy ships. Instead of cloths lining fellow nerfers - why not build a new game type around it? Some kind of nerfy adaptation to "ladder ball"

ladder ball rules with pvc parts list

The 3 different rungs are worth different points. The same concept could be applied to a run and gun version for nerfers - with your bolo rounds being shot at the opponents ladder. PVC ladders would be cheap and easy to build.

Each team would have someone as a designated scorer (with a high powered blaster and a bolo loaded) the team would have to protect and escort the scorer through the enemy defenses to get their scorer a shot at the enemy ladder. Shot bolos can only be picked up by the team who's turf the bolo lands on - each team starts with a limited number of bolos.


#342916 I'm making foam

Posted by shmmee on 19 November 2014 - 09:55 AM in Darts and Barrels

Droid31 was kind enough to toss some samples in with a broken set of x-bow arms.

The sample that really got my attention was a small stub of dense blue foam - similar to the "craft block" or building block foam. I haven't been able to play with that yet, but I'd imagine that foam to be darn near indestructible. Was that also something that you extruded? I'm sure you get a lot less foam with that high of a density, but there really isn't anything out there that even comes close to a foam that dense. I could see there being a much larger market for the High Density foam than the large pore pool noodle-esque foam.


#304515 No Time to Nerf

Posted by shmmee on 09 September 2011 - 06:21 PM in Off Topic

You've been one of the true masters of modding. I doubt there has been a single nerfer whom you haven't inspired with some great work of art. It's sad to see you go, but the great thing about marriage - is that the next generation of nerfers are sure to follow, and will need someone to teach them the ways of nerf. Keep your blasters remember your NH password, and we'll see you again when your first one can shoot a NF. Happy trails!


#290296 Ultimator With K14 Spring And Clear Plunger Tube

Posted by shmmee on 06 December 2010 - 07:57 PM in Modifications

I love my Ultimator, It's the only nerf gun i've seen with a notable recoil. I almost got a shiner from the priming handle after shooting it the first time on christmas morning. Though, it is too inaccurate to use as a missle launcher, and i've been to scared to screw up an irreplacable relic by doing anything but barrel attachments. I think i would miss the "Hummmmmm" the stock tenson spring makes after discharging.

I'm quite surprised you only get 115' (though it's still plenty of range) out of this mod. The Ultimator has a shockingly huge air cylinder. I don't know how you might test it, but how does the strength of the [k26] springs matchup to the stock spring? How does it do with fewer pumps? I'm left wondering if it's still discharging air long after the dart has left the barrel.

I once had a problem with my priming bar slipping too. I opened it up, wiped any lubricant off of the rod, and fidgited with the spring on the trigger some. (it had slipped) It stopped after that.

I am a big fan of the clear tube. That looks absolutely awsome!


#289761 Padding For Plunger Head

Posted by shmmee on 02 December 2010 - 04:30 PM in Modifications

Many use craft foam (sold at most craft stores). It's a 1/8" or 1/4" foam sheet. Felt might work. I've tried using a slice of foam from a "fun noodle" (pool floatation thing) but it ended up getting loose, and clogging the barrel.


#338590 Coloring/Painting Darts?

Posted by shmmee on 01 May 2014 - 09:27 AM in Darts and Barrels

I tried mass spray painting darts to mark them for a mass war - It was awful! Paint transfered from darts to barrels and hands, and then from hands to blasters. It took me quite a while to get blasters back to a normal working order - some of the worse ones (maverics) never recovered.

Perhaps dye instead of paint could be found, but I think titanium2 might be on to something. Marking the tails would be like raising a "find me flag" with every shot. My first attempt at darts included a bright neon disc (ear plug foam) glued to the tail. The darts were awful but recovery was great. I bet craft foam would be a good substitute. Hot gluing them on the tail would throw off your center of gravity and make the dart unstable. You would want to switch to a lighter glue. 3M makes several spray adhesives that could work. Application would be quick that way too - you could spray several discs at once and touch a tail to them to complete them.


#338599 Coloring/Painting Darts?

Posted by shmmee on 01 May 2014 - 04:22 PM in Darts and Barrels

I had once considered finding a paint/filtered eyeglass lens combo that would make darts pop out like they were glowing. I never was able to find anything though.


#359864 High Cap Magazine Collective Brain-Spew

Posted by shmmee on 12 May 2017 - 02:57 PM in Homemades

Much of this topic actually hits on a failed prototype I made many many years ago. I think I still have it in a box somewhere. I'll have to dig it out. Basically, 2 ribbons from 2 tape measures are supposed to neatly guide a line of darts through a mag and wrap them around the center of a spool with the ribbons forming the walls while the darts transition from out the bottom of the mag to the center of the spool. Because the entire spool is rotating along with the wound up line of darts, you only get friction on the few darts that are spinning towards or away from the spool. The spool would also perform better as more darts were loaded in - increasing the leverage the tape measures could exert on retracting the ribbon.


The functioning theory was that as darts are placed inside the mag (between the two ribbons) the ribbons would travel with the darts, guiding them to the cog in the center of the spool and as the spool is wound the ribbons & darts, the ribbons would feed in and out from the tape measures keeping potentially hundreds of in a neatly wound spiral. 


Theory collapsed into reality when I tried loading the thing. The ribbons failed to keep the darts neatly aligned during the mag to spool transition and as soon as they exited bottom of the mag they broke rank and jumbled into an un-extractable mess. I made a crappy ms paint drawing of expectations vs reality of that prototype but my work filters photobucket and I'm out of mobile data, so you'll all just have to wait till later. It could possibly work if there was a swinging guide running from the bottom of the mag to the cam, (keeping the darts aligned as it transitions) but after my initial failure I kinda stopped caring and threw it in a box. Also, I think I'd need something more sturdy than the 1/2" wide ribbon I was using. The ribbons were prone to bunching and twisting and falling off of the tape measure spool.


Another down side is that I had to chop off the fingers on top of the mag (the ones that keep darts from jumping completely out of the magazine). Without those fingers, a loaded drum has to be in a blaster or it will unload itself in quick glorious fashion. Knowing what i know now I probably could of kept the fingers and had just cut a slit for the ribbon to pass through instead. Better yet, instead of folding the ribbon over the top of the mag, simply pull the ribbon through slits at the bottom of the mag and have a longer follower (I used 1/2" lengths of dowel to make dummy darts for a follower) to make up the difference. Poof. no sharp fold on the ribbon and I'd get to keep the dart fingers at the top of the mag... wow, i'm actually starting to care about that project again!


#359982 High Cap Magazine Collective Brain-Spew

Posted by shmmee on 17 May 2017 - 05:22 PM in Homemades

IMG_20170517_112917_zpsfkoo8smv.jpg

IMG_20170517_112927_zpsonzmgmfw.jpg

dart%20drum_zpsgs2p0gmi.jpg

So, Hoping that worked. I can't actually see the pics due to work filters. Here's some pics of my failed prototype. The entire spool rotates inside the cookie tin so only the darts segueing between the mag and cam are moving independently of the spool. With a little more guidance between the stock mag and the cam, and a lot more rethinking for spring placement and materials (like having the ribbon feeding out through slots much lower in the mag and having a longer follower - instead of wrapping up and over the top of the mag, I think it could be viable.


#359954 High Cap Magazine Collective Brain-Spew

Posted by shmmee on 16 May 2017 - 09:36 AM in Homemades

My experience with RSCB's tells me that moist or damp darts do not like to slide - even through a straight tube. (my group recently had a nerf war during a rain storm). The thread is moving away from lung power to transition darts, and I think a fail has been avoided there. The  humidity that blowing in the tube would of transferred would probably of impacted dart movement after a few hours of nerfing and advancing darts down the tube.


As far as pumps go, you can easily source a battery powered air blower by looking near the air mattresses. I've got one, it takes 4 "D" batteries so it's stupid heavy but it puts out more air than a computer fan. A little modding to a lipo would cut down on the weight and seriously increase the output.


#294505 Too Much Friction

Posted by shmmee on 15 February 2011 - 08:35 AM in Modifications

Clippard has a distributor locally to me in slc. I'll see if the MAVO-3P is any cheaper through them. Maybe i'll only have to donate plasma instead of sell a kidney... (They seem to have distributors nearly every where.) At the least it will probably be next month before i have any fun money. 12$ shipping and 10$ handeling for a 8$ valve? Really?

If it is substantially cheaper I can order a second one for you Dyxlesic.


#294432 Too Much Friction

Posted by shmmee on 13 February 2011 - 01:04 AM in Modifications

So i found out the problem: the holes in the orange pieces are slightly crooked. how should i straighten them?


I'd suggest expanding the holes slightly more than the rod so they have a little bit of wiggle. From there remove the o-rings, and get a brass tube that matches the diameter of the orange plastic parts. Chop off a piece of tube, and split it length wise into two halves. De-burr, goop or epoxy putty the orange pieces onto the rod, then splint them with the brass tube halves to make sure they cure straight. Just don't glue the brass tube to the orange piece.

I have a talent for over complicating things. That may be more work than is needed, guess that would be the OCD way of making sure they are straight.

For lube, i like the grease sold in the little canisters (about as big as a 50 cent piece, and about 1/2" high) in the faucet guts section of the hardware store, It's thick, and makes a more forgiving seal where thinner lubricants wouldn't. It's also marked non toxic, and safe for all o-rings. Though I haven't done any long term testing with it, so i don't know if it gums up after a year or two. That's about my only concern with it so far.


#294444 Too Much Friction

Posted by shmmee on 13 February 2011 - 04:40 PM in Modifications

*spoilers*
When i said hybriding the 2 valves together, it is litterly what i am doing. It is like cheesys, using hornet parts and a firefly shell and turret for a semi automatic valve, but it has been re-worked in order to work with a backpressure tank/QEV like atomatrons as apposed to a at2k tank like in cheesys. this way, it is simplified, there is no need for a 3rd seal, and no need for another mechanism to pull the pin on the tank. I hope that makes sense


I've been working on the exact same thing with a DTG. Only I've been having sealing issues with the stock hornet trigger tube, so I'm going back to my homemade brass tube trigger valve which seals perfectly without doubbleing up on the o-rings and reducing friction. Or at leas i thought I was untill Nerkum posted a youtube link of the clipard valve integrated into a magstrike operating a big salvo tank. nerkums cliffard valve He presented it on page 2 of Buffdaddys semi-auto salvo thread page 2 of Buffdaddys Semiauto Salvo. Now i'm just annoyed my nerfing budget is spent. This may be a good time for both of us to listen to Doom.


#317859 Nerf Elite Rampage

Posted by shmmee on 02 July 2012 - 01:14 PM in General Nerf

I was lucky enough to get both elite blasters. Sorry about your slam fire. My rampage has been through a couple full drums slam firing without any problem. I do agree that it should come with a stock though.

I've measures the elite stems to be .25", as opposed to a streamlines 1" stem.

I've also weighed elite darts and found them to be 1.1 grams, lighter than the 1.4 grams of a streamline.

I also busted out my chrony and compaired the elite remakes to their predecessors:

All testing was done with very new elite darts
All 4 blasters are bone stock.
Measurements are in feet per second

Rampage Raider
Trigger fire
71.65--- 57.39
70.37--- 59.59
72.71--- 58.53
72.48--- 59.75
69.76--- 60.72
68.88--- 58.48
74.61--- 55.37
-------avg:-------
71.49--- 58.55


Rampage Raider
Slam Fire
67.58--- 43.44
74.92--- 56.97
73.35--- 55.98
74.45--- 61.16
72.30--- 60.07
74.58--- 61.49
78.28--- 61.33
70.93--- 60.2
-----Avg:---------
73.30--- 57.58

Retialator Recon
With barrel (I used the elite barrel for both.)
68.23--- 53.67
64.37--- 43.33
66.66--- 50.71
66.70--- 49.76
65.55--- 48.67
69.14--- 48.37
69.87--- 52.73
69.91--- 50.92
------avg:--------
67.55--- 49.77

Retialator Recon
With out barrel
69.89--- 52.17
70.95--- 45.88
70.44--- 54.96
69.06--- 50.87
66.99--- 59.14
72.87--- 54.42
69.68--- 54.76
69.49--- 52.37
72.64--- 56.13
-------avg:-------
70.22--- 53.41

It's interesting to see that the rampage is slighly faster shooting (stock) than the retialator, the retialator barrel only made a difference of 3 fps, and that slam firing granted a slight 2 fps increase in speed. It's also fun to see how the second gen blasters compare to their predecessors.
This may not be enough data to really come to any firm conclusions, but it's good enough for a general idea of the power increase provided by Elite retooling.

The price points at my TRU were $10 more on each blaster. It hurt!


#300855 JSPB (3DBBQ/Taiwan-style) darts?

Posted by shmmee on 01 July 2011 - 09:34 AM in Darts and Barrels

I think heat shrink tubing should show promise. Beige hot rod FBR is designed to hold up to 410 degrees F. I don't know what temperatures are needed to shrink the tubing - or what type of shrink tubing would be best (heatshrinktubingdirect.com also sells Teflon shrink tubing) but if the heat application is applied in a controlled manner I think it would be worth trying out. It seems to me that we'll need a soft or semi flexible shrink wrap so we don't core people once the padding on the head looses gets mushed to a pulp.

Keeping weight semi-consistent might be as easy as counting the number of wraps made.

It's last minute, and they haven't been approved yet, but I'm a bit short of darts for Armageddon. Our blanks are 1.25". I'll try banging a few hundred of these out for Saturday. These look like they should hopper feed without any problem. Has anyone seen e-tape thinner than it's standard width, or know where vinyl "rescue tape" is sold?


1.25" is way too short for this method. I'll be sporting gumdrops, and some slugs I bought off a friend in UT.

I found some 20 ga "beading wire" in the craft section that should work well. It was about $3.


#312617 Do you still use Nerf when you nerf?

Posted by shmmee on 09 March 2012 - 01:44 PM in Site Feedback

I'll occasionally throw a 35 round drum in my ar removed ls when I get the silly urge to spam darts.

It is interesting to note that so far most nerf brand blasters being used are air techs and older. I expect to see some saying they use nf's in pistol rounds, or maybe a stampede as a primary... Could that mean nerf is loosing its competitive edge for modding? It wasn't until reading this thread that I realized how heavily I relied on off brands like Buzz bee, lanard, ertl, and more recently marshmallow shooters as base components for my blasters.


#294595 Semi Automatic Firefly Valves

Posted by shmmee on 16 February 2011 - 08:59 PM in Modifications

Like boot i'd suggest a pnumatic air hose quick disconnect for the green part. (they're very common, and therefor cheap. Especially from harbor freight - if you have any locally) The female side has a check valve that closes when not plugged in. Though to keep the tank or pack pack side from from emptying when unplugged you'll need some sort of ball valve on the male side. I dont know any part numbers, but a threaded ball valve should from a local hardware store should work ok. (If you can figure out how to connect it to tubing) the ball valve/male connection might be better in the firefly side.

I would almost suggest adding the back pack tank as version 2.0, and just keeping it simple for now. You can always cut a hose and insert a tee later with the air hose quick disconnect. Get the thing running first. Don't over complicate in your initial build.

I favor a bladder vs a hard tank. True a MS bladder wouldn't fit inside the firefly shell, but a hard tank might not fit too well either. It would be easy enough to lop off the MS bladder shell portion and glue it externally under at the bottom of the firefly. (external integration). You'll be sacrificing a MS anyway for the valve. You might not get enough volume with a hard tank stored in the rear of the firefly shell. It would be wise to experiment with both without integrating anything or chopping any holes. It would also remove the regulator from the equation.

Good luck with it all.


#292995 Semi Auto Valve For Backfire Tanks

Posted by shmmee on 17 January 2011 - 09:37 AM in Homemades

Really? That's too bad, because I thought it was a great idea. Sorry some of the others are giving you guff.

That's ok, i've gotten a lot of feedback on this valve, positive, negitive, but all of it helpfull. Just some bob really helped me avoid a lot of wasted work (this valve supports a gun I'm designing to be used at BAFF. It's a long drive from Utah to California, and it really would of sucked to have the gun spot banned because the darts were too short.)

Draconius was also able to point me to an old post that I didn't know existed, and could be usefull.

I do feel justified after calculating the trigger pull to be about 4.5 pounds @40 psi. Any valve with a 0 pound pull would have to have a return spring, and a larger diameter piston would have more friction to overcome.

You're right though, soldering a joint isn't that exotic. It's also very strong. I've solldered plumbing in the basement before, and this project was much easier. This is the second valve i've built, and both are air tight. I feel my design remains competitive, and an ideal choice for a backfire backpressure tank. The short 2-3 hour build time also helps.

All things considered, thanks for the support!


#293059 Semi Auto Valve For Backfire Tanks

Posted by shmmee on 18 January 2011 - 01:10 PM in Homemades

Using cpvc is a hell of a lot easier then dremeling and soldering brass. But thats just my 2 cents.


Soldering brass isn't too difficult. Hell, you should be able to pull it off with a propane torch (if you're willing to wait about one hundred million years for the damn brass to heat properly).

One suggestion for soldering brass, though: sand the areas you want to apply solder to, then only apply solder to one of the surfaces you want to join. It'll make the joint look a lot better and you'll get the same effect with fewer materials.

Brass tubing is very thin, and heats very quickly. The propane tourch i used had it up to temp in a few seconds.
Solder likes to stick to more solder better than sticking to bare brass. "Tinning" both sides helps to avoid a lot of trouble with the final joining. Excess solder isn't too tragic of a waste either.
The first valve i made had a minimum ammount of solder prepaired on the middle leg. Each time i tried to apply more solder, I pushed the fitting around, knocked it off a couple of times and risked getting solder on the id of the long tube. (clamping it down probably would of helped.) It eventually sealed up, but took a couple of minutes. The final joining on the second valve i assembeled (the one with a noticable bead built up around the edge) was as simple as placing it on the pipe and heating the two pieces for a few seconds. The moment both pieces got up to temperature, The middle leg settled, solder joined, and it was a perfect air tight joint with 15-20 seconds of heat. Well worth the prep work.

I agree with you on sanding the brass prior to soldering though, i just forgot.


#292940 Semi Auto Valve For Backfire Tanks

Posted by shmmee on 16 January 2011 - 03:13 PM in Homemades

I'm trying for a clip fed semi-auto. (which has been done before, but I haven't seen any without extensive machining. I'm trying for something simple enough that a modder with moderate experience can duplicate.) With .75" steffans and extra .25" to seal the breech it will have a long trigger pull.


At our wars, any dart that doesn't have a full inch of foam gets ignored.
There has to be a limit somewhere, or eventually you're just shooting BBs with a foam 'beard' glued on.

I predict you're going to want to use leverage to shorten that trigger pull.
At which point the issue of fighting chamber pressure will get multiplied.


Oh. That's really, really good to know. I had originally planned on using a lever, but It is going in a raider shell, which doesn't have much room for levers and such. Guess it's about time for a small set back. I appreciate the heads up.


#292921 Semi Auto Valve For Backfire Tanks

Posted by shmmee on 16 January 2011 - 09:24 AM in Homemades

The trigger pull doesn't have to be any longer than a standard hornet trigger valve pull, i'm just exploiting a longer trigger pull to assist with the project it's going into. Looking forward to mirage 3.0! I'll pm you some details when i get a moment.


Oh I know, just from the last picture (and you're latest posts) it looks like you're actuating a breech with the valve. The direct connection that you seem to have means that you will have a trigger pull as long as whatever dart you are using. (I have a similar setup in the Mirage 2.0, but with a minor change to address this problem as, since I generally use streamlines I would have a ridiculous 3" trigger pull otherwise). It looks awesome though. I also like the use of expanded hornet tanks. i never had the confidence to open air tanks since they are so hard to get here, and so took the lazy (and less effective) way of using BS tanks.

Yup. Boot wins the cookie. I'm trying for a clip fed semi-auto. (which has been done before, but I haven't seen any without extensive machining. I'm trying for something simple enough that a modder with moderate experience can duplicate.) With .75" steffans and extra .25" to seal the breech it will have a long trigger pull. I definitely wouldn't call using a BS tank lazy, or less effective. They were designed with the capacity to fire arrows, and probably have a faster output too. The barrel side holes in a hornet tank are tiny. It's probably what I'd be using if i had any.


#292903 Semi Auto Valve For Backfire Tanks

Posted by shmmee on 15 January 2011 - 11:25 PM in Homemades

Now, many people on IRC, including obob, tried to convince me that such a setup will make the trigger pull obscenely hard. Let me know how that works out for you, because if it does I'm going to keep my newly built shuttle valve for something that needs it and move back to a syringe valve for my original design.


Nope, at 40 psi the trigger pull is firm, but extremely manageable. (tested from an air compressor, a constant and regulated source)


#292906 Semi Auto Valve For Backfire Tanks

Posted by shmmee on 15 January 2011 - 11:33 PM in Homemades

Nice! I have actually made several variations of my original valve (and am saving them for the final "Mirage" post). Although this seems like a difficult build, the results are awesome. My only fear is that the solder might not hold out, but I have absolutely no experience in that, so I'm just guessing.

That last picture looks interesting though! It seems very similar to what I'm working on, except from what I can tell the "trigger" pull will be very long, perhaps requiring two handed operation. Regardless, awesome work. I am very interested in seeing where this goes, and how you're project compares to the Mirage 2.0!

The trigger pull doesn't have to be any longer than a standard hornet trigger valve pull, i'm just exploiting a longer trigger pull to assist with the project it's going into. Looking forward to mirage 3.0! I'll pm you some details when i get a moment.


#292907 Semi Auto Valve For Backfire Tanks

Posted by shmmee on 16 January 2011 - 12:03 AM in Homemades

Issues resolved: Hornet sliding valves have more inputs than are needed for one tank, and sliding the O-rings past any of the extras will vent your reservoir. Those extra inputs are also waiting to chew up your o-rings.
Benefits: O-rings only traverse one hole. Extra brass on the venting end will turn your valve into a piston that will push back on a trigger (as discovered by Boot), or maybe open a bolt sled (a hint at what I've been working on). It looks simpler and cleaner, and unless something breaks, a seal fails, or you push your piston through the cross section, you can't vent your reservoir.


I hate to say this, but I'm going to have to protest this.

In your current setup, your fighting against the pressure of the reserve tank. In cheesy's mod, he had o rings on both sides of the reservoir's input. This is the same basic concept zero invented. This eliminates all the pressure against the trigger. Although you say it's manageable, it can be a hell of a lot better.

The extra inputs on a hornet valve don't hurt the o rings in any way. In fact, the sharp thin edge of the brass is more likely to damage your o rings then the hornet. This doesn't vent your reservoir either, which is why there are two o rings instead of just one.

If you really want a "semi-auto valve", I'd suggest just using a hornet trigger valve. If you are unable to get your hands on one, then I suggest atomatron's valve. Using cpvc is a hell of a lot easier then dremeling and soldering brass. But thats just my 2 cents.

I really do appreciate input. Good, bad, or indifferent, Though thanks for being civil in your disagreement. I would probably be more concerned about a heavy trigger pull if i wasn't relying on it to open a breach for me. If it's still more force than i need, i can counter balance with a spring. I haven't weighed it, but I'd guesstimate about 6-8 pounds of trigger pull. I'll see how the o-rings hold up over time and use. I'll also take a look at atomatron's valve. Thanks for the new things to look at.

Did some math (which has been wrong before) With a 3/8" diameter (.1875" radius) piston having a surface area (Pi*r squared) of .11039"*40 psi=4.415 pounds of pull on the trigger. (Just Some Bob, feel free to check and correct me if I'm wrong...again...). Four and a half pounds? I'd call that manageable.


#292890 Semi Auto Valve For Backfire Tanks

Posted by shmmee on 15 January 2011 - 08:56 PM in Homemades

Homemade Semi Auto Valve for Backfire backpressure tanks.

This valve is inspired and builds upon frame work done by Cheesypiza001, and Boot. They modified a hornet sliding valve to fire a backfire tank in semi auto fashion.

Cheesypiza001's semi auto valve Concept; semi-auto'd a firefly.
Mirage-ss by boot Semi-auto rscb

Both systems were successful in filling a tank, and venting the tank without venting the main reservoir. This just provides a little more polish with some unexpected benefits. This was developed to compliment my hornet tank expansion mod, but should work for any backfire backpressure tank.

Issues resolved: Hornet sliding valves have more inputs than are needed for one tank, and sliding the O-rings past any of the extras will vent your reservoir. Those extra inputs are also waiting to chew up your o-rings.
Benefits: O-rings only traverse one hole. Extra brass on the venting end will turn your valve into a piston that will push back on a trigger (as discovered by Boot), or maybe open a bolt sled (a hint at what I've been working on). It looks simpler and cleaner, and unless something breaks, a seal fails, or you push your piston through the cross section, you can't vent your reservoir.

Materials:
Hornet plunger rod (or figure out how to make your own)
13/32 brass tube
Solder, flux (or solder with a rosin core), and heat source (like a torch)
zip ties
lubricant
tubing

Tools:
pipe cutter
drill or drill press
torch (propane, benzine, acetylene, something to make the pipe hot. A candle might even work...)
sharp pointy knife to help with de-burring
Dremel with cut off wheel and 3/8” ish sanding or grinding drum (the closest to your brass tube diameter that you have)
drill bits: 9/64” (or 1/8” if you don't have the 9/64") and 3/8” (to de-burr after the 9/64” hole is drilled)
needle nosed pliers

helpful:
Heat gun (to soften tubing and stretch over brass tube.)
Vise

Theory and concept: A brass tee is made. The middle leg is hooked up to the tank, one leg is hooked to the air reservoir, the piston is inserted into the third leg. When both o-rings on the piston are behind the tee, air flows from reservoir to tank. The piston is depressed and when both o-rings straddle the middle leg of the tee, all 3 passages are isolated from each other. When both o-rings pass the middle leg, the tank vents around the piston post and out to atmosphere, causing the tank to fire (without venting the reservoir). Pressure is maintained on the piston in all stages causing the piston to return to the priming state as soon as no counter pressure exists. Testing at 40 psi results in a slightly firm, but manageable trigger pull.
Posted Image

Posted Image

Construction:
Build this:
Posted Image

Take your brass tube, and chop off a 1/2” long piece. You'll need this for a guide. Now grab your Dremel and grinding drum and grind a saddle (U shaped divot) into the tip on both top and bottom sides.
Posted Image
Fit check with the 1/2” long piece. You want metal to keep constant contact between both parts when one straddles the other. Squishing the tall tips together slightly may help fit up. Once free of gaps, chop off about 3/4” of the ground down side. This will become the middle leg of the tee.

Now figure out how long you want the top part of the tee by laying the hornet piston next to it. You want to give your self enough space for both sets of o-rings to pass by the middle leg. Mark that spot. Don't drill your vent hole till after you have solder in place. I'm not going to be too specific on dimensions, you can figure out that stuff, and tailor it to your own needs.

Solder time. “Tin” your pieces by getting solder on the parts to be joined before you try to join them, Apply flux to both contact points of the brass tee (the saddle inside and out) and the cross section where the tee will be mounted. Now heat and melt solder to both of those areas. Apply heat to the tube not solder. Heat the tube, remove the heat, and apply the solder. Fine wire solder will be easier to work with than a thicker gauge solder. Get globs of solder built up on the saddle of the middle leg.
Posted Image

Now that we have solder built up on the cross section, drill the vent hole (9/64”) in the center of where the tee will be placed. File off the solder around the vent hole (leaving it around where the tee will be placed. We don't want solder getting inside. Use the 3/8” drill bit to hand ream out the debris from your 9/64” hole.
Posted Image

To join the pieces, just place the tee on the cross section and heat them both. They'll bond. Quick and easy. The better prep and fit up, the easier this last step will be. Once cool, air test by plugging both holes on the cross brace with fingers and sucking on the middle leg.


Lube your hornet piston and stuff it in. I found the lube shown in the first picture in the faucet guts section of the hardware store. It was labeled "safe for all gaskets including ceramic" and "non-toxic" (so no petroleum distillates) It lubes well. It's also thick and stays where you put it.

Plumb by warming 3/8” tubing and stretch with a pair of needle nose pliers, then slide them over their connection. Or goop barbed connections in place as needed. Secure them with a zip tie.
Here it is being integrated into my latest project.
Posted Image