diamondbacknf1626's Content
There have been 433 items by diamondbacknf1626 (Search limited from 03-December 96)
#213637 My Nitefinder Mod: Unique Barrel Setup, Vaccum Loading, Minimization
 Posted by
on 19 February 2009 - 10:51 PM
in
Modifications
Posted by
on 19 February 2009 - 10:51 PM
in
Modifications
RVMVTV- Thank you, but before anyone else does this mod using a fairly beefy spring like I did, there is one more thing that you must do, or your blaster will be damaged. The screw holes that secure the plunger tube into the shell need to be re-enforced using some form of epoxy, or you could just hot glue the hell out of the plunger tube to get it to stay in place, but what I've realized is that over time, these screw ports will break, allowing your entire plunger tube to move, which in turn could damage the front of the shell. So before firing the blaster, Re-enforce these spots!. I cannot stress this enough. I don't want someone to try this mod, and have it ruin their nitefinder. The mod is still working extremely well, actually, regardless of the disconnection from the screwports, so it's still a beast of a pistol. I do recomend doing this mod still, just make sure you re-enforce those spots. I'm actually glad this got revived, so now I could make sure everyone knew that. Now that it's up though, any comments or questions?
#213571 Big Salvo
Posted by
on 19 February 2009 - 07:28 PM
in
Modifications
Nice, quick, perfect for my Salvo. Can you remove the barrels and rear load? Considering you didn't mention glue at any point.
#213473 New Raider CS-35 Speculation Thread
Posted by
on 19 February 2009 - 12:13 PM
in
General Nerf
I doubt there are two triggers. The forward handle doesn't look like it has one.
Did you read what he said. "Trigger" means that there is a pseudo-trigger, not really a trigger in terms of a gun trigger. As I think I said earlier, that's how it works. Exactly how DBNF described it. There are a million different airsoft "shotguns" that work the same way. You either pump, pull trigger, pump, pull trigger, or you pull the trigger and hold it, and you pull the handle back to prime, then push forward and it fires when the handle is all the way forward. Because there is an internal tigger, there are two triggers which both need to be depressed in order for the gun to fire. If you want to see the internals in terms of how that mechanism works, buy a cheap airsoft shotgun. It will be exactly the same as this gun, just with tinier internals since BBs don't weigh as much as darts.
Now that I got that out, I will probably never visit this thread again. Good day.
That's exactly what I meant. Thanks for clearing that up. I knew someone had mentioned something like this before, I just wasn't exactly sure who it was. Anyway, I agree, I'm most likely done in this thread, now that I've expressed how I think it's going to work, and it's been cleared up. There's really nothing left for any of us to do but wait...unfortunately. Until someone actually physically opens the gun up and takes pictures of it for all of us to see...this is nothing but speculation...
#213471 New Raider CS-35 Speculation Thread
Posted by
on 19 February 2009 - 12:06 PM
in
General Nerf
I doubt there are two triggers. The forward handle doesn't look like it has one.You can see that he's not letting the handle go in the video. He seriously slides the handle forward, and when it's finally there, the dart fires. Which is how I drew up that conclusion.
It could be kinda like a reverse Arrowstorm...
Who knows.
Nobody knows, and nobody will know until they actually see the internals of the gun. But I think I have an idea. I believe it was briefly mentioned earlier in the thread, but not in detail. There could be some form of "trigger" towards the front of the gun. Therefore, there would be two triggers that have to be depressed in order to fire the weapon. This fits, because in regular single fire mode, the handle would have to be all the way forward in order to pull the trigger. This could be because pushing it forward activiates that other trigger. Once it's forward, you can pull the main trigger to fire. However, in slam fire, since the first trigger is held down, you only have one to deal with, and when you slide the handle forward, it fires the gun. This could mean two catches, or some form of two stage catch. But like many others have said in the thread, nobody will no exactly until they actually have the gun in their hands, no matter how much speculation there is.
Not a visable trigger, I might've been unclear. I meant some form of plate serving as a trigger within the actual shell of the gun, so that pushing the handle forward, and therefore pusing it against the plate, actuates it. Therefore, having the handle in the forward position activates one stage of the catch, while pulling the actual trigger activates the final stage of the catch, therefore firing the gun. In slam mode, the trigger's already pulled, therefore all that's necessary is to activate the catch by pushing the handle forward (giving the "slam fire" effect). Or I could be completely wrong, and it could be something entirely different. Only time will tell.
#213464 New Raider CS-35 Speculation Thread
Posted by
on 19 February 2009 - 11:04 AM
in
General Nerf
You can see that he's not letting the handle go in the video. He seriously slides the handle forward, and when it's finally there, the dart fires. Which is how I drew up that conclusion.
It could be kinda like a reverse Arrowstorm...
Who knows.
Nobody knows, and nobody will know until they actually see the internals of the gun. But I think I have an idea. I believe it was briefly mentioned earlier in the thread, but not in detail. There could be some form of "trigger" towards the front of the gun. Therefore, there would be two triggers that have to be depressed in order to fire the weapon. This fits, because in regular single fire mode, the handle would have to be all the way forward in order to pull the trigger. This could be because pushing it forward activiates that other trigger. Once it's forward, you can pull the main trigger to fire. However, in slam fire, since the first trigger is held down, you only have one to deal with, and when you slide the handle forward, it fires the gun. This could mean two catches, or some form of two stage catch. But like many others have said in the thread, nobody will no exactly until they actually have the gun in their hands, no matter how much speculation there is.
#213402 Dtb Questions
Posted by
on 18 February 2009 - 11:08 PM
in
Modifications
What barrel material do you intend to use?
#213390 My Nitefinder Mod: Unique Barrel Setup, Vaccum Loading, Minimization
Posted by
on 18 February 2009 - 10:28 PM
in
Modifications
CoasterDynamix757- you have been pm'd regarding the problems.
#213351 Dtb Questions
Posted by
on 18 February 2009 - 08:36 PM
in
Modifications
To add a spring to a DTB, you just have to take a fair amount of time and twist it on there. It'll seem annoying and pointless at first, but trust me, try it, and it'll help results. I also found another way to do an easy barrel mod without utalizing the back piece of the ars at all. It's pretty effective, and I got some nice results. I'm planning on posting an overview for it at some point soon, but the basic concept is that you take a small stub of 17/32" brass, and put it in the stock white portion of the DTB barrels (just behind the ars). It fits perfectly. Then, the 17/32" also fits perfectly in PETG, so you basically use the 17/32 as a joint. Like I said, I got great results. I believe I twisted the stock spring together with a mav spring.
Those pictures don't work for me either, neither do any of the DTB mods besides the removable clip. That's actually why I came up with my own method for rebarraling. Not quite sure how the internal banding works on these. If I find anything out though, I'll post.
Those pictures don't work for me either, neither do any of the DTB mods besides the removable clip. That's actually why I came up with my own method for rebarraling. Not quite sure how the internal banding works on these. If I find anything out though, I'll post.
#213035 Crossfire 2000
Posted by
on 17 February 2009 - 03:47 PM
in
Modifications
Alright, so I decided that enough people were worried about that pump snapping off of there, I would do something about it to make sure it wouldn’t. It takes away a bit from the cleanliness of the gun, but in exchange, the thing’s now built like a tank.
I give you Part 2 of my Crossfire 2000 writeup.
All you need is a small 1 ¼” or so piece of half inch CPVC. Then, break out your dremel and sand/grind either end so that it looks like this:

That part’ll take a little bit of judgment on your part, but nothing major. I was able to get it to the right size fairly quickly. Plus, it doesn’t need to be exact. It’s just serving as a foundation for the next step.
What this is doing is bridging the gap between the front end of the pump and the bottom of the shell. In place once epoxied to the pump, it should look like this:

Now the next part’s important. Like all of the other parts of the mod, you still want to be able to open the shell. Because of this, we’re just going to epoxy the CPVC to one side of the shell. It’ll look like this when you’re done. Here are a bunch of pictures from all sides:

(Notice how in that picture it’s not touching the shell. This is important).

(I added a ton more epoxy all around the pump).
I also added a bit more in the back of the pump to bridge the gap between that and the handle:


Now what I wanted to do is solve another problem there was with the pump being able to fall out while pumping. This was solved easily by using some of the same epoxy I used for the rest of the mod. What you do is take a bit and at each point that the pump dips in, you make a little ridge with the epoxy. It’s hard to describe, so here’s a picture:


Some things to watch are that you don’t actually adhere the epoxy to the pump itself. That would obviously be bad.
Now the other concern was about the tubing being ripped off. First of all, I’m very careful with my guns, so there would be very little of an opportunity for this to occur, if any at all. And even if the tubing did snag on something, it is glued to both the tank and the pump with more glue than I can explain. It’s solid. Plus, the wire loom over top gives it great added protection from getting cut or damaged. Another plus side for the protection of the tubing is that when the gun is being used, the tubing falls to the inside of your arm, rather than the outside. Therefore, your entire arm is shielding the tubing from snagging on anything. You can find a way to re-enforce it if you’d like, but it really should not be a problem.
Again, thank you for all the compliments guys, they’re greatly appreciated. I hope part two satisfies those who were worried about this being a fragile gun to use, considering now it’s built like a tank. The epoxy most likely will be sanded down to look cleaner at some point soon, and I’ll post how it comes out if I decide to, but that’s it for now. I hope that solves any uneasiness about the gun. Again, I appreciate all of the comments, keep them coming.
Again, questions? Comments? Suggestions? Criticism?
I give you Part 2 of my Crossfire 2000 writeup.
All you need is a small 1 ¼” or so piece of half inch CPVC. Then, break out your dremel and sand/grind either end so that it looks like this:
That part’ll take a little bit of judgment on your part, but nothing major. I was able to get it to the right size fairly quickly. Plus, it doesn’t need to be exact. It’s just serving as a foundation for the next step.
What this is doing is bridging the gap between the front end of the pump and the bottom of the shell. In place once epoxied to the pump, it should look like this:
Now the next part’s important. Like all of the other parts of the mod, you still want to be able to open the shell. Because of this, we’re just going to epoxy the CPVC to one side of the shell. It’ll look like this when you’re done. Here are a bunch of pictures from all sides:
(Notice how in that picture it’s not touching the shell. This is important).
(I added a ton more epoxy all around the pump).
I also added a bit more in the back of the pump to bridge the gap between that and the handle:
Now what I wanted to do is solve another problem there was with the pump being able to fall out while pumping. This was solved easily by using some of the same epoxy I used for the rest of the mod. What you do is take a bit and at each point that the pump dips in, you make a little ridge with the epoxy. It’s hard to describe, so here’s a picture:
Some things to watch are that you don’t actually adhere the epoxy to the pump itself. That would obviously be bad.
Now the other concern was about the tubing being ripped off. First of all, I’m very careful with my guns, so there would be very little of an opportunity for this to occur, if any at all. And even if the tubing did snag on something, it is glued to both the tank and the pump with more glue than I can explain. It’s solid. Plus, the wire loom over top gives it great added protection from getting cut or damaged. Another plus side for the protection of the tubing is that when the gun is being used, the tubing falls to the inside of your arm, rather than the outside. Therefore, your entire arm is shielding the tubing from snagging on anything. You can find a way to re-enforce it if you’d like, but it really should not be a problem.
Again, thank you for all the compliments guys, they’re greatly appreciated. I hope part two satisfies those who were worried about this being a fragile gun to use, considering now it’s built like a tank. The epoxy most likely will be sanded down to look cleaner at some point soon, and I’ll post how it comes out if I decide to, but that’s it for now. I hope that solves any uneasiness about the gun. Again, I appreciate all of the comments, keep them coming.
Again, questions? Comments? Suggestions? Criticism?
#212991 Crossfire 2000
Posted by
on 17 February 2009 - 10:04 AM
in
Modifications
Sputnik- Thanks for the comments man, the use of the Titan barrel was one of my favorite parts actually. It keeps it looking pretty clean.
Banshee- I actually thought about that, except having it this way keeps it still fairly compact, rather than have a plunger rod sticking out of the back and another barrel in the front. Plus, I don't need a longer ranged gun for the top gun, that's what the 2k's for.
FA_24- Thank you. Sweet, thank you again. I can't wait to see it up in the directory. Both of those concerns are in the process of being dealt with. I have yet to find a way to re-enforce the tubing though, it's pretty solid, and I am careful with my guns. The pump though is already being adressed. A part two to this writeup will be up today.
Soothsayer & k9- Like I said before, already being dealt with. And k9, that'd be a good idea, but I already have something in mind, which you'll see shortly.
#212831 Modification and Paintjob Pictures
Posted by
on 16 February 2009 - 06:03 PM
in
Modifications
Alright, time for my bulk Mods/Painjobs post. It’s more of just a Mods post though.
First off, my custom designed minimized, vacuum loading Nite Finder. It’s probably one of my favorite sidearms:

Write up found here.
Now another custom sidearm. My Crossfire 2000:

Write up found here.
Couplered 2k with a speedloader. Pump plugged, airflow increase mod:

Quadded PETG 2k:

Pump Action Shotgun Lvl. 2 with all of my different barrels:

My breeched BBB. It’s a custom design/combination of designs. I combined Black Sunshine’s breaching system for his Azulsoli with Angel’s breach opening arm, plus my own internal coupler system to make this:

Work in progress (broken at the moment):

A CPVC couplered Nite Finder I made for my brother:

Now for one gun that deserves an introduction. It’s an Angel breached, spring replaced, front gun integrated, painted, PVC in the stock, felt covered bolt handel, trigger linked Longshot. This beast was made by Forsakenangel_24 himself:

And now another intro worthy weapon of destruction. My Zaxblast. It’s a BBBB with Marvelous salvo cleanly integrated. The trigger for the Salvos is comfortably within the foregrip of the BBBB. My favorite thing about it though is having three extra semi-auto shots backing me up whenever I need them. This beast was designed and made by Zaxbys, If you want one made for you, shoot him a PM. Trust me, you want one made for you. All of the barrels have great ranges, and having those extra shots makes this an insane primary. Here it is:

First off, my custom designed minimized, vacuum loading Nite Finder. It’s probably one of my favorite sidearms:
Write up found here.
Now another custom sidearm. My Crossfire 2000:
Write up found here.
Couplered 2k with a speedloader. Pump plugged, airflow increase mod:
Quadded PETG 2k:
Pump Action Shotgun Lvl. 2 with all of my different barrels:
My breeched BBB. It’s a custom design/combination of designs. I combined Black Sunshine’s breaching system for his Azulsoli with Angel’s breach opening arm, plus my own internal coupler system to make this:
Work in progress (broken at the moment):
A CPVC couplered Nite Finder I made for my brother:
Now for one gun that deserves an introduction. It’s an Angel breached, spring replaced, front gun integrated, painted, PVC in the stock, felt covered bolt handel, trigger linked Longshot. This beast was made by Forsakenangel_24 himself:
And now another intro worthy weapon of destruction. My Zaxblast. It’s a BBBB with Marvelous salvo cleanly integrated. The trigger for the Salvos is comfortably within the foregrip of the BBBB. My favorite thing about it though is having three extra semi-auto shots backing me up whenever I need them. This beast was designed and made by Zaxbys, If you want one made for you, shoot him a PM. Trust me, you want one made for you. All of the barrels have great ranges, and having those extra shots makes this an insane primary. Here it is:
#212772 Crossfire 2000
Posted by
on 16 February 2009 - 02:34 PM
in
Modifications
Icespartan_1114- Thank you, that was one of my goals. To utalize the space that I had. It helps to maintian a fairly clean look.
oh1134- A good tool to use would be a bandsaw or even a dremel to cut at the tank, and then to remove the tubing from the pump, use a pocket knife to cut it lengthwise, and then peal it off. You just need to be careful when you attach the new tubing to the tank, to make sure its airtight.
OnyxZenith- Thanks. How so? I would, but I'm not quite sure whether it'd make much of a difference handling-wise. If you were to make one and want it minimized, though, it wouldn't be too tough.
Daniel Beaver- That's one thing about it I like too. No, not at all, it's actually pretty easy. What I like about it is that it's far enough away from the main trigger to have room to pull back without triggering the Crossfire as well, but it's close enough that it feels like a double trigger: Pull the bottom part with your middle finger and it triggers the Crossfire, and the top part (keyring) with your pointer and it triggers the 2k. What do you mean PVC in between? Like, to bridge the gap between the pump and the handle? It really is extremely strong, but I understand, there is a lot of pressure on that one joint. I'll have to look into re-enforcing that.
Thanks for all the feedback, it's appreceated. Any more would be great.
#212744 Crossfire 2000
Posted by
on 16 February 2009 - 12:45 PM
in
Modifications
**EDIT**- Picutres are fixed **EDIT**
#212742 Crossfire 2000
Posted by
on 16 February 2009 - 12:42 PM
in
Modifications
Step 3: Integration
Now this step I actually have a fair amount of pictures for, so here we go. First what we need is to clean out the shell, and trust me, there’s a lot of that to do. Here are just a bunch of pictures of where you have to dremel, sand, and grind in order to fit the 2k components. It probably won’t take long to do, there are just a lot of little places:

Sand that down to remove the ridges along it.

Make these holes on both sides. The one to the right is for the firing pin and the one to the left is for the tubing.

Now you want to make these holes in the back for the keyring to exit along with the tubing on the bottom.

Now, you make that cut in the bottom of the handle, as that is where your pump is going to be located.
A lot of this cutting will take some guess and check as there is no way I could give you exact measurements for everything, but those are all of the places that you should be dremeling out.
Now that all of the gutting of the shell is out of the way, you need to have something to nest the 2k tank/valve in. I was originally going to secure it right into where the amo holder of the Crossfire was, but then decided I wanted to have the ability to open up the gun and service the tank again if necessary. It also wouldn’t look that clean, and wouldn’t be at all protected. This idea stemmed from a post where someone stated that a 2k tank fit perfectly inside a titan barrel. So you guessed it, you need to cut 2 1/16 inches out of a titan barrel, like so:

Then, to keep the ability to access the 2k tank, you’re going to want to cut the barrel into two equal half pipes. It does not need to in any way be exact, as you will see later, but get as close as you can. Now, you’ll have two halves of the titan barrel, like so:

Now you need to mount half the titan barrel in the shell. You only want to attach on half, because you still want to be able to open everything. You could mount the other half if you’d like, but I prefer it this way. It should look like this:

I just used some superglue, and it’s holding up great.
You also need to attach the pump into one half of the shell. Choose wherever you want to attach it. It can be farther up than mine, or farther back, your choice. I used a combination of hotglue first, and then some epoxy puddy to provide the strength it needs:

Now you can put the rest of the internals into the gun. You’re going to have to guess and check again where the 2k tank needs to rest in the Titan barrel as I did, before you get it right. I can tell you though, it won’t be all the way at the back or the front. You have to judge based upon where your pin is bent as to where the tank needs to fit. It’s not hard, but you have to make sure the pin has enough clearance to move within the shell. Once all of your internals are in, it should look like this:

For some reason, in that picture, it looks like the pump is tilted downwards. It’s not, and shouldn’t be, either, unless you’d like it to be. The one thing it cannot be is tilted up, because it will interfere with your barrel.
That picture also doesn’t have the Crossfire spring in it, just because it pops out unless you’re holding it down while you close the shell. Now close ’er up and you have one more quick thing to do that will ensure you can use the coupler without moving everything around when you twist the barrel out. Take your hot glue gun and squeeze some hot glue between the coupler and half of the Titan barrel. Again, only half. You want to be able to open the gun. It’ll look like this:

Now onto step four.
Step 4: Barrel
Ok, I can guaranty you now, that step four will be your favorite step. All you have left to do before you finish your Crossfire 2000 is to make a six inch barrel of PETG nested in some PVC to use with your couplered 2k. Take a deep breath, you’re done.
Here are some pics of the finished product:


I’m actually very happy with how this turned out. It looks nice and clean, and achieves exactly what I wanted it to. I haven’t range tested the 2k portion yet, but it should be similar to other singled 2ks. The crossfire portion when tested flat hit after five shots, an average of 48.4 feet. At the time (before I did the integration), the pistol was vacuum loading, which is when I achieved those ranges. As of now, it is not, so I only fire it with the dart at the end of the barrel. I have yet to re-range test with this set up, but I will edit my results in, along with the 2k ranges once I do. Regardless, though, the Crossfire wasn’t meant to have incredible range, but a good rate of fire. The 2k makes up in the range that the Crossfire lacks, while the Crossfire makes up for the ROF that the 2k lacks. The two together give you the Crossfire 2000.
Questions? Comments? Suggestions? Criticism? Anything would be greatly appreciated.
Now this step I actually have a fair amount of pictures for, so here we go. First what we need is to clean out the shell, and trust me, there’s a lot of that to do. Here are just a bunch of pictures of where you have to dremel, sand, and grind in order to fit the 2k components. It probably won’t take long to do, there are just a lot of little places:
Sand that down to remove the ridges along it.
Make these holes on both sides. The one to the right is for the firing pin and the one to the left is for the tubing.
Now you want to make these holes in the back for the keyring to exit along with the tubing on the bottom.
Now, you make that cut in the bottom of the handle, as that is where your pump is going to be located.
A lot of this cutting will take some guess and check as there is no way I could give you exact measurements for everything, but those are all of the places that you should be dremeling out.
Now that all of the gutting of the shell is out of the way, you need to have something to nest the 2k tank/valve in. I was originally going to secure it right into where the amo holder of the Crossfire was, but then decided I wanted to have the ability to open up the gun and service the tank again if necessary. It also wouldn’t look that clean, and wouldn’t be at all protected. This idea stemmed from a post where someone stated that a 2k tank fit perfectly inside a titan barrel. So you guessed it, you need to cut 2 1/16 inches out of a titan barrel, like so:
Then, to keep the ability to access the 2k tank, you’re going to want to cut the barrel into two equal half pipes. It does not need to in any way be exact, as you will see later, but get as close as you can. Now, you’ll have two halves of the titan barrel, like so:
Now you need to mount half the titan barrel in the shell. You only want to attach on half, because you still want to be able to open everything. You could mount the other half if you’d like, but I prefer it this way. It should look like this:
I just used some superglue, and it’s holding up great.
You also need to attach the pump into one half of the shell. Choose wherever you want to attach it. It can be farther up than mine, or farther back, your choice. I used a combination of hotglue first, and then some epoxy puddy to provide the strength it needs:
Now you can put the rest of the internals into the gun. You’re going to have to guess and check again where the 2k tank needs to rest in the Titan barrel as I did, before you get it right. I can tell you though, it won’t be all the way at the back or the front. You have to judge based upon where your pin is bent as to where the tank needs to fit. It’s not hard, but you have to make sure the pin has enough clearance to move within the shell. Once all of your internals are in, it should look like this:
For some reason, in that picture, it looks like the pump is tilted downwards. It’s not, and shouldn’t be, either, unless you’d like it to be. The one thing it cannot be is tilted up, because it will interfere with your barrel.
That picture also doesn’t have the Crossfire spring in it, just because it pops out unless you’re holding it down while you close the shell. Now close ’er up and you have one more quick thing to do that will ensure you can use the coupler without moving everything around when you twist the barrel out. Take your hot glue gun and squeeze some hot glue between the coupler and half of the Titan barrel. Again, only half. You want to be able to open the gun. It’ll look like this:
Now onto step four.
Step 4: Barrel
Ok, I can guaranty you now, that step four will be your favorite step. All you have left to do before you finish your Crossfire 2000 is to make a six inch barrel of PETG nested in some PVC to use with your couplered 2k. Take a deep breath, you’re done.
Here are some pics of the finished product:
I’m actually very happy with how this turned out. It looks nice and clean, and achieves exactly what I wanted it to. I haven’t range tested the 2k portion yet, but it should be similar to other singled 2ks. The crossfire portion when tested flat hit after five shots, an average of 48.4 feet. At the time (before I did the integration), the pistol was vacuum loading, which is when I achieved those ranges. As of now, it is not, so I only fire it with the dart at the end of the barrel. I have yet to re-range test with this set up, but I will edit my results in, along with the 2k ranges once I do. Regardless, though, the Crossfire wasn’t meant to have incredible range, but a good rate of fire. The 2k makes up in the range that the Crossfire lacks, while the Crossfire makes up for the ROF that the 2k lacks. The two together give you the Crossfire 2000.
Questions? Comments? Suggestions? Criticism? Anything would be greatly appreciated.
#212741 Crossfire 2000
Posted by
on 16 February 2009 - 12:40 PM
in
Modifications
Ok, before we start anything, let me warn you, this may take a while to explain. I’m going to do my best to make sure I remember to get everything down, so bear with me. My idea behind this was a quick reloading pistol with not necessarily amazing ranges paired with a fairly high powered gun that would take a bit longer to reload.
I give you the Crossfire 2000:

Let’s get to work. Here are the internals of the Crossfire, stock:

I’m going to take the mod in four steps. One and two are more of an overview, because these mods can probably be found in other places on the site.
Step 1: Crossfire Mods
What you’re going to want to do first are some basic mods to the Crossfire. First, take your plunger tube/barrel portion of the gun out, and cut it towards the end. Then, what you want to do is take a piece of PETG, and squeeze it into that orange piece. Then, wrap e-tape around the base of that PETG until it fits snuggly in the black plunger piece (Not tightly, or it will be awkward to prime). Like I said, this is basic stuff, so I did not take detailed pictures of the process. Here is what it should look like when it’s done though:

Then, you’re going to want to beef up the spring, because this one’s spring sucks stock. My spring I believe was from either a Chainblazer or a Rattler, but regardless, it’s a beefy spring. Here’s a comparison (Stock on the left, with the replacement on the right)
Now, since the main spring is so powerful, you’ll need to replace the catch spring with something a bit stronger. I actually recently found a bunch of industrial strength catch spring size springs, which did the job perfectly. Here’s a quick comparison:

The new catch is obviously on the left.
Now, you’re done with the mods to the Crossfire portion of this pistol of destruction. Close it up and test it out, make sure everything’s working alright. If it is, congratulations, you’re ready for step two.
Step 2: Airtech 2000 Mods
Alright, now we’re on to the AT2k part of this mod. This I have very little pictures of because A: I already had minimized a 2k before I started this project, and B: It’s not too tough to find elsewhere. Basically, what you’re going to be doing is removing the goo gage along with all of the yellow tubing in a stock 2k and replacing it with ten inches of what I believe is 3/8 od vinyl tubing. Then, you need to perform a simple mod to increase airflow, that has been done by both Imaseoulman and Tantum Bull, I believe. Correct me if I’m wrong. But basically what you do is cut the stem at the front of the 2k tank down to the point where it widens, in order to increase the air output of the tank. Then, cut a little less than half of a PVC coupler, and glue it on there. Then, in order to make this work, you’re going to need to bend the firing pin and remove the spring and orange piece from the pin. You can use a dremel or cutters for this. Then, use some wire and attach a keyring to the pin. This will be your trigger. You also want to wrap the tank with e-tape until it is one uniform diameter throughout. Match it up with the ridge on the back. This will help greatly later. I know that was really wordy, but here’s a final picture once all of that has been done (note: in the picture, it’s an o-ring. You want to use a keyring, because it needs to be a quick pull to effectively release air. An o-ring will stretch a bit and delay the release):

What you also want to do that I forgot to mention is to cover your vinyl tubing with wireloom. That’s the black tubing you see in the picture. You can find it at your local hardware store. This will protect your tubing from any damage during use.
Now, if you survived that enormous wordy paragraph, we can move on to the next step, the integration.
I give you the Crossfire 2000:
Let’s get to work. Here are the internals of the Crossfire, stock:
I’m going to take the mod in four steps. One and two are more of an overview, because these mods can probably be found in other places on the site.
Step 1: Crossfire Mods
What you’re going to want to do first are some basic mods to the Crossfire. First, take your plunger tube/barrel portion of the gun out, and cut it towards the end. Then, what you want to do is take a piece of PETG, and squeeze it into that orange piece. Then, wrap e-tape around the base of that PETG until it fits snuggly in the black plunger piece (Not tightly, or it will be awkward to prime). Like I said, this is basic stuff, so I did not take detailed pictures of the process. Here is what it should look like when it’s done though:
Then, you’re going to want to beef up the spring, because this one’s spring sucks stock. My spring I believe was from either a Chainblazer or a Rattler, but regardless, it’s a beefy spring. Here’s a comparison (Stock on the left, with the replacement on the right)
Now, since the main spring is so powerful, you’ll need to replace the catch spring with something a bit stronger. I actually recently found a bunch of industrial strength catch spring size springs, which did the job perfectly. Here’s a quick comparison:
The new catch is obviously on the left.
Now, you’re done with the mods to the Crossfire portion of this pistol of destruction. Close it up and test it out, make sure everything’s working alright. If it is, congratulations, you’re ready for step two.
Step 2: Airtech 2000 Mods
Alright, now we’re on to the AT2k part of this mod. This I have very little pictures of because A: I already had minimized a 2k before I started this project, and B: It’s not too tough to find elsewhere. Basically, what you’re going to be doing is removing the goo gage along with all of the yellow tubing in a stock 2k and replacing it with ten inches of what I believe is 3/8 od vinyl tubing. Then, you need to perform a simple mod to increase airflow, that has been done by both Imaseoulman and Tantum Bull, I believe. Correct me if I’m wrong. But basically what you do is cut the stem at the front of the 2k tank down to the point where it widens, in order to increase the air output of the tank. Then, cut a little less than half of a PVC coupler, and glue it on there. Then, in order to make this work, you’re going to need to bend the firing pin and remove the spring and orange piece from the pin. You can use a dremel or cutters for this. Then, use some wire and attach a keyring to the pin. This will be your trigger. You also want to wrap the tank with e-tape until it is one uniform diameter throughout. Match it up with the ridge on the back. This will help greatly later. I know that was really wordy, but here’s a final picture once all of that has been done (note: in the picture, it’s an o-ring. You want to use a keyring, because it needs to be a quick pull to effectively release air. An o-ring will stretch a bit and delay the release):
What you also want to do that I forgot to mention is to cover your vinyl tubing with wireloom. That’s the black tubing you see in the picture. You can find it at your local hardware store. This will protect your tubing from any damage during use.
Now, if you survived that enormous wordy paragraph, we can move on to the next step, the integration.
#212188 Pas Or Big Salvo
Posted by
on 14 February 2009 - 12:01 PM
in
General Nerf
No, you are gonna buy the PAS, mod it well, then do a simple barrel mod on the tanks then put the salvo on the PAS
Then, using the Marvelous Salvo system, you put the SMDTG trigger right within reach of your thumb of the hand you fire the gun with, and use an unplugged pump hooked up to the pump action of the main gun. Then, whenever you prime the PAS, it'll add a pump to the Salvos. This way, you don't even need to think about pumping it. Then if you need it quickly, prime the PAS once, and pump multiple times. The benefit of leaving the pump unplugged is: A. No need to worry about overpumping and needing to discharge the Salvos once you prime the PAS too many times, and B. It keeps it legal in Mag 7 hosted wars. After all that's done, like everyone above me has said, you've got yourself a beast of a primary.
#211891 My Nitefinder Mod: Unique Barrel Setup, Vaccum Loading, Minimization
Posted by
on 12 February 2009 - 09:51 PM
in
Modifications
Thanks for the feedback, guys. It's nice to hear for a first write-up. I'm glad I'm inspiring at least a few people to break out their nite finders. It really is a nice little pistol, and a powerful one, too.
Slug was kind of right though. What I did was unique, but not revolutionary. I shouldn't have used that adjective to describe my work, but Nerf Monkey, you're right. Regardless of my title, what's important is the write-up its self.
Again, thanks for the comments, keep them coming.
Slug was kind of right though. What I did was unique, but not revolutionary. I shouldn't have used that adjective to describe my work, but Nerf Monkey, you're right. Regardless of my title, what's important is the write-up its self.
Again, thanks for the comments, keep them coming.
#211626 At2k Problem
Posted by
on 11 February 2009 - 10:06 PM
in
Modifications
I've found that a good way to revive older valves such as the one at the end of the 2k tank is to spray it with a silicon lubricant. The one thing you want to make sure of is that it's a rubber safe lubricant and won't damage the valve. But that should breathe some life into your valve. Try the other method too though, I've never tried it, but it seems as if it should work.
By the way, if you choose to spray the valve with silicon lubricant, just be careful, because that's what your first few shots are going to smell like.
By the way, if you choose to spray the valve with silicon lubricant, just be careful, because that's what your first few shots are going to smell like.
#211340 My Nitefinder Mod: Unique Barrel Setup, Vaccum Loading, Minimization
Posted by
on 10 February 2009 - 11:25 PM
in
Modifications
I don't see anything "Revolutionary" here. You're not even the first person to use and unjustifiably grandiose adjective to promote your work.
I think it's about time I changed that title for good. I've changed it back and forth several times since I posted the write-up, and just kind of got tired of changing it, and left it. I'll change it though, because I'm really not trying to make this out to any more than it is. Sorry if it seemed like I was hyping it up without reason. I will change it now.
#211337 My Nitefinder Mod: Unique Barrel Setup, Vaccum Loading, Minimization
Posted by
on 10 February 2009 - 11:10 PM
in
Modifications
Are you using OMC's thick walled PETG?
I actually got my PETG from Mod Man, considering I got it before my account got validated, but I believe the dimensions are the same. It is thick walled.
#211333 My Nitefinder Mod: Unique Barrel Setup, Vaccum Loading, Minimization
Posted by
on 10 February 2009 - 11:02 PM
in
Modifications
BendyStraw- Thanks. Cool, like I said, I claim no credit for the ammo holders under the barrel, or even amo in the handle in general, but using the battery cover to swivel like that, correct me if I'm wrong, was my idea. If someone else has come up with this though, please let me know. I don't want to take credit for something that isn't mine.
NerfMonkey- The way the barrel is set up with the e-tape around it plus the superglue sealing it into the plunger tube is actually quite sturdy. I am careful with my guns, so I'm not dropping them or anything, but the barrel assembly is actually sturdy enough to be able to withstand it. That's another benefit to this mod, the barrel is always going to be perfectly straight and sturdy.
NerfMonkey- The way the barrel is set up with the e-tape around it plus the superglue sealing it into the plunger tube is actually quite sturdy. I am careful with my guns, so I'm not dropping them or anything, but the barrel assembly is actually sturdy enough to be able to withstand it. That's another benefit to this mod, the barrel is always going to be perfectly straight and sturdy.
#211222 My Nitefinder Mod: Unique Barrel Setup, Vaccum Loading, Minimization
Posted by
on 10 February 2009 - 07:13 PM
in
Modifications
Qui'lan Fett- Don't worry about it, but that's the beauty of this style barrel replacement. You don't have to use any of those pieces at all, drilled out or not, you don't use them. This one is also almost automatically air tight, which means vaccum loading's not even a question, if you have the right dart/barrel fit, this pistol will vaccum load. It does work though with barrel materials such as CPVC. It doesn't vaccum load, but it's still a pretty cool little pistol. My brother just made one with CPVC using my design.
washedup- No bubbles bursted, don't worry about it. I understand this isn't anything spectacular. The title probably doesn't deserve "Revolutionary" in it...but I've changed it back and forth so many times I'm just going to leave it. I just thought it was a good pistol, and a nice mod done to it, and figured I'd be more than willing to make one if requested for someone willing to buy it. I never expected an intense interest in it. But still, if anyone would like to have one made for them, just PM me or post here, and we can work out details. Like I said before, Crossfires/Strikefires work too.
Anyway...any more comments? Questions? Anything? Seeing as this is my first writeup, I'd really like some input. How I could make the writeup better, how I could make the gun better, compliments, criticism, anything.
#210999 My Nitefinder Mod: Unique Barrel Setup, Vaccum Loading, Minimization
Posted by
on 09 February 2009 - 09:59 PM
in
Modifications
Ok, I have been thinking, and discussing this with my parents, and I've decided that I may be willing to make these for anyone who would like to buy one. I understand this isn't the trading section of the forums, but this is the pistol I'm planning on making. I also understand that it isn't difficult to do...but if anyone's interested, please let me know. If there is an interest in this, I would be willing to do it. I'd also be willing to do simple mods to crossfires/strikefires if anyone would like one of those done, but I'm going to stick to pistols for now. Would there be an interest at all? I'd like some feedback before I move ahead with this.
By the way, thanks zax, that's an original idea of mine. I actually came up with it a while back when I modded a nf for my brother, and figured it'd fit in nicely here.
By the way, thanks zax, that's an original idea of mine. I actually came up with it a while back when I modded a nf for my brother, and figured it'd fit in nicely here.
#210895 The Longshot Contract.
Posted by
on 09 February 2009 - 05:28 PM
in
Modifications
I figured it'd be acceptable to double post in this thread because longshot has arrived and is absolutely incredible. Everything is working flawlessly, and the workmanship is more than impressive. It will be posted in the Mods/Paintjobs thread sometime shortly, most likely towards the end of the week. I must say, this thing is pretty damn intimidating to be on the other end of. Excellent work Angel, it was great doing buisness with you.
#210601 My Nitefinder Mod: Unique Barrel Setup, Vaccum Loading, Minimization
Posted by
on 08 February 2009 - 07:59 PM
in
Modifications
This is what I did with my NF's, except I glued the barrels in instead of taping them.
With PETG and no AR's.
Cool, what kind of results did you get out of yours? And how did you bridge the gap between the barrel and the plunger tube?
#210578 My Nitefinder Mod: Unique Barrel Setup, Vaccum Loading, Minimization
Posted by
on 08 February 2009 - 07:03 PM
in
Modifications
Are your ranges flat? Vacuum loading only works if the darts have a decently loose fit (that's why some of them only go half way - the slight variance in diameter is too tight to load this way), which translates into lower ranges. For example, my Urukai bow, when ramrodded with my big darts, shoots about 100' flat, but when vaccuum loading with looser darts (my old ones were from Wldworld - awesome foam), only shot about 60-70' flat, but shot much quicker. 60 flat would seem really high for a vacuum loading nf. You did the works to it though, so nice job.
I understand what you're saying. Those ranges are done using darts that are somewhat of a perfect medium between being too tight and lose in the barrel, so they vacuum load, but aren't too lose. I didn't go above sixty often, but it was generally around sixty, high fifties, and yes, ranges were taken flat., although I generally don't necessarily believe in flat shots. I understand they're the only way to properly range test a gun, which is why I did the tests flat, but when not doing a range test or am having a little war with my brother and friends, shots are almost always taken with a slight ark. It is very slight, probably not even measurable by eyeing it up, but it would increase ranges a bit. The spring is also pretty beastly, which contributes greatly to the ranges I'm getting. Plunger seal is also good, like you said, the works. But yeah, ranges are taken flat. Thank you, I appreceate it.
I don't really want to derail the thread too far back and forth between us, so if you have anything you want to ask or comment on (unless they could help someone else doing the mod), feel free to PM me. So anyone else, questions, comments, suggestions?
#210571 My Nitefinder Mod: Unique Barrel Setup, Vaccum Loading, Minimization
Posted by
on 08 February 2009 - 06:48 PM
in
Modifications
That was my idea....
Damn.
I want to say lol, but no internet slang. I'm laughing though, beat you to it. I actually just thought it up yesterday...and figured it would work nicely.
Looks great, but people have done the barrel replacement like yours only with CPVC couplers many times before.
Thanks, I've actually never seen one using this method before (using e-tape to make the seal and discarding all of the ar pieces), with CPVC couplers either...I wish I had, I would've probably come up with this a lot sooner.
#210562 My Nitefinder Mod: Unique Barrel Setup, Vaccum Loading, Minimization
Posted by
on 08 February 2009 - 06:18 PM
in
Modifications
Edit-before anyone else does this mod using a fairly beefy spring like I did, there is one more thing that you must do, or your blaster will be damaged. The screw holes that secure the plunger tube into the shell need to be re-enforced using some form of epoxy, or you could just hot glue the hell out of the plunger tube to get it to stay in place, but what I've realized is that over time, these screw ports will break, allowing your entire plunger tube to move, which in turn could damage the front of the shell. So before firing the blaster, Re-enforce these spots!. I cannot stress this enough. I don't want someone to try this mod, and have it ruin their nitefinder. The mod is still working extremely well, actually, regardless of the disconnection from the screwports, so it's still a beast of a pistol. I do recomend doing this mod still, just make sure you re-enforce those spots. I'm actually glad this got revived, so now I could make sure everyone knew that.
Ok, so I had a stock nitfinder on hand, and decided I needed a trusty sidearm that wasn't ramroded, couplered, or breached. That left vaccum loading, and I came up with this:

Now let's get to work.
I know everyone here most likely knows what this gun looks like stock, but here it is:

And its internals:

Now what sets this aside from other nitefinder mods is that there is no need for any of these pieces:

That means no air restrictors to boar out, none to drill out, none to sand out, and no worrying about creating an airtight seal because of a having a ton of pieces to interlock together. This means you immediately have ensured vaccum loading, and it’s actually a lot easier than other nitefinder mods. To start off, get yourself 4-5 inches of PETG (Mine was somewhere in between), and around 2 inches of thin wire or string. I found wire works best, and that is what I used. Take your wire and bend it around the edges of your PETG like so:

Then, take some e-tape and wrap one or two times around the base of the PETG in order to secure the wire and keep it in place. It should look like this:

Now for the original part of this mod. Take your e-tape and continue to wrap around the base of the PETG until it fits snugly in the plunger tube. If the e-tape extends a bit below the PETG, this is a good thing, because it will help to cushion the blow of the plunger head. Once it will fit snugly, squeeze a bit of superglue around the edge of the e-tape and slide it into the plunger so about half of the e-tape is in, and half is out. It should look like this:

You can also then wrap once or twice around the outside incase you’re worried about making a good seal, but it should already be perfect. Now I don’t have any pics of the assembly of the plunger rod, because I took it from a finished nitefinder I already had, but here is a picture of it finished:

I used an industrial spring, a beastly catch spring I was able to find, added an o-ring, and put some e-tape under them both in order to insure a nice seal within the plunger. I also re-enforced the plunger head a bit with some epoxy and I believe I used a longer screw to attach the plunger head. Now lube it up and put it back in the plunger, you’re done with your barrel assembly. Now for minimization.
Take your shell and remove the entire laser piece:

Now that that’s out, what you want to do is just cut the shell along these lines:

Once you’ve cut the shell, sand down the shell on both sides here until one of the ammo holders will fit vertically inside (mine’s only in halfway, but you can chose for yours to be in all the way):

Then, I lost the picture somehow, but what you want to do is superglue one of the amo holders vertically into one side of the shell (only do this to one side because you want to still have the ability to reopen the shell if you choose to.
Once that’s done, congratulations, you can now close up the shell, and screw it all back together, because you’re done for now. Once it’s all closed up, we’re going to be adding a secret amo compartment that will allow you to store one extra dart well…secretly.
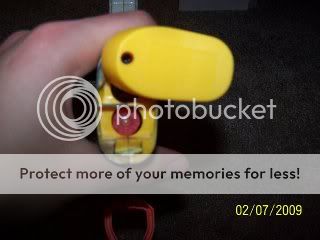
Take a pair of cutting pliers and snip off this little piece near the battery holder:

Don’t cut off the whole thing, you still want a little bit there so the battery cover won’t swivel when you don’t want it to. Now, what you need to do is take the battery cover. See those two screws in on there? Unscrew them and remove this piece:

Then screw that plate back on and you’re almost done. Screw the battery cover back on, and now to open your secret compartment, pull down on the back edge of the cover and rotate it to the side, which will open up and hold a Stefan very comfortably:
Almost done. There’s one more thing to add to this mod that’s optional but makes a nice handy addition. I don’t have pics of this part, but I will edit them in shortly. What you need to do is take a Mag Strike clip, unscrew the screws that you see in it, pop off the top cap, and then retrieve the belt clip itself. You’ll see that it steps down a few times on the clip. What you want to do is sand/cut those different levels off so it’s flush on that side. Then, if you’re a righty, you superglue or epoxy this clip to the left black portion of your nitefinder (where it says NERF), and it can now clip onto your belt or pocket (If you’re a lefty, glue it on the right side).
Now you’re done. I hit around 60 with BB weighted stefans, and the pistol is also vaccum loading (A few fat darts I have occasionally only suck about halfway down the barrel, but they still fire fine. I was extremely happy with the results, so to me, it really was a revolutionary nitefinder mod.
By the way, I am in no way claiming credit for the clip addition, minimization, or vertical amo holder addition to the front of the pistol, but am for the new barrel replacement and secret amo compartment. I have seen the front amo holder addition done before, as well as the clip on the side, just not a write up.
Any comments are greatly appreciated, and questions are welcome.
Ok, so I had a stock nitfinder on hand, and decided I needed a trusty sidearm that wasn't ramroded, couplered, or breached. That left vaccum loading, and I came up with this:
Now let's get to work.
I know everyone here most likely knows what this gun looks like stock, but here it is:
And its internals:
Now what sets this aside from other nitefinder mods is that there is no need for any of these pieces:
That means no air restrictors to boar out, none to drill out, none to sand out, and no worrying about creating an airtight seal because of a having a ton of pieces to interlock together. This means you immediately have ensured vaccum loading, and it’s actually a lot easier than other nitefinder mods. To start off, get yourself 4-5 inches of PETG (Mine was somewhere in between), and around 2 inches of thin wire or string. I found wire works best, and that is what I used. Take your wire and bend it around the edges of your PETG like so:
Then, take some e-tape and wrap one or two times around the base of the PETG in order to secure the wire and keep it in place. It should look like this:
Now for the original part of this mod. Take your e-tape and continue to wrap around the base of the PETG until it fits snugly in the plunger tube. If the e-tape extends a bit below the PETG, this is a good thing, because it will help to cushion the blow of the plunger head. Once it will fit snugly, squeeze a bit of superglue around the edge of the e-tape and slide it into the plunger so about half of the e-tape is in, and half is out. It should look like this:
You can also then wrap once or twice around the outside incase you’re worried about making a good seal, but it should already be perfect. Now I don’t have any pics of the assembly of the plunger rod, because I took it from a finished nitefinder I already had, but here is a picture of it finished:
I used an industrial spring, a beastly catch spring I was able to find, added an o-ring, and put some e-tape under them both in order to insure a nice seal within the plunger. I also re-enforced the plunger head a bit with some epoxy and I believe I used a longer screw to attach the plunger head. Now lube it up and put it back in the plunger, you’re done with your barrel assembly. Now for minimization.
Take your shell and remove the entire laser piece:
Now that that’s out, what you want to do is just cut the shell along these lines:
Once you’ve cut the shell, sand down the shell on both sides here until one of the ammo holders will fit vertically inside (mine’s only in halfway, but you can chose for yours to be in all the way):
Then, I lost the picture somehow, but what you want to do is superglue one of the amo holders vertically into one side of the shell (only do this to one side because you want to still have the ability to reopen the shell if you choose to.
Once that’s done, congratulations, you can now close up the shell, and screw it all back together, because you’re done for now. Once it’s all closed up, we’re going to be adding a secret amo compartment that will allow you to store one extra dart well…secretly.
Take a pair of cutting pliers and snip off this little piece near the battery holder:
Don’t cut off the whole thing, you still want a little bit there so the battery cover won’t swivel when you don’t want it to. Now, what you need to do is take the battery cover. See those two screws in on there? Unscrew them and remove this piece:
Then screw that plate back on and you’re almost done. Screw the battery cover back on, and now to open your secret compartment, pull down on the back edge of the cover and rotate it to the side, which will open up and hold a Stefan very comfortably:
Almost done. There’s one more thing to add to this mod that’s optional but makes a nice handy addition. I don’t have pics of this part, but I will edit them in shortly. What you need to do is take a Mag Strike clip, unscrew the screws that you see in it, pop off the top cap, and then retrieve the belt clip itself. You’ll see that it steps down a few times on the clip. What you want to do is sand/cut those different levels off so it’s flush on that side. Then, if you’re a righty, you superglue or epoxy this clip to the left black portion of your nitefinder (where it says NERF), and it can now clip onto your belt or pocket (If you’re a lefty, glue it on the right side).
Now you’re done. I hit around 60 with BB weighted stefans, and the pistol is also vaccum loading (A few fat darts I have occasionally only suck about halfway down the barrel, but they still fire fine. I was extremely happy with the results, so to me, it really was a revolutionary nitefinder mod.
By the way, I am in no way claiming credit for the clip addition, minimization, or vertical amo holder addition to the front of the pistol, but am for the new barrel replacement and secret amo compartment. I have seen the front amo holder addition done before, as well as the clip on the side, just not a write up.
Any comments are greatly appreciated, and questions are welcome.
#209546 Easier To Make Doomsayer Turret
Posted by
on 04 February 2009 - 06:50 PM
in
Modifications
I tried doing that on my original turret, but it was kinda hard to do since the barrel had to be pulled up as far as possible, making it hard to rotate and get the tape in the right spot. This method eliminates all of those problems, and the last barrel is just as easy as the first.
Yeah, that's the one problem with the method I'm using. I'm defitely trying yours. Do you think it will still be air tight without gluing the barrels in? Plus, I'm halfway through, so I may undo those.
#209528 Easier To Make Doomsayer Turret
Posted by
on 04 February 2009 - 06:22 PM
in
Modifications
Excellent concept for applying the electrical tape so that you don't have to interfear with the other barrels. However, I found another method which still uses Angel's concept. After you put the tape around the bottom of the barrel and slide it up in the turret, place the edge of the electrical tape on the PETG, and all you have to then do is rotate the barrel, and the tape will spin around it and wrap it up. Then you can continue with the rest of the process. I do like this method though, and I'm definiely trying it out. It seems much easier than the original.
#208924 Mod Man Foam Question
Posted by
on 02 February 2009 - 03:36 PM
in
General Nerf
I bought both foam and darts from Mod Man. The premade darts do not fit well at all in his PETG which I'm assuming is similar in size to OMC's. However, my darts that I make using his foam fit flawlessly in both PETG and 9/16" brass. I heat mine for ten minutes in a mesh bag in the dryer on medium heat. They fit perfectly. They're snug, but no need to twist them in. His darts are a bad example of his foam. Hope this helps.
By the way, you can use his darts in CPVC with high powered air guns (banned ones, like Titans and Jet Hawks Glider blasters) and they have insane results.
By the way, you can use his darts in CPVC with high powered air guns (banned ones, like Titans and Jet Hawks Glider blasters) and they have insane results.
#207045 The K9 Special (pas Mod)
Posted by
on 27 January 2009 - 09:40 PM
in
Modifications
I know this doesn't mean much coming from a guy with three posts, but excellent idea. It took the R.S.C.B., adapted it to this specific gun, and made it work. I just recently finished Angel's lvl 2 PAS mod, and it's only weekness is its ROF. This defenitely solves that. I'll have to try it once I get my hands on another PAS. Again, nice work.
#206082 The Longshot Contract.
Posted by
on 24 January 2009 - 10:08 PM
in
Modifications
Is there a new member to the forums who owns this Monster? Yes.
And that member is very anxious to get his hands on it. The gun and video both came out amazing, and no, it wasn't original, but it wasn't supposed to be. It was meant to be everything it says at the beginning of that video. I can't wait to see that monster in person...as long as I'm not on the wrong end of the barrel.

