Jump to content


Aj's Content

There have been 50 items by Aj (Search limited from 03-December 96)


By content type

See this member's


Sort by                Order  

#170535 Integrating The Vulcan In To A Squad

Posted by Aj on 19 August 2008 - 08:06 AM in General Nerf

My answer is synonymous with the rest, heck yes is can be integrated.

As far as giving out advice or tactics a little more information on what kind of war you're fighting would go a long way such as:

Do you all play with stock guns?
Are there rules against modded guns?
Are you nerfing outdoors or indoors?
What size are your wars (people per team)?

As stated before, you need to make sure you use the Vulcan in situations where its strengths are maximized and its weaknesses are minimized. Don't bring a knife to a gunfight, bring a gun to a knife fight.

1-2 Sidearms are good. The Recon you have in pistol mode with some extra clips and a NF/DS with a nice simple barrel mod and banding will give you a nice balance of range and ROF for sidearms.

Here are a couple of generic tactics that work in both indoors and outdoors, they all involve using cover to gain an advantage; as a Vulcan is about as useful as a milkshake in an open field battle. You'll have a welt on your neck from a x-bow before you can get within twice your range.

In both cases I have assumed that you are the one with the Vulcan, however if you're co-ordinating the squad you can ask your Vulcan (or RF20, both work for suppression) wielder to fill these roles.

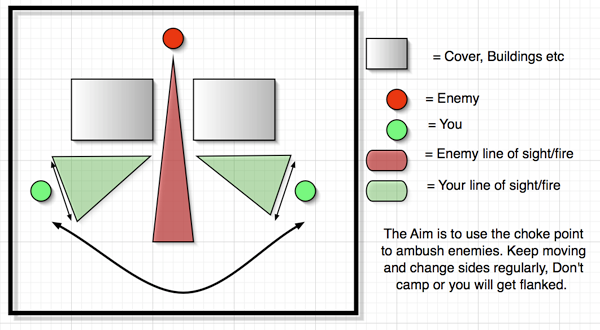
The first one is just basically..... "How to whore a choke point"..... Don't get too greedy, don't camp. Switch sides often and after a few kills find a new choke point - unless you have backup to protect your flanks. Remember - a dart in the head makes people learn quickly.

Keep moving as the arrows suggest, both within your fire zones and side to side; otherwise people will know where to aim.

Though I have only put one enemy in the diagram the idea is to do it to a group, where the ROF and the large ammo supply of the Vulcan really shine. Otherwise its just a plain ambush really and a skilled player could do it with a scout..

Posted Image

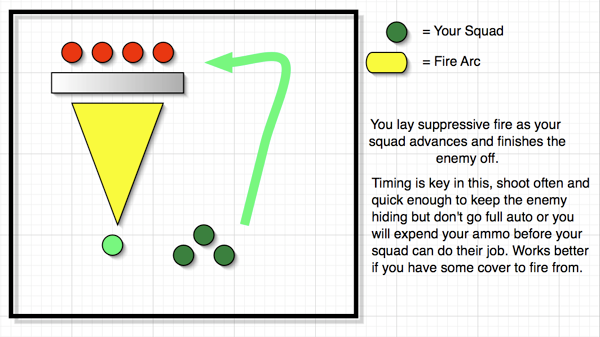
The next is an offensive or defensive tactic. Basically just a fire suppression tactic, I'm sure that everybody has heard of these. If your attacking its a good way to overwhelm dug in enemies. Pin them then mop them up. Having your squad advance from either side simultaneously (called a 'pincer' movement) works great.

f you're defending its much quicker to have your squad counter attack than to get in a long drawn out firefight. By ending it quickly it make sure the enemy doesn't get a chance to flank you. Its up to you to assess the situation; don't send your squad out if the enemy isn't truly pinned or they'll probably take heavy losses.

Posted Image

I hope thats at least a little helpful and didn't bore the veterans to death, more specific tactics could be suggested if you provide more info.

Aj


#282056 Amazing Paint Job - How Can I Learn This?

Posted by Aj on 04 August 2010 - 04:11 AM in Modifications

Just by looking at it I'd say there is a 95% chance that that blaster was painted using citadel miniatures paints - other wise known as games workshop. These paints are pricey but as far as acrylics go they are some of the best in my opinion.

I used to play a lot of warhammer when I was younger and particularly enjoyed painted, even winning a few local competitions for my miniatures.

So my suggestion is to look for tutorials on how to use citadel paints - gameworkshop.com is probably a good place to start.

In particular tutorials on painting tanks, especially tau or space marine tanks would be of use, as thes tanks feature large flat surfaces and panelling very similar to nerf guns.

The maverick you posted uses a lot of drybrushing, highlighting and shading. Some of the shading appears to have been done using inks, and given the smoothness I'd suspect some glazes were used on the red to smooth it out. All of these terms (using inks, drybrushing, glazing etc) are things you should search for and you'll find detailed tutorials in abundance on both GW and 3rd party hobby sites all over the web.

Also of note is that this maverick used a gloss varnish to give that deep, rich, shiny finish, which has been left off on the metallic parts to create contrasts. There should be plenty of tutorials about for applying this kind of finish also, and both matte and gloss varnish can be bought in spray and brush on form.

Hope this helps, remember take your time, have patience and look at your painting objectively, it's on of the hardest things to do, everyone in warhammer thinks their painting is super good when this is true for only about 5% of the hobbyists.. every one develops their 'own eyes' for their paintjobs, which just seem not to notice that big fleck of green you accidentally got on the black or whatever.. but try and avoid it.. get other people to point out flaws and dont be angry when they do, they're helping you become a better painter.

Aj


#256184 Custom Foam Job (requests)

Posted by Aj on 13 November 2009 - 08:16 AM in General Nerf

I'm sure that caulk-less seal loses usefulness in the arid climate of Australia. FBR is probably only for homes with mild summers and milder winters, but Australia's desert climate gives cold nights and hot days.


I sincerely hope you're joking in which case, lol..

If not... oh dear lord.....

Australia is not a desert. Nor are we starved for FBR, we just have a much lower number of nerfers and the majority are idiots who can't find said FBR (or any other modding materials for that matter.. they're all sold here you just need to find them..)

We are starved a little in the blaster category, but only really in the older things like the Air Tech lines and rapid fires..

The point of this foam, is not because we cant get FBR, it's to see if we can make something better than it. The guy doing this order is not ordering coloured FBR, it's from a completely different company that specialises in foam balls and toys. By doing this he hopes to have greater consistency within batches and between batches. I was pretty skeptical of the idea at first, now I'm just curious if he can pull it of.

Aj


#186184 [aus] Nerf War; Adelaide

Posted by Aj on 29 October 2008 - 01:44 AM in Nerf Wars

Hey guys

The plan is to meet at my house (which is within walking distance from the playing field) first, probably do some lunch and then go nerf the afternoon away. We' have stefans for this event which work great in Air guns and anything barrel loading, however for the recon / clip gun users out there they are a little tight. I'm working on some CDTD's for this, however it's advised to bring a backup gun if you can. We (Tidge and I) will have some spares floating around too.

If your guns are in need of quick mods (pegs/ar) so they can shoot stefans PM either me or Tidge, we might be able to do this earlier in the morning.. time permitting

in the interest of not having the cops called make sure you're flashing those orange barrels, and don't dress full camo or anything stupid like that

hope to be shooting you soon

Aj


#183172 Orange Ring On The Titan.

Posted by Aj on 12 October 2008 - 06:19 AM in Modifications

To open up my Titans I heated up a knife (box cutter etc) and cut the plastic in line with the seam on the Titan. I heated mine with a gas stove burner but a lighter can work if that's all that's available.

Aj


#266851 Dart Tag Blaster Modification Help

Posted by Aj on 25 February 2010 - 11:22 AM in Modifications

I am asking if the spring that keeps the nozzle thing in front of the plunger tube flush with the turret necessary.
If it is necessary, how can i replace it?


Yes that spring is necessary, as it keeps the seal against the turret. as for replacing it.. simply find something of equal size and power, easier said than done

Aj


#270356 Washer Based Plunger Heads And Replacement Plunger Tubes - Please Help

Posted by Aj on 26 March 2010 - 06:50 AM in Homemades

Last time I checked you can find Lee's tubing on amazon.


Amazon do not ship to Australia, but thanks

Aj


#270343 Washer Based Plunger Heads And Replacement Plunger Tubes - Please Help

Posted by Aj on 26 March 2010 - 12:02 AM in Homemades

Hi

The work you guys have been doing recently in here is f**kin boss. I have been incredibly impressed with the quality of blasters being produced by some of the contributors around here.

I live in Australia, and as such I don't have access to imperial size PVC, imperial size rubber washers and 1" PETG, so I have a few questions I'd like answered so that I may search for alternatives locally.

1st, everyone mentions 1" PETG coming from petco, I assume from my searching that it is a part for an aquarium gravel filter, however I'm not sure. Does anyone have the 'pet store' name for this product so that I can search for it more efficiently? is it a replacement part? does it come from a particular company or is it 'petco' brand?

I have seen some gravel filters with tubes that look about right online, however I'm reluctant to spend $25-30 to find out, and have yet to find the tube on its own. Any help information is appreciated.

Secondly, when finding rubber washers for the creation of a plunger head what relative size is appropriate?

Every thread i see says use xxx pipe with xxx washer, however I cannot tell how the washer fits in. Should i be looking for a washer that fits perfectly inside the tube? or should it be larger so that it bends into a cup like shape? if so how much larger? should the washer be closer to the OD or ID of the pipe?

I have done a lot of modding work, made breeches, machined a lot of plastics etc etc so I hope these questions are more justified than the average noob ones - I'm looking for a push in the right direction rather than the information handed to me on a platter

thanks

Aj


#187376 You Might Be An Aussie Nerfer If...

Posted by Aj on 03 November 2008 - 11:37 PM in General Nerf

I am a magstrike... Tidge knows what I'm talking about....

Great list mate.. very funny, I'm sure some more will get added to it after the next war

Aj


#269577 Electronics Question

Posted by Aj on 18 March 2010 - 09:58 PM in Modifications

Basically, without trying to sound rude, circuit building and modification is not something you can just jump right into. Some prior tuition or at least solid research is needed, along with some trial and error.

Anyways, I don't see how this is 'easier'. Wiring up LED's is one of thje simplest circuits you can create. What exactly are you trying to achieve with modification of this circuit?

You need to post a picture of both sides of the main PCB, as the side you posted has no traces on it. However as stated previosusly it's likely the blue things are the switches.

The light and sound show is controlled by the 'blob' style IC (the black blob on the LED board). Given that there are only 2 wires leading to that PCB from the 'power' PCB, it's pretty easy to deduce where the power comes from, and thus you could hook up a new power source with a rocker or push button switch very easily (as i assume you wish to trigger the lights and sounds some other way apart from spinning the gun).

If you can't work out how to do such a thing I suggest putting any dreams of electronic mods on hold, again not trying to be rude.

Aj