Jump to content


Aeromech's Content

There have been 378 items by Aeromech (Search limited from 07-December 96)


By content type

See this member's


Sort by                Order  

#351091 Parasite Blaster/Mounting Technique

Posted by Aeromech on 24 January 2016 - 01:58 PM in Homemades

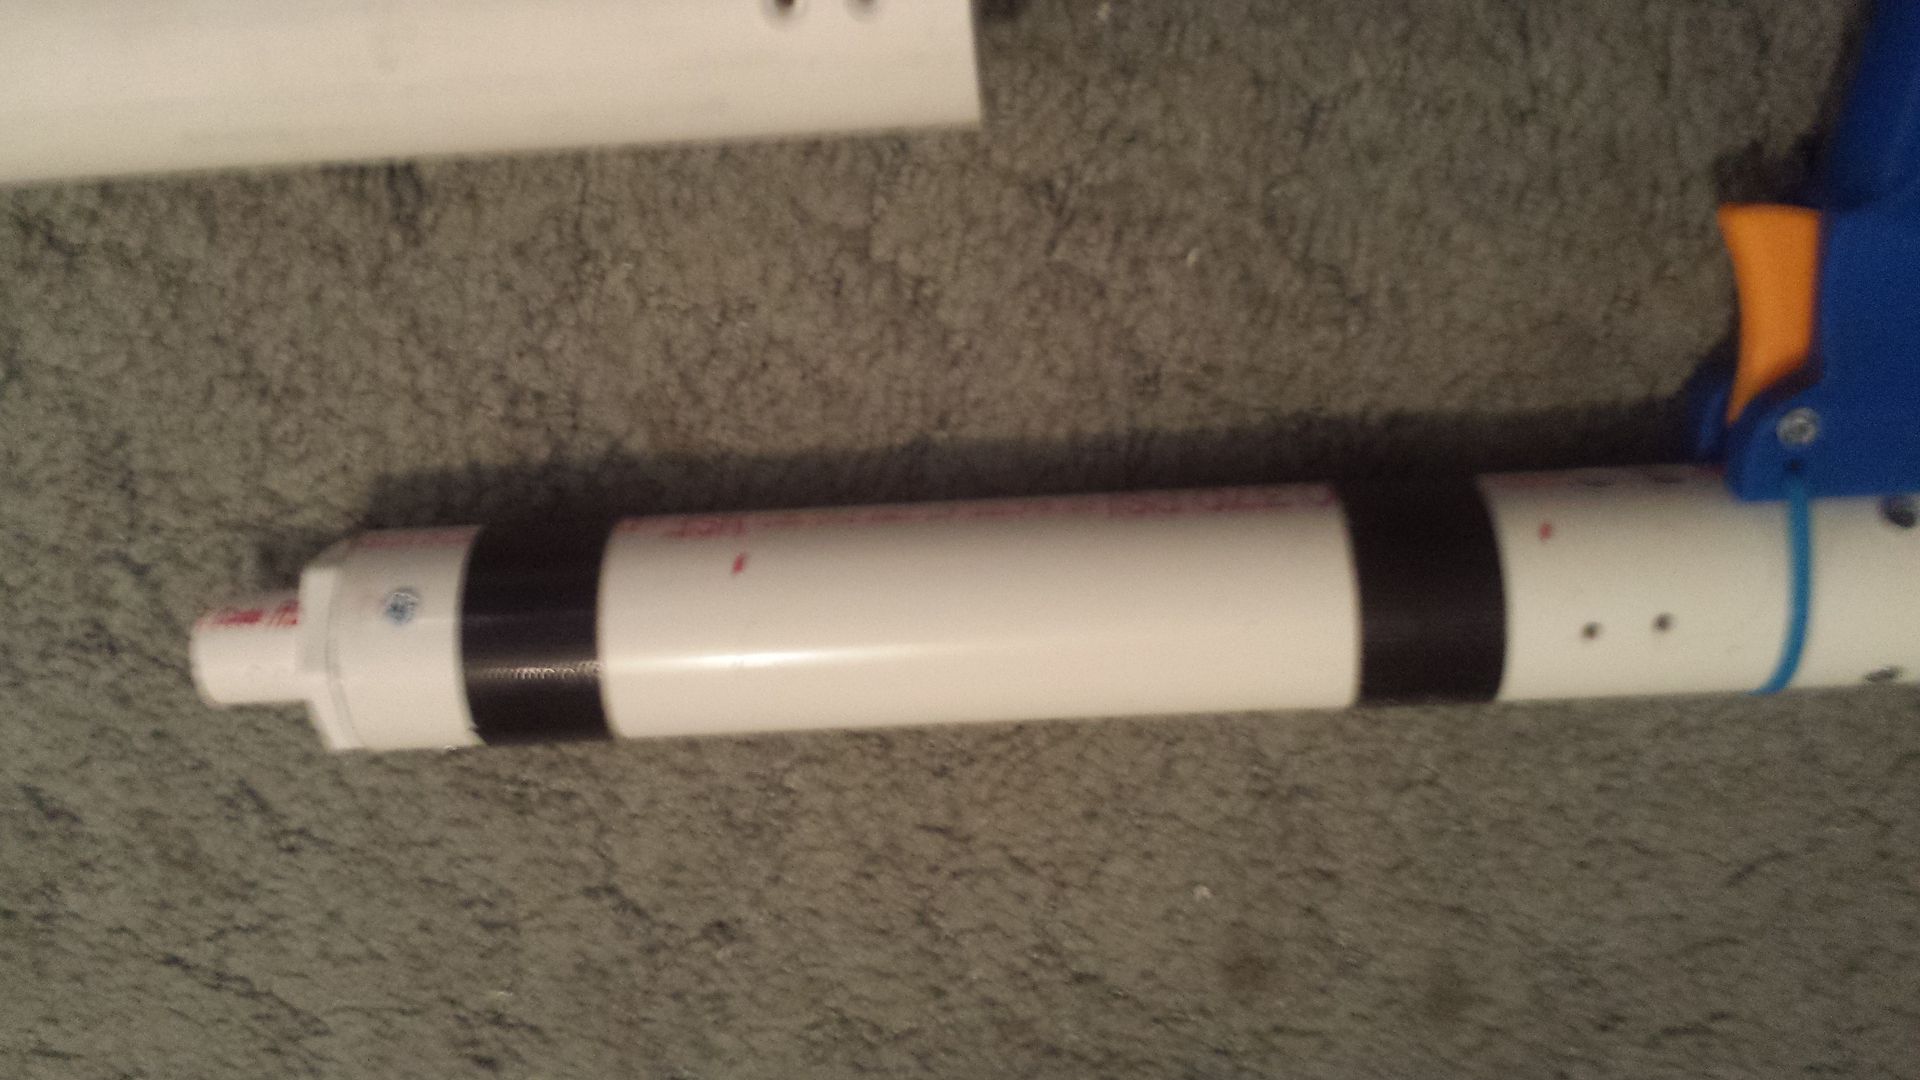
Good work. So simple I don't know why no one has done it before. I would've underslung an airgun, but there's no nothing wrong with a RBPistol. Only issue I can see is sourcing the thinwall pipe, which from what I remember is difficult to find.

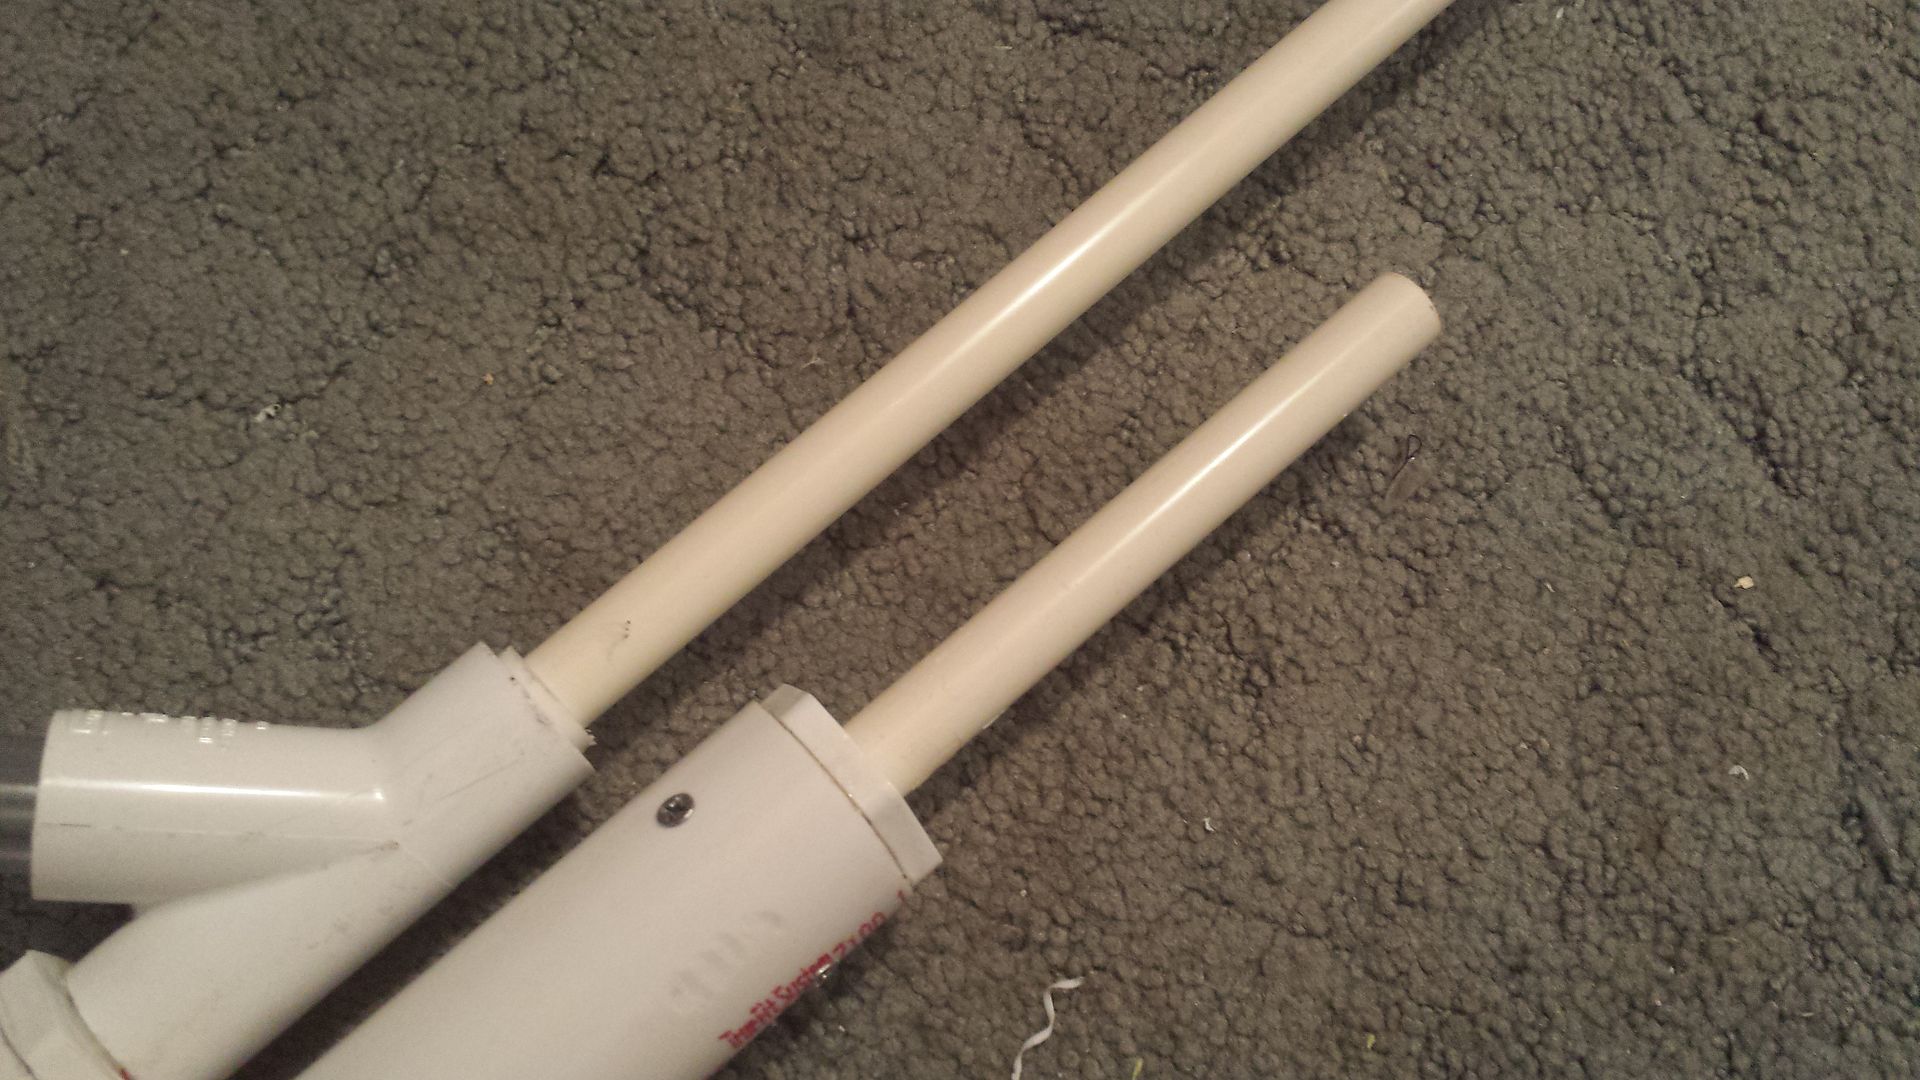
Everyone seems to find it in their local hardware stores, but I just buy it online because it's never available in my vicinity.


Not sure if it'll help Canadians, but you can buy it hereand pick up in store, if you're fortunate enough to live near a DoItBest.


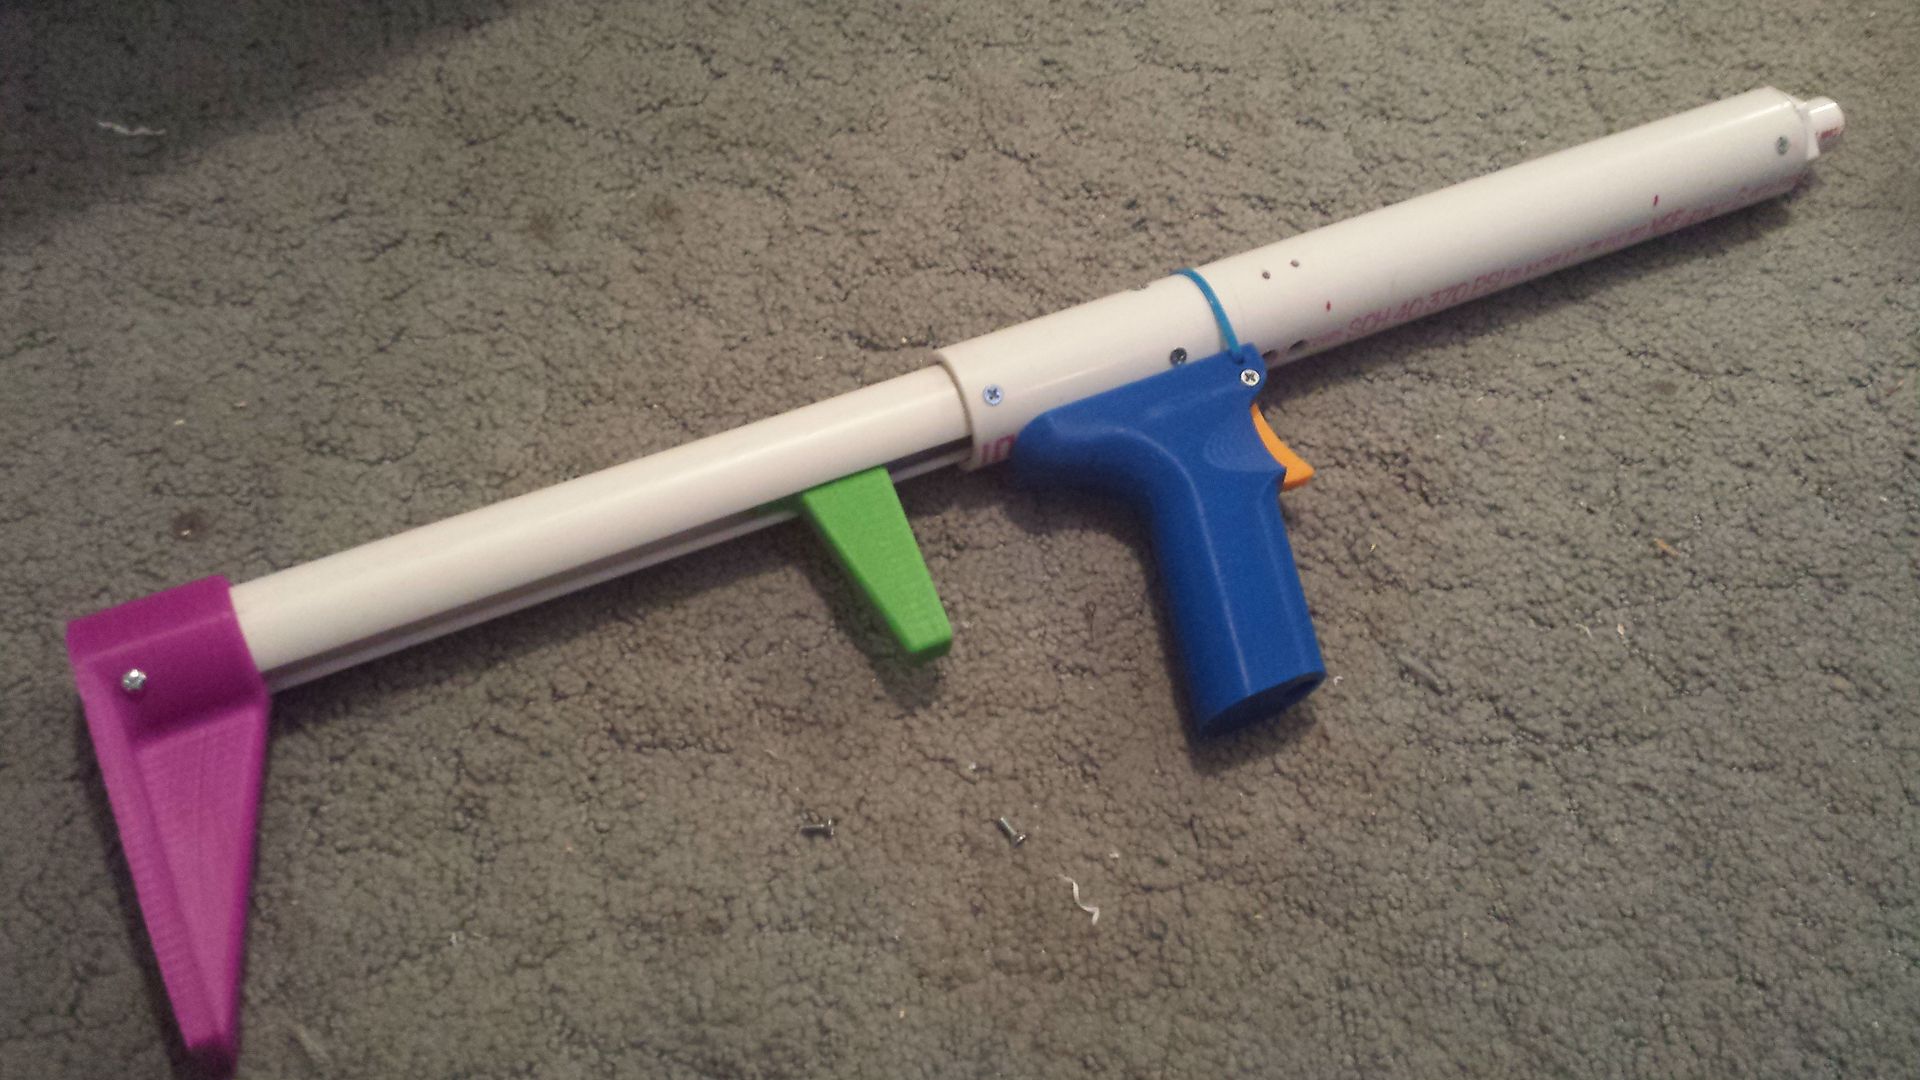
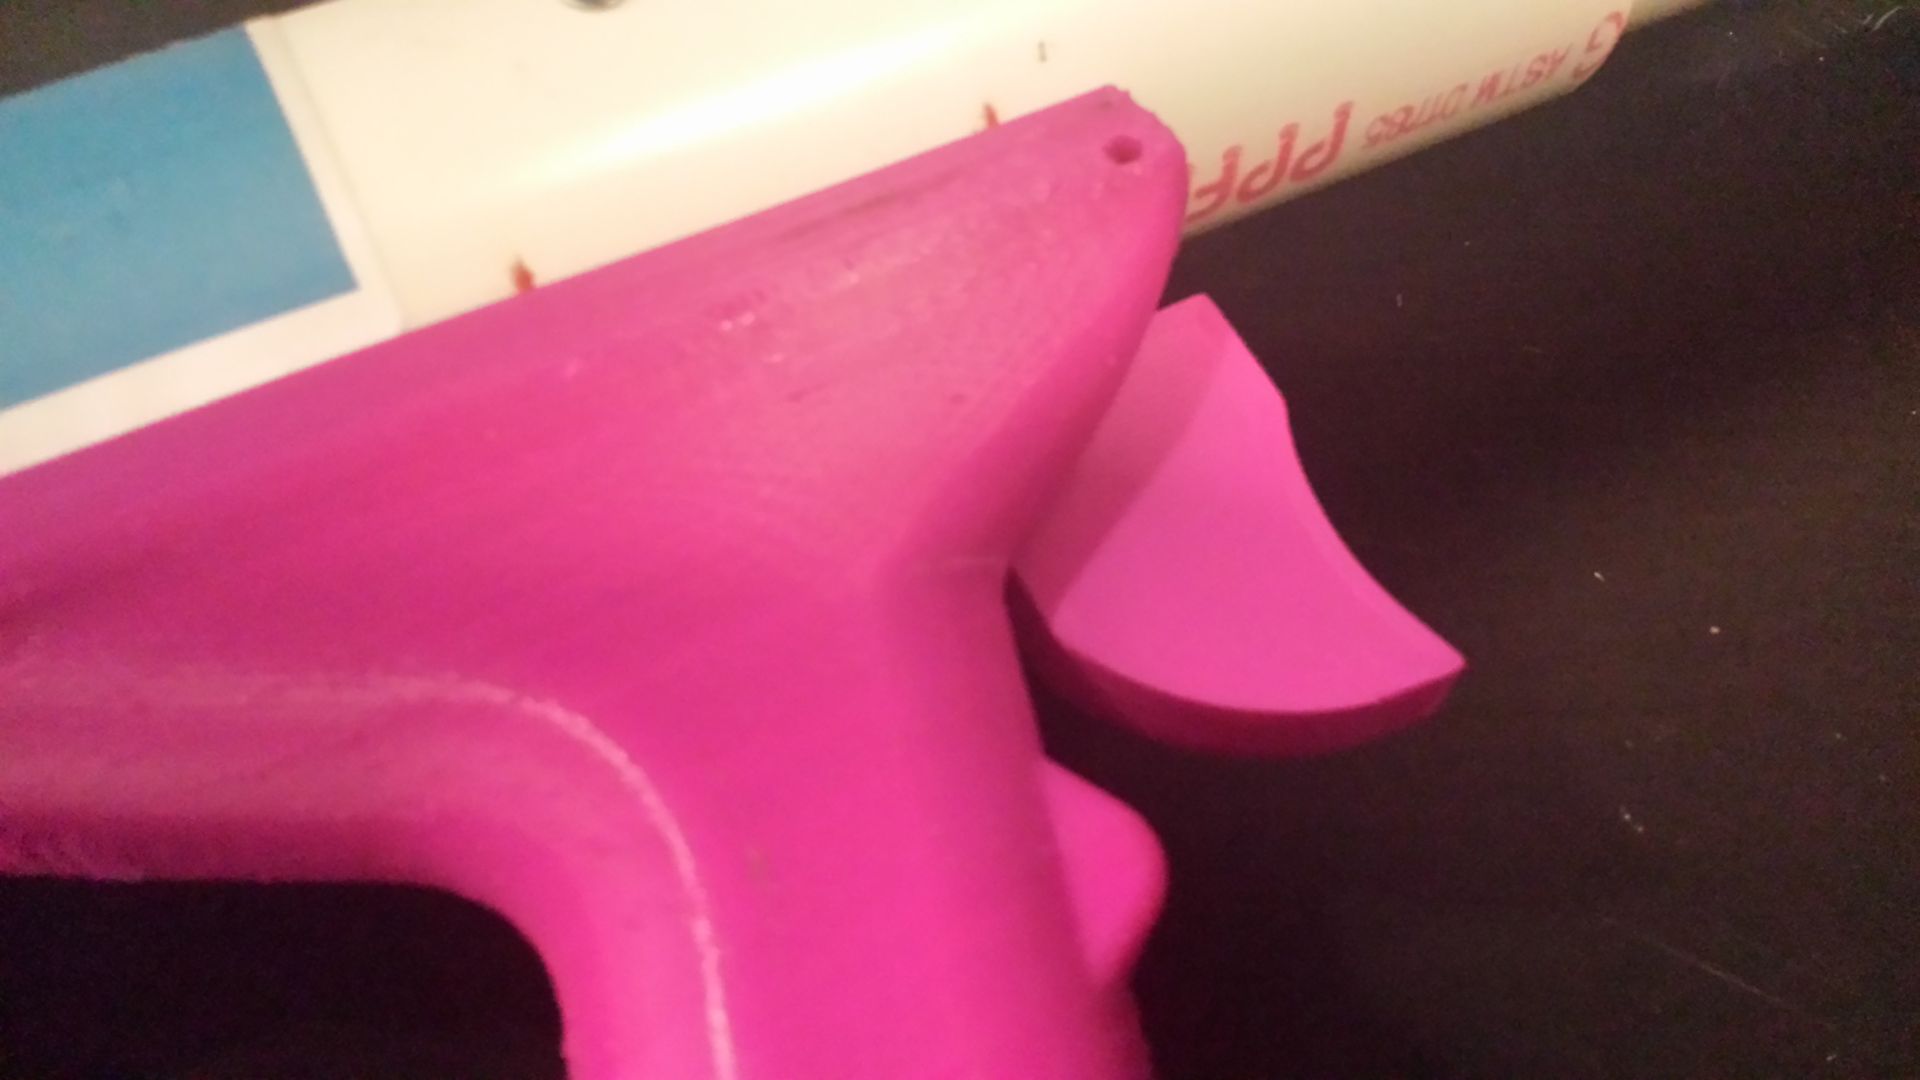
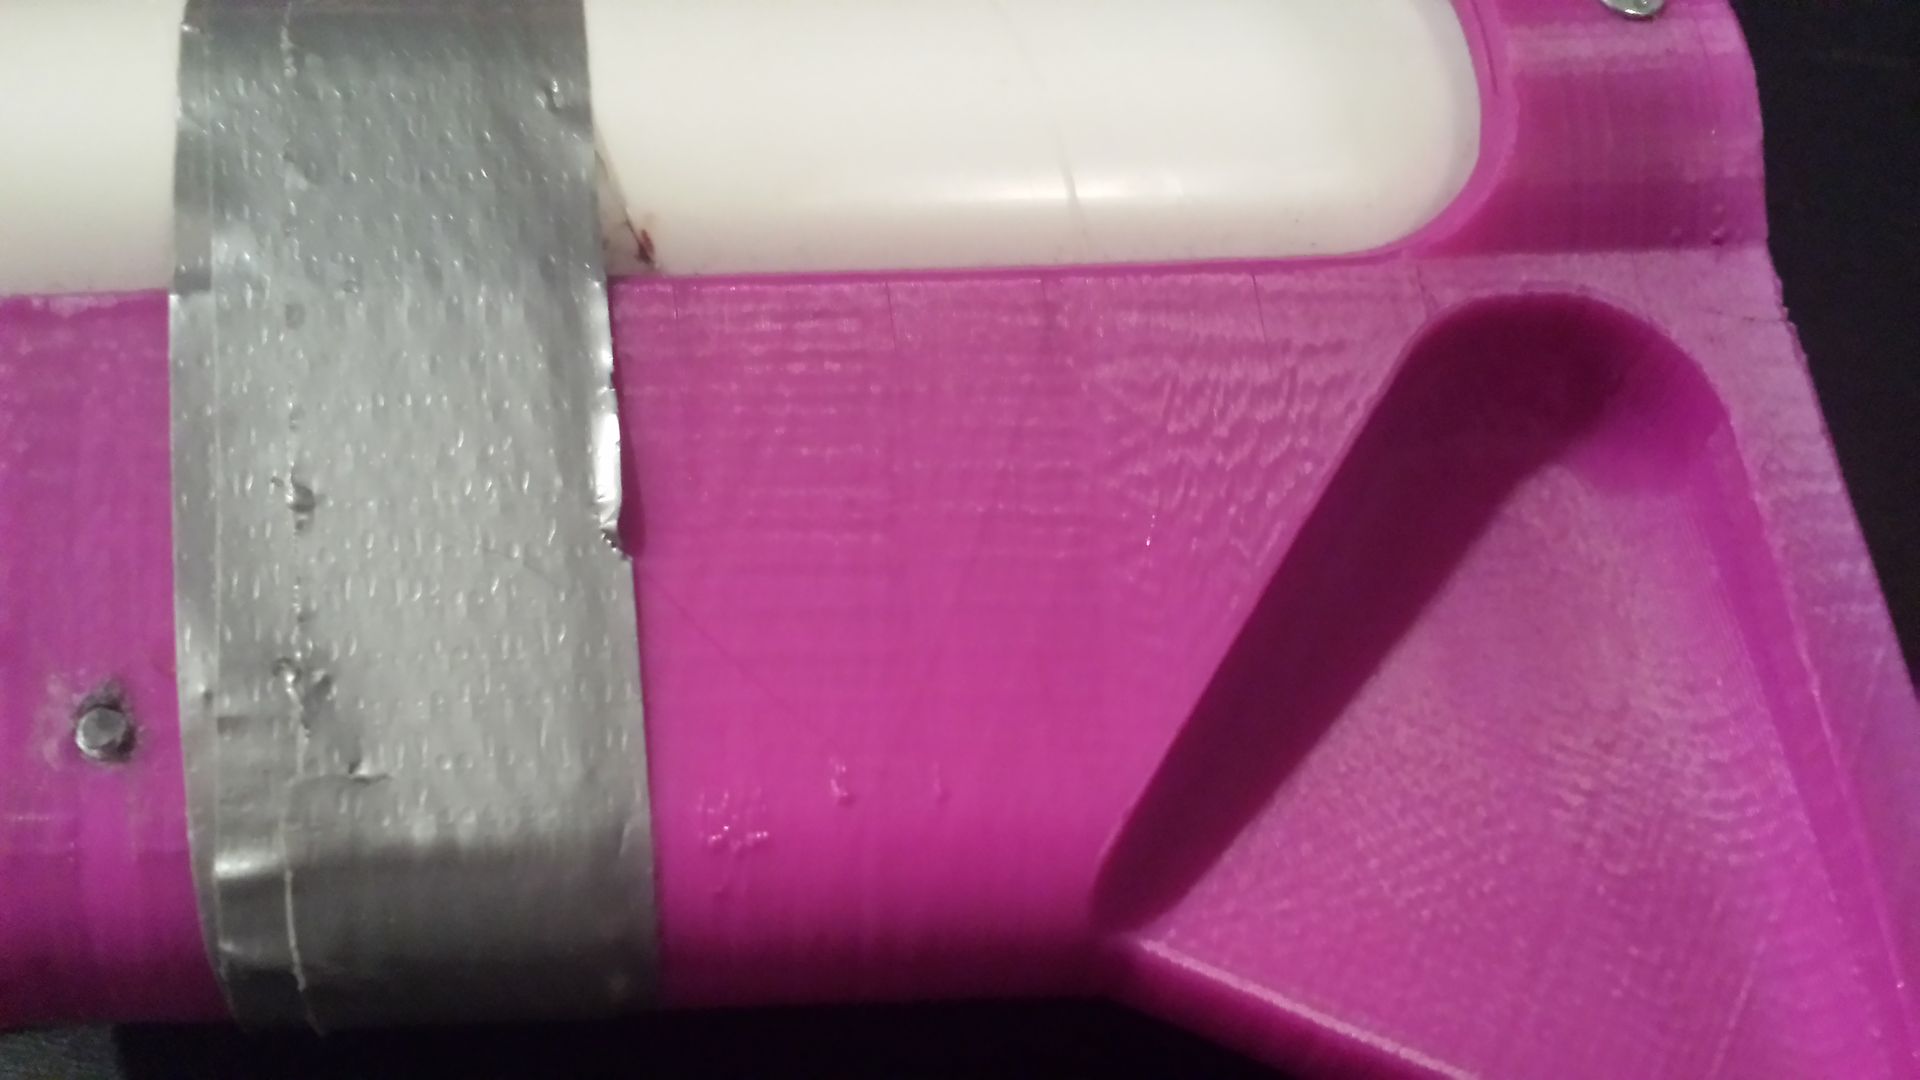
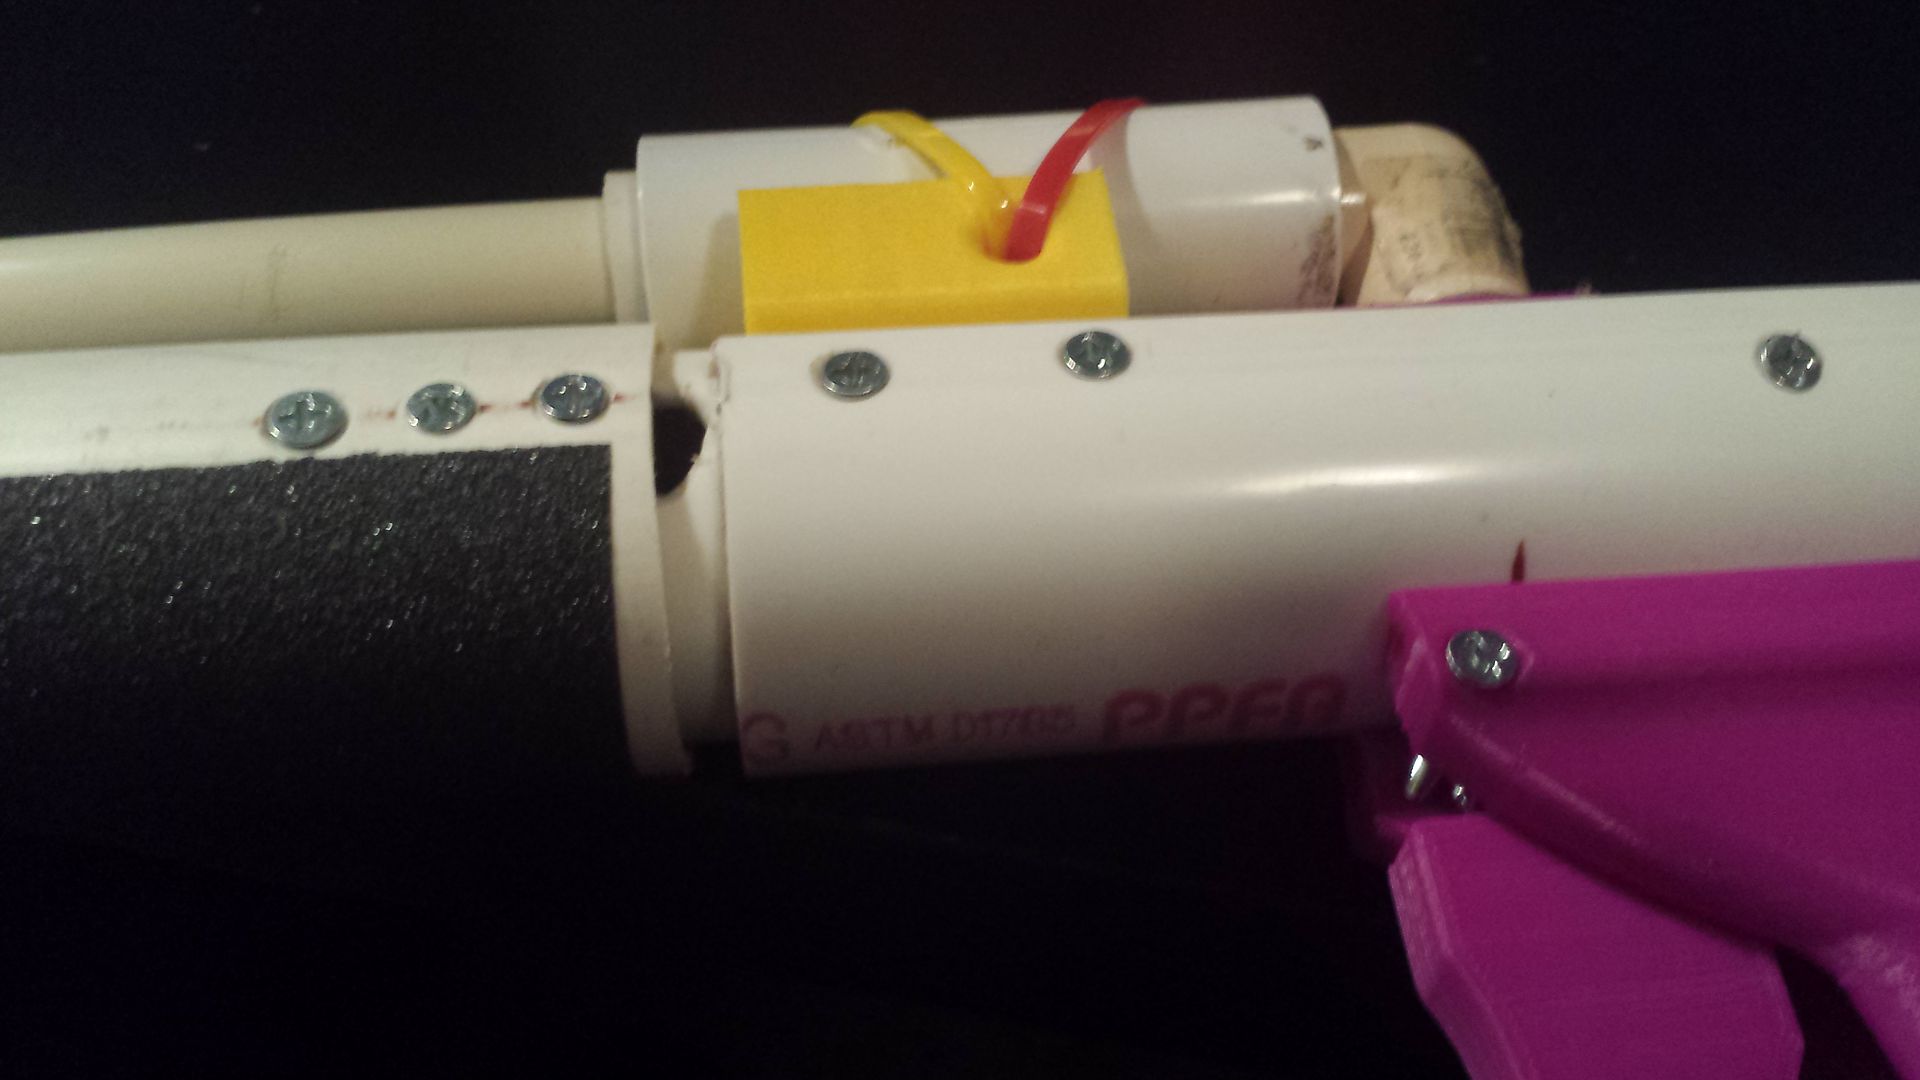
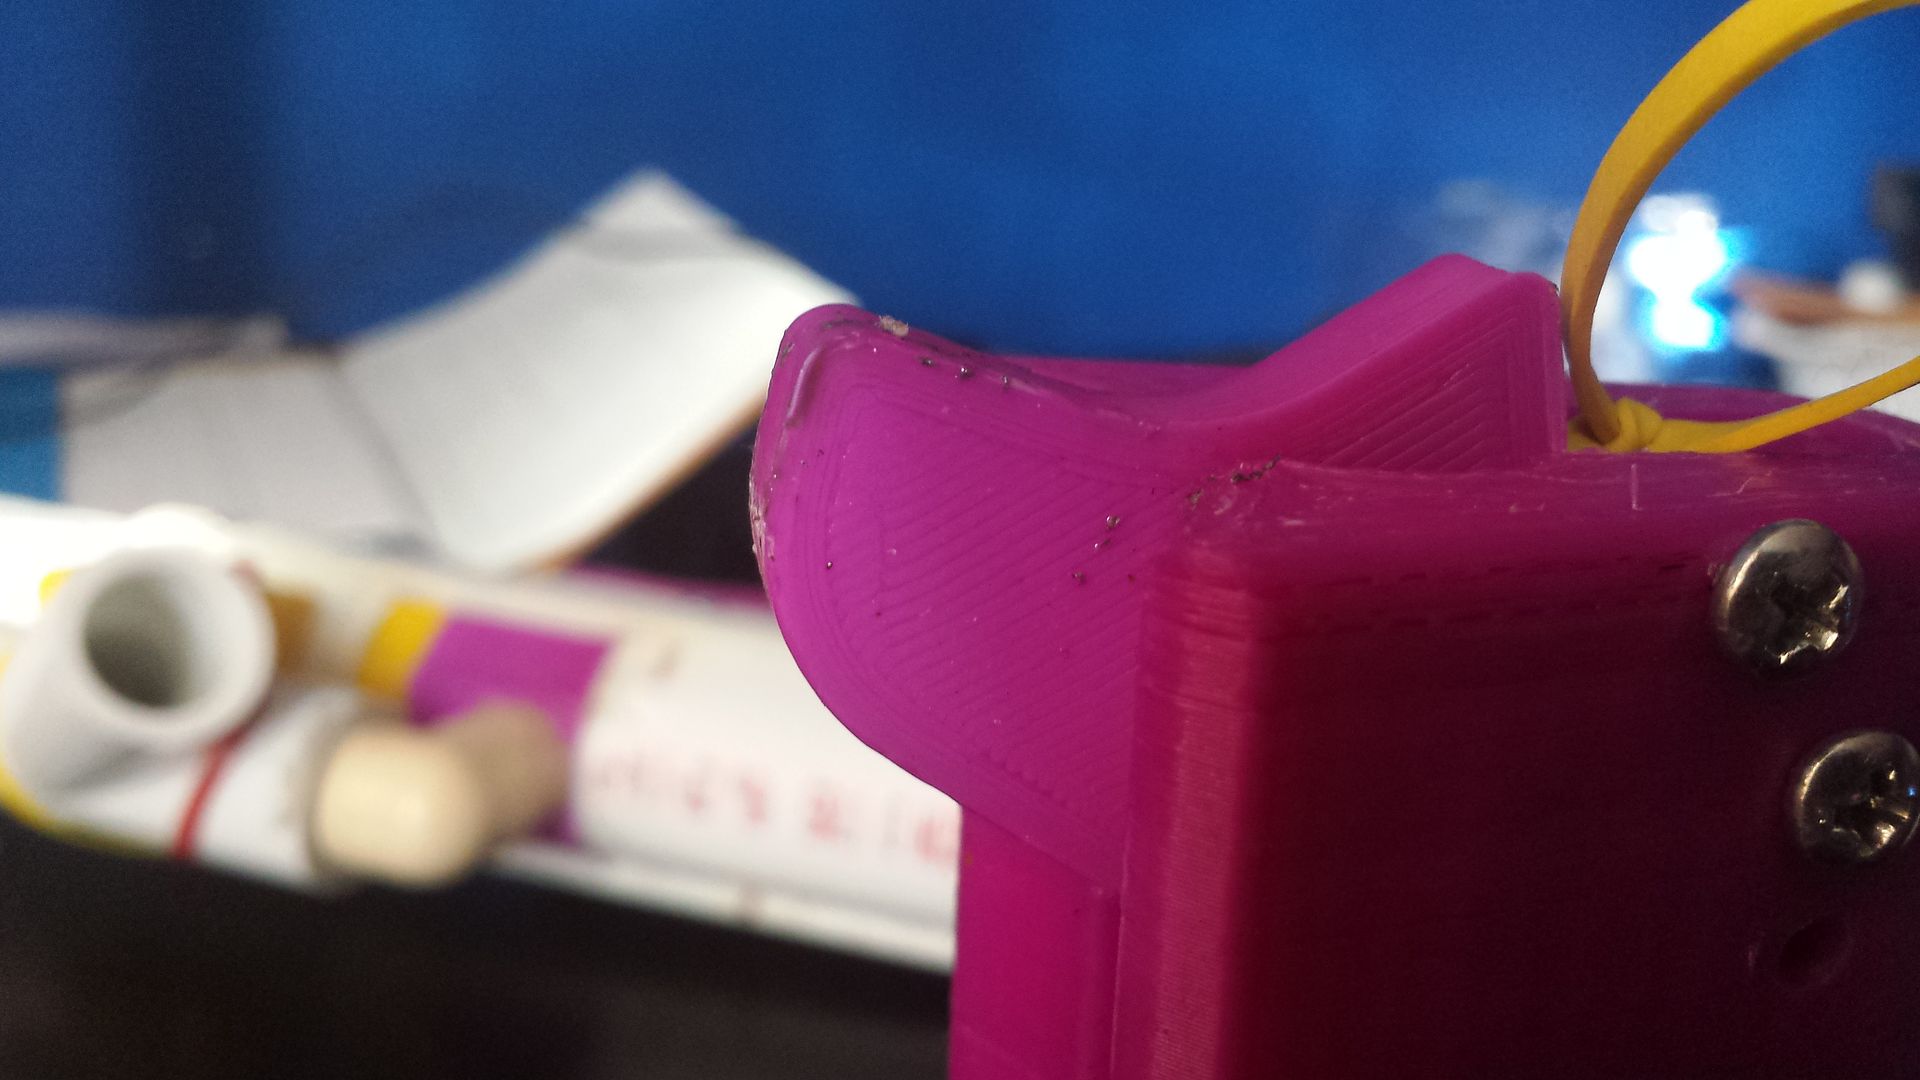
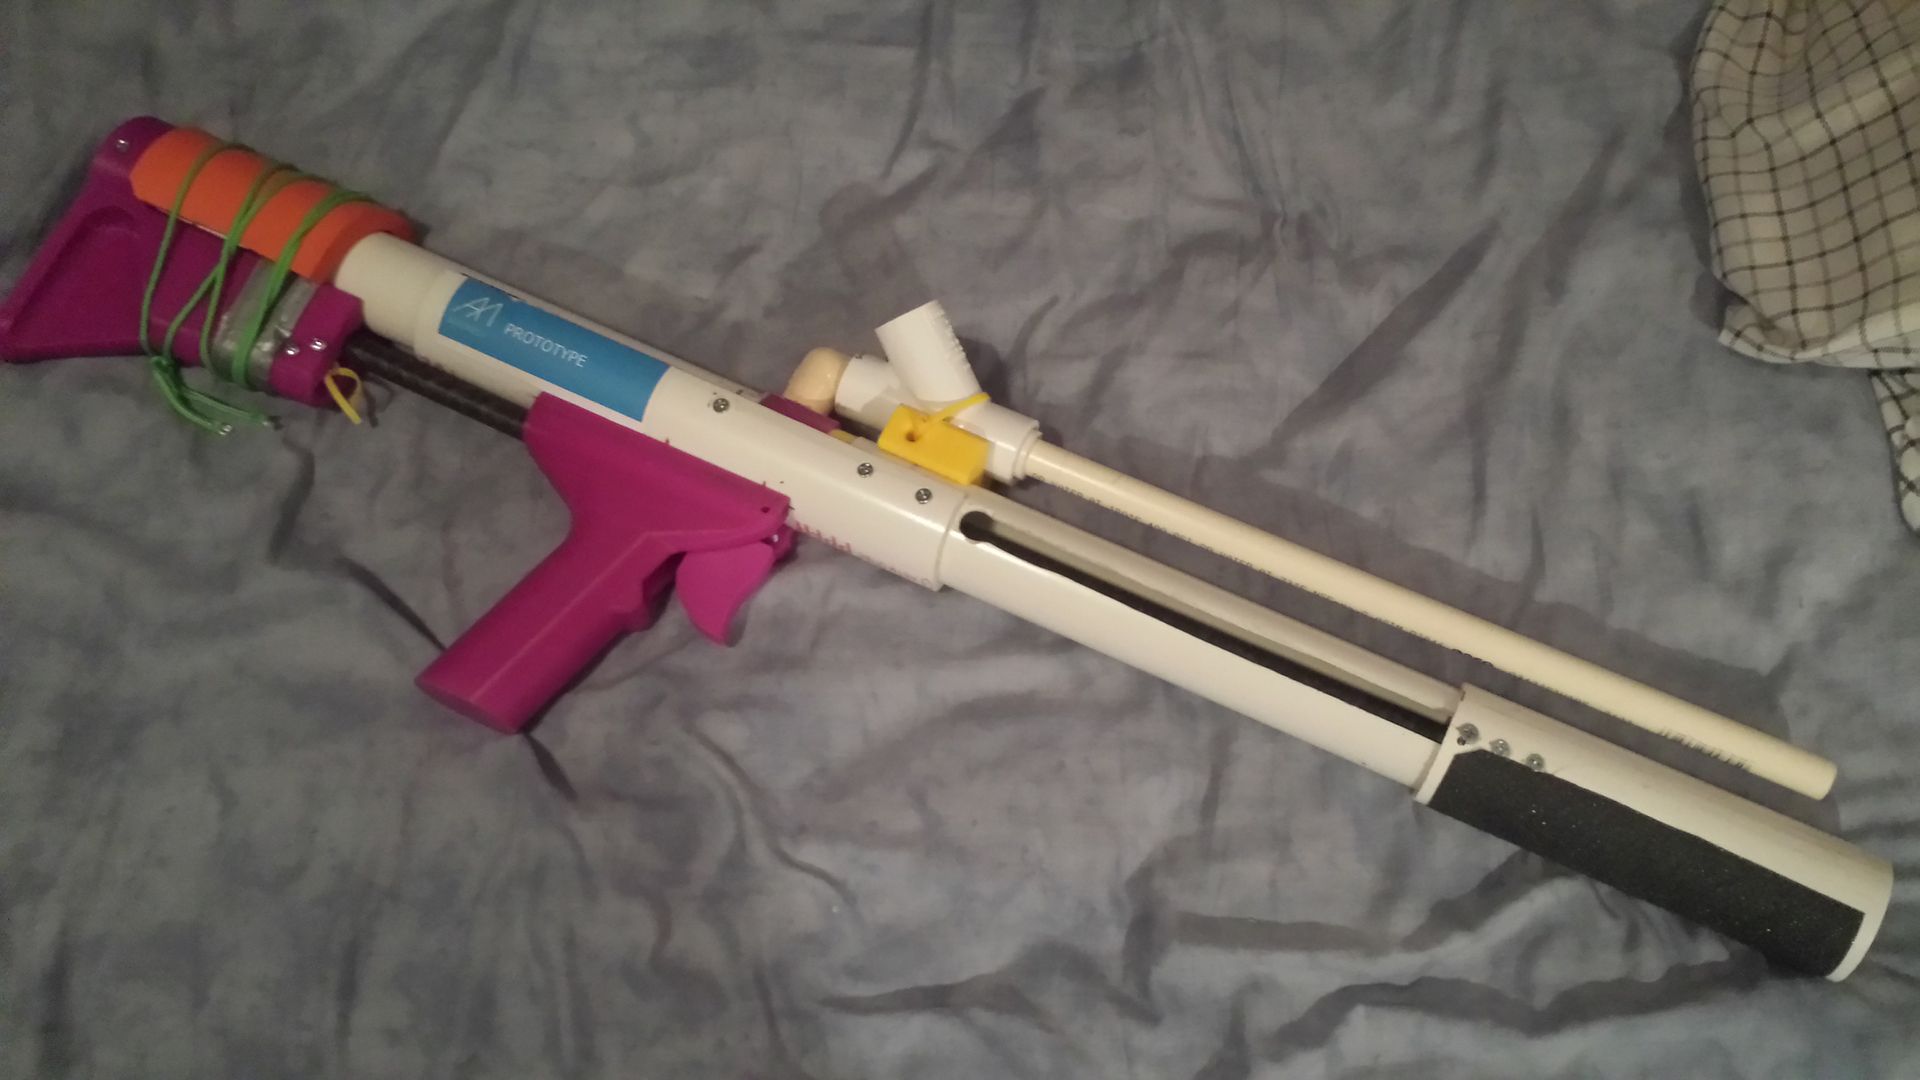
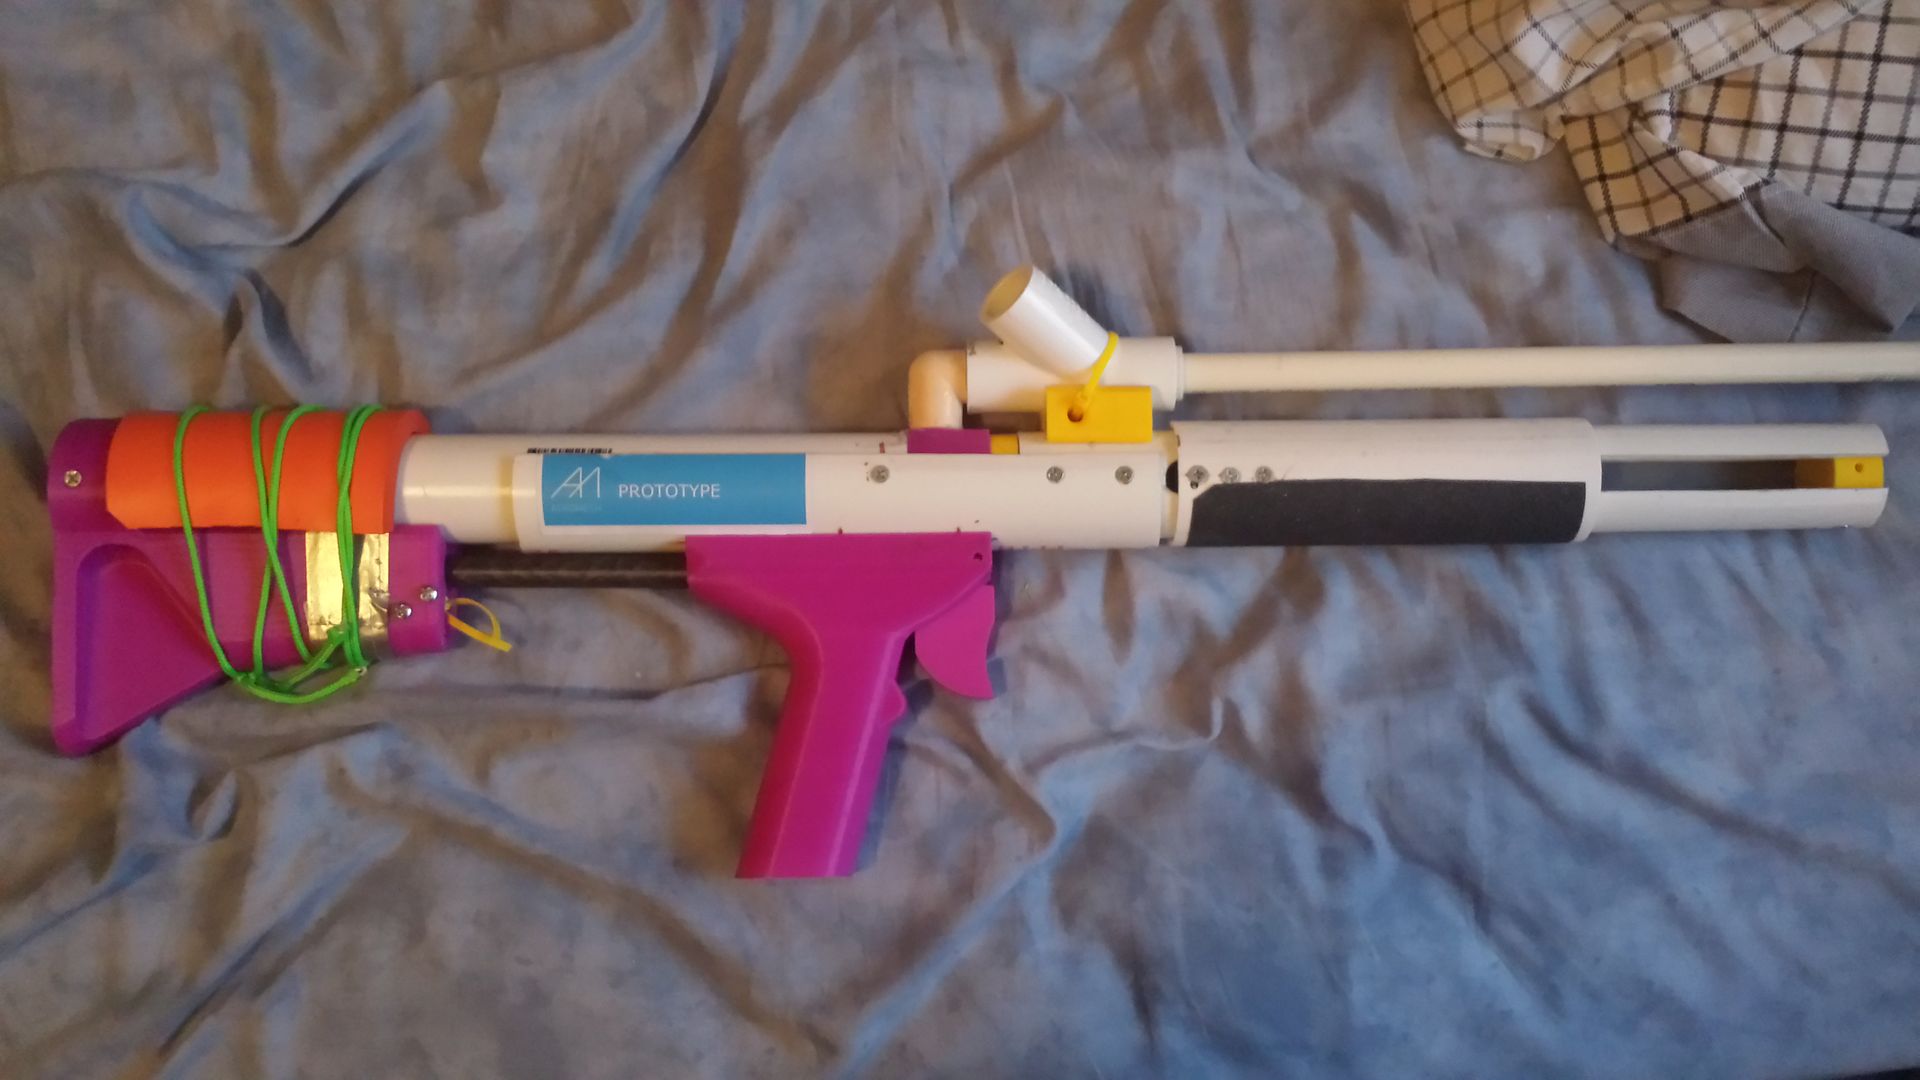
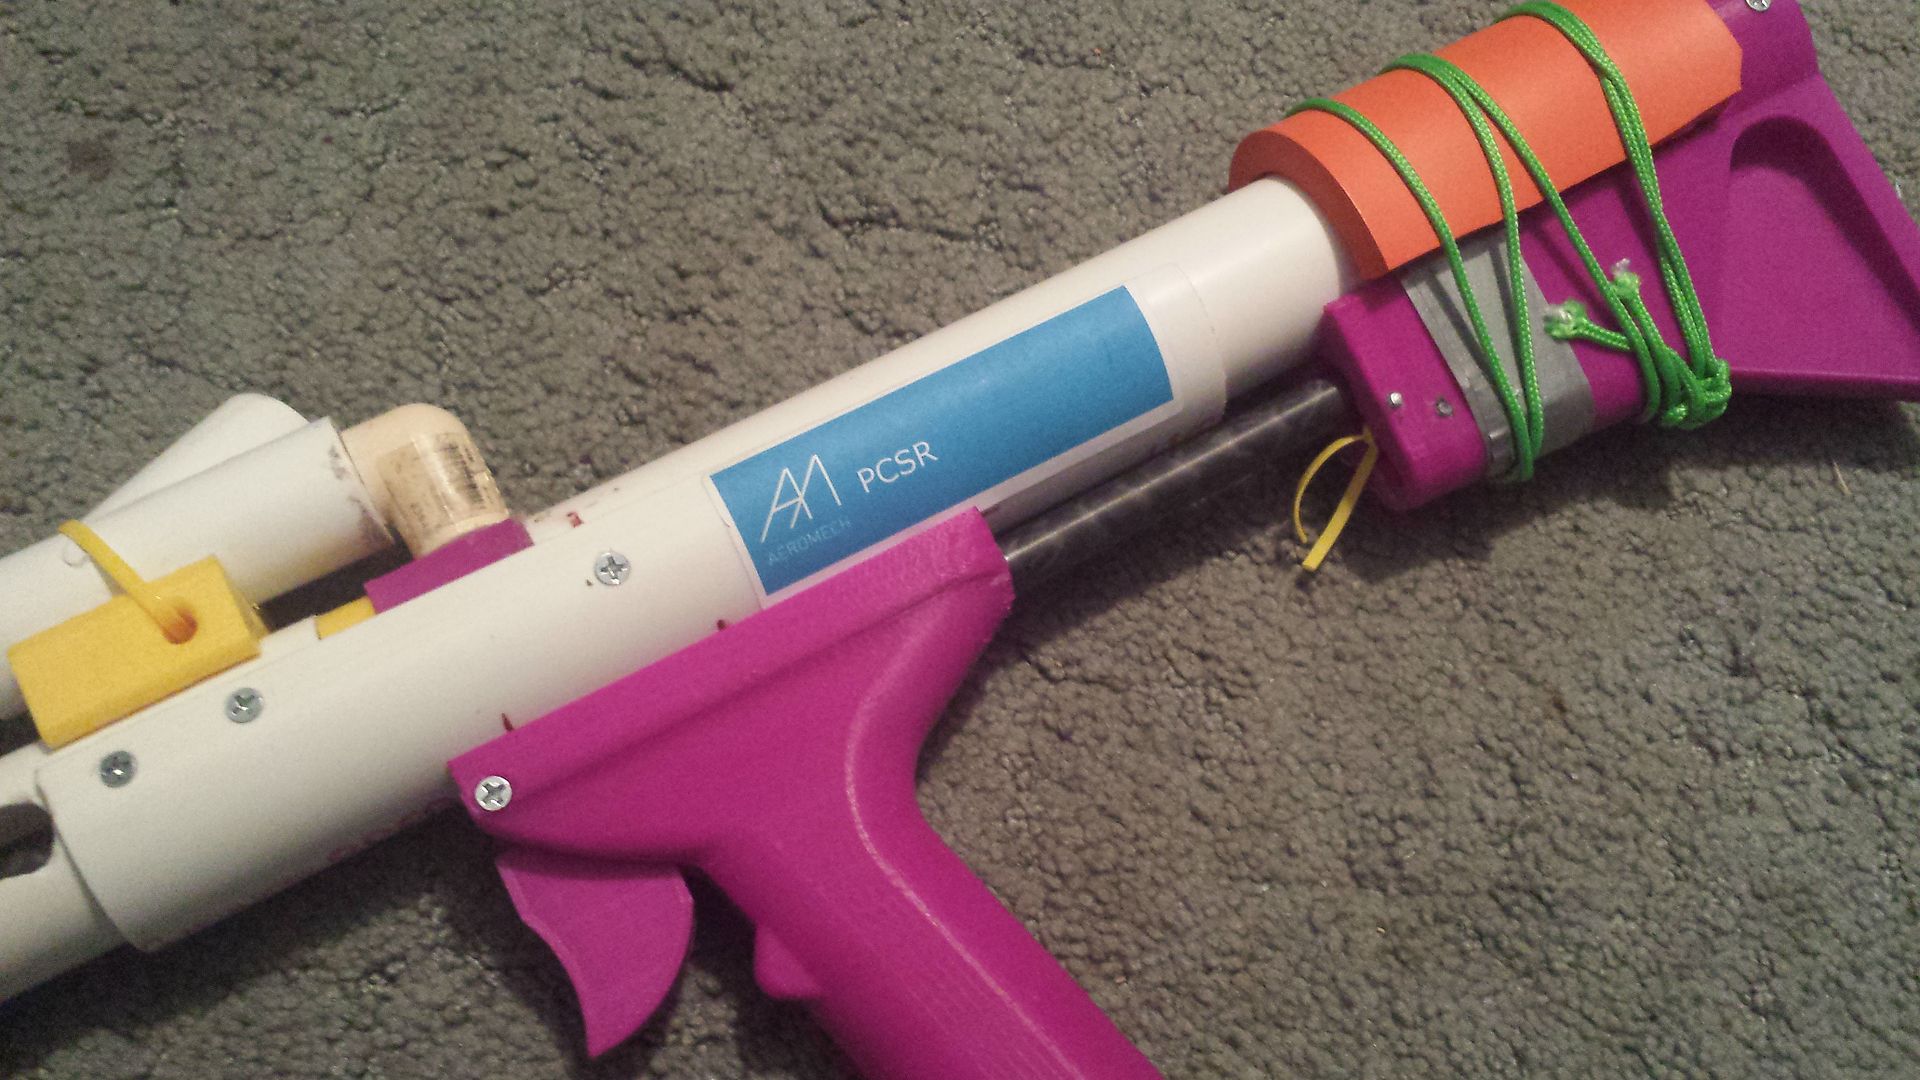
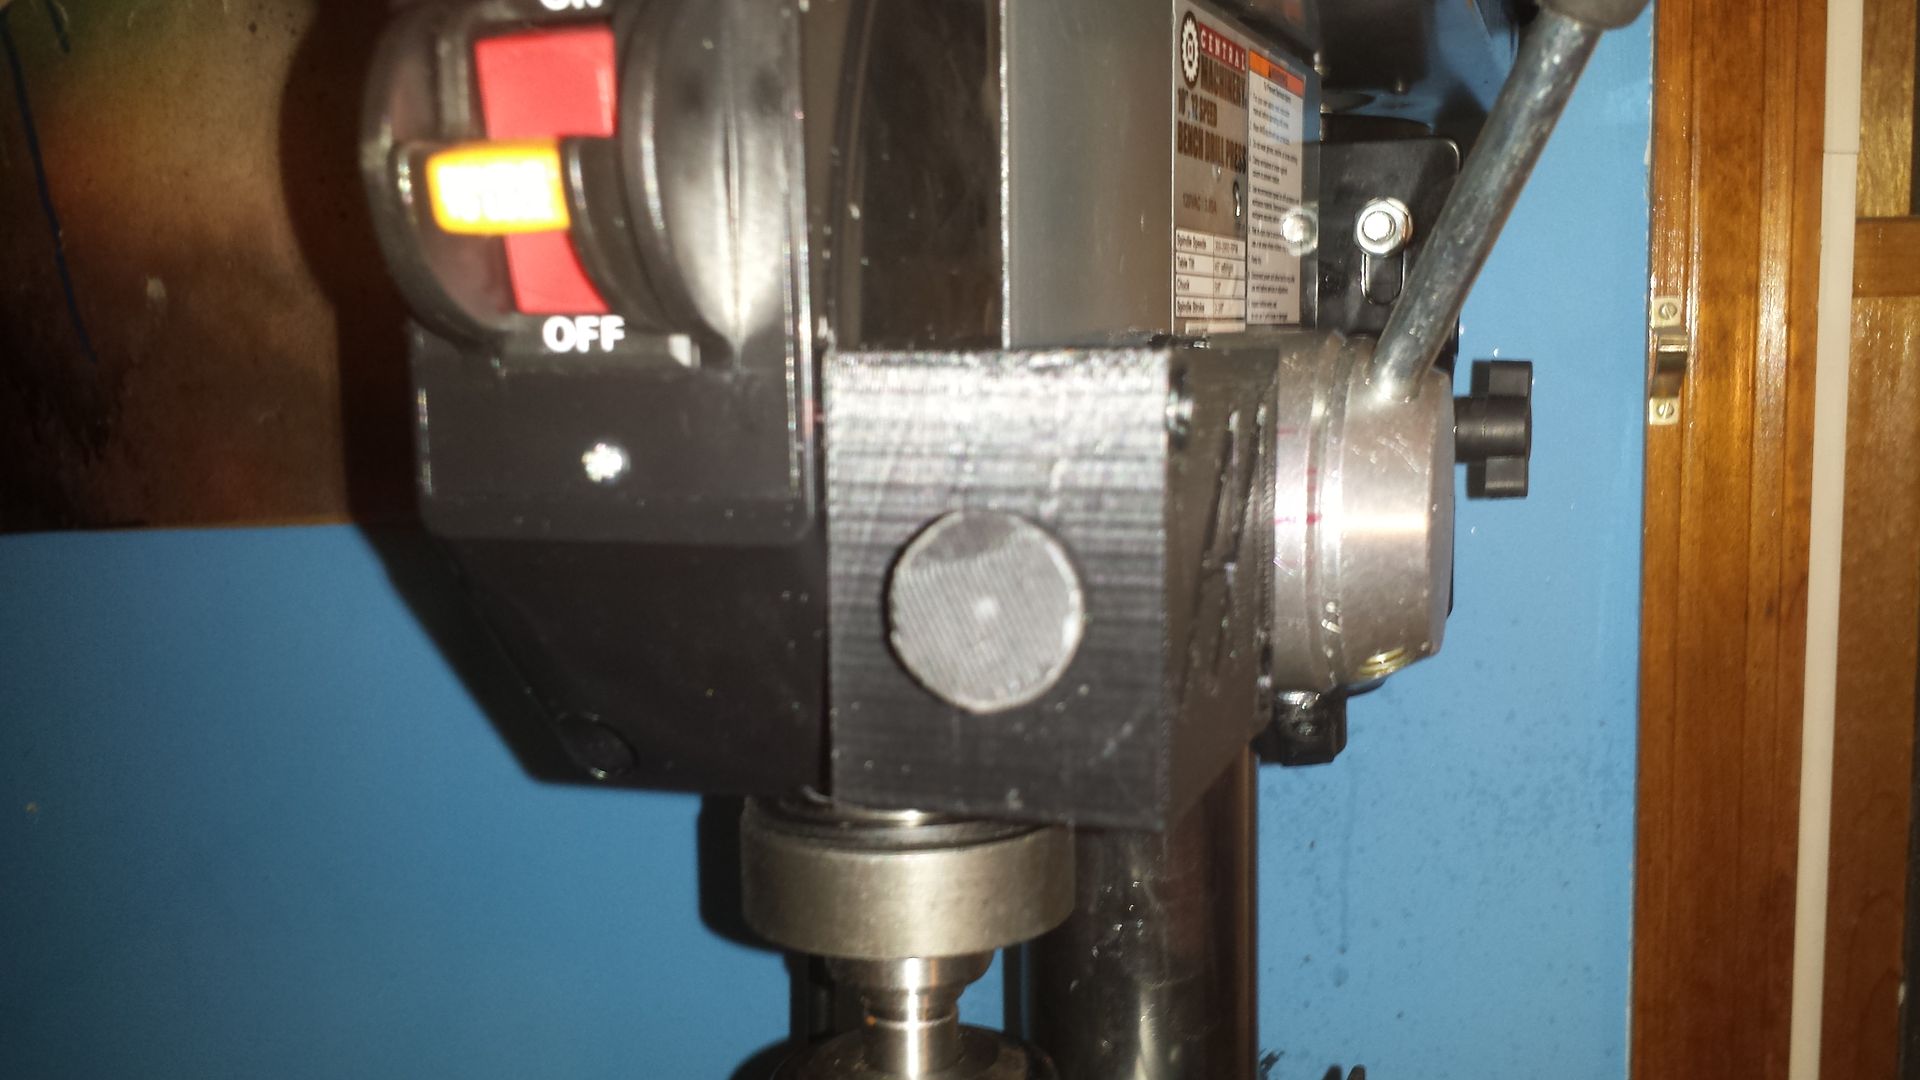
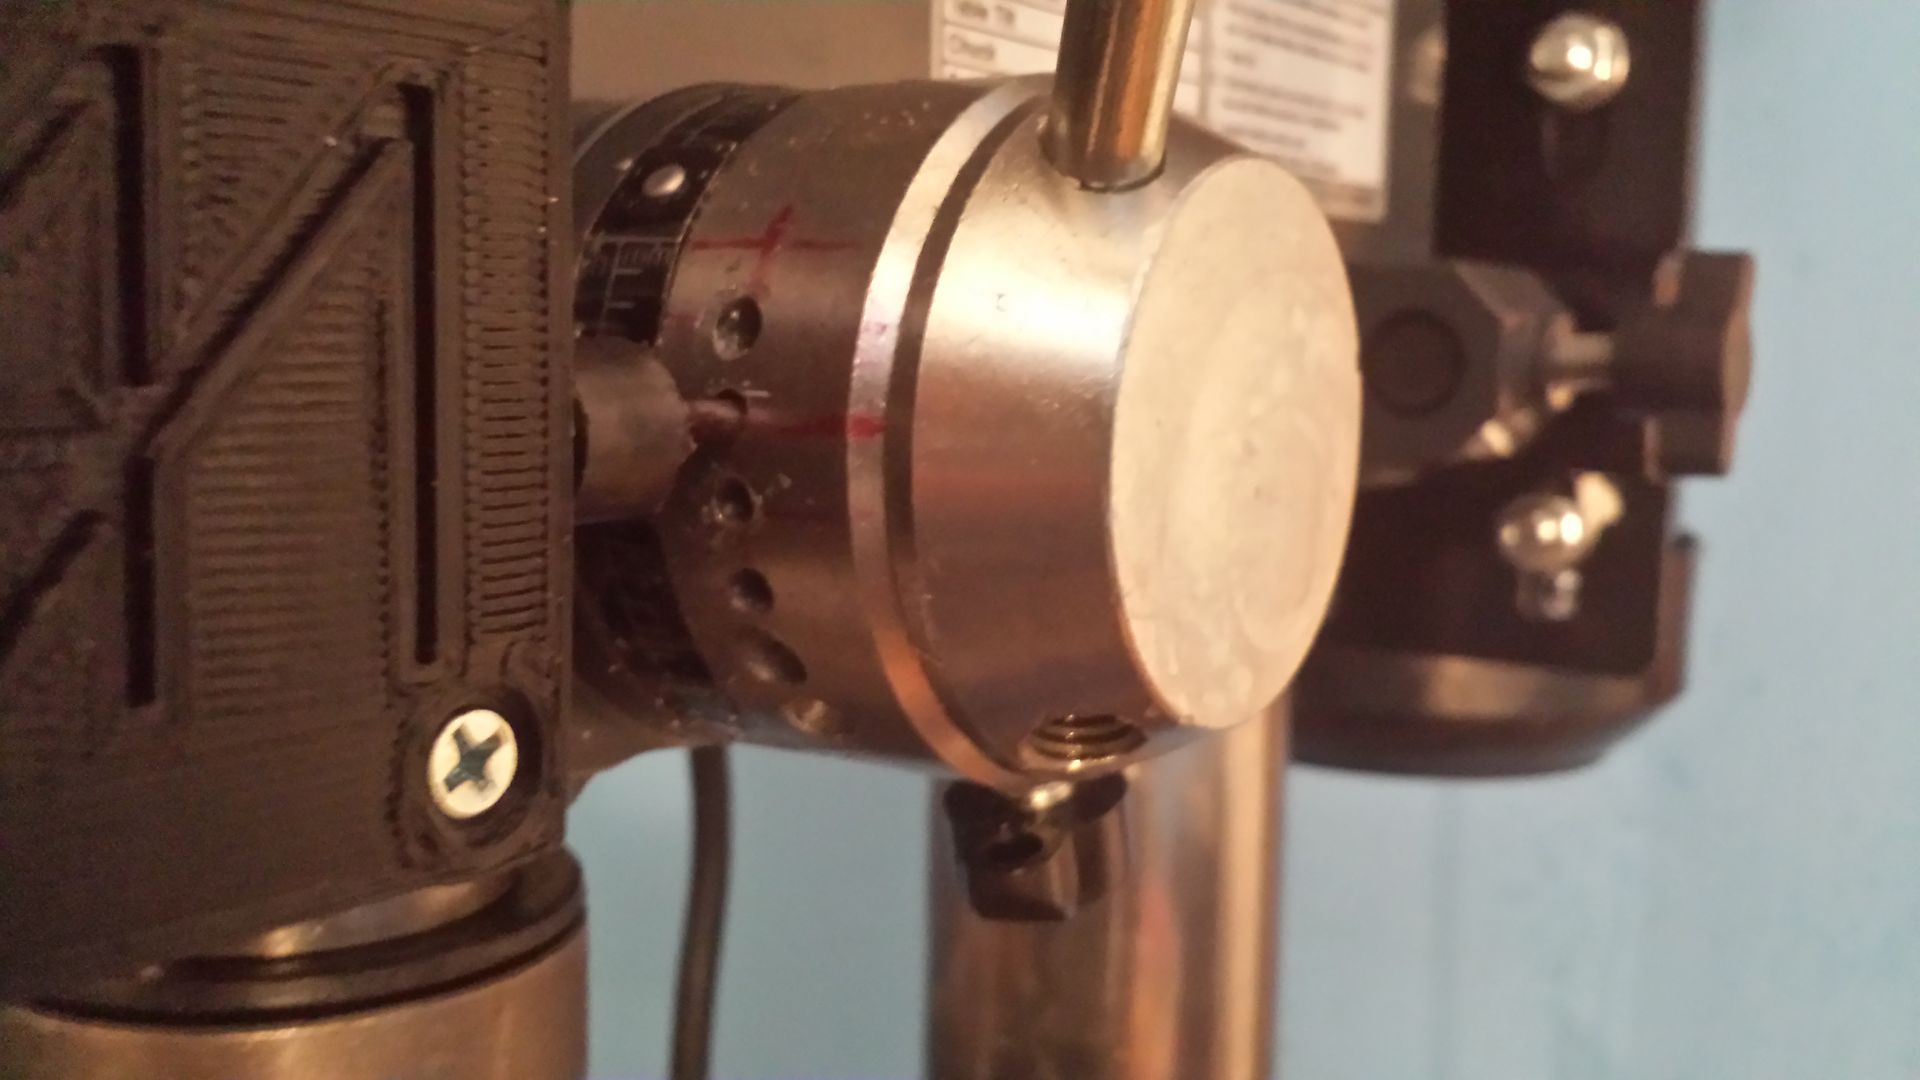
Nice job on this Aeromech, I would be nervous about the thinwall cracking around the screws, but since it's holding up for you I guess I'm just underestimating PVC.


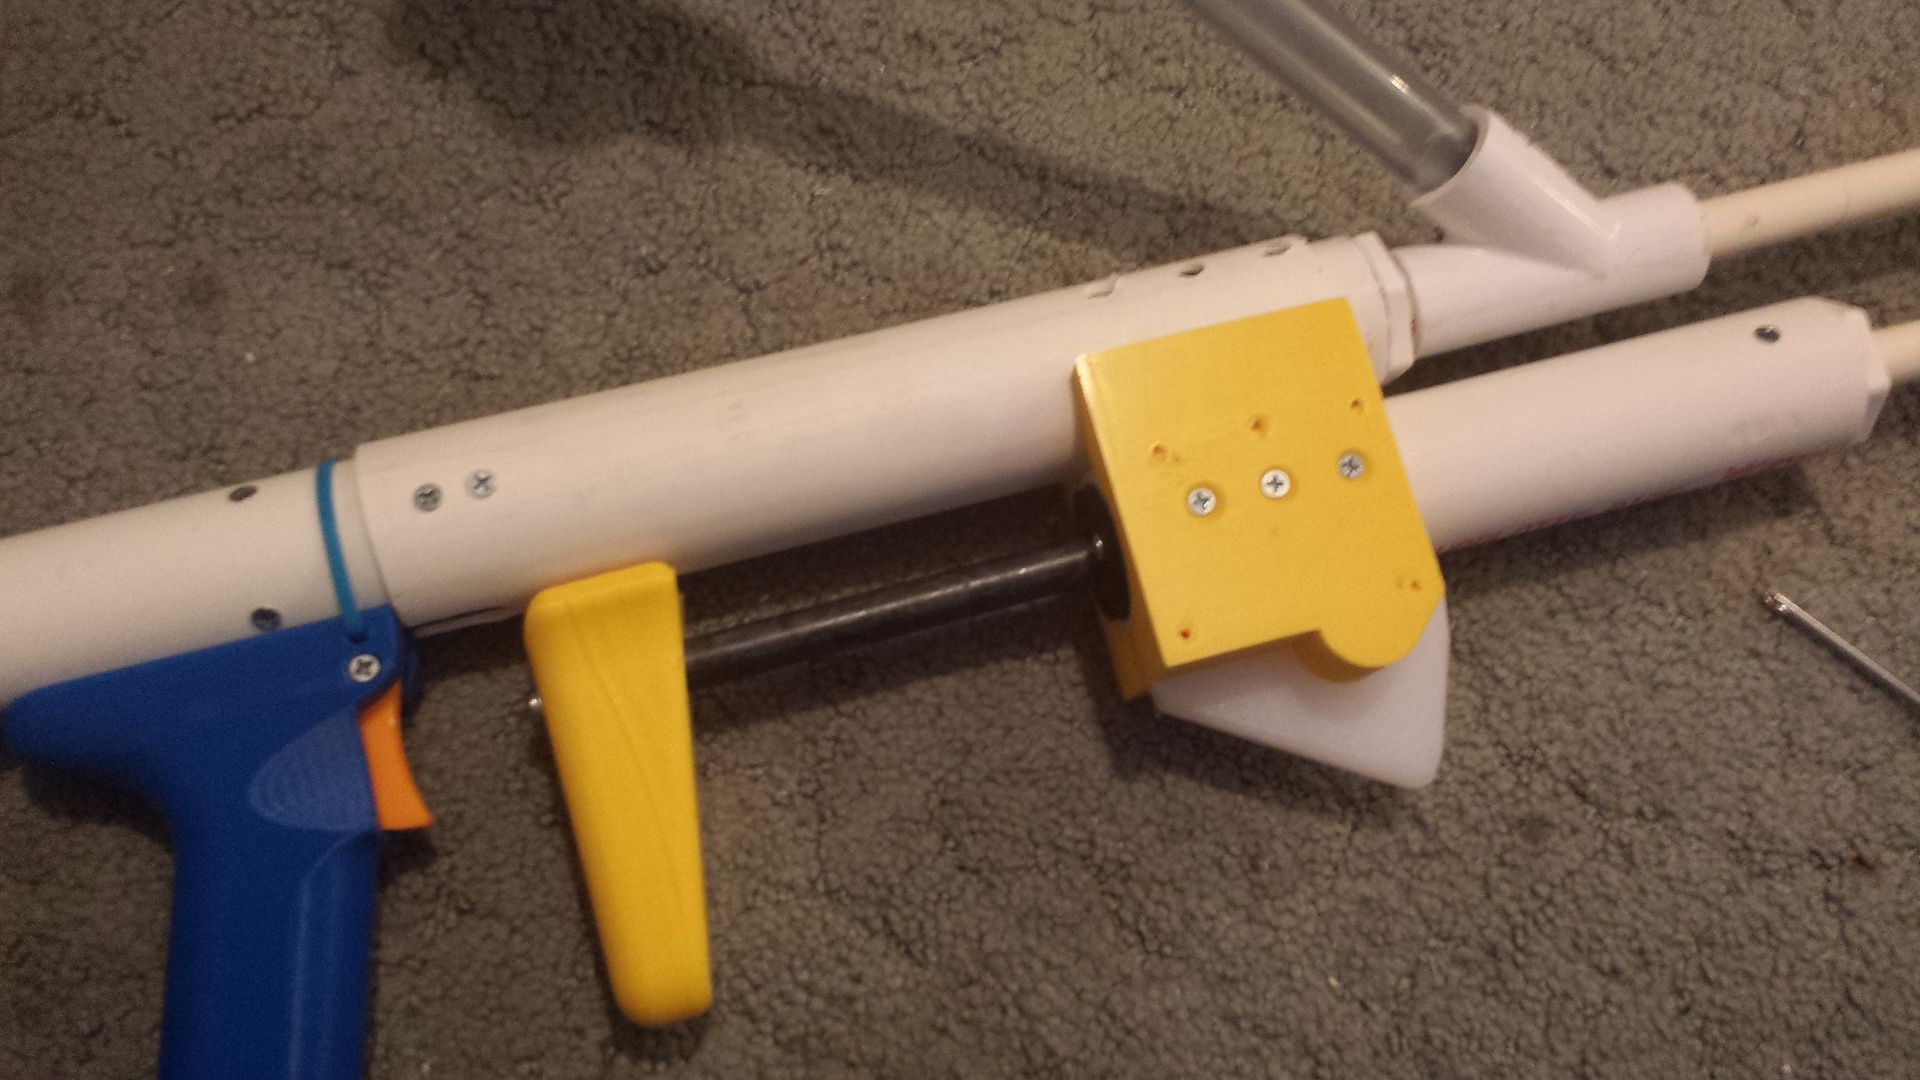
You said that the palm-trigger takes some getting used to, and it looks like it. I'm not a fan of vertical foregrips, but maybe you could have the pistol's priming grip return forward after priming. Reshape it into a vertical foregrip and then you could put a more "normal" trigger on the pistol.

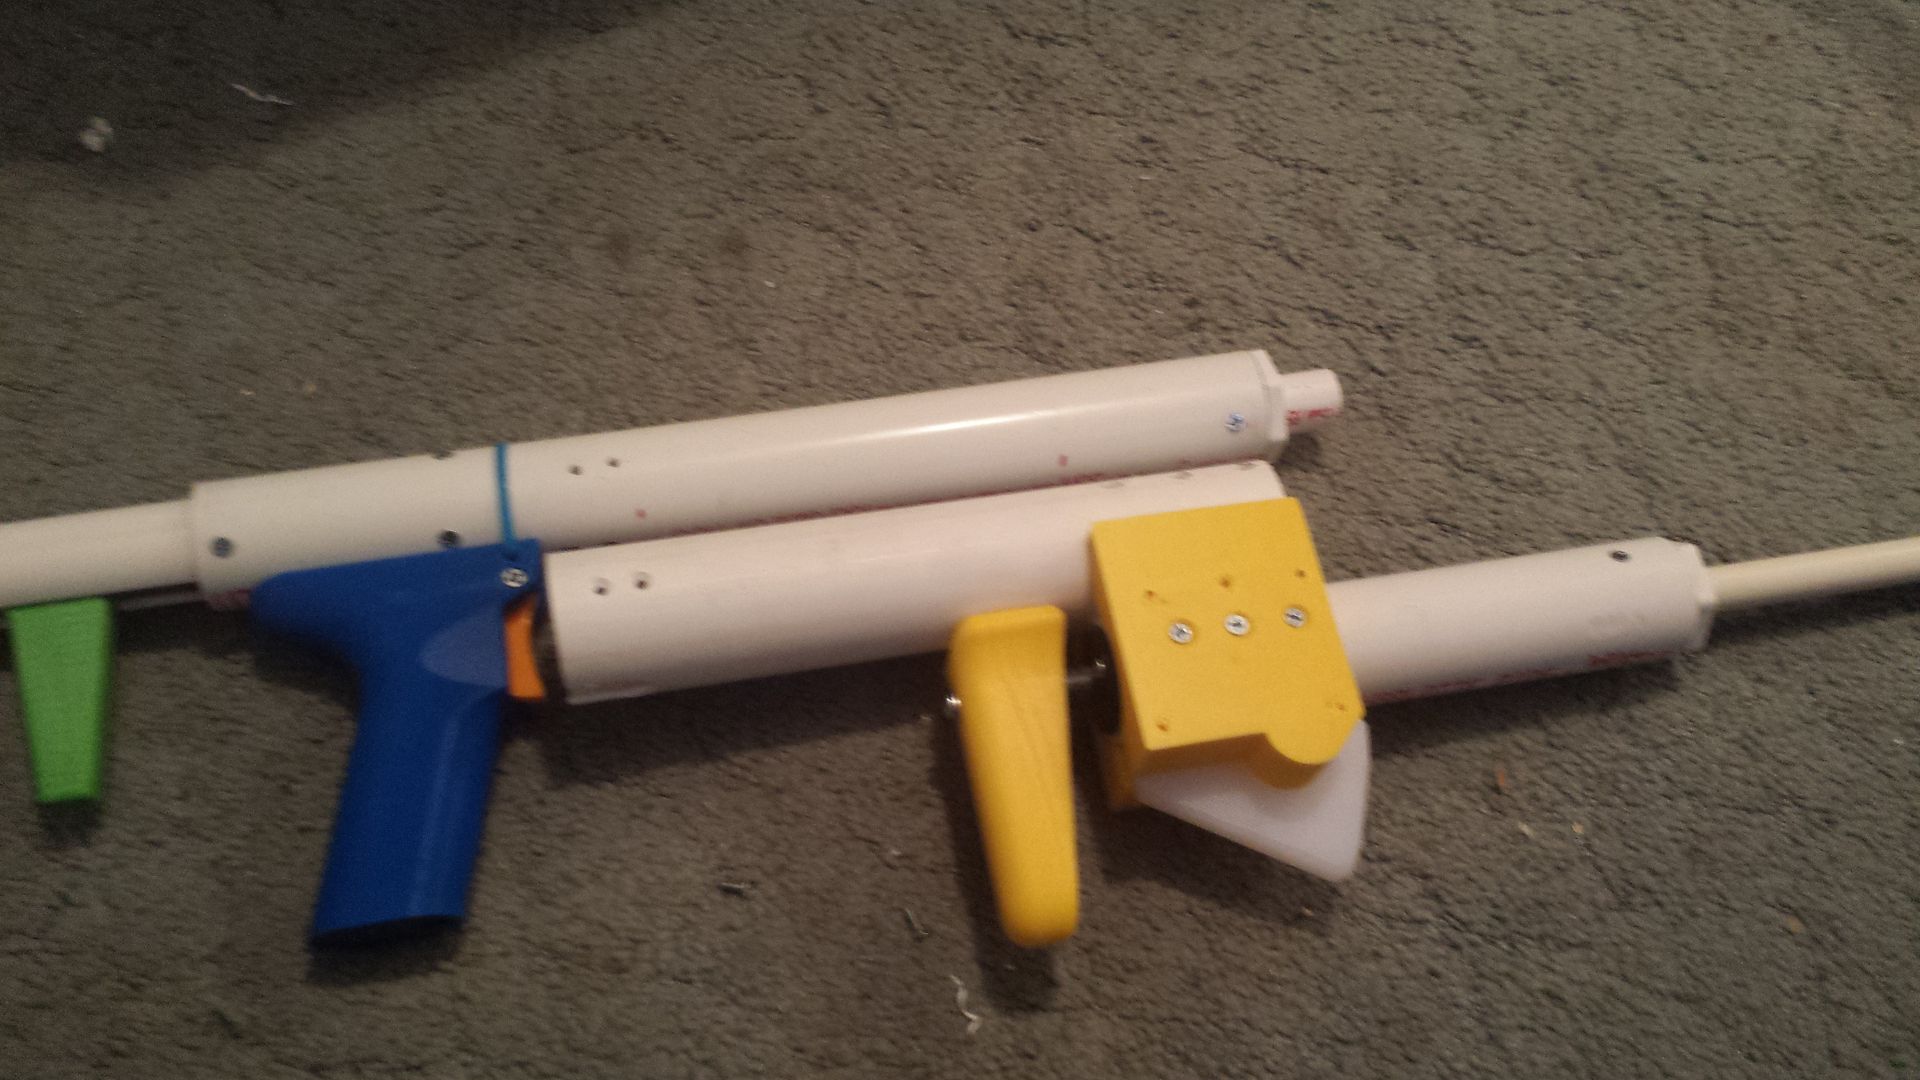
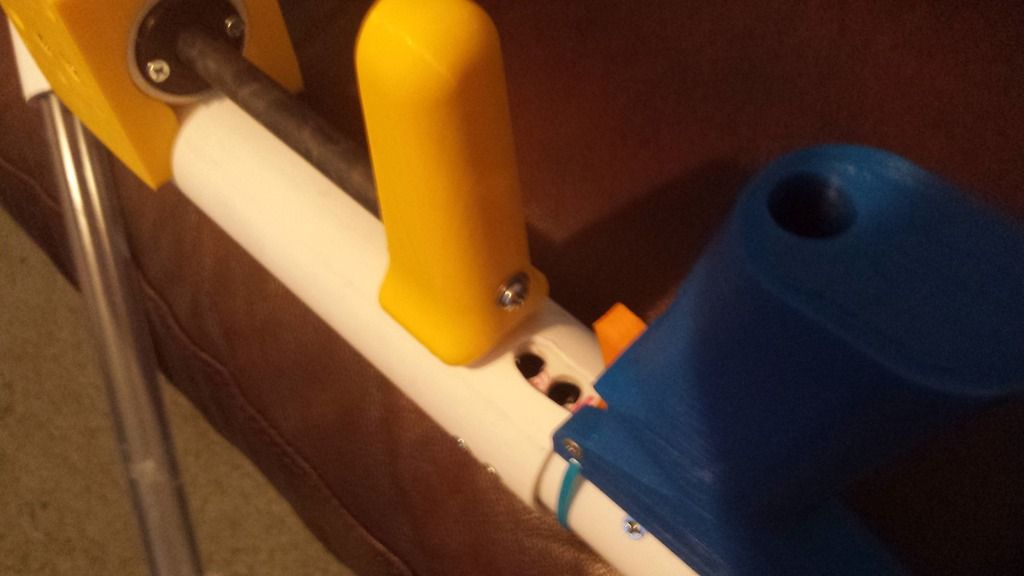
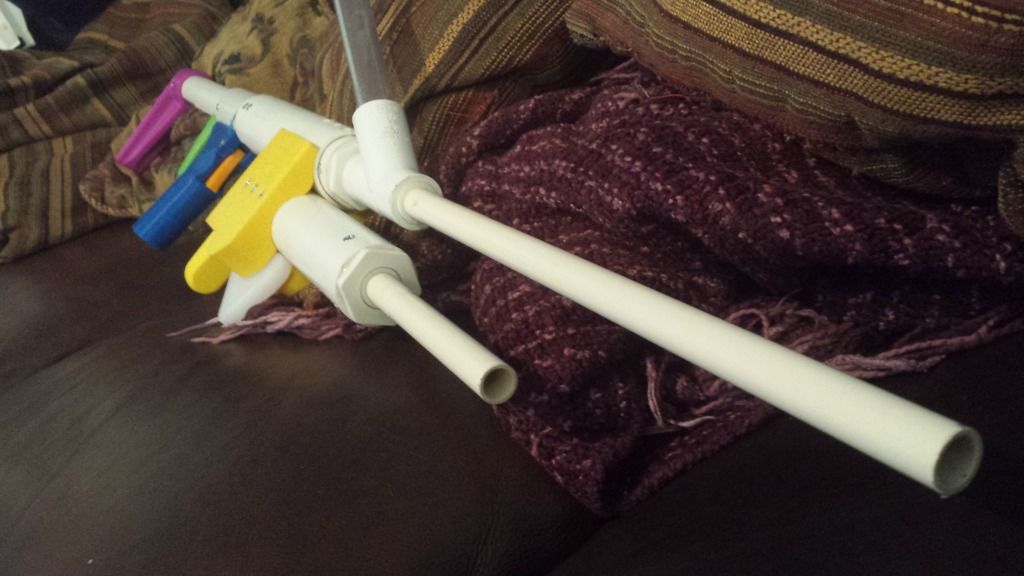
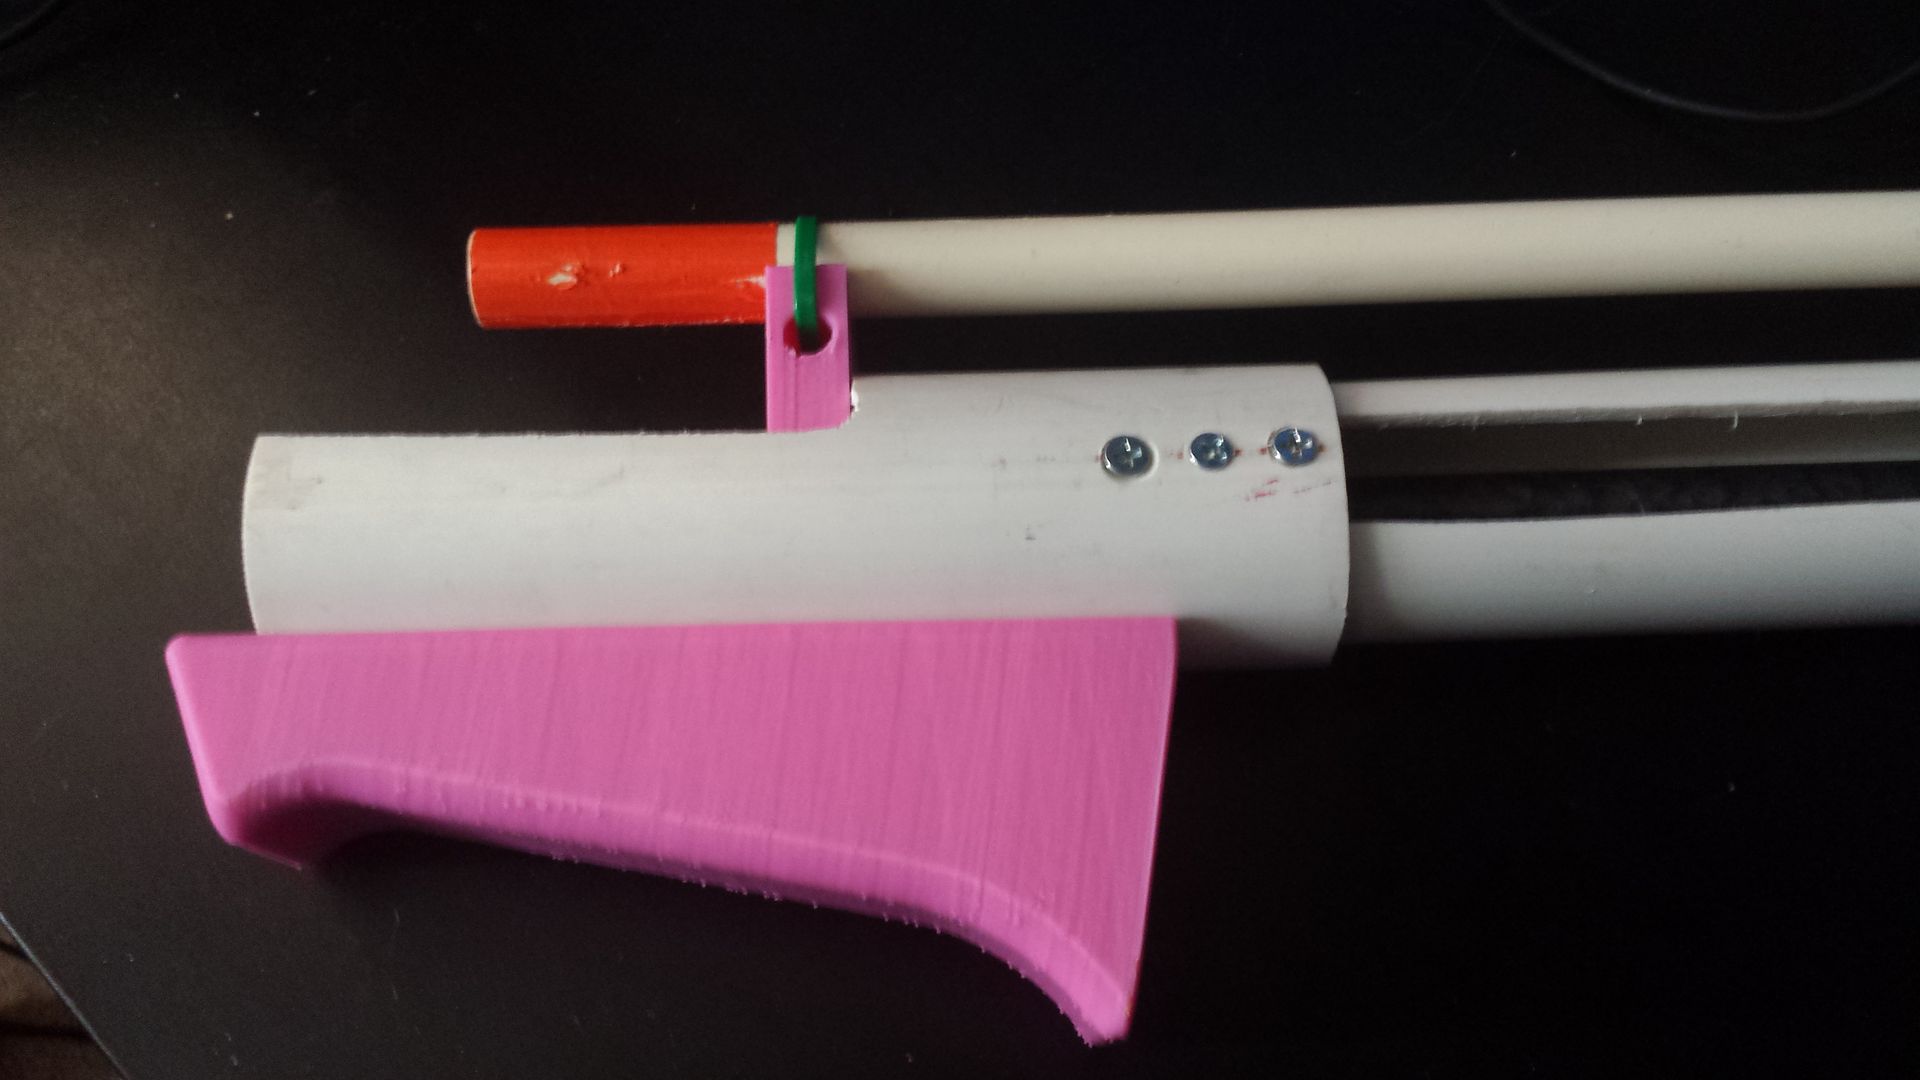
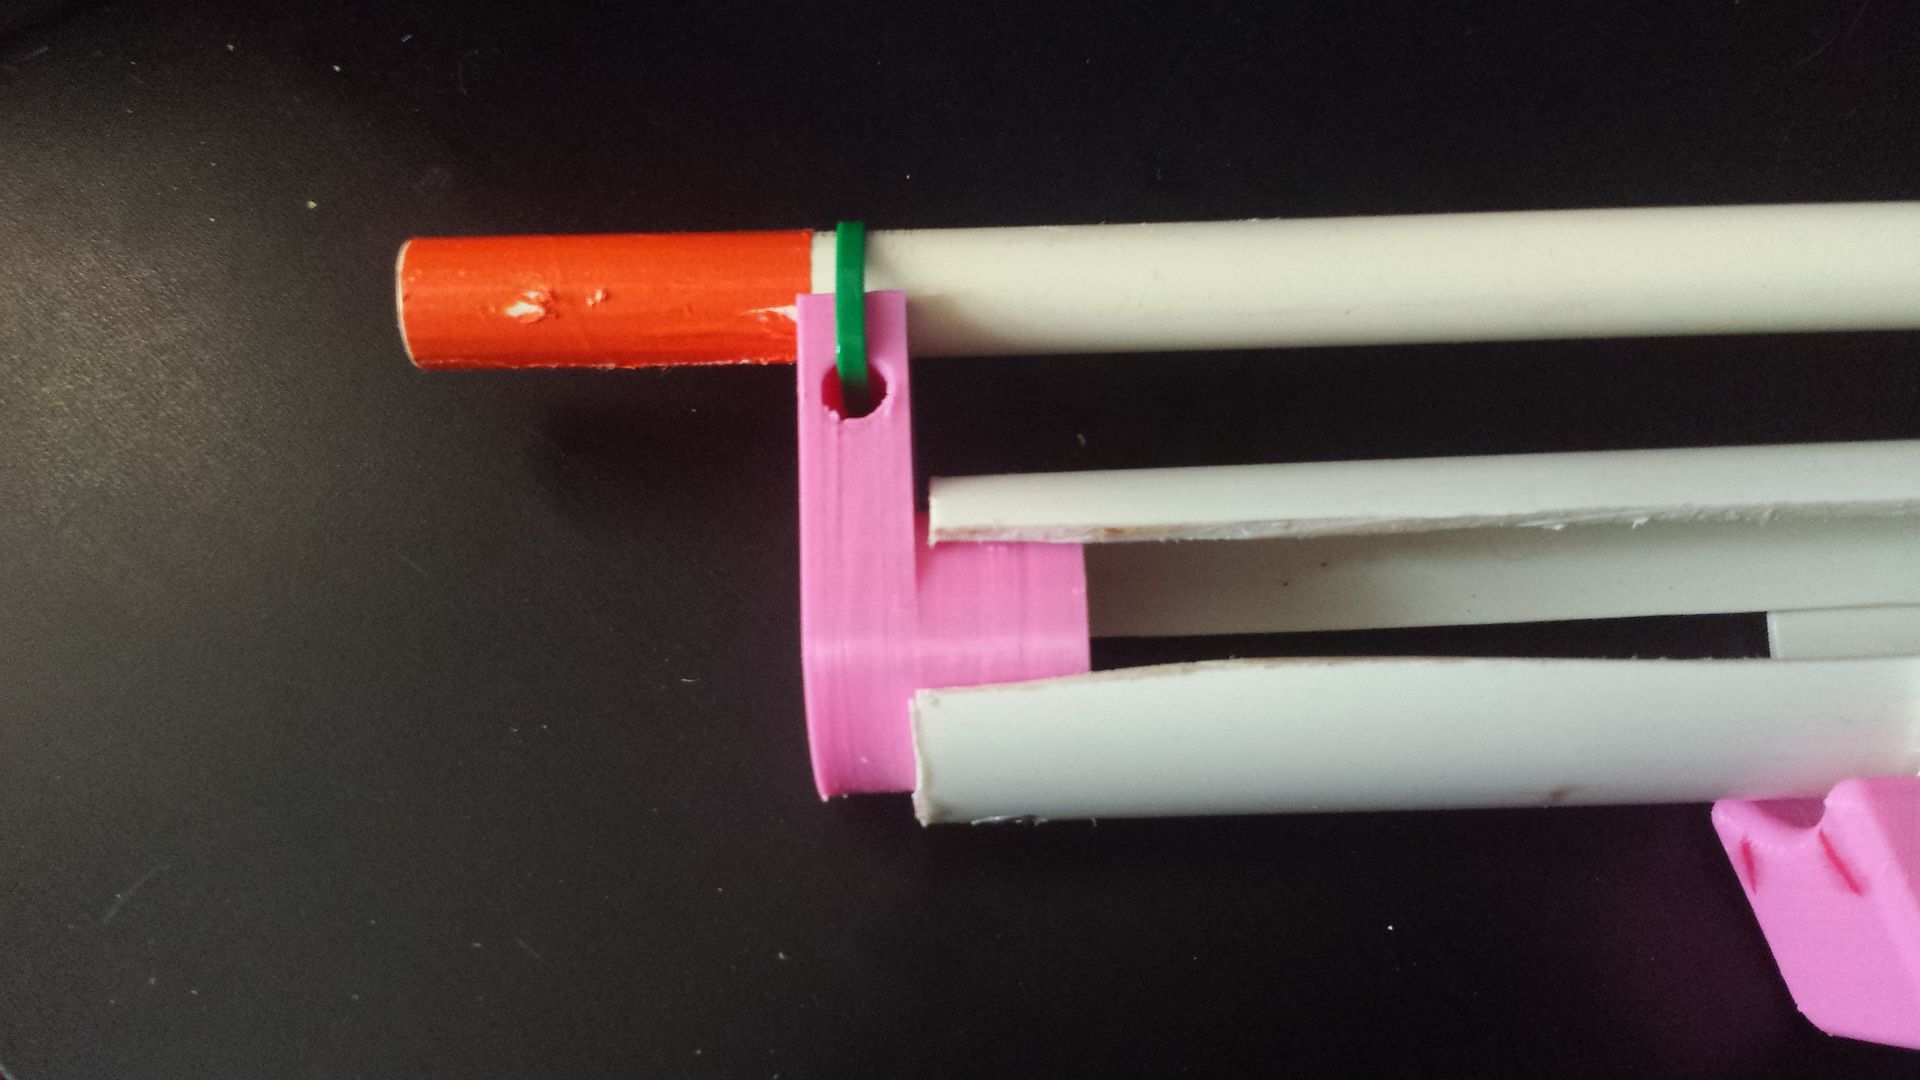
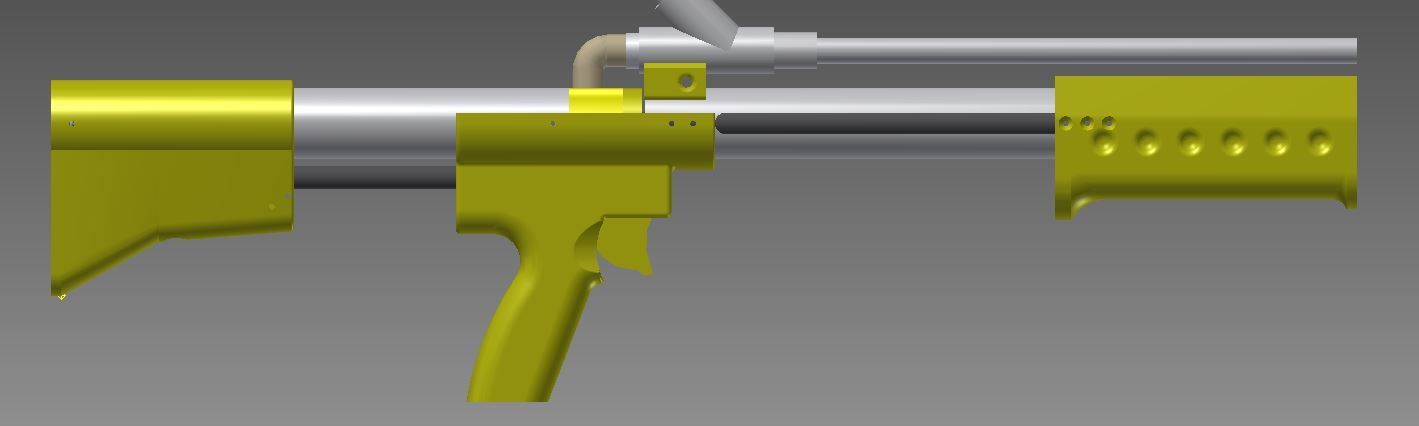
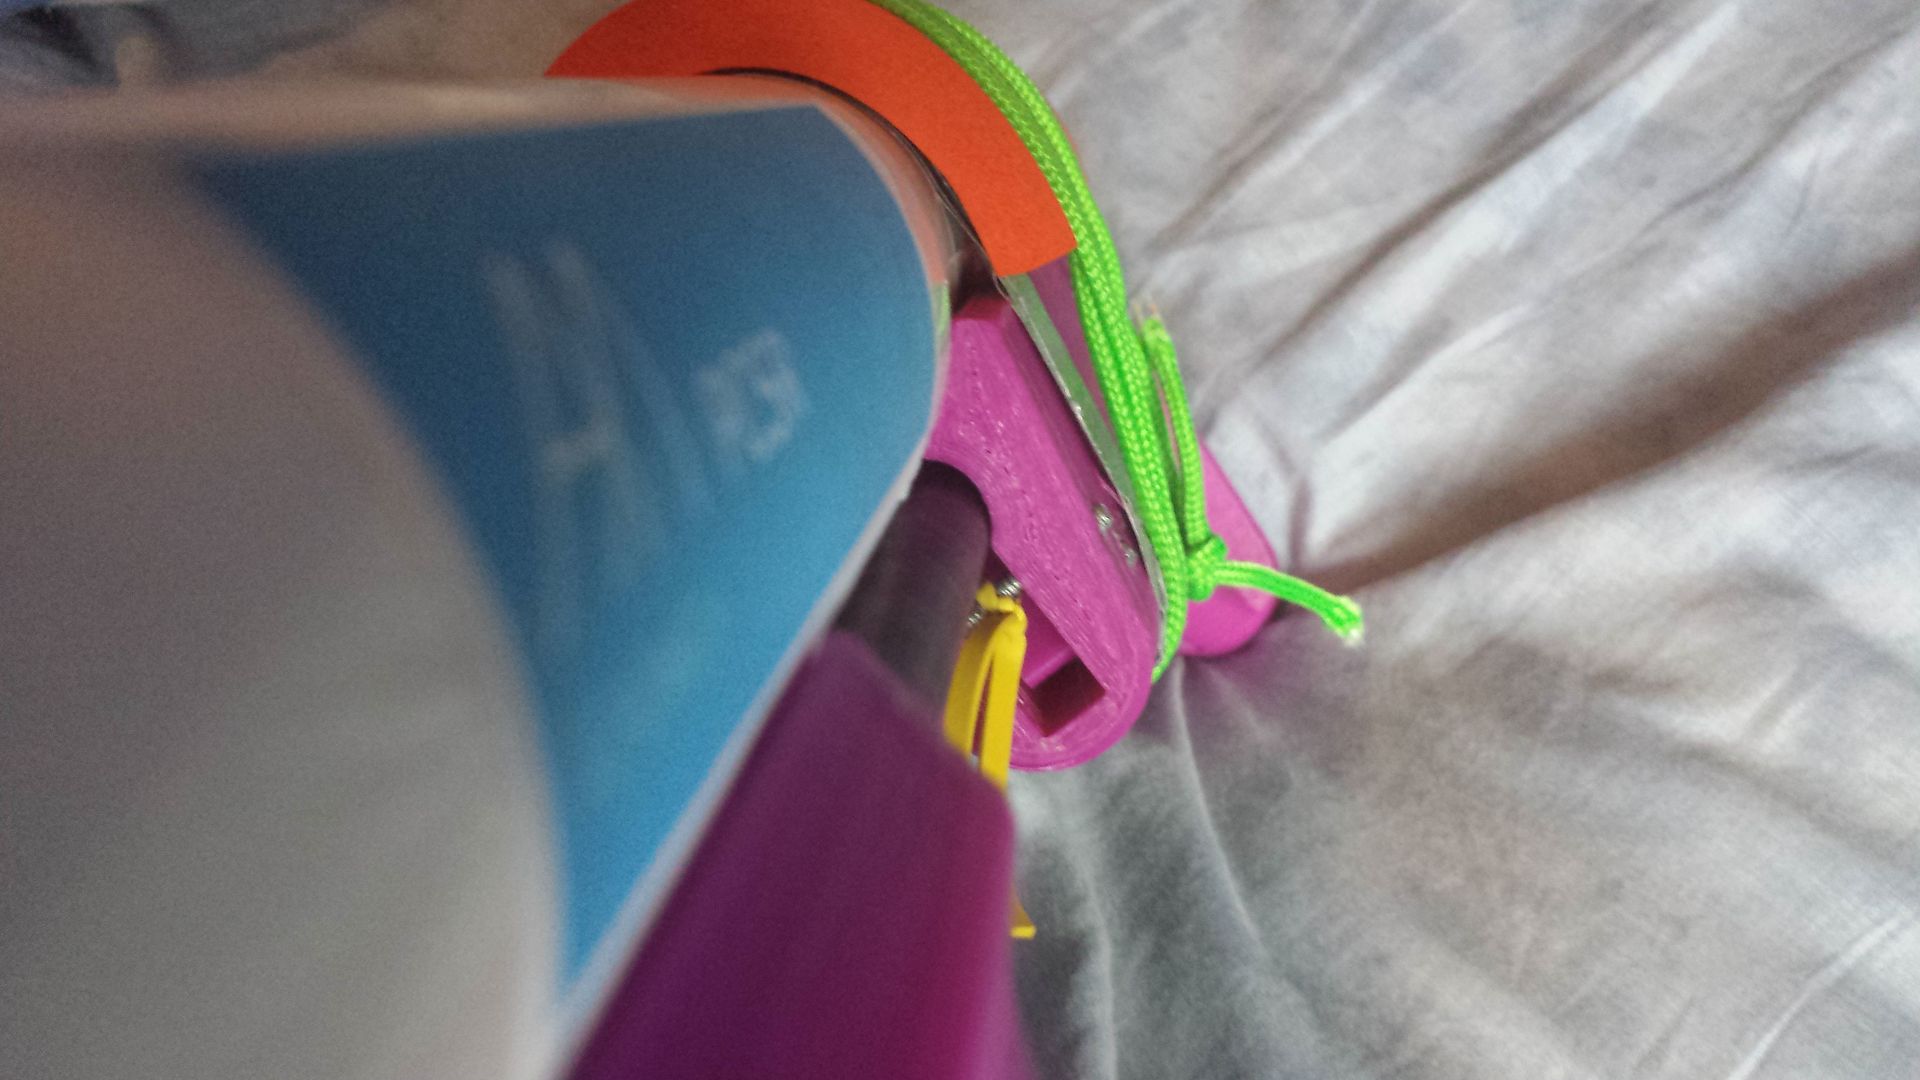
The screws on the thinwall actually don't take too much force. You have a snug fit with the electrical tape against the plunger tube, the back of the parasite is supported by the pistol grip itself, and the screws are really only to make sure the thing doesn't fly off the front and also prevents rotation. Plus I have four total, two on each side, so the force is fairly well distributed.


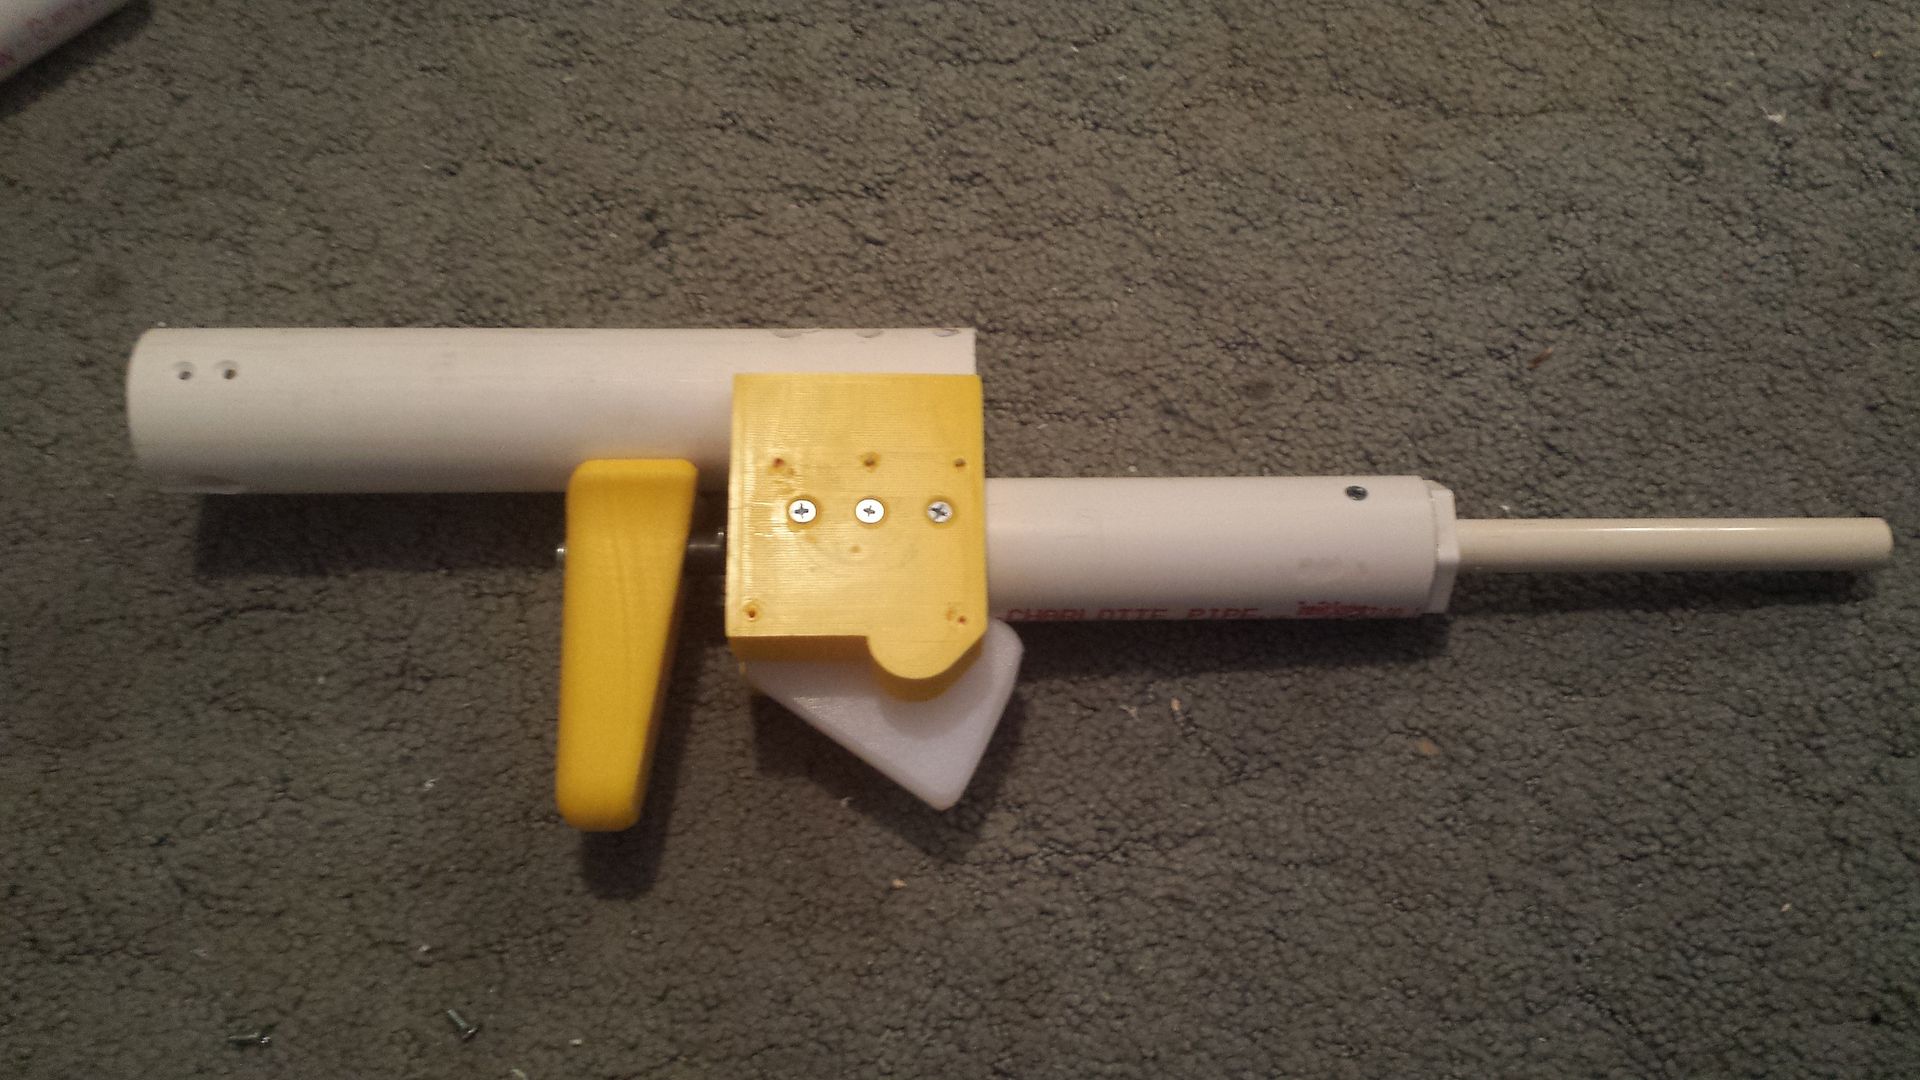
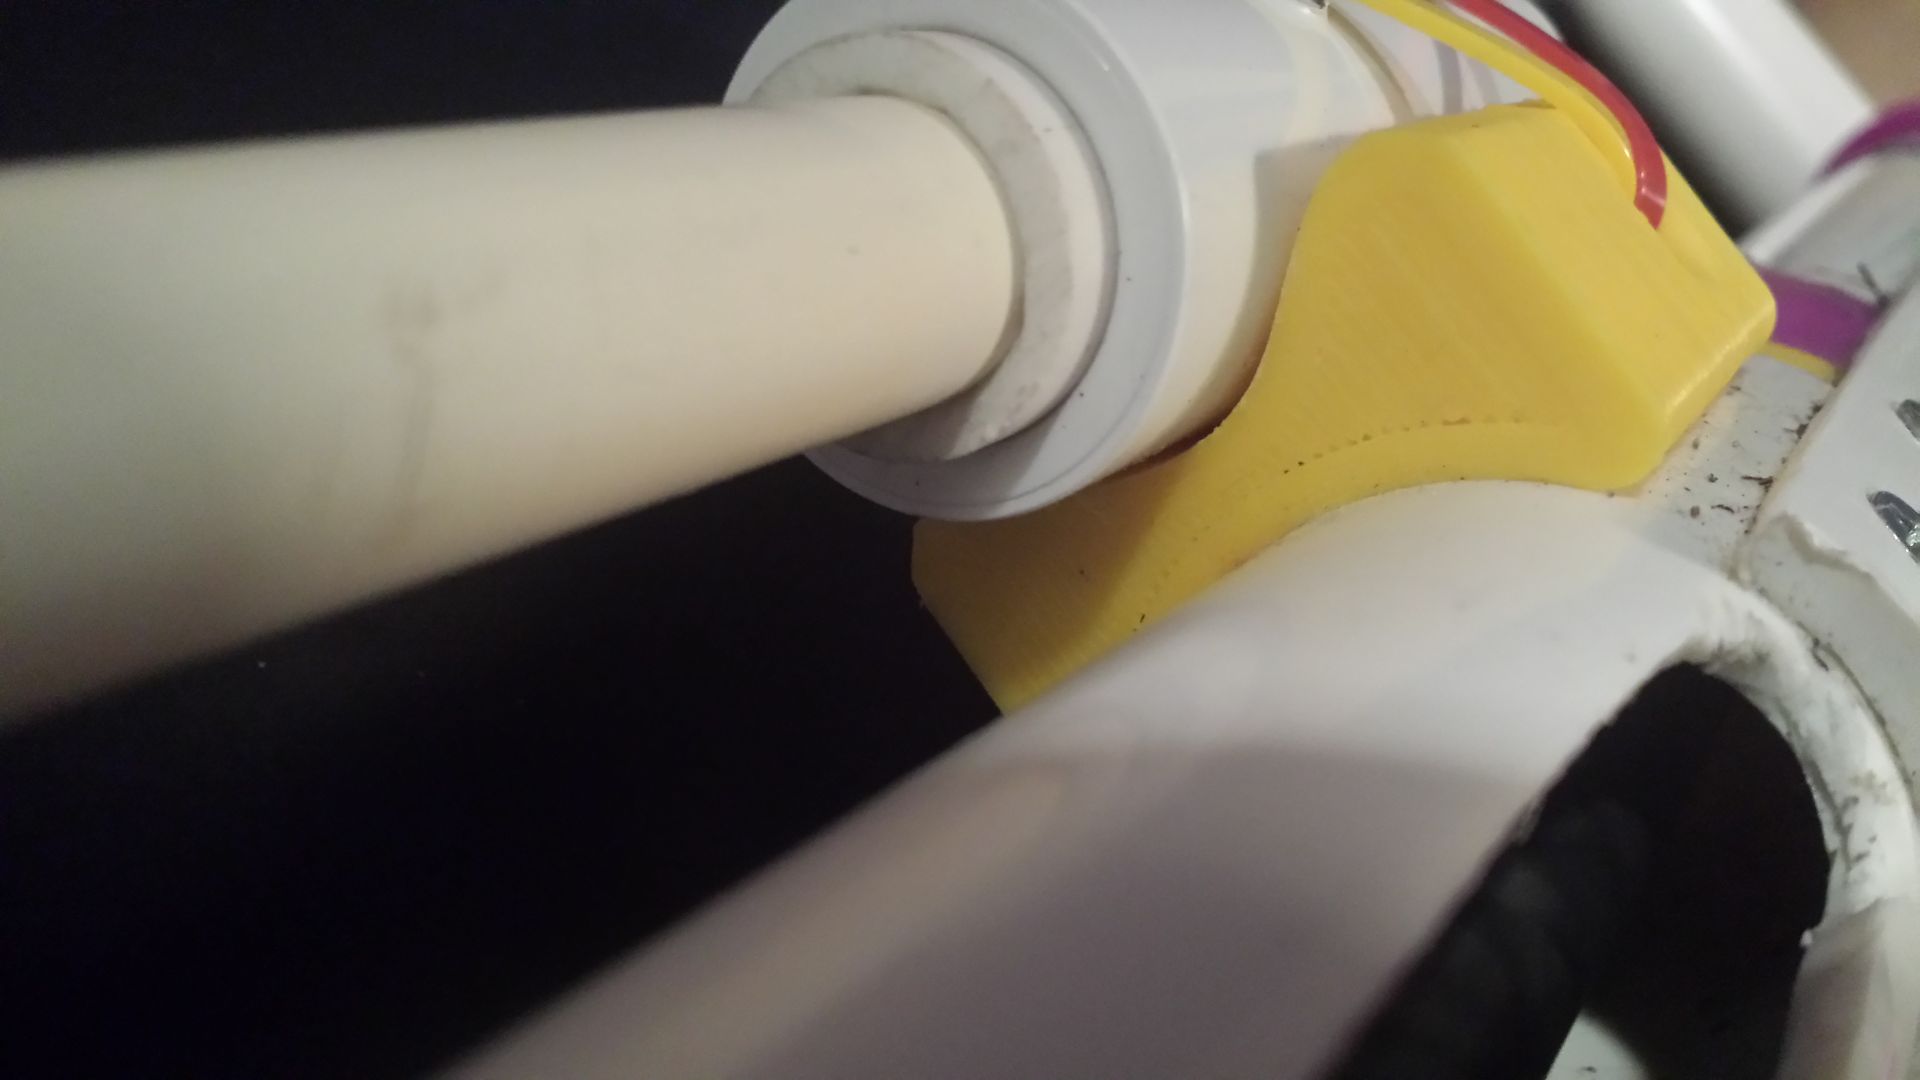
The palm trigger is only weird because it's not shaped very well. I need to make it a little bigger and then it will be fine. I was working on this for like five hours into the dark hours of the night and just wanted it done, so ergonomics was not sitting at the head of the class at the time.


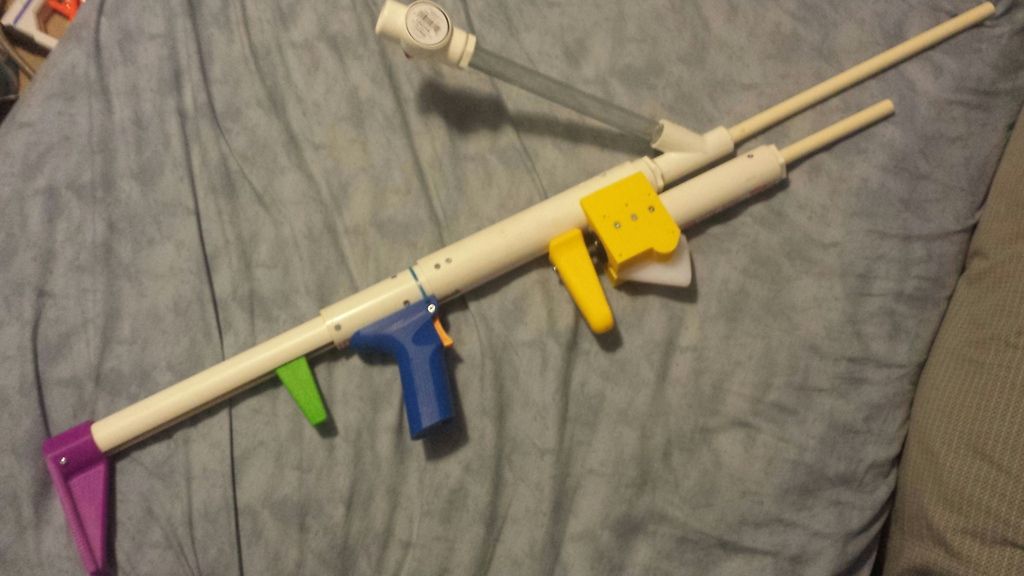
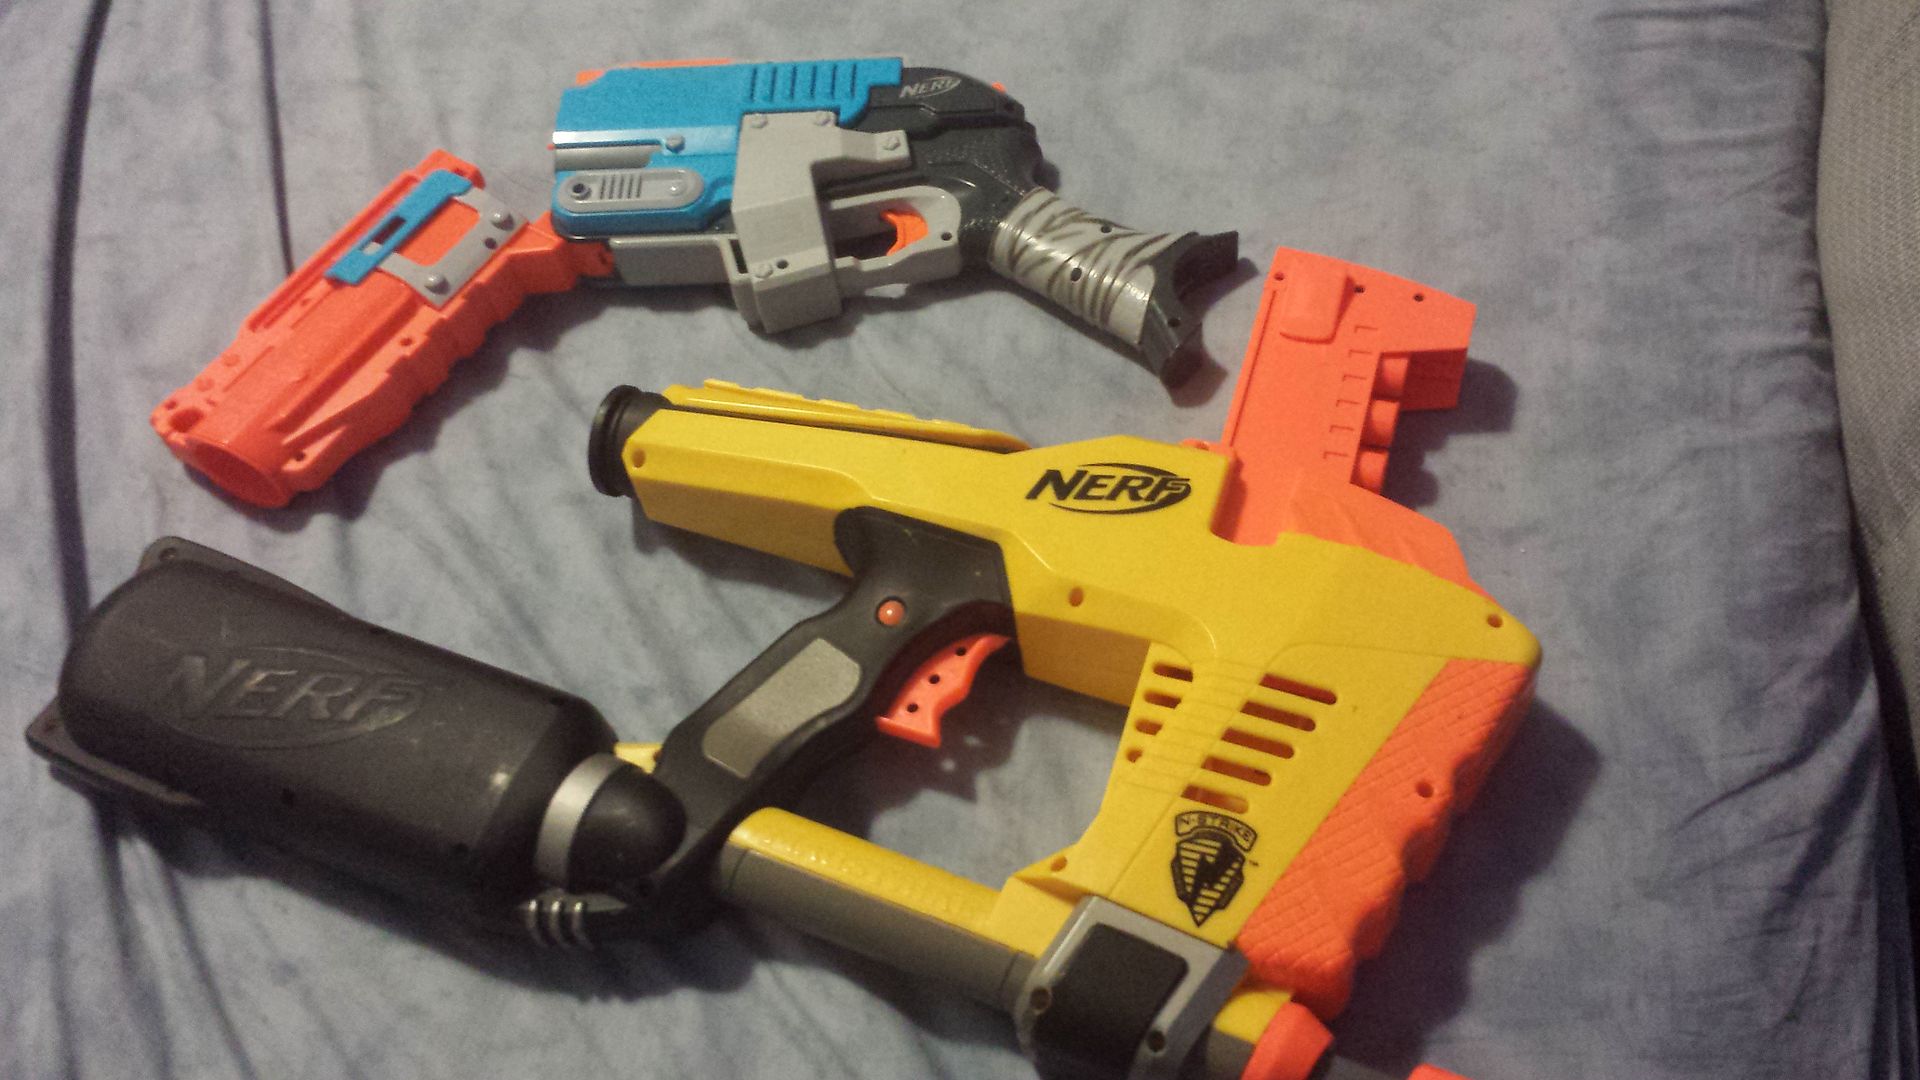
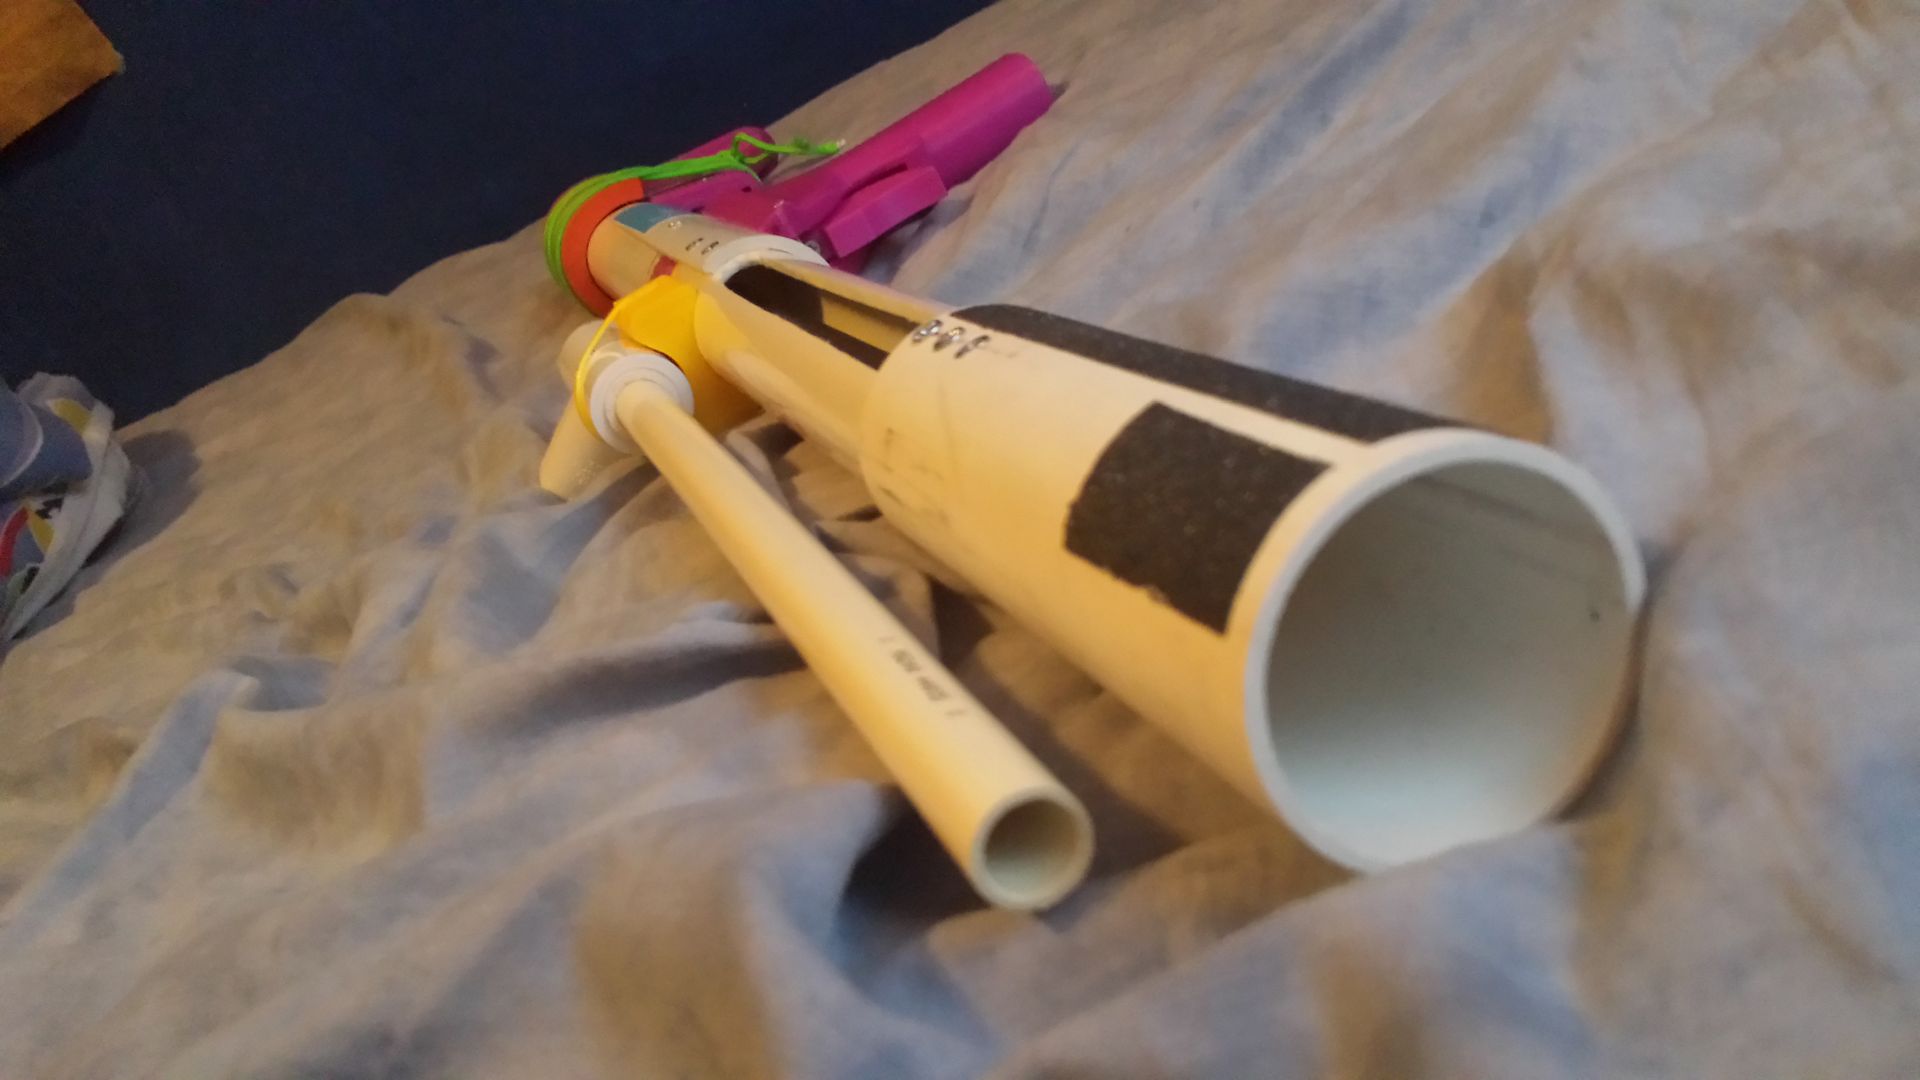
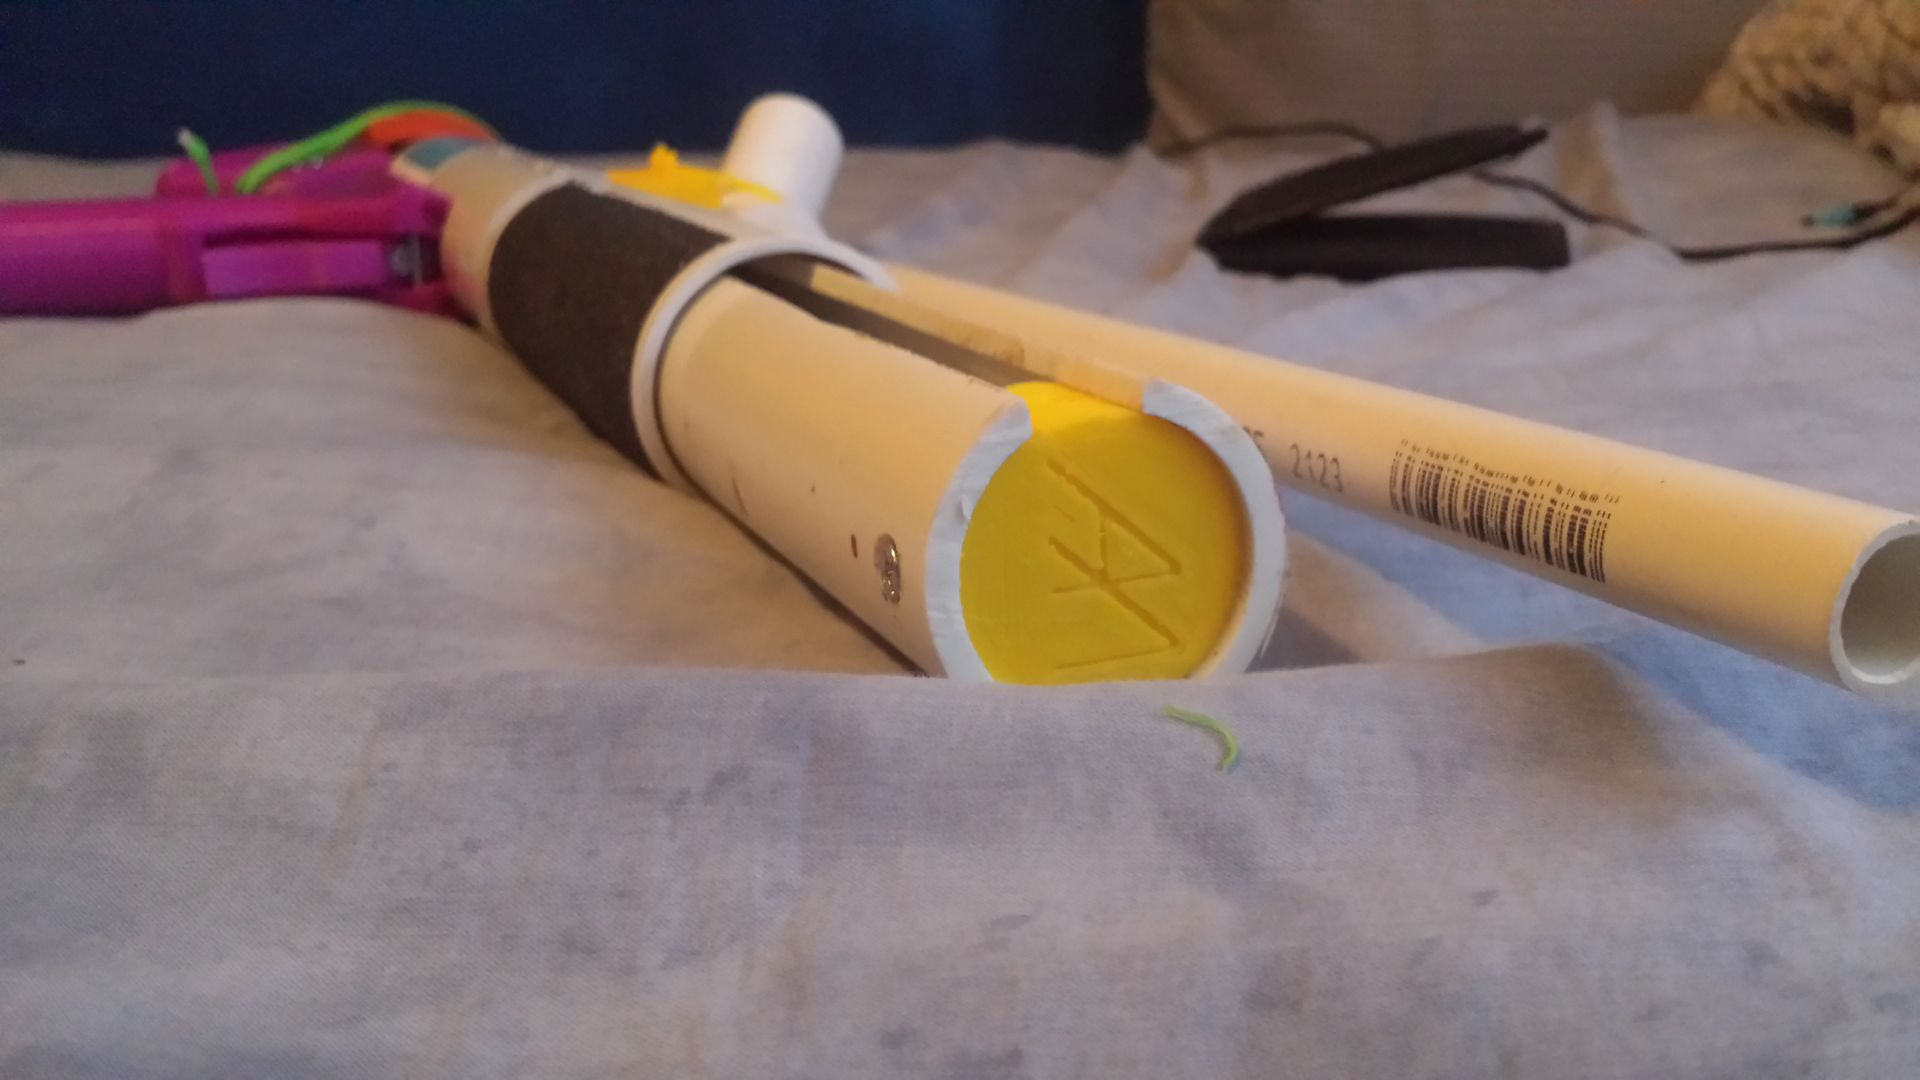
5 shots by stuffing the entire barrel? This is pretty cool. Would want to see it hopped because why the fuck not, lmao. I think you can attatch a similar system to a rainbow pump, and I'm tempted to try now. Also, how do you plan on solving the hand ergonomics? I guess this is great for a gross motor skill under the stress when the finger no do the working. 


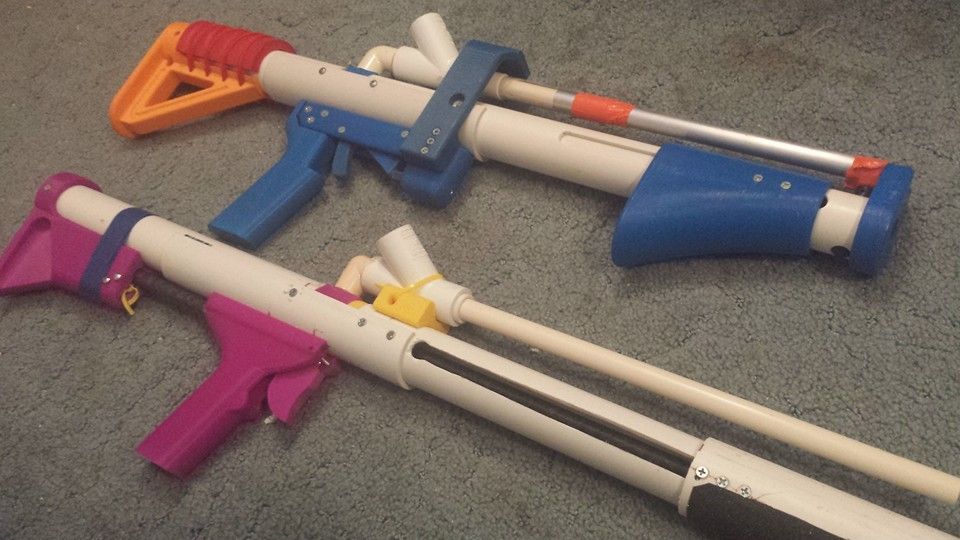
I've hoppered rainbow pistols before, they get like slightly better than stock nitefinder ranges. The shotgun is where it's at for me. I just love shotguns. Future double barrel, anyone?


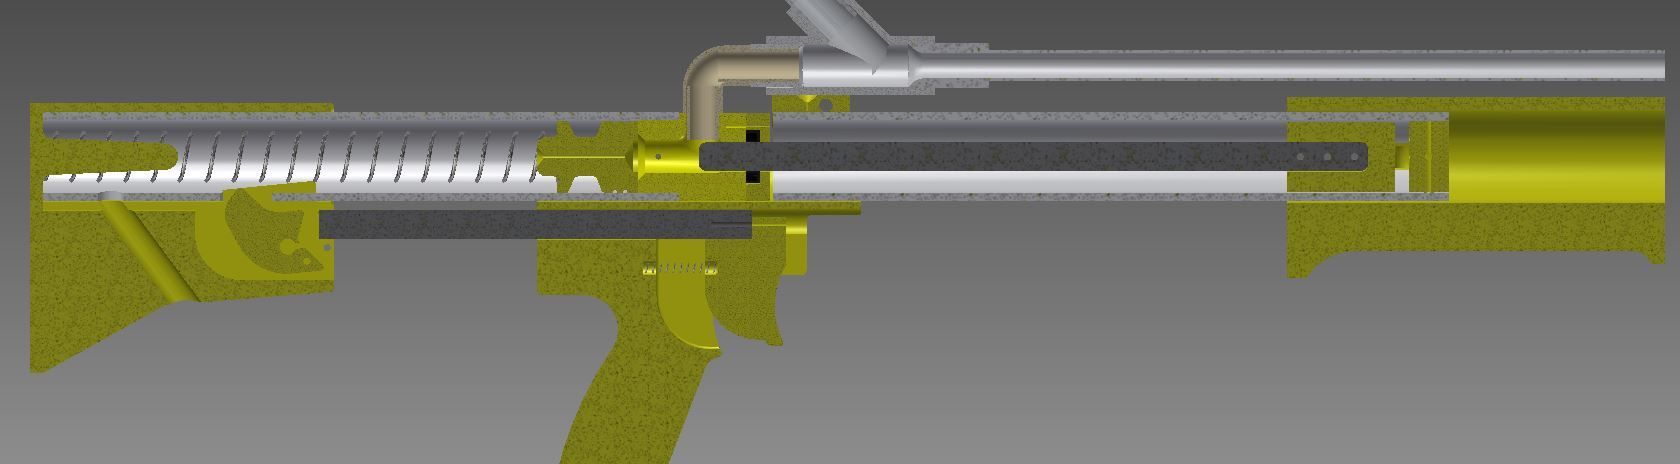
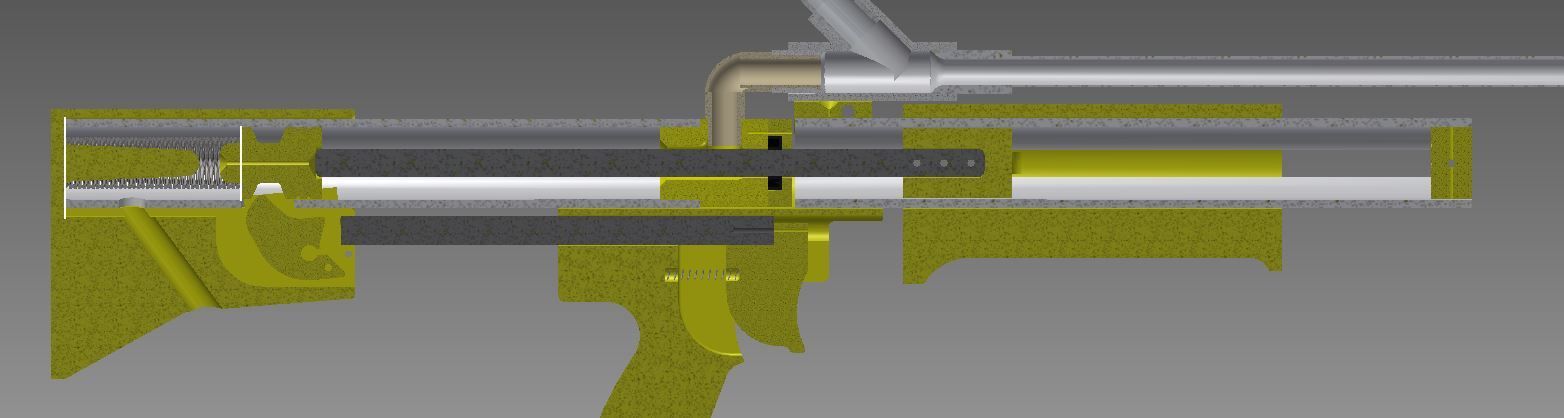
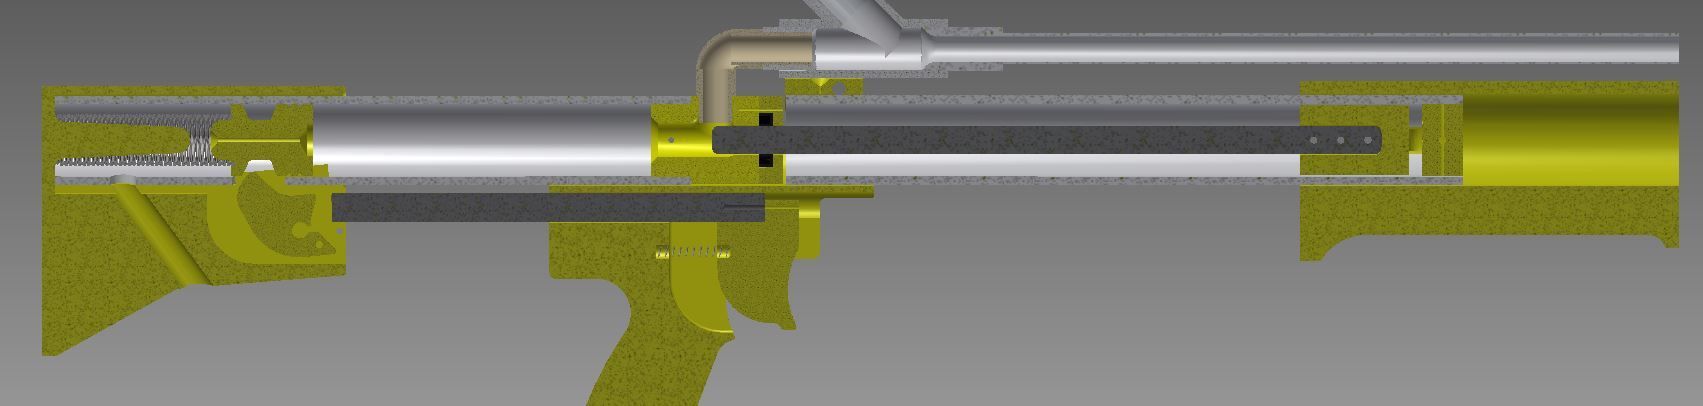
And this begs the question of, why hopper the thing at all? You already have a more than capable primary that has a relatively high ROF and hopper clip, what do you gain by adding a hopper to the parasite? The range wouldn't be as good, the ROF wouldn't be as good (assuming you're shouldering the blaster) and you don't gain anything the pullback doesn't already give you. I'd never run this as a single-shot. I run it as a shotgun because in the event you are reloading the main blaster, you have one more trick up your sleeve, you can panic-fire the parasite while reloading or rushing a capture point or something like that, and you get about a second of disorientation and a good spread to boot, so precise aiming isn't necessary. From ten yards my spread is about four feet with three darts, so it's hard to actually dodge. Add more darts and it becomes even more difficult.


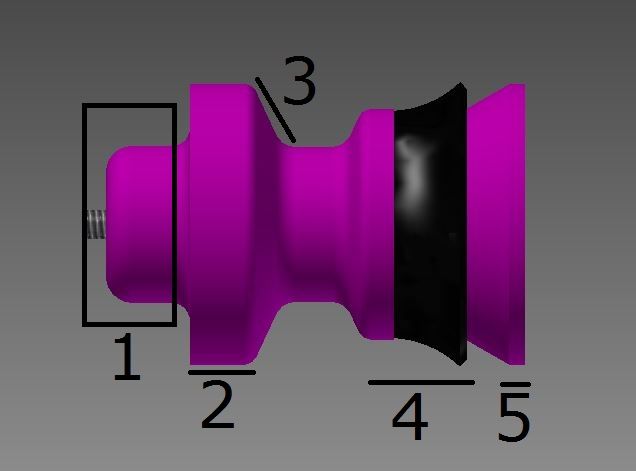
The ergonomics are easy to solve, this was more of a proof of concept than anything else. A simple chamfer operation on the edges around the bottom would solve all the problems, and shaving off 1/8" or so from each side would take off some weight and make it easier to hold. Right now, you actually hold it from the tube, and slide your hand backwards, almost like a pump, when you want to fire. And as admitted previously, the palm trigger is a bit too small, Just need to shape a new one when I feel like it and it'll solve most of the problems I already mentioned. Still, it works and I'm happy with it, though I think the added weight as a secondary blaster will delegate this to the wall, This mounting method is better used for maybe panther tanks or foregrips on snap-bows or rainbow-bows.


#351070 Parasite Blaster/Mounting Technique

Posted by Aeromech on 24 January 2016 - 03:24 AM in Homemades

Preface:


20160124_020340_zps2gfs9rwo.jpg

The humble pullback, lightweight and balanced. But what if you wanted to fuck with that completely? What if you wanted to add a grip to the front or an underslung blaster of some sort? Because drilling into the plunger tube isn't possible, the solution hitherto was to dump a fuckload of hot glue on there and pray the grip/ nitefinder pistol didn't shear off mid-war. Come on guys, we're better than this.


20160124_020226_zpszafc1hje.jpg

Heheh


This post hopes to provide the abstract for an easy solution to mounting foregrips and underslungs to pullback/bow style tubular blasters such as rainbows and snap-bows. This is gonna be a short one.


Materials

~12" thinwall 1-1/2" PVC -OR- 1-1/2 PVC halfpipe a la ESLT (thanks MHA and blitz)

Cutting Board

Tape

Foregrip or blaster you intend to mount

#6 flat-head screws of various sizes (depending on the building materials you have available)


Tools

Saw

Drill with various bits

Long shank countersink

Long nose screwdriver


Let's hit this like a sack of bricks


20160124_020425_zpskqhjqv09.jpg

This is the parasite mounting system and pistol. It's a Rainbow pistol without a grip, and instead with two sideplates and an over-sized trigger, made of cutting board in this picture. The sideplates connect on the top to the thinwall PVC via screws sunk internally from the top into the sideplates themselves, evidenced by the three assembly holes an the top-front of the thinwall.


20160124_020438_zpsn23td4j3.jpg

The thinwall will rest against whatever handle you have on the blaster, so it is fairly stable. Now we just need to attach it...


20160124_020501_zpsntoc9e57.jpg

The only modification needed to the blaster is a couple of screw holes on each side, and a few wraps of E-tape to bridge the Diameter gap between the thinwall and the 1-1/4" plungertube PVC, which is pretty small to begin with. Then the whole assembly slides right on from the front!


20160124_020627_zps3f6rqpn7.jpg

The pullback bar in resting position. It's actually rather comfortable to prime, the space is just big enough for your fingers and actually pretty intuitive when you use it.


20160124_020649_zpsn2yj5jot.jpg

Parasite Pistol Primed. Plenty of room for fingers. You don't notice it at all. Also note the positioning of the pistol trigger, you actuate it with your palm, not your index finger. Takes some getting used to.


20160124_021228_zpsjxs49mdt.jpg

Very easy to cut out a small slot for your anti-vacuum holes. Also note the pullbar matches the curvature of the thinwall PVC, so this is actually a unidirectional catch! (an advantage, in my book)


Results


20160124_030213_zps2atyriub_edit_1453622


--The blaster, originally weighing in at 2 pounds with barrel and hopper, now weighs 3 pounds, 9 ounces. So this particular configuration adds ~1.5 pounds to your setup. Could shave off maybe an ounce by adding lightening holes. Also shifts the center of gravity from right at the trigger to about 6 inches AHEAD of the trigger. So it FEELS heavy because the weight's all the way out there hanging off the front. It FEELS cumbersome and strips away the advantage the pullback had, that was mobility, the ability to swing it around because of it's featherweight. Most of the mass comes from the pistol, so if you were just adding a foregrip, this may be a reasonable "mod" for your bow style blaster, and may only add like half a pound. As it stands, it's super solid.


--That's a lot of weight for one shot, so I run this as a SHOTGUN, BABY. Throw like five darts into the pistol and we be gucci, french toast. With half a [k26] in the there, it gets great range even shotgunned. My room is maybe 12 yards long, but it hits the wall with a nice spread and a good amount of force. Could also add a shorty barrel and hopper if you are insane and want to add even more weight to the front.


--Forward trigger is a little awkward, I need to re-shape it, but it's 2am and I want to get this up. Actually decently comfortable just to hold, the 1-1/4 inch plunger tube of the pistol is just the right DIA.


--Super easy to remove if you don't like it or want to change it out for a different attachment. Though keep in mind you need a lot of thinwall if you intend to swap out multiple types of underbarrel attachements


--Need to fine-tune the sideplates shape in my 3D files before I get this out to the community. They're currently really blocky but it's a prototype and it actually works fairly well. Can easily increase comfort and maybe shave off a couple ounces. If you make this yourself, cutting board would work just fine for pistol-mounting.


Use this instead of hotglue, it looks horrible. You spent all that time and money making the thing look professional and then you're going to blast that shit all over it? Just... no. Use this. If you don't have the long-shank countersink tool to use on the thinwall, you can VERY CARFEULLY use a drill bit but I DO NOT RECC'D it. Expect to mess up several times. The take-away here is that you can use this thinwall PVC mounting method (which I dub "parasite") to mount your foregrip/ tac rail/ sack of potatoes to the front of pullback style blasters and not look like shit and actually stay on.


20160124_020742_zpsoxgrf3il.jpg

Money shot. Now with extra flailing appendages.


-Aeromech


#351069 Post your Stock/Superstock Loadout

Posted by Aeromech on 24 January 2016 - 02:38 AM in General Nerf

NIC: Like 6 Rainbows


Superstock:

20160124_022751_zpsokirgrkl.jpg

Used this magstrike and sledgefire pistol combo at the PA war last wekend, and let me tell you, I rocked 'round the clock in soaking wet socks, lived long and prospered like spock, tick-tock.


#350929 Will mostly harmless arms (MHA) Ammo fire out of a Rainbow pump ??

Posted by Aeromech on 20 January 2016 - 12:00 AM in Darts and Barrels

In my experience barrel material is the most important factor in feeding darts


Yes the darts will fire out of a rainbow type blaster, it's more than powerful enough, but if a 0.52 DIA dart is fired through a 0.485 DIA barrel, you see how much force must be exerted to push that dart through? It's foam so it's squishy, but it can only squish so much.


The barrel setup for ESLT's that MHA silly domes are supposed to fire through is 0.485 DIA CPVC for three inches, then aluminum tube of a much greater DIA, I dont know the exact measurement but greater than 0.500.


Barrel material is the most important thing when takling about darts. I use CPVC barrels almost exclusively and I can tell you nothing but the thinnest of darts fire through it, and larger red or beige foam tends to jam it up, but the grey foam and cpvc is very economical even if it limits your dart feeding ability.


#350641 Best nerf gun to loan out

Posted by Aeromech on 10 January 2016 - 01:19 AM in General Nerf

My go-to loaners are ruff cuts. They're impossible to screw up... "Darts go here, prime here, squeeze trigger fully to shoot both sides...." You still get 8 shots, they're easy to keep fed and they have decent stock range.


The darts tend to pop out of roughcuts though, and I've had sticky pumps before as well. Still one of the better suggestions here. Honestly with a few minutes of instruction I've given noobs Rapidstrikes and they've been fine. The automatics have the advantage that there is no user actuation to mess up, so you won't get your pump stuck on a half-lock and break it when you try to force it back or something. Rapidstrikes are cheap if you know where to look. I think walmart.com had them for something ridiculous like $27 or something. This was around Christmas, so maybe it's more like 33, but retaliators are mid-twenties anyway these days.


#350619 What was your favorite war experience?

Posted by Aeromech on 09 January 2016 - 11:44 AM in Site Feedback

Babbage Park 5-0. Closely packed trees, where a high ROF rainbow variant is not-quite overpowered up close but can flex into the long/mid range shots too. We got some good people in the Northeast and I like the nerfing as much as the dicking around in between rounds.


#350508 AR or venturi

Posted by Aeromech on 05 January 2016 - 12:45 AM in Modifications

I'm no physicist (Aeromech is?)
 
After that, the pressure would be equal to the force of sliding friction (which is always lower than static friction).


Initially a student of aeronautical engineering then switched to mechanical for grad school. Aero. Mech. ; )

If that initial burst of higher velocity exists from these venturi tubes, as I hypothesized, it may be to overcome that initial static friction, even if the effects are negligible after that point


#350469 PCSR: A new homemade design

Posted by Aeromech on 04 January 2016 - 12:01 PM in Homemades

IMG_20160104_115754_zps0qqhlqjy.jpg


IMG_20160104_115824_zpsi52ppxr8.jpg


With pump grip and barrel support. I can take constructive criticism. Works pretty damn well, I need to adjust the angles a touch on the grip and shave off maybe an inch work of material, But it feels pretty good.


#350449 Any nerf wars during break on long island

Posted by Aeromech on 03 January 2016 - 10:25 PM in Nerf Wars

and maybe Aeromech will host some more.


Oh boy you put the pressure right on me, eh? I will be in school until May so that means no blaster manufacture or repair until at least that time. Someone else will likely need to host a war, but at least we know Long island has a growing presence in the NIC. That being said if we have a war nearby I could probably have a blaster shipped out to school and find a means of getting there.


#350446 AR or venturi

Posted by Aeromech on 03 January 2016 - 09:00 PM in Modifications

Time to live up to my namesake.


This could theoretically work for paintball, and we already know this law works with homemade Nerf blasters, when the inner piston diameter of 1.36 ID PVC plunger tube decreases to 0.485 ID CPVC barrels. On the topic of using this in a Nerf mod for a blaster with AR's this MIGHT work by giving the flow a faster INITIAL velocity but as soon as the effective diameter of the pipe jumps back up to the diameter of your dart at the barrel, I feel as though this would not be very effective. The initial puff of air would have a higher velocity but a lower pressure. That being said, I always kept my dart posts in my Mavericks and found them to perform slightly better when they weren't drilled out.


Here's the basic equation:

incompressible%20flow_zpswf1w0zdl.jpg

Note this is for INCOMPRESSIBLE fluid and we'll get to that after these messages. But just read the equation. Basically, as the change in pressure gets larger, your velocity at the barrel gets larger. So if you decrease the constricted tube's diameter (and thereby decrease the pressure) the velocity in the constricted tube will increase. Your air will be traveling faster initially SO LONG AS THE DENSITY REMAINS CONSTANT which brings me to my next point, COMPRESSIBILITY.


Compressibility is a bitch. Just like a sponge can be squished and change it's density, so can a fluid, and all these easy equations go out the window. For a fluid to reach the point of compressibility, the air flowing in the pipe must be greater than 0.3. If the barrel is plugged by a dart, logically, the air flow cannot exceed the speed of the dart. In something like a suped up 4B, the FPS can reach 300 if you plug the pump, it's more like 250 for high end springers. So with the speed of sound at sea level being 1125 FPS, the mach number of a springer's barrel would be 0.22 and for a 4B, more like 0.27, so we get pretty close to compressibility being an issue, but dodged that bullet for now, so that above equation is valid. Honestly in some of these looser fit 4Bs I wouldn't be surprised if, when hooked up to the right equipment, we actually got into the realm of compressibility.


BUT if that restriction is made too small you begin to run into the problem of compressibility in homemades. For Nerf brand shit you won't have to worry about that.


Turbulent flow may also be something to consider, however, as many little holes expanding into a larger DIA pipe is bound to create some kind of nonlaminar flow. which has a whole slough of problems with it too. Long story short you want laminar flow if you want consistent performance, turbulent flow increases pressure and therefore less velocity based on that shit we just read. 


EDIT: As for the holes being on the outside, I suppose it has something to do with the nature of flows in pipes:

tube%20flow_zpsdbdjn6by.gif


Basically, those green arrows represent velocity. So in general, the fluid velocity is higher at the center where there is no friction from the walls of the pipe. The velocity at the pipe walls must be zero (no-slip condition) so near the walls the velocity is less than at the center. If the flow is closer to the walls, perhaps this is an attempt to defeat the friction at the walls and make a more "flat" (consistent) and less parabolic velocity profile. Turbulent flow would also accomplish this as the velocity profile of a turbulent flow is sort of plateau shaped and very flat like the second set of green arrows. I'm not a paintballer, so I really couldn't tell you the reason they use it, but this is just my educated guess.


So is this method worth it? Eh, I'm skeptical because as soon as it reaches the dart the DIA will increase therefore decreasing velocity, but for the instant the dart is pushed right up against the restricted region, the velocity may have some added effect, so it may be more effective in airguns where pressure is released in one instant as opposed to a springers which build up pressure as the plunger moves forward. If anything this may just reduce deadspace and that's where the increase in (apparent) performance comes from. I'd say test it out and experiment a little, and look what other kinds of experimentation has been done, i.e. potato gunners and the like probably have some insight. In the words of Ms. Frizzle: Fuckin' go for it.


Resources for nerds:

Khan Academy: https://www.khanacad...and-pitot-tubes

Venturi Effect: https://en.wikipedia.../Venturi_effect

Choked Flow: https://en.wikipedia...iki/Choked_flow

Compressible Fluids: https://en.wikipedia...mpressible_flow


#350416 PCSR: A new homemade design

Posted by Aeromech on 03 January 2016 - 11:50 AM in Homemades

Post War Report:


After playing with this for a few rounds and giving it out as a loaner the rest, these are the results. Conditions were near the freezing point all day..


20160103_033850_zpsx56cgns8.jpg

No stress marks on the handle. Go me. However I may move that nub up 0.1 inches or something. I'm still on the fence about that. Honestly didn't feel it while playing but just a minor thing.


20160103_033950_zpsgjcvswqb.jpg

A couple cracks in the stock up near the top, however, I don't believe they're from the war, I think that's because my print room was cold. Will keep my room warm this time around while printing. My padding also fell off because it was held on by paracord, and the stock is slightly tapered, loosening the rope as the day went on. Will be adding rope slots or something so that doesn't happen again.


IMG_20160103_034246_zpsr7e90ea7.jpg

Could throw an overlapping pump grip here. , giving the blaster the possibility to have a shorter feel to it, and take a few inches off the thinwall PVC pump


IMG_20160103_034400_zpsjircoy3o.jpg


IMG_20160103_034505_zpsgr5knpfo.jpg

That forward slot stop held up just fine. Can easily be adapted with a lightweight barrel support, which I think I will be adding to the next one. THERE ARE YOU HAPPY?!?!?


20160103_033654_zpsuxfimn8y.jpg

Wye spacer needs to be tweaked, too tall and the bottom radius is too large. caused the barrel to be shifted by 2-4 degrees from the body tube. It was like this before the war, but it was functioning so I just left it because I had other guns to work on.


20160103_033725_zpshie60gwc.jpg

This is the only "critical failure" I had on the blaster, and even with this I didn't really see a decrease in performance. Will increase the diameter by 0.001 inches so the CPVC isn't pushing out so much on the redirect piece. Additionally, the CPVC right angle piece came dislodged. Not so much that it came out, but enough that it could move maybe 1/8" out of place. The only thing holding it in was the goop, and the cantilever style of wye support I used basically put all the reaction force on the goop. A simple redesign of the aforementioned wye support will solve this.


20160103_111138_zpsejgghqlz.jpg

Catch held up fine, as predicted. The only thing I noticed was intermittently, maybe 5-10% of the time, the trigger pull was heavier than the rest. I think this has more to do with the piston, I fitted them off-camera and the angles didn't match up well. Will be adjusting the piston angle.


20160103_111208_zps7v7ktljy.jpg

Which brings us to the piston. Held up shockingly well. The only thing is the little ring formed on the back right there from the spring. Not too worried about it, just increase the infill a bit for this part. Also note the slightly kinked up spring. This is of course due to the fact that this blaster doesn't have a rod running through it.


This is why I didn't post the files immediately. I will be making about a dozen little tweaks this week and next. The performance on this thing is awesome, probably because the piston is so darn light! No long nylon rod to contend with, so even with a [k25] being roughly 10% weaker than a [k26], it really doesn't matter if your moving mass is 50% lighter than your typical springer.


I'm a bit of a perfectionist so these things matter to me. Editting the files this week.


#350407 Frozen Foam Part II, Long Island NY [1/2/2016]

Posted by Aeromech on 02 January 2016 - 09:46 PM in Nerf Wars

What a great war, guys. Got no sleep the night before but I had a blast, and will definitely be doing that again.


SUMMARY

-We got up to 14 people in attendance including at least 4 new faces that were very cool dudes and played well.

-Park area was well covered in trees and it wasn't bitterly cold Like last year. We talked blasters but also picked up the pace when necessary.

-Cops didn't have any problems with us being there.

-Passing the homemades bug onto stock users

-Shots must be called in the winter, because of coats and jackets cushioning the blow. Overall everyone was a good sport, as I hoped for.

-Got to test out three new blasters including my telescoping and PCSR. Valuable information was gained, especially for the latter.

-Watching umbrella-mobstacles fly away to Kansas

-Playing some of my favorite objective game modes including Bomberman Uma Thurman and Defend the Core (even if we messed it up)

-Everyone had food and drink, Devil's mom even brought cookies.

-Watching no less than eight of my blasters with my logo on them brought a manly tear to my eye.

-Getting shot in the forehead from Vans' Demon Rainbow really sucks.

-Everyone cleaned up well and dart/garbage sweeps were thorough.

-Cover was great overall, Lots of trees all around.


#350396 Frozen Foam Part II, Long Island NY [1/2/2016]

Posted by Aeromech on 02 January 2016 - 09:26 AM in Nerf Wars

I am in the black 2015 Hyundai sedan. Park near me. When you turn into the park, make a u turn where it says field 2 and then make a right into field 2 about 100 yards after that u turn. Looks pretty empty but there are some people around, and the play area is surrounded by paths. Be ready to pause the game if people get close.


#350387 Frozen Foam Part II, Long Island NY [1/2/2016]

Posted by Aeromech on 01 January 2016 - 07:00 PM in Nerf Wars

Pre-War Briefing

Tomorrow's weather is looking to be pretty damn beautiful. We're going to be playing on relatively dry ground, at or just above the freezing point. This years field is right next to last year's, and has much more trees and stuff. If we see anybody walking the paths around us, we will stop and hold until they pass. If we are asked to move, we will move to the old field, but even so, I don't think that will be much of an issue. I have some experimental cover that we will be testing out tomorrow that will ameliorate even the most barren of fields. Game types will include the typical deathmatch type games as well as some dope objective games of my own design to change it up. Bring some extra blasters, and plenty of darts. Be a pal and be ready to share some of your loaner or extra blasters. I'm already supplying blasters and darts for my less-nerfy friends, so don't rely on me, I've been building for the last three days. Bring $2 for breakfast/lunch, I'm getting bagels, and juice/coffee and setting up a table at the park, and I found out today that a Taco Bell is within walking distance from the park. Most importantly, bring a positive, sportsman's attitude. There are no winners and no losers, and no scores are kept. Let's have some fun and start off the new year with some cardio and plastic toys.


#350349 PCSR: A new homemade design

Posted by Aeromech on 31 December 2015 - 11:39 AM in Homemades

I'm one of those people who can copy designs from pictures. I could probably mass-produce them too, but haven't had the free cash to try and I don't know if the market is there to support the volume I'd need to make to undercut anybody. And since I try not to be a Jerk, I'd probably just do it for the sake of equipping my own group or something before trying to sell anything.


What are you on about? It'd be so easy to put a barrel support closer to the Y to enable you to use multiple barrel types. Making it wide enough to support 1/2" PVC is also trivial. If you're concerned about quick-change (shouldn't you have a screw or something holding the barrel on? Mine are usually glued on so they don't fly off when firing...), adding a barrel support doesn't need to make that longer; design a quick-change barrel support. Shoot, design one with removable padding (felt, probably) that allows it to expand/contract to fit multiple barrels. The advantage of a barrel support is *so* obvious to me and it is such an easy part to design/make. If you're worried about printing time wasted on such a simple part, a continuous partial barrel support (doesn't wrap around either barrel or body tube) can be cut on a table saw from any kind of plastic or wood bar stock in a few minutes with the right jigs.


Looking at your pump grip, you could probably loose the top of the pump and put a continuous barrel support there instead. Design some iron sights into it and you'll have an extremely attractive and solid blaster.


I think the barrel support is more of a preference of mine than anything, not really anything to do with print time. And yeah, throw a little slot on the end and you have yourself a place to add a barrel support to the front cap. Making it adjustable is easy but once again the barrel now has to be long enough to fit into the barrel support. I'm not only worried about print time but also overall manufacturing difficulty. I'm trying to make this as easy to put together as I can.


As for the stl files, sure you could try to make them visually, it's not hard. What is hard is the tweaking. This last week I have made half a dozen little changes to many different parts. Just be patient and they'll be out there. The prototype works, now it's just taking it from good to great.


#350347 Frozen Foam Part II, Long Island NY [1/2/2016]

Posted by Aeromech on 31 December 2015 - 11:09 AM in Nerf Wars

What street is the entrance on? Which field are you playing?


I'll add it to the top.


The war is THIS SATURDAY and weather looks good. So we won't be frozen, unfortunately.


#350308 PCSR: A new homemade design

Posted by Aeromech on 30 December 2015 - 03:23 AM in Homemades

I appreciate that someone's building blasters with this layout, and it looks like a good blaster.  

I don't understand why the OP is full of arbitrary comparisons to the ESLT sold as advantages.

You also seem to have also imagined a hype campaign about ESLT.  I'm actually curious what the voices in your head are saying about it. 


Which is worth repeating.  It holds the priming assembly in place.  This is by far the most noteworthy design feature in general and vs the ESLT, and this is the feature you should brag about.  I've done this crudely with ball-plunger-detent systems and simple tape-friction systems, but this is clean and internal.  It's a crude, friction system sure, but it's made possible by the rod-priming system that you use and it (presumably) lets you shoot upwards with one hand, which is a limitation of ESLTS and many pump-action homemades.


I was hoping you would chime in, thank you for the constructive criticism, it really means a lot.


My comparisons to the ESLT are because this is basically my version of the ESLT; it was the yardstick that I was basing my technical specifications off of, so of course I'm going to make the comparisons.


And the hype my not be generated by you, but I've seen it throughout many of the newer NIC members, where they buy one, bring it to a homemades war, and then are outclassed by most other things that aren't as good looking. I think because the ESLT is a sexy/colorful/good looking homemade as opposed to a SNAP or something, it looks appealing. To someone that doesn't know much about modding or building, upgrading one to perform at rainbow/ [k26] levels would not really be possible without a ton more reading up.


As for the O-ring seal at the redirect piece, I really don't like it. I've tightened it down like mad, but it still doesn't hug the steel rod tight enough to create a very good seal, that and the movement of the rod itself has the potential to break the air-seal once the thing is fired, but then again, as you mentioned, too much friction may slow the rod down too much, it's a delicate balance. The PCSR design does have the draw-back that the pump-rod must have some kind of lubrication on it for that seal to form, and, with open slots, it may very well get some dirt/grass/leaves/boulders in there. The not-sliding pump is really nice to have though. I'm a runner and a total wacko when I war, (something to do with the voices in my head?) so I can see this being very useful in upcoming wars.


The front barrel support is both a blessing and a curse in my eyes. It forces you to have a barrel that is at least 14 inches long. I know plenty of nerfers that use larger diameter or denser foam in their blasters which require wider ID barrels. The front support can be adjusted/sanded down a bit, but it's one more step you have to take. I am also looking at it from a slightly different angle too. When I go to war, I usually let other people use my stuff. (Something breaks, somebody forgot their gun, etc.) So if they have larger diameter darts (I use cpvc barrels and shitty darts) their darts will not work in my blaster. A barrel change on a traditional direct plunger system just requires taking off the barrel from the end of the wye and they're set. With a barrel support, the barrel must first be long enough that the barrel support doesn't get in the way of the darts, and then must actually fit in the barrel support (some guys like barrel sheaths for strength, and a PVC shroud will most certainly not fit in the ESLT barrel support). So I like to have the option to loan my blaster out in the field without too much trouble. If it was going to be used solely by me, it wouldn't be too much of an issue.


That being said, the addition of a barrel support on this would not be a difficult thing to add on. Really just change the slot cap at the front of the blaster and make one or two little changes to the pump.


For the weight, it's not just the front pump. The ESLT I weighed also had a very lightweight 3D printed stock of my own design, so if I was using the original padded HDPE stock, the blaster may very well be half a pound heavier about a quarter pound, just weighed it, more than it already is! So the weight is kind of tongue in cheek, I suppose. Even if I add another component to the PCSR, if I added the original stock back to the end of the ESLT, the ESLT would still come out heavier.


The plunger head uses a skirt seal because, at least for me, it improved performance. My original piston actually used two O-rings as the seal and the thing leaked all over the place, as in, the piston would barely slow down when you put your thumb over the barrel. With the skirt seal there was an increase in performance, and the leak was still there (pretty sure I dicked up the goop job, amateur mistake), the piston now actually slowed down when I blocked the barrel. One of the goals was minimize leaks, even if it costs a little more.


And yes, maybe I am being a little harsh on the old ESLT. It was the design I set out to improve upon, so maybe this is just another way of looking at it. Perhaps it wasn't obvious, but I do respect the work you guys do, hell, you do realize this PCSR would not exist without the ESLT? Because this is my blaster, I have some ideas and preferences that are going to be different from yours, so of course I'm going to design accordingly. But when our paths cross again, give her a once over. I don't think you'll be disappointed.


#350300 PCSR: A new homemade design

Posted by Aeromech on 29 December 2015 - 08:36 PM in Homemades

By the way, Aeromech, while we're slobbering all over you here: You make some really awesome relocated triggers. Both this and that rainbow carbine are ingeniously simple.

That's where this design started from. I'm finally adding a stock to the telescoping blaster I made a while back, so I'll have at least 2 blasters for Saturday that use the relocated trigger system.


It was Louiec3. Here's the post we are thinking of http://nerfhaven.com...hread/?p=280995


@Aeromech: very impressive design. I'm interested in how the 3D printed parts (specifically the floating plunger head and catchpiece) will hold up. For redundancy's sake, could a rod be screwed into the PH which would sit inside the spring and a another tube to guarantee the head wouldn't tilt out of place?


EDIT: Also, in order to get rid of the string/zip ties, would it be wise to extend the 1.5" halfpipe piece to include the back stock/catch assembly? Seems like you could make it more modular/solid that way.

Damn, it appears Louiec3 did this with a SNAP type catch at some point, huh. I had no knowledge of this to be honest with you.  Good for him.


piston%20half_zpseh2pk3pb.jpg

The catch I'm not really worried about. The 3D printed ESLT catch operates on similar principles and has held up well. As for the floating plunger head, piston number 2 snapped in half pretty soon after I started using it. Recall I said this is the 3rd piston design. So, what does one do? Increase the layers of the print from 6 to 8, and add a hole running through the middle where a screw can be sunk. This composite piston has the lightweight properties of plastic but the loading is now being supported by the steel screw instead of the more brittle plastic.


As for extending the 1.5" reciever, hmmm that could work. It would add some weight though. I'll test out these models at my war this weekend and see if that's necessary, I was actually planning on shortening the receiver a bit. Also, the string is on there to support the foam face cushioning, it provides no actual structural benefit.


#350291 PCSR: A new homemade design

Posted by Aeromech on 29 December 2015 - 03:09 PM in Homemades

It looks like that style of blaster might be more elegant, but it also looks no simpler to build. Seems more complex, actually, just free of 3d printed parts.


But for those with access to a 3d printer, these style blasters are largely plug & play. The slots look to be mostly end-slots, which can usually be cut with a regular saw.


Bingo. I love open slots because it means two things: First, if anything slides into those slots, in this case, the pump assembly, the only thing that needs to be done is to remove the cap piece at the end and you can slide out the pump, without having to take apart a fairly important sub-assembly. Second, it means that the design is more accessible to newer builders, and simpler to more seasoned builders, making the design all-around more attractive. I've advocated open slots since I started making homemades.


#350289 PCSR: A new homemade design

Posted by Aeromech on 29 December 2015 - 03:02 PM in Homemades

To be honest, while this blaster is cool and more powerful than an ESLT, it is still way more complicated and larger than it needs to be.


In my opinion, the best and only practical style of bullpup is the reverse-inverse aka. multiple orgasm style of priming. It takes up less space, is significantly easier to make, and is more powerful than a PCSR or ESLT.


Jwasko kinda beat me to the punch, but in terms of complexity, I think this thing is simpler than an ESLT, and about as simple as it could be. The pump mechanism is one rod and the propulsion mechanism is a two piece piston held together by a screw. They are independent of one another so they can be replaced separately and without taking the whole thing apart. An ESLT is connected through the center, so even to perform basic plunger-rod related maintenance, the whole thing has to be taken apart. Serviceability on this blaster is literally the easiest I've seen on any homemade out there.


The MO is a great design and probably superior to this one, but my technical specifications were designed to be an improvement of the ESLT, not the MO, primarily because the ESLT recieves so much hype and fails to deliver without extensive modifications and surgery. Once you have the parts printed, It's no more difficult than an MO to produce, based on the literature I've seen on the MO. If I was to design a blaster with the intention of competing with the MO that would be a different story....


#350265 PCSR: A new homemade design

Posted by Aeromech on 29 December 2015 - 02:21 AM in Homemades


i thought you were talking about the eye on the end, thats what i meant for files. my bad. however there;s a thing called a tap and die set, it works very well for cutting threads. people have been using it for a long time.


now i understand the plunger setup, does it have any problems with it riding against the inside of the tube and dragging? my worry would be that over time as the spring shortens it would not have the same pressure against it and would cause it to go a little cocked down the plunger tube and rub away at the material, then making the seal not be square and causing issues. places 2 and 5 being the concerns. obviously this is a long term thing but still a concern.


Ah very true. But then I have to buy a special tool to make it. I am big on ease of assembly and servicing, I don't even like slots because they're kind of sloppy to make without a mill and very time consuming in my experiences. My goal here is being to get more people involved in the hobby, and the motivation for eventually releasing the files.


I've yet to experience that problem with these. And luckily, the piston and spring can be replaced in under two minutes, (again, back to the ease of maintenance thing,) so you can swap out the entire piston and spring right then and there if problems do arise. However, I don't see that happening really. I've used 3D printed plunger heads with similar measurements and haven't had problems with them. I'll be warring with this prototype this weekend and will tell you if I experience any difficulties.


#350262 PCSR: A new homemade design

Posted by Aeromech on 29 December 2015 - 01:35 AM in Homemades

your complaints about the plunger rod being a special piece are nullified by the fact that you still have used a 3d printer every step of the way, which is arguably way more specialized and hard to replicate compared to a lathe; which you could easily replicate with a file and some time. especially your plunger head which seems needlessly complicated in shape just because you could.

 
And I disagree with you on the plunger rod. Tell me, can you accurately file threads into a 1/4" steel rod with any kind of precision? I didn't think so. And these days, 3D printers are getting more and more common whereas lathes are almost unheard of unless you go to engineering school or something.
 
The plunger head is exactly as complicated as it needs to be, allow me to explain:
 
piston%20numbered_zpsgjh6k2f0.jpg
 
1) This protrusion supports the main propulsion spring so it doesn't buckle in the plunger tube
2) This rear section provides support for the piston against the plunger tube. This is the first point of solid contact. Two are needed to ensure the piston remains cocentric to the plunger tube
3) This is the region where the catch engages the piston. It must be recessed for obvious reasons
4) This area supports the skirt seal
5) This provides the second point of contact with the plunger tube but also widens so that the force of hitting the redirect piece is distributed, making breaking less likely.
 
The piston wasn't designed that way because it looks cool, it looks like that because it works. This is in fact the 3rd piston design I tried and it function the best of all of them. The reason it's curved and angled is either to help the thing catch or to distribute the forces in such a way that the piston is stronger than if it was just a bunch of straight cylinders, which are likely to shear.


Yo you mad bro? My only point in that is that other people have stolen members' blasters in the past and that it's entirely possible for it to occur now. I don't get why you're so butt hurt about me making an extremely valid point.


This isn't getting us anywhere. Let's cut the shitposting shall we? This is a Nerf site last I checked.


#350252 PCSR: A new homemade design

Posted by Aeromech on 28 December 2015 - 09:46 PM in Homemades

That's really sad. I always appreciated the open source nature of the nerfing community, and always hated the increase over the last ~5years in users (and companies like OMW) creating shit to sell.


Don't get me wrong the mistrust was shitty too, and I hope that in the future people are similarly cautious but less idiotic about it.


I appreciate that you did share the base design in spite of the earlier mistreatment. I've been wanting to create something similar (but non-3D printed) and it's great to see a similar product carried to completion.


Is the trigger pull easy? It looks like releasing the catch pushes the plunger back against the main spring, so it'll be a fine balance between a catch that slips, and a catch that takes too much force to release. Of course, 3d printing makes it easier to replicate a working design that's the right balance between the two I suppose.


The open source nature of this hobby is the reason this blaster exists. I will say that outright. I have had some friends offer me their ESLTs to use so I think that situation has been dealt with.


EDIT: Thank you Orangeparkour, it really means a lot. One of these days I'll release the files. They aren't 100% yet and I'd like to get a couple made first before I set them free to the wild. Just like this is somewhat an improvement to the ESLT, I'm sure someone could improve this more too. Alright, less drama, more nerf...


To answer your original blaster question, the rhinocerous catch (I guess that's what we're calling it now?) has changed slightly from these original drawings. The trick is to get the catch sear angle to be tangential to the circular travel of the catch, this way you are not trying to further compress the mainspring, but merely overcome the friction force, which isn't that bad. It's a heavier trigger, but no worse than a heavy rainbow type trigger.


#350248 PCSR: A new homemade design

Posted by Aeromech on 28 December 2015 - 08:02 PM in Homemades

They were built to shoot silicone domes. People liked the metal darts better...  I still think pullback is superior for higher spring constant blasters. 

Will STL's and design files be shared eventually? Looks like a really nice design and I would love to build one. Really good work overall.


Also I would disagree and say that ESTL's do not only shoot proprietary ammo that only one person (myself you are obviously refering to) makes. 

They do not ONLY shoot propriety ammo, but it's what they were designed for, and therefore provide sub-optimal performance for most other ammo types. People do tend to use slugs more and that's the point. The ESLT comes shipped with a barrel meant for silly-domes. If nobody uses them anyway, the barrel needs to be replaced to accommodate the darts being used. The forward barrel rest on the ESLT demands the barrel must be 14 inches long no matter what. And if fatter/denser foam is used the ESLT can and will get some of the nastiests jams you've ever seen, partially caused by that non-vaccum-forming plunger seal. It gets stuck and then cannot get unstuck by priming back. Point being, it's a pain in the ass to change the barrel on that thing.


As for uploading the .STL files, you can refer to http://nerfhaven.com...o-borrow-eslts/ for my answer. Not one week ago, I came asking for a favor from the community and was greeted as a theif. Forgive me, but I'm not in a particularly generous mood at the moment. You will pay for a blaster just like anyone else. I will not release the files for the time being. TL;DR, When I can have people trust that I won't steal their $100 blaster, I will trust them that they will not try to sell MY $100+ blaster as their own.


EDIT: Thank you to my friends, who, upon reading this post, volunteered some ESLTs for me. And thank you Orangeparkour, upon rereading the thread, most of the comments there were trying to be helpful. Sorry to those of you I offended, the few bad ones left a bad taste in my mouth.


#350244 PCSR: A new homemade design

Posted by Aeromech on 28 December 2015 - 05:33 PM in Homemades

For everyone asking about the 3D files, yes I will post them RIGHT HERE

https://drive.google...WG8tOGxPNHJ4WnM


Preface

The ESLT is one of those blasters that is ubiquitous throughout the community. You see at least one at every war, and the [EDIT: stock] performance just does not live up to the hype, at least not without significant upgrades to the design. The seal leaks in both the front and at the plunger head itself, the "plunger rod" is a specialty component that can only be made if you have a lathe available;  any seal that might have been made at the front redirect piece is broken the second that rod starts moving. Overall, you're left with a blaster that approaches double rainbow weight with modified rapidstrike performance. While ideal for indoor skirnmishes, to say this competes with rainbows and SNAPs is, (as far as I'm concerned) an outright lie. This prototype, soon to be production, blaster is meant to be the next evolution of the ESLT and combines my experience with rainbows, solid modelling, and actual nerfing to create a blaster that fills all the roles previously described.


Objective

Create a blaster that is shorter than a traditional rainbowpump, with a muzzle velocity comparable to that of a low end rainbow (>220 FPS).

Create a blaster that weighs less than the ESLT (<3 pounds, 4 ounces)

Allow for quick change of barrel, (<30 seconds)

Allow for quick user servicability (Replace spring and back up in <2 minutes.)

Allow for easy lubrication (No special tools to lubricate)

Solve the leaking issues of redirect blasters

Use 3D printing where applicable to provide an ergonomic blaster experience.

In short, Create what the ESLT SHOULD have been.


PCSR: Pumpaction Compression Spring Redirect Blaster

(or Politically Correct Soviet Russia, depending on who you ask)


The prototype looks a little different than the initial model, so bear with me here. Operation, however, is identical.


original_zpshrl3rpwq.jpg

This was the original design from back in August. School brought blaster production to a hault until now, but I am very pleased with the results. Let's take a look inside, shall we?


fired_zpshk25zhnx.jpg

This is the beauty of the PCSR. There is no forward barrel rest like on the ESLT, so that barrel up there can be any type and any length of barrel you want. So whatever's already on your Rainbow/SNAP at home? throw it right on here and it will work with YOUR DARTS and not proprietary darts that only one person makes. And that main energy spring in the back? It's a [k25], and can be subbed out for a [k26] with the removal of 2 screws. You can upgrade or swap out your spring in under two minutes with nothing more than a screwdriver. So if you're indoors and don't feel like blowing holes in people, you can put in a weaker [k25] spring and an 8 inch pistol barrel, or throw in a [k26] and a 14 inch barrel for outdoors play.


Back to operation: The trigger is connected to that black nylon rod on the bottom. That rhinocerous shaped piece in the stock is actually the catch, it is pulled forward by a rubber band wrapped around a screw just in front of it (not pictured). It catches in the little recess in the floating piston and that's what locks it in place. You'll see in the next photo.


pumped%20back_zps2rnuyd0a.jpg

That stock-catch moves up and catches in the recess of the piston. This is what locks it in place. When the blaster is primed, the pump is pulled back and the nylon rod in the main tube pushes back on the floating piston until the piston is locked back. See that little black piece in the redirect piece? That's a specialty McMaster component that costs a touch more that the o-ring that the ESLT uses, but ACTUALLY SEALS AGAINST THE PUSHER ROD. It's used in pistons and actually creates a decent seal. The whole seal on the prototype isn't perfect, but I have concluded that's because I messed up the normal "goop seal" and the next one should be better. Still seals better than an ESLT. moving on...


ready%20to%20fire_zps8ycebshc.jpg

Ready to fire. The pump is pushed all the way forward. Because the rod is stationary when the blaster is fired, a better seal is created because nothing is moving through the rubber piston seal. There's no movement to break the seal. When the pump is all the way forward, it opens up the channel in the redirect piece allowing air to flow to the barrel. Much like how a throttle works, really. This piston seal has another benefit: It grips against the rod tightly enough that THE PUMP DOESN'T SLIDE AROUND when the blaster is primed. This is the only pumpaction homemade that I know of with this feature, meaning this blaster can be fired safely, without damage, with one hand, so long as the pump is already all the way forward. You can run with the thing one-handed and not have to worry about the pump sliding back.


To fire the blaster, the trigger is connected to a nylon rod which pushes down on the rhinocerous catch. When the catch drops, the piston slams forward and we all are happy that the experimental blaster actually works. Now onto the real thing...


IMG_20151228_171236_zpsok5zuyqk.jpg

She's beautiful, ain't she?


eslt_zpsydx18fmg.jpg

Shitty size comparison. This was for instagram, so it's not perfectly straight, but you get the idea ; )


20151228_145010_zpskbbuddxy.jpg

Here you can see the catch in the back of the stock.


piston_zpshvbmgylh.jpg

Modified the piston from an o-ring to a skirt seal piston, because initially it wasn't sealing. If this exercise has taught me anything it's that O-rings are utter shit.


20151228_162254_zpsp5f3az4v.jpg

Primed back. The draw is longer than a traditional blaster because it has to overcome the extra distance from the redirect piece, but it's something you get used to. Overall length is 3 inches longer than an ESLT, but that's only because of the length of the pump. Could easily be made shorter, but I like my pumps long.


20151228_162347_zpskclwihe1.jpg

She's fucking gorgeous and this is only the prototype. I should have another (production model) ready for Frozen Foam on Saturday. In Summary:


-Half a pound lighter than an ESLT

-4 inches longer than an ESLT in current configuration. Much shorter than even a Double rainbow when barrel length is included

-Roughly 220 FPS with a [k25] (untested but sound/echoes in my hallway match roughly 220 FPS)

-8 inch pump draw

-Pump stays forward when primed due to friction from pump-rod seal, a feature unseen in any other homemade.

-Roughly 6.5 inches of spring compression with .75 inches of pre-compression.

-Uses commonly available springs for propulsion and only one "specialty" part (the rod seal, but it's $5 for 5 on McM, so it won't kill ya).

-Certainly not 100% seal, but better than an ESLT

-Can change a barrel as easily as any traditional homemade.

-Pump comes out with two screws only, allowing for fast lubrication of the pump rod.

-Spring removes with two screws only (production model won't use duct tape, and will instead use zip ties or an extra ring on the stock to hold in place.)

-Pretty comfy, yo (not quantitative, but hey it just feels good).

-Uses only 10 3D printed parts.

-Still needs slots to be made, but hey ya can't win 'em all.


This blaster has met every goal I've set for it and then some. It gets Double rainbow performance at close to the size of an ESLT, at 15% lighter weight. Adding a little bit of a pump-grip to the thinwall PVC will probably negate that weight difference, but for me, I like the AR-15 cylindrical pumps so long as they have traction, i.e. I am a filthy skater and have skateboard tape laying around. I think I found myself a new primary.


20151228_162458_zps7ivixcdp.jpg

And just in case you were wondering, yes I have a HUGE ego.


-Aeromech


#350236 Frozen Foam Part II, Long Island NY [1/2/2016]

Posted by Aeromech on 28 December 2015 - 02:43 PM in Nerf Wars

Just a reminder this war is this SATURDAY JANUARY 2nd, 2016. I'm making preparations as we speak, I look forward to seeing everybody there. If somebody needs a ride from the train or something PM me and we can work something out.


#350189 ATTENTION Long Island Nerfers!

Posted by Aeromech on 27 December 2015 - 04:37 AM in Nerf Wars

Oh no I was using an ESLT (stock internals) and that was perfect. A K18'd rainbow would blow holes in people.


#350181 ATTENTION Long Island Nerfers!

Posted by Aeromech on 26 December 2015 - 10:52 PM in Nerf Wars

That was fun , definitely going back again.


Good cover, and great venue for stock/modified rounds, with blasters and ammunition provided. Also had dark/blacklight rounds which was fucking dope. Got to try out blasters that I've never shot before, and it was good, silly fun. If you want to feel like a god bring any homemade and you can laser people from across the room.


#350174 Homemades Picture Thread

Posted by Aeromech on 26 December 2015 - 05:17 AM in Homemades

eslt_zpsydx18fmg.jpg


Top: ESLT with better stock and intake, and cantilever wye brace

Bottom: Yet-to-be-named floating piston bullpup to dominate the ESLT above it


With a skirt seal and a [k25] at 95% compression, my ears tell me this is rocking around the christmas tree at 220 or so FPS. Beauty is , remove two screws and you can replace the spring with a [k26] and up that FPS by 10-20, as opposed to completely gutting the ESLT to make even minor adjustments.


EDIT: Ya'll like acronyms, let's call it the PCR or PCSR: "Pumpaction Compression-spring Redirect" blaster


20151227_151429_zpsb8djyo03.jpg


With her makeup on. Don't worry, the next one will not use duct tape. One or two minor EDIT: Like twenty changes are being made as we speak for better comfort and ease of use.


#350172 ATTENTION Long Island Nerfers!

Posted by Aeromech on 25 December 2015 - 11:41 PM in Nerf Wars

Homemades allowed? Permitted blaster/ammo types? Number of people? I know they are cool with homemades and modifieds, just not sure what your crew would be bringing. I have responsibilities that night, but there is a decent chance I could make this.


And are they cool with me filming Go Pro/gun-cam stuff? Obviously I'll leave it at home if someone is uncomfortable.


#350148 Frozen Foam Part II, Long Island NY [1/2/2016]

Posted by Aeromech on 24 December 2015 - 03:34 AM in Nerf Wars

Are balls allowed? 


Indeed they are.

Glad to see so much excitement for this war.


#350046 Slot Machine/ Poor Man's Mill

Posted by Aeromech on 17 December 2015 - 05:10 PM in Homemades

Indexable Z axis


20151217_165503_zpslyjdpxu8.jpg


20151217_165552_zpsrkzwmrtd.jpg


20151217_165540_zps7w7oxcvp.jpg


Very simple. 3D printed a box that a metal rod could slide through. Drilled holes into the rotating depth indicator. Pull back the pin and set it into the hole that contains your desired depth. It's spring loaded too, so it won't rattle out of the hole you put it in. Total additional cost: $5 for the rod, less if you have it laying around.


#349848 Barricade will not power on out of box.

Posted by Aeromech on 05 December 2015 - 01:51 PM in General Nerf

Sounds really silly, but make sure the batteries are in the proper way. That's not to insult your intelligence, as there is a 25% chance that I will put them in wrong on the first try, and this is (sort of) my job. More likely it is in fact a lemon, just return the thing in the original packaging.


#349844 Vulcan motor problems

Posted by Aeromech on 05 December 2015 - 03:13 AM in General Nerf

Willdo, Sir. I still need a motor though.

I'm saying your motor may not actually be dead and that the corrosion is preventing a closed circuit from being formed. Im nit sure what it was on the old Vulcans but they seemed to have this problem of corrosion. Ive never done a motor replacement so I am of little help to you here.


#349842 Vulcan motor problems

Posted by Aeromech on 04 December 2015 - 11:34 PM in General Nerf

Just use some sandpaper to remove the corrosion from the battery tray terminals. Problem solved.


#349640 Covering Operating Costs: Donations, Ads, Shirts, all of the above?

Posted by Aeromech on 24 November 2015 - 09:08 PM in Site Feedback

If we had an actual store going that'd be dope. If shirts/wristbands were readily available, there may be more money to be made, as opposed to only buying stuff at APOC.


#349601 Directory of Homemade Nerf Gun Build Guides

Posted by Aeromech on 23 November 2015 - 01:12 PM in Homemades

Sorted by Creator

Spoiler


Parts


Miscellaneous


#349590 Tagging, Organization, and the Homemades Directory

Posted by Aeromech on 23 November 2015 - 03:53 AM in Homemades

Langley recently performed some extensive upgrades of the Nerfhaven site, and one of them includes tagging. If you've posted in homemades in the last two years, you may have noticed that I snuck into your posts late last night and placed some tags lovingly under their titles. This makes things easier to search if you're looking for a particular type of post, and posts can now be grouped by general tags. If you think I've mis-tagged your post or you want to edit them yourself, that's fine, but keep in mind you really only want to put four or five tags MAX onto your posts.
 
HOW TO TAG
Pretty self explanatory. Hit the "start new topic". Add tags in the "Topic Tags" bar.
To edit tags in a topic you've already made, you need to go into the "full editor". Then you can add tags as shown above.
 
 
WHAT TO TAG
I think good tags would be:
1) The type of post it is (concept, writeup, advice),
2) The GENERAL type of blaster you're posting about (SNAP, plusbow, rainbow, bullpup)
3) The propulsion mechanism of your blaster (spring, airgun, bow, bungee).


tagggg2.jpg_zps4w7texxa.png

 
This makes it very easy to sort into the homemades directory. These should be taken as suggestions, point is don't go overboard on tags, and make sure they're consistent. Here is the list of all the tags used so far, in all the threads posted on Nerfhaven. I ask that when tagging, you try to pick tags already there so we can KEEP THIS LIST SHORT: http://nerfhaven.com/tags.html
 
Additionally, I will be updating the homemades directory, as it so sorely needs it, within the next week (let's be real, probably tomorrow night). This means that everyone that submitted a quality writeup or concept within the last year or so will get recognized in the directory, and members new and old will be able to see your work, and not a bunch of broken image links.


#349588 Can we please update the directories?

Posted by Aeromech on 23 November 2015 - 12:24 AM in Homemades

Congratulations Aeromech on your appointment to moderator of the Homemades forum! Thanks for volunteering.  You're welcome to manually update the directory thread if you like, but it would be especially helpful to go into the individual threads and tag them as "Writeup", as well as any other category or categories that you think are appropriate.  Setting up a page that automatically generates something resembling the directory thread based on tags is my job, and I'm already digging into it.

With pleasure, captian!


#349586 Can we please update the directories?

Posted by Aeromech on 22 November 2015 - 11:58 PM in Homemades

Exactly what the title says. I know I've submitted at minimum a half a dozen homemade designs, (full writeups at that,) over the past two years, and despite direct-messaging Cheerios on at least one occassion, probably more, nothing has been done to correct the issue. I know others have submitted designs too, and I am unable to find the writeups even from the homemade contest last year in the directory. The mod directory is a little better, but by no means perfect, last edit was in April, and I'll bet with some certainty more mod guides were submitted since then.

Sure, it's selfish and petty, but how are newer builders going to be recognized when they put something up? You may say google search, but if it's an idea that one is unaware of, a google search is useless. (i.e. you can't search for something if you are unaware of it's existance.) The directory acts like a library, where one can comb through, look at the names and functions of the submitted homemades, and learn about them, even if without any prior knowledge. New stuff and one-off designs are documented there even if they aren't very practical, but are good for getting the mental gears turning if you want to build your own/ play with a new design.

The site is beautiful and more functional after the update. But this still hasn't been adressed after at least one year of waiting. And I'm sick of it. Rant over.