- NerfHaven
- → ChaosPropel's Content
ChaosPropel's Content
There have been 379 items by ChaosPropel (Search limited from 13-May 97)
#288994 Modification and Paintjob Pictures
Posted by ChaosPropel on 26 November 2010 - 09:14 PM in Modifications
With only 4 months of nerfing experience, after going $20 over budget, and one week of work, it's finished...
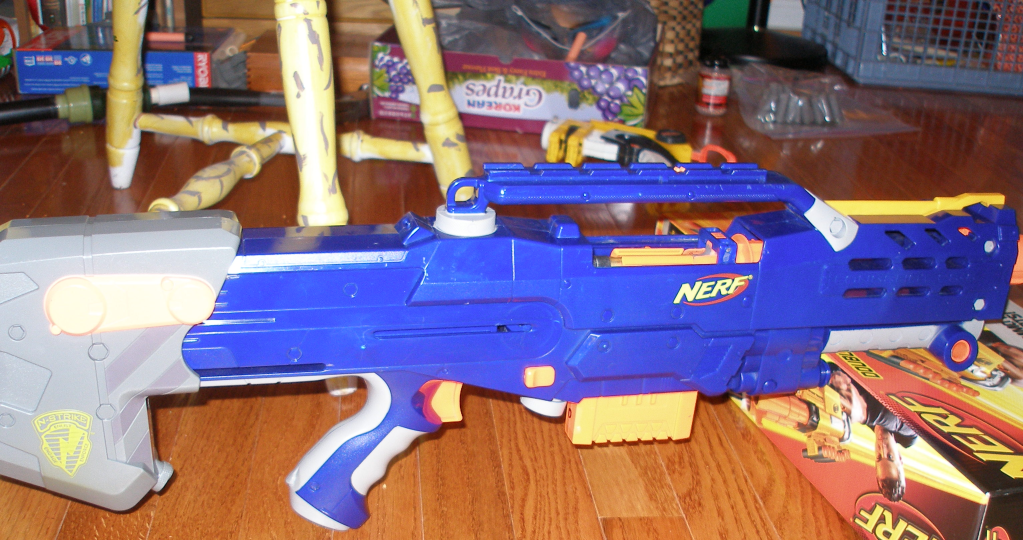
My Angel Breeched Longshot....
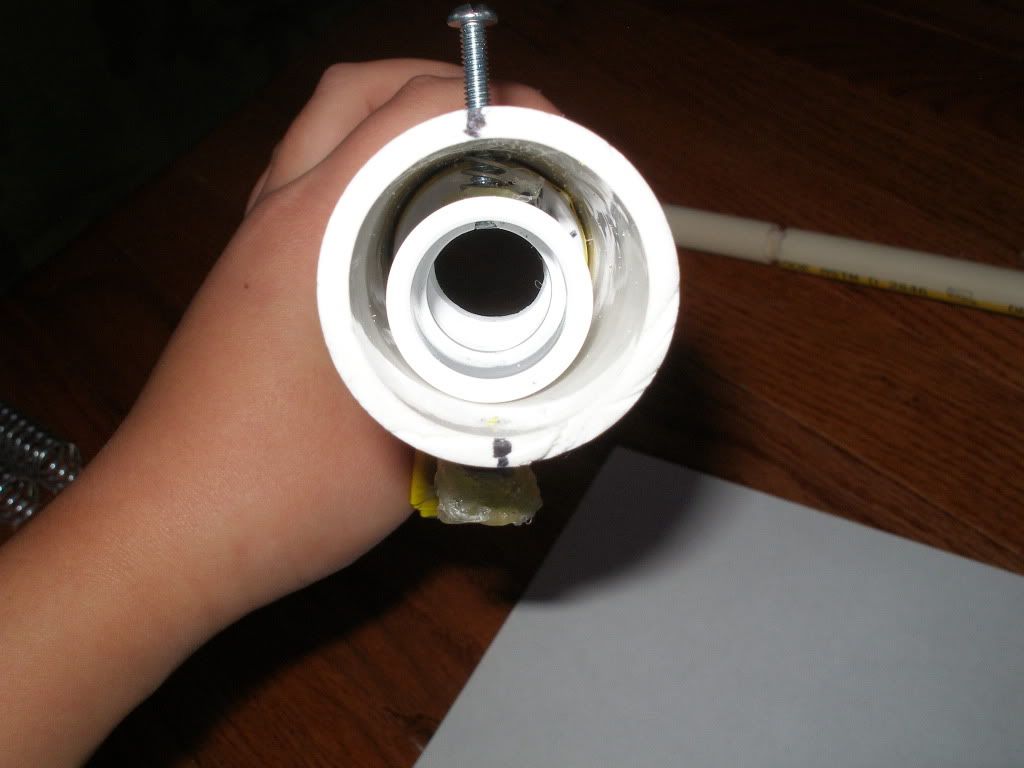
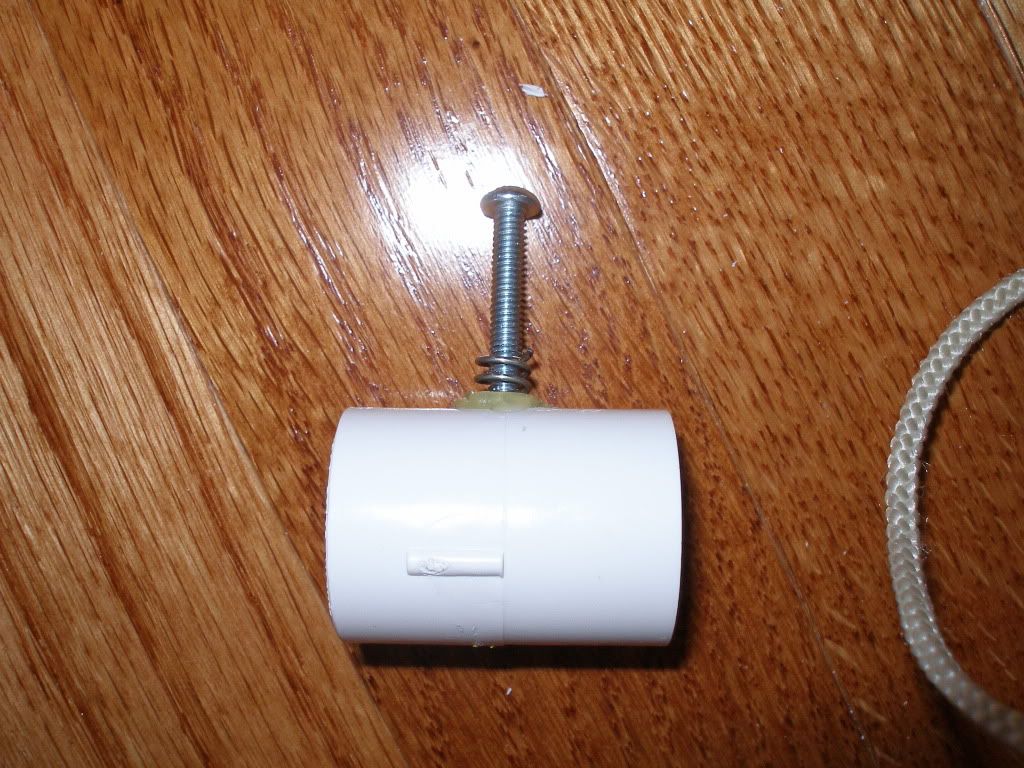
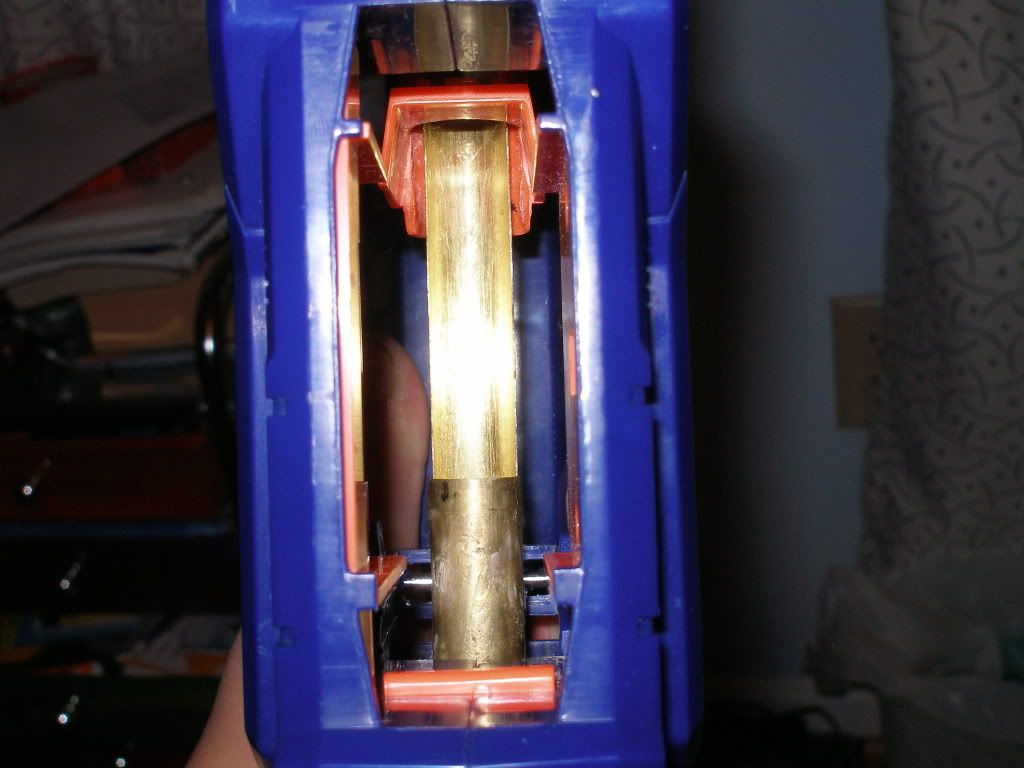
Here's a view of the closed breech from the jam door:
I originally intended to make my breech completely "stock"-exactly how Angel's writeup explains it. However, I had to do some improvising, since none of the writeups I found told you exactly where to cut the black bolt-piece down to. I realized mid way through the bolt assembly that when my barrel when into the 19/32" brass, it was stopped, and hit the 9/16" stub before the breech was completely closed. This is how my "new" design came along.
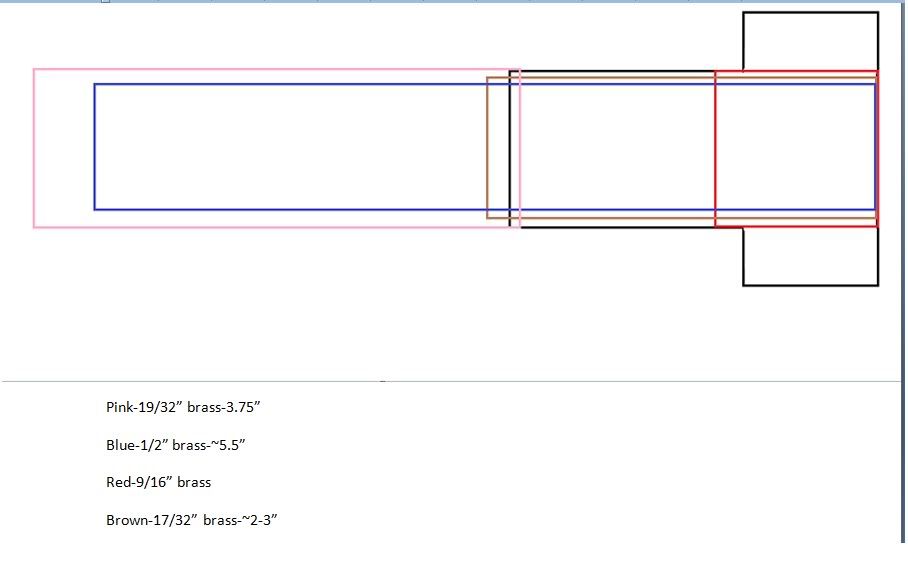
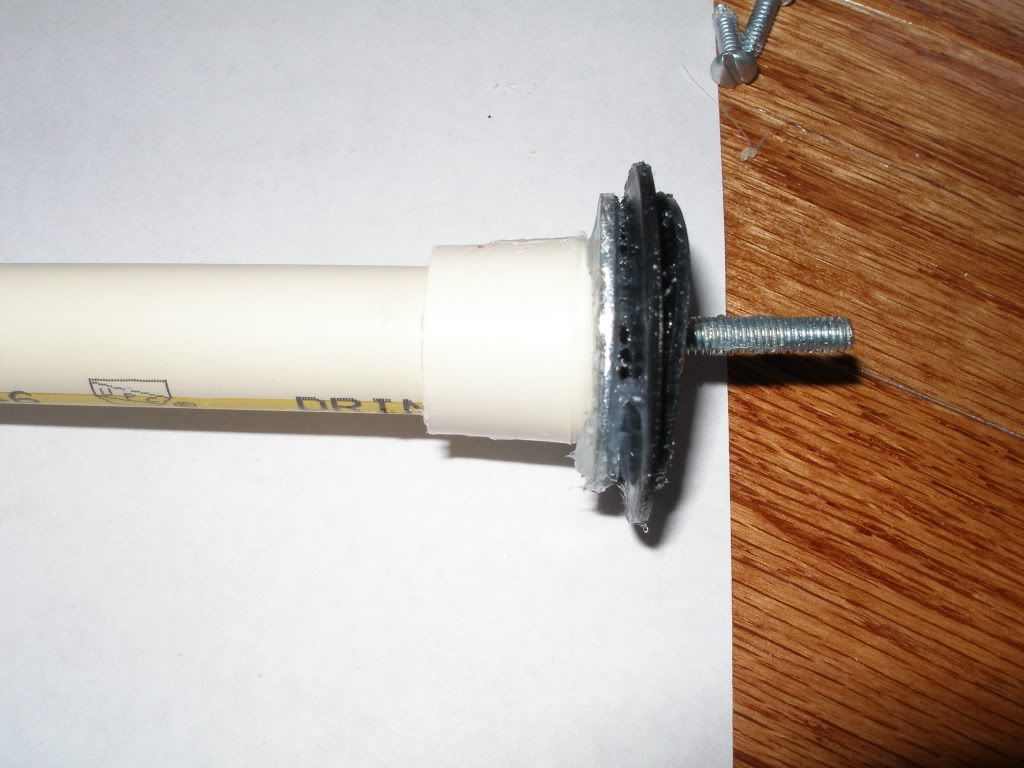
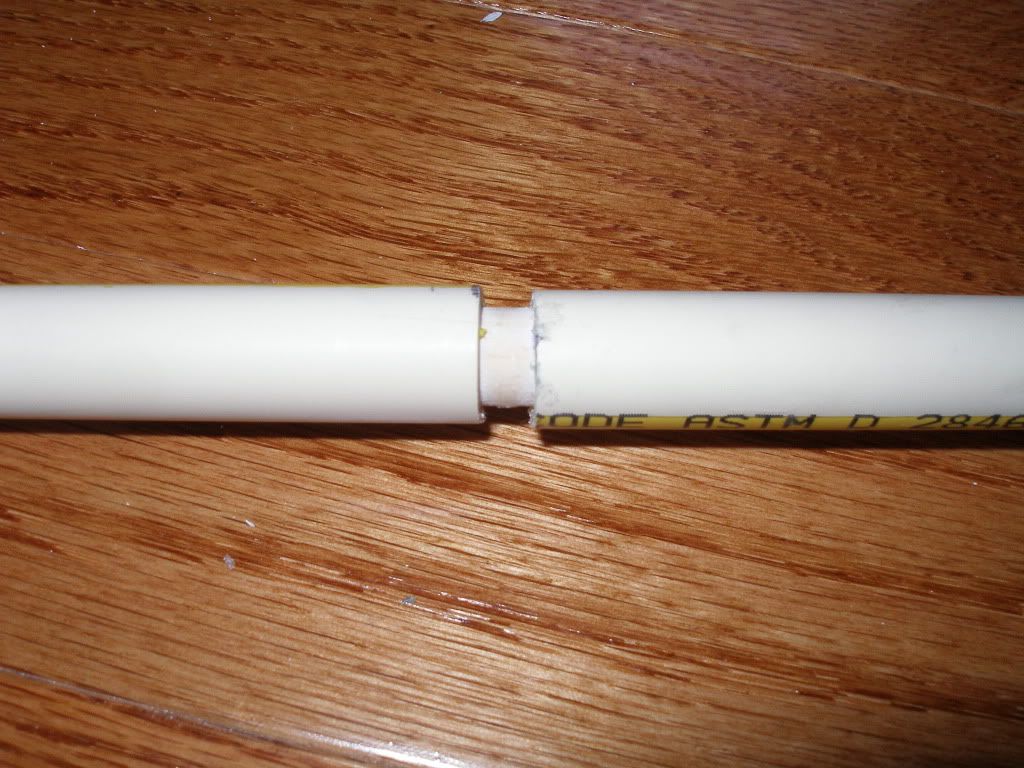
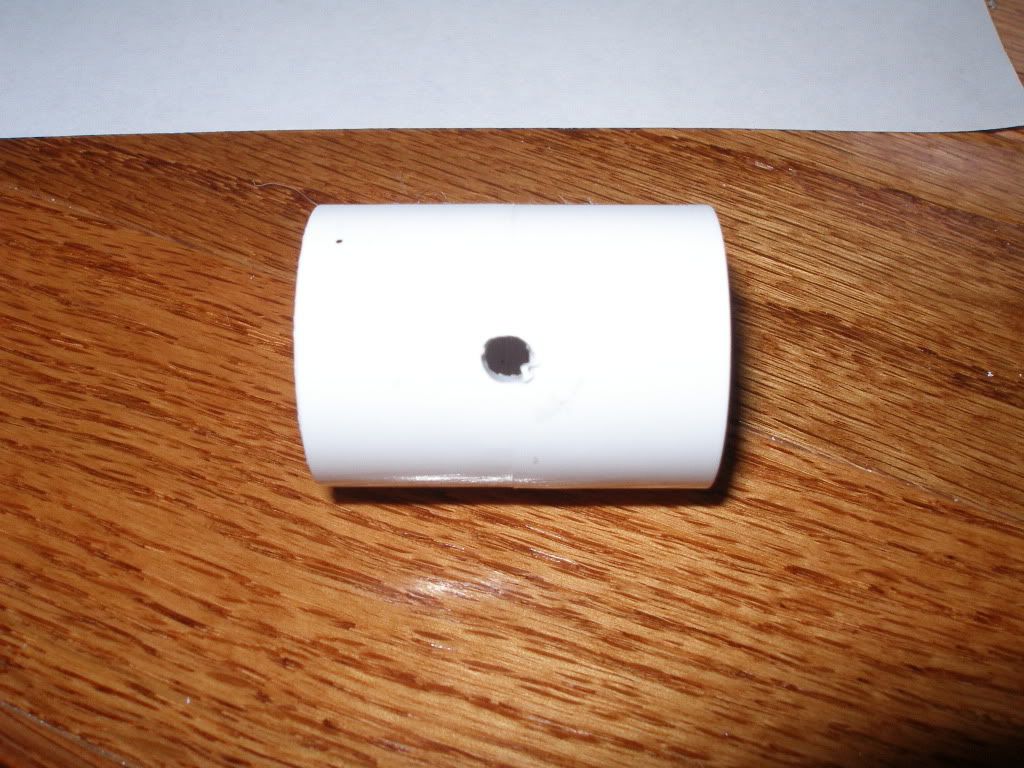
Basically, as the 9/16" barrel "half pipe" slides into the 19/32" brass and over the 1/2" brass, it slides over the 17/32" brass, and eventually is stopped by the 9/16" stub. However, for a 100% air-tight seal, plugging the air-release hole is still necessary. The 19/32" slides into the black piece a little bit. This is necessary for the 19/32" to be supported in the assembly, since the 9/16" does not protrude out of the piece. I still kept the 9/16" stub at the end to support the 17/32" and 1/2", and to create even more of a seal, if the half pipe touches it (this was more of an "attempt/experiment").
Suprisingly, my breech works almost flawlessly (the priming is quite hard, due to the excess friction between the barrel and the 17/32" stub), and opens enough to chanber a dart ~2-2.5" in length.
I did not feel that a writeup is necessary for this, but if people feel it is, please PM me and I will consider making a writeup. I personally feel that using this method makes the bolt-section a lot more versatile, and easy to make (measurement-wise and "getting everything to fit" wise).
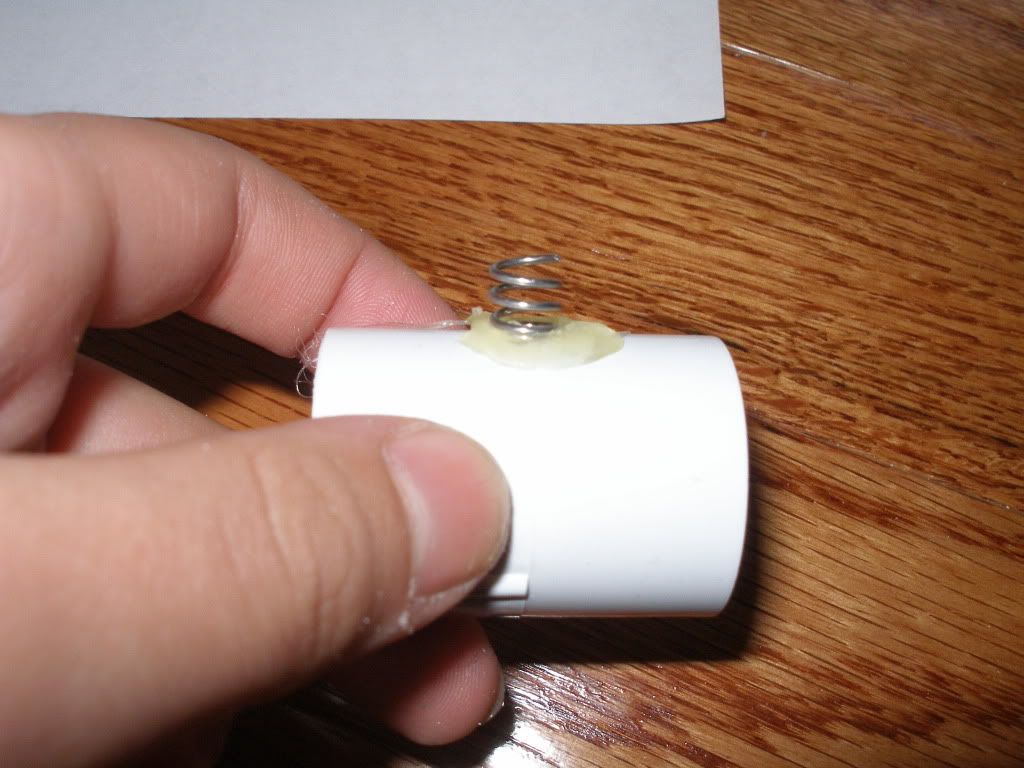
Here's a view of the opened breech from the mag-well:
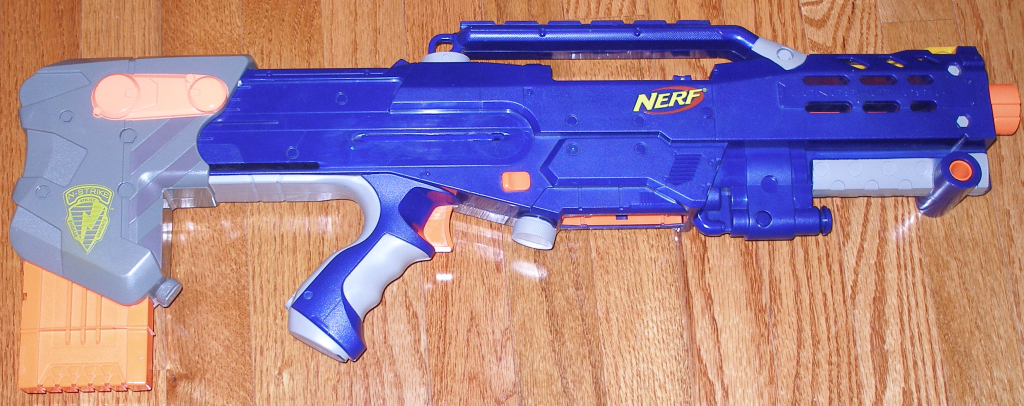
I am officially naming my Longshot "Colossus", after the great Greek statue. I love the gun, and I think that this is a great personal achievement.
With a stock LS spring, Recon Spring, and Lanard Shotgun spring, I'm getting 85-90'. I have yet to integrate the LSFG, but I am pretty happy with the gun without the integration. I may do it in the future, though.
Here he is in all of his holiness-
If anyone has any questions or comments on my breech or gun in general, please feel free to talk to me through PM's.
#289070 Validation Fast Track
Posted by ChaosPropel on 27 November 2010 - 10:18 AM in News
#289539 Beltway Bedlam
Posted by ChaosPropel on 30 November 2010 - 08:27 PM in Nerf Wars
#289589 Beltway Bedlam
Posted by ChaosPropel on 01 December 2010 - 07:12 AM in Nerf Wars
Since we have gotten so many people who are clearly active nerfers in the MD/VA/DC area reply to this post, I propose that we start a group of people/wars similar to BAFF, where we have monthly/bi-weekly wars. The purpose of the BAFF wars was to bring wars to an area that didn't have many wars, but had many nerfers. However, we would need to have at least ~5-7 confirmed people (people that want to do this, and CAN do this) before we could actually START.
Just an idea
#289654 How To[mostly] Build An Svt4b
Posted by ChaosPropel on 01 December 2010 - 06:58 PM in Modifications
How far into the 1"-3/4" bushing does the "OPRV" go? Does it just go in untill it touches the groove?
#290060 Alpha Trooper Accuracy?
Posted by ChaosPropel on 04 December 2010 - 05:48 PM in General Nerf
#290140 Coupler Catch Design
Posted by ChaosPropel on 05 December 2010 - 01:02 PM in Homemades
After building my first SNAP, I realized how much I was frustrated by all the fine tuning that was required for the catch system to work properly. I soon began brainstorming ideas for a possible new homemade design that would be simply, yet reliable. The design that I originally had thought of required the machining of wood, polycarb, and aluminum. I knew that this idea would not do, because it was too complex. I eventually had an “epiphany” one day, while building my second SNAP….I thought, “what if the groove in the center of a coupler was utilized as the ‘catch piece’?” I began to develop on that idea, and eventually came up with this. During the entire design process, the design evolved about 5-6 times in total, over the month and a half that it was stored in my mind.
It is because of the complications that the SNAP brought me, that I today present to the NIC, the Coupler Catch design. I have yet to deem an official name to this design/blaster.
I would first like to give credit to Modman, for his “old” “endcap catch” design. It is this design that gave me the placement of the catch spring and screw that is incorporated in the current model. Also, I do realize that this design is similar to that of the Rainbow. However, I had this idea well in my head before the Rainbow was release. The Rainbow design, did, however, give me some ideas/help in the design, so I thank Stark/Beaver for the design.
Goals
I had set many self-goals for this project/design prior to building. I wanted for the blaster to be simple, but reliable. I did not want for there to be too many pieces involved, and I wanted to machining of plastics or metals to be required. Also, I wanted for the blaster to be held together only by screws (excluding the bushing, obviously), to make quick/easy repairs and even field stripping possible. I meant for the design to meet with all of these goals, because if it didn’t, I would either have to “ditch” the design, or render it…why? Because I thought to myself, that if the design did not meet the goals (which were quite basic), then I would not be contributing anything to the community, and nobody would have the urge to build a replica, due to its negative traits.
Design
In the current design, a ½” PVC coupler is used to act as the “catch piece”, while a set of ¾” PVC endcaps are used to balance the plunger rod inside the coupler. There is a notch in the plunger rod that the groove of the coupler eventually rests in to, when the spring is compressed and the rod is pulled back.
Here is a diagram of the current design of the Coupler Catch:
I apologize for the crude MS Paint representation. I will make a clearer diagram if anyone asks for one.
As you (probably) can see, when unprimed, the plunger rod is naturally raising the coupler “catch piece” inside the plunger tube, due to its position in the two endcaps. As the plunger rod is pulled back (the front endcap acts as the spring rest), the groove in the coupler eventually falls into place in the notch in the plunger rod, due to a spring above it. The catch piece and catch spring are kept in balance by a #8-32 bolt that threads through the spring, and into the coupler.
The trigger assembly is a completely separate and somewhat complex system. It consists of an angle bracket, a weak “trigger spring”, and two #6-32 x ½” screws. The angle bracket , like in SGNerf’s “PVC Catch Ring” design, moves on a pivot, and it connected to a screw that is screwed into the plunger tube. The head of the screw rests nicely in the hole of the bracket. There is a weak spring between the plunger tube (1 1/4'” PVC) and the bracket (the section held in place by the screw). There is then another screw and a #8 washer (super glued to the head), which enters a hole drilled in the plunger tube, so that when it enters the plunger tube, it pushes the catch upwards, releasing it. The screw/washer piece is hot glued to the angle bracket. When you pull the front of the angle bracket backwards, the screw in the back of the bracket enters the plunger tube.
Here is a picture of the trigger assembly:
The more the merrier!
Here's a picture of one of the two endcaps that keeps the catch/plunger rod balanced/centered:
A look down the end of the plunger tube, from the back:
Here's a picture of my current plunger head:
Components from left to right: 1/2" CPVC endcap, 1 1/4" steel fender washer, 1 1/2" neoprene washer, 1 1/4" neoprene washer.
Here is a view of the notch in the plunger rod, which the coupler fits into.
The notch is created by cutting the 1/2" CPVC plunger rod at the point where you want the notch, wrapping e-tape around a 7/16" wooden dowel rod, then super gluing the rod into either side of the plunger rod, but leaving ~1/2" exposed, to create a gap/divide.
Here's a view of the catch piece and spring:
The spring is a strong industrial spring (that the catch screw can thread through), which is cut down to about 1/4", then hotglued to the top of the coupler, directly above the hole for the catch screw. The hole for the screw is drilled straight through the center of the coupler, and the screw is screwed into the coupler untill the bottom is flush with the groove.
Please note that the hole in the plunger tube for the screw to go through MUST be big enough to allow quite a bit of "wiggle room".
Here's a picture of the catch piece and hole:
If you use my current setup, with a 12" plunger tube (1 1/4" PVC) and a 12" 1/2" CPVC plunger rod, you only have enough room for about ~8 inches of spring area. You could, obviously, always make the PT larger, to house a longer spring like the [k26]. I used two Home Depot industrial springs, which were 4" each.
If you plan to use the same spring setup as me, you should make your notch about 3-4" away from the end of the endcap on the plunger rod.
I positioned my back endcap so that about 1/8" of it was sticking out of the back of the PT, for maximum possible draw. I positioned my coupler as tightly between the two endcaps as possible, so that I could, once again, have minumum space taken up by the assembly. I put the screws that secure the two endcaps in the MIDDLE of the endcap. The measurement from the middle of one endcap to the middle of the other ended up being 2 9/16" for me.
Conclusion
I feel that my goal was achieved. If you build this blaster, you will find that the catch movement is quite smooth. The one complaint I have is that the trigger assembly is not quite smooth/stable.
Features to fix in Rev. 2:
-Smoother trigger
-Smoother catch movement
-Less space taken up by the endcaps
-Maximum Draw length
-Shorter assembly time
The entire assembly of this blaster took me around 7 hours, but it should be easier for others, since I had to measure all the components out, and since I was the first to do this...
I will be posting a video of the function some time later this week. I cannot take ranges at the moment, due to the fact that the goop on the bushing is still drying , but the ranges should be similar, or a little less than SNAP ranges, since I have less draw. However ,the catching and trigger pull is MUCH smoother on this blaster than on my SNAP.
A writeup of how to make this will most likely be made, if requested.
Any questions/comments/suggestions may be posted here, or directed to me through PMs. I apologize if this overview was a bit unclear-it is my first overview/writeup post.
Please post any suggestions for the name of this design...they will be considered, since I can't think of any at the moment.
--Chaos
#290174 Coupler Catch Design
Posted by ChaosPropel on 05 December 2010 - 06:00 PM in Homemades
Shardbearer-I am using two 4" Home Depot industrial springs, similar to the Ace 49. It is the one that comes in a pack of two, with two smaller, unusable springs included.
The endcaps are to keep the plunger rod centered, which in turn keeps the catch centered.
Also, my design COULD use the catch notch carved directly into the plunger rod (I considered this quite a bit while contruction, actually), but then I realized that if you use that, the catch would only engage with ONE part of the plunger rod. The wooden dowl rod fixes that problem....
Nerfgeek- I realize that my design is still inferior to SGNerf's design/modman's design/setro's design, but please note that my goal was not to OVERCOME these designs, but rather to make my own design, while utilizing features of my own.
I am still doing some testing with the catch, and I have found that SUPER SUPER strong catch springs are a must. I ended up having my catch un-catching itself occasionally...I am working on diagnosing the problem, and fixing it.
#290259 Beltway Bedlam
Posted by ChaosPropel on 06 December 2010 - 03:19 PM in Nerf Wars
#291216 Concept: Firing From An Open Bolt.
Posted by ChaosPropel on 20 December 2010 - 07:10 AM in Homemades
#292044 R Series Blasters - Overview!
Posted by ChaosPropel on 01 January 2011 - 10:41 PM in Homemades
Just got back from a week long vacation ...
Anyway, I finished up building my own version of this last week. I used a 1/2" CPVC plunger rod, 2 4" HD Industrial Springs, a SNAP style "washer sandwhich" plunger head, a 1 1/4" PVC plunger tube, and a 3/4" tee as the main tee.
**Pics coming soon**
Overall, it was a very fun blaster to make, though there are a bunch of little details, as Ice mentioned.
I will be building another variant (with a 1 1/2" PT) soon, and I have a few questions for Ice and any other R3L builders-
-What did you use for the back bushing?(the one that connects the PT to the Main Tee) (considering you used a 1.5" PVC PT)
-What did you use for the front bushing? Do you recomment a bushing that slips OVER the 1 1/2" PVC, or one that nests INTO the PVC?
--Chaos
#292950 Beltway Bedlam
Posted by ChaosPropel on 16 January 2011 - 05:23 PM in Nerf Wars
As for the date, any one of the aforementioned seem fine for me, but it's not certain.
#293119 Beltway Bedlam
Posted by ChaosPropel on 19 January 2011 - 04:26 PM in Nerf Wars
#293152 Community Snap Thread
Posted by ChaosPropel on 20 January 2011 - 05:32 PM in Homemades
Not sure if this detracts form the current conversation, but has anyone noticed whether a well made snap catch, or an r3l catch is more durable?
I've made a semi-well-made SNAP, and 2 R3Ls. I haven't used the SNAP much, but I have used the R3L a lot (not at wars-just random shooting), with no signs of wear whatsoever.
I'm sorry that I can't add more to this, but I can reassure you that R3L catches, when made well, are extremely durable.
#293461 Beltway Bedlam
Posted by ChaosPropel on 27 January 2011 - 06:50 PM in Nerf Wars
#295159 Overhauled Berserker
Posted by ChaosPropel on 27 February 2011 - 09:23 PM in Modifications
I've been waiting for this writeup every since I saw this on your Youtube channel....great work!
#295211 Lanard Shotgun Problems
Posted by ChaosPropel on 01 March 2011 - 06:21 PM in Modifications
#295219 Lanard Shotgun Problems
Posted by ChaosPropel on 01 March 2011 - 09:01 PM in Modifications
Seconded.In my experiences with the part from the plunger head as a seal, it has ALWAYS created too much friction. I don't know how your turret is barely touching it because it was always too big for mine also. I would highly recommend using craft foam. It creates a fairly good seal with very minimal friction. I use it for all of my turret seals.
#295234 Hornet Tank Powered Longstrike
Posted by ChaosPropel on 02 March 2011 - 07:14 AM in Modifications
So... it still uses clips right? If it does then that's pretty cool.
I believe what's happening here is that it still uses stock clips, but when the bolt sled is pulled back, it takes the barrel back, which is connected to the hornet tank. This means that the tank is moving, and eventually (when the bolt's back in foward position) blasting air into the barrel.
#295462 Beltway Bedlam
Posted by ChaosPropel on 06 March 2011 - 06:36 PM in Nerf Wars
Sorry, but things have come up, so I definetely will not be attending. Hopefully there'll be more wars later this year that I can attend.
#295595 Bs-12 Advanced Tactical Nerf Rifle
Posted by ChaosPropel on 08 March 2011 - 08:15 PM in Homemades
#295688 Having Some Problems With My Spectre
Posted by ChaosPropel on 09 March 2011 - 08:14 PM in Modifications
Excuse me if I'm wrong, but the Spectre turret, like the Mav's, is getting support from a bar in the front (and one in the back), which allow it to come out for reload, so the CPVC being too heavy should not be a problem.Since you did nothing to the rotation mech, that might be the problem. I think you might have to glue the gear teeth together so that you can no longer rotate it (the barrels) by hand. Since that part is DESIGNED to skip on its own it might be skipping part-way due to the extra weight of the cpvc barrels causing it to over-rotate. It also looks like there is very little clearance between the CPVC and the rest of the shell so that might be causing a bit too much friction on the odd barrel that might be a tiny bit longer than the others. If the friction it generates is too much then the internal gears will skip making a "loud popping noise" and causing the barrels not to rotate. Try sanding down the front ends of the barrels slightly as well as glueing the internal gearing together, this SHOULD solve both problems.
#295692 Beltway Bedlam
Posted by ChaosPropel on 09 March 2011 - 08:50 PM in Nerf Wars
#295726 Once More With Feeling
Posted by ChaosPropel on 10 March 2011 - 06:50 AM in Nerf Wars
#296079 Pvat V2.0
Posted by ChaosPropel on 15 March 2011 - 08:27 PM in Homemades
How hard would it be to drill through the cap? Could I do it with a normal hand drill?
Other than that, great job!
#296092 Pvat V2.0
Posted by ChaosPropel on 16 March 2011 - 05:51 AM in Homemades
Got it. Thanks!You could use a variety of methods, as long as you end up having the hole in the cap. Personally, I use my drill press, but before I had one I used an electric hand drill. You don't even need a vise, I used to have my brother hold the piece with pliers while I drilled. So yes, you can use a hand drill, just be careful so that the piece doesn't start spinning around.
#296694 Once More With Feeling
Posted by ChaosPropel on 27 March 2011 - 10:22 AM in Nerf Wars
#296825 Once More With Feeling
Posted by ChaosPropel on 29 March 2011 - 02:14 PM in Nerf Wars
According to current plans, it works.So does the 28th work for everyone, then?
#297286 A new style Pump-action SNAP
Posted by ChaosPropel on 18 April 2011 - 07:53 PM in Homemades
EDIT: I believe that 1 1/2" PVC couplers als o work as pump grips (2 glued together), but it is quite a loose fit.
#297409 Once More With Feeling
Posted by ChaosPropel on 21 April 2011 - 03:41 PM in Nerf Wars
#297524 Foam Sports (Silicone Tip Dart, Video)
Posted by ChaosPropel on 25 April 2011 - 07:06 AM in Darts and Barrels
#297679 SGN-PAR55M Overview!
Posted by ChaosPropel on 29 April 2011 - 05:48 AM in Homemades
#297724 SGN-PAR55M Overview!
Posted by ChaosPropel on 30 April 2011 - 10:25 AM in Homemades
I believe he meant that the dart loading is "assisted" by a small spring in the back of the clip, which pushes darts foward, to help with feeding.I love it. That thing looks like it come right out of a videogame and looks mean as hell. Mad props to you. One thing I was wondering about though, what did you mean by "spring assisted chopper"?
#298079 Once More With Feeling
Posted by ChaosPropel on 14 May 2011 - 04:30 PM in Nerf Wars
#298293 How to put rubber bands on Tech Target?
Posted by ChaosPropel on 19 May 2011 - 05:44 AM in Modifications
I believe that True Value Hardware carries tiny bungee cords....I think they're about 4"?Mini bungee cords do sound easier to put on. Where can I get them? I did a quick search and Lowes poped up. Is there any other places where I can get them? and What length do the cords have to be?
#298336 Once More With Feeling
Posted by ChaosPropel on 20 May 2011 - 07:12 PM in Nerf Wars
#298575 Once More With Feeling
Posted by ChaosPropel on 25 May 2011 - 06:07 AM in Nerf Wars
As of now, I'm a definite.Weather-wise there is a 40% chance of showers and Thunderstorms. If that chance doesn't go below 30 by Thursday, I might have to call it off or push it back a week to make sure anyone making the trip doesn't drive all the way there to find the field turned into a giant puddle.
#298804 DDTB - Double Dart Tag Blaster
Posted by ChaosPropel on 27 May 2011 - 08:33 PM in Modifications
#298869 Once More With Feeling
Posted by ChaosPropel on 28 May 2011 - 03:32 PM in Nerf Wars
If I do end up going, I'll be looking for a stock (or somewhat stock, at least) sawtooth and/or any other fun/vintage/good blasters (ie. EaB?) I will also be looking to buy/trade for a
-some PETG (as much as possible)
-A hornet pump
-Airzone dart shooter (the thing used to make the Octoshot)
-Anything else you may want to get rid of-just PM me with offers, I'm open to a lot.
Please PM me with any offers/deals.
EDIT: Just put down a deal with Landstricker. I'm still looking for as much PETG as possible, and a sawtooth/EaB!
#298887 Once More With Feeling
Posted by ChaosPropel on 28 May 2011 - 07:58 PM in Nerf Wars
- NerfHaven
- → ChaosPropel's Content
- Terms of Service and Privacy Policy
- Code of Conduct ·